
ERS220 - Home robot SONY - Free user manual and instructions
Find the device manual for free ERS220 SONY in PDF.

| Product type | Home companion robot (AIBO ERS-220) |
| Processor | 64-bit RISC |
| Main memory | 32 MB |
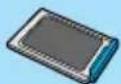
| Application media | Memory Stick for AIBO (sold separately) |
| Movable parts | 16 degrees of freedom (head: 3, legs: 3x4, retractable head: 1) |
| Inputs | PC card slot Type II, charging terminal, 100,000-pixel CMOS image sensor, stereo microphone |
| Audio output | Speaker |
| Display | LCD screen (time, date, volume, battery level, time zone) |
| Sensors | Temperature, infrared distance, acceleration, touch (head, face, back, legs, tail) |
| Power consumption | Approx. 9 W (normal mode) |
| Battery life | Approx. 1.5 hours (with fully charged ERA-201B1 battery) |
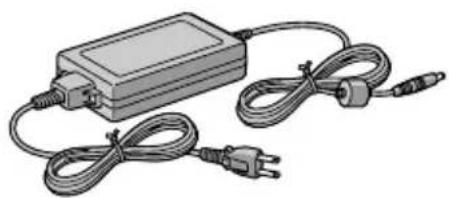
| Power supply | AC adapter 100-240 V, 50/60 Hz, output 16 V DC, 2.5 A |
| Battery | Lithium-ion 7.4 V, 2300 mAh (model ERA-201B1) |
| Operating temperature | 5 to 35 °C |
| Operating humidity | 10 to 80% (no condensation) |
| Maintenance and cleaning | Clean with a soft, dry cloth. Do not use volatile solvents. |
| Safety | Do not expose to water or moisture. Do not open the case. Suitable for children over 8 years. Small parts may be swallowed. |
| Spare parts and optional accessories | Battery ERA-201B1, adapter ERA-201P1, Memory Stick AIBO-ware, AIBO wireless LAN card, charging station |
Frequently Asked Questions - ERS220 SONY
User questions about ERS220 SONY
0 question about this device. Answer the ones you know or ask your own.
Ask a new question about this device
Download the instructions for your Home robot in PDF format for free! Find your manual ERS220 - SONY and take your electronic device back in hand. On this page are published all the documents necessary for the use of your device. ERS220 by SONY.
USER MANUAL ERS220 SONY
Entertainment Robot AIBO ERS-220 Operating Instructions
For Customers in the U.S.A. and Canada
Safety Information
Owner's Record
The model number and serial number are located inside the cover of the unit and on the side of the supplied AC adapter. Record the serial number in the space provided below. Refer to the model and serial number whenever you call upon your Sony AIBO Customer Link.
Model No. ERS-220
Serial No.
Warning
You can return your unwanted Lithium Ion batteries to your nearest Sony Service Center.
Note
In some areas the disposal of Lithium Ion batteries in household or business trash may be prohibited.
For the Sony AIBO Customer Link call 1-800-427-2988 in the United States or contact us via email at aibosupport@info.solsel.sony.com.
! Do not handle damaged or leaking Lithium Ion battery.
! Danger of explosion if the battery is incorrectly replaced. Replace only with the ERA201B1. Use of another battery may present a risk of fire or explosion. Discard used batteries according to the manufacturer's instructions.
! T he battery used in this device may present a fire or chemical burn hazard if mistreated. Do not disassemble, heat above 140^ (60^) or incinerate. Dispose of used battery promptly. Keep away from children. Do not disassemble and do not dispose of in fire.
RECYCLING LITHIUM ION RECHARGEABLE BATTERIES
Lithium Ion rechargeable batteries are recyclable.
You can help preserve our environment by returning your used rechargeable batteries to the collection and recycling location nearest you.
For more information regarding recycling of rechargeable batteries, call toll free 1-800-822-8837, or visit http://www.rbrc.org/
Caution: Do not handle damaged or leaking Lithium Ion batteries.

Regulatory Information
This equipment has been tested and found to comply with the limits for a Class B digital device, pursuant to Part 15 of the FCC Rules. These limits are designed to provide reasonable protection against harmful interference in a residential installation. This equipment generates, uses, and can radiate radio frequency energy and, if not installed and used in accordance with the instructions, may cause harmful interference to radio communications.
However, there is no guarantee that interference will not occur in a particular installation. If this equipment does cause harmful interference to radio or television reception, which can be determined by turning the equipment off and on, the user is encouraged to try to correct the interference by one or more of the following measures:
- Reorient or relocate the receiving antenna.
- Increase the separation between the equipment and receiver.
- Connect the equipment into an outlet on a circuit different from that to which the receiver is connected.
- Consult the dealer or an experienced radio/TV technician for help.
You are cautioned that any changes or modifications not expressly approved in this manual could void your authority to operate this equipment.
The shielded interface cable recommended in this manual must be used with this equipment in order to comply with the limits for a digital device pursuant to Subpart B of Part 15 of FCC Rules.
For Customers in Europe and Australia
Safety Information
WARNING
- T o prevent fire or shock hazard, do not expose the robot to rain or moisture.
- To avoid electrical shock, do not open the enclosure. Refer servicing to qualified personnel only. (Contact the AIBO Customer Link.) (page 8)
- P eriodically examine the AC adapter for conditions that may result in the risk of fire, electric shock, or injury to persons (such as damage to the cords, blades, housing) and in the event of such conditions, the AC adapter should not be used until properly replaced.
- The robot is not intended or recommended for children under 8 years old.
- The robot must be used only with the recommended AC adapter (ERA-201P1).
- The AC adapter is not a toy.
- Small parts can be swallowed.
- If the external flexible cable or cord is damaged, it must be replaced or repaired only by the manufacturer, an authorised service agent or a similar qualified person in order to avoid a hazard.
- All material for fastening or packing purposes are not part of the robot and should be discarded for children's safety.
- F or information regarding AC adapter, station, and Lithium Ion battery, please refer to the manuals provided separately.
DISPOSAL OF LITHIUM ION BATTERY
! Do not handle damaged or leaking Lithium Ion batteries.
! Danger of explosion if the battery is incorrectly replaced. Replace only with the ERA-201B1. Discard used batteries according to the manufacturer's instructions.
! T he battery used in this device may present a fire or chemical burn hazard if mistreated. Do not disassemble, heat above 60^ (140^) or incinerate. Dispose of used battery promptly. Keep away from children. Do not disassemble and do not dispose of in fire.
Voor de Klanten in Nederland (For customers in the Netherlands)
Regulatory Information
This product has been tested and found to conform to the following Safety Standards.
Toy Directive 88/378/EEC, EN50088/96 + A1/96 + A2/97, EN71-1/98, DIN EN 71-2/01.94, DIN EN 71-3/03.95
EMC Directive 89/336/EEC
EMI EN55022/98, EN55014/93 + A1/97+A2/99, EN50081-1/92
EMS:EN55024/98,EN55014-2/97,EN61000-3-2/95,EN61000-3-3/95.
EN50082-1/97 EN60825-1/94
AC Adapter and Lithium Ion Batteries have been tested all together as a system and found to conform to the following Safety Standards.
LVD 73/23/EEC + 93/68/EEC
EN60950/92 + A1/93 + A2/93 + A3/95 + A4/97 + A11/97
EN60065/98
EN61558-1/97 + A1/98
EN61558-2-7/97
CE (EMC) Marking Conformity Remarks
a) This equipment complies with EN55022.
Class B digital for use in following areas: residential, business, and light-industrial.
b) This product conforms with the following European Directive:
89/336/EEC (EMC directive)
SONY
Sony Corporation
6-7-35 Kitashinagawa, Shinagawa-ku, Tokyo 141-0001 JAPAN
Please keep all information for future reference.
Customer Support
How can you contact the AIBO Customer Link?
In the U.S.A. and Canada:
Call 1-800-427-2988 (U.S.A.)
Email address: aibosupport@info.sel.sony.com
In Europe:
English line: +44(0)-20-7365-2937
German line: +49(0)-69-9508-6309
French line: +33(0)-1-5569-5117
In Australia:
+1300-36-2426 (toll free within Australia)
Email address: cicci@ap.sony.com
In Hong Kong:
+852-2345-2966
Email address: aibo_helpdesk@shk.sony.com.hk
In Singapore:
+65-473-8500
E-mail address: AIBO.Link@ap.sony.com
© 2001 Sony Corporation. Reproduction in whole or in part without written permission is prohibited. All rights reserved.
安全資訊
警告
AIBO-ware "Memory Stick" and AIBO PC applications ..... 20
Checking the supplied accessories 21
Index to parts and controls 22
Inner unit 25
Controls on the core unit 27
Unit connector 27
Preparations
Assembling AIBO 30
Removing the head, tail, and legs 33
Loading the battery 38
Charging the battery 40
Handling and settings
Loading and removing "Memory Sticks" 44
Loading a "Memory Stick" 44
Removing a "Memory Stick" 46
Starting up AIBO 47
When not playing with AIBO 49
Changing settings 50
Setting the time. 50
Setting the date 52
Setting the time zone 53
Setting the volume level of AIBO tones 55
Checking the battery level 56
Replacing the battery 57
Installing the optional wireless PC Card 60
World time zones. 62
Additional information
Notes on use 66
On handling AIBO 66
On handling the AC adapter 68
On handling the battery 68
On cleaning. 68
Troubleshooting 69
Clinic mode 69
Changing AIBO to clinic mode 69
Symptoms and remedies. 74
Limited warranty (for the U.S.A. only). 78
Service procedure (for the U.S.A. only) 81
Specifications 82
Index. 85
Introduction
This chapter introduces you to the Entertainment Robot AIBO ERS-220.
What is AIBO?

AIBO is the nickname given to the Sony entertainment robot. Developed to encourage human and robot interaction, AIBO introduces you to new pleasures and lifestyles.
The name AIBO was coined from the words "A. I." (Artificial Intelligence), "eye", and "robot". In Japanese, the word "aibou" means "partner" or "pal".
For the latest information about AIBO, go to the following home page: http://www.aibo.com/

ERS-220
AIBO ERS-220 is an entertainment robot able to walk on four legs. It has a total of 16 actuators throughout its body to control its movements, and 19 lights on its head, tail, and elsewhere to express emotions like happiness or anger and reactions to its environment.


OPEN-R
"OPEN-R" is the standard interface for the entertainment robot system that Sony is actively promoting. This interface expands the capability of the entertainment robot through a flexible combination of hardware and interchangeable software to suit various applications. AIBO ERS-220 conforms to the OPEN-R version 1.1.2.
"AIBO," the AIBO logo, "OPEN-R," and the OPEN-R logo are registered trademarks of Sony Corporation. "Memory Stick,"
"MEMORY STICK," and "are trademarks of Sony Corporation. In this manual, the "TM" mark has been omitted.
AIBO-ware "Memory Stick" and AIBO PC applications
To play with AIBO ERS-220, you need an AIBO-ware "Memory Stick" (sold separately). If the main unit is AIBO's body, then the AIBO-ware in the "Memory Stick" is its mind, determining its character and functions. The separately available AIBO wireless LAN card allows you to play with AIBO from a personal computer.
- AIBO-ware "Memory Stick" is designed especially for AIBO, containing the applications that can be executed with AIBO.
- Before purchasing AIBO-ware, check the model number to be sure that you can use it with your specific AIBO.
AIBO-ware "Memory Stick" (sold separately)
Allows you to train and play with AIBO, and to choose various characters.

AIBO main unit
AIBO Wireless LAN Card (sold separately)

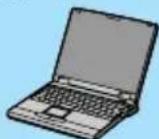
AIBO PC applications (sold separately)
Enables wireless communication between AIBO and a personal computer.
Note
When there is no AIBO-ware "Memory Stick" loaded, AIBO enters clinic mode (see page 69), which allows you to check the AIBO main unit.
Checking the supplied accessories
Check to make sure you have the following items before you play with AIBO.
AC adapter ERA-201P1
Core unit
Conversion plug
Head unit
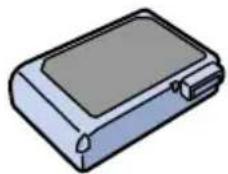
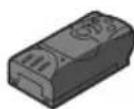
■Lithium Ion battery pack ERA-201B1 (1)
Leg unit (4)
Pink ball

Tail unit
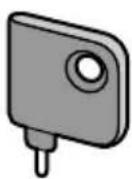
■Release pin
■Documentation
- AIBO Operating Instructions
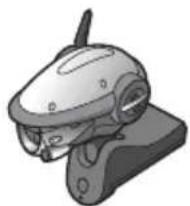
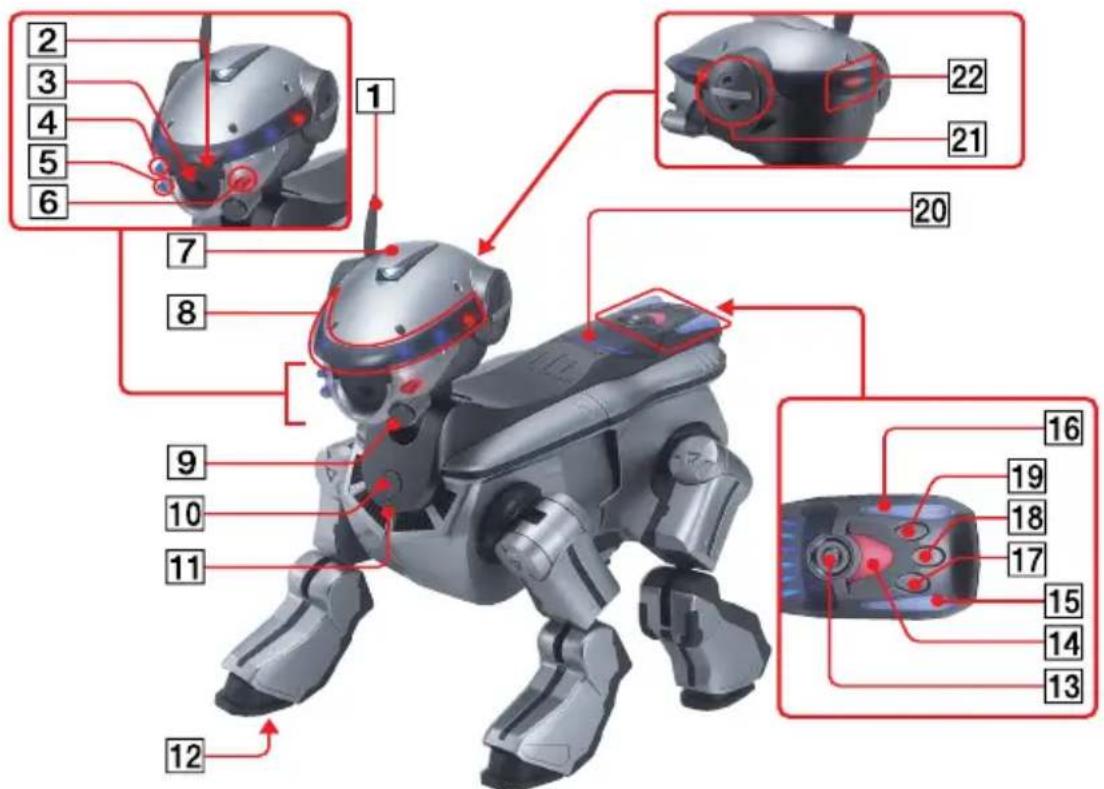
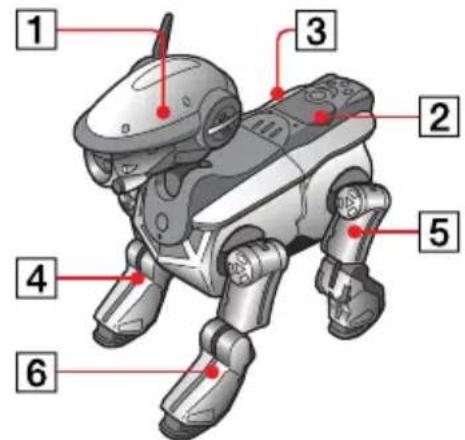
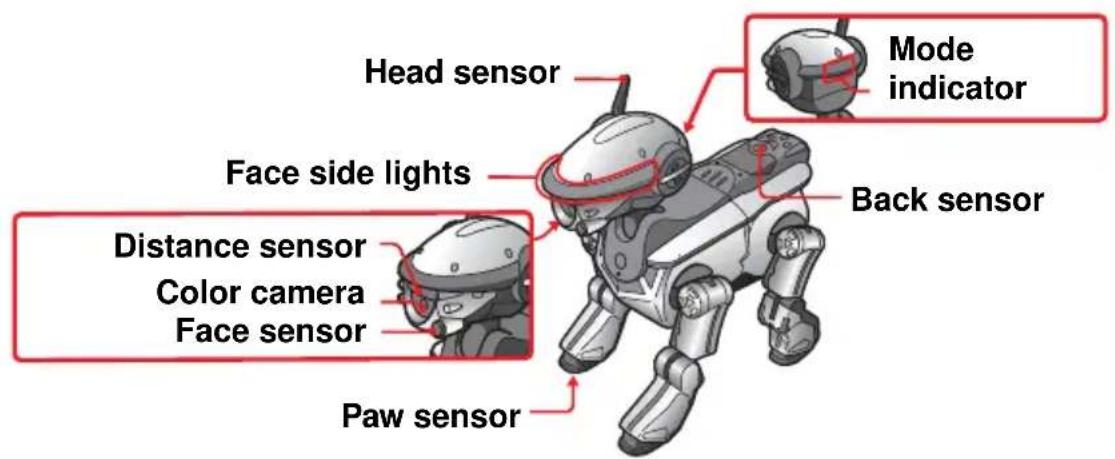
Index to parts and controls
Notes
- Do not paste stickers over the color camera.
- Do not paste stickers over joints or other movable parts, or insert anything that could hinder the motion of these parts.
- W hen you hold AIBO, always grasp the body (page 47). Do not lift AIBO by the legs.
1Head sensor
Enables various functions through AIBO-ware.
2Distance sensor
Measures the distance to objects in AIBO's path.
3Color camera
Allows AIBO to recognize the objects by color, shape, and movement.
456Face front lights (3)
AIBO-ware uses these lights for a variety of expressions.
7Retractable head light
AIBO-ware opens the light and shines toward the front.
8Face side lights
Light in blue and red.
9Face sensor
Allows AIBO to sense touches on the face.
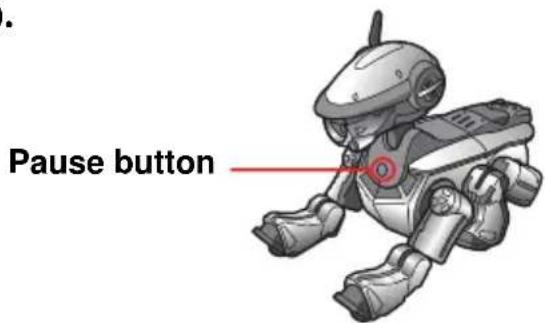
10Pause button
Press to start up or pause AIBO.
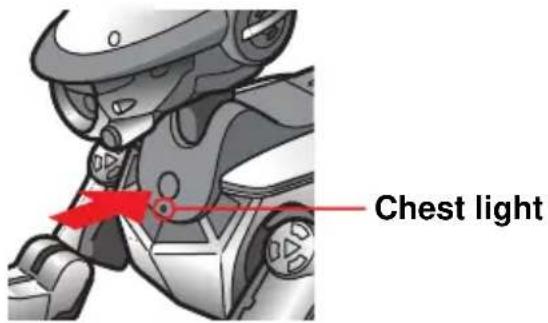
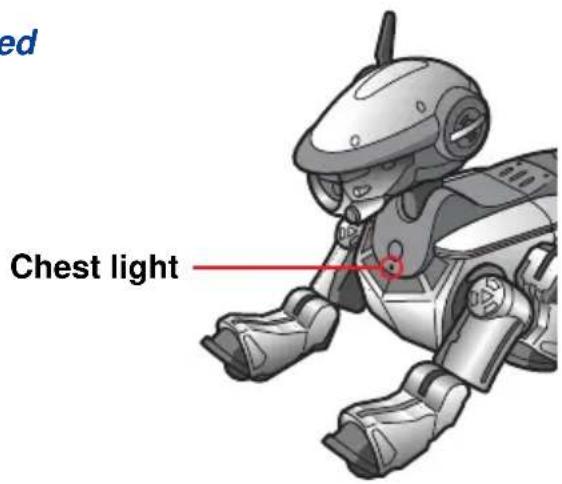
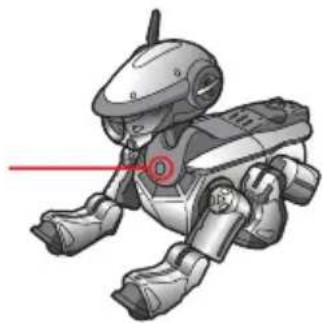
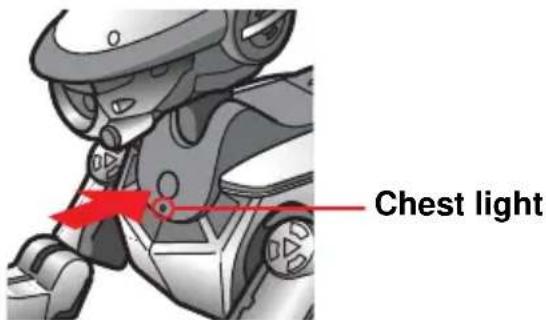
11 Chest light
- When AIBO is active: Lights up in green
- When AIBO is preparing to pause: Flashes in green
- During battery recharges: Lights in orange
- When a battery error occurs: Flashes in orange
- When AIBO is paused: Goes out
12 Paw sensors
Located on the bottom of each paw.
13Back sensor
Allows AIBO to sense touches on the back.
14 15 16 Tail lights (3)
AIBO-ware uses these lights for a variety of expressions.
17 18 19 Tail sensors (3)
AIBO-ware uses these three sensors for various functions.
20Back multi-indicators
AIBO-ware uses these six indicators to show various emotional states.
21 Stereo microphone
Allows AIBO to pick up surrounding sounds.
22Mode indicator
Shows AIBO's current mode.
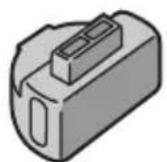
Inner unit
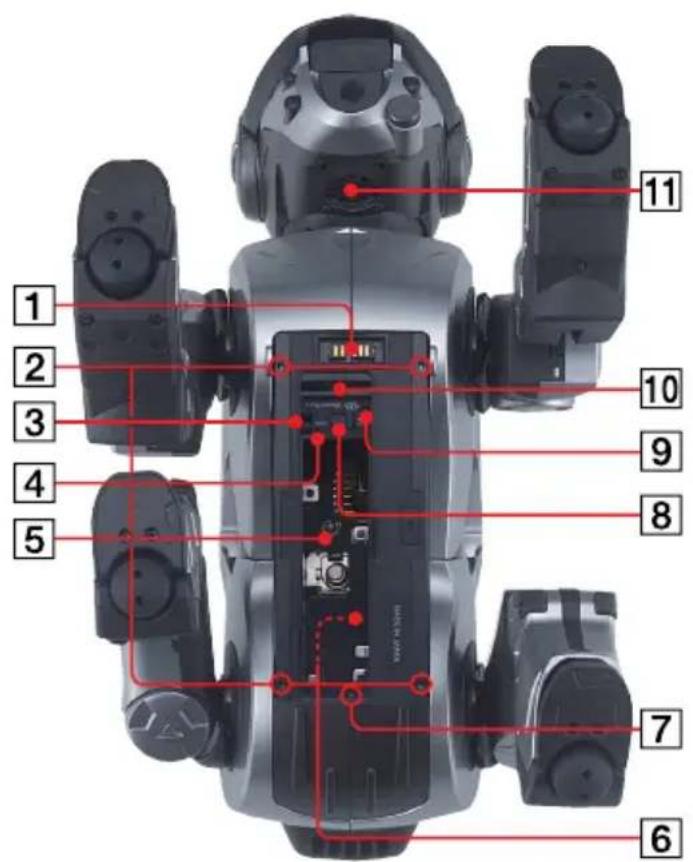
Note
Do not touch the charging terminal with your hands. Doing so may soil the terminal and cause poor contact, or transmit harmful static electricity.
1Charging terminal
Connect the supplied AC adapter here with the supplied AC adapter conversion plug. This terminal connects the Energy Station (not supplied) when charging AIBO's internal battery using the Energy Station.
2 Leg release holes
Insert the supplied release pin into these holes to remove the respective legs.
3 Battery pack lock indicator
When AIBO is accessing the "Memory Stick", the battery pack release lever is locked and the battery cannot be removed. The battery lock indicator lights in red during this time. Do not remove the "Memory Stick" while the indicator is lit in red.
4 Battery pack unlock hole
Insert a pin or other pointed object into this hole to unlock the battery.
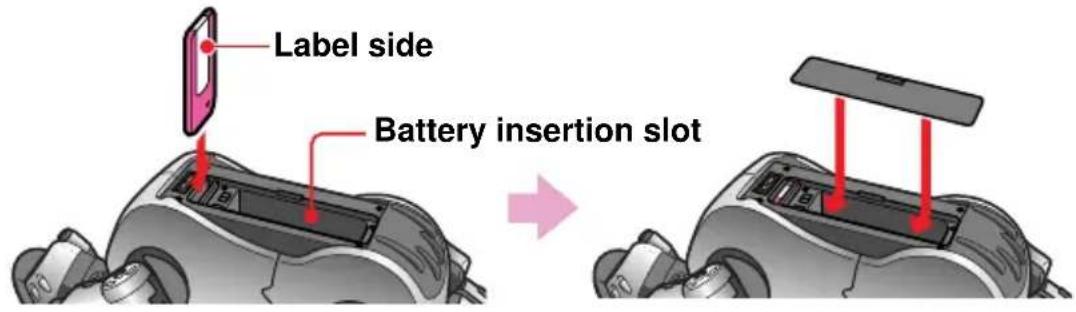
5 Battery insertion slot
Insert the supplied or an optional Lithium Ion battery pack into this slot.
Serial number sticker
7Tail release hole
Insert the supplied release pin into this hole to remove AIBO's tail.
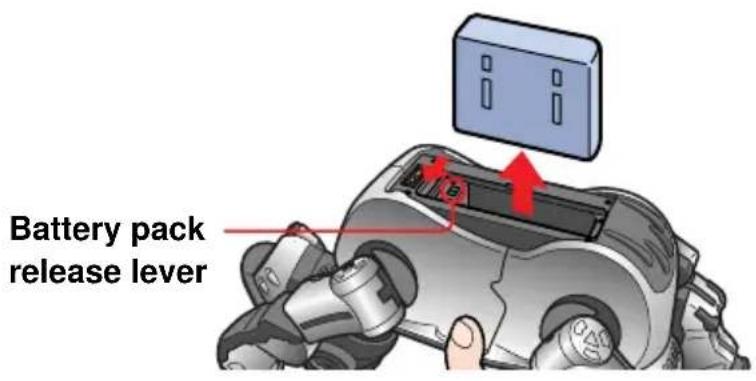
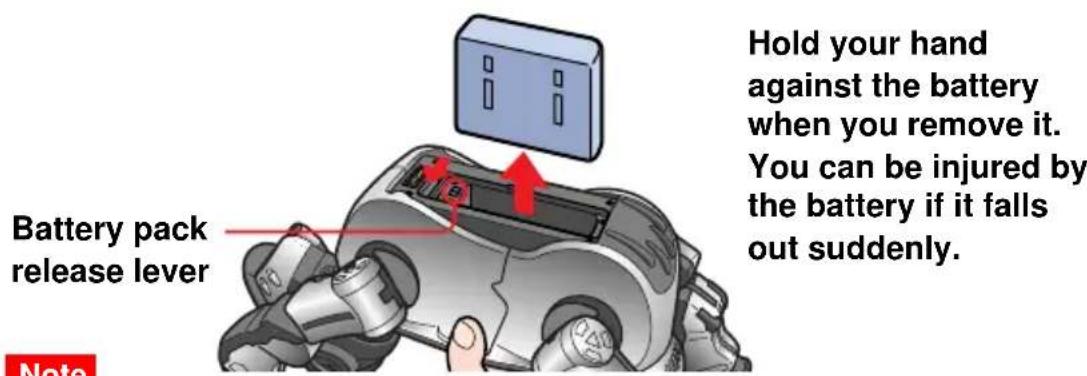
8 Battery pack release lever
Slide this lever to release the battery.
9Head unit release hole
Insert the supplied release pin into this hole to remove AIBO's head unit.
10"Memory Stick" insertion slot
Insert the AIBO-ware "Memory Stick" (not supplied) into this slot.
11Speaker
Plays melodies and special-effect sounds.
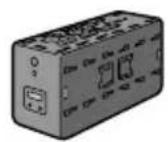
Controls on the core unit
The core unit appears when AIBO's head, legs, and tail have been removed. For details on removing and attaching the respective parts, see page 30.
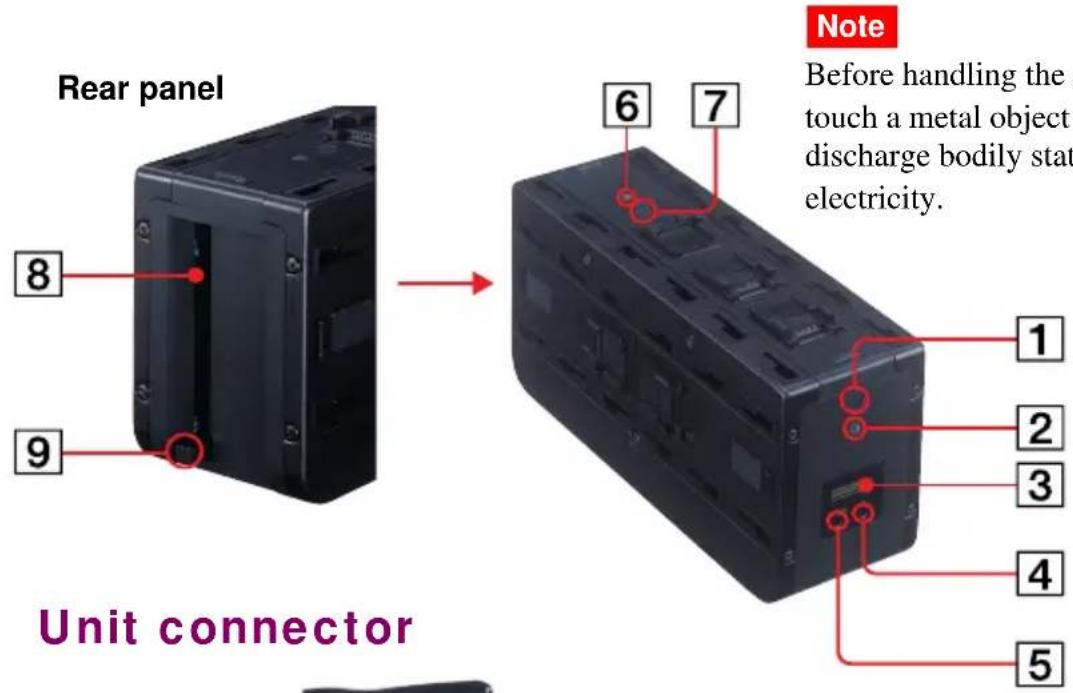
Notes
- Do not touch a unit connector terminal with your hands. Doing so may soil the terminal and cause poor contact, or transmit harmful static electricity.
- Before handling a unit, touch a metal object to discharge bodily static electricity.
1Pause button A (chest)
This button functions in the same way as the AIBO pause button.
2Operation status indicator A (chest)
This indicator functions in the same way as the AIBO chest light.
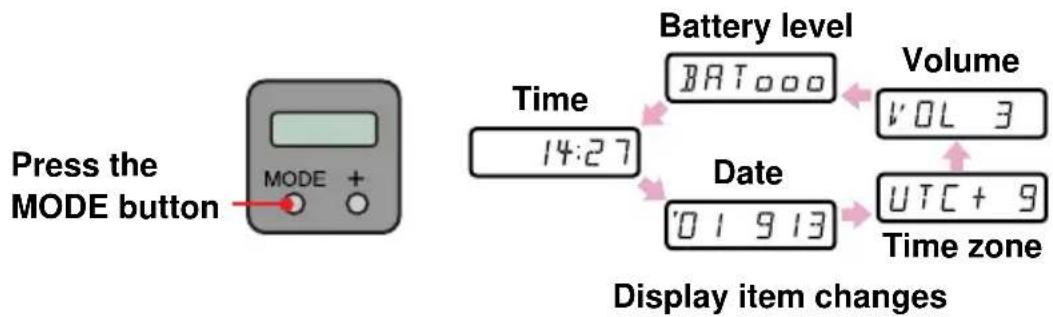
3Display panel
Shows the current time, battery charging status, or the volume level of AIBO's musical tones.
4+button
Increases setting values in the display panel.
5MODE button
Press to change the mode setting of an item in the display panel.
6Operation status indicator B (back)
This indicator is reserved for future use. It is not used currently.
7Pause button B (back)
This button is reserved for future use. It is not used currently.
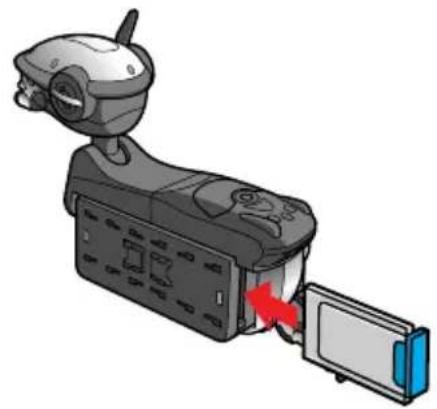
PC Card insertion slot
Insert the special AIBO PC Card (not supplied) into this slot.
9PC Card release switch
After inserting the special AIBO PC Card (separately available) into the PC card insertion slot, flip this switch to the side. To remove the PC Card, flip this switch up and then press.
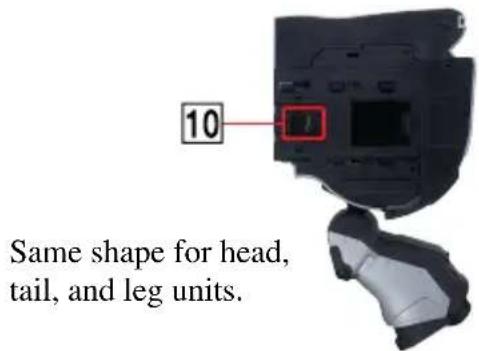
10 Unit connector terminal
Preparations
This chapter explains how to assemble AIBO and how to charge the batteries.
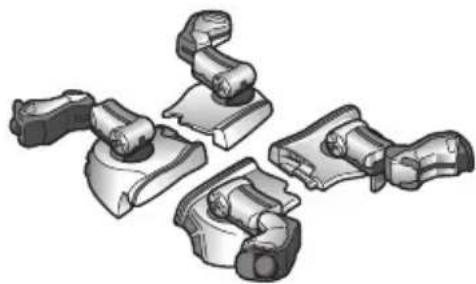
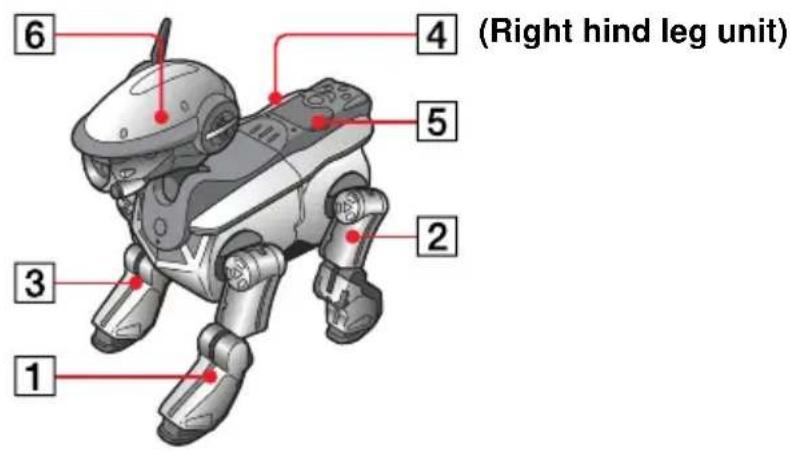
Assembling AIBO
Assemble AIBO by attaching the head, tail, and leg units to the core unit. Assemble the units in the order 1 to 6 shown in the figure.
(Right hind leg unit)
Notes
Assembly and disassembly should always be done under the supervision of an adult who understands how to handle AIBO.
- Do not drop or insert foreign objects into the holes of each unit (especially of the core unit.) Doing so will damage AIBO.
- If you combine the units of the ERS-220 with the units of other AIBO models, incorrect movements may occur.
- Do not touch the core unit charging terminal or a unit connector terminal with your hands. Doing so may soil the terminal and cause poor contact, or transmit harmful static electricity.
- Before handling the core unit or a head, tail, or leg unit, touch a metal object to discharge bodily static electricity.
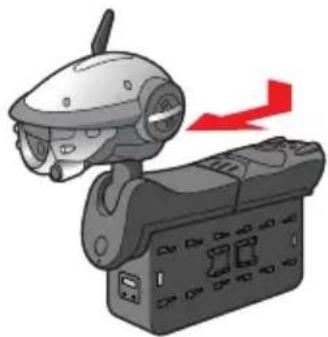
1 Attach the head unit.
Align the projection of the head unit with the hole in the core unit, and slide it in until it clicks into place.
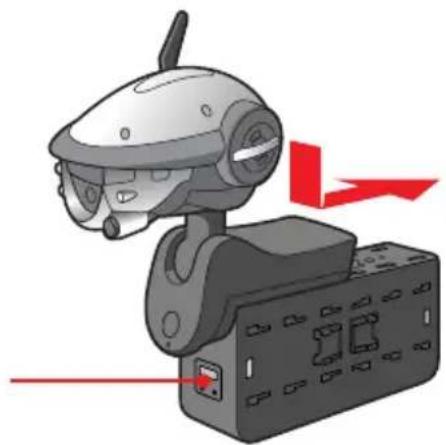
The side with the display panel is the front.
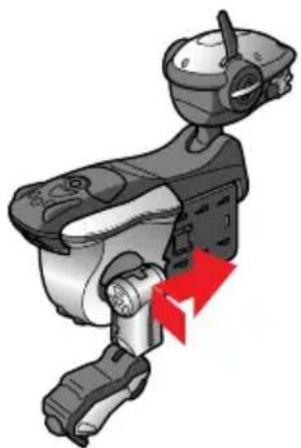
2 Attach the tail unit.
Align the projection of the tail unit with the hole in the core unit, and slide it in until it clicks into place.
3 Attach the right hind leg unit.
4 Attach the other legs in the order right front leg, left hind leg, left front leg.
Removing the head, tail, and legs
You need to remove the head, tail, and legs in order to set the time, adjust the sound volume, and insert a PC Card.
Notes
Assembly and disassembly should always be done under the supervision of an adult who understands how to handle AIBO.
- Do not touch the core unit charging terminal or a unit connector terminal with your hands. Doing so may soil the terminal and cause poor contact, or transmit harmful static electricity.
- Electronic components inside AIBO may be damaged if you handle AIBO with static electricity built up on your body. Before handling the core unit or a head, tail, or leg unit, touch a metal object to discharge bodily static electricity.
1 Press the pause button to pause AIBO.
Wait until the chest light goes out.
Note
The battery pack lock indicator lights in red while AIBO is accessing the "Memory Stick". To prevent damage to AIBO, do not remove the "Memory Stick" during this time. The battery is locked until the data-saving procedure is complete. Removing with force may damage AIBO.
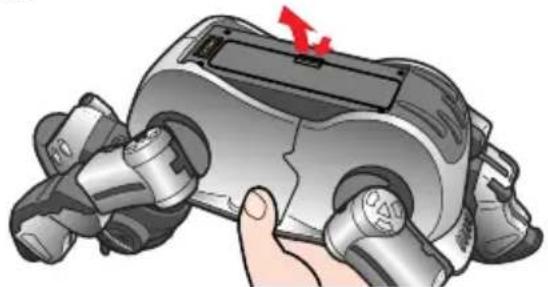
2 Grasp AIBO firmly by the body, turn it upside down, and then open the cover.
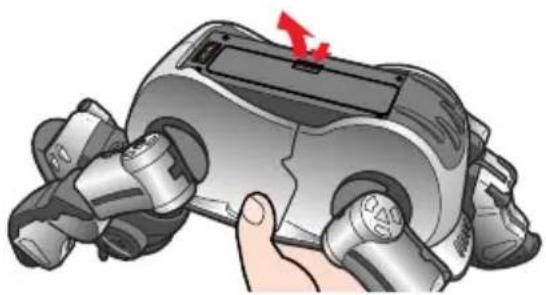
Notes
-
Lift AIBO by the body, and not by the head, tail, or legs.
-
Do not touch the charging terminal with your hands. Doing so may soil the terminal and cause poor contact.
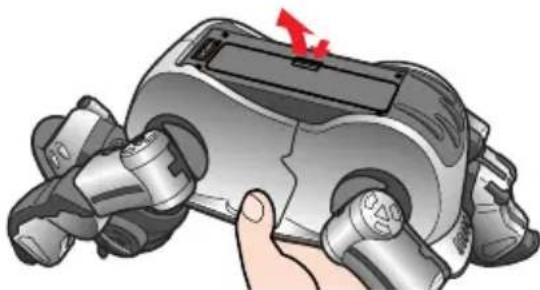
3 Slide the battery pack release lever and remove the battery.
Hold your hand against the battery when you remove it. You can be injured by the battery if it falls out suddenly.
Note
The battery is locked when the battery pack lock indicator is lit in red. Removing with force at this time may damage AIBO.
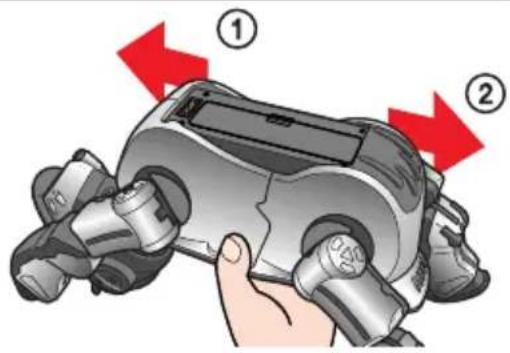
4 Remove the head, tail, and legs by inserting the supplied release pin into the release holes.
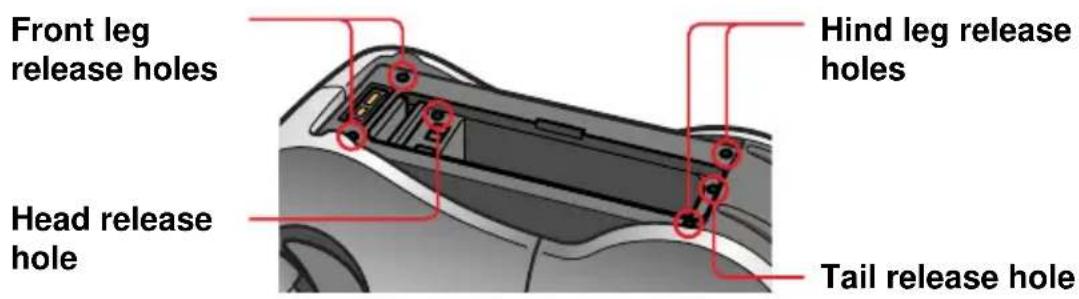
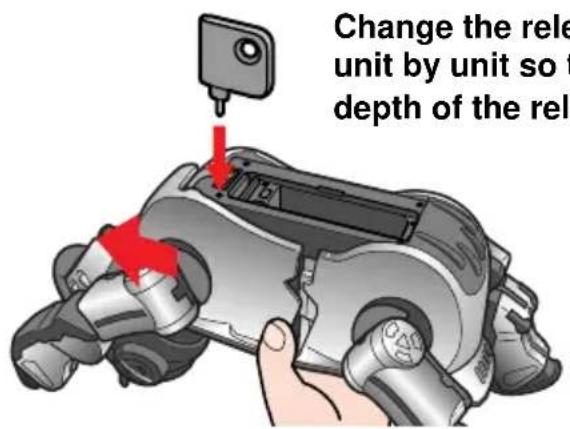
Remove the head, tail, and legs in the order that is opposite to the order in which they were attached (the removal order is shown by 1 to 6 in the figure).
Loading the battery
The battery supplied with AIBO comes partially charged, but you should charge it fully before playing with AIBO. To charge the battery, first load it as described below.
1 Grasp AIBO firmly by the body, turn it upside down, and then open the cover.

Notes
- Lift AIBO by the body, and not by the head, tail, or legs.
- Do not touch the charging terminal with your hands. Doing so may soil the terminal and cause poor contact.
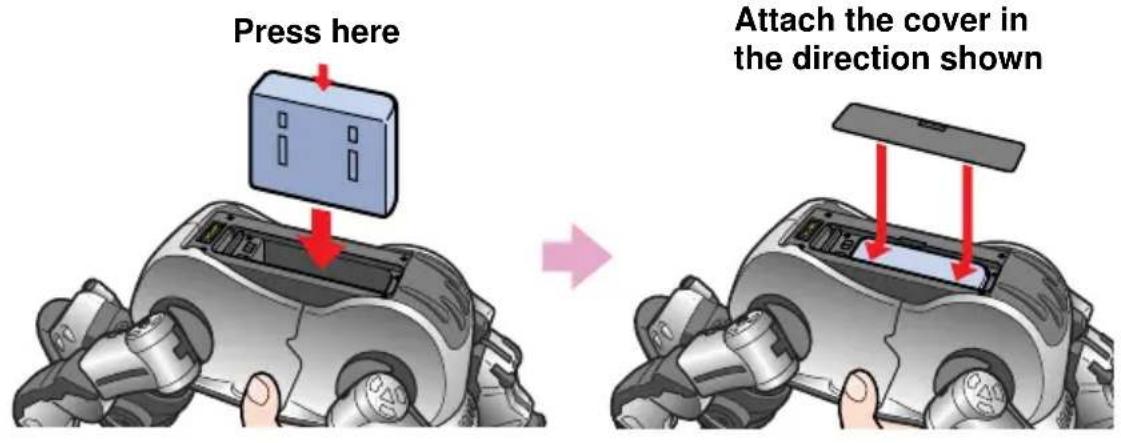
2 Insert the battery in the direction of the arrow until it clicks into place, then replace the cover.
Push here. Attach the cover in the
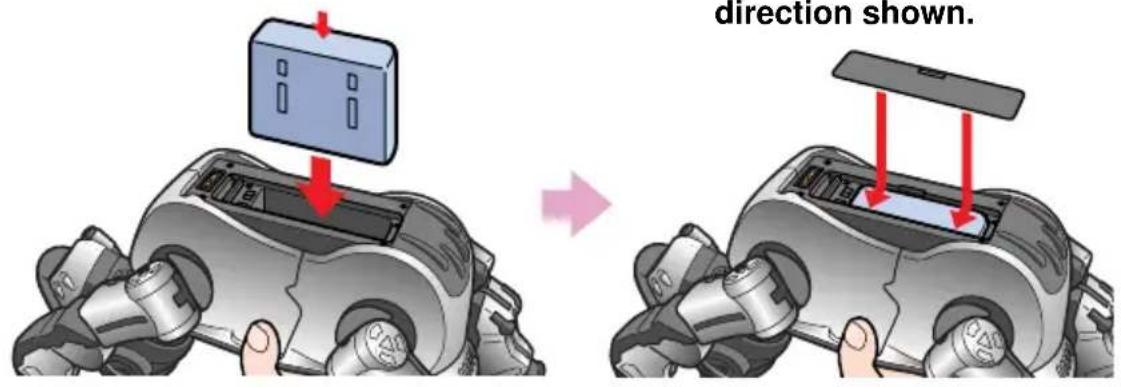
See page 57 for information about how to remove the battery.
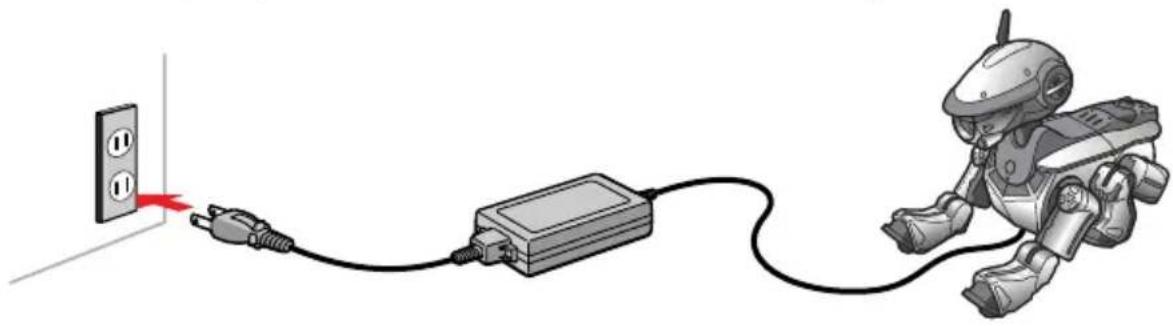
Charging the battery
You can use the supplied AC adapter and conversion plug to charge the battery while it is loaded in AIBO. It is recommended that you charge the battery at room temperature (10^ to 30^ (50^ to 86^) . At room temperature, it takes about 2 hours to fully charge the battery.
1 Connect the AC adapter to the AC adapter conversion plug.
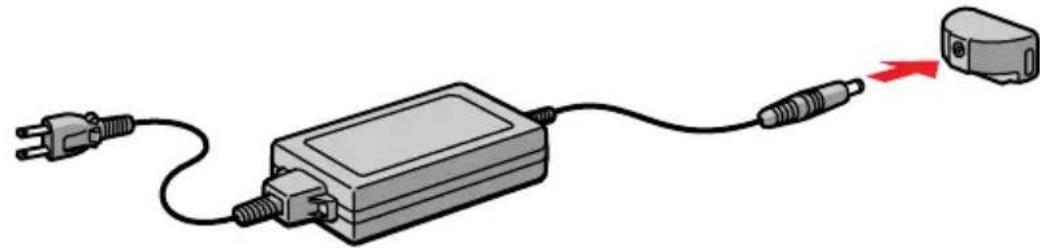
2 Connect the conversion plug to the charging terminal.
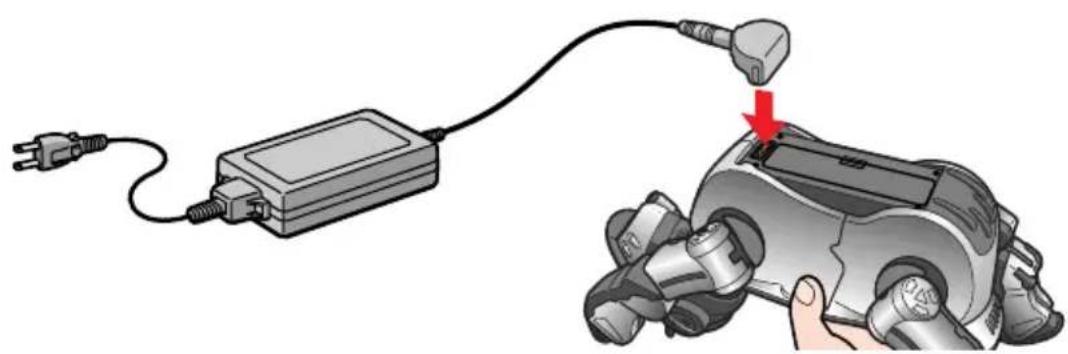
3 Connect the AC adapter to a power outlet, and place AIBO in the position shown below.
Pressing the pause button has no effect while the AC adapter is connected.
While charging
The chest light lights up in orange.
When the battery is fully charged
The chest light goes out.
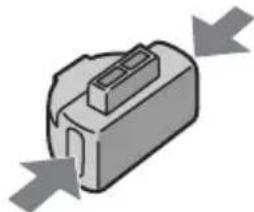
When you remove the conversion plug from AIBO
Grasp the plug firmly, pressing in the grips on both sides.
Notes
- If the chest light flashes orange while you are charging the battery, a charging error has occurred. Exchange the battery for a new one, or contact AIBO Customer Link.
- If you connect the AC adapter to AIBO while it is in active mode, AIBO automatically changes to pause mode and charging of the battery starts.
Using the Energy Station (not supplied)
By placing AIBO on the optional Energy Station, you can charge AIBO's internal battery at the same time that you charge a spare battery. This allows playtime longer with AIBO by exchanging batteries. See page 57 for more information about exchanging batteries.

Handling and settings
This chapter explains how to handle AIBO and make settings on the display panel.
To play with AIBO, you need the separately available AIBOware.
Loading and removing "Memory Sticks"
To play with AIBO, load an AIBO-ware "Memory Stick" (sold separately). For details, refer to the User's Guide supplied with the AIBO-ware "Memory Stick". When you start up AIBO without loading an AIBO-ware "Memory Stick", it enters clinic mode in which AIBO's sensors and other parts are checked (see page 69).
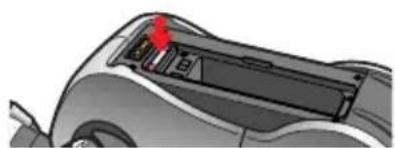
Loading a "Memory Stick"
1 Grasp AIBO securely by the body, turn it upside down, and then open the cover.
Notes
- Lift AIBO by the body, and not by the head, tail, or legs.
- Do not touch the charging terminal with your hands. Doing so may soil the terminal and cause poor contact.
2 Insert the "Memory Stick" and close the cover.
Hold with the mark down and the label showing on the battery insertion slot side. Push in firmly until it clicks.
Removing a "Memory Stick"
Before removing a "Memory Stick" from AIBO, press the pause button to make AIBO pause, and check to be sure that the battery pack lock indicator is off.
Open the cover, lightly press the "Memory Stick" one time, and remove the "Memory Stick".
Notes
- A "Memory Stick" cannot be removed while the battery pack lock indicator is lit up in red. Do not try to remove the "Memory Stick" during this time.
- If the erase prevention switch on the "Memory Stick" is set to LOCK, no data can be recorded on the "Memory Stick", even if it is loaded in AIBO.
Starting up AIBO
1 Place AIBO on the floor as shown below.
Place it on a flat, non-slippery surface, such as a carpet with a short nap.

Notes
-
If you place AIBO on a slippery floor or a carpet with a long nap, it tends to fall often, fail to go forward, or have a tendency to jam up.
-
Be sure to place AIBO on the floor as shown above. This will prevent AIBO from moving unexpectedly and being damaged when you press the pause button to start AIBO.
2 Press the pause button.

AIBO's pause mode is cancelled and the chest light lights up in green. Wait for a while until AIBO starts to move under the control of the loaded AIBO-ware.
Note
Press the pause button again whenever you want AIBO to stop, if an error occurs in AIBO, or if your fingers or other things are caught in one of AIBO's joints.
For details about playing with AIBO from this point on Refer to the User's Guide supplied with the AIBO-ware.
When not playing with AIBO
We recommend that you charge the battery (see page 40) so AIBO will be ready to play at any time.
Pausing AIBO
Press the pause button.
The chest light flashes in green, and goes out after a few moments. AIBO pauses.
Pause button
If you will not be playing with AIBO for a long time
It is recommended that you remove the battery. A small amount of power continues to flow, depleting the battery, even when AIBO is paused.
Changing settings
You can remove AIBO's head, tail, and legs, and use the display panel to make various settings. Normally the display panel is blank. A setting item appears when you press the MODE button, and disappears after 30 seconds. Press the MODE button repeatedly to select the item to set.
You should load a fully charged battery in AIBO before making any settings.
Setting the time
1 Press the MODE button repeatedly until the time appears.
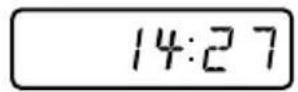
2 Press the MODE button and hold it down (for 1 second or longer) to enable setting of the time.
The hour display flashes.

3 Press the ^+ button to set the hour, and press the MODE button.
The minute display flashes.

4 Press the + button to set the minute, and press the MODE button.
The time display stops flashing and shows the new set time.


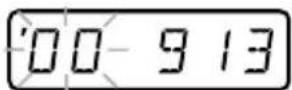
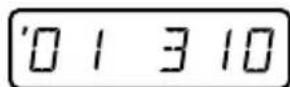
Setting the date
1 Press the MODE button repeatedly until the date appears.
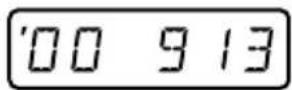
Note
Only the first two digits of the year are shown. '01 means 2001.
2 Press the MODE button and hold it down (for 1 second or longer) to enable setting of the date.
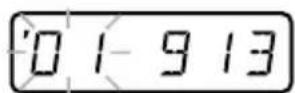
The year display flashes.
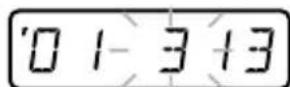
3 Press the + button to set the year, and press the MODE button. The month display flashes.


4 Press the ^+ button to set the month, and press the MODE button.
The day display flashes.

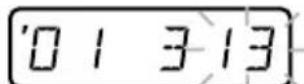
5 Press the + button to set the day, and press the MODE button.
The display stops flashing and shows the new set date.


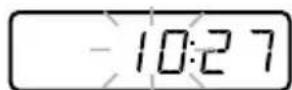
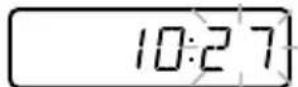
Setting the time zone
The time zone is a function for showing a difference in hours between the time at your location and the UTC (Universal Time, Coordinated) time. This difference is expressed as a whole number from -12 to +12 . For example, the time zone for Hawaii is -10 . See the map on page 62 for the time zones of other countries around the world.
Note
The time zone function does not support daylight savings time.
1 Press the MODE button repeatedly until the time zone appears.

2 Press the MODE button and hold it down (for 1 second or longer) to enable setting of the time zone.
The hour difference display flashes.

3 Press the + button to set the time zone, and press the MODE button.
The display stops flashing and shows the new set time zone.


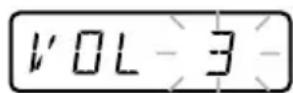
Setting the volume level of AIBO tones
You can adjust the volume level of tones heard from AIBO in 4 steps. A volume level of 0 means mute (no sound is heard from the speaker).
1 Press the MODE button repeatedly until the volume appears.

2 Press the MODE button and hold it down (for 1 second or longer) to enable setting of the volume.
The volume level display flashes.
3 Press the + button to set the volume level (0 to 3), and press the MODE button.
The display stops flashing and shows the new set volume level.
Note
To cancel changes to any setting, press the MODE button and hold it down (for 1 second or longer). The display panel returns to the original display and the setting is not changed.
Checking the battery level
You can check the amount of charge remaining in the battery loaded in AIBO.
1 Press the MODE button repeatedly until the battery level appears.
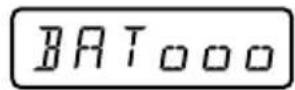
The battery level is displayed in 4 steps.
BAT Exhausted
BAToLow
BATOoFairly low
BAT000Fully charged
Replacing the battery
You can charge the battery loaded in AIBO by connecting the conversion plug and AC adapter. But you can also exchange the battery for one that has been charged with the Energy Station (separately available).
1 Press the pause button to pause AIBO.
Wait until the chest light goes out.
Note
The battery pack lock indicator lights in red while AIBO is accessing the "Memory Stick". To prevent damage to AIBO, do not remove the "Memory Stick" during this time. The battery is locked until the data-saving procedure is complete.
Removing with force may damage AIBO.
2 Grasp AIBO firmly by the body, turn it upside down, and then open the cover.
Notes
- Lift AIBO by the body, and not by the head, tail, or legs.
- Do not touch the charging terminal with your hands. Doing so may soil the terminal and cause poor contact.
3 Slide the battery pack release lever and remove the battery.
The battery is locked when the battery pack lock indicator is lit in red. Removing with force at this time may damage AIBO.
4 Insert the charged battery until it clicks into place, then replace the cover.
5 Place AIBO on the floor as shown below.

Note
Be sure to place AIBO on the floor as shown above. This will prevent AIBO from moving unexpectedly and being damaged when you press the pause button to start AIBO.
Installing the optional wireless PC Card
Before installing the optional wireless PC Card, be sure to press AIBO's pause button to make it pause.
For more information about installing the PC Card, refer to the documentation supplied with the ERA-201D1 AIBO Wireless LAN Card.
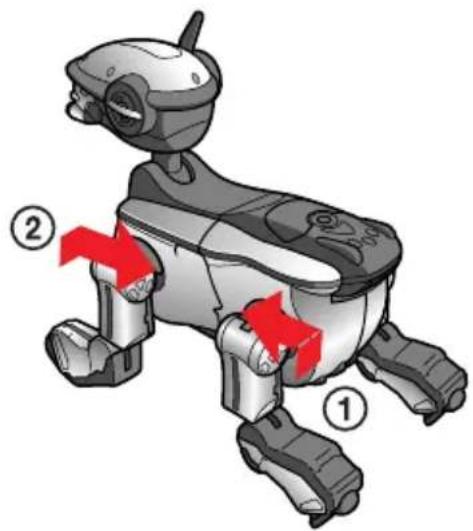
1 Remove both of the left legs (see page 33 for details about how to remove them).
The PC Card slot appears.
2 Firmly slide the PC Card all the way in.
3 Flip the PC Card release switch to the side.
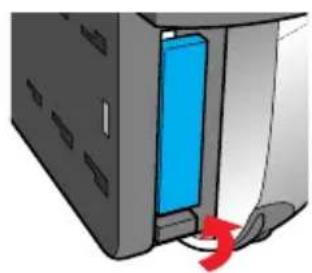
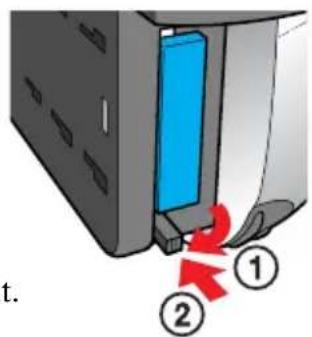
To remove, flip the switch out.
4 Replace the left legs.
World time zones
Refer to this map when setting the time zone.


Additional information
This chapter provides notes on usage, a troubleshooting guide, and other information to help you get to know AIBO better.
Notes on use
To prevent AIBO and the AC adapter from being damaged, observe the following precautions.
On handling AIBO
- Do not use AIBO in places subject to vibrations, on an incline, or at a place where it might fall.
- Do not press down hard on AIBO with your hand or elbow.
- Do not drop or shake AIBO as this may damage AIBO or cause data saved to the "Memory Stick" to be lost.
- Do not touch the charging terminal or a unit connector terminal with your hands. Doing so may soil the terminal and cause poor contact.
- Lift AIBO by the body, and not by its head, tail or legs. Do not swing or twist AIBO.
- Do not leave AIBO in very hot places, such as a car parked in the sun.
- Do not allow foreign things, such as paper clips, to get into AIBO or its joints.
- Do not use AIBO outdoors. If you do, moisture or other foreign matter may enter AIBO and cause damage.
- Do not use AIBO on concrete or other hard surfaces as this may damage AIBO.
- Do not allow AIBO to get wet.
-
Do not touch the lens of the color camera directly with your hand.
-
Do not apply stickers to the color camera.
- Do not point the color camera at the sun, whether AIBO is turned on or off, as this may damage the camera.
- Do not oil AIBO's joints or other movable parts.
- Do not apply stickers to AIBO's movable parts or insert anything between them as this may interfere with AIBO's movement.
- Do not disassemble or modify AIBO.
- W hen transporting AIBO, put it in a cushioned box like the one it came in to protect its body, head, tail and legs from damage.
- Do not use AIBO in a place subject to strong electromagnetic waves or X rays.
- T he AIBO-ware applications designed for ERS-110/111 cannot be used with ERS-220.
- ERS-220 cannot be used with "Memory Stick" applications that do not comply with OPEN-R Ver. 1.1.
Moisture condensation
If AIBO is brought directly from a cold place to a warm place, moisture may condense on AIBO's inside or outside surfaces. Operating AIBO in this state can cause damage. If moisture condensation has occurred, wait for about one hour before turning AIBO on.
On handling the AC adapter
- Be sure to use only the supplied AC adapter to charge AIBO's battery. Using any other adapter may cause damage to AIBO.
- Do not connect the AC adapter to electronic transformers designed for use by travelers, as this may cause AIBO to heat up or become damaged.
On handling the battery
- Do not expose the battery to temperatures above 45^ (113^) . Doing so can damage it or impair its performance.
- Be careful not to let foreign matter like dust or sand get into the terminals.
- If you are not going to play with AIBO for a long period, remove the battery from AIBO and store it in a dry, cool place.
- T he battery is constantly discharging even when it is not in use. Charge the battery before using AIBO.
- Do not drop the battery or place a heavy object on it. Do not apply strong pressure or physical shock to the battery.
On cleaning
- Clean AIBO with a clean, dry, soft cloth.
- Do not use volatile solvents that may damage AIBO's surface finish.
- W hen cleaning with a chemical fabric, see its instructions.
Troubleshooting
Before contacting the AIBO Customer Link regarding a problem, we recommend that you use clinic mode to check AIBO's balance and sensors, and refer to "Symptoms and remedies" (page 74).
Clinic mode
If you start up AIBO without inserting an AIBO-ware "Memory Stick", AIBO enters clinic mode in which its sensors and other parts are checked. The mode indicator turns off at this time. If the problem persists, contact the AIBO Customer Link (page 80).
Changing AIBO to clinic mode
1 Remove the AIBO-ware "Memory Stick" from AIBO (see page 46).
2 Place AIBO on the floor as shown below, and then press the pause button (page 47).
AIBO enters clinic mode and repeats the following sequence of actions: stands up, sits down, lies down.
ItemProcedure
Touch sensors and AIBO's overall balance.
The following checks are done to test whether AIBO moves with good overall balance and whether the touch sensors operate correctly.
1 Push the back sensor for three seconds.
AIBO does the following sequence of actions: walks forward, walks backward, kicks right leg, kicks left leg. Then it returns to the sequence: stands up, sits down, lies down. The face side lights light up in order.
2 P r ess the face sensor for three seconds.
AIBO does the following sequence of actions: sits, waves with its right front paw, waves with its left front paw, raises both front paws. The face side lights light up in order.
| ItemProcedure | |
| Paw sensors | 1 Press the face sensor and the back sensor at the same time for three seconds. AIBO lies down with its legs spread apart. 2 Touch a paw sensor. AIBO pulls in the touched paw. 3 P r ess the face sensor and the back sensor at the same time for three seconds. AIBO returns to the sequence: stands up, sits down, lies down. |
| Head sensor 1 P r ess the head sensor forward. The red face side light lights up. 2 P r ess the head sensor back. The blue face side light (center) lights up. | |
| Color camera 1 Move the supplied pink ball close to the color camera at the front of AIBO's head. Color camera | The blue face side light (front) lights up. AIBO will not recognize the ball if it is held too close or too far away, so try moving it backward and forward. |
| Distance sensor | 1 P r ess the face sensor and the back sensor at the same time for three seconds. AIBO lies down with its legs spread apart. |
| Distance sensor | 2 Move your hand over the distance sensor at the front of AIBO's head. A tone sounds. (No tone sounds if the volume level has been set to mute.) The pitch of the tone varies depending on the distance of your hand from the sensor. AIBO will not recognize your hand if it is held too close or too far away, so try moving it backward and forward. |
| 3 P r ess the face sensor and the back sensor at the same time for three seconds. AIBO returns to the sequence: stands up, sits down, lies down. | |
| Pick-up mode 1 Pick AIBO up from the floor. AIBO's legs stop moving so that it is easy to hold (pick-up mode). The mode indicator lights. 2 Place AIBO on the floor, or place AIBO on the floor and then push the head sensor forward or backward for three seconds. AIBO returns to the sequence: stands up, sits down, lies down. | |
Symptoms and remedies
If you experience any difficulties, use this table to help solve the problem. If the problem persists, contact the AIBO Customer Link (see page 80).
| SymptomCause/Remedy | |
| AIBO does not move when the pause button is pressed. | There is no battery loaded. →Load a battery (page 38). After loading the battery, press the pause button to activate AIBO. The batteries are exhausted. →Check the battery level (page 56). If the battery is exhausted, charge the battery or exchange it for a changed one. The AC adapter is connected to the charging terminal. →Disconnect the AC adapter and try starting AIBO again. One of AIBO's units (head, tail, leg) is not firmly attached. →Slide the unit all the way in until it clicks. |
| When the pause button is pressed, the chest light flashes alternately in green and orange, and a buzzer sounds. | The battery is abnormally hot. →Wait until the battery cools off. There was a battery error. →Exchange the battery for a new one (page 57). |
| When the pause button is pressed, a sad melody is heard and AIBO does not move. | ·A “Memory Stick” with no applications is loaded. ·The loaded “Memory Stick” is not intended for AIBO. |
| The battery is locked and cannot be exchanged. | ·A program is running. Press the pause button to pause the program. |
| AIBO does not move when placed on the Energy Station (separately available). | ·In clinic mode, AIBO does not move on the Energy Station. |
| It takes a long time for AIBO to start moving. | ·AIBO is loading data from the “Memory Stick”. Wait for a while. |
| AIBO tries to walk but cannot go forward. | The floor may be slippery, or the nap of the carpet may be too long. →Place AIBO on a surface that is not so slippery, such as a carpet with a short nap. |
| AIBO falls often. The floor may be slippery, inclined, or unstable. →Place AIBO on a flat surface that is not so slippery. | |
| AIBO stopped moving after being picked up. | AIBO stops moving whenever it is picked up. →Check that the mode indicator is flashing, place AIBO on the floor, and then press the head sensor forward or backward for three seconds. AIBO returns to the sequence: stands up, sits down, lies down. |
| The mode indicator is flashing and a musical tone is heard, but AIBO's legs do not move. | AIBO stops moving whenever it is picked up or gets something caught in one of its joints. →Place AIBO on the floor, and then press the head sensor forward or backward for three seconds to awaken AIBO. |
| The chest light flashes in orange. | There may be a problem with the battery. →Exchange the battery for a new one (page 57). |
| AIBO does not chase the supplied ball. | In clinic mode, AIBO responds to the ball but does not chase it (page 72). |
| AIBO does not walk. AIBO will walk if you touch one of the touch sensors (page 71). | |
| After the pause button is pressed, the chest light comes on and does not go out. | There may be a problem with the application program. →Check that the battery pack lock indicator is white, and try removing the battery (page 57). After reloading the battery, press the pause button again (page 23, 11). |
| The power of the battery is exhausted right after it was recharged and loaded into AIBO. | If the battery's operating time becomes very short, the battery may have reached the end of its life. Replace it with a new battery (page 57). |
| No sound is heard. AIBO's volume level may be set to mute. →Adjust the volume level (page 55). | |
Limited warranty (for the U.S.A. only)
SONY ELECTRONICS INC. ("SONY") warrants this Product and its accessories against defects in material or workmanship as follows:
- PRODUCTS: For a period of one (1) year from the date of purchase, SONY will, at its option, either repair or replace the defective parts and/or the Product (i.e., AIBO) with new or rebuilt replacements. After this one (1) year period, you must pay all parts and labor charges.
- ACCESSORIES: For a period of thirty (30) days from the date of purchase, SONY will, at its option, either repair or replace defective parts and/or accessories (i.e., AC adapter and battery) with new or rebuilt replacements. After this thirty (30) day period, you must pay all parts and labor charges.
- REPAIRS: For a period equal to the longer of (a) the remainder of the original limited warranty period on the original Product or accessory, or (b) for 90 days after the date of repair/replacement of Products or for 30 days after the date of repair/ replacement of accessories, SONY will repair or replace defective parts, accessories and/or Products used in the repair or replacement of Products or accessories under this Limited Warranty with new or rebuilt replacements.
To obtain warranty service, you must first obtain an event number from AIBO Customer Link (page 8). You will need to return the Product and all accessories to SONY in the original carton, using the original packaging materials. All supplied accessories must be returned with the Product. SONY is not responsible for any damage during shipment arising from the failure to properly pack the Product or accessory being returned to SONY or from any damage caused by or resulting from the carrier's handling. For information on returning your Product or accessories for warranty repair, please contact the AIBO Customer Link.
This warranty does not cover customer instruction, installation or set up adjustments.
This warranty does not cover the cost of removal or reinstallation, cosmetic damage or damage due to acts of God, accident, misuse, abuse, negligence of, or to any part of the Product. This warranty does not cover lost profits, lost sales, loss of use of the Product, or other consequential loss or damage due to improper operation or maintenance, installation, connection to improper voltage supply, or attempted repair by anyone other than a facility authorized by SONY to service the Product. This warranty does not cover Products sold AS IS or WITH ALL FAULTS, or consumables (such as fuses).
This warranty does not apply when the malfunction results from use of the Product in conjunction with accessories, products or ancillary or peripheral equipment not manufactured by SONY, and where it is determined by SONY that there is no fault with the Product itself.
SONY will pay shipping charges for all in-warranty service. However, if no trouble is found with the Product or accessory, if the trouble is from a non-covered charge or if it is determined that the warranty period has expired, you will be billed for the cost of shipping and handling.
This warranty is valid only in the United States.
Proof of purchase in the form of a bill of sale or receipted invoice which is evidence that the unit is within the Limited Warranty period must be presented to obtain warranty service.
This warranty is invalid if the factory applied serial number has been altered or removed from the Product.
REPAIR OR REPLACEMENT AS PROVIDED UNDER THIS WARRANTY IS THE EXCLUSIVE REMEDY OF THE CONSUMER. SONY SHALL NOT BE LIABLE FOR ANY INCIDENTAL OR CONSEQUENTIAL DAMAGES FOR BREACH OF ANY EXPRESSED OR IMPLIED WARRANTY ON THIS PRODUCT. EXCEPT TO THE EXTENT PROHIBITED BY APPLICABLE LAW, ANY IMPLIED WARRANTY OF MERCHANTABILITY OR FITNESS FOR A PARTICULAR PURPOSE ON THIS PRODUCT IS LIMITED IN DURATION TO THE DURATION OF THIS LIMITED WARRANTY.
Some states do not allow the exclusion or limitation of incidental or consequential damages, or allow limitations on how long an implied warranty lasts, so the above limitations or exclusions may not apply to you. This warranty gives you specific legal rights, and you may have other rights which vary from state to state.
For your convenience, SONY ELECTRONICS INC. has established telephone numbers for product information regarding the Entertainment Robot. Please call:
AIBO CUSTOMER LINK 1-800-427-2988
or write to: aibosupport@info.solsel.sony.com
Other information about AIBO is also available on the internet site at: www.aibo.com/
Service procedure (for the U.S.A. only)
- Contact the AIBO Customer Link. The E-mail address is aibosupport@info.sel.sony.com and its toll free number is 1-800-427-2988.
- If the AIBO Customer Link determines that your unit needs repair, follow the procedure described below.
a. The AIBO Customer Link will give you the event number, which is valid for ten days.
b. Following the procedure described on the label attached to the box, put AIBO and the designated accessories into the original box. If you did not keep the original box, the AIBO Customer Link will send a new box to you free of charge within the warranty period. The actual shipping and material cost will be charged to you after the warranty period.
c. Mark your event number on the top of the box and send it to the designated address. The AIBO Customer Link will designate the shipping method and pay the shipping charges within the warranty period; after the warranty period, you must pre-pay the shipping charges.
d. As soon as the repair is completed, your AIBO will be sent back to you. After the warranty period has expired, the actual shipping cost will be charged to you together with the repair cost.
- Please understand that the AIBO Customer Link only accepts credit cards for all the charges of repair, shipping and material after the warranty period has expired.
User registration
All users are registered based on information from the purchaser. If a different person takes over this unit, please inform the "AIBO Customer Link" of the change.
Specifications
AIBO
CPU 64-bit RISC processor
Main memory
32 MB
Supplied application media
"Memory Stick" for AIBO
Movable parts
Head: 3 degrees of freedom
Retractable head light:
1 degree of freedom
Leg: 3 degrees of freedom
(4 legs)
Total: 16 degrees of freedom
Inputs PC Card Type II slot
Charging terminal
Video input 100,000 CMOS image sensor
Audio input Stereo microphone
Audio output Speaker
LCD display Time, date, volume level,
battery level, time zone
Internal sensors
Temperature sensor
Infrared distance sensor
Acceleration sensor
Touch sensors (head, face, back, legs, tail)
Vibration sensor
Power consumption
Approx. 9 W (normal mode)
Operable duration
Approx. 1.5 hours (when
operated with a fully charged
ERA-201B1, in normal
mode)
Dimensions Approx. 152· 296· 278mm
(6·11 3/4·11 inches)
(w/h/d)
Mass Approx. 1.5kg 3 lb 5 oz
(including battery and
"Memory Stick")
Operating temperature
5^ to 35^ (41^ to 95^)
Operating humidity
10% to 80%
Operating wet bulb temperature
Less than 29^ (84^)
Storage temperature
-20^ to 60^ (-4^ to 140^)
Storage humidity
10% to 90%
Storage wet bulb temperature
Less than 29^ (84^)
AC adapter
Input 100 to 240VAC
50 to 60Hz 0.85 to 0.46 A
Output 16 V DC, 2.5 A
Operating temperature
5^ to 35^ (41^ to 95^)
(temperature gradient less than 10^ (18^) /hour)
Operating humidity
20% to 80% (no
condensation), provided that humidity is less than 65% at 35^ (95^) (wet-bulb
temperature: less than 29^ (84^)
Storage temperature
-20^ to 60^ (-4^ to
140^) (temperature gradient
less than 10^ (18^) /hour
Storage humidity
10% to 90% (no
condensation), provided that
humidity is less than 20% at
35^ (95^) (wet-bulb
temperature: less than 35^ (95^)
Dimensions
Approx. 60· 30· 120mm
approx. 2^3 / 8· 1^3 / 16· 4^3 / 4
inches) (w / h / d)
Mass Approx. 325g (11.5 oz)
Cord length DC cord: Approx. 1.8m
(70^7 / 8 inches)
AC cord: Approx. 1.8m
(70^7 / 8 inches)
Lithium Ion battery pack
Battery used Lithium Ion type battery
Main output voltage
7.4 VDC
Capacity 2300mAh
Operating temperature
5^ to 40^ (41^ to 104^)
(temperature gradient less
than 10^ (18^) /hour
Operating humidity
10% to 80% (no
condensation)
Operating wet bulb temperature
Less than 29^ (84^)
Storage temperature -20^ to 60^ (-4^)
to 140^ (temperature
gradient less than 10^
(18^) / hour)
Storage humidity
10% to 90% (no
condensation)
Dimensions Approx. 80.2· 58.2· 21mm
approx. 3^1 / 4· 2^3 / 8·^27 / _32
inches) (w / h / d)
Mass Approx. 170g (6 oz)
Design and specifications are subject
to change without notice.
Supplied accessories
See page 21.
Index
A
ACadapter 21,40,68
Accessories
Sold separately 20,42
Supplied 21
AIBO
Charging 40
Cleaning 68
Handling 68
Introduction to AIBO 18
Resting. 49
AIBO Customer Link 80
AIBO-ware 20
B
Back multi-indicators 24
Back sensor 24
Battery
Charging 40
Exchanging 57
Handling 68
Insertion slot 26
Level 56
Lock indicator 26
Release lever 26,58
Unlock hole. 26
C
Charging terminal 26,38
Chest light 23
Clinic mode. 69
Color camera 23
Conversion plug 21, 38
Core unit 27
D
Display panel 28, 50
Distance sensor 23
E
Energy Station 42
Entertainment robot 18
F
Face sensor. 23
Face side lights 23
H
Head sensor 23
L
Leg units. 21, 30
Lights
Back multi-indicators 24
Chest light. 23
Face side lights 23
Mode indicator. 24
Tail lights. 24
Lithium Ion battery 21, 39
M
"Memory Stick"
Insertion slot. 25, 45
Loading 44
Removing. 46
Mode button 28,50
Mode indicator. 24
0
Operation status indicators A/B .... 28
P
Pause. 33,49
Pause button 23,48,49
Paw sensors 23
PC Card
- button 28,51
Installing 60
PC Card insertion slot 28,60
PC Card release switch.....28, 61
Pink ball 21
R
Release holes 36
Retractable head light 23
S
Sensors
Back sensor 24
Distance sensor 23
Face sensor. 23
Head sensor 23
Paw sensors 23
Tail sensors 24
Settings
Date. 52
Time 50
Time zone. 53
Volume level 55
Speaker 26
Stereo microphone 24
T
Tail lights 24
Tail sensors. 24
Tail unit 21,30
Time zone 53,62
U
Units
Assembling 30
Core unit 21, 27, 30
Head unit 21,30
Legunit. 21,30
Release holes 36
Release pin 21,36
Removing. 33
Tail unit 21,30
W
World time zones 62
Directive EMC 89/336/EEC
EMI EN55022/98, EN55014/93 + A1/97 + A2/99, EN50081-1/92
EMS: EN55024/98, EN55014-2/97, EN61000-3-2/95, EN61000-3-3/95,
EN50082-1/97, EN60825-1/94
LVD 73/23/EEC + 93/68/EEC
EN60950/92 + A1/93 + A2/93 + A3/95 + A4/97 + A11/97
EN60065/98
EN61558-1/97 + A1/98
EN61558-2-7/97
"Memory Stick" AIBO-ware et applications PC AIBO 12
"Memory Stick" AIBO-ware et applications PC AIBO
condensation), a condition
LVD 73/23/EWG + 93/68/EWG
EN60950/92 + A1/93 + A2/93 + A3/95 + A4/97 + A11/97
EN60065/98
EN61558-1/97 + A1/98
EN61558-2-7/97
- For Customers in the U.S.A. and Canada
- Safety Information
- Owner's Record
- Warning
- Note
- RECYCLING LITHIUM ION RECHARGEABLE BATTERIES
- Regulatory Information
- For Customers in Europe and Australia
- DISPOSAL OF LITHIUM ION BATTERY
- Voor de Klanten in Nederland (For customers in the Netherlands)
- SONY
- Customer Support
- 安全資訊
- 警告
- Preparations
- Handling and settings
- Additional information
- Introduction
- What is AIBO?
- ERS-220
- AIBO-ware "Memory Stick" and AIBO PC applications
- Checking the supplied accessories
- AC adapter ERA-201P1
- Core unit
- Conversion plug
- Head unit
- ■Lithium Ion battery pack ERA-201B1 (1)
- Leg unit (4)
- Pink ball
- Tail unit
- ■Release pin
- ■Documentation
- Index to parts and controls
- Notes
- 1Head sensor
- 2Distance sensor
- 3Color camera
- 456Face front lights (3)
- 7Retractable head light
- 8Face side lights
- 9Face sensor
- 10Pause button
- Chest light
- Paw sensors
- 13Back sensor
- 15 16 Tail lights (3)
- 18 19 Tail sensors (3)
- 20Back multi-indicators
- Stereo microphone
- 22Mode indicator
- Inner unit
- 1Charging terminal
- Leg release holes
- Battery pack lock indicator
- Battery pack unlock hole
- Battery insertion slot
- Serial number sticker
- 7Tail release hole
- Battery pack release lever
- 9Head unit release hole
- 10"Memory Stick" insertion slot
- 11Speaker
- Controls on the core unit
- Assembling AIBO
- Attach the head unit.
- Attach the tail unit.
- Attach the right hind leg unit.
- Attach the other legs in the order right front leg, left hind leg, left front leg.
- Removing the head, tail, and legs
- Press the pause button to pause AIBO.
- Grasp AIBO firmly by the body, turn it upside down, and then open the cover.
- Slide the battery pack release lever and remove the battery.
- Loading the battery
- Charging the battery
- Connect the AC adapter to a power outlet, and place AIBO in the position shown below.
- While charging
- When the battery is fully charged
- When you remove the conversion plug from AIBO
- Using the Energy Station (not supplied)
- Loading and removing "Memory Sticks"
- Loading a "Memory Stick"
- Insert the "Memory Stick" and close the cover.
- Removing a "Memory Stick"
- Starting up AIBO
- Place AIBO on the floor as shown below.
- Press the pause button.
- When not playing with AIBO
- Pausing AIBO
- If you will not be playing with AIBO for a long time
- Changing settings
- Setting the time
- Press the MODE button and hold it down (for 1 second or longer) to enable setting of the time.
- Press the + button to set the hour, and press the MODE button.
- Press the + button to set the minute, and press the MODE button.
- Setting the date
- Press the + button to set the month, and press the MODE button.
- Press the + button to set the day, and press the MODE button.
- Setting the time zone
- Setting the volume level of AIBO tones
- Checking the battery level
- Press the MODE button repeatedly until the battery level appears.
- Replacing the battery
- Insert the charged battery until it clicks into place, then replace the cover.
- Place AIBO on the floor as shown below.
- Installing the optional wireless PC Card
- Flip the PC Card release switch to the side.
- Replace the left legs.
- World time zones
- Notes on use
- On handling AIBO
- Moisture condensation
- On handling the AC adapter
- On handling the battery
- On cleaning
- Troubleshooting
- Clinic mode
- Changing AIBO to clinic mode
- ItemProcedure
- Push the back sensor for three seconds.
- P r ess the face sensor for three seconds.
- Symptoms and remedies
- Limited warranty (for the U.S.A. only)
- Service procedure (for the U.S.A. only)
- User registration
- Specifications
- AIBO
- AC adapter
- Lithium Ion battery pack
- Index
- A
- B
- C
- D
- E
- F
- H
- L
- M
- 0
- P
- R
- S
- T
- U
- Units
- W
- "Memory Stick" AIBO-ware et applications PC AIBO
Brand : SONY
Model : ERS220
Category : Home robot