PLDED5030ACRK - TV Proscan - Free user manual and instructions
Find the device manual for free PLDED5030ACRK Proscan in PDF.
| Product Type | LED Television |
| Screen Size | 50 inches (127 cm) |
| Resolution | 1920 x 1080 (Full HD) |
| Aspect Ratio | 16:9 |
| Brightness | 250 cd/m² |
| Contrast Ratio | 3000:1 |
| Viewing Angle | 178° horizontal / 178° vertical |
| Response Time | 6.5 ms |
| Colors | 16.7 million |
| Color System | ATSC / QAM / NTSC |
| Sound System | M |
| Audio System | BTSC |
| Audio Power | 10 W + 10 W (2 speakers) |
| Connectivity | HDMI (3 inputs including 1 MHL), VGA, component input, AV input, digital coaxial output, analog audio output, headphone, USB port (for service), RF antenna |
| Special Features | Roku Streaming Stick compatibility, MHL, universal remote (code 1218), closed captioning, electronic program guide |
| Power Supply | 100-240 V~, 50/60 Hz |
| Power Consumption | 100 W |
| Safety Class | Class I (with grounding) |
| Wall Mount | VESA standard 200 x 200 mm |
| Care and Cleaning | Clean with a soft, dry cloth. Do not use liquid or abrasive cleaners. |
| Safety | Do not expose to rain or moisture. Unplug during storms or when not in use for long periods. Do not block ventilation openings. |
Frequently Asked Questions - PLDED5030ACRK Proscan
User questions about PLDED5030ACRK Proscan
0 question about this device. Answer the ones you know or ask your own.
Ask a new question about this device
Download the instructions for your TV in PDF format for free! Find your manual PLDED5030ACRK - Proscan and take your electronic device back in hand. On this page are published all the documents necessary for the use of your device. PLDED5030ACRK by Proscan.
USER MANUAL PLDED5030ACRK Proscan
Before using the TV, please read this manual thoroughly, and retain it for future reference.

Model:PLDED5030A-C-RK

CONTENTS
| 1 | SAFETY PRECAUTION | 1 | |
| 2 | IMPORTANT SAFETY INSTRUCTION | 2 | |
| 3 | ACCESSORIES | 3 | |
| 4 | GETTING STARTED | 3 | |
| 5 | CONTROL REFERENCE GUIDE | Remote Control | 4 |
| Front View | 6 | ||
| Back View | 6 | ||
| Side View | 7 | ||
| 6 | CONNECTIONS | Antenna Connection | 8 |
| AV Connection | 8 | ||
| YPbPr Connection | 9 | ||
| HDMI Connection | 9 | ||
| VGA Connection | 10 | ||
| Headphone Connection | 10 | ||
| Power Cord Connection | 10 | ||
| Coax(SPDIF) Connection | 11 | ||
| 7 | WALL MOUNT INSTALLATION | 12 | |
| 8 | INITIAL SETUP | Putting The Unit On A Proper Place | 13 |
| Source Selection | 13 | ||
| Turning The Unit On For The First Time | 13 | ||
| 9 | TV SETUP | TV(CHANNEL) Menu | 14 |
| Picture Menu | 15 | ||
| Audio Menu | 16 | ||
| Time Menu | 17 | ||
| Setup Menu | 18 | ||
| LOCK(Parental) Menu | 19 |
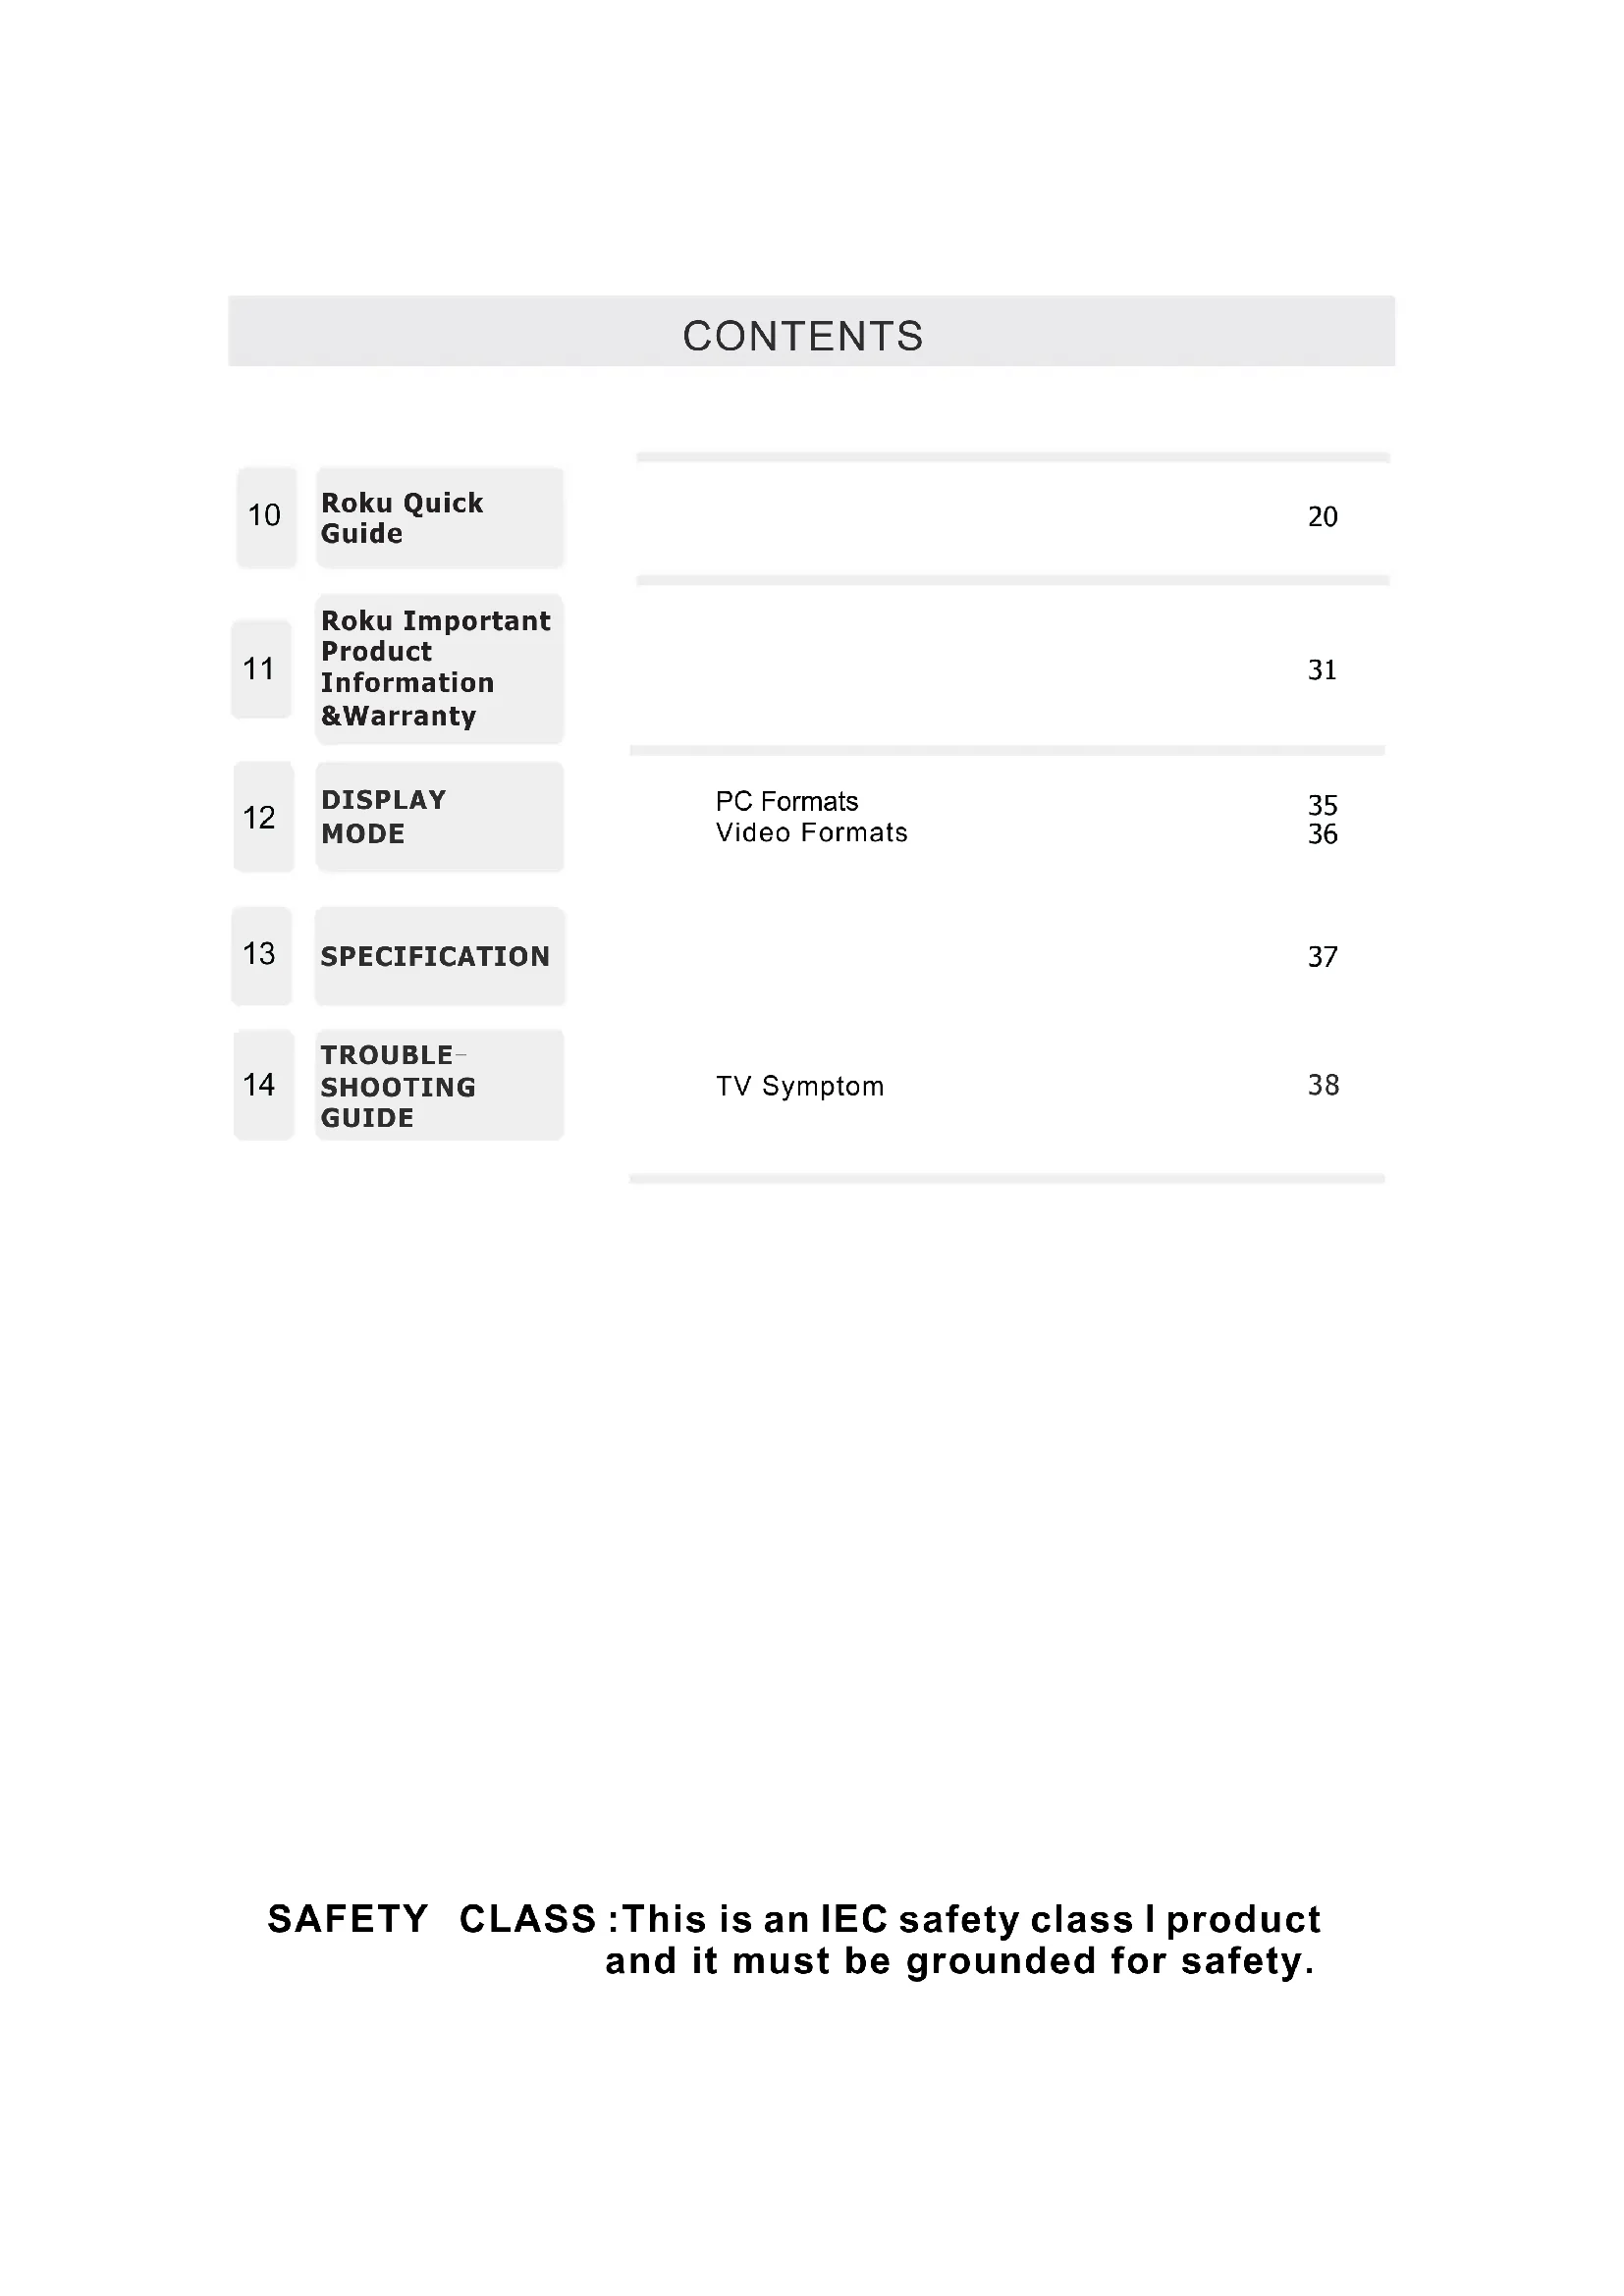
CONTENTS
10
Roku Quick Guide
20
11
Roku Important Product Information &Warranty
31
12
DISPLAY MODE
PC Formats Video Formats
35 36
13
SPECIFICATION
37
14
TROUBLESHOOTINGGUIDE
TV Symptom
38
SAFETY PRECAUTION
- CAUTION MARKING WAS LOCATED AT THE REARPLACEMENT INFORMATION OF THE APPARATUS.
WARNING: TO REDUCE THE RISK OF ELECTRIC SHOCK, DO NOT REMOVE COVER (OR BACK) NO USER SERVICEABLE PARTS INSIDE. REFER SERVICING TO QUALIFIED SERVICE PERSONNEL.
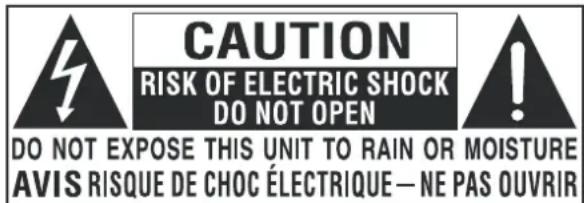
The lightning flash with arrowhead symbol, within an equilateral triangle, is intended to alert the user to the presence of uninsulated "dangerous voltage" within the product's enclosure that may be sufficient magnitude to constitute a risk of electric shock to persons.
The exclamation point within an equilateral Triangle is intended to alert the user to The presence of important operating and maintenance (servicing) instructions in the literature accompanying the appliance.

CAUTION
DANGER OF EXPLOSION IF BATTERY IS INCORRECTLY REPLACED. REPLACE ONLY WITH THE SAME OR EQUIVALENT TYPE.
- USE OF CONTROLS OR ADJUSTMENTS OR PERFORMANCE OF PROCEDURES OTHER THAN THOSE SPECIFIED MAY RESULT IN HAZARDOUS RADIATION EXPOSURE.

WARNING:
TO REDUCE THE RISK OF FIRE OR ELECTRIC SHOCK,DO NOT EXPOSE THIS APPLIANCE TO RAIN OR MOISTURE. TO REVENT FIRE OR SHOCK HAZARD,DO NOT
EXPOSE THIS UNIT TO RAIN OR MOISTURE. DO NOT PLACE OBJECTS FILLED WITH LIQUIDS ON OR NEAR THIS UNIT.
- SHOULD ANY TROUBLE OCCUR, DISCONNECT THE AC POWER CORD AND REFER SERVICING TO A QUALIFIED TECHNICIAN.
- Do not use this unit in places that are extremely hot, cold, dusty or humid.
- Do not restrict the airflow of this unit by placing it somewhere with poor airflow, by covering it with a cloth, by placing it on bedding or carpeting.
SAFETY INFORMATION
- When connecting or disconnecting the AC power cord, grip the plug and not the cord itself. Pulling the cord may damage it and create a hazard.
- When you are not going to use the unit for a long period of time, disconnect the AC power cord.
RATING PLATE LOCATION
The rating plate is located on the rear of the unit. FCC STATEMENTS
NOTE: This unit has been tested and found to comply with the limits for a Class B digital device, pursuant to Part 15 of the FCC Rules. These limits are designed to provide reasonable protection against harmful interference in a residential installation.
This unit generates, uses and can radiate radio frequency energy and, if not installed and used in accordance with the instructions, may cause harmful interference to radio communication. However, there is no guarantee that interference will not occur in a particular installation. If this unit does cause harmful interference to radio or television reception, which can be determined by turning the unit off and on, the user is encouraged to try to correct the interference by one or more of the following measures:
- Reorient or relocate the receiving antenna.
- Increase the separation between the unit and receiver.
-Connect the unit into an outlet on a circuit different from that to which the receiver is connected. - Consult the dealer or an experienced radio/TV technician for help.

WARNING:
Changes or modifications to this unit not expressly approved by the party responsible for compliance could void the user authority to operate the unit.
IMPORTANT SAFETY INSTRUCTIONS
1)Read these instructions.
2)Keep these instructions.
3)Heed all warnings.
4)Follow all instructions.
5)Do not use this apparatus near water.
6)Clean only with a dry cloth.
7)Do not block any ventilation openings. Install in accordance with the manufacturer's instructions.
8)Do not install near any heat sources such as radiators, heat registers, stoves, or other apparatus (Including amplifiers) that produce heat.
9)Do not defect the safety purpose of the polarized or grounding-type plug. A polarized plug has two blades with one wider than the other. A groundingtype plug has two blades and a third grounding prong. The wide blade or the third prong is provided for your safety. If the provided plug does not fit into your wall outlet, consult an electrician for replacement of the obsolete outlet.
10) Protect the power cord from being walked on or pinched particularly at plugs, convenience receptacles, and the point where they exit from the apparatus.
11)Only use attachments / accessories specified by the manufacturer.
12)Use only with the cart, stand, tripod, bracket, or table specified by the manufacturer, or sold with the apparatus.

When a cart is used, use caution when moving the cart / apparatus combination to avoid injury from tip-over.
13)Unplug this apparatus during lightning Storms or when unused for long periods of time.
14)Refer all servicing to qualified service personnel. Servicing is required when the apparatus has been damaged in any way, such as the power cord or plug is damaged, liquid has been spilled or objects have fallen into the apparatus, the apparatus has been exposed to rain or moisture, does not operate normally, or has been dropped.
15) To prevent electric shock, ensure the grounding pin on the AC cord power plug is securely connected.
ACCESSIONS
Please check and identify the supplied accessories.
Remote control 1
Battery(AAA) 2
Warranty Card 1
Instruction Manual .x1
Base stand and 6 screws
Screw driver x1
GETTING STARTED
USING THE REMOTE CONTROL
-
Point the remote control at the remote sensor located on the unit.
-
When there is a strong ambient light source, the performance of the infrared remote sensor
may be degraded, causing unreliable operation.
The recommended effective distance for remote operation is about 16 feet (5 meters).
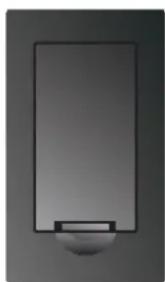
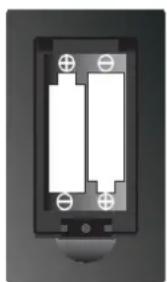
TO INSTALL THE BATTERIES
-
Open the battery door.
-
Insert 2"AAA"batteries
BATTERY REPLACEMENT
When the batteries become weak, the operating distance of the remote control is greatly reduced and you will need to replace the batteries.

CAUTION: Danger of explosion if battery is incorrectly replaced.
NOTES
- If the remote control is not going to be used for a long time, remove the batteries to avoid damage caused by battery leakage corrosion.
- Do not mix old and new batteries. Do not mix ALKALINE, standard (CARBON-ZINC) or rechargeable (NICKEL-CADMIUM) batteries.
Always remove batteries as soon as they become weak. - Weak batteries can leak and severely damage the remote control.

WARNING:
Do not dispose batteries in a fire. Batteries may explode or leak.
Batteries shall not be exposed to excessive heat such as sunshine, fire or the like.
CONTROL REFERENCE GUIDE
REMOTE CONTROL
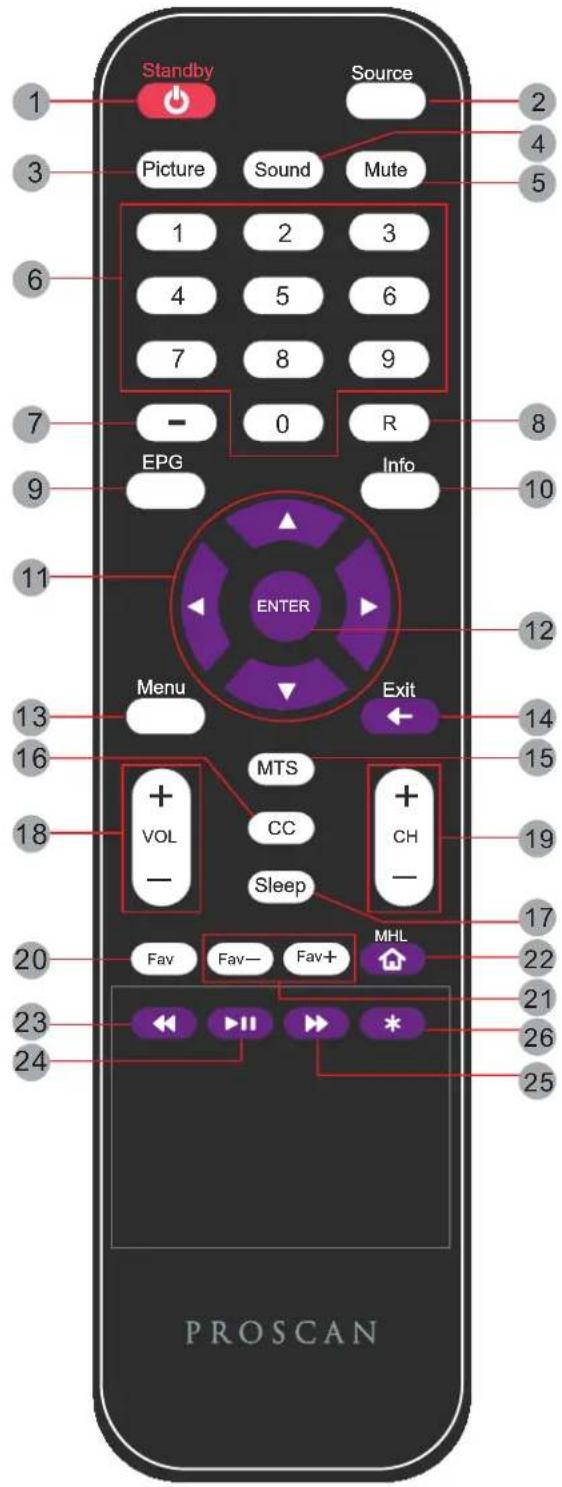
Universal Remote Code: 1218 (Universal Remote Control is not included.)
1.STANDBY To switch on the TV or make the TV into standby mode.
2.SOURCE Press this button to select an input source.
3.Picture Selects various preset picture settings.
- Sound Selects various preset sound settings.
5.MUTE Press this button to mute or restore sound.
6.0-9 Allows you to change the channel of the TV.
-
- Inserts the dash for selecting digital channels directly.
8.R Returns to the previous channel.
9.EPG Press this button to select the electronic programme guide in DTV mode.
-
Info Shows the display info.
-
UP/DOWN/LEFT/RIGHT
Moves the cursor upward/downward/to the left/to the right when making a selection. -
ENTER Press to confirm selections on a menu screen.
13.MENU Displays the OSD Menu of the TV.
14.Exit Press this button to exit the on screen display.
15.MTS To change among STEREO, MONO and SAP. If there is no second language available for the signal received, LED Display audio will output to mono.
16.CC Press the button to enter into the CC mode.
17.SLEEP To select the amount of time before your TV turns Off automatically.
18.VOL+/VOL-Increases/Decreases the Volume control.
-
CH + / CH- Skips to the next/previous channel on TV mode.
-
FAV Press this button to show the favourite list.
21.FAV+/FAV- Press this button to go through the FAV channel list.
CONTROL REFERENCE GUIDE
REMOTE CONTROL

Universal Remote Code: 1218 (Universal Remote Control is not included.)
22.MHL This button selects the source HDMI2 for MHL connection or regular HDMI connection. The button while using a ROKU™ product will return any current running program back to the ROKU™ home screen.
23. REWIND Under ROKU™ this button rewrites the current video being played.
24.PLAY/PAUSE Under ROKUTM this button plays or pauses the current video being played.
25.FAST FORWARD Under ROKU™ this button plays the current video at a faster pace.
26.STAR( Under ROKUTM this button gives the info ROKUTM stick.
CONTROL REFERENCE GUIDE
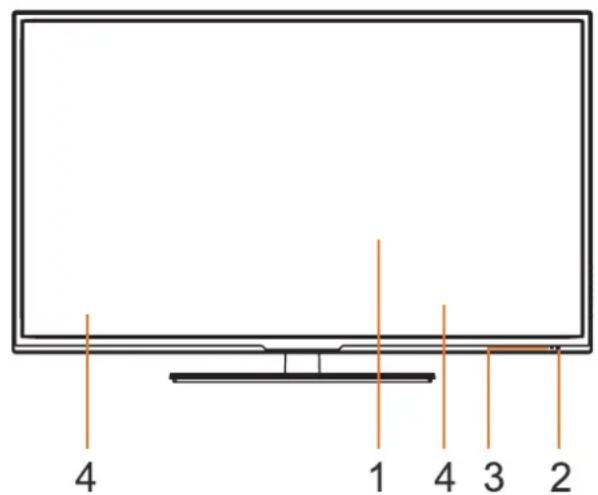
FRONT VIEW
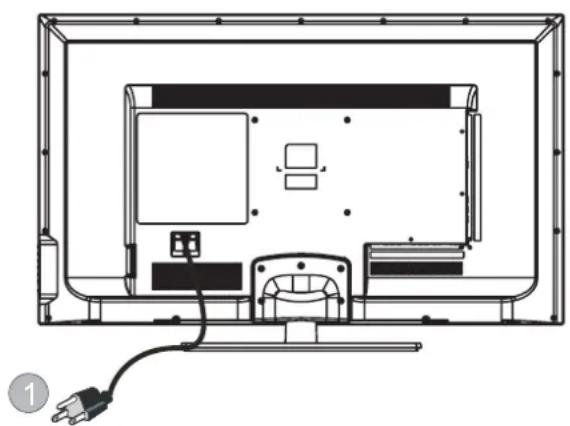
BACK VIEW
1.Color Screen
2. Remote Sensor
Do not block this sensor or the remote control will not work.
- Standby Indicator
Indicates whether the unit is ON or in STANDBY (OFF) mode.
Light in red: The unit is in STANDBY.
Light in blue:The unit is turned ON.
4.Speakers
1.Power cord
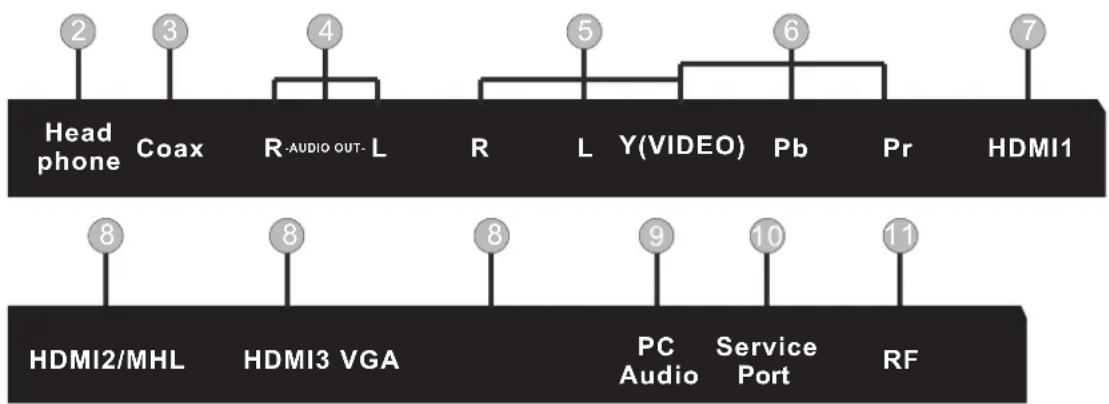
2. Headphone Jack
3.Coax OUT Jack
4.AUDIO OUT Jack
(Audio out- This connection is for sending out analog audio signal to the 2nd equipment.Red
is for Right Channel, white is for Left Channel.)
5.AV (VIDEO/ AUDIO R/L) IN
6. COMPONENT IN Jack
7.HDMI IN Jack
HDMI2 also doubles as the MHL connection for cell phones. MHL is a protocol where the TV will display what your cell phone displays. If your cell phone supports MHL you can purchase a MHL cable from any electronic store and connect it to HDMI2 and also your cell phone. Make sure the TV's source is changed to HDMI2 and turn on your cell phone. You should see an image of your cell phone screen. HDMI2 also supports ROKU™ streaming stick. Plug the ROKU stick to HDMI2, and switch your source to HDMI2. Afterwards use the purple colored buttons to access ROKU functions.
8.VGA IN Jack
9.PC AUDIO IN Jack
10. Service Port
11.TV ANTENNA Terminal
SIDE VIEW
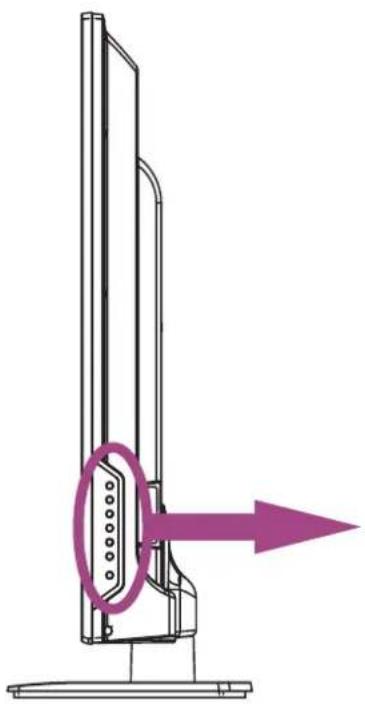
1 VOL+
2 VOL
3 CH+
4 CH-
5 MENU
6 SOURCE
7 STANDBY
1. VOL+ Button
This button increases the TV's volume. If a sub-menu is active, pressing this button will move the select right.
2. VOL-Button
This button decreases the TV's volume. If a sub-menu is active, pressing this button will move the selection left.
3. CH+ Button
This button changes the TV channel up.If the OSD is active,this button functions as up for the menu.
4. CH-Button
This button changes the TV channel down. If the OSD is active, this button functions as down for the menu.
5. Menu Button
This button activates the On Screen Display (OSD). If a sub-menu is active, pressing this button will exit the OSD.
6. SOURCE Button
Press to select the input source of the TV.
7. STANDBY Button
Turn on the TV by pressing the button once.
Press the button again to turn off the TV.
CONNECTIONS
CONNECTING A TV ANTENNA / CABLE / SATELLITE
To view television channels correctly, a signal must be received from one of the following sources:
- An indoor or outdoor aerial antenna
-A cable system - A satellite system
NOTE
For receiving over-the-air TV broadcasts, we recommend that you use an external fixed antenna. Should you require the use of a temporary antenna, please ensure that you purchase an antenna with sufficient ability to receive in weak signal areas. Only when you are in close proximity to a transmitter will a temporary antenna reproduce a signal as strongly as a fixed antenna.

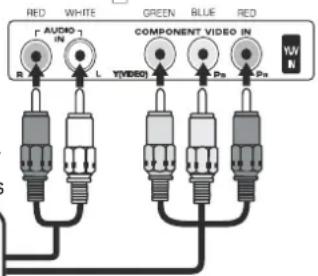
CONNECTING AN A/V DEVICE
To connect to other equipment such as a VCR, camcorder, satellite system or cable, etc.
CONNECTING DEVICES WITH A COMPOSITE (GREEN RCA-TYPE)
VIDEO OUTPUT
To connect A/V devices such as a VCR, video game system or camcorder.
Connecting to a VCR / Video Game System / Camcorder
Connect the AUDIO /VIDEO cable (not included) as shown.
Make sure you connect the cable from the other equipmenAudiOvDEoQbit (AV in)
NOTE
-
Please refer to the user manual for the other equipment for more information.
-
Composite video input (shared with component)
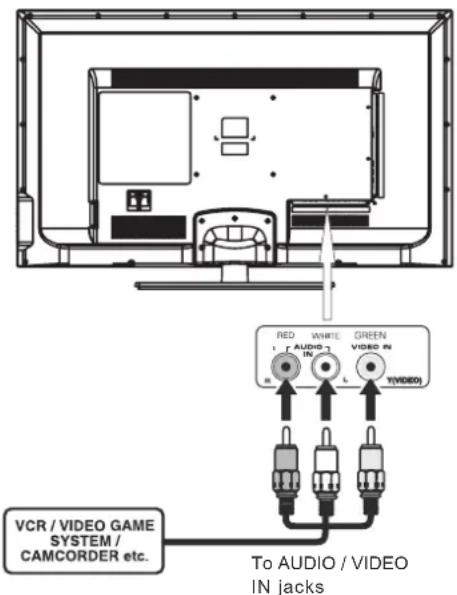
To AUDIO /VIDEO OUT jacks
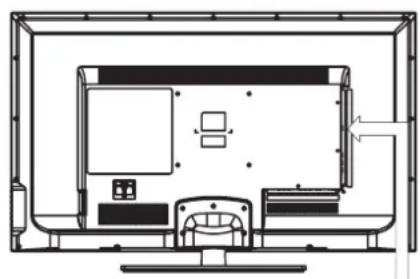
CONNECTIONS
CONNECTING A HIGH-DEFINITION (HD) SOURCE USINGCCOMPOKENON
High-Definition (HD) Devices with component video output must be connected to tRbPrinput.
Connect the component video cable and audio cable (not included) as shown.
Make sure you connect the component video cable and audio cable from the other equipment
(COMPONENT OUT and AUDIO OUT) to the unit COMPONENT IN.
NOTE
When connecting a DVD player to the television, the picture resolution is solely dependent upon the resolution supported by the DVD player attached. DVD player resolutions vary from 480i to 1080i. and this television can support DVD players up to a maximum resolution of 1080i.
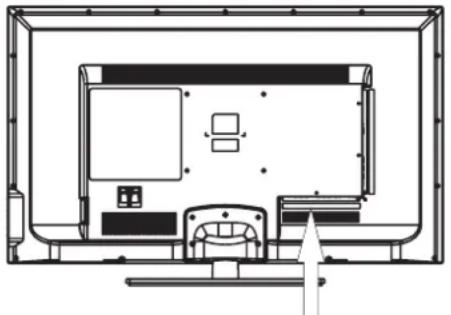
COMPONENT IN
To COMPONENT AUDIO IN jacks
To COMPONENT
VIDEO IN jacks
To COMPONENT
VIDEO OUT jacks
To COMPONENT AUDIO
OUT jacks

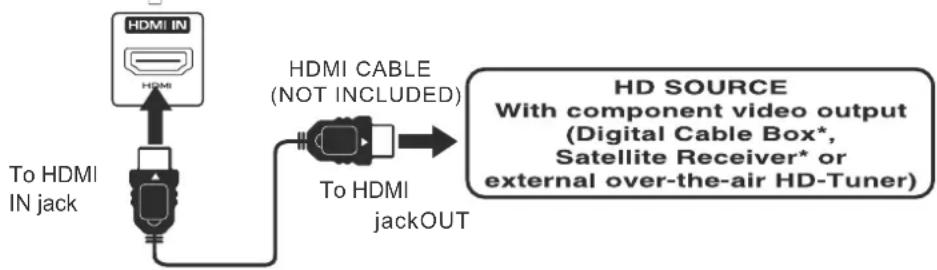
CONNECTING A HIGH-DEFINITION (HD) SOURCE USING HDMI CONNECTION
HDMI (High Definition Multimedia Interface) supports both video and audio on a single digital connection for use with DVD players, DTV, set-top boxes and other digital AV devices. HDMI was developed to provide the technologies of High Bandwidth Digital Content Protection (HDCP) as well as Digital Visual Interface (DVI) in one specification. HDCP is used to protect digital content transmitted and received by DVI-compliant or HDMIcompliant displays.
HDMI has the capability to support standard, enhanced or high-definition video plus standard to multi-channel surround-sound audio. HDMI features include uncompressed digital video, a bandwidth of up to 2.2 gigabytes per second (with HDTV signals), one connector (instead of several cables and connectors), and communication between the AV source and AV devices such as DTVs.
Connect the HDMI cable (not included) as shown:
Make sure you connect the cable from the source equipment (HDMIn) (HDMI IN).
CONNECTIONS
CONNECTING APC
Connect the 15-pin D-SUB PC/VGA connector from your computer to the 15-pin D-SUB PC/VGA input on this unit using a monitor cable and an audio cable (not included) as shown.
Make sure you connect the cable from the computer (VGA) to this Dhot-PC OUT (VGA AUDIO nPC INd
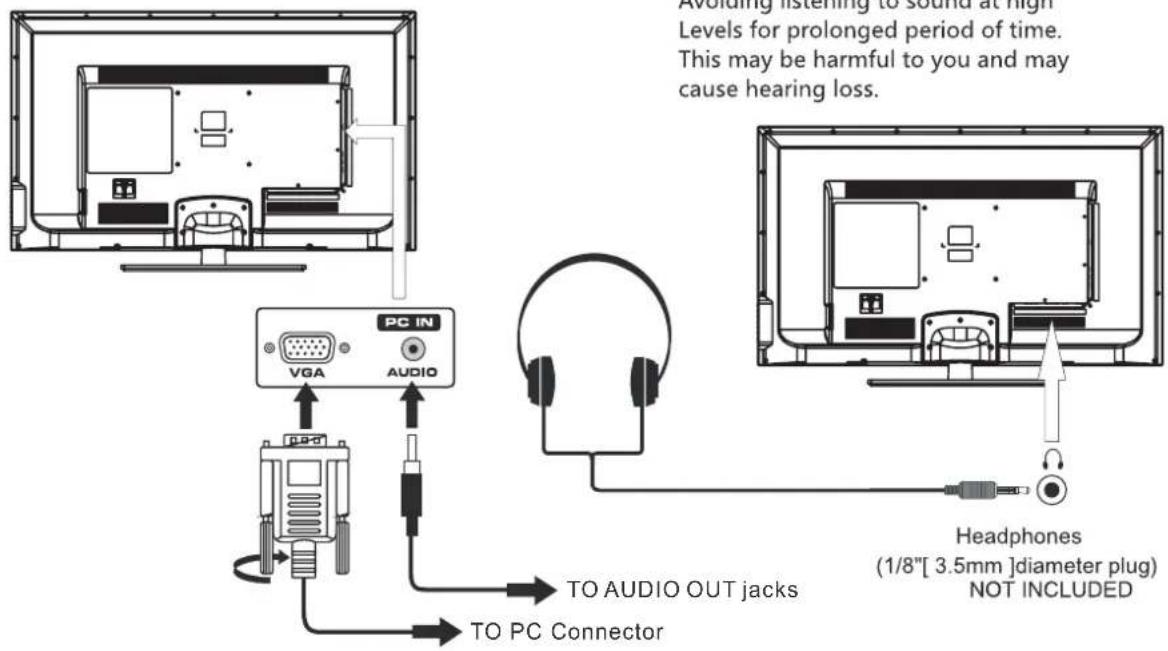
CONNECTING HEADPHONES
-
Turn down the volume before connecting headphones to the unit, then adjust the volume to your desired level.
-
When headphones are connected, no sound will come from the front speakers.
NOTE
Avoiding listening to sound at high Levels for prolonged period of time. This may be harmful to you and may cause hearing loss.
You can power on your TV unit before you make sure the power cord is inserted well. At the same time, please check that the rated voltage of your unit matches your local Voltage.
NOTE
- Insert the power plug fully into the socket outlet. (If the power plug is loose it could generate heat and cause fire.)
- Ensure that the power plug is easily accessible.
- Ensure the earth pin on the power plug is securely connected to prevent electrical shock.
- Do not touch the power plug with a wet hand. (This may cause electrical shock)
- Do not use any power cord other than that provided with this TV. (This may cause fire or electrical shock.)
- Do not damage the power cord.
(A damaged cord may cause fire or electrical shock.)
- Do not move the TV with the cord plugged in the socket outlet.
- Do not place a heavy object on the cord or place the cord near a high-temperature object.
- Do not twist the cord, bend it excessively, or stretch it.
- Do not pull on the cord. Hold onto the power plug body when disconnecting cord.
- Do not use a damaged power plug or socket outlet.
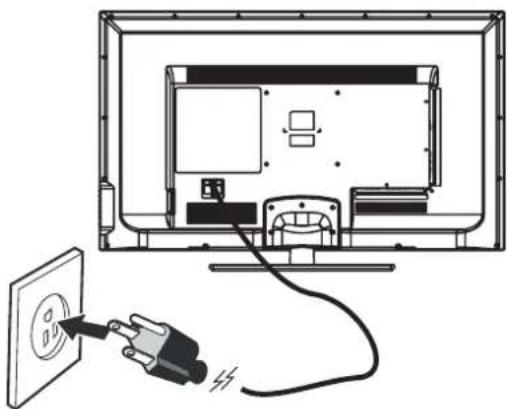
To AC wall outlet
CONNECTIONS
Connection to a Home Theater Audio System
For BEST audio performance
Connecting to a Home Theater System Dolby Digital can deliver optimal 2 channel stereo or surround sound with five discrete full range channels plus a sixth channel for a subwoofer.
Enjoy optimal sound reproduction from your system with a Dolby Digital amplifier that incorporates a digital coaxial input. Connect an optional digital cable directly to the television's Coax audio output to listen through all inputs except VGA.
(The VGA does not support digital audio)

How To Setup Digital Output
Press the MENU button on the remote control Press the right arrow button to select sound Press the down arrow button to highlight SPDIF type right Raw or PCM
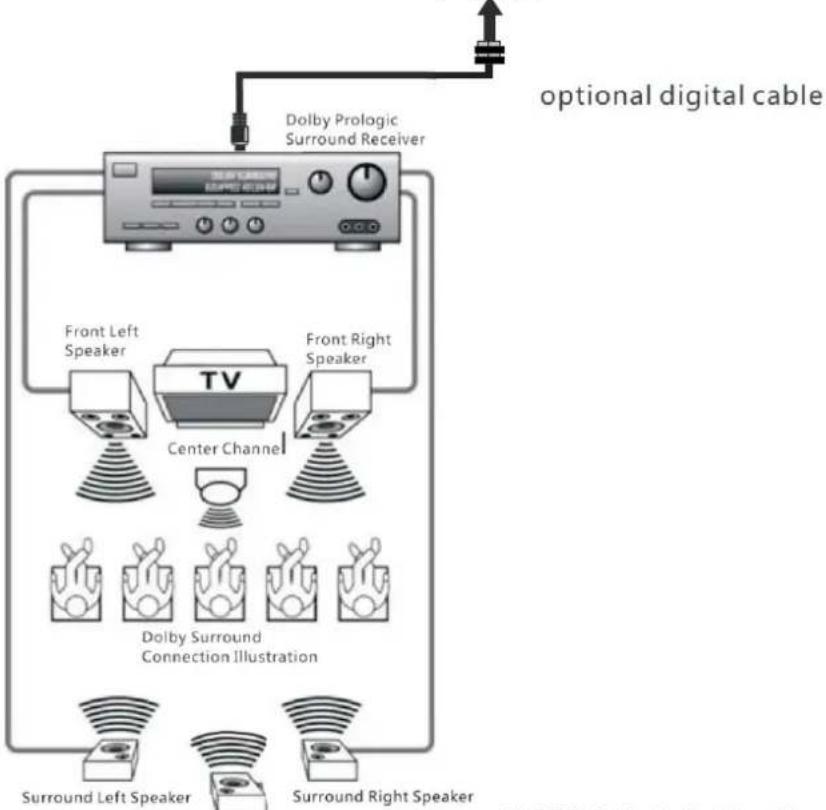
Subwoofer
*NOTE: Refer to the User Manual from your home theater equipment for recommended audio settings.
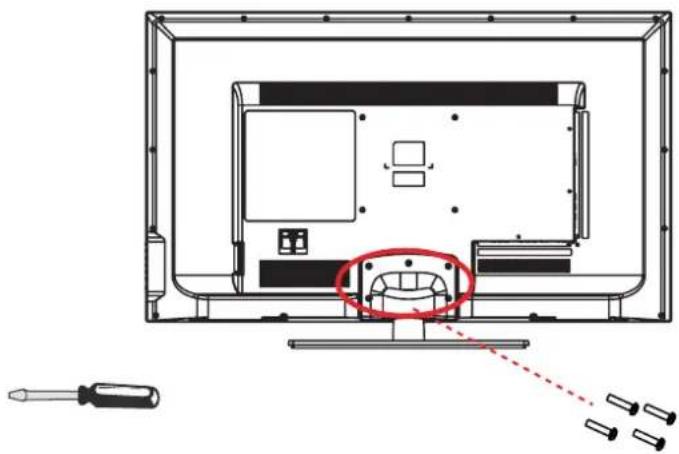
WALL MOUNT INSTALLATION
INSTALLING REMOVING THE BASE STAND
WARNING : The LED Display is very fragile , and must be protected at all times when removing the base Stand .
Be sure that no hard or sharp object or anything that could scratch or damage the LED display comes into contact with it. Do NOT exert pressure on the front of the unit at any time because the screen could crack
- Disconnect all cables or cords connected to the unit.
- Lay the unit down on a flat surface with the back side facing up Please make sure to place a soft cushioned material(such as a pillow or thick piece of foam beneath the screen.
- To remove the base stand loosen screws off the holes then pull downwards to release the base stand.
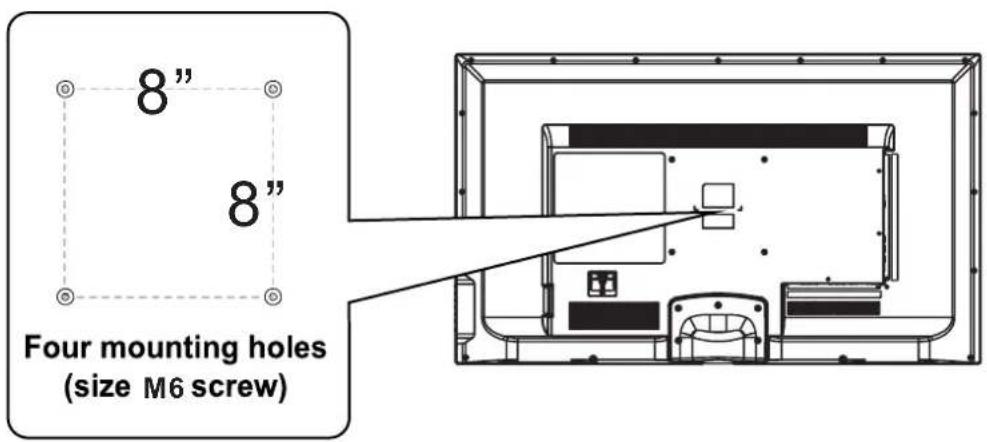
MOUNTING ON THE WALL
This unit is VESA-compliant, and is designed to be wall-mounted with a VESA-compliant 8'' × 8''
(200mm x 200mm) mounting kit designed for flat-panel TVs (not supplied). Mount this unit according to the instructions included in the mounting kit.
Length of screw should not exceed 12mm
NOTE
Remove the base stand before mounting the unit on the wall.
INITIAL SETUP
PUTTING THE UNIT ON A PROPER PLACE
When you turn on your television set for the first time, be sure to place it on a solid stable surface.
To avoid danger, do not expose the TV to water, or a heat source (e.g. lamp, candle, radiator).
Do not obstruct the ventilation grid at the rear and be sure to leave sufficient gaps around the unit.
TURNING THE UNIT ON FOR THE FIRST TIME
After you have initially connected your TV antenna or cable, turn the television ON.
A screen will display asking you to run a Channel Auto Scanto search and receive available local digital channels.
It is here where you will select antenna options and run Channel Auto Scan
Channels will be stored in the TV tuner.
Press the Enter on the remote control.
Using the buttons, scroll to highlight chaneel mode.
Press the button to highlight AIR/CABLE.
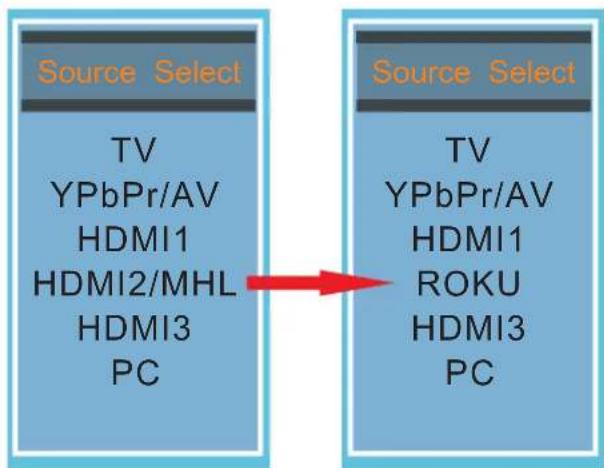
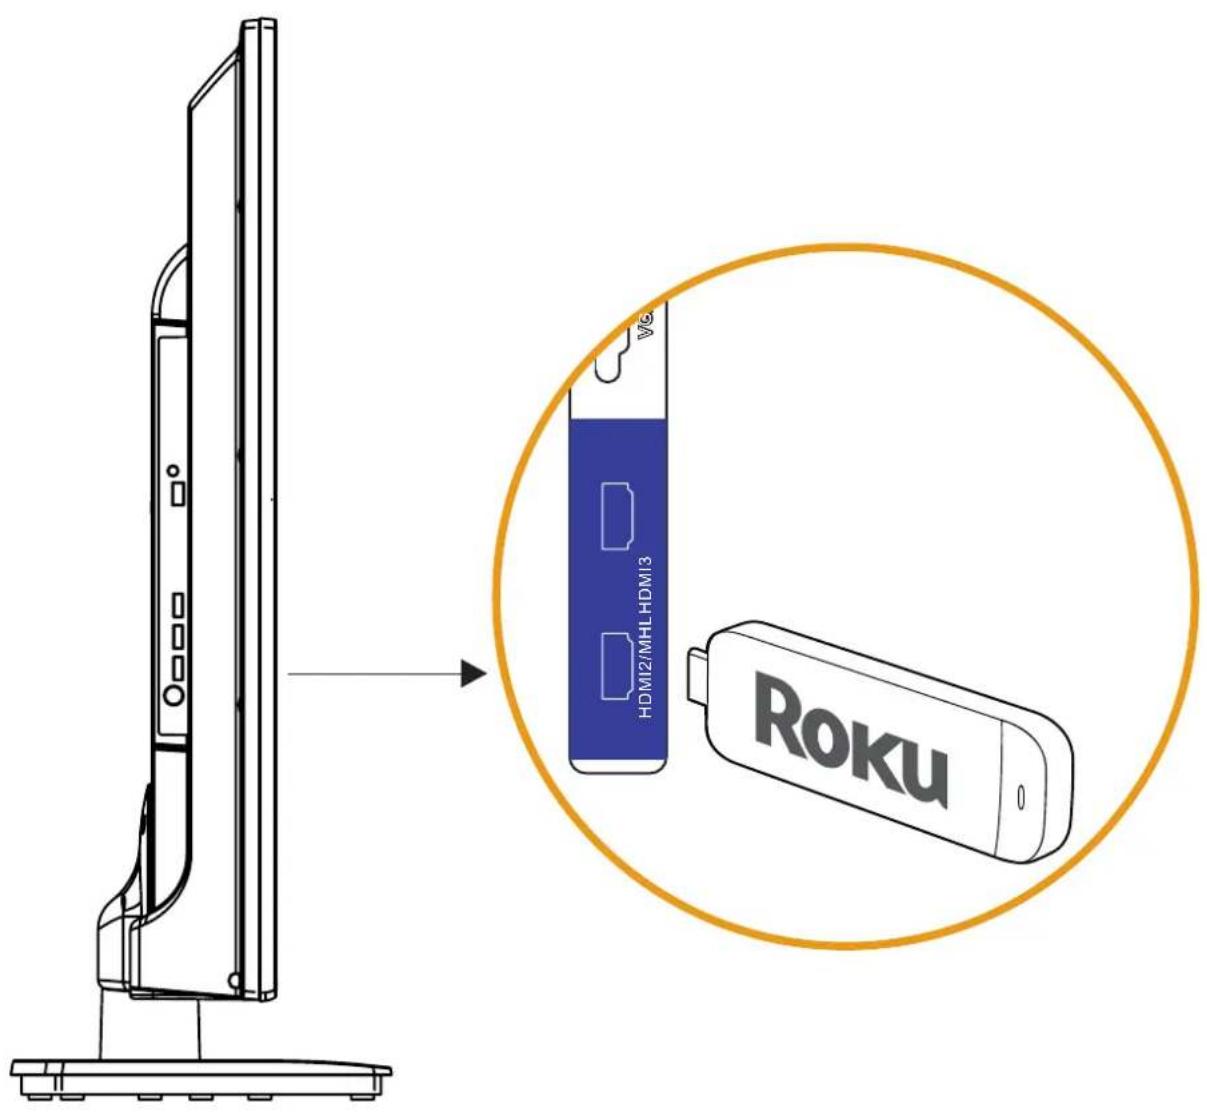
SOURCE SELECTION
- Press the Source the remote control.
- Use or button to select the optionsthe (TV,YPbPr/AV,HDMI1,HDMI2/MHL,HDMI3,PC) and select any of them using the button on the ENTER (The screen will change to your desired sU)ce 3.The source HDMI 2 / MHL will automatically display to the word ROKU if a ROKU streaming stick is connected.
Note: Before watching please make sure all necessary cables and devices are connected.
TV SETUP
CHANNEL MENU
Press MENU button to display the main menu.
Press button to select CHANNEL in the main menu, it will highlight the first option.

AIR/CABLE
This feature allows you to switch between air (such as using antenna) and cable.
AUTO SCAN
This feature searches channels automatically for you.
FAVORITE
This feature gives the favorite list of channels added by you.
CHANNEL LIST
This feature shows the list of stored channels.
SHOW / HIDE
This feature tells you if you have chosen for channel to be skipped.
CHANNEL NUMBER
This feature tells you what channel you are currently on.
CHANNEL LABEL
This feature changes the name of the channel.
Please Note:
The channel options are only available when you select TV as your SOURCE. When you open the OSD menu on other sources (HDMI, YPbYr/AV, PC) these options will be grayed out.
TV SETUP
PICTURE MENU
Press MENU button to display the main menu.
Press / button to select PICTURE in the main menu, it will highlight the first option.

PICTURE MODE
This feature changes various color modes for the TV.
BRIGHTNESS
This feature changes the picture's detail in dark colors.
CONTRAST
This feature changes the difference between dark and bright objects.
COLOR
This feature changes the amount of color in the picture.
TINT
This feature changes the white balance of the color.
SHARPNESS
This feature changes the picture quality.
COLOR TEMPERATURE
This feature adjusts the color temperature of the TV, giving warm, normal, cool.
ADVANCED SETTINGS
a)ASPECT RATIO This feature changes the various aspects of the TV's video. (Aspects include wide, zoom, cinema, normal).
b)NOISE REDUCTION This feature reduces general pixilation by blurring them.
c)DYNAMIC CONTRAST This feature allows the TV to automatically adjust the contrast of the TV depending on the picture you are viewing.
TV SETUP
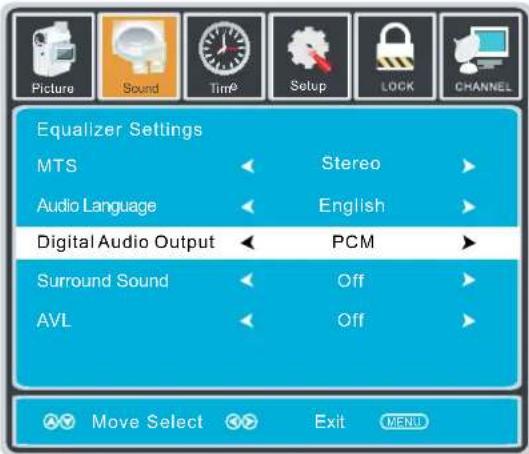
SOUND MENU
Press MENU button to display the main menu.
Press / button to select SOUND in the main menu, it will highlight the first option.
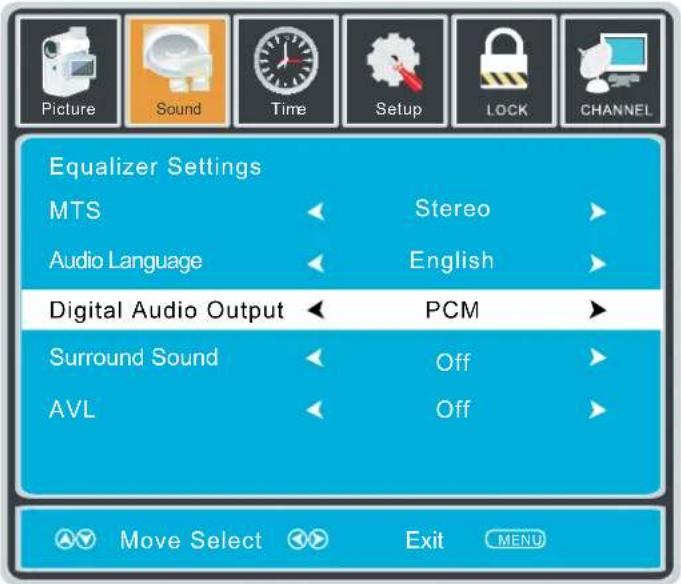
EQUALIZER SETTINGS
This feature enables the internal equalizer of the speakers.
You can adjust the settings individually or use the presets (standard, music, movie, sports, user).
MTS
This feature adjusts the second audio programming in analog channels.
AUDIO LANGUAGE
This feature adjusts the digital second audio programming in digital channels.
DIGITAL AUDIO OUTPUT
This feature adjusts the digital audio output.
SURROUND SOUND
This feature adjusts the dimensional surround effect on or off (for built-in speakers only).
AVL
This feature adjusts the auto volume leveler enabling volume protection from overly loud commercials.
Please Note:
AUDIO LANGUAGE and MTS are dependent on the broadcasting station's support and are only available under the source TV.
TV SETUP
TIME MENU
Press MENU button to display the main menu.
Press button to select TIME in the main menu, it will highlight the first option.
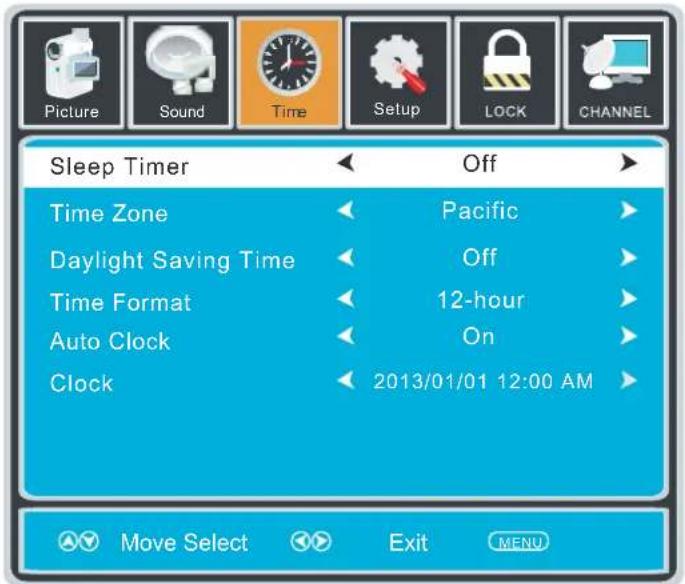
SLEEP TIMER
This timer automatically turns off the TV at the designated time.
TIME ZONE
This option adjusts the global time zone for the TV.
This option toggles the daylight saving time feature.
TIME FORMAT
This option adjusts the display format for the time.
AUTO CLOCK
This option enables the TV to sync time with the antenna.
(Put it on AUTO if you have an antenna attached to the TV.If you have CABLE or SATELLITE or anything else please use make sure AUTO CLOCK is turned off)
CLOCK
This option adjusts the time and date of the TV. You need to disable AUTO CLOCK in order to use this function.
Please Note:
The TIME function will only keep accurate time if the TV is plugged into a power source.
If the TV is unplugged or the power strip is turned off, the TV's time will not be accurate.
TV SETUP
SETUP MENU
Press MENU button to display the main menu.
Press button to select SETUP in the main menu, it will highlight the first option.
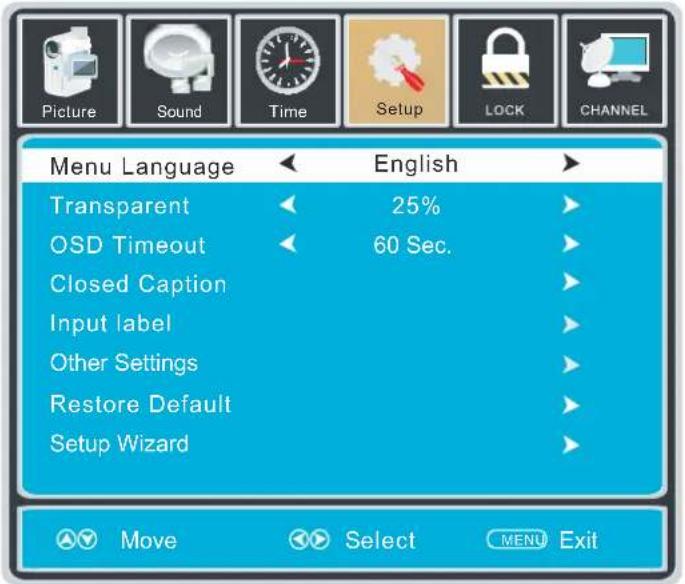
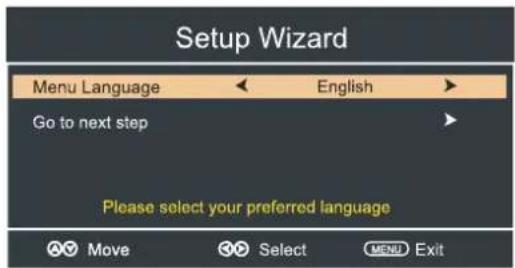
MENULANGUAGE
This option changes the language of the TV's OSD menu.
TRANSPARENT
This option changes the transparency of the menu allowing background TV images to show through.
OSD TIMEOUT
This option changes the time which the TV's OSD menu automatically goes off.
CLOSED CAPTION
This option displays words on the TV.
INPUT LABEL
This option changes the source names to your personal preference.
OTHER SETTINGS
This option adjusts miscellaneous options of the TV.
AUDIO ONLY-This option turns off the screen while the audio is still playing.
RESTORE DEFAULT
This option restores all the changes in the OSD menu back to the default factory settings.
SETUP WIZARD
This option enables the TV to show you the setup wizard of the TV again.
Please Note:
Closed captioning is only available under AV and TV ports.
Closed captioning depends on your TV program's support. Sometimes due to the TV channel or the signal, closed captioning will not be available.
In United States, closed captioning under analog signals is CC1.
In United States, closed captioning under digital signal is Service1.
TV SETUP
LOCK MENU
Press MENU button to display the main menu.
Press / button to select LOCK in the main menu, it will highlight the first option.
Press "0000" for the lock password.

CHANGE PASSWORD
This option allows you to change the LOCK menu password.
SYSTEM LOCK
This option enables parental locking and filtering for the TV.
US RATING
This option filters US TV programming and movies.
CANADA RATING
This option filters CANADA TV ratings.
RRT SETTING
This feature is a downloadable rating filter based on TV broadcasts. With the transition of TV broadcasts to digital, future changes, and enhancements in how TV shows are rated for content are possible.
RESET RRT
This option resets the RRT5 settings.
Please Note:
Please refer to RATINGS EXPLAINED for more information on ratings definitions.
Downloadable rating and clear downloadable data might be grayed out depending on the Tvs tations support.
RRT5 options are based on TV broadcasts, if it is grayed out, then it is not available in your region.
Hi!
Let'sgetstarted.

Roku

Roku Streaming Stick™
What you need
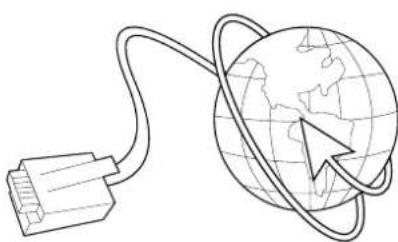
High speed Internet
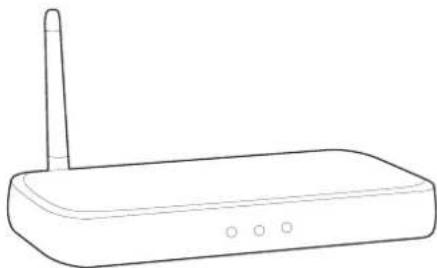
Wireless Router
Know your
Streaming Stick
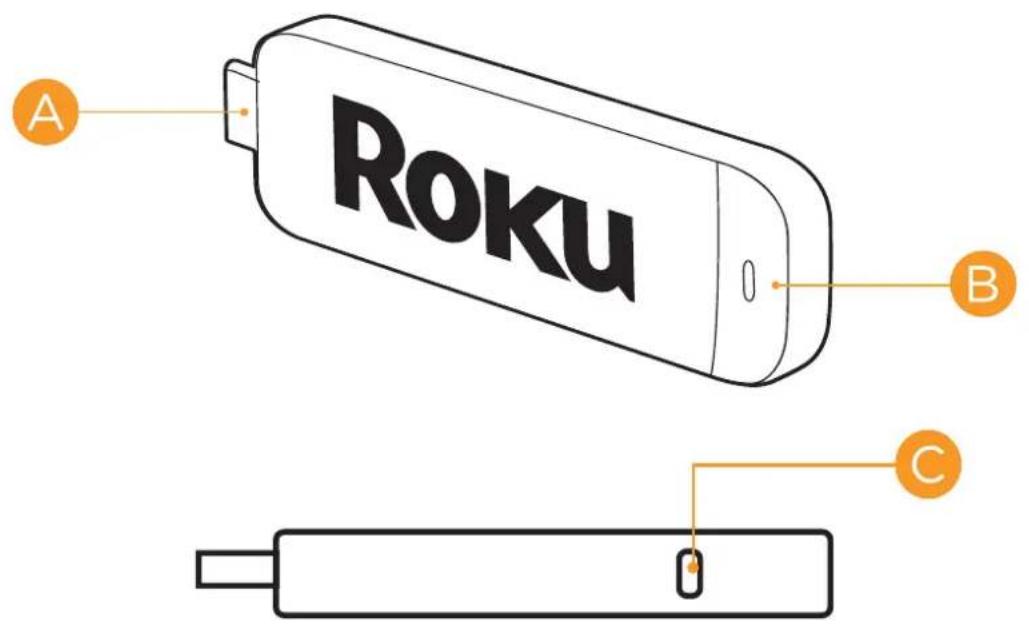

[MHL CONNECTOR] Plugs into the
MHL port on the back of your TV.

[STATUS LIGHT] Signifies it is on
when lit, or activity when flashing.

[RESET BUTTON] Used to reset
your Streaming Stick
What to do
Plug it in
Plug your Roku Streaming Stick into the MHL port of your Roku Ready TV. Simple as that!
Connect to network
Now you can grab your remote and jump right into guided setup. Have your network name and password ready and do the following:
- Select your network from the list of available networks.
- Enter your network password, if you use one. Remember, network passwords are case sensitive.
What to do (cont.)
Complete guided setup
It’s the final stretch and hooray—it’s a breeze! Continue following the on-screen instructions and you’ll:
Get the latest software.
- Link the Roku Streaming Stick to your Roku account on your computer.

Your Roku account:
During setup, you’ll be prompted to create your Roku account
online at roku.com/link. Your Roku Streaming Stick will generate a unique code that links your player to your new account. Roku accounts are free and secure. And while a valid credit card number is required to create your account, rest assured you will only be charged if you authorize purchases of channels and games from the Roku Channel Store.
Troubleshooting
Having trouble completing setup? Don't worry: it's usually an easy fix.
If you cannot see a picture on your TV:
Make sure your TV is turned on. (This tip could save you some embarrassment.)
Make sure the video input on your TV or home theater receiver is set to match the output (usually HDMI or MHL) used with the Roku Streaming Stick. Most TVs have an Input button (or a source button) on the remote control to change video inputs.
If you cannot connect to your wireless home network during guided setup:
If you are not getting 3 or more signal-strength bars above your wireless network, adjust the location of your Roku Streaming Stick and/or wireless router. Make sure there are no obstructions, like cement walls, between your Roku Streaming Stick and your wireless router.
Make sure you select the correct wireless router name on the "Wireless" screen.
Troubleshooting (cont.)
Make sure you enter the correct password, if your network is security-enabled (password is case sensitive).
If you have turned off SSID broadcasting on your wireless router, you can add your network by selecting "My network is not shown" from the "Wireless" screen.
If you cannot hear sound:
Make sure the connectors on the cables between your TV and home theater receiver are pushed in all the way.
(cont.)
Make sure the volume on your TV or home theater receiver is turned up and isn't on mute.
Roku Streaming Stick™
Important Product Information
The License Agreement
The Roku and third-party software license terms can be found at: www.roku.com/ license. Use of the Roku Streaming Stick ("Streaming Stick") constitutes acceptance of as well as agreement to those license terms.
One (1) Year Limited Hardware Warranty
Subject to the additional terms and conditions set forth below, Roku provides this Limited Warranty:
- Only to the person or entity that originally purchased the Streaming Stick from Roku or from one of its authorized re-sellers or distributors; and
- Only for Streaming Sticks purchased and delivered to the end user within the United States and Canada.
Limited Warranty
Roku warrants the Streaming Stick hardware against defects in materials and workmanship under normal use for a period of one (1) year from the date of purchase ("Warranty Period"). If Roku determines that the Streaming Stick's hardware is defective, Roku will either repair the unit or replace the unit with either a new or rebuilt Streaming Stick, at its option. If the Warranty Period has expired or is otherwise not applicable (see Scope and Limitation on Warranty below), we will return the Streaming Stick to you. More information about this warranty can be found at www.roku.com/support. THE FOREGOING SETS FORTH ROKU'S SOLE OBLIGATION AND YOUR EXCLUSIVE REMEDY IN THE EVENT OF ANY BREACH OF THIS LIMITED WARRANTY.
Return and Warranty Service Process
Please access and review the online help resources at www.roku.com/support before seeking warranty service. To return or obtain warranty service for a
Streaming Stick, you must first obtain a Return Merchandise Authorization (RMA) number from a Customer Support Representative (CSR) at Roku. Customer Support contact information can be found by visiting www.roku.com/support. RMA numbers expire thirty days from issuance. Roku may attempt to troubleshoot a warranty-related problem prior to issuing a RMA number. Please be prepared to provide additional information upon request. Once a RMA number is obtained, you must ship your Streaming Stick, freight prepaid, together with proof of purchase and all accessories, in either the original packaging or packaging affording an equal degree of protection, to the Roku authorized distribution facility identified by the CSR.
Failure to return any of the accessories could result in a delay and/or result in an invoice to you or credit to Roku for the missing accessories.
Important: When emailing for a RMA number, please provide the following information with your request: (a) model number, (b) serial number, (c) problem description, (d) software version (located in the System Configuration menu), (e) date of purchase, (f) place of purchase (re-seller or online place of purchase), and (g) return shipping address (P.O. boxes are not accepted).
Scope of and Limitation on Warranty
The warranty on the Streaming Stick is limited to the repair or replacement of defective units as described in the Limited Warranty section above. This warranty does not cover customer training or education, installation, set up adjustments, or signal reception problems. This warranty also does not cover any issue related to the service provided by your Service Provider, including but not limited to service disruption, changes in service terms, changes in offerings, changes in format, or technical problems. This warranty does dnot dcover damage ddue dto acts dof dGod, daccident, misuse, dabuse, negligence, commercial use or modification of, or to any part of, your Streaming Stick. This warranty does not cover damage due to improper operation or maintenance, connection to improper voltage supply or attempted repair by anyone other than a facility authorized by Roku to service your Streaming Stick. This warranty does not cover consumables (such as fuses and batteries).
Legal Notices
Federal Communication Commission Interference Statement
This dequipment dhas dbeen dttested dand dfound dto dcomply dwith dthe dlimits dfor da dClass dE digital device, pursuant to Part 15 of the FCC Rules. These limits are designed to provide reasonable protection against harmful interference in a residential installation. This equipment generates, uses and can radiate radio frequency energy and, if not installed and used in accordance with the instructions, may cause harmful interference to radio communications. However, there is no guarantee that interference will not occur in a particular installation. If this equipment does cause harmful interference to radio or television reception, which can be determined by turning the equipment off and on, the user is encouraged to try to correct the interference by one of the following measures:
- Reorient or relocate the receiving antenna.
- Increase the separation between the equipment and receiver.
- Connect the equipment into an outlet on a circuit different from that to which the receiver is connected.
- Consult the dealer or an experienced radio/TV technician for help.
This ddevice dcomplies dwith dPart d15 dof dthe dFCC dRules. dOperation dis dsubject dto dthe following two conditions: (1) This device may not cause harmful interference, and (2) this device must accept any interference received, including interference that may cause undesired operation.
FCC Caution: Any changes or modifications not expressly approved by the party responsible for compliance could void the user's authority to operate this equipment.
IEEE 802.11b or 802.11g operation of this product in the U.S.A. is firmware-limited to channels 1 through 11.
Wireless Radio Use:
This device is restricted to indoor use when operating in the 5.15 to 5.25 GHz frequency band.
IMPORTANT NOTE:
FCC Radiation Exposure Statement:
This equipment complies with FCC radiation exposure limits set forth for an uncontrolled environment. This equipment should be installed and operated with minimum distance 20cm between the radiator and your body.
This transmitter must not be co-located or operating in conjunction with any other antenna or transmitter.
Note to US model owner:
To comply with US FCC regulation, the country selection function has been completely removed from all US models.
The availability of some specific channels and/or operational frequency bands are country dependent and are firmware programmed at the factory to match the intended destination. The firmware setting is not accessible by the end user.
Safety Precautions
The Streaming Stick has been designed with the highest concern for safety. However, any electrical device, if used improperly, has the potential for causing fire, electrical shock or personal injury. To help ensure accident-free operation, follow these guidelines:
- Observe all warnings, precautions and instructions.
- Stop use, unplug the device that the Streaming Stick is inserted into from the electrical outlet and disconnect any other cables immediately if the Streaming Stick or the device functions in an abnormal manner, produces unusual sounds or smells or becomes too hot to touch.
- For more information on product safety and troubleshooting, please go to www. roku.com/support.
Use and Handling
- Keep the Streaming Stick and any accessories, including the remote, out of the reach of small children.
- Do not touch the Streaming Stick during an electrical storm.
- Do not allow liquid, small particles or other foreign objects to get into the Streaming Stick or accessories.
- Do not expose the Streaming Stick to smoke or steam.
- Do not expose the Streaming Stick or accessories to high, temperatures, high humidity or direct sunlight.
www.roku.com
DISPLAY MODE
PC FORMATS
| SUPPORTED PC INPUT MODE | |||
| Resout ion | Horizontal Scanning Frequency (KHz) | Vertical Scanning Frequency (Hz) | Form at |
| 640 x 480 | 31.5 | 60.0 | DOS |
| 800 x 600 | 35.1 | 56.2 | VESA |
| 800 x 600 | 37.9 | 60.0 | VESA |
| 1024 x 768 | 48.4 | 60.0 | VESA |
| 1360 x 768 | 47.7 | 60.0 | VESA |
| 1920 x 1080 | 66.6 | 60.0 | VESA |
NOTE:
This product does not support the display mode not listed above. In order to achieve the best display effect, please select the above-listed 6 display modes input signal.
Because of the difference of display drivers output signal (especially non-standard signal output), the display image may appear little disturbance which can be adjusted on the PC menu.
To prolong this unit's service life, please set your computer to power management mode.
VIDEO FORMATS
| SUPPORTED COMPONENT / HDMI INPUT MODE | |||
| Resolution | Horizontal Scanning Frequency (KHz) | Vertical Scanning Frequency (Hz) | Format |
| 720 480 | 31.47 | 59.94 | 480 i |
| 720 480 | 15.734 | 59.94 | 480 p |
| 1280 X20 | 37.5 | 50 | 720 p |
| 1280 X20 | 45 | 60 | 720 p |
| 1920 X080 | 31.25 | 50 | 1080 i |
| 1920 X080 | 33.75 | 60 | 1080 i |
| 1920 X080 | 27 | 24 | 1080 p |
| 1920 X080 | 56.25 | 50 | 1080 p |
| 1920 X080 | 67.50 | 60 | 1080 p |
NOTE:
The above listed formats are also related to the AV devices you are about to connect. Before you connect this unit with others please read all instructions carefully and make sure all necessary cables are connected.
This unit may be incompatible with some other formats which are not meet the above conditions.
SPECIFICATION
| Model Description 50"LED TV | ||
| Panel | Panel Type | LED Panel |
| Diagonal Size | 50 inches | |
| Screen Format 16 9: | ||
| Resolution | 1920 x 1080 | |
| Brightness | 250 nit | |
| Contrast | 3000:1 | |
| View Angle | 178(H)/178(V) | |
| Response Time | 6.5 ms | |
| Maximum Color | 16.7M colors | |
| Systems | Color System | ATSC/QAM/NTSC |
| Sound System | M | |
| Audio System | BTSC | |
| Sound Output | L/R Speaker: 10 W + 10 W | |
| Input / Output Jacks | RF Input 75 ohm external terminal | |
| HDMI Input | Video 480i 480p 720p 1080i, 1080p.: , , , , Audio: Two channel linear PCM 32, 44.1 and 48kHz, 16, 20 and 24 bits | |
| PC-RGB Input | D-sub 15pinG: 0.7Vp-p, 75ohmsB: 0.7Vp-p, 75ohmsR: 0.7Vp-p, 75ohms | |
| Composite Video Input | 1.0 Vp-p, 75ohms RCA | |
| Component/Y Pb Pr Input | RCAY: 1.0 Vp-p, 75ohms, 0.3V negative syncPb: 0.7Vp-p, 75ohmsPr: 0.7Vp-p, 75ohms | |
| Sound Input | AV AUDIO: For CVBS/COMPONENT Audio inputPC AUDIO: For PC RGB Audio input500mV rms, Impedance: 20k ohms | |
| Power | Power Requirement | 100-240V~ 50/60Hz |
| Rated Power Consumption | 100 W | |
This manual is only for your reference.
Specifications are subject to update without prior notice.
TROUBLESHOOTING GUIDE
SYMPTOM CAUSE AND REMEDY(
TV
Bad Picture (snow, Check the location of the antenna and adjust it if necessary.
multiple images -Make sure the antenna cable is firmly connected.
distortion,blurry) -Make sure all input cables are firmly connected.
No sound. Increase the volume.
- Check whether the mute function has been activated on the Remote Control.
Black and White Check the PICTURE setting within the PICTURE menu.
picture. Check to make sure the program you are watching is broadcast in Color and not Black & White.
No picture or sound. -Make sure the unit is plugged in and turned on.
Make sure that the ATV mode is selected.
- Try a new channel to check for possible station trouble.
- Make sure the antenna is connected properly.
- Increase the volume.
- Make sure the antenna or audio/video source device is working properly.
- Make sure all cables are firmly connected.
- Check for local interference.
Coloredpatches of - Make sure there are no unshielded electrical devices nearby picture. that are causing interference.
- Turn the TV off for 30 minutes, then try it again.
Panel function key does Under the influence of electrostatic phenomenon, the product not respond correctly. may malfunction and require usertopowerreset.
- Unplug and re-plug the AC power cord.
The display monitor's panel goes hot. LED TV takes inside lighten phosphor. It may increase the temperature of the screen in some occasions. It's not a defect.
Unusual dots Black dots and Bright points may appear on the LED screen. This is a structural property of the LED panel and is not a defect.
Stripes on screen Adjust the impulse phase may decrease stripes. RGB in
The top of the monitor - It may occur during long-time working. It's not a defect. gets hot
Unable to select a The channel may be skipped. Choose this channel by certain channel. directly selecting the buttons from the remote control.
Disorder display at power on. This may be caused because of a very short interval between POWER OFF and ON.
- Unplug the power and restart.
CONTENU
| 1 | MISES EN GARDE DE SECURITÉ | 1 | |
| 2 | CONSIGNES DE SECURITÉ IMPORTANTES | 2 | |
| 3 | ACCESSOIRE | 3 | |
| 4 | PRÉPARATIFS | 3 | |
| 5 | GUIDE DE RÉFERENCE DES COMMANDES | Télécommande | 4 |
| Vue De Devant | 6 | ||
| Vue Arrière | 6 | ||
| Vue De Côté | 7 | ||
| 6 | CONNEXIONS | Connexion Antenne | 8 |
| Connexion AV | 8 | ||
| Connexion Y Pb Pr | 9 | ||
| Connexion HDMI | 9 | ||
| Connexion VGA | 10 | ||
| Connexion Headphone | 10 | ||
| Branchement du cordon d'alimentation | 10 | ||
| Connexion Coax(SPDIF) | 11 | ||
| 7 | MONTAGE MURAL | 12 | |
| 8 | INSTALLATION RAPIDE | Mise De L'appareil Dans Une Place Propre | 13 |
| Selection De Source | 13 | ||
| Mise En Circuit Initiale De L'Appareil | 13 | ||
| 9 | RÉGLAGE INITIAL DU TÉLÉVISEUR | Menu Program(CHANNEL) | 14 |
| Menu Image | 15 | ||
| Menu Audio | 16 | ||
| Menu Heure | 17 | ||
| Menu Option | 18 | ||
| Menu Verro(LOCK) | 19 |
CONTENU
10
Roku rapide guide
20
11
DO NOT EXPOSE THIS UNIT TO RAIN OR MOISTURE AVIS RISQUE DE CHOC ELECTRIQUE-NE PAS OUVRIR
AVERTISSEMENT:POUR REDUIRE LE RISQUE D'UN CHOC ELECTRIQUE,NE PAS RETIRER LE COUVERCLE (NI LE DOS).AUCUNE PIECE Necessitant L'ENTRETIEN PAR L'UTILISATEUR A L'INTEIRIEUR. POUR REPARATION,S'ADRESSER A UN REPARATEUR QUALIFIÉ.