
LT23X576 - Television JVC - Free user manual and instructions
Find the device manual for free LT23X576 JVC in PDF.
| Product Type | LCD Television |
| Brand | JVC |
| Model | LT23X576 |
| Screen Size | 58.2 cm (23 inches) diagonal |
| Display Resolution | 1280 x 768 (WXGA) |
| Aspect Ratio | 16:9 |
| Color System | NTSC |
| Power Supply | 120 V AC, 60 Hz |
| Power Consumption | 120 W (standby: 1 W) |
| Audio Output | 5 W + 5 W |
| Speakers | 2 x round 5.4 cm |
| Dimensions (with stand) | 619 x 498 x 225 mm |
| Weight (with stand) | 11.4 kg |
| Input Connectors | Antenna (RF), Composite (VIDEO-1), S-Video (VIDEO-1), Component Y/Pb/Pr (VIDEO-2), PC (D-SUB 15-pin), PC Audio (mini-jack), Headphones (mini-jack) |
| Main Functions | PIP (Picture-in-Picture), V-Chip (parental control), Sleep Timer, MTS (stereo/SAP), Closed Captions (CC), Multiple Aspect Ratio (Regular, Panorama, Cinema, Full, etc.) |
| Security | Channel Lock, V-Chip, Front Panel Lock |
| Screen Cleaning | Soft dry cloth; do not use chemical cleaners |
| Included Accessories | Remote Control RM-C1880, AA/R6 batteries x 2, AC adapter, power cord |
Frequently Asked Questions - LT23X576 JVC
User questions about LT23X576 JVC
0 question about this device. Answer the ones you know or ask your own.
Ask a new question about this device
Download the instructions for your Television in PDF format for free! Find your manual LT23X576 - JVC and take your electronic device back in hand. On this page are published all the documents necessary for the use of your device. LT23X576 by JVC.
USER MANUAL LT23X576 JVC
TELEVISEUR A ECRAN PLAT – LCD MANUEL D'INSTRUCTIONS
natural_image
Front view of a modern flat-screen computer monitor with a blank screen and stand (no visible text or symbols)
natural_image
Abstract black and white diagonal striped pattern with no text or symbolsImportant Safety Precautions
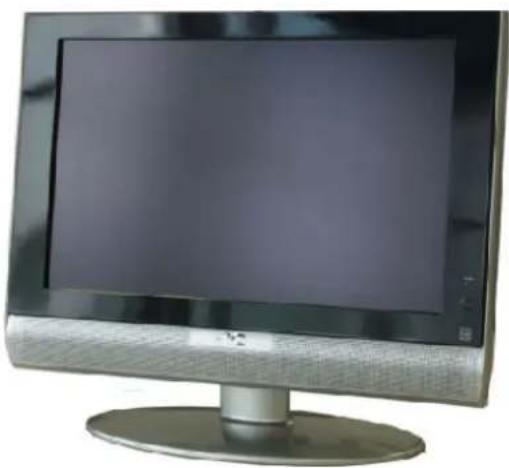
CAUTION
RISK OF ELECTRIC SHOCK DO NOT OPEN

CAUTION : To reduce the risk of electric shock. Do not remove cover (or back). No user serviceable parts inside. Refer servicing to qualified service personnel

The lightning flash with arrowhead symbol, within an equilateral triangle is intended to alert the user to the presence of uninsulated "dangerous voltage" within the product's enclosure that may be of sufficient magnitude to constitute a risk of electric shock to persons.

The exclamation point within an equilateral triangle is intended to alert the user to the presence of important operating and maintenance (servicing) instructions in the literature accompanying the appliance.
WARNING:
TO PREVENT FIRE OR SHOCK HAZARDS, DO NOT EXPOSE THIS TV SET TO RAIN OR MOISTURE.
CAUTION:
TO INSURE PERSONAL SAFETY, OBSERVE THE FOLLOWING RULES REGARDING THE USE OF THIS UNIT.
- Operate only from the power source specified on the unit.
- Avoid damaging the AC plug and power cord.
- Avoid improer installation and never position the unit where good ventilation is unattainable.
- Do not allow objects or liquid into the cabinet opening.
- In the event of trouble, unplug the unit and call a service technician. Do not attempt to repair it yourself or remove the rear cover.
Changes of modifications nor approved by JVC could void the warranty.
* When you don't use the TV set for a long period of time, be sure to disconnect both the power plug from the AC outlet and antenna for your safety.
* To prevent electric shock do not use this polarized plug with an extension cord, receptacle or other outlet unless the blades can be fully inserted to prevent blade exposure.
IMPORTANT RECYCLING INFORMATION
This product has a fluorescent lamp that contains a small amount of mercury. It also contains lead in some components. Disposal of the materials may be regulated in your community due to environmental considerations. For disposal or recycling information, please contact your local authorities, or the Electronic Industries Alliance:
http://www.eiae.org

ENERGY STAR
- As an “ENERGY STAR®” partner, JVC has determined that this product or product model meets the “ENERGY STAR®” guidelines for energy efficiency.
IMPORTANT SAFETY INSTRUCTIONS
- Read these instructions.
- Keep these instructions.
- Heed all warnings.
- Follow all instructions.
- Do not use this apparatus near water.
- Clean only with dry cloth.
- Do not block any ventilation openings. Install in accordance with the manufacturer's instructions.
- Do not install near any heat sources such as radiators, heat registers, stoves, or other apparatus (including amplifiers) that produce heat.
- Do not defeat the safety purpose of the polarized or grounding-type plug.
A polarized plug has two blades with wider than the other.
A grounding type plug has two blades and a third grounding prong.
The wide blade or the third prong are provided for your safety. If the provided plug does not fit into your outlet, consult an electrician for replacement of the obsolete outlet. - Protect the power cord from being walked on or pinched particularly at plugs, convenience receptacles, and the point where they exit from the apparatus.
- Only use attachments/accessories specified by the manufacturer.
- Use only with a cart, stand, tripod, bracket, or table specified by the manufacturer, or sold with the apparatus. When a cart is used, use caution when moving the cart/apparatus combination to avoid injury from tip-over.

natural_image
Silhouette of a person pushing a large object, enclosed in a circular frame (no text or symbols)-
Unplug this apparatus during lightning storms or when unused for long periods of time.
-
Refer all servicing to qualified service personnel. Servicing is required when the apparatus has been damaged in any way, such as power-supply cord or plug is damaged, liquid has been spilled or objects have gallen into the apparatus, the apparatus has been exposed to rain or moisture, does not operate normally, or has been dropped.
-
Apparatus shall not be exposed to dripping or splashing and no objects fill with liquids, such as vases, shall be placed on the apparatus.
FCC Notice:
Note: This equipment has been tested and found to comply with the limits for a Class B digital device, pursuant to Part 15 of the FCC Rules. These limits are designed to provide reasonable protection against harmful interference in a residential installation. This equipment generates, uses and can radiate radio frequency energy and, if not installed and used in accordance with the instructions, may cause harmful interference to radio communications. However, there is no guarantee that interference will not occur in a particular installation. If this equipment does cause harmful interference to radio or television reception, which can be determined by turning the equipment off and on, the user is encouraged to try to correct the interference by one or more of the following measures:
– Reorient or relocate the receiving antenna.
- Increase the separation between the equipment and receiver.
- Connect the equipment into an outlet on a circuit different from that to which the receiver is connected.
- Consult the dealer or an experienced radio/TV technician for help.
Thank you for buying this JVC LCD flat television.
To make sure you understand how to use your new TV, please read this manual thoroughly before you begin.
("LCD" stands for Liquid Crystal Display.)
WARNING: TO PREVENT FIRE OR SHOCK HAZARD, DO NOT EXPOSE THIS APPLIANCE TO RAIN OR MOISTURE.
WARNING
Always use the provided AC adapter and power cord.
WARNING
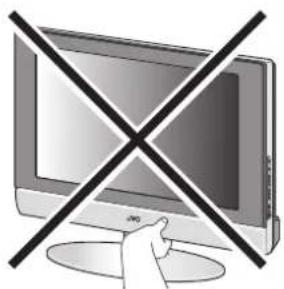
- Fingers may be trapped under the TV causing injuries. Hold the TV at the bottom in the middle, and do not allow it to tilt up or down.
- The TV may fall causing injuries. Hold the bottom of the stand with your hand and tilt the TV up and down.
- Do not allow children to hang from the TV, place their elbows on the TV or lean against the TV. Doing so may cause the TV to fall over and led to injuries.
natural_image
Illustration of a hand holding a computer monitor with a diagonal line crossing over it (no text or symbols)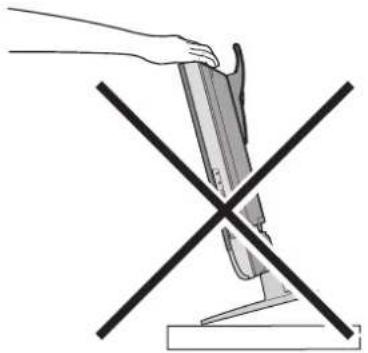
natural_image
Diagram showing a hand holding a tool above a mechanical component with two crossed lines (no text or symbols)CAUTION:
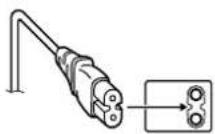
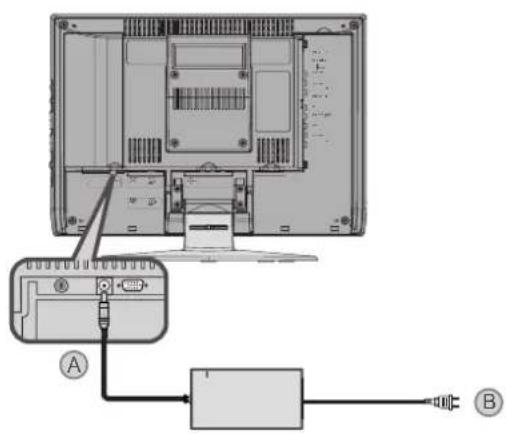
- To avoid electric shock or damage to the unit, first firmly insert the small end of the power cord into the AC Adpater unit it is no longer wobbly, and then plug the larger end of power cord into an AC outlet.
• Illustration of LT-17X576
CAUTION:
• Opterate only from the power source (AC 120V, 60 Hz).
- Avoid damaging the AC plug, AC adapter and power cord.
- When you are not using this unit for a long period of time, it is recommended that you disconnect the power cord from the main outlet.
CAUTION ON HEATING OF AC ADAPTER:
- In using, the AC adapter get heat on the surface of case. It is normal, not defective, while it is in operation.
- Don't be covered with any material on case of AC adapter
NOTES:
- The rating plate (serial number plate) and safety caution are on the back of the main unit.
- The rating information and safety causation of the AC Adapter are on its upper and lower sides.
Point defects
LCDs use collections of fine pixels to display images. While there is no problem with more than 99.99% of these pixels, please understand that a very small number of pixels may not light or may light all the time.
Distance recommendations
Avoid improper installation and never position the unit where good ventilation is impossible.
When installing this TV, distance recommendations must be maintained between the set and the wall, as well as inside a tightly enclosed area or piece of furniture.
Keep to the minimum distance guidelines shown for safe operation.
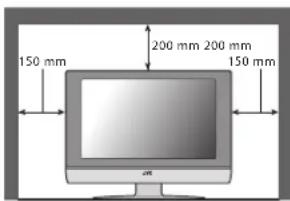
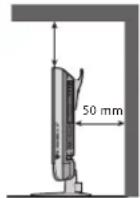
Failure to take the following precautions may cause damage to the television or remote control.
DO NOT block the TV's ventilat ion openings or holes.
(If the ventilation openings or holes are blocked by a newspaper or cloth, etc., the heat may not be able to get out.)
DO NOT place anything on top of the TV.
(such as cosmetics or medicines, flower vases, potted plants, cups, etc.)
DO NOT allow objects or liquid into the cabinet openings.
(If water or liquid is allowed to enter this equipment, fire or electric shock may be caused.)
DO NOT place any naked flame sources, such as lighted candles, on the TV.
DO NOT subject the TV to direct sunlight.
The surface of the TV screen is easily damaged. Be very careful with it when handling the TV.
Should the TV screen become soiled, wipe it with a soft dry cloth. Never rub it forcefully.
Never use any cleaner or detergent on it.
If there is a fault, unplug the unit and call a service technician. Do not attempt to repair it yourself or remove the rear cover and the AC adapter.
Cleaning the screen
The screen is coated with a special thin film to reduce reflection. If this film is damaged, uneven colors, discoloration, scratches, and other problems that can not be repaired may occur. Pay attention to the following when handling the screen.
- Do not use glue or adhesive tape on the screen.
- Do not write on the screen.
- Do not allow the screen to come in contact with any hard objects.
- Do not allow condensation to form on the screen.
- Do not use alcohol, thinner, benzene or other solvents on the screen.
- Do not rub the screen hard.
Setting up your TV....6
Installation....6
Using the stand 6
Putting the batteries into the Remote control.....7
Remove the terminal cover 7
Connecting the aerial and video cassette recorder (VCR)....8
Connecting the power cord to the AC outlet .....8
Initial Setup....8
TV buttons and functions .....9
Turn the TV on from standby mode .....9
Choose a TV channel 9
Watch images from external devices .....9
Adjust the volume 9
Using the Menu....9
Remote control buttons and functions....10
Turn the TV on or off from standby mode .....10
Choose a TV channel ....10
Adjust the volume 11
Watch images from external equipment .....11
MTS (Multi-Channel Television Sound)......11
Displaying the source information....11
ZOOM function....12
Sleep timer funtion 12
VIDEO STATUS....12
C.C. (Closed Caption)....12
Using the PC PIP function .....13
Operating a JVC brand VCR or DVD player....13
Using the TV's menu....14
Basic operation ......14
PICTURE SETTING....15
VIDEO STATUS 15
Picture Adjustment....15
COLOR TEMPERATURE....15
RESET....15
SOUND SETTING 16
Sound Adjustment.... 169
HYPER SURROUND 169
FEATURES...... 17
NOISE MUTING 17
FRONT PANEL LOCK 17
AUTO SHUT OFF 17
INITIAL SETUP.... 18
LANGUAGE 18
AUTO TUNER SETUP ....18
CHANNEL SUMMARY....18
CLOSED CAPTION 19
V-CHIP 19
SET LOCK CODE 20
PC MENU.... 21
PC PICTURE POSITION.... 21
PC PICTURE.... 21
SOUND 21
PC support mode list.... 22
Additional preparation.... 23
Connecting external equipment 248
Troubleshooting....25
Specifications.... 29
MEMO....30
Installation
Cautions for installation
• Install the TV in a corner on a wall or on the floor so as to keep cords out of the way.
- The TV will generate a slight amount of heat during operation. Ensure that sufficient space is available around the TV to allow satisfactory cooling. See “Distance recommendations” on page 4.
Using the stand
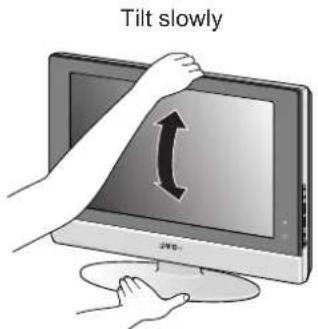
This TV comes with a Table Top Stand already attached.
This stand can be used to adjust the direction of the TV screen 5° up, 10° down, and 20° to the left or right.
Tilt the TV up and down:
While holding the bottom of the stand with one hand, use your other hand to hold the middle of the top of the TV and slowly tilt the TV up and down.
- As a safety measure, the stand is constructed so that it requires a certain amount of force to tilt the TV.
LT-17X576
Hold down steadily in front of center on stand
LT-23X576

Hold down steadily
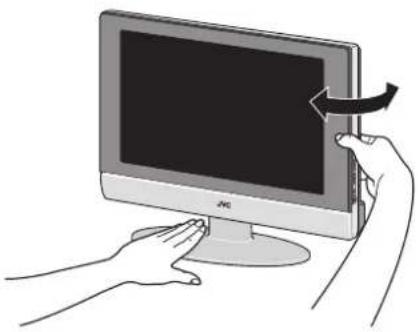
Rotate the TV to the left and right:
While holding the bottom of the stand with one hand, use your other hand to hold the edge of the panel and slowly adjust the direction of the TV screen.
natural_image
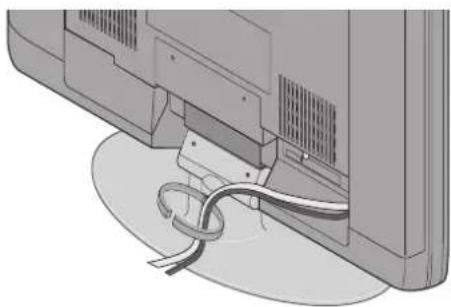
Illustration of hands interacting with a computer monitor (no text or symbols visible)Cable holder
A cable holder which is used to keep the connection cables tidy is attached to the back of the stand.
natural_image
Diagram of a computer monitor with cable and ventilation slots, no text or symbols presentcable holder
Putting the batteries into the Remote control
Use two AA/R6 dry cell batteries.
Insert the batteries from the - end, making sure the + and - polarities are correct.

- Follow the warnings printed on the batteries.
- Battery life is about six months to one year, depending on your frequency of use.
- The batteries we supply are only for setting up and testing your TV, please replace them as soon as you need to.
- If the remote control does not work properly, replace the batteries.
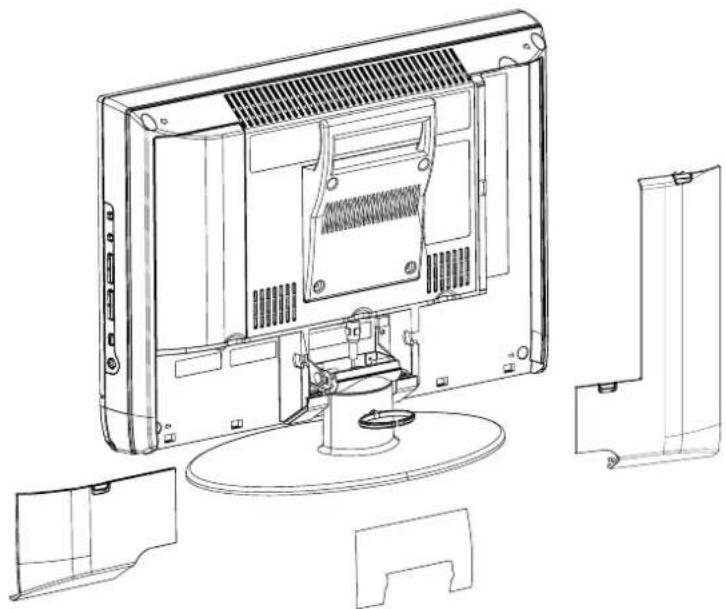
Remove the terminal cover
There are connection terminals behind the covers of the rear of the TV. Remove the cover before connecting a DVD or VCR.
The covers can be removed by removing the hook at the top and then pulling out while lifting slightly. To replace the covers, first connect the hook at the bottom of the cover to the TV and then insert the hook at the top.
- Leave the covers off if they do not fit properly. Do not force to replace the covers. Doing so may cause damages of the connection cables and the covers.
- Leave these covers off when mounting the TV on a wall.
natural_image
Technical line drawing of a computer monitor with internal components and external mounting brackets (no text or symbols)- 100mm mount based on VESA regulation is equipped. As for the wall mounting unit, please consult your dealer.
- The handle and the stand can be left by loosing the screws with a screwdriver when mounting the TV on a wall.
- Spread a soft cloth on a flat table and then place the TV on the cloth with the screen facing downwards when you leave the handle and the stand.
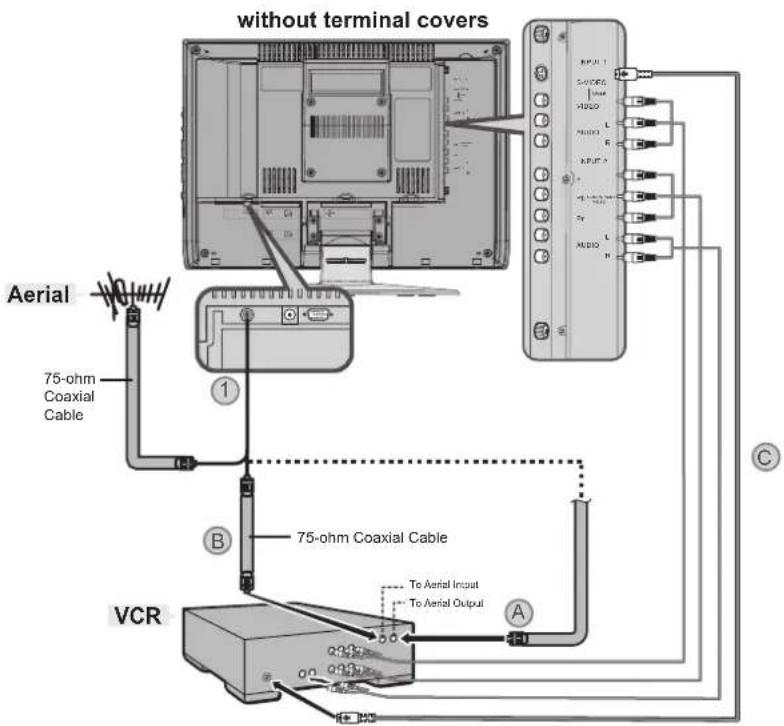
Connecting the aerial and video cassette recorder (VCR)
• The connecting cables are not provided.
- For further details, refer to the manuals provided with the devices to be connected.
If you are connecting a VCR, follow in the diagram below.
If you are not connecting a VCR, follow ①
- To connect the PC, please see "Connecting the PC" on page 24.
- To connect more equipment, please see "Connecting external equipment" on page 23.
Connecting the power cord to the AC outlet
If you are connecting a AC adapter, follow in the diagram below.
- Connect Ⓐ to the TV and Ⓑ to the AC outlet.
Caution
- Operate only from the power source(AC 120 V, 60 Hz)
- Remove the AC plug from the outlet to completely disconnect the TV from the power supply.
INITIAL SETUP
When the television is first turned on, the INITIAL SETUP menu will appear. First in beginning, please select the LANGUAGE and do AUTO TUNER SETUP.
| INITIAL SETUP | |
| ▶ LANGUAGE | ENG/FRAN/ESP/中文 |
| AUTO TUNER SETUP | ▶ |
| CLOSED CAPTION | ▶ |
| CHANNEL SUMMARY | ▶ |
| V-CHIP | ▶ |
| SET LOCK CODE | ▶ |
| ▼▲ : SELECT | OK : OPERATE |
- As for setting Language and Auto Tuner Setup, see page 18.
- When you do not perform AUTO TUNER SETUP, the INITIAL SETUP menu will appear every time you turn the power on.
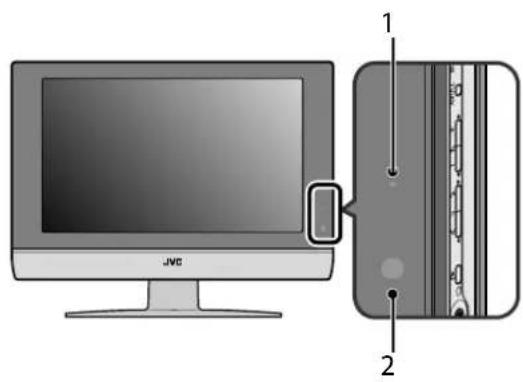
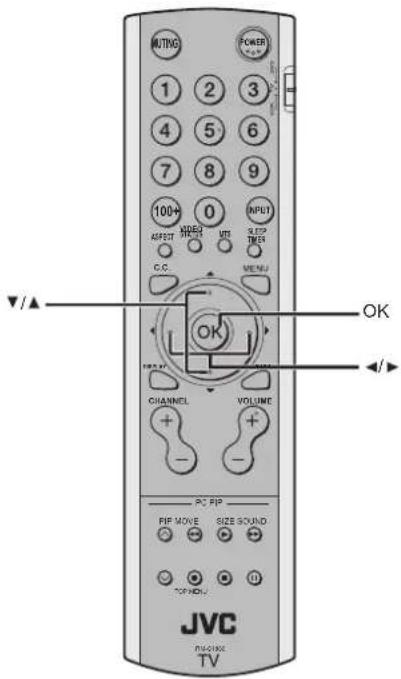
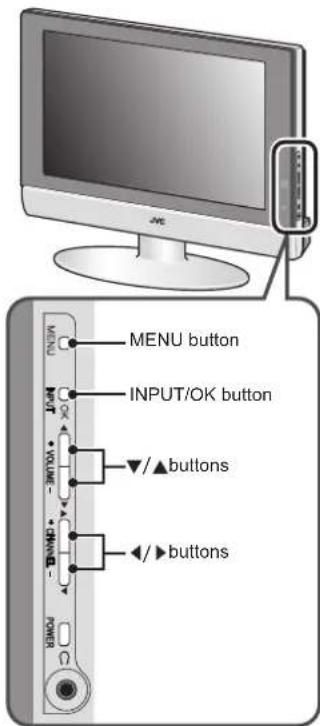
1 Power lamp
2 Remote control sensor
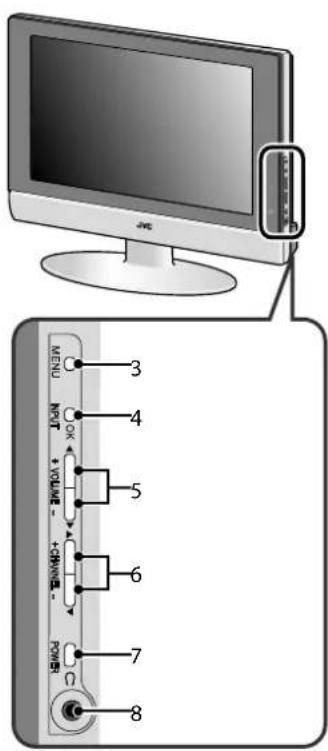
3 MENU button
4 INPUT OK button
5 VOLUME - / + button
6 CHANNEL button
7 Standby botton
8 Headphone jack (mini jack)
Turn the TV on from standby mode
Press the POWER button to turn the TV on from standby mode
- Check that the AC plug on the power cord from the TV is connected to correctly AC outlet.
Choose a TV channel
Press the CHANNEL -/+ buttons to choose a program number
Watch images from external devices
Press the INPUT button to choose an INPUT terminal
flowchart
graph TD
    A["Last Program number"] --> B["VIDEO-1"]
    B --> C["VIDEO-2"]
    C --> D["PC"]
    D --> A
Adjust the volume
Press the VOLUME buttons
The volume level indicator appears.
Using the Menu
Use the MENU button.
Refer to "Using the TV's menu" (see page 14) for details of using the menu.
1 Muting button
2 Number buttons
3 ASPECT button
4 VIDEO STATUS button
5 C.C. button
6 ◀/▶buttons
7 DISPLAY button
8 CHANNEL buttons
9 VCR/DVD/PIP control buttons
10 V/A buttons
11 POWER button
12 VCR/TV/DVD switch
13 INPUT button
14 SLEEP TIMER button
15 MTS button
16 MENU button
17 ▼/▲ buttons
18 OK button
19 BACK button
20 VOLUME buttons
Turn the TV on or off from standby mode
1 Make sure to set the VCR/TV/DVD switch to the TV position.
- You cannot turn the TV on or off when the VCR/TV/DVD switch is set to the VCR or DVD position.
2 Press the POWER button to turn on or off.
When the TV is turned on, the power lamp lights Green.
- The power can be turned on by pressing the TV button
- Check that the AC plug on the power cord from the TV is connected to AC outlet.
Choose a TV channel
Use the number buttons:
Enter the program number of the channel using the number buttons.
Example:
• 6 → press 0 and 6
• 12 → press 1 and 2
•123 → press 100+ and 2 and 3
Use the CHANNEL -/+ buttons:
Press the CHANNEL ^-/+ buttons to choose the program number you want.
Adjust the volume
Press the VOLUME -/+ buttons to adjust the volume.
The volume indicator appears and the volume changes as you press the VOLUME -/+ buttons.
Muting the sound
Press the muting button to turn off the sound.
Pressing the muting button again restores the previous volume level.
Watch images from external equipment
Use the INPUT button:
Press the INPUT button to choose an VIDEO terminal.
flowchart
graph TD
    A["Last Program number"] --> B["VIDEO-1"]
    B --> C["VIDEO-2"]
    C --> D["PC"]
    D --> A
In the PC mode:
If following message appears, the power lamp blinks in amber and the TV goes in to reduced power mode.
- "NO SIGNAL"
- "CABLE NO INSERT"
- "OUT OF RANGE"
See "Troubleshooting" on page 25 for details of this messages.
MTS (Muti-Channel Television Sound)
MTS technology allows several audio signals to be broadcast at once, giving you a choice in what you wish to hear with a TV program. In addition to mono or stereo sound, an MTS broadcast may also include a second audio program(SAP).
Press MTS button to switch STEREO/SAP/MONO.
- Keep the TV in stereo mode to get the best sound quality. The sound will work in stereo mode even if a certain broadcast is in mono sound only.
- Choose the mono setting to reduce excessive noise on a certain channel or broadcast.
- Selecting SAP will allow you to hear an alternative soundtrack, if one is available.
- MTS unavailable if your television's input source is in VIDEO-1, VIDEO-2.
Displaying the source information
You can display the source information on the screen.
Press the DISPLAY button to display the source information.
Pressing the DISPLAY button changes the display as follows:
flowchart
graph TD
    A["01 STEREO"] --> B["TV"]
    C["VIDEO-1"] --> D["EXT"]
    B --> E["No Display"]
    D --> E
    style A fill:#f9f,stroke:#333
    style C fill:#f9f,stroke:#333
    style B fill:#ccf,stroke:#333
    style D fill:#ccf,stroke:#333
    style E fill:#cff,stroke:#333
• The source information switched by DISPLAY button.
• The source type : TV/VIDEO-1/VIDEO-2/PC
ASPECT function
You can change the screen size according to the picture aspect ratio. Choose the optimum one from the following ASPECT modes.
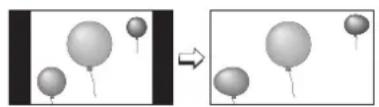
REGULAR - The regular ratio is used when you want to watch a 4:3 broadcast or recorded program without modifying the original picture to fit the dimensions of your 16:9 screen. The 4:3 picture will fill the screen from top to bottom, while black bars will appear to fill up the remaining space along the picture's sides. The 4:3 picture will be centered within the boundaries of the 16:9 screen.
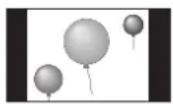
PANORAMA - With this ratio a normal 4:3 aspect picture is stretched to fit the dimensions of the 16:9 aspect screen.
natural_image
Two panels showing balloons floating in a 3D space, one before and after transformation (no text or symbols)CINEMA - This ratio "zooms in" on the center part of a 4:3 aspect picture, blowing it up to fill the 16:9 screen.
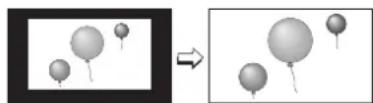
FULL - This is the ratio to use when watching 16:9 High-Definition broadcasts.

HD PANORAMA - This ratio stretches the High-Definition 16:9 aspect image to eliminate the black side bars.

CINEMA ZOOM - This ratio stretches the High-Definition 16:9 aspect image to eliminate the black surrounding bars.

natural_image
Two-panel image showing a magnified view of balloons on the left and a simplified view of balloons on the right, both without any text or symbols.Choose the ASPECT mode
1 Press the ASPECT button to display the aspect mode
Adjusting the visible area of the picture
If subtitles or the top (or bottom) of the picture are cut off, you can adjust the visible area of the picture manually.
1 Press the ASPECT button
The ASPECT is displayed in OSD.

2 While it is displayed, press the ▼/▲ buttons to change the position of the picture
- You cannot adjust the visible area in REGULAR or FULL mode.
- When the PANORAMA and CINEMA mode appears arrows on top and bottom to move the screen.
- You can choose PANORAMA, CINEMA, FULL or REGULAR when the broadcast is NTSC, 480i, 480p. You can choose HD PANORAMA or CINEMA ZOOM, or FULL when the broadcast is HD (1080i or 720p).
Sleep timer function
The Sleep Timer can turn the TV off for you after you fall asleep. Program it to work in intervals of 10 minutes, for a total time of up to 120 minutes.
Press the sleep timer button.
VIDEO STATUS
You can choose one of five VIDEO STATUS to adjust the picture settings automatically.
Press the VIDEO STATUS button.
STANDARD:
Standardizes picture adjustment.
DYNAMIC:
Heightens contrast and sharpness.
THEATER:
Softens contrast and sharpness.
GAME:
Normalcontrast and sharpness.
C.C. (Closed Caption)
Use the C.C. (Closed Caption) button to select the mode of closed caption.
Press the C.C. button to switch OFF/CAPTION/TEXT.
• See page 18 when you set the caption/text mode.
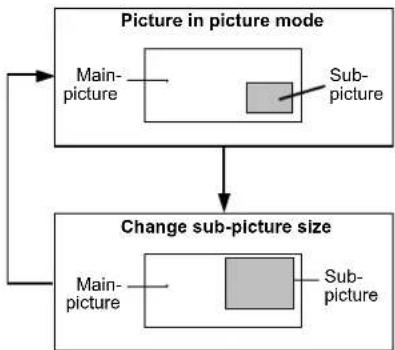
Using the PC PIP function
A PC picture and TV or a video program from an external device can be watched at the same time.
1 P r ethe R&P button.
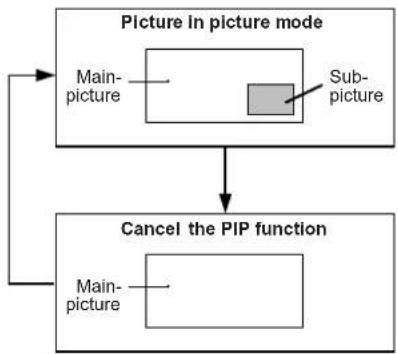
flowchart
graph TD
    A["Picture in picture mode"] --> B["Main-picture"]
    A --> C["Sub-picture"]
    B --> D["Cancel the PIP function"]
    C --> D
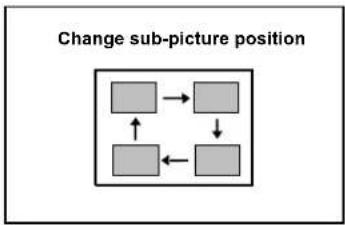
2 P r e h e MOVE button to change the position of sub-picture
flowchart
graph TD
    A[" "] --> B[" "]
    C[" "] --> D[" "]
    E[" "] --> F[" "]
    G[" "] --> H[" "]
    I[" "] --> J[" "]
    K[" "] --> L[" "]
    M[" "] --> N[" "]
    O[" "] --> P[" "]
    Q[" "] --> R[" "]
    S[" "] --> T[" "]
    U[" "] --> V[" "]
    W[" "] --> X[" "]
    Y[" "] --> Z[" "]
3 P ressite SIZE button to change the sub-picture size
flowchart
graph TD
    A["Picture in picture mode"] --> B["Main-picture"]
    A --> C["Sub-picture"]
    B --> D["Change sub-picture size"]
    C --> D
4 P r e he SOUND button to choose the sound
MAIN : Main picture's sound PIP : Sub picture's sound
Operating a JVC brand VCR or DVD player
These buttons will operate a JVC brand VCR or DVD player. Pressing a button that looks the same as the device's original remote control button has the same effect as the original remote control.
1 Set the VCR/TV/DVD switch to the VCR or DVD position
VCR:
When you are using a VCR, set the switch to the VCR position. You can turn the VCR on or off with the Standby button.
DVD:
When you are using a DVD player, set the switch to the DVD position. You can turn the DVD player on or off with the Standby button.
2 Press the VCR/DVD Control Button to control your VCR or DVD player
- If your device is not made by JVC, these buttons will not work.
• Even if your device is made by JVC, some of these buttons may not work, depending on the device you are using. - You can use the CHANNEL-/+ buttons to choose a TV channel the VCR will receive, or choose the chapter the DVD player plays back.
- Some models of DVD player use the CHANNEL-/+ buttons for both operating the fast forward/backward functions and for choosing the chapter.
- Set the VCR/TV/DVD switch to the TV position when you turn the TV on or off.
To use DVD MENU button
Some DVDs allow you to select the disc contents using the menu. When you playback these DVDs, you can select the subtitle language and sound-track language, etc. by using the DVD menu.
1 Press DVD MENU button during play back
The DVD menu appears on the screen.
- Press DVD MENU button again to resume playback at the scene when you pressed the button.
2 Press or buttons to select the desired item
3 Press OK button
The menu continues to another screen.
Repeat steps 2 and 3 to set additional items if any.
This TV has a number of functions you can operate using menus. To use all your TV's functions, you need to understand the basic menu operating techniques fully.
Basic operation
1 Press the MENU button to display the MENU (main menu)
| MENU | |
| ▶ PICTURE | ▶ |
| SOUND | ▶ |
| FEATURES | ▶ |
| INITIAL SETUP | ▶ |
| ▼▲ : SELECT | OK : OPERATE |
2 Press the ▼/▲ buttons to choose a menu title, and press the OK button
The menu appears.
To return to the previous menu:
Press the BACK button on the remote control or the MENU button on the TV.
To exit a menu instantly:
Press the MENU button on the remote control or press the MENU button on the TV several times.
3 Press the ▼/▲buttons to choose a function
- For details of the functions in the menus, see the following pages.
4 Press the buttons to choose the setting of that function
- If you want to operate a function which appears only with its name, follow the descriptions of that function on the following pages.
- The display appearing at the bottom of a menu shows you a button on the remote control that you can use when you operate a chosen function.
5 Press the OK button to complete the setting
The menu disappears.
- The menu will be disappear if you press the CHANNEL -/+ buttons, the AV button or the number buttons while the menu is displayed.
Operation with the buttons on the TV
You can also operate the menus using the buttons on the front panel of the TV.
The menu will disappear after about two minutes if no operation is performed.
Refer to “Using the TV’s menu” (see page 14) for details of displaying the menu.
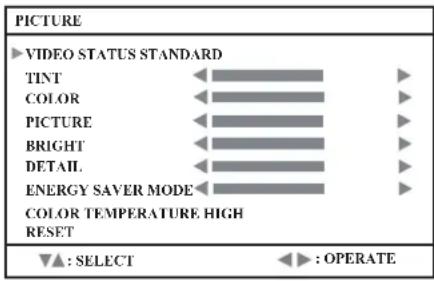
VIDEO STATUS
You can choose one of five VIDEO STATUS to adjust the picture settings automatically.
You can also set the setting you like in each video status.
STANDARD:
Standardizes picture adjustment.
DYNAMIC:
Heightens contrast and sharpness.
THEATER:
Softens contrast and sharpness.
GAME:
Normal contrast and sharpness.
Picture Adjustment
You can change the picture settings of each PICTURE MODE mode as you like.
TINT:
You can adjust the levels of red and green in your TV picture.
◀ :reddish
▶:greenish
COLOR:
You can make all the colors in the TV picture appear either more vivid or subtle.
◀ : lighter
▶ : deeper
PICTURE:
You can adjust the levels of black and white on TV screen, giving you a darker or brighter picture overall.
◀:lower
▶ : higher
BRIGHT:
You can adjust the overall brightness of the TV picture with the Bright control.
◀ : darker
▶: brighter
DETAIL:
You can adjust the level of fine detail displayed in the picture.
◀: softer
▶: sharper
ENERGY SAVER MODE:
You can adjust the back light.
◀ : darker
▶ : lighter
COLOR TEMPERATURE
You can select one of two COLOR TEMPERATURE modes (two tones of white) to adjust the white balance of the picture. Since white is the color which is used as a reference for all the other colors, changing the COLOR TEMPERATURE mode affects the appearance of all the other colors on the screen.
HIGH:
A bluish white. Using this mode when watching bright pictures allows you to enjoy a more vivid and bright picture.
LOW:
A reddish white. Using this mode when watching films allows you to enjoy colors that are characteristic of films.
RESET
You can reset the picture settings you have chosen to the default in each video status.
Refer to “Using the TV’s menu” (see page 14) for details of displaying the menu.
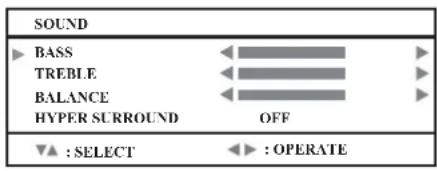
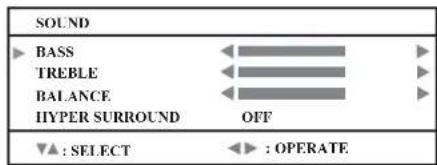
You can adjust the sound to your liking.
BASS:
You can adjust the low tone of the sound.
◀ : weaker
▶ : strong
TREBLE:
You can adjust the high tone of the sound.
◀ : weaker
▶ : strong
BALANCE:
You can adjust the volume balance between the left and right speaker.
◀: turn the left speaker's volume level up.
▶: turn the right speaker's volume level up.
HYPER SURROUND:
You can enjoy Surround sound with a "live" effect by using the HYPER SURROUND functions.
ON: HYPER SURROUND function is turned on.
OFF: HYPER SURROUND function is turned off.
- When the bar is in center of BASS, TREBLE and BALANCE, ◀▶ become yellow.
Refer to “Using the TV’s menu” (see page 14) for details of displaying the menu.
| FEATURES | |
| NOISE MUTING | OFF |
| FRONT PANEL LOCK | OFF |
| AUTO SHUT OFF | OFF |
| ▲: SELECT | ◀: OPERATE |
NOISE MUTING
You can set the TV to automatically change to a blue screen and mute the sound if the signal is weak or absent, or when there is no input from an external device.
ON:
This function is turned on.
OFF:
This function is turned off.
FRONT PANEL LOCK
This allows you to lock the keys on the front of the TV, so that a child may not accidentally change your viewing preferences.
AUTO SHUT OFF
When the AUTO SHUT OFF mode is on, the TV will shut off when received no signal after 9 minutes.
Refer to "Using the TV's menu" (see page 14) for details of displaying the menu.
| INITIAL SETUP | |
| ▶ LANGUAGE | ENG/FRAN/ESP/中文 |
| AUTO TUNER SETUP | ▶ |
| CLOSED CAPTION | ▶ |
| CHANNEL SUMMARY | ▶ |
| V-CHIP | ▶ |
| SET LOCK CODE | ▶ |
| ▼▲ : SELECT | OK : OPERATE |
LANGUAGE
Select LANGUAGE and press the ◀/▶ buttons to choose the language.
ENG/FRAN/ESP/中文
The language in which you want the onscreen menus to appear.
AUTO TUNER SETUP
In auto tuner setup, the TV automatically scans through all available channels.
| AUTO TUNER SETUP | |
| TUNER MODE START | CABLE |
| ▼▲:SELECT | ◀▶:OPERATE |
1 Select TUNER MODE and press the ◀/▶ buttons to switch AIR/CABLE
2 Select START and press the button to start channel programming.
| CHANNEL SUMMARY | |||
| CH NO. SCAN | ∅ | CH NO. SCAN | ∅ |
| 01 | 11 √ | ||
| 02 | 12 | ||
| 03 | 13 | ||
| 04 | 14 | ||
| 05 | 15 | ||
| 06 | 16 | ||
| 07 √ | 17 | ||
| 08 | 18 | ||
| 09 √ | 19 | ||
| 10 | 20 | ||
| ▼▲ ◀►: SELECT OK : OPERATE | |||
After scanning, the CHANNEL SUMMARY menu appear, and the channel with program signal will be marked by mark √.
CHANNEL SUMMARY
1 Press the buttons to choose the CHANNEL SUMMARY and press ◀/▶ to OPERATE.
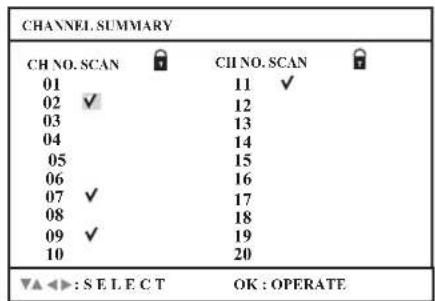
2 Press the ▼ and ◁ buttons to choose the CHANNEL that you want. Then press OK button to enable or disable the channel by mark √.
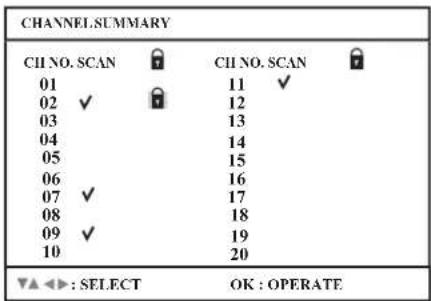
You can delete channels from the scan by removing the "v". If any channels were missed during auto setup and you wish to add them, you may be placing an "v" next to the channel number.
3 Press the ▼/▲ and buttons to choose the that you want. Then press 0 button to lock or unlock channel by mark.
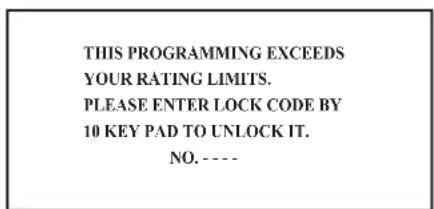
Channel Guard Message
When a viewer attempts to watch a blocked channel, this message appears:
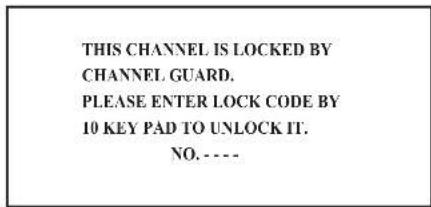
To watch a channel that you have locked, enter the Lock Code using the 10 key pad. If the wrong code is entered, the message "INVALID LOCK CODE!" will flash on screen.
The channel cannot be accessed until the correct lock code is entered.
NOTE :
- Once a channel has been locked, it will remain unlocked until the television is turned off.
• See also "SET LOCK CODE", page 20.
CLOSED CAPTION
Select CAPTION or TEXT and press the ◀/▶ buttons to select a caption (CC1 to CC4) or text channel (T1 to T4).
| CLOSED CAPTION | |
| CAPTION | CC1 |
| TEXT | T1 |
| ▼▲:SELECT | ◀▶:OPERATE |
Many broadcasts now include an onscreen display of dialog called closed captions. Some broadcasts may also include displays of additional information in text form. Your TV can access and display this information using the closed caption feature.
V-CHIP
Your TV is equipped with V-Chip technology which enables you to block channels or content that you feel to be inappropriate for children, based on US and Canada rating guidelines.
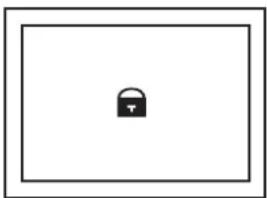
natural_image
Simple line drawing of a padlock inside a rectangular frame (no text or symbols)You can customize the V-Chip settings of your television to match your personal tastes.
US V-Chip Ratings :
U.S. PARENTAL RATING SYSTEMS
Programs with the following rating are appropriate for children.
• TV Y is Appropriate for All Children
Programs are created for very young viewers and should be suitable for all ages, including children ages 2 - 6.
• TV Y7 is Appropriate for Older Children
Most parents would find such programs suitable for children 7 and above. These programs may contain some mild fantasy violence or comedic violence, which children should be able to discern from reality.
Programs with the following rating are appropriate for entire audience.
• TV G stands for General Audience
Most parents would find these programs suitable for all age groups. They contain little or no violence, no strong language, and little or no sexual dialog or situations.
• TV PG Parental Guidance Suggested
May contain some, but not much, strong language, limited violence, and some suggestive sexual dialog or situations. It is recommended that parents watch these programs first, or with their children.
• TV 14 Parents Strongly Cautioned
Programs contain some material that may be unsuitable for children under the age of 14 including possible intense violence, sexual situations, strong coarse language, or intensely suggestive dialog. Parents are cautioned against unattended viewing by children under 14.
• TV MA Mature Audiences Only
These programs are specifically for adults and may be unsuitable for anyone under 17 years of age. TV MA programs may have extensive V, S, L, or D.
Viewing Guidelines
In addition to the rating categories explained above, information on specific kinds of content are also supplied with the V-Chip rating. These types of content may also be blocked. The content types are:
• V/FV is for VIOLENCE/FANTASY VIOLENCE
• S stands for SEXUAL CONTENT
• L stands for strong LANGUAGE
• D stands for suggestive DIALOG
1 Press 0 to enter the V-Chip setting menu.
| V-CHIP | |
| ▶ V-CHIP ON SET US TV RATINGS SET MOVIE RATINGS | |
| ▼▲ : SELECT | ◀ ▶ : OPERATE |
2 Select V-CHIP and press the ◀/▶ button to turn on or turn off V-CHIP function.
3 Select SET US TV RATINGS and press the ◀/▶ buttons to turn on or turn off the lock.
| SET US TV RATINGS | ||||||
| TV-MA | TV-14 | TV-PG | TV-G | TV-Y7 | TV-Y | |
| - | - | - | - | - | - | |
| V/FV | - | - | - | - | ||
| S | - | - | - | |||
| L | - | - | - | |||
| D | - | - | ||||
| FINISH | ||||||
For example. To block viewing of all TV 14 shows, move the cursor to the top row of that column and add a lock icon. Once you've put a lock on the top everything in that column is automatically locked.
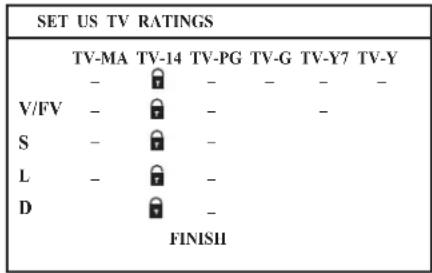
Note:
If you want to change the setup, move the cursor to the top column and change the lock icon to " - " by pressing ◀ or ▶ again. You may then select individual categories to block.
Movies Ratings :
- NR- Not Rated
This is a film which has no rating. In many cases these films were imported from countries which do not use the MPAA ratings system. Other NR films may be from amateur producers who didn't intend to have their film widely released.
NR (Not Rated) Programming may contain all types of programming including children's programming, foreign programs, or adult material.
•G - General Audience
In the opinion of the review board, these films contain nothing in the way of sexual content, violence, or language that would be unsuitable for audiences of any age.
• PG - Parental Guidance
Parental Guidance means the movie may contain some contents such as mild violence, some brief nudity, and strong language. The contents are not deemed intense.
• PG -13 - Parents Strongly Cautioned
Parents with children under 13 are cautioned that the content of movies with this rating may include more explicit sexual, language, and violence content than movies rated PG.
• R - Restricted
These films contain material that is explicit in nature and is not recommended for unsupervised children under the age of 17.
• NC-17 - No One Under 17
These movies contain content which most parents would feel is too adult for their children to view. Content can consist of strong language, nudity, violence, and suggestive or explicit subject matter.
• X - No One Under 18
Inappropriate material for anyone under 18.
1 Select SET MOVIE RATINGS and press the ◀/▶ buttons to turn on or turn off the lock.
| SET MOVIE RATINGS | ||||||
| X | NC-17 | R | PG-13 | PG | G | NR |
| - | - | - | - | - | - | - |
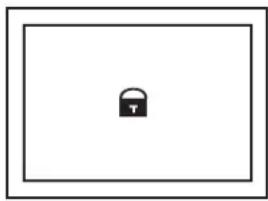
SET LOCK CODE
Channel guard and V-Chip settings are protected by a four-digit lock code. Your TV comes preset with a lock code of "0000". You may change the code to any four-digit number you wish.
natural_image
Simple line drawing of a padlock inside a rectangular frame (no text or symbols)1 Select SET LOCK CODE and press 0 to enter the the SET LOCK CODE setting menu.
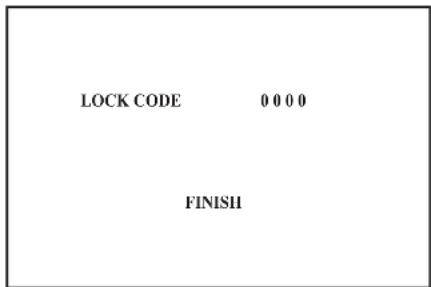
2 P ress the▼/▲ buttons to move to the next digit and press the to select the number. Then move to FINISH and press OK to save settings and exit.
When a viewer attempts to watch a blocked channel, this message appears:
The channel will remain blocked until the correct lock code is entered.
This TV also has a number of functions on PC mode, you can operate using pc menus.
| PC MENU | |
| ▶ PC PICTURE POSITION ▶ | |
| PC PICTURE ▶ | |
| SOUND ▶ | |
| ▼▲ : SELECT OK : OPERATE | |
| 1024 X 768X60 |
PCPICTURE POSITION
You can adjust the picture settings as following functions. At first, we recommend you complete the AUTO SET UP before you start using your PC.
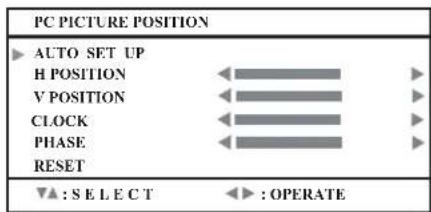
AUTO SET UP:
You can adjust picture settings automatically for optimized picture position, clock and phase.
H POSITION:
You can adjust picture horizontal position.
: left
▶ : right
V POSITION:
You can adjust picture vertical position.
:down
▶ : up
CLOCK:
You can adjust CLOCK to fine tune picture.
PHASE:
You can adjust PHASE to fine tune picture.
RESET:
You can select RESET for default setting.
PCPICTURE
You can change the picture settings of each PICTURE MODE mode as you like.
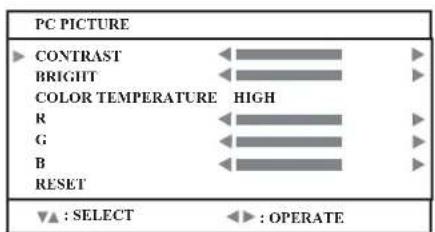
CONTRAST:
You can adjust the picture contrast.
◀:lower
▶ : higher
BRIGHT:
You can adjust the brightness.
: darker
▶ : brighter
COLOR TEMPERATURE:
You can adjust the picture color mode.
HIGH
A bluish white. Using this mode when watching bright pictures allows you to enjoy a more vivid and bright picture.
LOW:
A reddish white. Using this mode when watching films allows you to enjoy colors that are characteristic of films.
MANUAL:
User defined.
R:
You can adjust the Red color component.
◀ : To decrease the levels of red
▶ : To increase the levels of red
G:
You can adjust the Green color component
: To decrease the levels of green
▶ : To increase the levels of green
B:
You can adjust the Blue color component.
◀ : To decrease the levels of blue
▶ : To increase the levels of blue
RESET:
You can select RESET for default setting.
SOUND
You can adjust the sound to your liking.
BASS:
You can adjust the low tone of the sound.
◀ : weaker
▶: strong
TREBLE:
You can adjust the high tone of the sound.
◀ : weaker
▶: strong
BALANCE:
You can adjust the volume balance between the left and right speaker.
◀: turn the left speaker's volume level up.
▶: turn the right speaker's volume level up.
HYPER SURROUND:
You can enjoy Surround sound with a "live" effect by using the HYPER SURROUND functions.
ON: HYPER SURROUND function is turned on.
OFF: HYPER SURROUND functionis turned off.
LT-17X576 / LT-23X576
| Mode NO. | Mode Name | H Freq. (kHz) | ||
| Resolution | V Freq. (Hz) | |||
| 1 | VGA | 70 | HZ | 31.469 |
| 640x350 | 70.087 | |||
| 2 | VGA | 60 | Hz | 31.469 |
| 640x480 | 59.941 | |||
| 3 | SVGA | 56 | Hz | 35.16 |
| 800x600 | 56.25 | |||
| 4 | SVGA | 60 | Hz | 37.879 |
| 800x600 | 60.317 | |||
| 5 | XGA | 48.363 | ||
| 1024x768 | 60.004 | |||
| 6 | XGA | 70 | Hz | 56.476 |
| 1024x768 | 70.069 | |||
| 7 | MAC VGA | 35 | ||
| 640x480 | 66.667 | |||
| 8 | US TEXT | 31.469 | ||
| 720x400 | 70.087 | |||
| 9 | WXGA | 47.73 | ||
| 1280x768 | 60 | |||
| 10 | VGA | 75 | Hz | 37.5 |
| 640x480 | 75 | |||
| 11 | SVGA | 75 | Hz | 46.875 |
| 800x600 | 75 | |||
| 12 | XGA | 75 | Hz | 60.023 |
| 1024x768 | 75.029 | |||
The resolution and the frequencies which are displayed on the screen may not exactly same as this list.
Connecting external equipment
Connect the equipment to the TV, making the correct rear panel and front panel connections.
Before connecting anything:
- Read the manuals that came with the equipment. Depending on the equipment, the connection method may be different from the diagram. Also, the equipment settings may need to change depending on the connection method.
- Turn off all the equipment including the TV.
- The “Specifications” on page 29 give the details of the EXT terminals. If you are connecting equipment not listed in the following connection diagram, see the table to choose the best EXT terminal.
- Connecting cables are not supplied.
1 VCR (composite signal)
2 VCR (composite signal/S-VIDEO signal)
3 T-V LINK compatible VCR (composite signal/S-VIDEO signal)
4 Decoder
5 DVD player (composite signal/S-VIDEO signal)
6 DVD player (component signal)
7 PC
8 TV game (component signal)
9 TV game (composite signal/S-VIDEO signal)
10 Headphones
11 Camcorder (composite signal/S-VIDEO signal)
12 Video+Audio cable
13 Video cable
14 Audio cable
15 S-VIDEO cable
16 Y/Pb/Pr cable(apply for 480i, 480p, 1080i and 720p)
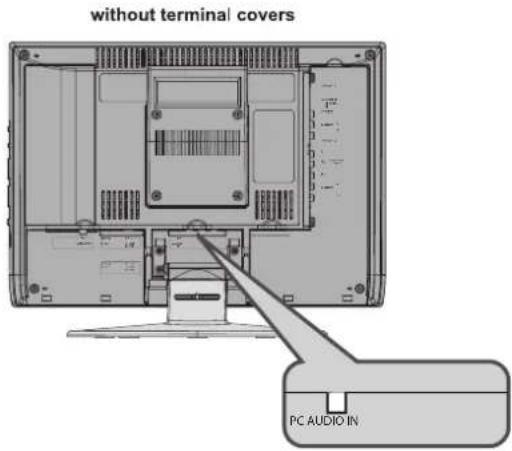
17 PC Audio in
18 D-SUB in
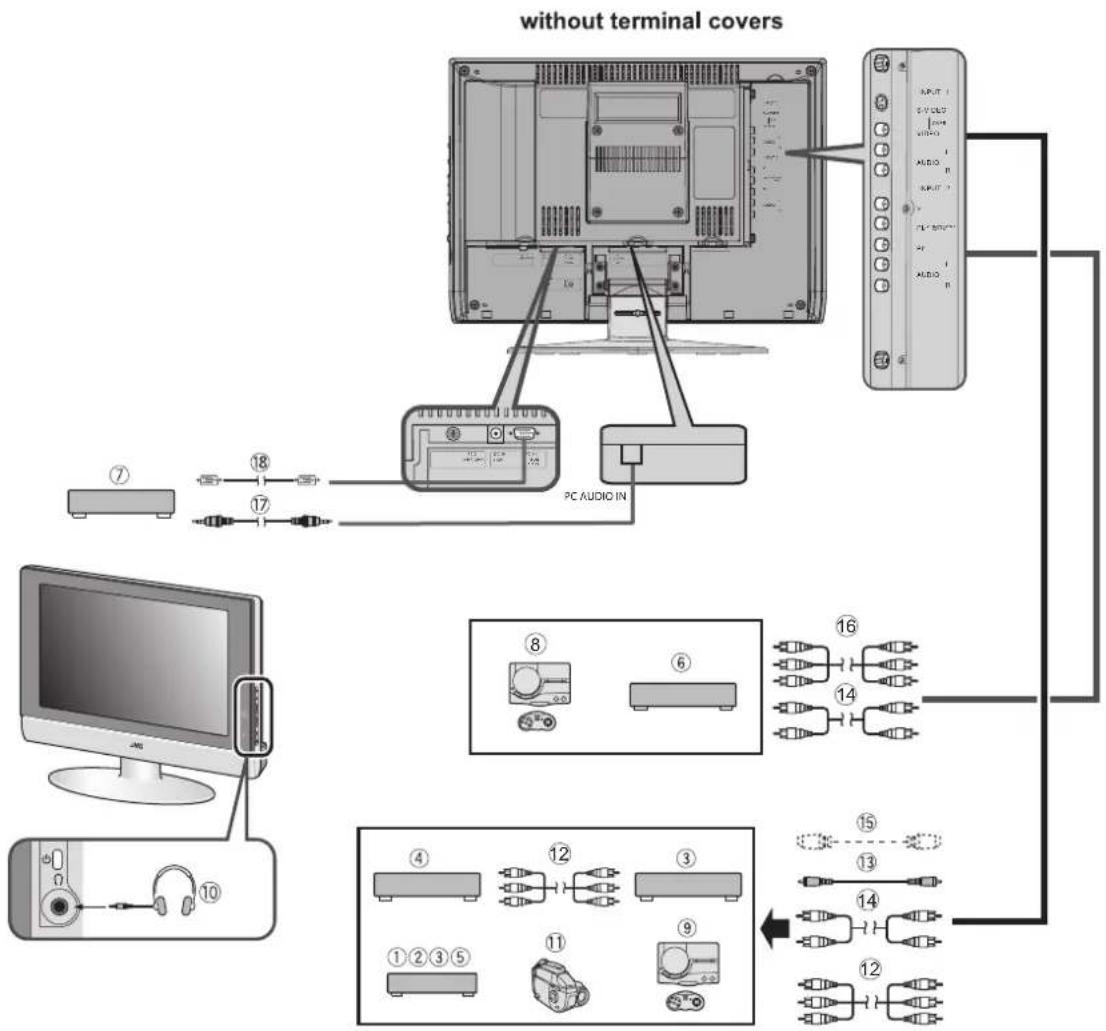
Connecting headphones
Connect the headphones with a stereo mini-jack (3.5 mm diameter) to the headphone socket at the TV.
Connecting the PC
Connect the PC with the D-SUB cable to the D-SUB in at the TV, and connect the sound device of PC with a stereo mini-jack to PC AUDIO IN.
You can adjust the picture by AUTO SET UP function when the PC signal is output correctly, the AUTO SET UP function can optimize the picture position, clock and phase. You can have a fine vision after AUTO SET UP function executed.
If a problem arises while you are using the TV, please read this troubleshooting guide carefully before you ask to have the TV repaired. You may be able to fix it easily by yourself. For example, if the mains plug is disconnected from the mains outlet, or the TV aerial has problems, you may think there is a problem with the TV itself.
Important:
- This troubleshooting guide only covers problems whose causes are not easy to decide. If you have a question when you are operating a function, read the page(s) for that function carefully, not this troubleshooting guide.
- If you follow the advice in this troubleshooting guide without any success, unplug the mains plug and ask for your TV to be repaired. Do not attempt to repair the TV by yourself or to remove the rear cover of the TV.
If you cannot turn on the TV
- Are the AC plug on the power cord from the TV is connected to AC outlet?
- Make sure to set the VCR/TV/DVD switch to the TV position. You cannot turn the TV on when the VCR/TV/DVD switch is set to the VCR or DVD position.
If you cannot turn off the TV
- Make sure to set the VCR/TV/DVD switch to the TV position. You cannot turn the TV off when the VCR/TV/DVD switch is set to the VCR or DVD position.
No picture
- Have you chosen a TV channel with very poor reception? If so, the NOISE MUTING function will be activated: the entire screen becomes blue, and the sound is muted. If you still want to view the TV channel, follow the description “NOISE MUTING” on page 17 to change the NOISE MUTING function setting to OFF.
Poor picture
- If noise (snow) totally blocks out the picture, there may be a problem with the aerial or aerial cable. Check the following to try to solve the problem:
—Have the TV and aerial been connected properly? - Has the aerial cable been damaged?
-Is the aerial pointing in the right direction? -Is the aerial itself faulty? - If the TV or aerial suffers interference from other equipment, stripes or noise may appear in the picture. Move any equipment such as an amplifier, or a hair drier, that can cause interference away from your TV. Or try moving the TV. If the aerial suffers interference from a radio tower or high-voltage wire, please contact your local dealer.
- If the TV suffers interference from signals reflecting from mountains or buildings, double-pictures (ghosting) will occur. Try to change the aerial's direction or replace it with one with better directionality.
- Have the COLOR and BRIGHT settings been adjusted properly? Follow the description “Picture Adjustment” on page 15 to try to adjust them properly.
- Videotaping teletext is not recommended because it may not record correctly.
- When viewing images from commercially available video software products, or videos from videotapes which have been recorded improperly, the top of the image may be distorted. This is due to the condition of the video signal. There is nothing wrong with the TV.
Poor sound
- Have you adjusted BASS or TREBLE properly? If not, follow the description “Sound Adjustment” on page 16.
If the TV does not respond to the remote control
- Have the batteries of the remote control worn out? Follow the description “Putting the batteries into the Remote control” on page 7 and replace them with new batteries.
- Have you attempted to use the remote control from the sides or rear of the TV or from more than seven meters away from the TV? Use the remote control in the front of your TV or from less than seven meters away.
- If the TV suddenly stops responding, disconnect the power cord of the TV from the AC outlet. Connect them to the AC outlet again to turn on the TV. If the TV returns to a normal state, it is not a failure.
Other concerns
- When the SLEEP TIMER function operates, the TV is automatically turned off. If the TV suddenly turns off, try to press the standby button to turn on the TV once again. If the TV goes back to normal, there is no problem.
- It takes a short period of time from the time an operation such as changing channels is performed until an image is displayed. This is not a malfunction. This is the time required for the image to stabilize before it can be displayed.
- The TV may make a crackling sound due to a sudden change in temperature. The picture or sound may be normal. If you hear crackling sounds frequently while you are viewing the TV, there may be other causes. As a precaution, ask your service technician to inspect it.
- The top of the TV and the screen may become hot during use but this has no affect on the performance of the TV. Ensure that the ventilation holes are not blocked.
- When the picture is unstable, the screen may become white for a moment. This occurs when the signal which drives the liquid crystal is missing. This is not a malfunction.
- When a still image has been displayed for a long period, a faint residual image may remain on the screen for a short time after the power has been turned off or when another image is displayed. This is not a malfunction and the image will eventually disappear.
- When the correct picture has not been displayed on screen, the following error messages will display on screen. NO SIGNAL - TV received no signal from PC, you may check your PC is working correctly or not. CABLE NO INSERT - The cable is not connected correctly. Ensure that the cable is connected correctly. OUT OF RANGE - The picture resolution is out of limit. Ensure that the PC picture resolution is set correctly.
JVC®
LIMITED WARRANTY
COLOR TV 1-1
For Canadian model televisions, see separate sheets for Canadian Warranty information.
JVC COMPANY OF AMERICA (JVC) warrants this product and all parts thereof, except as set forth below ONLY TO THE ORIGINAL RETAIL PURCHASER to be FREE FROM DEFECTIVE MATERIALS AND WORKMANSHIP from the date of original purchase for the period shown below. ("The Warranty Period") FOR DIRECT-VIEW COLOR TELEVISION, PICTURE TUBE is covered for Two(2)years.
| Parts | 1 YEAR | Labor | 1 YEAR |
THIS LIMITED WARRANTY IS VALID ONLY IN THE FIFTY (50) UNITED STATES, THE DISTRICT OF COLUMBIA AND IN THE COMMONWEALTH OF PUERTO RICO.
WHAT WE WILL DO:
If this product is found to be defective within the warranty period, JVC will repair or replace defective parts with new or rebuilt equivalents at no charge to the original owner. Such repair and replacement services shall be rendered by JVC during normal business hours at JVC authorized service centers. Parts used for replacement are warranted only for the remainder of the Warranty Period. All products may be brought to a JVC authorized service center on a carry-in basis. Color televisions with a screen size of 27" or greater qualify for in-home service. In such cases, a technician will come to your home and either repair the TV there or remove and return it if it cannot be repaired in your home.
WHAT YOU MUST DO FOR WARRANTY SERVICE:
Please do not return your product to the retailer
Instead, return your product to the JVC authorized service center nearest you. If shipping the product to the service center, please be sure to package it carefully, preferably in the original packaging, and include a brief description of the problem(s). Please call 1-800-252-5722 to locate the nearest JVC authorized service center. Service locations can also be obtained from our website http://www.jvc.com. If your product qualifies for in-home service, the service representative will require clear access to the product.
If you have any questions concerning your JVC Product, please contact our Customer Care Center at 800-252-5722
WHAT IS NOT COVERED:
This limited warranty provided by JVC does not cover:
- Products which have been subject to abuse, accident, alteration, modification, tampering, negligence, misuse, faulty installation, lack of reasonable care, or if repaired or serviced by anyone other than a service facility authorized by JVC to render such service, or if affixed to any attachment not provided with the products, or if the model or serial number has been altered, tampered with, defaced or removed;
- Initial installation, installation and removal from cabinets or mounting systems.
- Operational adjustments covered in the Owner's Manual, normal maintenance, video and audio head cleaning;
- Damage that occurs in shipment, due to act of God, and cosmetic damage;
- Signal reception problems and failures due to line power surge;
- Video Pick-up Tubes/CCD Image Sensors are covered for 90 days from the date of purchase;
- Accessories;
- Batteries (except that Rechargeable Batteries are covered for 90 days from the date of purchase);
- Products used for commercial purposes, including, but not limited to rental.
There are no express warranties except as listed above.
THE DURATION OF ANY IMPLIED WARRANTIES, INCLUDING THE IMPLIED WARRANTY OF MERCHANTABILITY, IS LIMITED TO THE DURATION OF THE EXPRESS WARRANTY HEREIN.
JVC SHALL NOT BE LIABLE FOR ANY LOSS OF USE OF THE PRODUCT, INCONVIENCE, OR ANY OTHER DAMAGES, WHETHER DIRECT, INCIDENTAL OR CONSEQUENTIAL (INCLUDING, WITHOUT LIMITATION, DAMAGE TO TAPES, RECORDS OR DISCS) RESULTING FROM THE USE OF THIS PRODUCT, OR ARISING OUT OF ANY BREACH OF THIS WARRANTY. ALL EXPRESS AND IMPLIED WARRANTIES, INCLUDING THE WARRANTIES OF MERCHANTABILITY AND FITNESS FOR PARTICULAR PURPOSE, ARE LIMITED TO THE WARRANTY PERIOD SET FORTH ABOVE.
Some states do not allow the exclusion of incidental or consequential damages or limitations on how long an implied warranty lasts, so these limitations or exclusions may not apply to you. This warranty gives you specific legal rights and you may also have other rights which vary from state to state.
JVC COMPANY OF AMERICA
DIVISION OF JVC AMERICAS CORP
1700 Valley Road
Wayne, NJ 07470
http://www.jvc.com
REFURBISHED PRODUCTS CARRY A SEPARATE WARRANTY, THIS WARRANTY DOES NOT APPLY. FOR DETAIL OF REFURBISHED PRODUCT WARRANTY, PLEASE REFER TO THE REFURBISHED PRODUCT WARRANTY INFORMATION PACKAGED WITH EACH REFURBISHED PRODUCT.
For customer use:
Enter below the Model No. and Serial No. which is located either on the rear, bottom or side of the cabinet. Retain this information for future reference.
Model No.:
Serial No.:
Purchase date :
Name of dealer :
TO OUR VALUED CUSTOMER —
THANK YOU FOR PURCHASING THIS JVC PRODUCT.
WE WANT TO HELP YOU ACHIEVE A PERFECT EXPERIENCE.
NEED HELP ON HOW TO HOOK UP? NEED ASSISTANCE ON HOW TO OPERATE? NEED TO LOCATE A JVC SERVICE CENTER? LIKE TO PURCHASE ACCESSORIES?
JVC® IS HERE TO HELP!
TOLL FREE: 1(800)252-5722 http://www.jvc.com
Remember to retain your Bill of Sale for Warranty Service.
Do not attempt to service the product yourself
Caution
To prevent electrical shock, do not open the cabinet. There are no user serviceable parts inside. Please refer to qualified service personnel for repairs
BT-51011-8
(0504)
Specifications
| Item\Model | LT-17X576 | LT-23X576 |
| Broadcasting systems US M TV system | ||
| Color systems | NTSC | |
| Channels and frequencies | • Channels(on air) VHF 2 to 13, UHF 14 to 69• Channels(CABLE) 1 to 125 | |
| Sound-multiplex systems US system | ||
| Power requirements | TV: 12V DC, Power source: AC 120V 60 Hz | TV: 24V DC, Power source: AC 120V 60 Hz |
| Power consumption | 60 W, Standby: W | 120W, Standby: 1 W |
| Screen size Viewable area 43.5 cm | (measured diagonally) | Viewable area 58.2cm(measured diagonally) |
| Display resolution 1280 | X 768 (W-XGA) | |
| Audio output Rated Power output: | 3 W + 3 W | Rated Power output: 5 W + 5 W |
| Speakers 5.4 cm round x 2 | ||
| INPUT 1 terminal | • Video input, S-VIDEO (Y/C) input and Audio L/R inputs are available. | |
| INPUT 2 terminal | • Component Video input and Audio L/R inputs are available. | |
| PC INPUT terminal | Analog RGB: D-SUB (15 pins) x 1, PC AUDIO IN x 1• PC signal and audio inputs are available. | |
| Headphone jack | Stereo mini-jack (3.5 mm in diameter) | |
| Dimensions (W x H x D) | 465 mm x 325 mm x 78 mm (Without the stand)465 mm x 363 mm x 190 mm (With the stand) | 619 mm x 436 mm x 86 mm (Without the stand)619 mm x 498 mm x 225 mm (With the stand) |
| Weight | 6.2 kg (Without the stand)7.4 kg (With the stand) | 9.4kg(Without the stand)11.4kg (With the stand) |
| Accessories Remote control unit | x 1 (RM-C1880)AA/R6 dry cell battery X 2AC adapter x 1 (HP-OL060D033)Power cord x 1 | Remote control unit x 1 (RM-C1880)AA/R6 dry cell battery x 2AC adapter x 1 (HP-OW120A034)Power cord x 1 |
ENGLISH
Design and specifications subject to change without notice.
Pictures displayed on the screen using this TV's ZOOM functions should not be shown for any commercial or demonstration purpose in public places (cafes, hotels, etc.) without the consent of the owners of copyright of the original picture sources, as this constitutes an infringement of copyright.
MEMO:
MEMO:
MEMO:
RISQUE D'ELECTROCUTION NE PAS OUVRIR

natural_image
Symbolic illustration of a person pushing a large cylindrical object, enclosed in a circle with no text or symbols.natural_image
Illustration of a computer monitor with a hand holding a screen, crossed out by a diagonal line (no text or symbols)
natural_image
Diagram showing a hand holding a tool above a cross-shaped object, with no visible text or symbolsMISE EN GARDE:
Son MTS (Multi-Channel Television Sound) ...11
natural_image
Illustration of hands interacting with a computer monitor (no text or symbols visible)Attache de câbles
natural_image
Diagram of a computer monitor with cable and ventilation slots, showing internal components (no text or symbols)Attache de câbles
natural_image
Technical line drawing of a computer monitor internal structure showing front, rear, and side views (no text or labels)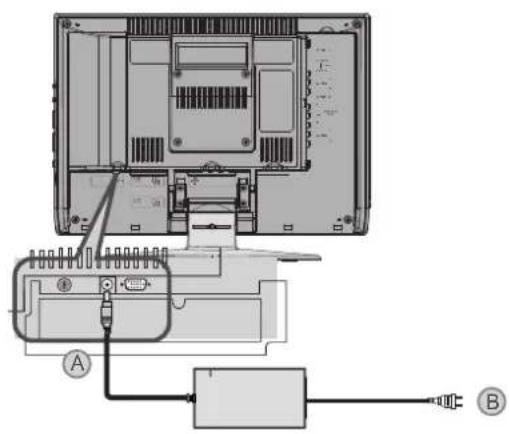
CONFIG.INITIALE
Son MTS (Multi-Channel Television Sound)
• PG – Accord Parental
natural_image
Abstract geometric pattern with diagonal black and white stripes on white background (no text or symbols)JVC COMPANY OF AMERICA
Division of JVC Americas Corp.
1700 Valley Road
Wayne, New Jersey, 07470
JVC®
JVC CANADA, INC.
21 Finchdene Square
Scarborough, Ontario
Canada, M1X 1A7