USER MANUAL ARP4012H Royal Sovereign
natural_image
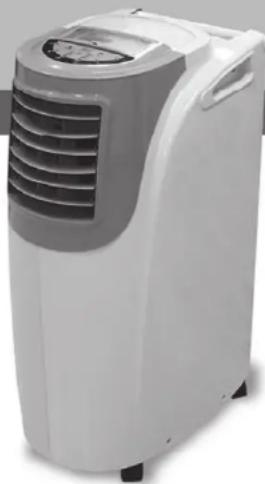
White and gray portable air conditioner unit with ventilation grille (no visible text or symbols)
OWNER'S MANUAL
ARP-4009, 4010, 4012, 4012H
PORTABLE AIR CONDITIONER
ARP-4009,4010,4012,4012H
PORTABLE AIR CONDITIONER ACONDICIONADOR DE AIRE PORTÁTIL
Read and retain these instructions for future reference
For any Customer Support needs, please choose the Support tab on www.royalsovereign.com
Royal Centurian Inc.
PORTABLE AIR CONDITIONER
Model ARP-4009, 4010, 4012, 4012H
INTRODUCTION
Thank you for choosing Royal Sovereign to provide you and your family with all of the "Home Comfort" requirements for your home, apartment, or office. This Portable Air Conditioner can be set-up in just minutes and can be easily moved from room to room. It is a multi-functional room air comfort system that offers you Air Conditioning, Dehumidification and Air Circulation modes. This manual will provide you with valuable information necessary for the proper care and maintenance for your new appliance. Please take a few moments and read the instructions thoroughly. If properly maintained, your appliance will give you many years of troublefree operation.
CONTENTS
Page
Precautions for use 4
Notes on operation and identification of parts 5
Installation instructions....6\~7
Operation 8\~9
Remote control 10\~11
Maintenance 12
Troubleshooting 13
Specifications 14
Warranty 15
Contact information 16
Electrical Specifications and Power Cord
Check to ensure that the electrical service being used is adequate for the model you've chosen. The electrical rating of your new air conditioner is defined on the serial plate of the unit. Please refer to the rating when checking electrical requirements to ensure they meet the electrical codes of your location.
• Install the air conditioner according to the installation instructions supplied.
• Do not modify any part of this product.
- Do not insert any objects into the product or block the airflow in any way.
- Ensure that the power supply you use has an appropriate voltage rating.
- Only use a properly installed 3 pin, grounded AC socket that is rated 115V, 60Hz, 15 amps or more.
- If the electrical outlet you intend to use is not adequately grounded or protected by a time delay fuse or circuit breaker, you should have a qualified electrician install the proper outlet.
- This unit uses a plug with a built-in fuse. Conduct a Power Plug Check (see page 9) before use to confirm normal operation.
- Do not use this unit with any extension cords or adapter plugs.
- If the cord or plug is damaged in any way, please call the Royal Sovereign Service Department (see page 16.)
- Do not plug this cord into a loose electrical outlet.
- Turn the unit off and unplug, when cleaning the air conditioner, removing the filter or when the air conditioner will not be used for an extended time period.

General Use
- Do not block air outlets or intake with obstacles.
- Do not insert any objects into the air conditioner.
- Do not splash or pour water on the housing or control panel.
- Do not place heavy items or sit on unit.
• Make sure the drainage plug is installed on bottom of machine.
- Drain the unit when moving the air conditioner or when storing the unit.
ARP-4009, 4010, 4012, 4012H
Notes on operation
If you turn the air conditioner off and immediately restart it, allow 3 minutes for the compressor to restart cooling. In the event of a power failure, wait 3 minutes before restarting unit.
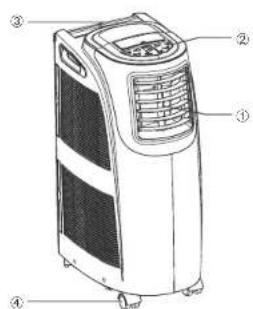
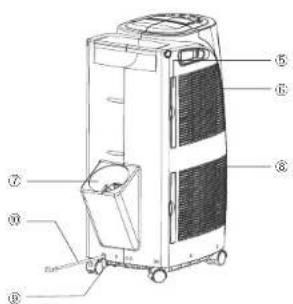
Identification of parts
- Air outlet
- Display panel
- Handle
- Caster
- Air filter
- Air intake (evaporator)
- Air outlet (heat exchange)
- Air intake (condenser)
- Water outlet drain
- Power supply cord


Installation
Unpack your new Portable Air Conditioner and let the machine stand upright for 2 hours before starting.
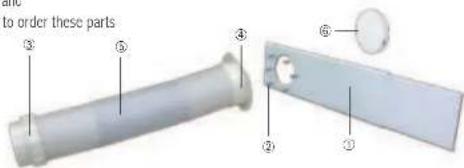
Unpack all parts listed below. If any parts are missing do not return this product to the place of purchase.
Please visit our website www.royalsovercign.com and click on the "Customer Support" tab and
"Make a Request" to request missing parts or call 1-800-397-1025 and press option #4 to order these parts
Accessories Include
- Window slider kit ....1 Set
- Screws 6 Pieces
- Exhaust hose connector (PAC) ....1 Pieces
- Exhaust hose connector (window) -1 Pieces
- Exhaust hose 1 Piece
- Cover 1 Piece
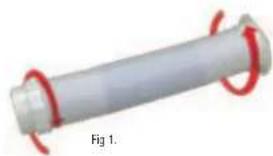
A. Exhaust Hose and Connector : Fig 1.
- Attach the threaded nozzles of Exhaust Hose Connector to the end of the exhaust hose by turning clockwise.
- Repeat for other end.
natural_image
Close-up of a cylindrical mechanical component with red spiral end caps, labeled Fig 1 (no text or symbols on the object itself)
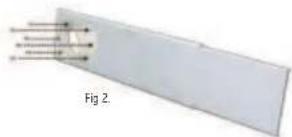
B. Attach Hose Fixture : Fig 2.
- Line up the screw holes on the hose fixture to the front of the window slider kit.
- Using the 4 screws provided, attach the hose fixture to the window panel of the slider kit.
ARP-4009, 4010, 4012, 4012H
C. Install the Window Slider Kit : Fig 3.
- Op en the window and place the Window Slider Kit on the inside edge of the window.
- Adjust the Window Slider by adjusting it to the width of the window.
- Close the window to secure.
- Tighten the two screws to lock the window slider in place.
Fig 3.
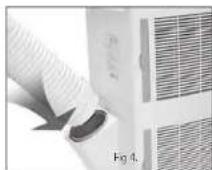
D. Connecting the Exhaust Hose to the PAC : Fig 4.
- Connect the hose connector to the air outlet by aligning the tabs on the hose to the PAC and snap it into place.
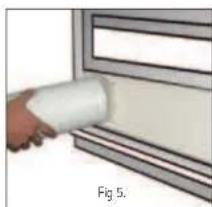
E. Connect the Exhaust Hose to Window Slider Kit : Fig 5.
- Move the Portable Air Conditioner within 4 feet of the window.
- Extend hose to desired length by pulling open.
- Align the tabs on the hose and the window panel fixture and snap them into place.
natural_image
Hand applying a white cylindrical tool to a window frame (no text or symbols visible)

Operation
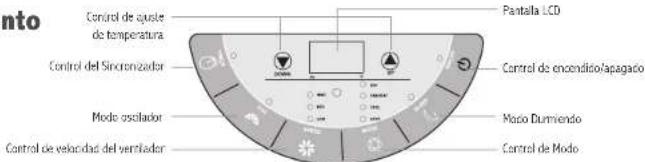
Control Panel
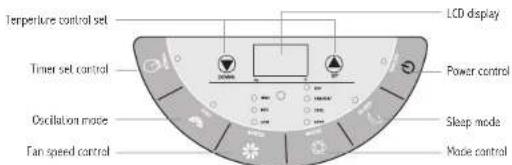
Power Control
The power control button turns the unit on and off. When you press the button, the unit begins to operate.
Mode Control
The Mode Control has 3 settings (four settings on 4012H). Auto Cool Dehumidify Fan / Heat
Cool Mode
Press the Mode Control button to select Cool mode. The green light will show on the display.
The unit displays "present room temperature." The temperature range settings are between 64\~88 °F
A. In Cool mode, use the or button to adjust and set the desired temperature for the room. After 3 seconds the display will return back to the present room temperature.
NOTE: The air exchange hoses must be vented through window kit when in this mode.
Dry (Dehumidify) Mode
Press the Mode Control button to select Dry (dehumidify) mode. The light will show on the display.
When the Dehumidify mode is on, the temperature buttons do not function. The fan speed can be adjusted only if the temperature in the room is higher then 77 °F. If it is below this temperature, the
fan speed is automatically fixed to "low" and cannot be adjusted. When the humidity in the room is 50% or lower, the compressor will not run and the unit will not dehumidify
NOTE: The exhaust hose must be connected to remove the humidity.
Fan Mode
Press the Mode Control button to select Fan mode. The light will show on the display. The air is circulated throughout the room with no cooling.
Heat Mode (only ARP-4012H)
Press the Mode Control button to select Heat mode. The red light will show on the display.
The unit displays "present room temperature". Healing is only activated when the temperature in the room is below 81°F. The temperature setting can be adjusted between 64 and 81°F.
B. In Heat mode, use the √ or √ button to adjust and set the desired temperature for the room. After 3 seconds the display will return back to the current room temperature.
NOTE: The two air exchange hoses must be vented through window kit when in this mode.
ARP-4009, 4010, 4012, 4012H
Fan Speed Control
Press the Speed button to set the fan speed. The fan settings are low, medium, and high.
NOTE: The air will be circulated without cooling or heating and the unit does not have to be vented for this mode.
Timer
I here are 2 different timer programs. You can set the number of hours before the air conditioner automatically turns OH or you can set the number of hours that will elapse before the unit turns ON.
When the air conditioner is turned off, you can choose to turn it on in one hour intervals.
-
Press the Timer button on the Control Panel (the timer indicator light will be lit).
-
Continue to press the Timer button until you reach the number of hours you want to elapse before the unit turns on. Example: If you want the air conditioner to turn on in eight hours, press the button until you see 8 on the display.
-
The unit will turn on when the set time elapses
When the air conditioner is turned on, you can choose to turn it off in one hour intervals.
-
Press the Timer button on the Control Panel (the timer indicator light will be lit).
-
Continue to press the Timer button until you reach the number of hours you want to elapse before the unit turns off. Example: If you want the air conditioner to turn off in eight hours, press the button until you see 8 on the display.
-
The unit will turn off when the set time elapses
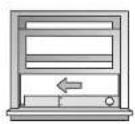
Oscillation Mode
The oscillation feature moves the air louvers from left to right to allow the air to reach more areas in the room. Press the OSC button to start this feature.
Sleep Mode
Sleep Mode is used to keep the room comfortable while saving energy. When the Sleep Mode button is pressed, the set temperature will increase by 2^ F in the first hour and increase another 2^ in the second hour. It will then remain at that temperature for the remainder of the night.
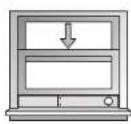
Tank Full
Condensed water may accumulate in the unit. If the internal tank fills, it will begin to make a beeping sound. The unit will not operate until the unit has been drained (See Maintenance Page for instructions on how to drain.)
Automatic Restart
In the event of a power failure. The settings will return to the previously set operating modes once the power is restored.
Power Plug Check
-
Press the RESET button.
-
Insert the power plug into the electrical outlet.
-
Press the TEST button. If the circuit breaker is working you'll hear a click.
-
Press the RESET button until you hear another click. The circuit breaker in the plug is now activated.
-
Do not use the air conditioner if the above procedure cannot be successfully performed.
After switching the air conditioner off, wait 3 minutes before switching it back on again.
9

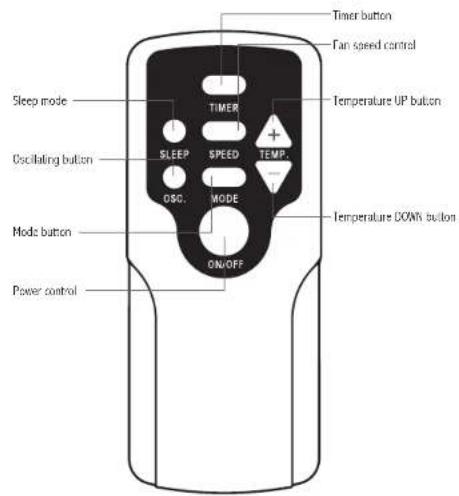
Remote Control
All functions can be accessed from the remote control.
ARP-4009, 4010, 4012, 4012H
Remote Control Operation
- The remote control uses two AAA (IEC RO# 1.5V) batteries which have been included for your convenience.
- Remove the battery cover on back of the remote.
- Insert the batteries, making sure the (+) and (-) polarity is aligned correctly.
- Replace the battery cover.
Notes:
-When replacing batteries, always change both batteries at the same time.
-Remove the batteries if the remote control is not used for a month or longer.
-Do not dispose of batteries in a fire.
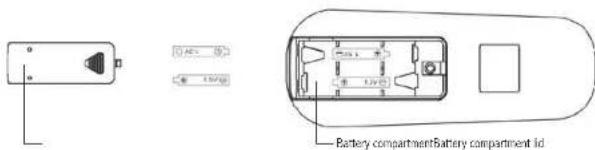
Battery replacement
Remove the cover on the back of the remote control and insert the batteries with (+) and (-) poles pointing in the proper direction.

Maintenance
Drainage
Occasionally, you may need to drain the unit.
1. Drain the unit if the Warning Light on the display panel of the air conditioner is on.
2. Turn off the power to the unit and unplug.
3. Place a shallow dish under the drainage plug to collect water.
4. Remove the drainage plug.
5. Replace the plug, when drainage water stops flowing.
Cleaning the filter
The filter should be cleaned every 2 weeks or 100 hours of use in order to maintain proper airflow.
- Remove the filter. Gently pull the filter assembly from the back of the unit and then remove the filter from the assembly.
- Clean the filter by vacuuming or a soft cloth. If the filter is very dirty, it can be easily washed with a mild detergent and rinsed thoroughly with clean water. Dry the filter before replacement.
- Reinstall the filter in the filter assembly.
- Replace the filter assembly on the back of the machine.
Note : Never operate the air conditioner without the filter in place. This may damage the unit.
Cleaning and maintaining the air conditioner
Turn the air conditioner off and remove the electrical plug. Wipe with a soft, dry, or damp cloth. A mild detergent can be used. Be sure to remove any residue and dry completely. Do not use harsh chemicals, abrasive cleaners or volatile substance (such as gasoline). Avoid splashing water on the air conditioner as this can seriously damage the unit.
Storing the air conditioner
If the unit will not be used for a long time, be sure to drain the air conditioner, clean the air filter, pull out the power supply plug, and remove the batteries from the remote control before storage. After draining, keep the air conditioner running on FAN mode for at least 8 hours to dry the unit completely to prevent mold.
ARP-4009, 4010, 4012, 4012H
Troubleshooting
| Problem Possible Reasons | |
| Air Conditioner does not operate | - Check and reset the power plug. Wait 3 minutes and try to run the unit again.- The batteries in the remote may need to be replaced. Replace the batteries and try to run the unit again.- Make sure the plug is properly plugged into the outlet.- The set temperature may be too close to room temperature. Lower the set temperature.- The air outlet may be blocked. Check the air outlet and remove any items that may be found. |
| Air Conditioner runs but does not cool | - Check the room for open doors or windows and close them.- There may be another appliance in the room giving off heat. Check the room and turn off the appliance.- The air filter may be dirty. Check the filter and clean if necessary.- The air exhaust or intake may be blocked.- The set temperature may be too high. Check the set temperature and reduce it if necessary. |
| Air Conditioner does not run and water full indicator is lit | - There may be excess water in the unit. Drain the unit. |

SPECIFICATIONS
- Figures noted in the contents are for reference only; variation may result due to the application in different countries or regions, and shall be based on practical operation.
| Description of product Air Conditioner |
| Model ARP-4009 ARP-4010 ARP-4012 ARP-4012H | | | | |
| Voltage/Frequency AC 115V=60Hz | |
| Input power 1050W 1470W 1700W 1700W | | | | |
| Current 9.1A 12.8A 14.8A 14.8M | | | | |
| Cooling Capacity | 9,000BTU/hr | 10,000BTU/hr | 12,000BTU/hr | 12,000BTU/hr |
| Dehumidifying Capacity | 4.4 pints/hr |
| Coolant | R-22 |
| Timer | 24 hour |
| Dimension (w) X (h) x (s) | 20.3 x 34.5 x 14.6 inches |
| Weight | 77lbs |
“Electrical waste products should not be disposed of with household waste.
Please recycle where facilities exist. Check with your local authority or retailer for recycling advice."

ARP-4009, 4010, 4012, 4012H
FULL ONE YEAR WARRANTY
Royal Sovereign warrants each Portable Air Conditioner to be free from defects in material and workmanship. Our obligation under this warranty is limited to the repair or replacement, free of charge, when delivered to an authorized Royal Sovereign service center, of any defective part(s) thereof, other than parts damaged in transit. This warranty is in effect to the original purchaser, for a period of one year from the date of purchase and is not transferable. This warranty shall apply only if the air conditioner is used on Alternating Current (AC) circuit, in accordance with the factory provided instructions which accompany it.
To request servies, please go to www.royalsovereign.com - Customer Support to submit a request or call 1-800-397-1025
LIMITED FIVE YEAR WARRANTY (COMPRESSOR)
For a period of five years from the date of purchase, when this Royal Sovereign Portable Air Conditioner is operated and maintained according to the instruction manual provided with the product, Royal Sovereign will supply a replacement compressor (parts only), free of charge, if the original compressor is determined to be defective in workmanship or material. If repair becomes necessary, please contact our customer service center. You will be responsible for all freight, insurance, and any other transportation charges to get the unit to our factory or service center. If shipping is required, be sure to pack the unit properly to avoid shipping damages, as we will not be responsible for such damages.
EXCLUSIONS
This warranty excludes and does not cover defects, malfunctions or failures of your Royal Sovereign Portable Air Conditioner, caused by repairs by unauthorized persons or service centers, mishandling, improper installation, modification or unreasonable use including incorrect voltage, acts of God, or failure to provide reasonable and necessary maintenance. This warranty is in lieu of any and all expressed warranties. In no event shall Royal Sovereign be liable for consequential or incidental damages. This limitation would not apply if you live in a location that does not permit the exclusion of limitation of incidental or consequential damages. This warranty gives you specific legal rights and you may also have other rights which vary from state to state.
Please visit www.royalsovereign.com - USA - Customer Support for out of warranty service or to view frequently asked questions.
natural_image
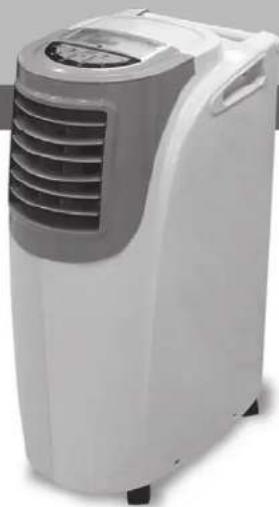
White and gray portable air conditioner unit with ventilation grille (no visible text or symbols)

ROYAL SOVEREIGN INTERNATIONAL, INC.
2 Volvo Drive Rockleigh, N: 07647 USA
TE:118003971025 FAX:112017501022
RS INTERNATIONAL AUSTRALIA PTY. LTD.
30 Prime Drive, Seven Hills, NSW 2147, AUSTRALIA
TEL: 61296742127 FAX: 61296742027
RS Holland B.V.
Industrieseq 6X, 4104N8, Copenhagen, The Netherlands
OBSOakdale Road, Toronto, Ontario 93N 255 GWAOM
TE:1)416-2418400 FAX:11416-2418185
Royal Sovereign Mexico, S.A. de C.V.
24 de Abril de 1860 No. 8 Col. Leyes de Reforma Mexico D.F.C.P. 09310
Tel: (52) 55-5600-0757, 55-5600-7848 Fax: (52) 59-5600-0748
MANUAL DEL PROPIETARIO
ARP-4009, 4010, 4012, 4012H
ACONDICIONADOR DE AIRE PORTÁTIL
ARP- 4009, 4010, 4012, 4012H
Royal Centurian Inc.
natural_image
White and gray portable air conditioner unit with ventilation grille (no visible text or symbols)

Instalación
natural_image
3D rendering of a cylindrical mechanical component with red circular end caps, labeled Fig 1 (no text or symbols on the object itself)
A. Manguera de Escape y Conector: Fig. 1
natural_image
Diagram showing a rectangular object with internal parallel lines and arrows, labeled 'Fig 2.' (no text or symbols on the object itself)
ARP-4009, 4010, 4012, 4012H
natural_image
Hand holding a white cylindrical object against a wall, labeled 'Fig 5.' (no text or symbols on the object itself)

Funcionamiento
Panel de Control
Modo Secar (Deshumedecer)
natural_image
White and gray portable air conditioner unit with ventilation grille (no visible text or symbols)

ROYAL SOVEREIGN INTERNATIONAL, INC.
2 Volvo Drive Rockleigh, N: 07647 USA
TE:118003971025 FAX:112017501022
RS INTERNATIONAL AUSTRALIA PTY. LTD.
30 Prime Drive, Seven Hills, NSW 2147, AUSTRALIA
TEL: 61296742127 FAX: 61296742027
RS Holland B.V.
Industrieseq 6X, 4104N8, Copenhagen, The Netherlands
OBSOakdale Road, Toronto, Ontario 93N 255 GWAOM
TE:1)416-2418400 FAX:11416-2418185
Royal Sovereign Mexico, S.A. de C.V.
24 de Abril de 1860 No. 8 Col. Leyes de Reforma Mexico D.F.C.P. 09310
Tel: (52) 55-5600-0757, 55-5600-7848 Fax: (52) 59-5600-0748

MANUEL DU PROPRIÉTAIRE
ARP-4009, 4010, 4012, 4012H CONDITIONNEUR D'AIR PORTABLE
ARP-4009, 4010, 4012, 4012H
CONDITIONNEUR D'AIR PORTABLE
Royal Centurian Inc.
natural_image
White and gray portable air conditioner unit with ventilation grille (no visible text or symbols)
CONDITIONNEUR D'AIR PORTABLE


Installation
natural_image
3D rendering of a cylindrical mechanical component with red spiral arms, labeled Fig 1 (no text or symbols on the object itself)
natural_image
Diagram of a rectangular object with internal arrows, labeled Fig. 2 (no text or symbols on the object itself)
ARP-4009, 4010, 4012, 4012H
natural_image
Hand holding a white cylindrical object against a wall, labeled 'Fig 5.' (no text or symbols on the object itself)

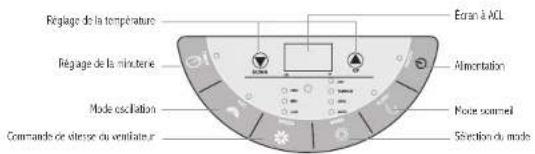
Fonctionnement
Panneau de Commande
After switching the air conditioner off, wait 3 minutes before switching it back on again.

Télécommande
natural_image
White and gray portable air conditioner unit with ventilation grille (no visible text or symbols)

ROYAL SOVEREIGN INTERNATIONAL, INC.
2 Volvo Drive Rockleigh, N: 07647 USA
TE:11)8003971025 TE:11)2017501022
RS INTERNATIONAL AUSTRALIA PTY. LTD.
30 Prime Drive, Seven Hills, USA 2147, AUSTRALIA
TEL: (61)2-9674-2127 FAX: (E1)2-9674-2027
ROYAL SOVEREIGN INC.
100° World Norden II, 426-5. Gasan-cong, Grumcheon-gu, Seoul, 153-759, KOREA Oakdale Road, Toronto, Ontario H3N 250-GWADA
TF +18212 2025 8800 TÉLÉC -18212 2025 8830
RS CAMADA INC.
CREA Oakdale Road, Toronto, Ontario H3N 250 CANADM
TEL: +1) 416-741-8430 (AX: -1) 416-741-8185
RS Holland B.V.
Industreewa 6K, 410488, Quembers, The Netherlands
TEL: 310345473092 TEL: 31034551981
Royal Sovereign Mexico, S.A. de C.V.
24 de Abril de 1960 No. 8 Col. Leyes de Reforma Mexico D.F. C.P. 09310
TEL: (52) 55-5600 0754, 55-5600 7848 TÉLÉC: (52) 55-5600 0748