
ARP914 - Air Conditioning Royal Sovereign - Free user manual and instructions
Find the device manual for free ARP914 Royal Sovereign in PDF.

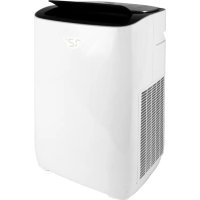
| Product Type | Portable Air Conditioner |
| Brand | Royal Sovereign |
| Model | ARP914 |
| Dimensions (W x D x H) | 405 mm x 315 mm x 660 mm (15.94 x 12.4 x 25.98 in) |
| Net Weight | 25 kg (55.12 lb) |
| Power Supply | 115-120 V / 60 Hz |
| Cooling Capacity (ASHRAE) | 14,000 BTU/h |
| Cooling Capacity (DOE) | 7,000 BTU/h |
| Power Consumption (Cooling) | 1,880 W (ASHRAE) / 1,576 W (DOE) |
| Rated Current | 11.5 A (ASHRAE) / 6.6 A (DOE) |
| Noise Level | ≤ 56 dB |
| Refrigerant | R410A |
| Dehumidification Capacity | 28.8 L/day (60.9 pints/day) |
| Airflow | 340 m³/h |
| Fan Speeds | 2 (Low and High) |
| Adjustable Temperature Range | 15-31 °C (59-88 °F) |
| Main Functions | Cooling, dehumidification, fan, vertical oscillation, 24h timer, child lock |
| Maintenance and Cleaning | Clean air filters every 2 weeks; manual or continuous drainage possible |
| Safety | Plug with TEST/RESET fuse, auto shut-off on full tank (code E4) |
| Warranty | 1 year parts and labor, 3 years compressor |
| Certification | cETLus |
| Included Accessories | Remote control, window sealing plate, exhaust hose with connectors, drainage hose, user guide |
Frequently Asked Questions - ARP914 Royal Sovereign
User questions about ARP914 Royal Sovereign
0 question about this device. Answer the ones you know or ask your own.
Ask a new question about this device
Download the instructions for your Air Conditioning in PDF format for free! Find your manual ARP914 - Royal Sovereign and take your electronic device back in hand. On this page are published all the documents necessary for the use of your device. ARP914 by Royal Sovereign.
USER MANUAL ARP914 Royal Sovereign
natural_image
White industrial air purifier with black lid and white base (no visible text or symbols)ARP-912
ARP-914
Royal Sovereign International, Inc.
Please read and retain these instructions.
To register your product, please go to www.royalsovereign.com
Thank you for purchasing the Royal Sovereign Portable Air Conditioner, ARP-912 / ARP-914. This manual will provide you with safety information, instructions for optimal use, and proper care and maintenance for your product. Please read this manual carefully before operating.
CONTENTS
SAFETY INSTRUCTIONS 3-4
PRODUCT VIEW 5
INSTALLATION 6-7
PRODUCT OPERATION 8-11
MAINTENANCE OF THE MACHINE....12-13
TROUBLESHOOTING....14
SPECIFICATIONS....15
WARRANTY 16
SAFETY INSTRUCTIONS
When using this appliance follow these safety precautions to reduce risk of fire, electric shock, or injury.
WARNING
Electrical Safety
- For your safety, this appliance should be properly grounded on a level surface indoors.
- The appliance should be placed near an electrical outlet so that the outlet is easily accessible.
- Make sure the voltage meets the appliance's electricity requirements (115-120V/60Hz).
- Do not connect this machine to an outlet having the electrical ratings below or above this machine.
- In case of any abnormality, be sure to turn off the machine, disconnect the plug, and contact Royal Sovereign Customer Service.
- Do not operate if the electrical plug or power cord is damaged. If damaged, call Royal Sovereign Customer Service for repair/replacement.
- Do not under any circumstances alter the electric plug.
- Do not place heavy items on the plug or cord.
- Do not plug this cord into a loose electrical outlet.
- Only plug the appliance into a properly installed, grounded 3 prong outlet.
- If the electrical outlet you intend to use is not adequately grounded or protected by a time delay fuse or circuit breaker, you should have a qualified electrician install the proper outlet.
- Do not share the electrical socket with other appliances.
- Do not use an adapter plug or extension cord with this appliance.
- Never attempt to turn off this machine by disconnecting the plug.
- When plugging or unplugging, keep your hands dry.
- Always grasp the plug when plugging or unplugging the appliance. Never unplug by pulling on the cord.
- Do not pull on the power cord while moving the unit.
- This unit uses a plug with a built-in fuse. Conduct a Power Plug Check (see Operation page 8) before use to confirm normal operation.
- Turn the unit off and unplug when; cleaning the air conditioner, removing the filters, not using the air conditioner for an extended time period.
Read & Fully Understand This Owner's Manual Before Using This Machine.
SAFETY INSTRUCTIONS
When using this appliance follow these safety precautions to reduce risk of fire, electric shock, or injury.

WARNING
Operational Safety
- Install the air conditioner according to the installation instructions supplied (Installation pages 6-7).
- Do not block air outlets or intake with obstacles.
- Do not insert any objects into the air conditioner.
- Do not place heavy items or sit on the unit.
- Do not place flammable or chemical substances near the unit.
- Do not place this machine near heating appliances.
- Do not splash or pour water on the housing or control panel.
- To prevent the water from freezing, do not use this machine and the drain hose at a temperature below 41^ F ( 5^ C).
- Make sure the rubber drain plug is securely plugged into the drain port on the back of the unit at the bottom to prevent water leaks.
- Drain the unit before moving the air conditioner or storing the unit.
- Do not operate the unit with the back cover removed.
- Do not use this machine outside. Exposure to direct sunlight or rain may result in overheating, electric shock and fire.
- Do not modify any part of this product.
- Do not operate this appliance for any other purpose other than its intended use.
- This appliance is not designed for use by young children. Young children should be supervised to ensure that they do not play with or climb on the unit.
Read & Fully Understand This Owner's Manual Before Using This Machine.
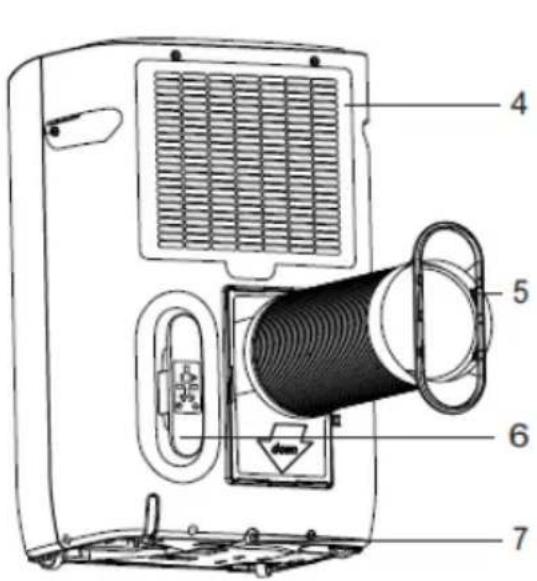
PRODUCT VIEW
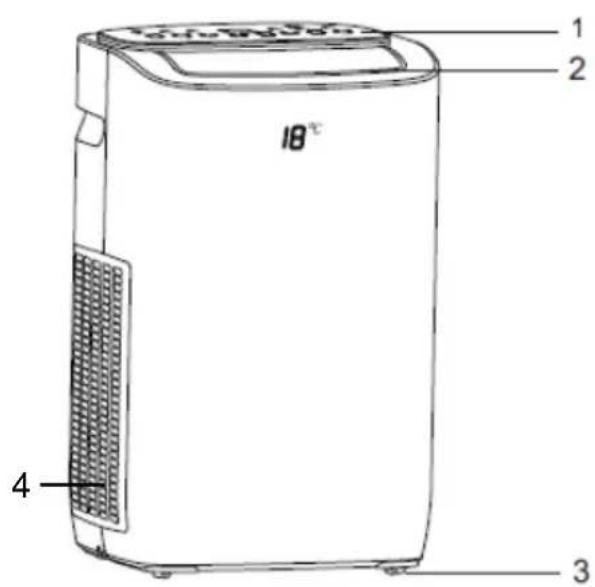
- Display panel
- Air outlet
- Caster wheels
- Air filters
- Exhaust duct (with connectors attached)
- Cord management hook
- Drainage port
INSTALLATION
Accessories Included
- Window seal plate
- Exhaust duct connectors (2)
- Exhaust duct
- Remote control
- Drainage hose
- Instruction manual
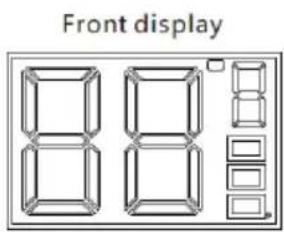
When the automatic mode is selected: the front display window is displayed on the right
When the cooling mode is selected: the front display window is displayed on the right
When the ventilation mode is selected: the front display window is displayed on the right
When the dehumidification mode is selected: the front display window is displayed on the right
NOTE: To prevent damage after moving, unpack your new portable air conditioner and let the machine stand upright for a minimum of 2 hours before operating.
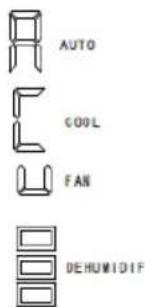
Part 1: Placement
- Place the air conditioner on a flat surface and near a power supply outlet at least 8 in. (20 cm.) away from any wall or object that could block the airflow (See below).
- Socket wiring should be in accordance with the local electric safety requirements.
natural_image
Line drawing of a wall-mounted device with two 200mm height labels, no text or symbols present.INSTALLATION
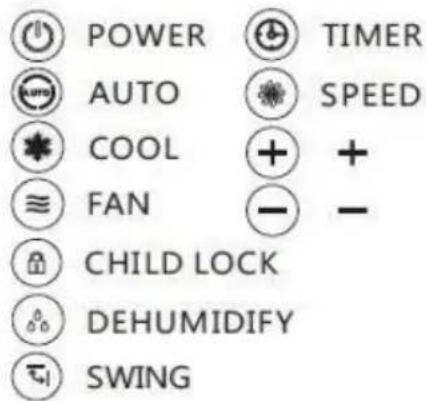
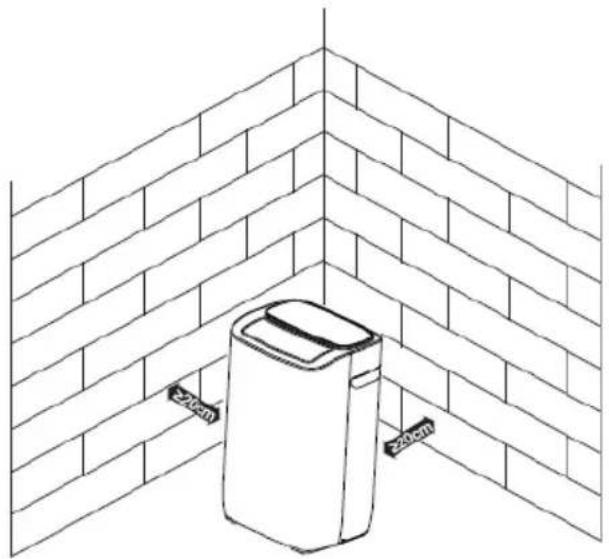
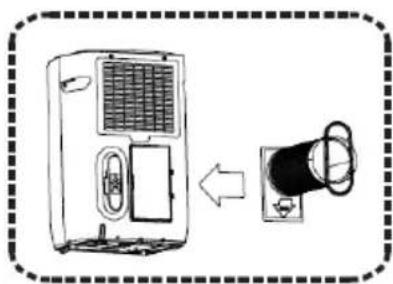
Part 2: Exhaust Hose Installation
• The two exhaust duct connectors tighten on the ends of the exhaust duct (See Fig. 1).
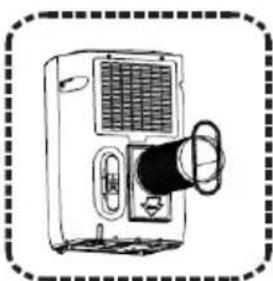
- Slide the square side of the exhaust duct connector into the opening at back of the air conditioner (See Fig. 2 and Fig. 3).
• The exhaust hose can extend up to approximately 59 in. (150 cm.).
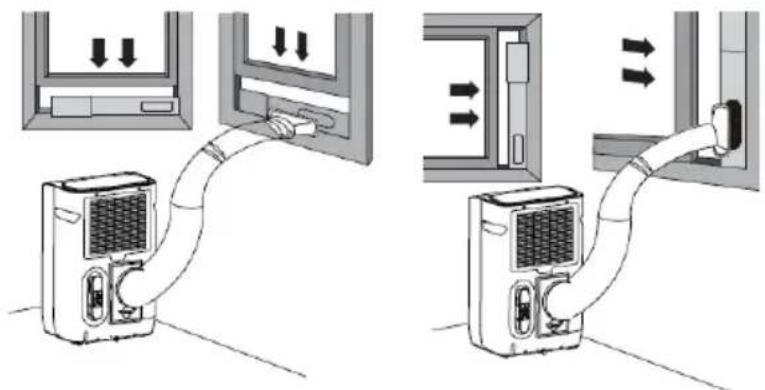
Part 3: Window Seal Plate Installation
- The window seal plate can be installed horizontally or vertically. The window seal plate can fit in windows with a minimum width of 23.5 in (60 cm.) and a maximum width of 59 in. (150 cm.).
- Open the window and place the window seal plate on the inside edge of the window.
- Adjust the window seal plate to the width of the window. Once secure, close the window.
- Connect the oval side of the exhaust duct connector to the window seal plate.
natural_image
Diagram of hands rotating a cylindrical object with arrows indicating rotation (no text or symbols)Figure 1
natural_image
Diagram showing a device connected to a wall-mounted device (no text or symbols present)Figure 2

natural_image
Line drawing of a portable air conditioner unit with ventilation grille and control panel (no text or symbols)Figure3
PRODUCT OPERATION
BEFORE PLUGGING IN THE UNIT TO A POWER SOURCE:
- Let the appliance stand upright for a minimum of 2 hours. This will reduce the chance of malfunction in the cooling system.
- Check to make sure the rubber drain plug is securely plugged into the drainage port on the back of the unit at the bottom to prevent water leaks.
- Check to make sure the exhaust hose has been installed properly (See Installation page 7).
- Check to make sure that the air conditioner has been properly vented out the window (See Installation page 7).
Conduct a Power Plug Check:
- Press the RESET button on the power cord.
- Plug the cord into an electrical outlet.
- Press the TEST button on the power cord. The RESET button should pop up.
- Press the RESET button for use.
- Do not use the air conditioner if the test fails. The green light on the power cord will turn on if the plug is working properly.
Note: IF YOU TURN THE AIR CONDITIONER OFF AND IMMEDIATELY RESTART IT, ALLOW 3 MINUTES FOR THE COMPRESSOR TO RESTART COOLING. IN THE EVENT OF A POWER FAILURE, WAIT 3 MINUTES BEFORE RESTARTING THE UNIT.
ATTENTION: THE UNIT SOLD IN THE UNITED STATES IS SET TO FAHRENEHIT. THE UNIT SOLD IN CANADA IS SET TO CELSIUS.
PRODUCT OPERATION
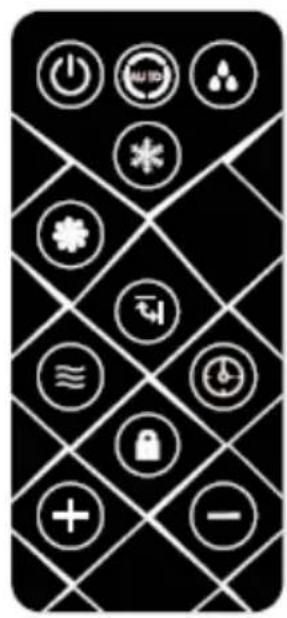
Remote Control
- All functions can be accessed from the remote control. A CR2025 battery is required for operation. Battery is included.
Child Lock Function:
- This button is on the remote control only. When pressed, this function locks the air conditioner into the mode it is currently in. When in lock mode you cannot change modes from the display or remote control until it is unlocked. Unlock by pressing the lock button again.
Touchscreen Control Panel:
| Icon Description | |
 | Press this icon to turn the machine on and off. |
 | Press this icon to switch between operating modes: fan, auto, and cool. |
 | Press this icon to lower the set temperature or 24-hour timer. |
 | Press this icon to raise the set temperature or 24-hour timer. Long press this key for 5 seconds to show the current room temperature. |
 | Press this icon to set the wind speed of the machine. First press sets high speed, second press sets low speed. |
 | Press this icon to operate the timer. When the machine is on, use the timer to set time-off. When the machine is off, use the timer to set the time-on. |
 | Press this icon to turn on the dehumidification mode. |
 | Press this icon (swing) to turn on vertical oscillating air vent. |
PRODUCT OPERATION
Boot State:
- When you select a mode, the machine will enter boot state. The front display, as well as the indicator light of the mode selected will blink for a few seconds to allow the machine to process the selection. Once the machine has processed the change, the indicator light will turn solid and the new mode will begin.
Fan Operation:
- In the boot state, press the mode icon to switch to fan mode. The front display, as well as the indicator light will blink for a few seconds when selected and turn solid when confirmed.
• In fan mode, the upper blower works and the compressor does not work. - Press the wind speed icon to switch between high and low wind speeds.
Auto Mode:
- In the boot state, press the mode icon to switch to automatic mode. The front display, as well as the indicator light will blink for a few seconds when selected and turn solid when confirmed.
- When the machine is powered on for the first time or if the machine has been off for more than 30 minutes, the machine enters automatic mode by default.
- When switching to automatic mode from other modes or from powering on the air conditioner (first time or when off for over 30 minutes), the machine will automatically set to the following:
• If room temperature is > 75°F (24°C) auto set to cooling mode
• If room temperature is >72^ F ( 22^ C) and <75^ F ( 24^ C) auto set to fan mode
• If room temperature is <72^ ( 22^ ) auto set to single cold type ventilation
- Once in automatic mode, the room temperature will change, while the set mode will remain the same. The set mode will not change until automatic mode is complete.
Cooling Operation:
- In the boot state, press the mode icon to switch to cooling mode. The front display, as well as the indicator light will blink for a few seconds when selected and turn solid when confirmed.
- Press the increase or decrease icons to set the desired temperature. The temperature range is from 59-88°F (15-31°C). The front and top digital displays will show the current set temperature.
- Press the wind speed icon to switch between high and low wind speeds.
- For optimal operation, shorten the length of the air duct and keep from direct sunlight.
PRODUCT OPERATION
Oscillating Air Vent:
- In the boot state, press the swing icon. The front display, as well as the indicator light will blink for a few seconds when selected and turn solid when confirmed.
• In this mode, the air vent louvers will automatically swing up and down. - Press the swing icon again. The indicator light will turn off when selected and the louvers will stop swinging.
Dehumidify Mode:
- In the boot state, press the dehumidification icon. The front display, as well as the indicator light will blink for a few seconds when selected and turn solid when confirmed.
- In the dehumidify mode, the fan runs at low speed and the temperature is not adjustable.
- Do not use dehumidify mode when the temperature is lower than 59^ (15°C).
Timer
- When the air conditioner is on, press the timer icon and select a desired off (shutdown) time through the increase and decrease icons (+ / -). The off timer can be set for any time from 0 to 24 hours. Press the timer icon again to show the preset shutdown time on the control panel and front display.
- When the air conditioner is off, press the timer icon and select a desired on (startup) time through the increase and decrease icons (+ / -). The on timer can be set for any time from 0 to 24 hours. The control panel and front display will show the time remaining until startup.
- Once the desired time is selected, wait 3 seconds and the air conditioner will automatically accept the setting.
MACHINE MAINTENANCE
WARNING: Before maintenance, turn the power switch off and disconnect the power cord from the wall.
Drainage
The internal water tank in the air conditioner has a water level safety switch. When the water level reaches or exceeds an anticipated height, the buzzer alarm will ring 6 consecutive times, each time interval of 1 second. The machine will then enter E4 water full protection mode and be shown on the display. In E4 mode the machine will stop the refrigeration and the compressor. In order for the machine to resume operation it must be drained.
To drain manually:
- Turn off the power to the unit and unplug.
- Place a water tray under the drainage port at the bottom of the unit to collect water.
- Remove the rubber drainage plug.
- Replace the plug, when drainage water stops flowing.
For continuous drainage into a floor drain:
- Turn off the power to the unit and unplug.
- Remove the rubber drainage plug from the drainage port at the bottom of the unit.
- Attach the drainage hose to the drainage port. Drainage hose is approximately 40in.(101cm.).
- Place other end of drainage hose into a floor drain.
- Replace the rubber drainage plug after operation to prevent leaks.
Cleaning the unit
- Turn off the power to the unit and unplug.
- Wipe down unit with a soft, dry, or damp cloth. A mild detergent can be used.
- Never use a volatile substance such a gasoline or abrasive cleaners.
- Do not splash water onto the unit.
MACHINE MAINTENANCE
WARNING: Before maintenance, turn the power switch off and disconnect the power cord from the wall.
If the unit will not be used for a long time:
- Drain the air conditioner manually using the drainage port (See Drainage page 12).
- Remove the battery from the remote control before storage.
- Clean the air filters.
• Cover the unit with plastic or return it to the original carton.
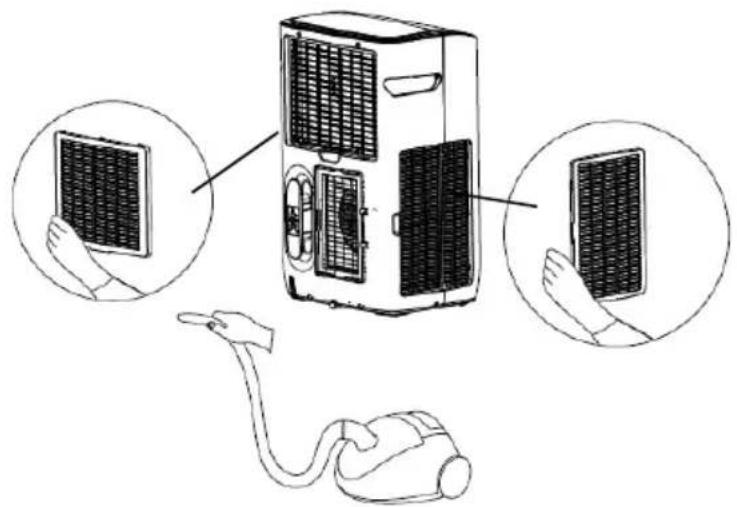
Cleaning the air filters
The filters should be cleaned about every 2 weeks to maintain proper airflow.
- Grasp the formed handle of the filter and pull it up, removing it from the evaporator.
• Use a brush attachment with a vacuum cleaner to clean the air filters.
NOTE: Failure to keep the air filters clean will result in poor circulation. DO NOT operate the machine without the filters.
natural_image
Diagram of a portable air conditioner unit connected to a plug, with three circular insets showing hand positioning (no text or symbols present)TROUBLESHOOTING
In case of problems, first turn off the air conditioner and disconnect from the source of electricity.
| SymptomSolutions | |
| The machine is not running or only running on the fan mode | Reset the power plug. Wait 3 minutes and try to run the unit again.Securely confirm that the unit is plugged in.Make sure the appliance voltage meets the electricity requirements.Check to see if the water indicator light is on. If full, drain the water tank (See Drainage page 12).Check to see if the 24-hour timer is set to off. |
| Not cool enough | Make sure all windows and doors in the room are closed.Connect the exhaust air hose tightly and make sure that it can function properly. Keep it as short and free of curves as possible to avoid bottlenecks.Make sure all air inlets and outlets are not blocked. If they are, clear the obstruction.Remove all heat sources from inside the room.Decrease the set temperature.The air filter may be blocked by dust, so clean the air filter. |
| Machine is noisy or vibrating during operation | Place the unit on a flat, level surface.Make sure that the unit is not touching any other objects. |
| Machine often starts or stops | Make sure that you are using the correct supply voltage from a suitable power source.Correct the placement of the exhaust hose |
| E2 Code• Room temperature sensor is abnormal. Contact for repair. | |
| E3 Code• Indoor and outdoor sensor is abnormal. Contact for repair. | |
| E4 Code• Full of water. Empty tank. | |
| E5 Code• Outdoor coil sensor is abnormal. Contact for repair. | |
NOTE: For all replacements and repairs that need to be made, contact Royal Sovereign Customer Service at +1) 800-397-1025
SPECIFICATIONS
| MODEL ARP-912 ARP-914 | ||
| Cooling Capacity | 12,000 BTU ASHRAE6,000 BTU DOE | 14,000 BTU ASHRAE7,000 BTU DOE |
| Room Size (Sq. ft.) Up to 450 Up to 500 | ||
| Voltage / Frequency 115-120V / 60 Hz 115-120V / 60 Hz | ||
| Standard Cooling Input Power | 1420W ASHRAE1310W DOE | 1880 ASHRAE1576W DOE |
| Rated Cooling Current 11.5 | A 6.6 A | |
| Operating Sound Level ≤ 56 | dB ≤ 56 dB | |
| Dehumidifier Capacity 45.6 | Pints (21.6 L) per Day 60.9 Pints (28.8 L) per Day | |
| Air Flow Volume 340 m3h 340 m3h | ||
| Fan Speeds 2 | 2 | |
| Fan Speed Level | Low: 950 rpmHigh: 1200 rpm | Low: 1000 rpmHigh: 1250 rpm |
| Refrigerant | R410A | R410A |
| Temperature Setting | 59-88 °F (15-31 °C) | 59-88 °F (15-31 °C) |
| Certification cETLus cETLus | ||
| Unit Dimensions (W x D x H) | 15.94"W x 12.4"D x 25.98"H405 mm x 315 mm x 660 mm | 15.94"W x 12.4"D x 25.98"H405 mm x 315 mm x 660 mm |
| Unit Weight | 55.12 lbs. / 25 kgs. | 55.12 lbs. / 25 kgs. |
ONE YEAR LIMITED WARRANTY
Royal Sovereign International, Inc. warranties this product to be free from defects in material and workmanship to the original purchaser only as outlined below.
Parts: Replacement of defective parts for 1 year from the date of customer purchase.
Compressor: 3-year warranty from the date of customer purchase. Royal Sovereign will supply a replacement compressor (parts only), free of charge.
Labor: 1 year from the date of end user purchase.
This warranty only covers products that are properly installed, properly maintained, and properly operated in accordance with the instructions provided. This limited warranty does not cover any failures or operating difficulties due to normal wear and tear, accident, abuse, misuse, alteration, misapplication, improper installation, or improper maintenance and service by you or any third party.
Returned product will not be accepted without a Return Authorization number. To request a Return Authorization number, please visit us at www.royalsovereign.com. All transportation costs for the return of damaged product or parts will be the responsibility of the purchaser. Return defective product, in original packaging, to the address below.
Royal Sovereign International, Inc. requires reasonable proof of your date of purchase from an authorized retailer or distributor. Therefore, you should keep your receipt, invoice, or canceled check from the original purchase. The limited warranty shall be limited to the repair or replacement of parts which prove defective under normal use and service within the warranty period.
Royal Sovereign International, Inc. (and its affiliated companies) SHALL HAVE NO LIABILITY WHATSOEVER TO PURCHASER OR ANY THIRD PARTY FOR ANY SPECIAL, INDIRECT, PUNITIVE, INCIDENTAL, OR CONSEQUENTIAL DAMAGES. Some states do not allow the exclusion or limitation of incidental or consequential damages so the above exclusion and limitations may not apply to you.
ROYAL SOVEREIGN INTERNATIONAL, INC.
2 Volvo Dr., Rockleigh, NJ 07647 USA
Email: info@royalsovereign.com
RS INTERNATIONAL CANADA INC.
191 Superior Blvd, Mississauga Ontario L5T 2L6 CANADA
TEL: +1) 905-461-1095 TF #: +1) 866-961-6673
FAX: +1) 905-461-1096
www.royalsovereign.ca
Guide d'utilisation

natural_image
White rectangular electronic device with black lid and ventilation slots (no visible text or symbols)ARP-912
ARP-914
Royal Sovereign International, Inc.

natural_image
Line drawing of a trash bin mounted on a brick wall corner, no text or symbols presentINSTALLATION
natural_image
Diagram of a portable air conditioner unit connected to a plug, with three circular insets showing hand positioning (no text or symbols present)DÉPANNAGE
GARANTIE LIMITÉE D'UN AN
Email: info@royalsovereign.com
RS INTERNATIONAL CANADA INC.
191 Superior Blvd, Mississauga Ontario L5T 2L6 CANADA
TEL: +1) 905-461-1095 TF #: +1) 866-961-6673
FAX: +1) 905-461-1096
www.royalsovereign.ca
- CONTENTS
- SAFETY INSTRUCTIONS
- WARNING
- Electrical Safety
- Operational Safety
- PRODUCT VIEW
- INSTALLATION
- Accessories Included
- Part 1: Placement
- Part 2: Exhaust Hose Installation
- Part 3: Window Seal Plate Installation
- PRODUCT OPERATION
- BEFORE PLUGGING IN THE UNIT TO A POWER SOURCE:
- Conduct a Power Plug Check:
- Remote Control
- Child Lock Function:
- Boot State:
- Fan Operation:
- Auto Mode:
- Cooling Operation:
- Oscillating Air Vent:
- Dehumidify Mode:
- Timer
- MACHINE MAINTENANCE
- Drainage
- To drain manually:
- For continuous drainage into a floor drain:
- Cleaning the unit
- If the unit will not be used for a long time:
- Cleaning the air filters
- TROUBLESHOOTING
- ONE YEAR LIMITED WARRANTY
- ROYAL SOVEREIGN INTERNATIONAL, INC.
- RS INTERNATIONAL CANADA INC.
- Guide d'utilisation
- DÉPANNAGE
- GARANTIE LIMITÉE D'UN AN
Brand : Royal Sovereign
Model : ARP914
Category : Air Conditioning