PSB3713 - Soundbar Proscan - Free user manual and instructions
Find the device manual for free PSB3713 Proscan in PDF.
| Product Type | Soundbar |
| Brand | Proscan |
| Model | PSB3713 |
| Output Power | 2 x 10 W |
| Power Supply | DC 16V / 1.8 A power adapter (included) |
| Remote Control Power | CR2025 3V button cell battery |
| Connectivity | Bluetooth, AUX 1 input (3.5 mm), RCA AUX inputs (L/R), FM antenna |
| Main Functions | FM radio, Bluetooth, auxiliary input, equalizer with presets (POP, JAZZ, CLASSIC, ROCK, NORMAL), clock |
| Bluetooth Range | 10 m |
| Dimensions (width) | 734 mm (± 3 mm) |
| Package Contents | Power adapter, remote control, 3.5 mm audio cable, RCA cable, 2 metal wall brackets, 4 screws, user manual |
| Installation | Wall mounting possible with included brackets or placement on a flat surface |
| Cleaning | Wipe with a slightly damp cloth |
| Safety | Do not expose to water or humidity, do not place any naked flame source (candle) on the device |
| Warning | Do not obstruct ventilation openings, do not use near a heat source, unplug during storms or prolonged inactivity |
| Repairability | No user-serviceable parts. Call a qualified repair technician for any service |
| Warranty | Any unauthorized modification voids the warranty |
Frequently Asked Questions - PSB3713 Proscan
User questions about PSB3713 Proscan
0 question about this device. Answer the ones you know or ask your own.
Ask a new question about this device
Download the instructions for your Soundbar in PDF format for free! Find your manual PSB3713 - Proscan and take your electronic device back in hand. On this page are published all the documents necessary for the use of your device. PSB3713 by Proscan.
USER MANUAL PSB3713 Proscan
natural_image
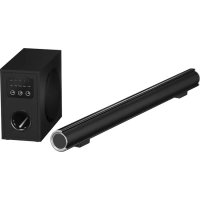
Black rectangular electronic device with a digital display showing '12:15' and control buttons (no readable text or symbols beyond branding)USER MANUAL
MODEL:PSB3713-B
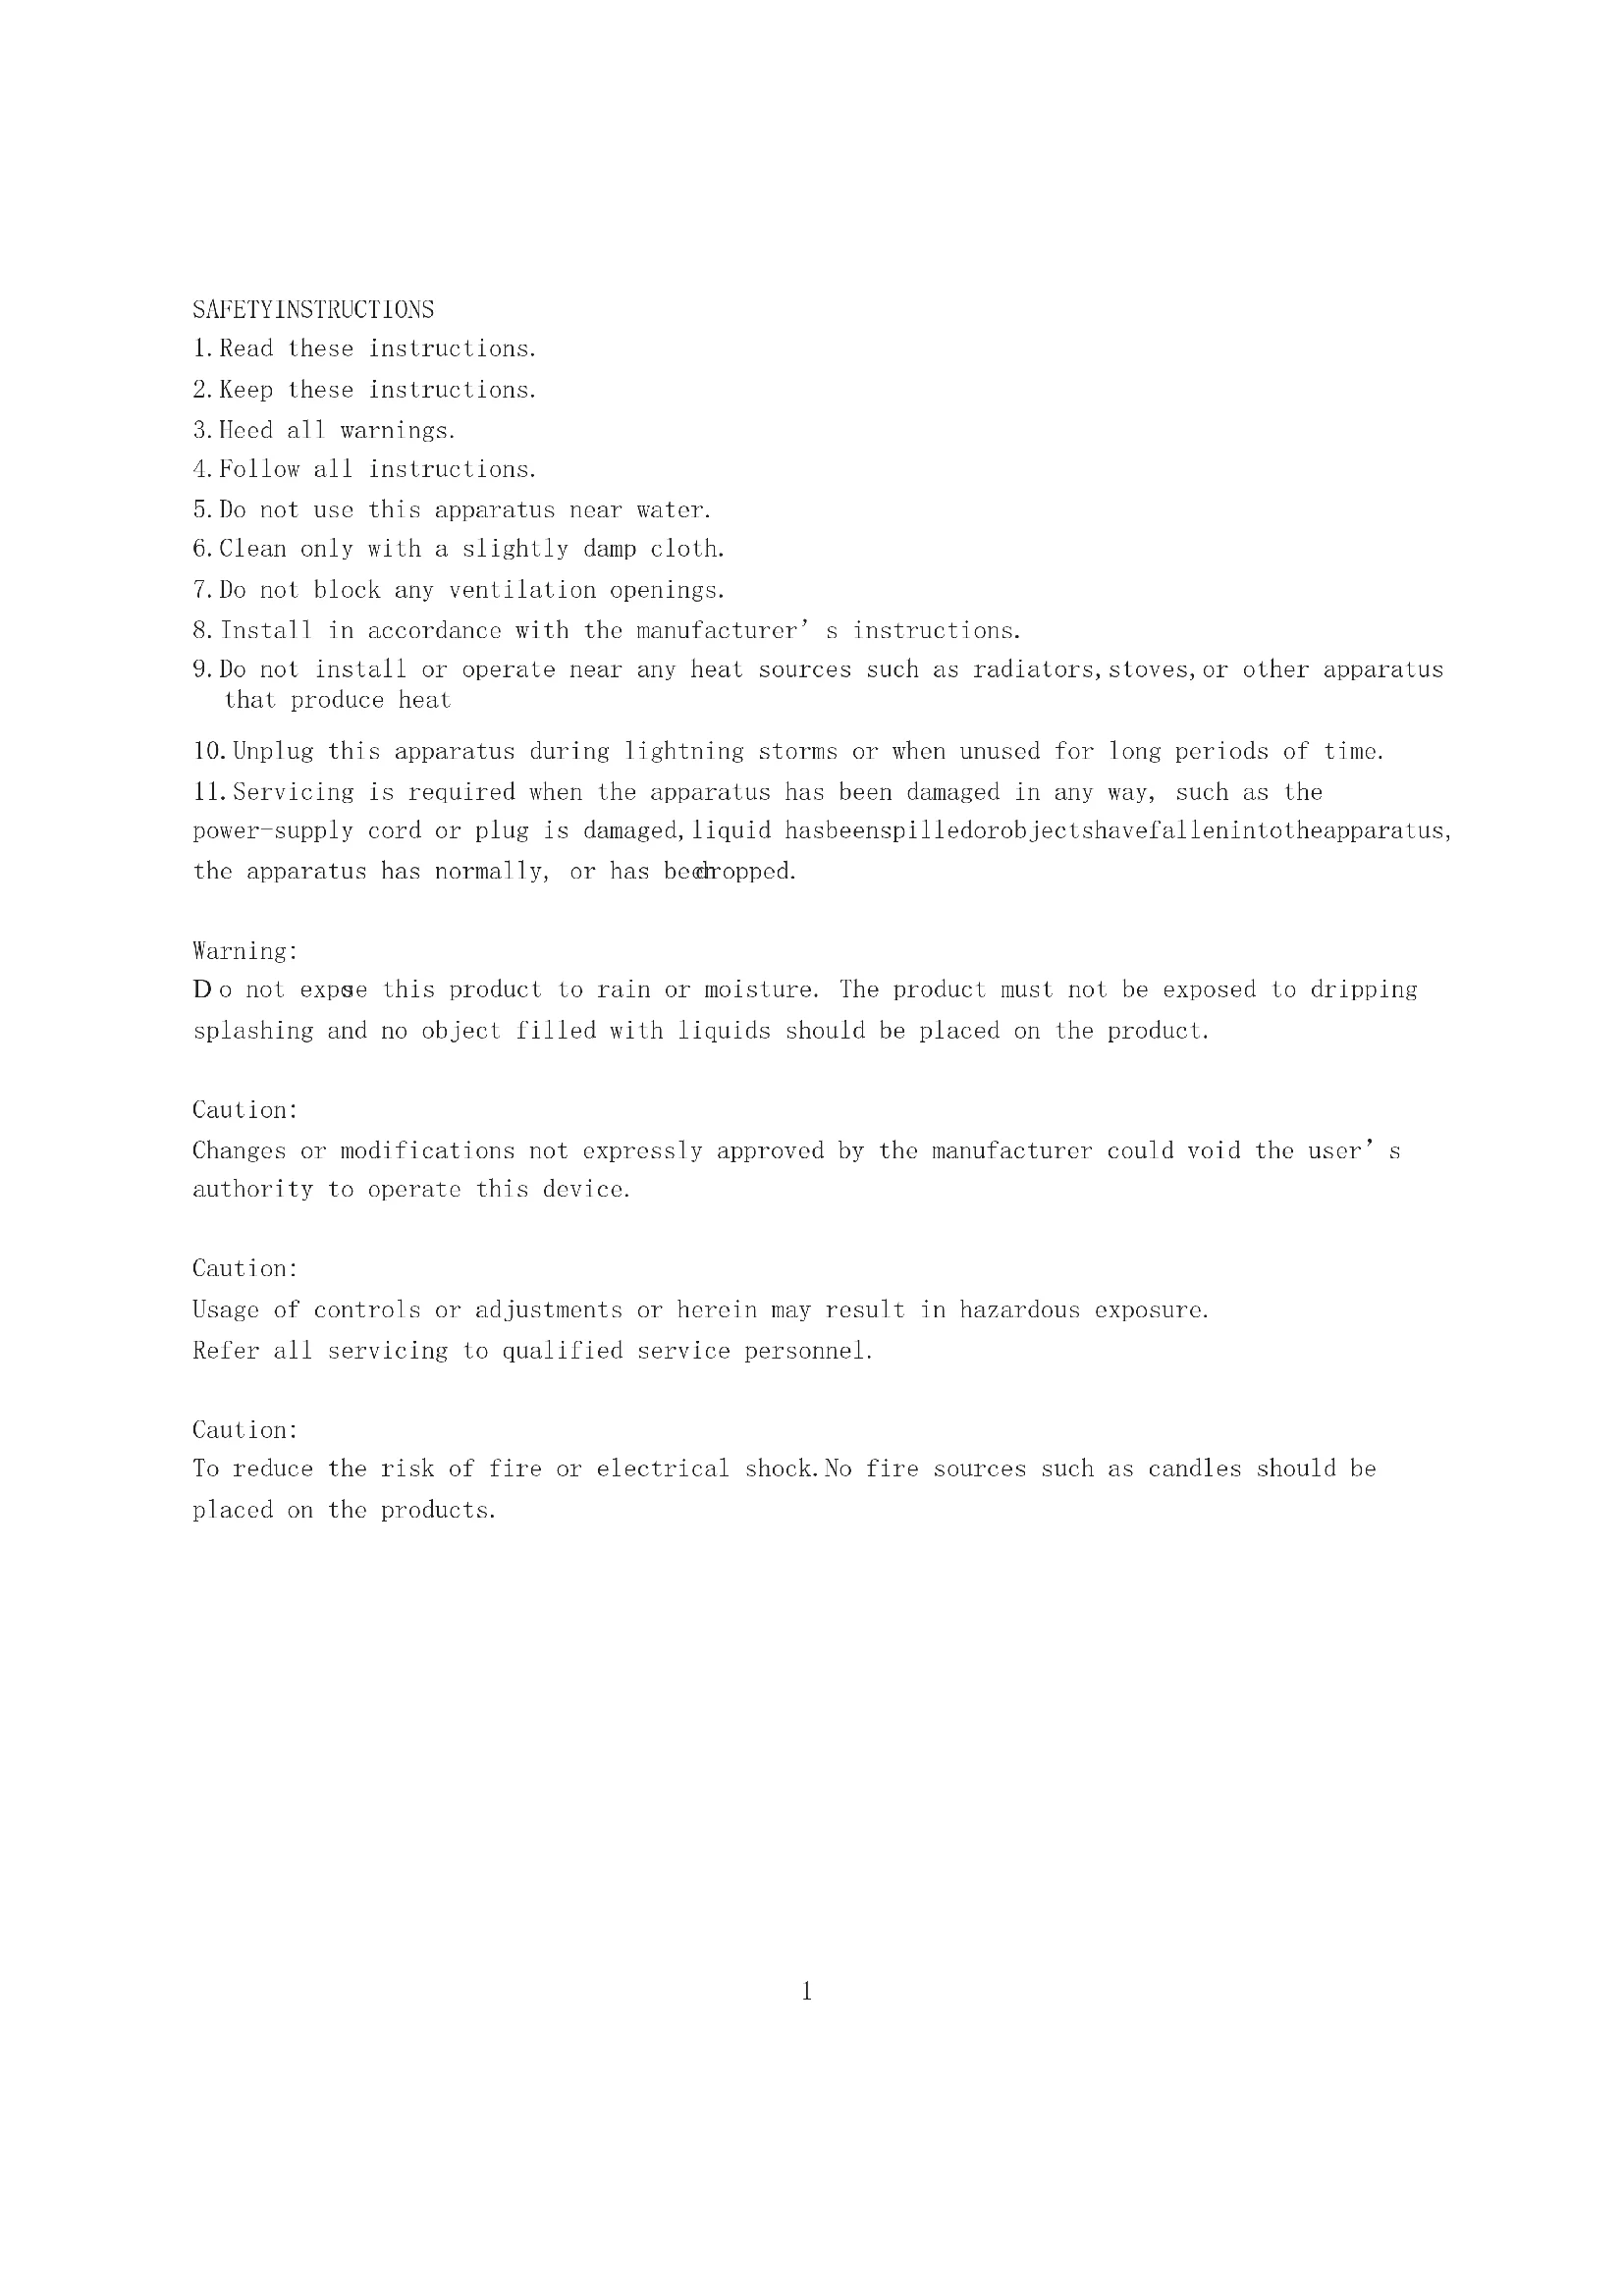
SAFETYINSTRUCTIONS
- Read these instructions.
- Keep these instructions.
- Heed all warnings.
- Follow all instructions.
- Do not use this apparatus near water.
- Clean only with a slightly damp cloth.
- Do not block any ventilation openings.
- Install in accordance with the manufacturer's instructions.
- Do not install or operate near any heat sources such as radiators, stoves, or other apparatus that produce heat
- Unplug this apparatus during lightning storms or when unused for long periods of time.
- Servicing is required when the apparatus has been damaged in any way, such as the power-supply cord or plug is damaged, liquid has been spilled or object shave fallen into the apparatus, the apparatus has normally, or has been dropped.
Warning:
Do not expose this product to rain or moisture. The product must not be exposed to dripping splashing and no object filled with liquids should be placed on the product.
Caution:
Changes or modifications not expressly approved by the manufacturer could void the user's authority to operate this device.
Caution:
Usage of controls or adjustments or herein may result in hazardous exposure.
Refer all servicing to qualified service personnel.
Caution:
To reduce the risk of fire or electrical shock. No fire sources such as candles should be placed on the products.
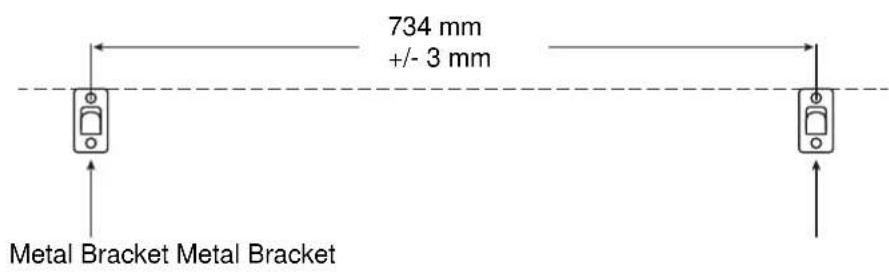
MOUNTING
1
text_image
734 mm +/- 3 mm Metal Bracket Metal Bracket- Follow the figure 1 abovetodeterminethe positions where the screw should be mounted. Makesurethetw obrackets are mounted in the same level.
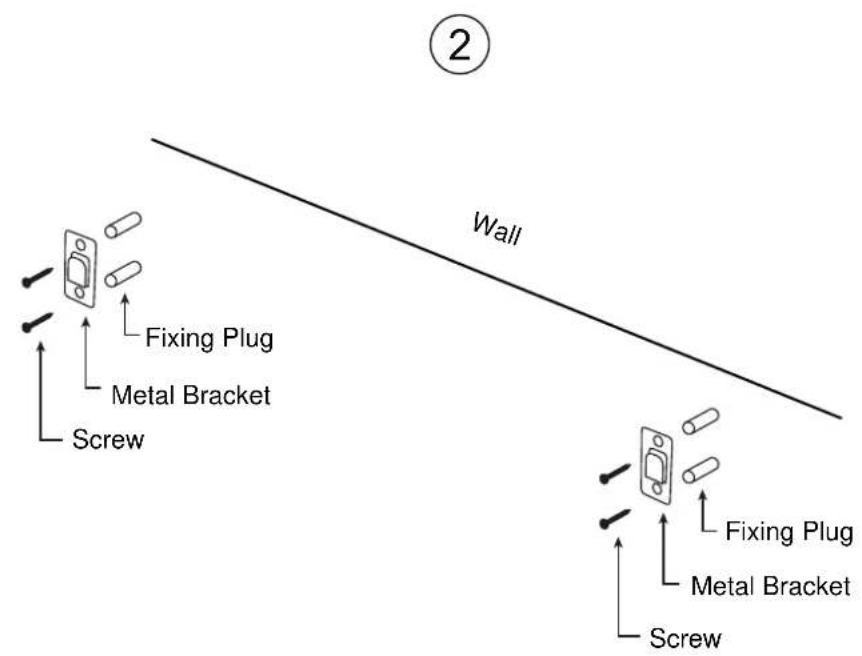
text_image
② Wall Fixing Plug Metal Bracket Screw Fixing Plug Metal Bracket Screw- Insert the fixing plugs into the screw holes and insert screws to fix the metal bracket onto the wall.
3
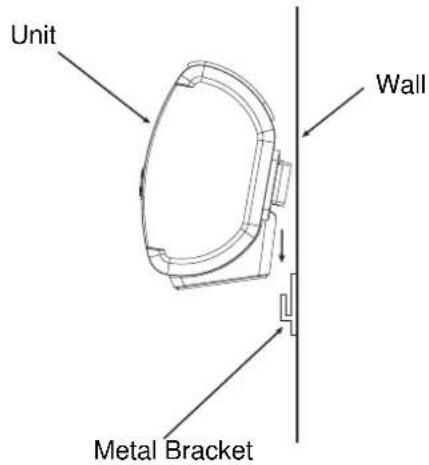
text_image
Unit Wall Metal Bracket3.Hangthcunitonthewall
Note:
The gap between themetal bracket and plastic mounting holder on the car of the unit is designed for simple mounting, which will make the unit movable.
PRODUCTOVERVIEW
FrontView
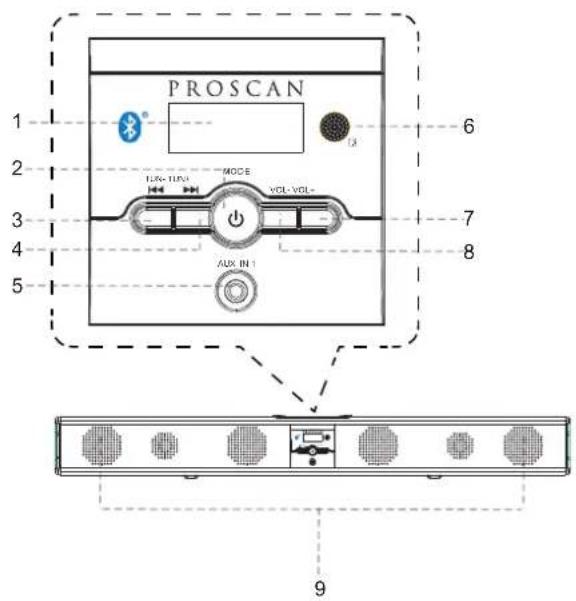
text_image
PROSCAN 1 2 3 4 5 6 7 8 91.LCDDisplay6.RemoteSensor
2. Standby/MODEButton
7.Volume+ Button
3. Tune-Button8. Volume-Button
4. Tunc+Button9.Speakers
5.AUX JackIN1
RearView
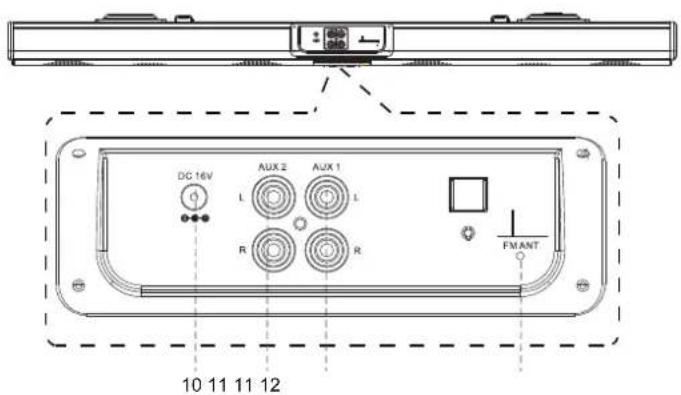
text_image
DC 16V L AUX 2 L AUX 1 R R FM ANT 10 11 11 1210.DCINJack
11.RCAAudioInputJacks
12.FMAntenna
RemoteControl
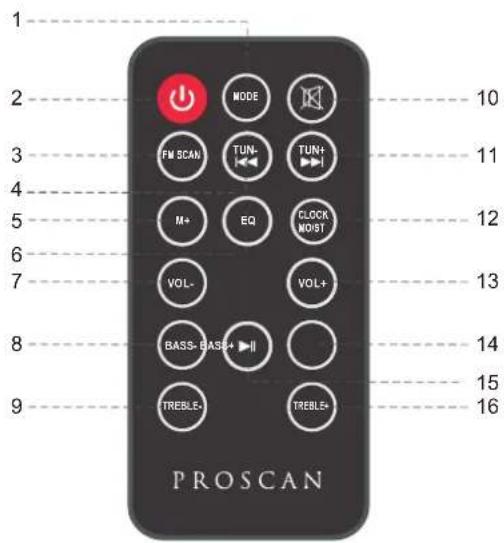
text_image
1 2 3 4 5 6 7 8 9 MODE FM SCAN TUN- M+ EQ CLOCK MOIST VOL- BASS-BAS+ TREBLE- TREBLE- PROSCAN 10 11 12 13 14 15 16ButtononButton6.EQButt1.MODE
-
Standby Button
-
VOL-(Volume-) Button
12.CLOCK/MO/ST
-
FM SCAN Button
-
BASS- Button
-
VOL+ (Volume+) Button
-
TUNE-Button9.TREBLE-Button15.Play/PauseButton
-
BASS+ Button
-
M+(Memory+) Button
-
Mute Button
-
TREBLE+ Button
11.TUNE+ Button
BATTERYINSTALLATION
-Beforeinstallation
Removeanddiscardtheinsulationtab.
-Replacebatteryfortheremotecontrol
- PushandslideoutthebatteryholderasFigure1 below.
- ReplacethebatterywithanewCR2025buttoncellwiththepolarity(+)sideupward.
3.Slideintothebatteryholder.
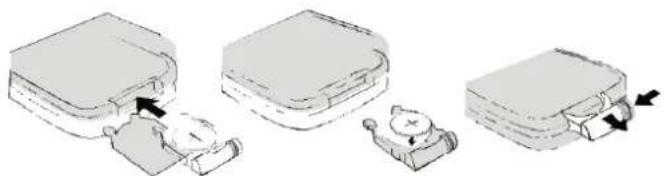
natural_image
Illustration of three steps of a device with arrows indicating movement, no text or symbols presentBatteryprecautions
- Neverrechargethebatteries,applyheattothemortakethemapart.
- Battery shall not be exposed to excessive heats such as sunshine, ircorthelike.
•Donotthrowthebatteriesinire! - Attentionshouldbedrawntotheenvironmentalaspectsofbatterydisposal.
- Iftheremotecontrolisnotgoingtobeusedforalongtime,removethebattery toavoiddamagecausedbybatteryleakagecorrosion.
POWERCONTROL
-Toturntheuniton
- Connectthesuppliedpoweradapter.
- PressSTANDBYbuttontoturnontheunit.
-Toturntheunitoff
- Press STANDBY button on the remote control or hold STANDBY button in the front of the unit.
NOTE:
If the unit is not used for along period of time, disconnect the power adapter.
TIMESETTING
- Placetheunittostandbymode.
- Hold CLOCK/MO/STbuttonontheremotecontroluntilthehourdigitflashes.
- ThenpressTUNE+orTUNE-buttonontheunitorremotecontroltoadjustthehour.
- PressCLOCK/MO/STbuttonontheremotecontroltoconfirmthehoursettingandtheminute digitwillflash.
- ThenpressTUNE+orTUNE-buttonontheunitorremotecontroltoadjusttheminute.
- PressCLOCK/MO/STbuttonontheremotecontroltoconfirmtheminutesetting.
FMRADIO
PowerontheunitandpressbuttModeDtedlyuntiltheFMfrequencyappearsonthe display.
-Searchandstorethestations
1.HoldTUNE+orTUNE-buttontosearchstationsforwardorbackward.Theunitwillstopifa stationisfound.ThenpressFMSCANbutton,"CHXX"willflashandthenuseM+buttonto selecttheplaceyouwantthestationstoredto.PressFMSCANbuttonontoconfirm.Or
2.HoldFMSCANbuttonthenreleasetheunitwillsearchandstorethestationsautomatically.
-Listentothepresetstations
PressM+buttonrepeatedlytoselectthedesiredpresetstationstolistento.
NOTE:
IfthereceivedFMstationsareinstereomode,theunitwillplayinstereomodeautomatically.If receptionisweak,presstheCLOCK/MO/STbuttontoturntheunittomonomode.Pressagain to turntosterecomodcagain.
AUXIN
-AUXINsourcemayinclude:
- Personalaudioplayers
• Personalcomputersorlaptops
-AUXINconnection:
- Connectasterco3.5mmjackcable(supplied)betweentheheadphoneorLINE/Audiooutputof thepersonalaudioplayerandthejackonthefrontoftheunit.AUXIN1
MODE2.Powerontheunitandpressbuttonrepeatedlyuntil"AUX1"appearsonthedisplay.
Setyourpersonalaudioplayer/computertoplay.
NOTE: If there is nosound or if the volume is not louden enough, you may increase the setting on the source.
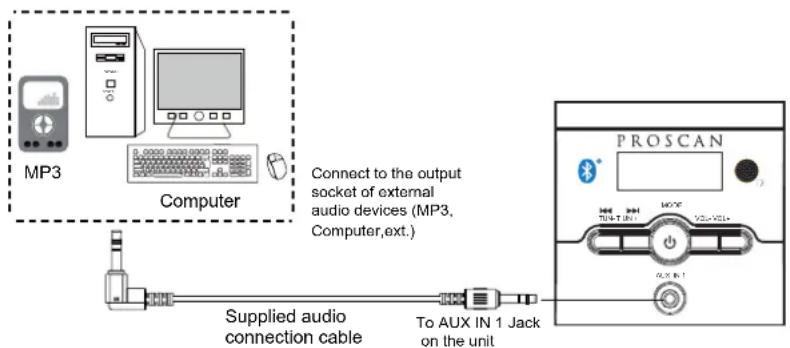
text_image
MP3 Computer Connect to the output socket of external audio devices (MP3, Computer,ext.) Supplied audio connection cable To AUX IN 1 Jack on the unit PROSCAN-During playback
- PressMUTEbuttontoturnoffthesound.Pressagaintoresumethesound.
- PressVOLUME+/-buttonstoadjustthevolumeelevel.
- PressBASS+/-buttonstoadjustbasslevel.
- PressTREBLE+/-buttonstoadjusttreblelevel.
- PressEQbuttontoswitchbetweenPOP/JAZZ/CLASSIC/ROCK/NORMAL.
RCAAUXIN
-RCAAUXINsourcesmayinclude
• TV/DVD/VCR
-RCAAUXINconnection
-
Connect the RCA audiocable(supplied)tothcaudiooutputjackonDVDplayerandAUX orjackon2herearoftheunit.
-
PressMODEbuttonrepeatedlyuntilor "AUX1"(for AUX 1 connection) "AUX 2"(for AUX 2 connection) appearsonthedisplay.
NOTE: Before AUX 1 connection, make sure the AUX IN cable is not inserted into the AUXIN1jackinthefrontoftheunit.
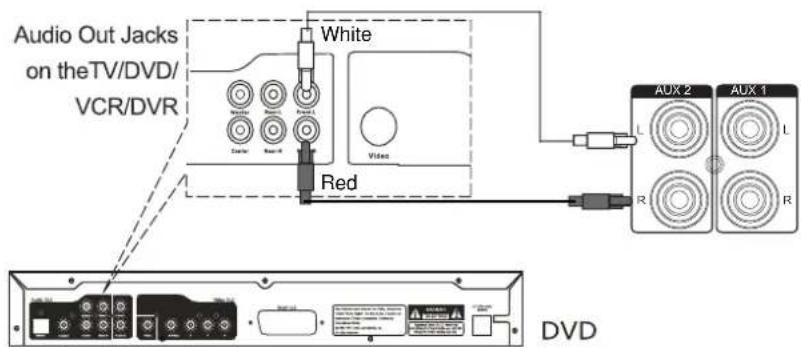
text_image
Audio Out Jacks on theTV/DVD/ VCR/DVR White Red Video AUX 2 AUX 1 DVD-During playback
- PressMUTEbuttontoturnoffthesound.Pressagaintoresumethesound.
- PressVOLUME+/-buttonstoadjustthevolumelevel.
- PressBASS+/-buttonstoadjustbasslevel.
- PressTREBLE+/-buttonstoadjusttreblelevel.
- PressEQbuttontoswitchbetweenPOP/JAZZ/CLASSIC/ROCK/NORMAL.
BLUETOOTH
-Paring:
- PressMODEbuttonrepeatedlyuntil"BT"appearson thedisplay.
- TurnofftheBluetoothfunctionalityofotherdevicesthatarepairedwithyourunit.
- TurnonBluetoothfunctionalityonyourBluetoothdevice. Typically, Bluetoothcontrols are foundonthedevice'stoolsorsettingsmenu(seeyourusermanual). TurnonBluetooth connectivityandmakeyourdevice"discoverable".
- Cleanout the paring list on your Bluetooth device.
- Choose "addanewBluetoothdevice" or "setupBluetoothdevice" on your device. It will start to search. Once "PROSCAN" shows on your device, select it. If your device prompts you for a pass code, please enter 0000. If the pairing attempt fails or times out, please start pairing procedure again.
- After your device and the "PROSCAN" have connected each other, a "Du" sound can be heard.
-During playback:
MakesuretheBluetoothconnectionbetweentheunitandthedeviceisactivated.
- PressPLAY/PAUSEbuttontosuspendmomentarilytheplayingtrack.Pressagaintoresume playing.
- PressTUNE + buttontoskipforwardtothenexttrack and TUNE - buttontoskipback previoustrack.
- PressMUTEbuttontoturnoffthesound.Pressagaintoresumethesound.
- PressVOLUME+/-buttonstoadjustthevolumelevel.
- PressBASS+/-buttonstoadjustbasslevel.
- PressTREBLE+/-buttonstoadjusttreblelevel.
- PressEQbuttontoswitchbetweenPOP/JAZZ/CLASSIC/ROCK/NORMAL.
SPECIFICATIONS
Power source of the remote control.... DC 3V, 1x CR 2025 button cell
Output of the power adapter....DC 16V 1.8A
Audio output.... 10W x 2
Power consumption....25W
Bluetooth working range....10M
FM coverage....87.5-108.0MHz
ACCESSORIES
1xPoweradapter
1xInstructionmanual
1xRemotecontrol
1xStereoaudioconnectioncablewith3.5mmstereoplug
1xRCAaudiocable
2x Wall-mountmetalbrackets
4xScrews
PROSCAN
37" BARRE DE SON

natural_image
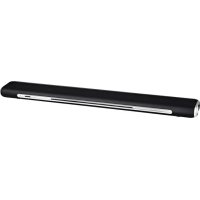
Black rectangular electronic device with a digital display and control buttons (no visible text or symbols)MANUEL DU PROPRIÉTAIRE
Modèle: PSB3713-B
CONSIGNES DE SÉCURITÉ
text_image
Appareil Mur Support muralnatural_image
Illustration of three different storage compartments with arrows indicating movement, no text or symbols present| Bande | FM | 87.5-108.0 | MHz |