
PSB551 - Soundbar Proscan - Free user manual and instructions
Find the device manual for free PSB551 Proscan in PDF.


| Product Type | Bluetooth Soundbar with Wireless Satellites and Wired Subwoofer |
| Model Number | PSB551 |
| Brand | Proscan |
| Power Input | AC 100-240V ~ 50/60Hz (Main Adapter), DC 22V---4A (Main), DC 15V=0.8A (Surround Adapter) |
| Speaker Output | 6 x 15W + 50W (Subwoofer) |
| Bluetooth Version | 5.2 |
| Bluetooth Range | Up to 32 feet (open area) |
| Remote Control Range | Up to 16 feet |
| Audio Inputs | HDMI ARC, Optical, AUX (3.5mm), USB, Bluetooth |
| FM Radio | Yes, with auto-scan and memory |
| EQ Modes | Normal, News, Music, Movie, Bass, Game |
| USB Playback | Yes, supports MP3 (and other formats) from USB drive |
| USB Recording | Yes, records audio from Bluetooth source to USB |
| Mounting | Wall-mountable (screws not included for brick walls) |
| Subwoofer Connection | Wired to main unit |
| Satellite Speakers | Wireless (pre-paired) |
| Indicator Colors | Standby (red), USB (white), Bluetooth (blue), AUX (green), Optical (purple), FM (yellow), HDMI (light blue) |
| Battery for Remote | 2 x AAA (included) |
| Safety Features | Overload protection, ventilation requirements, polarized plug |
| Cleaning | Dry cloth only |
| Warranty | 90 days limited |
| Accessories Included | Power adapter, remote control, AUX cable, 2 surround adapters, AAA batteries, instruction manual |
Frequently Asked Questions - PSB551 Proscan
User questions about PSB551 Proscan
0 question about this device. Answer the ones you know or ask your own.
Ask a new question about this device
Download the instructions for your Soundbar in PDF format for free! Find your manual PSB551 - Proscan and take your electronic device back in hand. On this page are published all the documents necessary for the use of your device. PSB551 by Proscan.
USER MANUAL PSB551 Proscan
natural_image
Line drawing of a Proscan audio workstation with three speakers and a central speaker (no text or symbols)MODEL: PSB551
Please read this instruction manual carefully and keep it for future reference.
PROSCAN, and the PROSCAN logo are trademarks used under license by CURTIS INTERNATIONAL LTD. – www.proscan-brand.com.
IMPORTANT SAFETY INSTRUCTIONS

natural_image
Black triangular warning symbol with white lightning bolt symbol (no text)CAUTION
RISK OF ELECTRIC SHOCK DO NOT OPEN

natural_image
Black triangular warning symbol with exclamation mark (no text or numbers)CAUTION: TO REDUCE THE ELECTRIC SHOCK, DO NOT REMOVE THE COVER (OR BACK). NO USER SERVICEABLE PART INSIDE, REFER SERVICING TO QUALIFIED SERVICE PERSONNEL.

DANGEROUS VOLTAGE: The lighting flash with arrowhead symbol within an equilateral triangle is intended to alert the user to the presence of uninsulated “dangerous voltage” within the product’s enclosure that may be of sufficient magnitude to constitute a risk of electric shock to persons.

ATTENTION: The exclamation point within an equilateral triangle is intended to alert the user to the presence of important operating and maintenance (servicing) instructions in the literature accompanying the appliance.
WARNING: TO PREVENT FIRE OR SHOCK HAZARD, DO NOT EXPOSE THIS UNIT TO RAIN OR MOISTURE.
WARNING: USE UNDER SUPERVISION OF AN ADULT DUE TO LONG
CORD This unit has a long cord that can be easily tripped on or pulled on, causing injury. Please make sure it is arranged so that it will not drape over a tabletop, etc. Where it can be pulled on by children or tripped over accidentally.
CALIFORNIA PROP 65 WARNING: "WARNING" This product contains chemicals known to the State of California to cause birth defects or other reproductive harm. For more information on these regulations and a list of chemicals, log on the following website: http://www.oehha.ca.gov/prop65.html
This product meets and complies with all Federal regulations.
FCC STATEMENT:
This device complies with part 15 of the FCC Rules. Operation is subject to the following two conditions: (1) This device may not cause harmful interference, and (2) this device must accept any interference received, including interference that may cause undesired operation.
Note: This equipment has been tested and found to comply with the limits for a Class B digital device, pursuant to part 15 of the FCC Rules. These limits are designed to provide reasonable protection against harmful interference in a residential installation.
This equipment generates, uses and can radiate radio frequency energy and, if not installed and used in accordance with the instructions, may cause harmful interference to radio communications. However, there is no guarantee that interference will not occur in a particular installation. If this equipment does cause harmful interference to radio or television reception, which can be determined by turning the equipment off and on, the user is encouraged to try to correct the interference by one or more of the following measures:
—Reorient or relocate the receiving antenna.
—Increase the separation between the equipment and receiver.
—Connect the equipment into an outlet on a circuit different from that to which the receiver is connected.
—Consult the dealer or an experienced radio/TV technician for help.
Note: The Grantee is not responsible for any changes or modifications not expressly approved by the party responsible for compliance. such modifications could void the user's authority to operate the equipment.
The device has been evaluated to meet general RF exposure requirement. To maintain compliance with FCC's RF exposure guidelines, the distance must be at least 20 cm between the radiator and your body, and fully supported by the operating and installation.
IMPORTANT SAFETY INSTRUCTIONS
Before using the unit, be sure to read all operating instruction carefully, please note that these are general precautions and may not pertain to your unit. For example, this unit may not have the capability to be connected to an outdoor antenna.
1. Read these instructions
All the safety and operating instructions should be read before the appliance is operated.
2. Keep these instructions
The safety and operating instructions should be kept for future reference.
3.Heed all warnings
All warnings on the appliance and in the operating instructions should be adhered to.
4. Follow all instructions
All operation and use instructions should be followed.
5.Do not use this apparatus near water
The appliance should not be used near water; for example, near a bath tub, washbowl, kitchen sink, laundry tub, in a wet basement, or near a swimming pool.
6.Clean only with dry cloth
The appliance should be cleaned only as recommended by the manufacturer.
-
Do not block any ventilation openings. Install in accordance with the manufacturer's instructions. Slots and openings in the cabinet and in the back or bottom are provided for ventilation, to ensure reliable operation of the product and to protect it from overheating. These openings must not be blocked or covered. The openings should never be blocked by placing the product on a bed, sofa, rug, or similar surface. This product should never be placed near or over a radiator or heat source. This product should not be placed in a built-in installation, such as a bookcase or rack unless proper ventilation is provided or the manufacturer's instructions have been adhered to.
-
Do not install near any heat sources such as radiators, heat registers, stoves, or other apparatus (including amplifiers) that produce heat.
-
Do not defeat the safety purpose of the polarized or grounding-type plug. A polarized plug has two blades with one wider than the other. A grounding type plug has two blades and a third grounding prong. The wide or the third prong are provided for your safety. If the provided plug does not fit into your outlet, consult an electrician for replacement of the obsolete outlet.
-
Protect the power cord from being walked on or pinched particularly at plugs, convenience receptacles, and the point where they exit from the apparatus.
-
Only use attachments / accessories specified by the manufacturer.
-
Use only with a cart, stand, tripod, bracket, or table specified by the manufacturer, or sold with the apparatus.
When a cart is used, use caution when moving the cart/apparatus combination to avoid injury from tip-over.
An appliance and cart combination should be moved with care.

Quick stop, excessive fore and uneven surfaces may cause the appliance and cart combination to overturn.
13. Unplug this apparatus during lightning storms or when unused for long periods of time.
To protect your product from a lightning storm, or when it is left unattended and unused for long periods of time, unplug it from the wall outlet and disconnect the antenna or cable system. This will prevent damage to the product due to lightning and power-line surges.
- Refer all servicing to qualified service personnel. Servicing is required when the apparatus has been damaged in any way, such as power-supply cord or plug is damaged, liquid has been spilled or objects have fallen into the apparatus, the apparatus has been exposed to rain or moisture, does not operate normally, or has been dropped.
15.Power source
This product should be operated only from the type of power source indicated on the marking label. If you are not sure of the type of power supply to your home, consult your appliance dealer or local power company. For products intended to operate from battery power, or other source, refer to the operation instructions.
16.Power lines
An outside antenna system should not be located in the vicinity of overhead power lines or other electric light or power circuits, or where it can fall into such power lines or circuits. When installing an outside antenna system, extreme care should be taken to keep from touching such power lines or circuits as contact with them might be fatal.
17. Overloading
Do not overload wall outlets and extension cords as this can result in a risk of fire or electric shock.
18.Object and liquid entry
Never push objects of any kind into the product through openings as they may touch dangerous voltage points or short out parts that could result in fire or electric shock. Never spill or spray any type of liquid on the product.
19. Outdoor antenna grounding
If an outside antenna is connected to the product, be sure the antenna system is grounded so as to provide some protection against voltage surges and built up static charges. Section 810 of the National Electric Code ANSI/ NFPA 70 provides information with respect to proper grounding of the mast and supporting structure, grounding of the lead- in wire to an antenna discharge product, size of grounding conductors, location of antenna- discharge product, connection to grounding electrodes and requirements for the grounding electrodes.
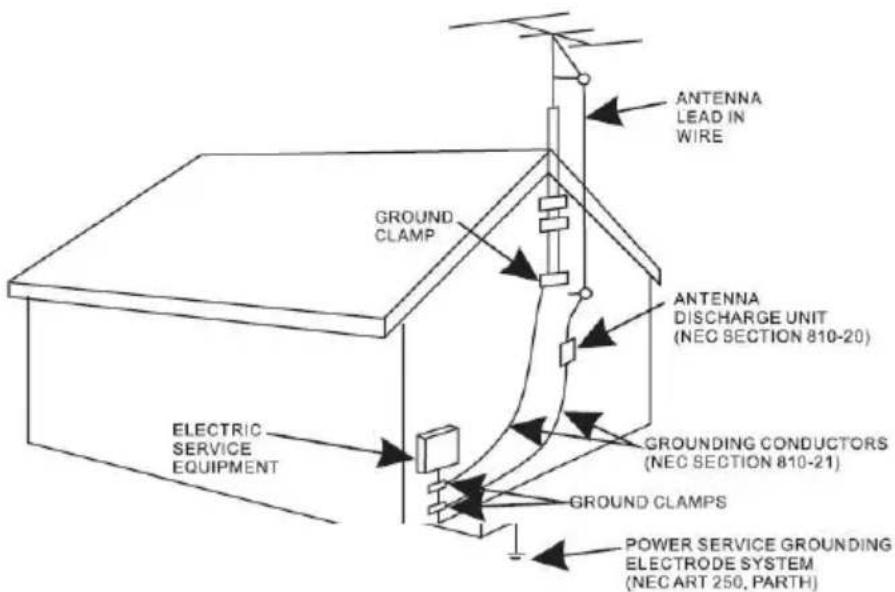
20. Service
Do not attempt to service this product yourself as opening or removing covers may expose you to dangerous voltage or other hazards. Refer all servicing to qualified service personnel.
21.Replacement parts
When replacement parts are required, be sure the service technician uses replacement parts specified by the manufacturer or those that have the same characteristics as the original parts. Unauthorized substitutions may result in fire or electric shock or other hazards.
22. Safety check
Upon completion of any service or repairs to this product, ask the service technician to perform safety checks to determine that the product is in proper operating condition.
23. Wall or ceiling mounting
The product should be mounted to a wall or ceiling only as recommended by the manufacturer.
24. Damage requiring service
Unplug this product from the wall outlet and refer service to qualified service personnel under the following conditions.
a) When the power- supply cord or plug is damaged.
b) If liquid has been spilled or objects have fallen into the product.
c) If the product has been exposed to rain or water.
d) If the product does not operate normally by following the operating instructions. Adjust only those controls that are covered by the operating instructions, as an adjustment of other controls may result in damage and will require extensive work by a qualified technician to restore the product to its normal operation.
e) If the product has been dropped or the cabinet has been damaged.
f) When the product exhibits a distinct change in performance- this indicates a need for service.
25. Note to CATV system installer
This reminder is provided to call the CATV system installer's attention to Article 820-40 of the NEC that provides guidelines for proper grounding and, in particular, specifies that the cable ground shall be connected to the grounding system of the building, as close to the point of cable entry as practical.
NOTE: Refer all servicing to qualified service personnel. Servicing is required when the unit has been damaged in any way such as the following: the power-supply cord or plug has been damaged, liquid has been spilled into unit, the unit has been exposed to rain or moisture, the unit has been dropped or the unit does not operate normally.
PRODUCT OVERVIEW
TOP VIEW
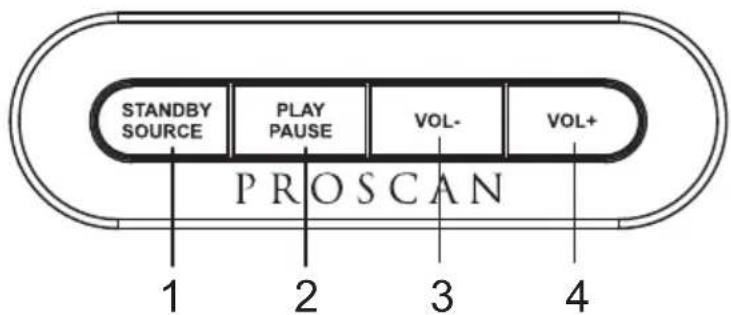
REAR VIEW
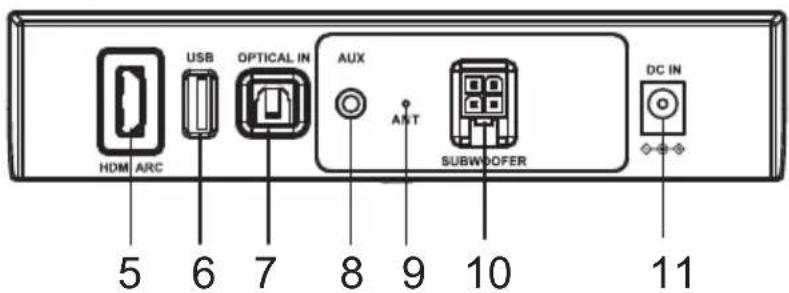
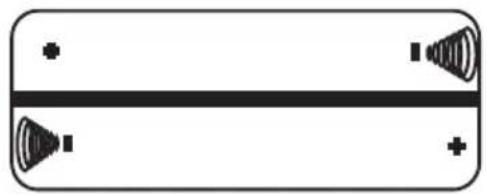
1.Slide and lift the battery door.
-
Install 2 (two) AAA size batteries into the battery compartment as indicated by the polarity markings.
-
Close the battery door.
natural_image
Simple diagram of a battery with two charging conduction devices and a central conductor (no text or symbols)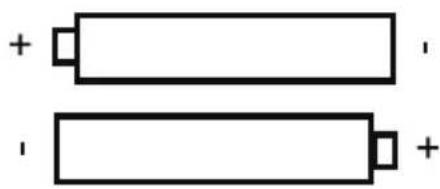
natural_image
Two parallel batteries with positive and negative terminals, no text or symbols presentCaution:
- Use only the size and type of battery specified.
- Be sure to follow the correct polarity when installing the battery as indicated in the battery compartment, a reserved battery may cause damage to the device.
- Do not mix different types of batteries together (e.g. Alkaline and Carbon-zinc) or old batteries with fresh ones.
- If the batteries in the device are consumed or the device is not to be used for a long period of time, remove the batteries to prevent damage or injury from possible leakage.
- Do not try to recharge the battery not intended to be recharged; it can overheat and rupture. (Follow battery manufacturer's instructions)
- The batteries shall not be exposed to excessive heat such as sunshine, fire or the like.
- Clean the battery contacts and also those of the device prior to battery installation.
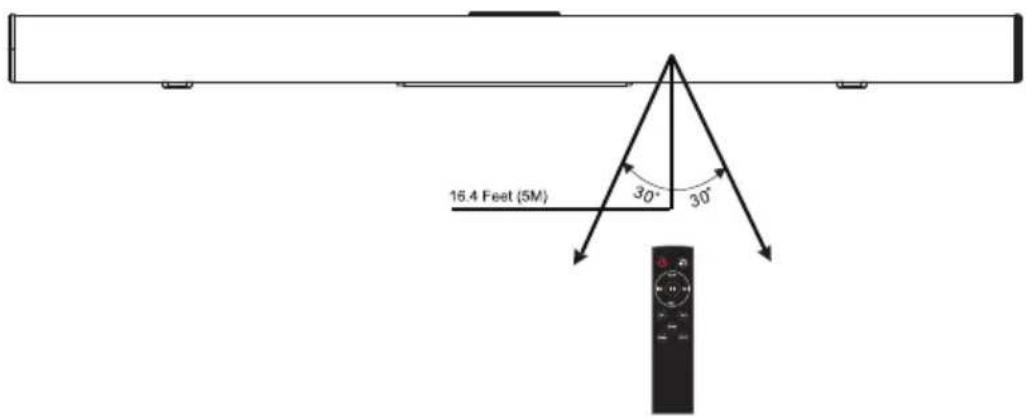
Remote control operation range
- When there is an obstacle between the remote and the receiver, the unit may not operate.
- When direct sunlight, an incandescent lamp, fluorescent lamp or any other strong light shines on the REMOTE SENSOR of the unit, the operation of the remote may be unstable.
PLACEMENT AND MOUNTING
1. Placing the device on a table - Ventilation
When placing the Soundbar on an entertainment center, bookshelf, or any type of enclosed space, be sure to allow at least 2-3 inches of space around the Sound Bar for ventilation. If the Sound Bar is enclosed in a tight space, without ventilation, heat generated from the Sound Bar could produce a potential heat hazard.
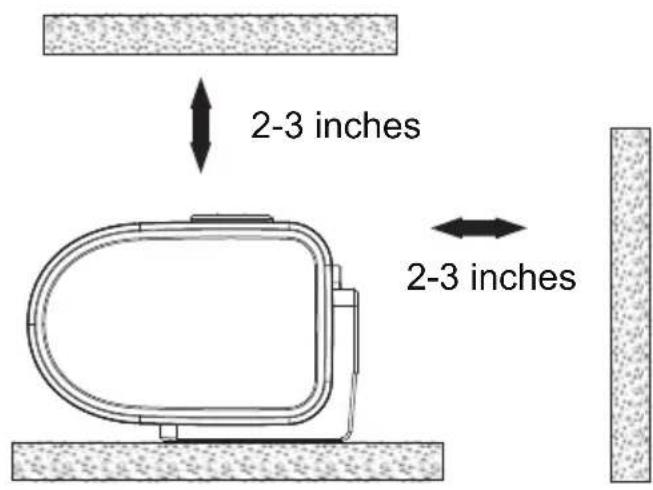
2. The Installation Distance

2.1Mounting to a wooden wall
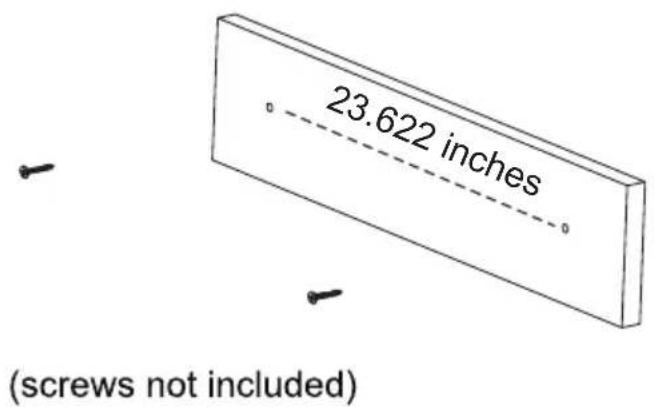
A. Mark the position of the mounting screws on the wall using a pencil.
B. Drill the screws directly into the marks that you have made on the wall and leave approx. 0.3 inches length to hook the sound bar.
C. Put the sound bar onto the mounting screws. Make sure they are firm and stable.
2.2 Mounting to a brick wall
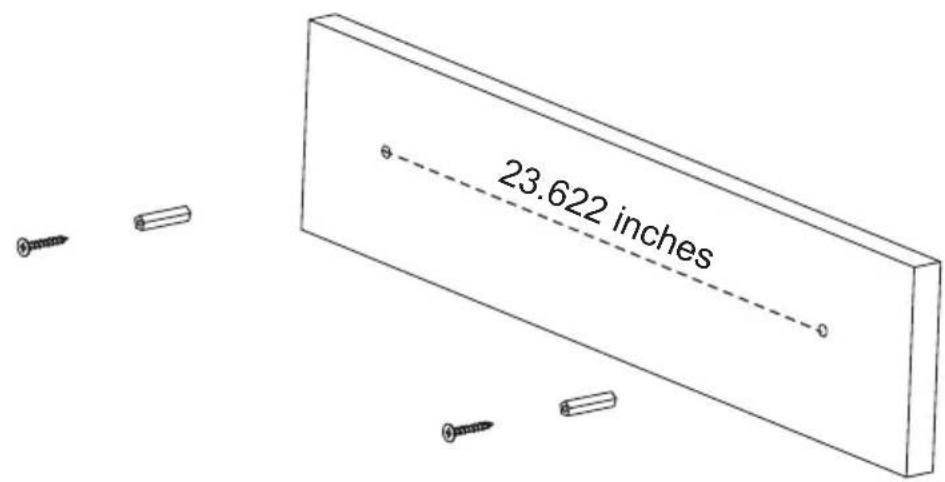
(screws and plastic fixing plug are not included)
A. Mark the position of the mounting screws on the wall using a pencil.
B. Drill 2 holes on wall with a powerful electric drill.
C. Insert the fixing plug and hammer into the holes.
D. Secure the screws into the fixing plug and leave approx. 0.3 inches length to hook the sound bar.
E. Put the sound bar onto the mounting screws. Make sure they are firm and stable.
GENERAL OPERATION
-
Connect the AC/DC adapter to the unit and wall outlet.
-
Press and hold the STANDBY/SOURCE button on unit or press ⏻ button on remote control to power on the unit; press the same button to enter standby mode.
-
Press the ➕ button on remote control or STANDBY/SOURCE button on unit to switch to the desired mode.
-
During playback:
-
Press the Mute button on remote control to turn on or off the sound.
- Press the EQ button on remote control repeatedly to change to different EQ mode.(Normal/News/Music/Movie/Bass/Game)
- Press and hold the EQ button on remote control to change to default normal mode.
-
Press the Vol+ or Vol- button on unit or remote control to adjust the volume.
-
The color of indicator in front of the unit will change in different modes:
| Standby mode: red | USB mode: white |
| Bluetooth mode: dark blue | AUX in mode: green |
| Optical mode: purple | FM mode: yellow |
| HDMI mode: light blue |
BLUETOOTH OPERATION
- Power on the unit as previously explained.
- Press the BT button on remote control or STANDBY/SOURCE button on unit to switch to Bluetooth mode, the indicator in front of the unit will blink in blue and you can hear a sound "Bluetooth".
- Power on the external Bluetooth device and activate Bluetooth mode to search for the unit.
- When the Bluetooth name Pro PSB551 appears, select it and make connection.
5.A sound will be heard when the unit is successfully connected and the indicator will stay solid blue. - During playback:
Press the ◀◀ or ▶▶ button on remote control to skip tracks.
Press the ▶ button on remote control or PLAY/PAUSE button on unit to play or pause the track.
- To disconnect the current connection, press and hold the BT button on remote control.
Note:
- The unit will be automatically connected with the last connected Bluetooth device if both are activated Bluetooth function and in working range.
HDMI IN OPERATION
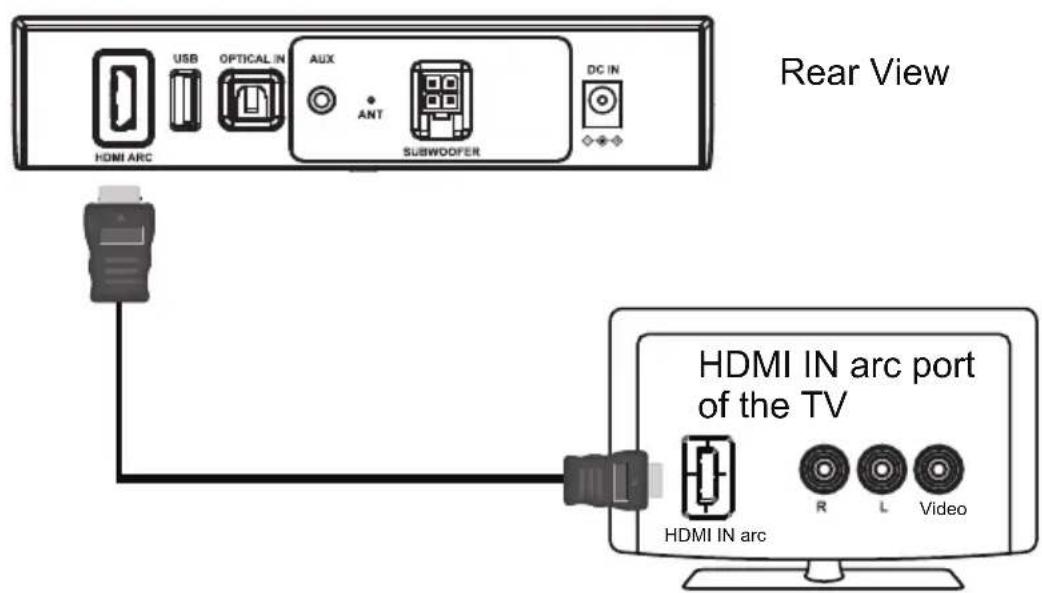
- Connect one end of HDMI cable (not included) to the HDMI ARC jack of this unit, the other end to the HDMI IN ARC jack of TV.
- Power on the unit and switch to HDMI mode as previously mentioned and you will hear a sound "HDMI".
- Start the playback on TV as usual.
Note:
- The TV must have ARC capability and be connected to HDMI IN ARC jack.
OPTICAL-IN OPERATION
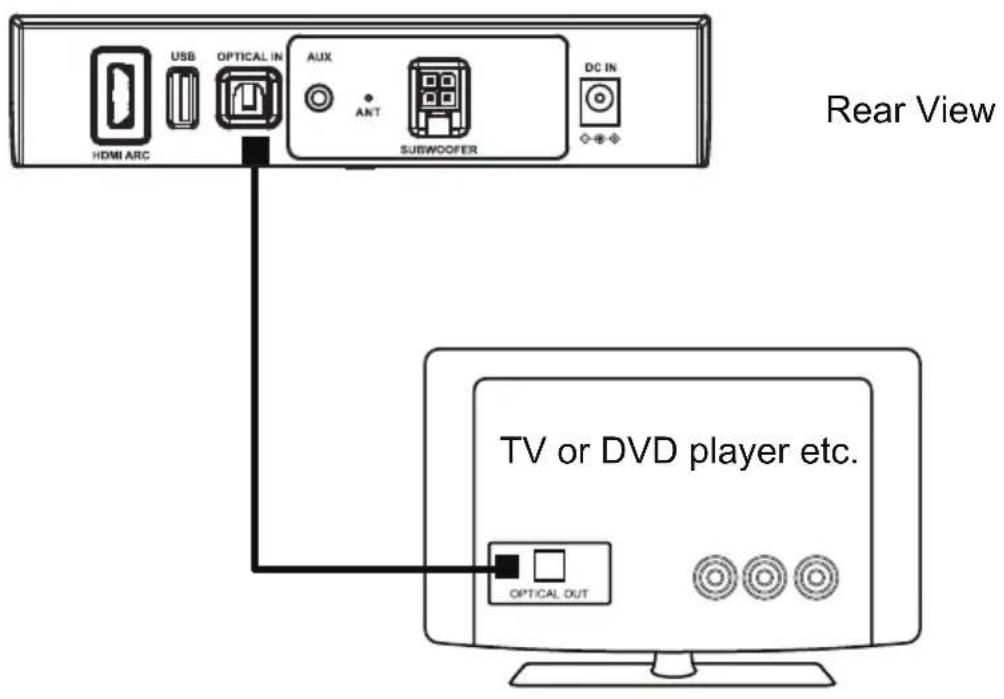
- Connect one end of Optical cable (not included) to the OPTICAL jack of this unit, the other end to the OPTICAL OUT jack of TV or DVD player etc.
- Power on the unit and switch to OPTICAL mode as previously mentioned and you will hear a sound "OPTICAL".
- Start the playback on TV or DVD player as usual.
AUX IN OPERATION
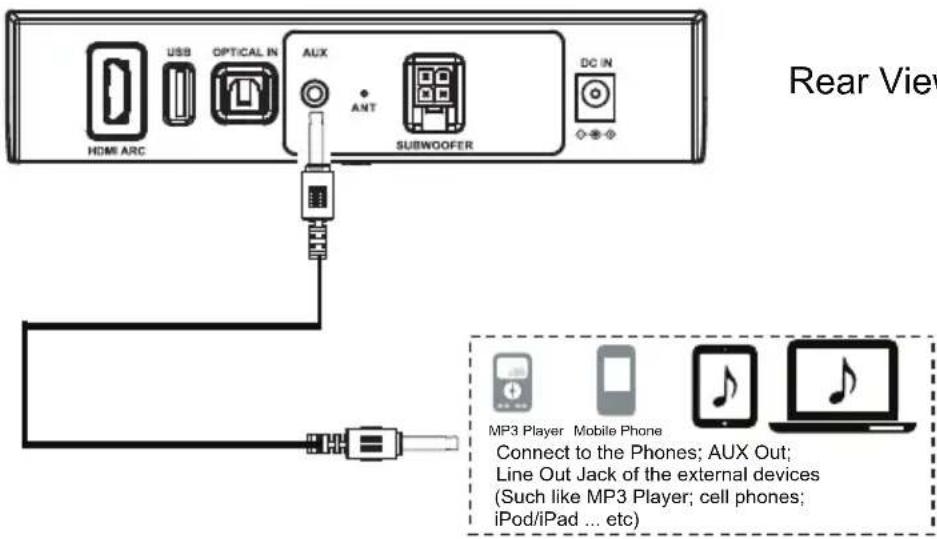
- Connect one end of included AUX in cable to the AUX jack of this unit, the other end to the 3.5mm earphone jack or AUX out jack of external device.
- Power on the unit and switch to AUX mode as previously mentioned and you will hear a sound "AUXILIARY".
- Start the playback on external device as usual.
FM OPERATION
- Power on the unit and switch to FM mode as previously mentioned, then you will hear a sound "FM".
- Press and hold the Scan button on remote control to scan and store the available stations automatically. It will play the first stored station when scanning is finished.
- Press the Scan button to change the stored stations.
USB OPERATION
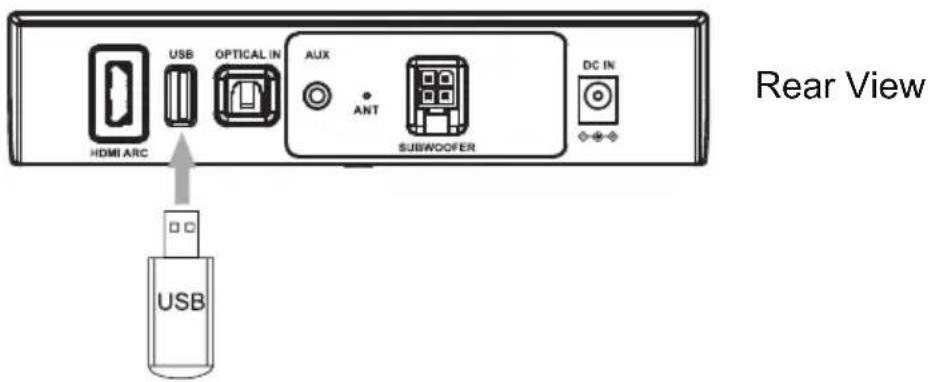
- Insert the USB device (not included) into the USB jack of this unit.
- Power on the unit as previously mentioned and you will hear a sound "USB".
- It will automatically play the tracks stored in USB device.
Note:
- When play music in other modes, it will be in USB mode once you insert the USB device. If you want to change to other modes, press the Standby/Source button on unit or 📄 button on remote control.
USB Recording
- Insert an USB device into the USB jack of this unit.
2.Play music in Bluetooth mode. - Press the REC button on remote control and you will hear a sound indicating recording starts.
- Press the REC button on remote control to stop recording and you will hear a sound indicating recording finished, then it will play the recording song immediately.
Note:
●The recording function only works in Bluetooth mode.
- If you want to listen to the track recorded in USB device, turn the unit to USB mode and press the ◀◀ or ▶▶ button on remote control to select.
SUBWOOFER CONNECTION
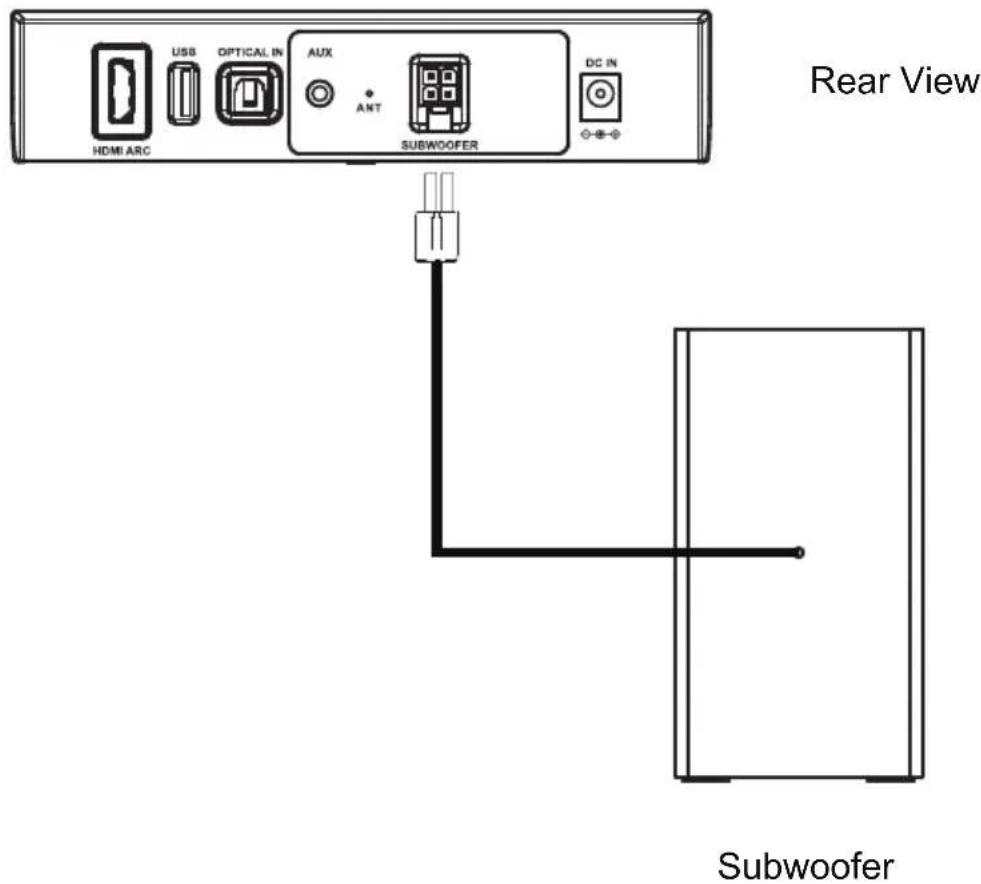
- Connect the subwoofer as above illustrate.
- Connect one end of surround adapter to outlet and other end to DC IN jack of surround box, the Power Indicator will light red.
- Press and hold the Standby button to power on or off the surround box.
- The surround boxes are already paired to the unit when produced, the Indicator on the rear of surround box will light green and you can play music as usual.
Note:
- If you want to disconnect the surround boxes, press the Standby button on rear of surround boxes and the Indicator will blink.
- If you want to reconnect the surround boxes, press the Standby button on rear of surround boxes and the Indicator will stay solid green.
TROUBLESHOOTING
| SYMPTOM | POSSIBLE CAUSE POSSIBLE SOLUTION | |
| No power | The adapter is not connected Connect the adapter to the unit and wall outlet. | |
| The unit is in power off mode | Press and hold the STANDBY/SOURCE button on the unit or press the ⏻ button on remote control to power on the unit. | |
| No sound or sound weak | Volume level in minimum position | Raise the volume level by pressing the VOL + Button on the unit. |
| The paired/connected device is not in playback mode | Play music/movie in the paired/ connected device as usual and make sure the volume level of it is in high level. | |
| Input source incorrect | Press the ➕ button on the remote control or STANDBY/SOURCE button to switch to desired mode. | |
| Sound distortion/ rattle | Volume level too high | Reduce the volume level by pressing the VOL- button on the unit or remote control.Reduce the volume level of the paired/connected device. |
| Remote Control not functioning | Out of range | Point the remote control to the remote sensor on the unit within 16 feet, +/-30 degress. |
| The battery in the remote control is drained | Replace with new battery. | |
| Bluetooth reception failure | The external device is too far from the unit | Put the external BT device close to the unit. |
| Have not paired | Pair the unit with the BT Device as the procedures stated in this manual. | |
SPECIFICATIONS
Power input of main adapter....AC 100-240V\~ 50/60Hz
Power output of main adapter....DC 22V---4APoweroutput
Power output of Surround adapter....DC 15V=0.8APoweOutput
Speaker output 6x15W+50W
Bluetooth effective working range in open area....up to 32 feet
Remote effective working range up to 16 feet
Bluetooth version....5.2
ACCESSORIES
1x Instruction Manual
1x Power Adapter
1x Remote Control
1x AUX in Cable
2x Surround Adapter
2x AAA batteries
SPECIFICATIONS AND ACCESSORIES ARE SUBJECT TO CHANGE WITHOUT NOTICE
HDMI®
HIGH-DEFINITION MULTIMEDIA INTERFACE
The terms HDMI and HDMI High-Definition Multimedia Interface, and the HDMI Logo are trademarks or registered trademarks of HDMI Licensing Administrator, Inc. in the United States and other countries.
90 Day Warranty
This product is warranted to be free from defects in material and workmanship for a period of ninety (90) days from the date of original delivery to the consumer. During this period, your exclusive remedy is repair or replacement of this product or component found to be defective, at our option; however, you are responsible for all costs associated with returning the product to us. If the product or component is no longer available, we will replace with a similar one of equal or greater value. Prior to a replacement being sent, the product must be rendered inoperable or returned to us.
This warranty does not cover glass, filters, wear from normal use, use not in conformity with the printed directions., or damage to the product resulting from accident, alteration, abuse, or misuse. This warranty extends only to the original consumer purchaser or gift recipient. Keep the original sales receipt, as proof of purchase is required to make a warranty claim. This warranty is void if the product is used for other than single-family household use or subjected to any voltage and waveform other than as on the specified rating on the label (e.g., 120V\~60Hz).
We exclude all claims for special, incidental, and consequential damages caused by breach of express or implied warranty. All liability is limited to the amount of the purchase price. Every implied warranty, including any statutory warranty or condition of merchantability or fitness for a particular purpose, is disclaimed except to the extent prohibited by law, in which case such warranty or condition is limited to the duration of this written warranty. This warranty gives you specific legal rights. You may have other legal rights that vary depending on where you live. Some states or provinces do not allow limitations on implied warranties or special, incidental, or consequential damages, so the foregoing limitations may not apply to you.
For faster service, locate the model, type, and serial numbers on your appliance.
ATTACH YOUR PROOF OF PURCHASE HERE, PROOF OF PURCHASE IS REQUIRED TO OBTAIN WARRANTY SERVICE.
Please have the following information available when you contact the Support Team:
• Name, address and telephone number.
• Model number and serial number.
• A clear, detailed description of the problem.
- Proof of purchase including dealer or retailer name, address and date of purchase.
PROSCAN
BARRE DE SON BLUETOOTH 5.1 AVEC CAISSON DE BASSES FILAIRE ET SATELLITES SANS FIL
natural_image
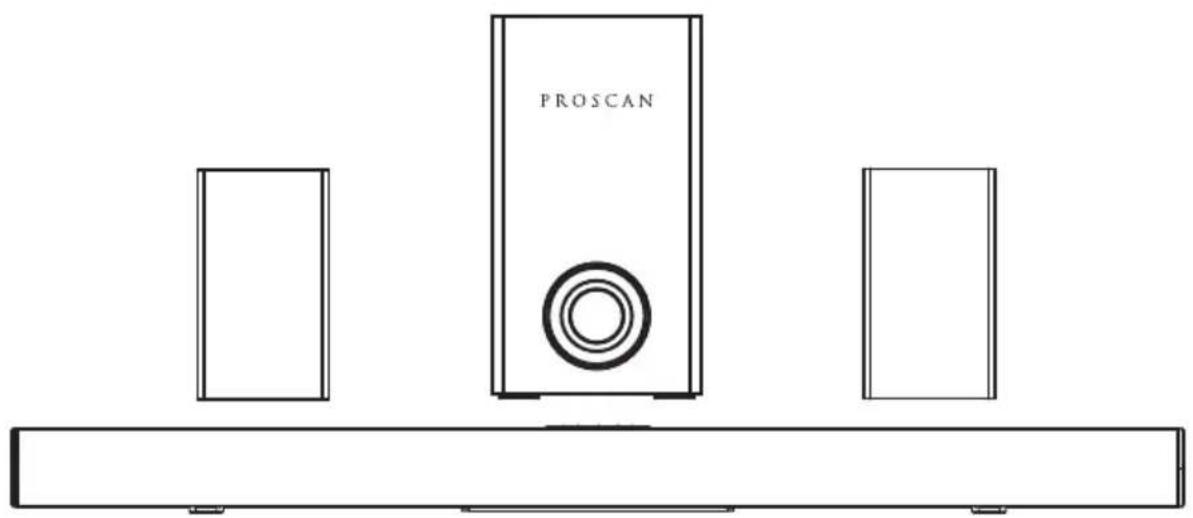
Line drawing of a Proscan audio workstation with three speakers and a central speaker (no text or symbols on the devices themselves)MODÈLE : PSB551
natural_image
Black triangular warning symbol with white lightning bolt symbol (no text)ATTENTION
RISQUE D'ÉLECTROCUTION NE PAS OUVRIR

natural_image
Black triangular warning symbol with exclamation mark (no text or numbers)ATTENTION : POUR RÉDUIRE LES RISQUES D'ÉLECTROCUTION, N'OUVREZ PAS LE BOÎTIER (OU LE PANNEAU ARRIÈRE). L'APPAREIL NE CONTIENT AUCUNE PIÈCE REMPLAÇABLE PAR L'UTILISATEUR. POUR UNE RÉPARATION, PRENEZ CONTACT AVEC LE PERSONNEL QUALIFIÉ.

natural_image
Simple diagram of a battery with two charging conduction stages and two positive charges (no text or symbols)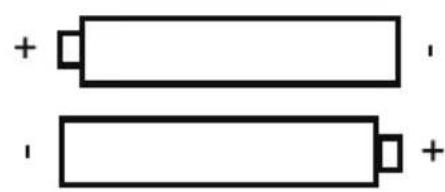
natural_image
Two parallel batteries with one positive and one negative, connected by a battery symbol (no text or labels)Attention :
2. Distance d installation

- MODEL: PSB551
- IMPORTANT SAFETY INSTRUCTIONS
- CAUTION
- RISK OF ELECTRIC SHOCK DO NOT OPEN
- WARNING: TO PREVENT FIRE OR SHOCK HAZARD, DO NOT EXPOSE THIS UNIT TO RAIN OR MOISTURE.
- WARNING: USE UNDER SUPERVISION OF AN ADULT DUE TO LONG
- FCC STATEMENT:
- Read these instructions
- Keep these instructions
- 3.Heed all warnings
- Follow all instructions
- 5.Do not use this apparatus near water
- 6.Clean only with dry cloth
- Unplug this apparatus during lightning storms or when unused for long periods of time.
- 15.Power source
- 16.Power lines
- Overloading
- 18.Object and liquid entry
- Outdoor antenna grounding
- Service
- 21.Replacement parts
- Safety check
- Wall or ceiling mounting
- Damage requiring service
- Note to CATV system installer
- PRODUCT OVERVIEW
- Caution:
- Remote control operation range
- PLACEMENT AND MOUNTING
- Placing the device on a table - Ventilation
- The Installation Distance
- 2.1Mounting to a wooden wall
- Mounting to a brick wall
- GENERAL OPERATION
- BLUETOOTH OPERATION
- Note:
- HDMI IN OPERATION
- OPTICAL-IN OPERATION
- AUX IN OPERATION
- FM OPERATION
- USB OPERATION
- USB Recording
- SUBWOOFER CONNECTION
- SPECIFICATIONS
- ACCESSORIES
- SPECIFICATIONS AND ACCESSORIES ARE SUBJECT TO CHANGE WITHOUT NOTICE
- Day Warranty
- PROSCAN
- BARRE DE SON BLUETOOTH 5.1 AVEC CAISSON DE BASSES FILAIRE ET SATELLITES SANS FIL
- ATTENTION
- RISQUE D'ÉLECTROCUTION NE PAS OUVRIR
- Attention :
- Distance d installation
Brand : Proscan
Model : PSB551
Category : Soundbar