
eSAM603 - Mixer Ecler - Free user manual and instructions
Find the device manual for free eSAM603 Ecler in PDF.
| Product type | Mixing console |
| Brand | Ecler |
| Model | eSAM603 |
| Dimensions (W x H x D) | 482.6 x 44.45 x 250 mm (19", 1U) |
| Weight | 3 kg (approx) |
| Power supply | 90-264 V AC, 47-63 Hz, 0.5 A time-lag fuse |
| Power consumption | 20 W (approx) |
| Number of inputs | 6 inputs (1 MIC, 4 MIC/LINE STEREO, 1 LINE STEREO) |
| Input types | MIC (mono), LINE (stereo/mono) with MIC/LINE switch |
| Number of outputs | 3 balanced outputs (A, B, C) + AUX/REC output |
| Output types | Balanced on Euroblock, adjustable level |
| Equalizer | 3-band (100 Hz, 2 kHz, 10 kHz) ±15 dB on outputs A/B and C |
| Talkover function | Priority assignable to inputs 1-5, attenuation of other inputs |
| Phantom power | +18 V, selectable via internal jumper (default off) |
| Operating modes | MONO/STEREO per input, STEREO/SINGLE for outputs A/B |
| Connectors | Euroblock for inputs and outputs, IEC power |
| Remote MUTE input | Dry contact NO (normally open) |
| Operating temperature | 0°C to 40°C (estimated) |
| Operating humidity | Below 80% (estimated) |
| Finish / Color | Standard black |
| Safety | Grounding mandatory, warning symbols |
| Maintenance | Clean with a dry cloth, no solvents |
Frequently Asked Questions - eSAM603 Ecler
User questions about eSAM603 Ecler
0 question about this device. Answer the ones you know or ask your own.
Ask a new question about this device
Download the instructions for your Mixer in PDF format for free! Find your manual eSAM603 - Ecler and take your electronic device back in hand. On this page are published all the documents necessary for the use of your device. eSAM603 by Ecler.
USER MANUAL eSAM603 Ecler
Graphic Symbol Explanation

The lightning flash with arrowhead symbol, within an equilateral triangle, is intended to alert the user to the presence of uninsulated "dangerous voltage" within the product's enclosure that may be of sufficient magnitude to constitute a risk of electric shock to persons.

The exclamation point within an equilateral triangle is intended to alert the user to the presence of important operating and maintenance (servicing) instructions in the literature accompanying the appliance.

The lightning flashes printed next to the OUTPUT terminals of the apparatus are intended to alert the user to the risk of hazardous energy. Output connectors that could pose a risk are marked with the lightning flash. Do not touch output terminals while apparatus power is on. Make all connections with apparatus turned off.
WARNING: To prevent fire or shock hazard, do not expose this equipment to rain or moisture.
IMPORTANT SAFETY INSTRUCTIONS
-
Read these instructions.
-
Keep these instructions.
-
Heed all warnings.
-
Follow all instructions.
-
Do not use this apparatus near water.
-
Clean only with dry cloth.
-
Do not block any ventilation openings. Install in accordance with the manufacturer's instructions.
-
Do not install near any heat sources such as radiators, heat registers, stoves, or other apparatus (including amplifiers) that produce heat.
-
Do not defeat the safety purpose of the polarized or grounding type plug. A polarized plug has two blades with one wider than the other. A grounding type plug has two blades and a third grounding prong. The wide blade or the third prong are provided for your safety. If the provided plug does not fit into your outlet, consult an electrician for replacement of the obsolete outlet.
-
Protect the power cord from being walked on or pinched particularly at the plugs, convenience receptacles, and at the point where they exit from the apparatus.
-
Only use attachments/accessories specified by the manufacturer.
-
Unplug the apparatus during lightening sorts or when unused for long periods of time.
-
Refer all servicing to qualified personnel. Servicing is required when the apparatus has been damaged in any way, such as power supply cord or plug is damaged, liquid has been spilled or objects have fallen into the apparatus, the apparatus has been exposed to rain or moisture, does not operate normally, or has been dropped.
-
Disconnecting from mains: Switching off the POWER switch all the functions and light indicators of the device will be stopped, but fully disconnecting the device from mains is done unplugging the power cord from the mains input socket. For this reason, it always shall remain readily operable.
-
IMPORTANT REMARK 0 4
1.1. Safety Precautions
04
-
INTRODUCTION 0 4
-
INSTALLATION 0 5
-
INPUTS 0 5
-
OUTPUTS 0 6
-
CONSIDERATIONS 0 7
6.1. Starting Up 07
6.2.MONO/STEREO modes and INPUTS-OUTPUTS assignment 07
6.3. Equalization 07
6.4. Ground loops, background noise
6.5. Cleaning 08
-
TECHNICAL CHARACTERISTICS 3 3
-
DIAGRAMS 3 4
8.1. Function list 34
8.2. Function diagram
8.3. Configuration diagram 3
8.4. Block diagram 36
We thank you for trusting on us and choosing our eSAM603 mixer. In order to get the most in operation and efficiency from your mixing unit, it is VERY IMPORTANT for you - before you plug anything - to read this manual very carefully and take seriously into account all considerations specified within it.
In order to guarantee the optimum operation of this unit, we strongly recommend that its maintenance be carried out by our Authorised Technical Services.
1.1. Safety Precautions

This apparatus must be earthed through its mains cable.
Do not expose the unit to rain or water splashes, and do not place liquid containers or incandescent objects like candles on top of the unit.
any change in the configuration of the unit must be carried out by a qualified technician.
Should any connection / disconnection task be done, always disconnect the unit from the mains supply.
There are no user serviceable parts inside the unit.
CAUTION: RISK OF ELECTRIC SHOCK. DO NOT OPEN.
2. INTRODUCTION
The eSAM 603 is a professional audio mixer designed for easy handling in sound reinforcement applications. Its main features are:
- 1 MIC input channel, IN1
- 4 MIC/STEREO LINE input channels, IN2 to IN5
1STEREO LINE input channel, IN6 - MONO/STEREO switch available on all STEREO LINE or MIC/STEREO LINE inputs
- 3 balanced outputs (A, B and C) can operate in stereo mode (AB) + mono (C) or as 3 mono outputs (A, B and C in mono mode)
STEREO/SINGLE switch for A/B outputs: stereo or individual (MONO) operating modes - Sensitivity level control on the rear panel
- 18V DC Phantom power available on all MIC and MIC/LINE inputs
- A, B and C output keys are available on all inputs to independently select the output destination of each input
- Includes assignable Talkover (priority) on inputs 1 to 5 (the Talkover function may be simultaneously enabled on several inputs)
- Independent 3-band tone controls for A and B outputs, and for C output
- Signal presence/clipping LED indicator (SP/CLIP) per output
A, B and C output level control
Record/auxiliary output - The "MUTE" remote control input allows connection of external dry contact closures (fire detection systems and other safety devices that have to mute the three mixer outputs by activating the "NO" (normally open) control signal)
3. INSTALLATION
EN
The eSAM603 mixer has been specially designed to be installed in a standard 19" rack, taking up 1U.
Due to its low power consumption and heat sink, the eSAM603 doesn't need any fan cooling. However, avoid installing it in dusty environments and/or in a location with extreme temperature and moisture.
The mixer should be kept apart from noise and interference sources (dimmers, motors, etc...) as well as from power cables.
The eSAM603 operates from 90V to 264V CA, 47 to 63Hz. Its oversized power supply is compatible with any mains voltage worldwide.
In order to protect the mixer from eventual overloads, the eSAM603 is protected by a timered power fuse of 0.5A. If it gets blown up, you must replace it with an identical one. If it gets blown up, you must replace it with an identical one. NEVER REPLACE THE FUSE WITH ANOTHER ONE WITH A HIGHER VALUE.

CAUTION: Fuse substitutions have to be performed by a qualified technician.
4. INPUTS
The eSAM603 inputs accept two types of audio signals (mono microphone and/or stereo line). For inputs accepting both types of signals, the selection is done using a MIC/LINE switch located on the rear panel:
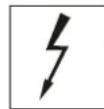
- Microphone signal: Euroblock connector and a nominal input level from -50dBV (3.16mV) to -20dBV (0.1V), with a GAIN control on the rear panel to adjust the gain.
Here is the wiring diagram for microphones:
Balanced
- Live (+18V)
- Cold (+18V)
- Ground (0V)
(Phantom ON)
Unbalanced
- Live (+18V)
2-3.Ground (0V)
(Phantom ON)
Microphones must be low impedance (200 to 600 ) and monophonic.
The eSAM603 supplies phantom power for condenser microphones; it is enabled by an internal jumper (see diagram). By default, phantom power is disabled (factory setting).
The Talkover (priority) function operates when a signal is detected at the inputs 1 to 5 this function is assigned to; it attenuates the other inputs of the unit that don't have priority. Turn it on/off for each input channel with the "TK" switch on the front panel.
- Line level signals: to manage the important level differences existing between conventional CD and LINE sources and other devices capable of producing audio signals, the LINE inputs 2-5 of the eSAM603 are standard line inputs (0dBV) and the sensitivity of the LINE input #6 can be selected (0/-6dBV) by internal jumper (the default position is 0dBV). A sensitivity of -6dBV is ideal for low-level sound sources such as media players, portable MP3 players, tablets, computers, mobile phones, etc.
Turntables CAN NOT be directly connected to this unit, because eSAM603 has no RIAA preamp equipped input.
5. OUTPUTS
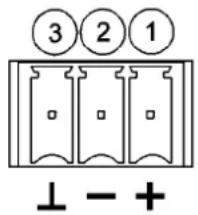
The eSAM603 has three electronically balanced outputs with Euroblock connectors.
Connection is made according to the following diagram:
Balanced
- Live
- Cold
- Ground
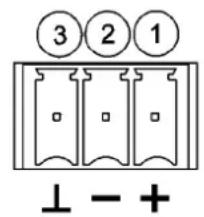
Unbalanced
- Live
3.Ground

The master level of each mixer output (OUT A, B or C) must be adjusted so that the overload indicators (CLIP) are not permanently lit on the system amplifiers, but at most on the lowest frequencies marking the rhythm.
Other connections on the back panel:
- AUX/REC output with a nominal output of 0dBV (10kΩ load) and an extra gain setting of +6dB, enabled by internal jumper (0dBV is the default position).
- MUTE remote control input: enabled by external dry contact closure. It allows connection of fire detection systems and other safety devices that have to mute the three mixer outputs by using this control signal. The mode of operation is "NO" (normally open).
6. CONSIDERATIONS
6.1. Starting up
This is directly done via the POWER mains switch. Even is the power-up noise of eSAM603 is minimal, we highly recommend to power up all equipment in the following order: sound sources, mixing units, equalizer, processors and finally power amplifiers. The power down sequence is the inverse of the power up one.
6.2. MONO/STEREO modes and INPUTS-OUTPUTS assignment
On the front panel, each input channel has a master level control (VOL) and 3 buttons (A, B and C) to assign its signal to one or more outputs of the unit. When one of these buttons is engaged, the signal is sent to the corresponding output.
Microphone inputs are always mono, so you can send the mono signal at the A, B and/or C destination output by pressing the corresponding button. Example for input 1:
| Input (type) Output A content | (A button pressed) | Output B content (B button pressed) | Output C content (C button pressed) |
| IN1 (microphone, mono) IN1 IN1 IN1 |
For line level signals, the output assignment depends whether these signals are in MONO or STEREO mode (MONO/STEREO switch on the rear panel for each MIC/LINE or LINE input). Example:
| Input (type) Output A content | (A button pressed) | Output B content (B button pressed) | Output C content (C button pressed) |
| IN2 (LINE, switch in the STEREO position) | IN2 L (left channel) | IN2 R (right channel) | IN2 L+R (mono sum) |
| IN3 (LINE, switch in the MONO position) | IN3 L+R (mono sum) | IN3 L+R (mono sum) | IN3 L+R (mono sum) |
The C output is always mono and therefore always receives a mono sum of L + R line inputs that have been assigned to this output, regardless of their MONO/STEREO setting.
Additionally, the STEREO/SINGLE front panel switch allows you to choose between two ways to control the A and B output volume:
- simultaneously and only with OUT A control, OUT B control being disabled (switch in the STEREO position). This mode is suitable for the sound reinforcement of a stereo zone (A, left channel / B, right channel) and a mono zone (C)
- independently, using the A and B controls (switch in the SINGLE position). This mode is suitable for the sound reinforcement of three zones, A, B and C
6.3. Equalization
The tone controls of the A/B and C outputs provide a ± 15dB gain/attenuation for each of the three available bands, and their central operating frequencies are 100Hz, 2kHz and 10kHz.
You should always make sure that the signal sources coming to the unit, as well as all devices connected to its outputs, do not have their grounds interconnected, that is; ground must never come from two different devices. Should this ever happen, noises could occur and seriously interfere the sound quality.
Cable shields, when connected to the chassis, must never be linked together. This will avoid ground loops.
The eSAM603 mixer was designed to produce the lowest background noise. Independently from the electronic design, the resulting background noise directly relies on the correct use and installation of the mixing unit.
Adjust, where appropriate, the gain of each input for an adequate operating level and then adjust the VOL controls on the front panel to obtain the desired input mix. Finally, adjust the VOL control of the main mix output to get the relevant output volume for your installation, and also enable the TK switches for priority inputs (a signal detection on these priority inputs will attenuate the signal of non-priority inputs).
Important note on mix level adjustment: setting for example a channel VOL control to "2" and the output VOL control to "10" is not the same as the opposite. In the first case, the signal entering the mixing amplifier is weak, but even so it contains a background noise, so the signal/noise ratio is low (low signal). When the output amplifier equally amplifies both parts as a whole, the output has a very high background noise. In the second case, as the channel VOL control is set to the maximum, the signal received by the mixing amplifier has a high level and therefore also a high (good) signal/noise ratio, so when this signal reaches the output VOL control and is amplified, the signal/noise ratio remains better than in the previous case.
6.5. Cleaning
The front panel should not be cleaned with dissolvent or abrasive substances because silk-printing could be damaged. To clean it, use a soft cloth slightly wet with water and neutral liquid soap; dry it with a clean cloth. Be careful that water never gets into the unit through the holes of the front panel.

Laitters are always available.
| LINE | <0.005% | ||||
| M | I | C | B | A | L |
CMRR
MIC >60dB@1kHz
Signal/Noise ratio (gain +15dB)
| LINE | >100dB | |
| MIC | BAL | >85dB |
Tone control
| BASS | 100Hz | ±15dB |
| MID | 2kHz | ±15dB |
| TREBLE | 10kHz | ±15dB |
Talkover
| TIME | 2 | seconds | ||||
| E | F | F | E | C | T |
Phantom voltage
| +18VDC | |
| 90-264VCA | 47-63Hz |
| 18VA | |
Mains
Power consumption
| Panel | 482.6x44mm | ||
| D | e | p | t h |
Dimensions
W e i g h t
8. DIAGRAMS / 8.1. Function list 8. DIAGRAMAS / 8.1. Lista de sistemas
- Channel volume control, VOL 1. Control de volumen de la vía, VOL
- Talkover switch, TK 2. Puesta en marcha talkover, TK
- Output destination switches, A, B, C
- Output main volume control, OUT A/B/C
- Bass control, BASS 5. Control de graves, BASS
- Midrange control, MID 6. Control de medios, MID
- Treble control, TREBLE 7. Control de agudos, TREBLE
- LED indicator, SP/CLIP 8. Indicador luminoso, SP/CLIP
- STEREO (VOL A)/SINGLE (VOL A/VOL B) switch
- LED indicator, MUTE 10. Indicador luminoso, MUTE
- LED indicator, ON 11. Led puesta en marcha, ON
- Micro input, MIC 12. Entrada micro, MIC
- Input sensitivity adjust, ADJ 13. Ajuste sensibilities de entrada, ADJ
- Micro line selector 14. Selector micro linea
- Mono-stereo switch, L+R 15. Conmutador de mono-estéreo, L+R
- Line input, LINE 16. Entrada linea, LINE
- Recording output, AUX/REC 17. Salida de grabacion, AUX/REC
- Main output, OUT A 18. Salida principal, OUT A
- Main output, OUT B 19. Salida principal, OUT B
- Main output, OUT C
- Screwable terminal for remote mute, MUTE
- Mains socket
- Fuse holder
- Mains switch, POWER
-
Portafusibles
-
Conmutador de envio autas, A, B, C
-
Control nivel general de salute, OUT A/B/C
-
Conmutador ESTEREO (VOL A) INDEPENDIENTE (VOL A / VOL B)
-
Salida principal, OUT C
- Terminales atornillables control remotemute, MUTE
- Base de toma de red
- Interruptor puesta en marcha, POWER


- Graphic Symbol Explanation
- IMPORTANT SAFETY INSTRUCTIONS
- Safety Precautions
- CAUTION: RISK OF ELECTRIC SHOCK. DO NOT OPEN.
- INTRODUCTION
- INSTALLATION
- INPUTS
- OUTPUTS
- CONSIDERATIONS
- Starting up
- MONO/STEREO modes and INPUTS-OUTPUTS assignment
- Equalization
- Cleaning
- DIAGRAMS / 8.1. Function list 8. DIAGRAMAS / 8.1. Lista de sistemas
Brand : Ecler
Model : eSAM603
Category : Mixer