
DPR10 - DJ Equipment Monacor - Free user manual and instructions
Find the device manual for free DPR10 Monacor in PDF.

| Product type | MP3 recorder/player |
| Brand | Monacor |
| Model | DPR-10 |
| Category | DJ equipment |
| Storage media | USB flash drive (up to 64 GB), SD/MMC memory card (up to 64 GB) |
| Supported audio formats | MP3, WMA |
| Main functions | Playback, MP3 recording, copy between media, file deletion, track programming, alphabetical search, repeat, random play, intro function (10 s) |
| Audio inputs | AUX INPUT (RCA) for recording |
| Audio outputs | OUTPUT (RCA) line level |
| Power supply | 12 V DC, 400 mA, plug 5.5/2.1 mm (center positive) |
| Remote control | Infrared, 2 × 1.5 V type R03 (AAA) batteries |
| Display | LCD screen with information on track, folder, duration, media |
| Ambient temperature range | 0 – 40 °C |
| Usage | Indoor only, protect from splashes and moisture |
| Maintenance and cleaning | Dry soft cloth, no chemicals or water |
| Supplied accessories | Remote control, user manual |
| Optional accessories | Power supply unit 12 V/400 mA (ref. PSS-1205DC) |
| Dimensions (approx.) | Not specified by manufacturer – compact device |
| Weight (approx.) | Not specified by manufacturer |
| Repairability | Repair by qualified personnel only; warranty void if unauthorized opening |
Frequently Asked Questions - DPR10 Monacor
User questions about DPR10 Monacor
0 question about this device. Answer the ones you know or ask your own.
Ask a new question about this device
Download the instructions for your DJ Equipment in PDF format for free! Find your manual DPR10 - Monacor and take your electronic device back in hand. On this page are published all the documents necessary for the use of your device. DPR10 by Monacor.
USER MANUAL DPR10 Monacor
English ...... Page 8
Français....Page 12
Italiano ...... Pagina 16
| Technische Daten | Specifications | Caractéristiques techniques | Dati tecnici | DPR-10 |
| Frequenzgang | Frequency response Bande passante Banda passante | 20–20 000 Hz | ||
| Klirrfaktor | THD Taux de distorsion | Fattore di distorsione | < 0,3 % | |
| Kanaltrennung | Channel separation Séparation des canaux Separazione canali | >60 dB | ||
| Dynamikumfang | Dynamic range Dynamique Range dinamico | >96 dB | ||
| Audioausgang | Audio output Sortie audio Uscita audio | 0–1,2 VRCA (Cinch) | ||
| Audioeingang | Audio input Entrée audio Ingresso audio | 800 mV max.RCA (Cinch) | ||
| Stromversorgung | Power supply Alimentation | Alimentazione | 12 V(=), 400 mA | |
| Abmessungen(B × H × T) | Dimensions(W × H × D) | Dimensions(I × h × p) | Dimensioni(I × h × p) | 174 × 52 × 110 mm |
| Gewicht | Weight | Poids Peso | 545 g | |

text_image
MONACOR® DPR-10 Title-This so ▶ TR0052 03:49 MP3 SD /MMC CARD IR 0 1 2 3 4 REC 5 6 7 8 9 VOL▲ FUNC ■ ←← → ← FOLDER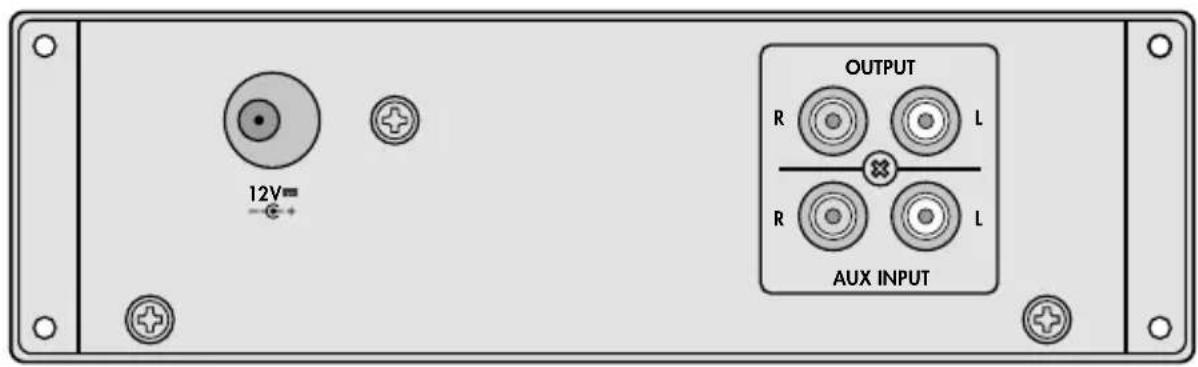
text_image
OUTPUT R L R L AUX INPUT 12V=MP3-Rekorder
text_image
12V OUTPUT R L R L AUX INPUTMP3 Recorder
These instructions are intended for users without any specific technical knowledge. Please read the instructions carefully prior to operation and keep them for later reference.
1 Applications
With the MP3 recorder DPR-10, it is possible to replay MP3 and WMA files from USB flash drives* and memory cards* (64 GB max.). For recordings in MP3 format, an audio unit (radio, CD player etc.) can be connected. It is also possible to copy audio files from a memory card to a USB flash drive and vice versa.
The MP3 recorder DPR-10 can be operated as a separate unit. Due to its compact design, it is also suited for installation into another unit (e. g. into an active speaker system). When installing the DPR-10 into another unit, make sure that this unit will not overheat the DPR-10.
2 Important Notes
The unit corresponds to all relevant directives of the EU and is therefore marked with .
- The unit is suitable for indoor use only. Protect it against dripping water, splash water and high air humidity. The admissible ambient temperature range is 0 – 40 °C.
- For cleaning only use a dry, soft cloth; never use water or chemicals.
- No guarantee claims for the unit and no liability for any resulting personal damage or material damage will be accepted if the unit is used for other purposes than originally intended, if it is not correctly connected or operated, or if it is not repaired in an expert way.
- Likewise, no liability will be accepted for any data loss on a storage medium caused by a defect or operating errors.
*Note: Due to the large number of storage device manufacturers and device drivers, it cannot be guaranteed that all storage media are compatible with the DPR-10.
If the unit is to be put out of operation definitively, take it to a local recycling plant for a disposal which is not harmful to the environment.
3 Connections
Prior to making or changing any connections, switch off the DPR-10 and the units to be connected.
1) Use an RCA cable to connect the jacks OUTPUT to a line level input, e. g. of a mixer or amplifier (L = left channel, R = right channel).
2) For MP3 recordings, connect an audio unit with line level output (e.g. CD player, mixer) to the jacks AUX INPUT.
3) For power supply, a regulated 12 V power supply unit with a rating of 400 mA and with a low-voltage plug of 5.5 / 2.1 mm (outside / inside diameter) is required (e. g. PSS-1205DC from MONACOR). Connect the power supply unit to the jack 12 V---: Make sure to connect the positive pole to the centre contact!
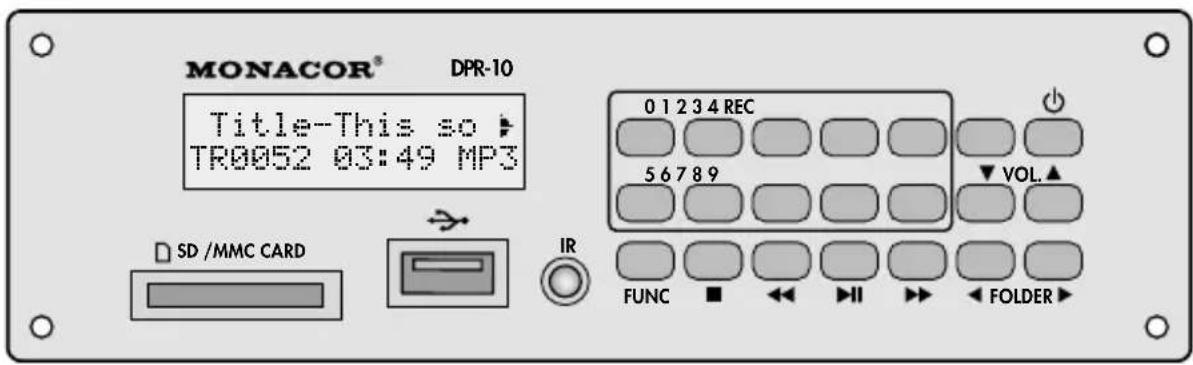
4 Operation
Switch on the unit by means of the button ☑at the unit or the button POWER on the remote control. Welcome will appear on the display. If neither a memory card nor a USB flash drive is inserted, NO USB will appear on the display.
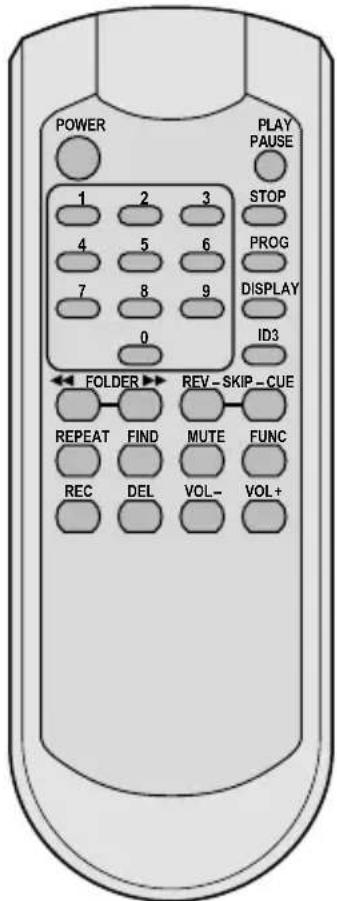
4.1 Remote control
1) Remove the battery compartment cover on the rear side of the remote control. Insert the batteries (2 × 1.5 V, size AAA) as indicated in the battery compartment. Close the compartment with the cover.
If the remote control is not used for a longer period of time, remove the batteries as a precaution so that the remote control will not be damaged in case the batteries should leak.
2) When pressing a button, always point the remote control towards the sensor "IR". Make sure that there are no obstacles between the remote control and the sensor.
3) When the operating range of the remote control decreases, the batteries are discharged and must be replaced.
Never put batteries in the household waste. To protect the environment, always take them to a special waste disposal, e. g. collection container at your retailer.
text_image
POWER PLAY PAUSE 1 2 3 STOP 4 5 6 PROG 7 8 9 DISPLAY 0 ID3 FOLDER REV-SKIP-CUE REPEAT FIND MUTE FUNC REC DEL VOL- VOL+4.2 Replaying music titles
1) Connect a USB flash drive to the USB port and/or
insert a memory card into the slot SD/MMC CARD (notched corner to the right). To remove the card, push the card into the slot until it disengages.
2) To start the replay, press the button ▶II PLAY/PAUSE.
3) All other functions available during replay are listed in the table on page 1.
4) After operation, switch off the unit with the button ⏻ or POWER. The power supply unit has a low power consumption even when the DPR-10 has been switched off; therefore, disconnect the power supply unit from the mains socket when the DPR-10 is not used for a longer period of time.
4.3 Audio recordings
It is possible to make MP3 recordings from a unit connected to the jacks AUX INPUT (e. g. CD player) and to store them on a memory card or a USB flash drive.
1) Make sure that the write protection of the memory card or USB flash drive is not enabled; if required, disable the protection.
2) To select the jacks AUX INPUT, press the button FUNC repeatedly until AUX appears on the display.
3) Press the button REC. The display will show Waiting...
- When a memory card is inserted or a USB flash drive is connected, recording will start after a preparation period of approx. 10 seconds.
- When a memory card is inserted and a USB flash drive is connected, Target [CARD] or [USB] will appear on the display after 2 seconds. Use the buttons ◀, ▶/REV-SKIP-CUE to select the storage medium to be used for recording. Then press the button REC again. Recording will start after a preparation period of approx. 10 seconds.
4) During the recording, RECORD → [CARD] or [USB] will appear on the display. To stop recording, press the button STOP / ■.
Notes:
- The unit will create the folder TMC_AUX on the storage medium for its own recordings. The following names will be assigned to the files recorded:
REC_AUX.mp3
REC_AUX001.mp3
REC_AUX002.mp3
etc.
The date and the time of the files, however, are not correct. The folder name and the file names can be changed with a computer.
- If a recording is distorted, reduce the volume of the unit connected. (The signal level at the jacks must not exceed 800 mV.)
4.4 Copying audio files or entire folders
Individual audio files or entire folders can be copied from a memory card to a USB flash drive or vice versa.
1) Use the button FUNC to select the storage medium containing the title to be copied (indication CARD or USB).
2) Press the button REC. The display will briefly show RECORD. Then the magnifying glass
symbol ♀ in the lower left corner will start flashing and, next to it, Dir will be shown. The folder search function is activated.
3) Use the buttons ◀, ▶/REV-SKIP-CUE to select the folder to be copied or the folder containing the file to be copied.
4) To copy the folder selected, press the button REC again, or to copy a single file from the folder selected, keep the button REV, CUE, ◀ or ▶ pressed until File is shown next to the magnifying glass symbol. Then briefly press the button REV, CUE, ◀ or ▶ to select the file to be copied. Press the button REC to start copying.
Note: The copy process can be stopped at any time with the button STOP / ■.
4.5 Deleting individual audio files
1) Use the button FUNC to select the storage medium containing the file to be deleted (indication CARD or USB).
2) On the remote control, press the button DEL; the display will briefly show DELETE. Then the magnifying glass symbol ☑ in the lower left corner will start flashing and, next to it, Dir will be shown. The folder search function is activated.
3) Use the buttons REV – SKIP – CUE to select the folder containing the file to be deleted.
4) When the folder has been found, keep the button REV or CUE pressed until File is shown next to the magnifying glass symbol. Then briefly press the button REV or CUE to select the file to be deleted.
5) To delete the file, press the button DEL. The display will briefly show DELETE.
6) To delete further files, repeat steps 2) to 5).
Note: The process can be stopped at any time with the button STOP / ■.
Subject to technical modification.
| Remote control buttons ↓ | Function overview | ||
| Buttons at the unit ↓ | |||
| FUNC × × to | switch | between USB port and memory card | |
| ▶IIPLAY/PAUSE | × | × | to start the replay andto switch between replay and pause |
| VOL × × signal | level (volume) at the jacks OUTPUT | ||
| MUTE × | to mute / unmute the sound | ||
| 1... 9, 0 × × | direct title selection, examples:title 8 = buttons 8 and ▶IItitle 30 = buttons 3, 0 and ▶IItitle 125 = buttons 1, 2, 5 and ▶II | ||
| ◀ FOLDER ▶ | × | × | to go to the first title of the previous / next folder |
| REV – SKIP – CUE◀◀ ▶▶ | × | × | beginning of title, previous / next title: press button brieflyfast forward / reverse: keep button pressed (sound will be muted in the process) |
| REPEAT × | repeat functions, random replay and intro functionbasic setting PLAY ALL: all titles will be replayed oncefirst actuation of button REPEAT TRACKthe title selected will be repeated continuouslynext actuation of button REPEAT FOLDERall titles in the folder selected will be repeated continuouslynext actuation of button REPEAT ALLall titles will be repeated continuouslynext actuation of button RANDOM REPEATall titles will be replayed continuously in random ordernext actuation of button RANDOM PLAYall titles will be replayed once in random ordernext actuation of button INTRO PLAYintro function: the first 10 seconds of each title will be replayednext actuation of button PLAY ALL: basic setting | ||
| DISPLAY × | to change the information shown in the lower line of the display(not available when the replay has been stopped)- no. and playing time of the title - folder name - title name - no. of folders and titles | ||
| ID3 | × | to change the information shown in the upper line of the display- name of the file, the title, the artist and the album will scroll through the upper line- the selected storage medium will be indicated: CARD or USB | |
| FIND | × | alphabetic search for titles and foldersTitle search: 1) Press FIND once → Indication "A".2) Select the first letter of the title with REV -SKIP -CUE.3) Press the button PLAY to start the replay.If there are multiple titles beginning with the same letter, keep the button REV or CUEpressed until the letter starts flashing; select the title with REV -SKIP -CUE and thenpress the button PLAY to start the replay of the title.Folder search: 1) Press FIND twice → Indication Dir.2) Select the folder with REV -SKIP -CUE.3) Press the button PLAY to start the replay of the first title in the folder. | |
| PROG × | to compile an individual title sequence:1) Press the button STOP/ ■.2) Press the button PROG.3) Enter the folder number and press the button PROG.4) Enter the title number and press the button PROG.5) Proceed in the same way to add further titles to the sequence.6) Press the button PLAY to start the replay of the sequence.To delete or stop the sequence, press the button STOP/ ■. | ||
| STOP ■ | × × to stop the replay | ||
text_image
MONACOR® DPR-10 Title-This so TR0052 03:49 MP3 SD /MMC CARD IR 0 1 2 3 4 REC 5 6 7 8 9 VOL▲ FUNC ■ ←→ → ← FOLDER