XR-CA665EE - Car stereo SONY - Free user manual and instructions
Find the device manual for free XR-CA665EE SONY in PDF.
User questions about XR-CA665EE SONY
0 question about this device. Answer the ones you know or ask your own.
Ask a new question about this device
Download the instructions for your Car stereo in PDF format for free! Find your manual XR-CA665EE - SONY and take your electronic device back in hand. On this page are published all the documents necessary for the use of your device. XR-CA665EE by SONY.
USER MANUAL XR-CA665EE SONY
FM/AM Cassette Car Stereo
Operating Instructions
GB
HCTpykua NO 3KcnpyaTaun
RU
For installation and connections, see the supplied installation/connections manual.
Ipeed yctaHOKoi n POcEOeINHeHnA MnpOHTaTe npInarAeMyIO HNCTpyKuIO no yctaHOBKe IPOcEOeINHeHIO.
XR-CA665EE
Welcome!
Thank you for purchasing this Sony Cassette Player. You can enjoy its various features even more with:
- Optional CD/MD units (both changers and players) ^*1 .
- CD TEXT information (displayed when a CD TEXT disc*2 is played on a connected optional CD unit with the CD TEXT function).
- Supplied controller accessory Card remote commander RM-X114
- Optional controller accessory Rotary commander RM-X4S
1 This unit works with Sony products only.
2 A CD TEXT disc is an audio CD that includes information such as the disc name, artist name, and track names. This information is recorded on the disc.
Table of Contents
Location of controls 4
Precautions 6
Notes on Cassettes. 6
Getting Started
Resetting the unit. 7
Detaching the front panel 7
Setting the clock 8
Cassette Player
Listening to a tape 9
Playing a tape in various functions 10
Radio
Storing stations automatically Best Tuning Memory (BTM). 10
Receiving the stored stations. 11
Storing only the desired stations 11
Storing station names Station Memo. 12
Tuning in a station through a list -- List-up 12
Other Functions
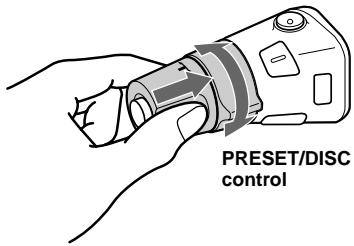
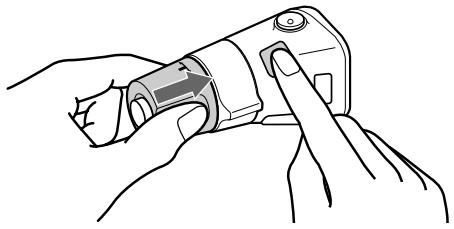
Using the rotary commander. 13
Adjusting the balance and fader 14
Quickly attenuating the sound. 14
Changing the sound and display settings - Menu 15
Setting the equalizer (EQ3) 15
Setting the Dynamic Soundstage Organizer (DSO) 16
CD/MD Unit (optional)
Playing a CD or MD. 17
Display items 17
Playing tracks repeatedly -Repeat Play. 18
Playing tracks in random order Shuffle Play. 18
Labelling a CD
— Disc Memo 19
Locating a disc by name -List-up. 20
Additional Information
Maintenance 20
Removing the unit. 22
Specifications 23
Troubleshooting 24
Error displays/Messages 25
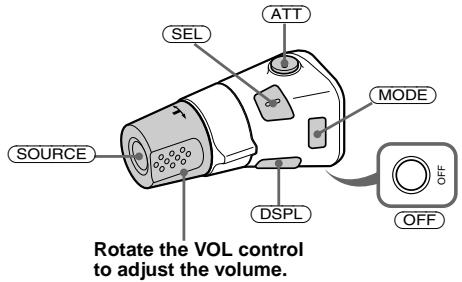
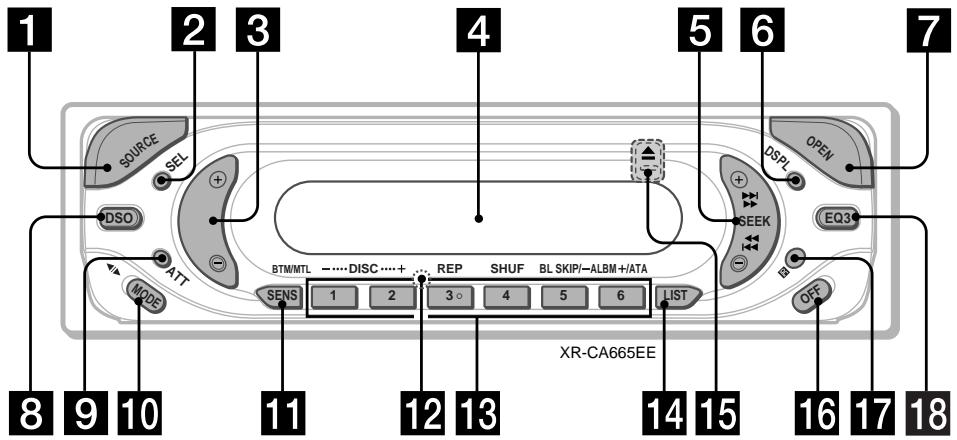
Location of controls
Refer to the pages listed for details.

SOURCE (Power on/Tape/Radio/CD/ MD) button
Selecting the source
2 SEL (select) button
Selecting items.
3 Volume + / - button
4 Display window
5 SEEK+/-button
Tape:
Fast-forwarding, reversing a tape Automatic Music Sensor
Radio:
Tuning in stations automatically/finding a station manually.
CD/MD:
Skipping tracks/fast-forwarding, reversing a track.
DSPL (display mode change) button 8,12,17,19
7 OPEN button 7,9
8 DSO button 16
9 ATT (attenuate) button 14
10 MODE (▶) button
Changing the operation
11 SENS/BTM/MTL button 10, 11
RESET button (located on the front side of the unit, behind the front panel) 7
13 Number buttons 15, 17
Tape:
③: REP 10
⑤: BL SKIP 10
⑥: ATA 10
Radio:
Storing the desired station on each number button.
CD (MP3 files)/MD:
①: DISC - 17
②: DISC + 17
③: REP 18
④: SHUF 18
MP3 files:
⑤: ALBM - 17
⑥: ALBM + 17
14 LIST button 12, 19, 20
15 (eject) button (located on the front side of the unit, behind the front panel) 9
16 OFF (Stop/Power off) button* 7, 9, 17
17 Receptor for the card remote commander
18 EQ3 button 15, 16
- Warning when installing in a car without an ACC (accessory) position on the ignition switch
After turning off the ignition, be sure to press and hold OFF on the unit until the display disappears.
Otherwise, the display does not turn off and this causes battery drain.
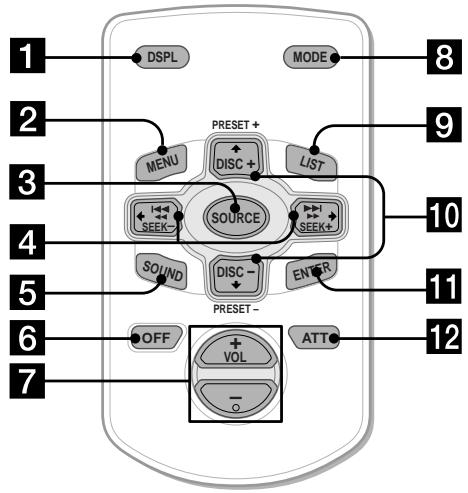
The corresponding buttons of the card remote commander control the same functions as those on this unit.
1 DSPL button
2 MENU button*
3 SOURCE button
4 SEEK (+ / - ) buttons
5 SOUND button
6 OFF button
7 VOL (+ / - ) buttons
8 MODE button
9 LIST button
10 DISC/PRESET (+ / - ) buttons
11 ENTER button
12 ATT button
- Not available for this unit
Note
If the display disappears by pressing OFF, it cannot be operated with the card remote commander unless SOURCE on the unit is pressed, or a cassette tape is inserted to activate the unit first.
Tip
Refer to "Replacing the lithium battery" for details on how to replace the batteries (page 21).
Precautions
- If your car was parked in direct sunlight, allow the unit to cool off before operating it.
- If no power is being supplied to the unit, check the connections first. If everything is in order, check the fuse.
- If no sound comes from the speakers of a 2-speaker system, set the fader control to the centre position.
- When a tape is played back for a long period, the cassette may become warm because of the built-in power amplifier. However, this is not a sign of malfunction.
If you have any questions or problems concerning your unit that are not covered in this manual, please consult your nearest Sony dealer.
To maintain high quality sound
Be careful not to splash juice or other soft drinks onto the unit or tapes.
Notes on Cassettes
Cassette care
- Do not touch the tape surface of a cassette, as any dirt or dust will contaminate the heads.
- Keep cassettes away from equipment with built-in magnets such as speakers and amplifiers, as erasure or distortion on the recorded tape could occur.
- Do not expose cassettes to direct sunlight, extremely cold temperatures, or moisture.
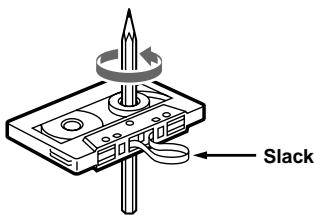
- Slack in the tape may cause the tape to be caught in the machine. Before you insert the tape, use a pencil or similar object to turn the reel and take up any slack.
Distorted cassettes and loose labels can cause problems when inserting or ejecting tapes. Remove or replace loose labels.

- The sound may become distorted while playing the cassette. The cassette player head should be cleaned after each 50 hours of use.
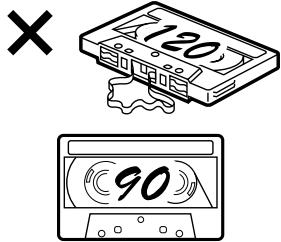
The use of cassettes longer than 90 minutes is not recommended except for long continuous play
The tape used for these cassettes is very thin and tends to stretch easily.
Frequent playing and stopping of these tapes may cause them to become entangled in the cassette deck mechanism.

Getting Started
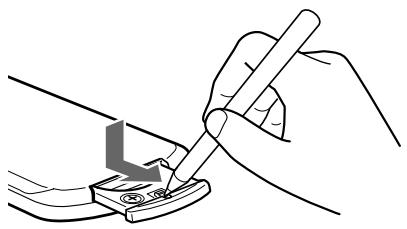
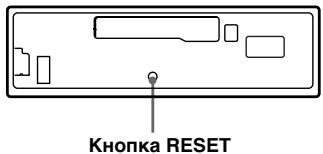
Resetting the unit
Before operating the unit for the first time, or after replacing the car battery or changing the connections, you must reset the unit.
Remove the front panel and press the RESET button with a pointed object, such as a ballpoint pen.

Note
Pressing the RESET button will erase the clock setting and some stored contents.
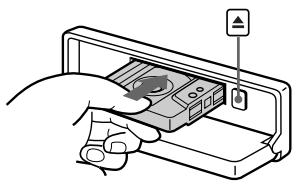
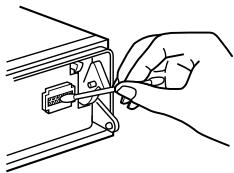
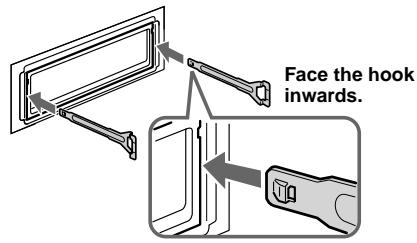
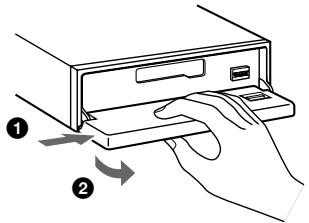
Detaching the front panel
You can detach the front panel of this unit to protect the unit from being stolen.
Caution alarm
If you turn the ignition switch to the OFF position without removing the front panel, the caution alarm will beep for a few seconds.
If you connect an optional amplifier and do not use the built-in amplifier, the beep sound will be deactivated.
1 Press (OFF)*.
Tape playback or radio reception stops (the key illumination and display remain on).
- If your car has no ACC position on the ignition switch, be sure to turn the unit off by pressing OFF until the display disappears to avoid car battery drain.
2 Press , then slide the front panel to the right, and gently pull out the left end of the front panel.
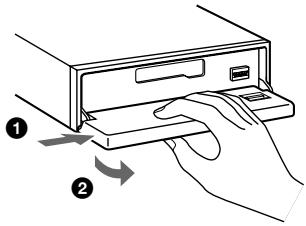
Notes
- If you detach the panel while the unit is still turned on, the power will turn off automatically to prevent the speakers from being damaged.
- Do not drop or put excessive pressure on the front panel and its display window.
- Do not subject the front panel to heat/high temperature or moisture. Avoid leaving it in a parked car or on a dashboard/rear tray.
Tip
When carrying the front panel with you, use the supplied front panel case.
continue to next page
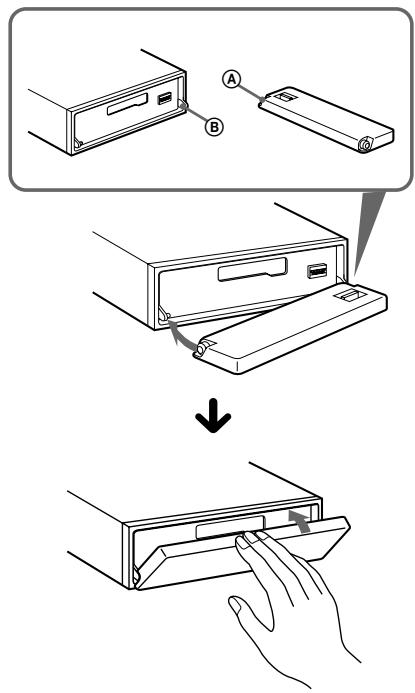
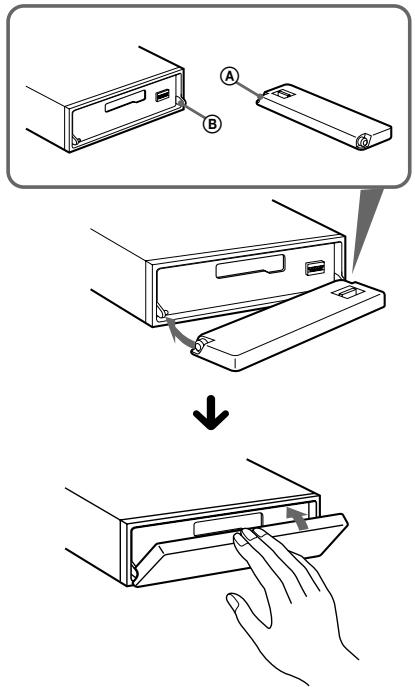
Attaching the front panel
Place hole A of the front panel onto the spindle B on the unit, then lightly push the left side in.
Note
Do not put anything on the inner surface of the front panel.
Setting the clock
The clock uses a 24-hour digital indication.
Example: To set the clock to 10:08
1 Press DSPL for 2 seconds.
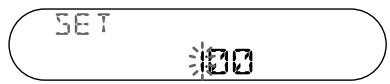
The hour indication flashes.
Press the volume + / - button to set the hour.

SET

Press SEL.
SET

The minute indication flashes.
Press the volume + / - button to set the minute.

SET

2 Press DSPL.

The clock starts.
After the clock setting is completed, the display returns to normal play mode.
Cassette Player
Listening to a tape
1 Press and insert a cassette.
Playback starts automatically.
2 Close the front panel.
If a cassette is already inserted, press SOURCE repeatedly until "FWD" or "REV" appears to start playback.
FWD: The side facing up is played.
REV: The side facing down is played.
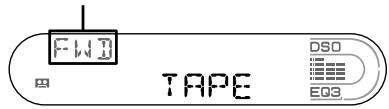
The side facing up is played.

The side facing down is played.
| To | Press |
| Change the tape's playback direction | MODE (▲▶) |
| Stop playback | OFF |
| Eject the cassette | OPEN then ▲ |
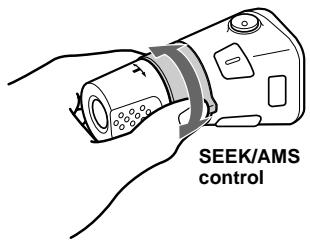
Fast-winding the tape
During playback, press and hold either side of (SEEK).

Fast-forward
Rewind
To start playback during fast-forwarding or rewinding, press MODE
Locating a specific track
Automatic Music Sensor (AMS)
During playback, press either side of (SEEK) momentarily for each track you want to skip.
You can skip up to nine tracks at one time.

To locate succeeding tracks
To locate preceding tracks
Note
The AMS function may not work when:
- the blanks between tracks are shorter than 4 seconds.
- there is noise between tracks.
- there are long sections of low volume or quiet sections.
Playing a tape in various functions
You can play the tape in various functions:
- REP (Repeat Play) repeats the current track.
- BL SKIP (Blank Skip) skips blanks longer than 8 seconds.
- ATA (Automatic Tuner Activation) turns on the tuner automatically when fast-winding the tape.
- MTL (Metal) lets you play a metal or CrO2 tape.
During tape playback, press the desired function button repeatedly until "ON" in the display appears.
Function buttons
③: REP
⑤: BL SKIP
⑥: ATA
(SENS):MTL
Example: ATA function
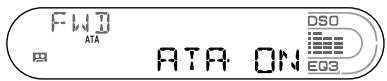
ATA function starts.
To return to normal play mode, select "OFF."
Radio
The unit can store up to 6 stations per band (FM1, FM2, FM3*, AM1 and AM2).
Caution
When tuning in stations while driving, use Best Tuning Memory to prevent accidents.
- FM3 tuning range is 65 to 74 MHz (at 30 kHz step).
Storing stations automatically
Best Tuning Memory (BTM)
The unit selects the stations with the strongest signals within the selected band, and stores them in the order of their frequency.
1 Press SOURCE repeatedly to select the radio.
2 Press MODE repeatedly to select the band.
3 Press (SENS) (BTM) for 2 seconds. A beep sounds when the setting is stored.
Notes
- If only a few stations can be received due to weak signals, some number buttons will retain their former settings.
- When a number is indicated in the display, the unit starts storing stations from the one currently displayed.
Receiving the stored stations
1 Press (SOURCE) repeatedly to select the radio.
2 Press MODE repeatedly to select the band.
3 Press the number button (1 to 6) on which the desired station is stored.
If preset tuning does not work
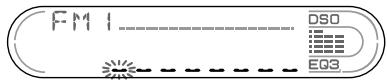
Automatic tuning/Local Seek Mode
Automatic tuning:
Press either side of (SEEK) to search for the station (automatic tuning).
Scanning stops when the unit receives a station. Repeat until the desired station is received.
Local Seek Mode:
If the automatic tuning stops too frequently, press (SENS) repeatedly until "LOCAL-ON" appears.
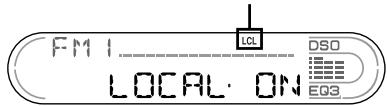
"LCL" indicator is displayed.
Only the stations with relatively strong signals will be tuned in.
To cancel the local seek mode, select "LOCAL-OFF."
Tip
If you know the frequency of the station you want to listen to, press and hold either side of (SEEK) to locate the approximate frequency, then press (SEEK) repeatedly to fine adjust to the desired frequency (manual tuning).
If FM stereo reception is poor
— Monaural Mode
During radio reception, press (SENS) repeatedly until "MONO-ON" appears.
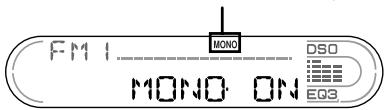
"MONO" indicator is displayed.
The sound improves, but becomes monaural ("ST" disappears).
To return to normal play mode, select "MONOFF."
Tip
If FM broadcasts are difficult to hear, set DSO to "OFF" (page 16).
Storing only the desired stations
You can manually preset the desired stations on any chosen number button.
1 Press SOURCE repeatedly to select the radio.
2 Press MODE repeatedly to select the band.
3 Press either side of (SEEK) to tune in the station that you want to store.
4 Press the desired number button (① to ⑥) for 2 seconds until "MEM" appears.
The number button indication appears in the display.
Note
If you try to store another station on the same number button, the previously stored station will be erased.
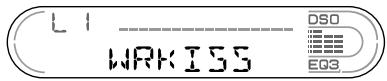
Storing station names
Station Memo
You can assign a name to each radio station and store it in memory. The name of the station currently tuned in appears in the display. You can assign a name using up to 8 characters for a station.
1 Tune in a station whose name you want to store.
2 Press LIST for 2 seconds.
3 Enter the characters.
Press the volume + / - button to select the desired character.
$$ \begin{array}{l} \mathsf {A} \longleftrightarrow \mathsf {B} \longleftrightarrow \mathsf {C} \dots \longleftrightarrow 0 \longleftrightarrow 1 \longleftrightarrow 2 \dots \longleftrightarrow \ + \longleftrightarrow - \longleftrightarrow * \dots \longleftrightarrow - ^ {* 1} \longleftrightarrow \mathsf {A} \end{array} $$
*1 (blank space)
Press SEL after locating the desired character.
The next character flashes.
3 Repeat steps 1 and 2 to enter the entire name.
4 To return to normal radio reception mode, press LIST for 2 seconds.
Tip Simply overwrite or enter " " to correct or erase a name.
Erasing the station name
1 Press LIST for 2 seconds.
2 Press DSPL for 2 seconds.
The stored names will appear.
3 Press the volume + / - button repeatedly to select the station name you want to erase.
4 Press SEL for 2 seconds.
The name is erased.
Repeat steps 3 to 4 if you want to erase other names.
5 Press LIST for 2 seconds.
The unit returns to normal radio reception mode.
Note
If you have already erased all of the station names, "NO DATA" appears in step 4.
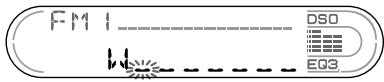
Tuning in a station through a list
List-up
1 During radio reception, press LIST momentarily.
The frequency or the name assigned to the current station appears in the display.
2 Press LIST repeatedly until you find the desired station.
If no name is assigned to the selected station, the frequency appears in the display.
3 Press either side of (SEEK) to tune in the desired station.
Other Functions
You can also control the unit with a rotary commander (optional).
Using the rotary commander
First, attach the appropriate label depending on how you want to mount the rotary commander. The rotary commander works by pressing buttons and/or rotating controls.
By pressing buttons
| Press | To |
| SOURCE | Change source (Radio/CD*1/MD*1/Tape)/ Power on |
| MODE | Change operation (Radio band/CD unit*1/MD unit*1/Tape playback direction) |
| ATT | Attenuate sound |
| OFF*2 | Stop playback or radio reception/Power off |
| SEL | Adjust and select |
| DSPL | Change the display item |
By rotating the control
Rotate and release to:
-Locate the beginning of tracks on the tape.
- Tune in stations automatically.
- Skip tracks on the disc.*1
Rotate, hold, and release to:
- Fast-wind the tape.
Find a station manually. - Fast-forward/reverse a track.*1
Tip
To start playback while fast-winding the tape, press MODE.
By pushing in and rotating the control
Push in and rotate the control to:
-Receive preset stations.
- Change discs during CD (MD) playback*1.
During playback of a CD containing MP3 files*3
Push in and repeat rotating quickly to:
- Change discs one by one.
Push in, then rotate and hold to:
- Change albums.
1 Only if the corresponding optional equipment is connected.
2 If your car has no ACC (accessory) position on the ignition key switch, after turning off the ignition, be sure to press and hold OFF until the display disappears.
*3 Available only when optional CD unit with the MP3 file control function is connected.
continue to next page
Changing the operative direction
The operative direction of controls is factory-set as shown below.

If you need to mount the rotary commander on the right hand side of the steering column, you can reverse the operative direction.
Press SEL for 2 seconds while pushing the VOL control.
Adjusting the balance and fader
You can adjust the balance and fader.
1 Press (SEL) repeatedly until "BAL" or "FAD" appears.
Each time you press , the item changes as follows:
LOW* MID* HI*
BAL (left-right) FAD (front-rear)
- When EQ3 is activated (page 15).
2 Press the volume + / - button to adjust the selected item.
Note
Adjust within 3 seconds after selecting the item.
Quickly attenuating the sound
Press ATT.
After "ATT-ON" momentarily appears, the "ATT" appears in the display.
To restore the previous volume level, press ATT again.
Tip
When the interface cable of a car telephone is connected to the ATT lead, the unit decreases the volume automatically when a telephone call comes in (Telephone ATT function).
Changing the sound and display settings
—Menu
The following items can be set:
SET(SetUp)
A.SCRL (Auto Scroll)* (page 17).
- M.DSPL (Motion Display) — to select the Motion Display mode from "1," "2," and "OFF."
- Select "1" to show decoration patterns in the display and activate Demo display.
- Select "2" to show decoration patterns in the display and deactivate Demo display.
- Select "OFF" to deactivate the Motion Display.
- BEEP — to turn the beeps on or off.
Selecting the desired item
Press SEL and the desired preset number button simultaneously.
SEL ^+ 3:A.SCRL*
SEL ^+ 4:M.DSPL
SEL ^+ 6: BEEP
- When no CD or MD is playing, this item will not appear.
After the mode setting completed, the display returns to normal play mode.
Note
The displayed item will differ depending on the source.
To cancel the item, press SEL and the preset number button simultaneously again.
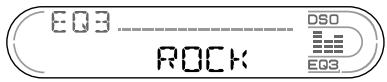
Setting the equalizer (EQ3)
You can select an equalizer curve for 7 music types (XPLOD, VOCAL, CLUB, JAZZ, NEWAGE, ROCK, CUSTOM, and OFF (equalizer OFF)).
You can store a different equalizer setting for each source.
Selecting the equalizer curve
1 Press (SOURCE) to select a source (Radio, Tape, CD or MD).
2 Press (EQ3) repeatedly until the desired equalizer curve.
Each time you press 3 , the item changes.

To cancel the equalizing effect, select "OFF."
continue to next page
Adjusting the equalizer curve
You can store and adjust the equalizer settings for different tone ranges.
1 Press (SOURCE) to select a source (Radio, Tape, CD or MD).
2 Press (EQ3) repeatedly to select the desired equalizer curve.
3 Adjusting the equalizer curve.
Press SEL repeatedly to select the desired tone range.
Each time you press (SEL), the tone ranges changes.
$$ \text {L O W} \rightarrow \text {M I D} \rightarrow \text {H I} (\rightarrow \text {B A L} \rightarrow \text {F A D}) $$
Press the volume + / - button repeatedly to adjust to the desired volume level.
The volume level is adjustable by 1 dB steps from -10dB to +10dB .
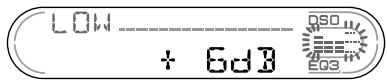
3 Repeat step 1 and 2 to adjust the equalizer curve.
To restore the factory-set equalizer curve, press SEL for 2 seconds.
After 3 seconds, the display returns to normal play mode.
Note
When EQ3 is set to "OFF," you cannot adjust the equalizer settings.
Setting the Dynamic Soundstage Organizer (DSO)
If your speakers are installed into the lower part of the doors, the sound will come from below and may not be clear.
The DSO (Dynamic Soundstage Organizer) function creates a more ambient sound as if there were speakers above the dashboard (virtual speakers).
You can store the DSO setting for each source.
DSO mode and image of virtual speakers
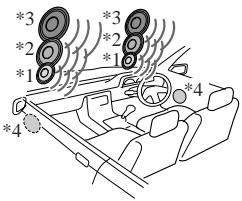
1 DSO-1
2 DSO-2
3 DSO-3
4 DSO-OFF
1 Press (SOURCE) to select a source (Radio, Tape, CD or MD).
2 Press (DSO) repeatedly until the desired DSO setting appears.
Each time you press , the DSO setting changes.
To cancel the DSO function, select "OFF."
Notes
- Depending on the type of car interior or type of music, DSO may not have a desirable affect.
- If FM broadcasts are difficult to hear, set DSO to "OFF."
CD/MD Unit (optional)
This unit can control external CD/MD units (optional).
If you connect an optional CD unit with the CD TEXT function and the CUSTOM FILE function, the CD TEXT information will appear in the display when you play a CD TEXT disc.
If you connect MP3 playable CD units (e.g. MP3 CD changer), you can play MP3 files; compressed audio files with quality of sound.
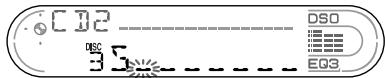
Playing a CD or MD
1 Press (SOURCE) repeatedly to select "CD" or "MD (MS*)".
2 Press MODE repeatedly until the desired unit appears. CD/MD playback starts.
- MS: MG Memory Stick System-up Player MGS-X1
| To | Press |
| Stop playback | OFF |
| Skip discs | 1 (-) |
| - Disc selection | 2 (+) |
| Skip albums | 5 (-) |
| -album selection | 6 (+) |
| Skip tracks | SEEK (↓/▶) |
| -Automatic Music Sensor | [once for each track] |
| Fast-forward/reverse | SEEK (▲/▶) |
| -Manual Search | [hold to desired point] |
When the last file on the disc is over
The file number indication returns to "1," and playback restarts from the first file of the disc.
Notes
- If a disc with no MP3 files (tracks) is inserted, "CD" appears in the disc type display to start playback but there will be no sound.
- Before playing a track, this unit reads all track and album information on the disc. Depending on the track structure, it may take more than a minute before play begins. During this time, "READ" is displayed. Please wait for play to start automatically when the reading is complete.
Cautions when connecting MGS-X1 and MD unit(s) This unit recognizes MGS-X1 as an MD unit.
- When you want to play MGS-X1, press (SOURCE) to select "MS" or "MD." If "MS" appears in the source display, MGS-X1 starts to play. If "MD" appears in the source display, press (MODE) to select "MS," to start playback.
- When you want to play an MD unit, press SOURCE to select "MD" or "MS." If your desired MD unit appears in the source display, it starts to play. If "MS" or another MD unit appears in the source display, press MODE to select your desired MD unit, to start playback.
Display items
When the disc/album/track changes, any prerecorded title*1 of the new disc/album/track is automatically displayed (if the Auto Scroll function is set to "ON," names exceeding 8 characters will be scrolled (page 15)).
| To | Press |
| Switch display item | DSPL |
1 When pressing DSPL, "NO NAME" indicates that there is no disc name, album name, or track name, and "NO ID3" indicates that there is no ID3 tag.
2 While displaying an ID3 tag, the album number does not appear.
3 If the disc has been labelled by this unit using the CUSTOM FILE function, Disc Memo is displayed preferentially.
4 Only for CD TEXT discs with the artist name.
*5 Available only when an MP3 file is played.
continue to next page
Notes
- Some characters cannot be displayed. Characters and signs which cannot be displayed appear as “*.”
- For some CD TEXT discs or ID3 tags with very many characters, information may not scroll.
- This unit cannot display the artist name for each track of a CD TEXT disc.
Tip
When A.SCRL (Auto Scroll) is set to "OFF" and the disc/album/track name is changed, the disc/album/ track name does not scroll.
Playing tracks repeatedly
— Repeat Play
You can select:
- REP-TRACK — to repeat a track.
- REP-ALBM* — to repeat an album.
-
REP-DISC — to repeat a disc.
-
Available only when optional CD unit with the MP3 file control function is connected.
During playback, press ③ (REP) repeatedly until the desired setting appears in the display.
Repeat Play starts.
To return to normal play mode, select "REPOFF."
Playing tracks in random order
Shuffle Play
You can select:
- SHUF-ALBM*1 — to play the albums in the current optional CD unit with the MP3 data control function in random order.
- SHUF-DISC — to play the tracks on the current disc in random order.
- SHUF-CHGR — to play the tracks in the current optional CD (MD) unit in random order.
- SHUF-ALL*2 - to play all the tracks in all the connected CD (MD) units in random order.
1 Available only when optional CD unit with the MP3 file control function is connected.
2 Available only when two or more optional CD (MD) units are connected.
During playback, press (4) (SHUF) repeatedly until the desired setting appears in the display.
Shuffle Play starts.
To return to normal play mode, select "SHUFOFF."
Note
"SHUF-ALL" will not shuffle tracks between CD units and MD units.
Labelling a CD
—Disc Memo (For a CD unit with the CUSTOM FILE function)
You can label each disc with a custom name (Disc Memo). You can enter up to 8 characters for a disc. If you label a CD, you can locate the disc by name (page 20).
1 Start playing the disc you want to label in a CD unit with the CUSTOM FILE function.
2 Press LIST for 2 seconds.
The unit will repeat the disc during the labelling procedure.
3 Enter the characters.
Press the volume + / - button to select the desired character.

*1 (blank space)
Press SEL after locating the desired character.
The next character flashes.
Repeat steps 1 and 2 to enter the entire name.
4 To return to normal play mode, press LIST for 2 seconds.
Tips
- Simply overwrite or enter " - " to correct or erase a name.
- You can label CDs on a unit without the CUSTOM FILE function if that unit is connected along with a CD unit that has the function. The Disc Memo will be stored in the memory of the CD unit with the CUSTOM FILE function.
Note
REP-TRACK/SHUF play is suspended until the Name Edit is complete.
Viewing the Disc Memo
As a display item, the Disc Memo always takes priority over any original CD TEXT information.
| To | Press |
| View | DSPL during CD/CD TEXT disc playback |
Tip
Other items can be displayed (page 17).
Erasing the Disc Memo
1 Press SOURCE repeatedly to select "CD."
2 Press MODE repeatedly to select the CD unit storing the Disc Memo.
3 Press LIST for 2 seconds.
4 Press DSPL for 2 seconds. The stored names will appear.
5 Press the volume + / - button repeatedly to select the disc name you want to erase.
6 Press SEL for 2 seconds.
The name is erased.
Repeat steps 5 and 6 if you want to erase other names.
7 Press LIST for 2 seconds.
The unit returns to normal play mode.
Notes
- When the Disc Memo for a CD TEXT disc is erased, the original CD TEXT information is displayed.
- If you cannot find the Disc Memo you want to erase, try selecting a different CD unit in step 2.
- If you have already erased all of the Disc Memo, the unit returns to normal CD play mode in step 4.
Locating a disc by name
List-up (For a CD unit with the CD TEXT/ CUSTOM FILE function, or an MD unit)
You can use this function for discs that have been assigned custom names*1 or for CD TEXT discs*2.
1 Locating a disc by its custom name: when you assign a name for a CD (page 19) or an MD.
2 Locating discs by the CD TEXT information: when you play a CD TEXT disc on a CD unit with the CD TEXT function.
1 Press LIST momentarily.
The name assigned to the current disc appears in the display.
2 Press LIST repeatedly until you find the desired disc.
3 Press either side of SEEK to play the disc.
Notes
- Once a disc name has been displayed for 5 seconds, the display goes back to its normal playback mode.
- The track names are not displayed during MD playback.
- If there are no discs in the magazine, "NO DISC" appears in the display.
- If a disc has not been assigned a custom file, "NO NAME" appears in the display.
- If the disc information has not been read by the unit, "NOT READ" appears in the display. To load the disc, first press the number button, then choose the disc that has not been loaded.
- The information appears only in upper cases. There are also some letters which cannot be displayed (during MD playback).
Additional Information
Maintenance
Fuse replacement
When replacing the fuse, be sure to use one matching the amperage rating stated on the original fuse. If the fuse blows, check the power connection and replace the fuse. If the fuse blows again after replacement, there may be an internal malfunction. In such a case, consult your nearest Sony dealer.
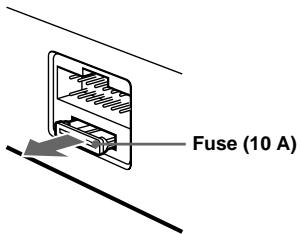
Warning
Never use a fuse with an amperage rating exceeding the one supplied with the unit as this could damage the unit.
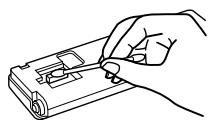
Cleaning the connectors
The unit may not function properly if the connectors between the unit and the front panel are not clean. In order to prevent this, detach the front panel (page 7) and clean the connectors with a cotton swab dipped in alcohol. Do not apply too much force. Otherwise, the connectors may be damaged.
Main unit
Back of the front panel
Notes
- For safety, turn off the ignition before cleaning the connectors, and remove the key from the ignition switch.
- Never touch the connectors directly with your fingers or with any metal device.
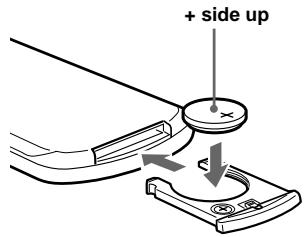
Replacing the lithium battery
Under normal conditions, batteries will last approximately 1 year. (The service life may be shorter, depending on the conditions of use.) When the battery becomes weak, the range of the card remote commander becomes shorter. Replace the battery with a new CR2025 lithium battery. Use of any other battery may present a risk of fire or explosion.

Notes on lithium battery
- Keep the lithium battery out of the reach of children. Should the battery be swallowed, immediately consult a doctor.
- Wipe the battery with a dry cloth to assure a good contact.
- Be sure to observe the correct polarity when installing the battery.
- Do not hold the battery with metallic tweezers, otherwise a short-circuit may occur.
WARNING
Battery may explode if mistreated.
Do not recharge, disassemble, or dispose of in fire.
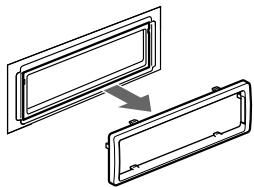
Removing the unit
1 Remove the protection collar.
Detach the front panel (page 7).
2 Engage the release keys together with the protection collar.
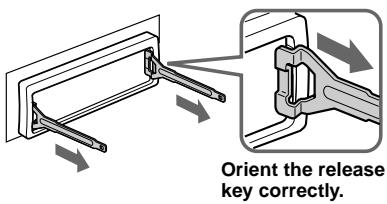
3 Pull out the release keys to remove the protection collar.
2 Remove the unit.
Insert both release keys together until they click.
Pull the release keys to unseat the unit.
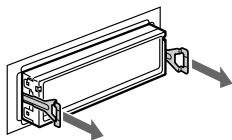
Slide the unit out of the mounting.

Specifications
Cassette Player section
Tape track
4-track 2-channel stereo
Wow and flutter
0.08% (WRMS)
Frequency response
30 - 18,000Hz
Signal-to-noise ratio
| Cassette type | |
| TYPE II, IV | 61 dB |
| TYPE I | 58 dB |
Tuner section
FM
Tuning range
FM1/FM2:
87.5-108MHz
(at 50kHz step)
FM3:
65-74MHz
(at 30kHz step)
Aerial terminal
External aerial connector
Intermediate frequency
10.7 MHz/450 kHz
Usable sensitivity
9 dBf
Selectivity
75 dB at 400 kHz
Signal-to-noise ratio
67 dB (stereo),
69 dB (mono)
Harmonic distortion at 1kHz
0.5% (stereo),
0.3% (mono)
Separation
35 dB at 1 kHz
Frequency response
30 - 15,000Hz
AM
Tuning range
531-1,602 kHz
Aerial terminal
External aerial connector
Intermediate frequency
10.7 MHz/450 kHz
Sensitivity
30 V
Power amplifier section
Outputs
Speaker outputs
Speaker impedance
(sure seal connectors)
Maximum power output
4-8ohms
50W× 4 (at 4 ohms)
General
Outputs
Audio outputs (rear)
Power aerial relay control lead
Power amplifier control lead
Inputs
Telephone ATT control terminal
BUS control input terminal
BUS audio input terminal Remote controller input terminal
Aerial input terminal
Tone controls
Low:
± 10 dB at 60Hz (XPLOD) Mid:
± 10 dB at 1kHz (XPLOD) High:
± 10 dB at 10kHz (XPLOD)
12 V DC car battery (negative earth)
Dimensions
Approx. 178× 50× 180mm (w / h / d)
Mounting dimensions
Approx. 182× 53× 161mm (w / h / d)
Mass
Approx. 1.2kg
Supplied accessories
Card remote commander RM-X114
Parts for installation and connections (1 set)
Front panel case (1)
Optional accessories
Rotary commander RM-X4S
BUS cable (supplied with an RCA pin cord)
RC-61 (1m) , RC-62 (2m)
CD changer (10 discs)
CDX-757MX, CDX-656X
CD changer (6 discs)
CDX-T70MX, CDX-T69X
MD changer (6 discs)
MDX-66XLP
MG-MS System-up Player
MGS-X1
DVD changer
DVX-100S
Source selector
XA-C30
AUX-IN Selector
XA-300
Note
This unit cannot be connected to a digital preamplifier or an equalizer which is Sony BUS system compatible.
Design and specifications are subject to change without notice.
Troubleshooting
The following checklist will help you remedy problems you may encounter with your unit. Before going through the checklist below, check the connection and operating procedures.
General
No sound.
- Press the volume + button to adjust the volume.
- Cancel the ATT function.
- Set the fader control to the centre position for a 2-speaker system.
The contents of the memory have been erased.
- The RESET button has been pressed. Store again into the memory.
- The power cord or battery has been disconnected.
- The power connecting cord is not connected properly.
No beep sound.
- The beep sound is cancelled (page 15).
- An optional power amplifier is connected and you are not using the built-in amplifier.
The display disappears from/does not appear in the display window.
- The display disappears if you press and hold OFF.
Press and hold again until the display appears. - Remove the front panel and clean the connectors. See "Cleaning the connectors" (page 21) for details.
Stored stations and correct time are erased. The fuse has blown.
Makes noise when the ignition key is in the ON, ACC, or OFF position.
The leads are not matched correctly with the car's accessory power connector.
No power is being supplied to the unit.
- Check the connection. If everything is in order, check the fuse.
- The car does not have an ACC position. Press SOURCE (or insert a cassette) to turn on the unit.
The power is continuously supplied to the unit.
The car does not have an ACC position.
The power aerial does not extend.
The power aerial does not have a relay box.
Tape playback
The sound is distorted.
The tape head is contaminated.
Clean the head with a commercially available dry-tape cleaning cassette.
The AMS does not operate correctly.
- There is noise in the space between tracks.
- A blank space is too short (less than 4 seconds).
- A long pause, or a passage of low frequencies or very low sound level is treated as a blank space.
Radio reception
Preset tuning is not possible.
- Store the correct frequency in the memory.
The broadcast signal is too weak.
The stations cannot be received.
The sound is hampered by noises.
- Connect a power aerial control lead (blue) or accessory power supply lead (red) to the power supply lead of a car's aerial booster. (Only when your car has built-in FM/AM aerial in the rear/side glass.)
- Check the connection of the car aerial.
- The auto aerial will not go up. Check the connection of the power aerial control lead.
- Check the frequency.
- When the DSO mode is on, the sound is sometimes hampered by noises.
Set the DSO mode to "OFF" (page 16).
Automatic tuning is not possible.
- The local seek mode is set to "ON."
Set the local seek mode to "OFF" (page 11). - The broadcast signal is too weak.
Perform manual tuning.
The "ST" indication flashes.
- Tune in the frequency accurately.
The broadcast signal is too weak.
Set to the monaural reception mode (page 11).
A programme broadcast in stereo is heard in monaural.
The unit is in monaural reception mode.
Cancel monaural reception mode (page 11).
CD/MD playback
The sound skips.
Dirty or defective disc.
Error displays/Messages
Error displays
(For this unit and optional CD/MD changers) The following indications will flash for about 5 seconds, and an alarm sound will be heard.
BLANK*1
No tracks have been recorded on an MD.*2
Play an MD with recorded tracks on it.
ERROR\*1
A CD is dirty or inserted upside down.*2
Clean or insert the CD correctly.
An MD does not playback because of some problem.*2
Insert another MD.
- A CD/MD cannot play because of some problem.
Insert another CD/MD.
FAILURE
The connection of speakers/amplifiers is incorrect.
See the installation guide manual of this model to check the connection.
HITEMP
The ambient temperature is more than 50^
Wait until the temperature goes down below 50^
NO DISC
No disc is inserted in the CD/MD unit.
Insert discs in the CD/MD unit.
NO MAG
The disc magazine is not inserted in the CD/ MD unit.
Insert the magazine in the CD/MD unit.
NO MUSIC
A CD which is not a music file is inserted in the MP3 playable CD unit.
Insert a music CD in the MP3 playable CD unit.
NOT READY
The lid of the MD unit is open or the MDs are not inserted properly.
Close the lid or insert the MDs properly.
OFFSET
There may be an internal malfunction.
Check the connection. If the error indication remains on in the display, consult your nearest Sony dealer.
RESET
The CD/MD unit cannot be operated because of some problem.
Press the RESET button on the unit.
1 When an error occurs during playback of a CD or MD, the disc number of the CD or MD does not appear in the display.
2 The disc number of the disc causing the error appears in the display.
If these solutions do not help improve the situation, consult your nearest Sony dealer.
Messages
L.SEEK +/-
The Local Seek mode is on during automatic tuning (page 11).
"or"
You have reached the beginning or the end of the disc and you cannot go any further.
POn3dpaBnaem CnokynkoI
Blaoradapm Bac 3a To, YTO Bbl ocTaHOBnIb CBOI BblOp Ha 3TOM KaccETHom npOnrpbIbATEne Sony. DaHHbI npOnrpbIbATEnb IMeET prd HOBbIX xapaKTepeNCTNK:
- BO3MOXHOCTb NOKJIIOUeHnA
ДОПОЛНTEЛьнБИХ ПОИргьВaTeЛeN
КOMпАКТ-/MнHи-ДИССКOB (KaK OБынБИX,
ТAK И C BO3MOXHOCTbIO CMEHblДИССКOB)1.
-Инфорmaця CD TEXT (отобрахаемаг, Кordа дисс к с CD TEXT2 ВОСПОНЗБОДТСА на поКЛIOЧЕНМОДОПОННТЕЛВHOM РОПИРьВАТENE КOMпАКТ-DИССКOB C Функции CD TEXT).
-Пилагаemoe BCNOMORAteIbHoe yctpoiCTBOДЯУnpaBNeHnЯ ПульТ ДИСТАнцIOHHOуnpaBЛeHnЯ RM-X114
-ДОПОЛНТЕЛБHоВ BCNOMORAteLbHoe yCTPOIcTBO DЯУпавлени ПоворOTьДиСТанцИнHHы nevеклIOчATEь RM-X4S
1 Danhoe yctpojctBO pa6oTaET TOnbKO B KOMPJIeKTe C n3dienHmФnMpbl Sony.
2ДиСКс CD TEXT - 3TO 3ByKOBоМКПаKT-ДИСК, сОдржаши тakую Инфорmaши, КАн ha3BaHnE ДИСКа, ИМЯ ИСПONHITeЯ И Ha3BaHnI KOMNo3иц. ΘТа Инфорmaши запсаHA на ДИСКe.

Kaccetna CTpeofoHnuecka aBTOMaHTOJIa C dHaIa3OHOM FM/AM
CdenaHO TaunnaHne
I3roTOBHTeJIb: CoHn KopnpoeiH
AДпес: 6-7-35 КИТашинага, ШИнага-ba-Ky, Tokno 141-0001, Дноня
CopepkHne
PacnoJoxeHne opraHOB ynpaBHeHn 4
CoxpaHHe He Ha3BaHn paIIOCTaHcI -PamTb cTaHcI . 12
HactpoiKa paAnocTaHcIIO nO cIncky -ImeHNo IOnCK. 13
Dpyrne yHKuIN
IcnoJIb3OBAHHe IOBOpOTHOrO DnCTaHcIOHHOrO nepeKlNoUaTeJra 13
Hac troka baJahca n feJepa.... 15
Pe3Koe cHJKeHHe yPoBnI rpoMkoCTn 15
IImeHHeIe napaMeTpOb 3Byka I
DIncPJIeR
- MeHIO. 16
INdkaun/COo6ueHnO6 own6kax. 28
PacnoJoxeHne opraHOB ynpaBJeHnA
Iopnp6hee cm. Ha yka3aHHbIx Ctpaanazx.
NepemOTka JeHTbI BnpeD nn Ha3a.I.
6 KhoNka DSPL (H3MeHeHne pexnma dncnpe) 9,13,19,21
7 Khonka OPEN 8,9
8 Khonka DSO 17
9 Khonka ATT (npurnyuweHne 3Byka) 15
10 Khonka MODE (▶)Изменения оретацим
11 Khonka SENS/BTM/MTL 10, 11
12 Khonka RESET (pacnoIoxeHa noid nepednei naHeJIbIO) 7
13 HomepHbIe KhoNKn 16, 18 Kacceta:
③: pěxún REP 10
⑤:Функць BL SKIP 10
⑥:Фуннцая ATA 10
PaanopnpemHnK:
COxpaHHeHne HUxHOn paIIOcTaHcIM C Ha3HaueHnEM eN COOTBeTCTByIOeHOMepHOH KHOPIK.
KOMNaKT-DnCK (cФaIamn MP3)/MnHnDnCK:
①: DISC - 18
②: DISC + 18
③: pěkúm REP 19
④:pexum SHUF 20
Фаиbl MP3:
⑤: ALBM - 18
⑥: ALBM + 18
14 Khonka LIST 12, 20, 22
15 Khonka (n3BLeueHne nUcKa) (pacnoIooKeHa noI nepeJeHne paHeJIbIO) 9
16 Khonka OFF (CTon/Πιταήν Βυικλ) 8,9,18
17 DaTnK nyIbTa DnCTaHcNoHHoro ynpabJIeHHN
18 Khonka EQ3 16, 17
*Co6JIIOJaIteOCTOpOXHOCtB,BbIINJHAR yCTaHOBkyBaBTOMo6NJe,BKOTOPOM HET noJIOXKeHNAcc (npHaJLeXHocTn) B 3aMKe 3aXnraHn
Iocne BbIKIOUeHn 3axnraHn
O6BaTeJbHO HxKMITE KHOKNy OFF Ha
aannapate n ydepKuBaIte ee HaxaToi, noka
He norachET Dncnnei.
Ecnn 3Toro He cdeNaTb, dinCnneH He OKKnOuaeTcA, YTO MOKeT pInBecTn K pa3PnDke aKKyMnyIaTopa.
NylbT NcTaHcNoHnOуnpaBLeHnR M-X114
KhONKn Ha nyIbTe DnCTaHcNoHHOrO ynpabJIeHNr C TaKIMN Xe 06o3HaueHnMn, YTO n Ha yCtpoiCTBe, ynpabJIaIOT TEMn Xe yHKuMaMn.
1 Khonka DSPL
2 Khonka MENU*
3 Khonka SOURCE
4 KhoIKNSEEK (+ / - )
5 Khonka SOUND
6 Khonka OFF
7 KhonKu VOL (+ / - )
8 Khonka MODE
9 KHonka LIST
10 Khonkn DISC/PRESET (+ / - )
11 Khonka ENTER
12 Khonka ATT
- OTCYCTBYET Ha daHHOM yCTPOIÇTBE
PpmeaHne
Ecnn DnCnPbBbKlNooaTeTcH NaKathm KONKn OFF), IM HeBO3MOKHO bSyTe yInpabTbC NOMOULIOy NylbTa NdCTAHNOHORO YnpabJIeHH, NOKa Ha yCTpoiCTBe He bSyTe HaxKaTa KHONKa (SOURCE) INN CHaHa Ne 6yTe BCTaJIeHa KACCeta IIN PInBeDHeHH yCTpoiCTBa B aKtNBHOoe COCToHHe.
Cobet
IpoBObHe IHCTpyKunn no 3aMeHe 6atapeek cm. B pa3JeNe "3aMeHa NHTeBOB 6atapeyn" (ctp.23).
Mepbl
PpeOCTOPOXHOCTH
- Ecni aBTOMO6nJIb 6bl npinapKOBaH B COJHeuHOM McTe, He BKJIIOuaIte yCTpoiCTBO Do TEX nOp, NOKa OHO He OXlaDNTCra.
- Ecni Ha annapaT He noJaetc TnTaHne, cnaaI npOBepbTe coeDInHeHn. EcnBCE CoeDInHeHn BblONHeHbI npaBnIbHO, npOBepbTe npedoxpaHnteIb.
- EcIIN CnCTema c 2 rPOMKOrOBOpnteJIaMn He BOCIpOn3BOJNT HIKaKOro 3ByKa, yCTaHOBInTe peYJrTOp fEiJepa B CpeDHee nIoXKeHne.
Kaccetama MoKeT haRpeBaTbCnIocne IaNTeHbHOBO BOCnpON3BeDEHNr I3-3a BCTPOeHHOу yCNlNTeN MOuHcOtN. OdHaKo 3To He RbLnEeTc npN3HaKOM HeNCnPpABHoCTN.
B clyuae Bo3HKnHOBeHHa BOpocOB nI np6IeM, KacaUxNcra DaHoro yCTpOiCtBa, KOToPbIE He OINcaHbI B daHHOM pyKoBOOcTBe, o6paTntEc b K 6JIHXaIWeMy dIJIepy Sony.
He pekomehdyeTcHNCJb3ObaTbKacceTbI npoDOLXNITbHOCTBIO60nee 90 MNHT, KpOMeKdAJIaNtBHLBOHOr HENpepbIBHOBOCNPON3BedeHn.
B 3nKacceTax nCnoJb3yeTcOueHb TOHKaJIeHTa,KOTopar JERKO paCTrIINBaETcR.
Haactoe BkJIOUeHne BOCIpOu3BeEHHN I OCTaHOBKN pN INCnONb3OBaHm TaKnx KaccET MOXeT pPUBecTN K 3aNyTbIBaHHIO PJIeHNB JLEHTONpOTRAKHOM MEXaHH3Me.
Hauano pa60tbl
IpeyectaHObKa napametpoB yCTpOcTba
Ipeep nepBbIM BkHIOueHENm ycTpoiCTBa nIIN Pocne 3aMeHbI aBTOMo6nIbHO rAkkyMylIaTOpa, a TaKxE POCNE I3MeHENr CXEmbl NODKJIIOUeHNr CJeDyET nepeycTaHOBNT napaMeTpbl ycTpoiCTBa. CHnMMte NepeDnHO pAnHeN b HaxMMte KhONky RESET c nomOuBIO 3aoCTpeHHoro npedMeTa, HanpImep, shapNKOBOn pyKn.
PpmeaHne
ПиннхуннхКОннxRESET npOxCQoNT CTnpanHe yCTaHOBKВBpeMeHи HeKoTObIx dpynx 3aHeCEHbX B nMaMbT bnapMeTPOB.
Сятыпераğен панели
Ipy npedotbpaueHn Kpaxn annapaTa BblMOKeTe CHrTb C Hero nepeDHOIO nHaHeB.
Ppeynpexkaioi cnHnA
EcIn Bbl, noBepHyB KJIIOU 3axnraHn, nepeBeIe erO B nIoXeHne OFF, He OTcoEINHB NpeIeHNIO paHeIb, B TeueHne HECKoIbKnx CeKYHd 6yTeT CblIeH npeDynpeIteNbHbI 3ByKOBoCnHaJ. EcIn Bbl He nObl3yeTeCbCTpoEHbIM ycNITeMe, a NOkJIIOuAeTe DOnONHITeNbHbI, 3ByKOBO CNrHaJ BKJIIOUaTbCRe He 6yTeT.
1 HaxMnte KhONky (OFF)*.
Bocnpo3BeDeHne KaccTebl nI npnempaanopporpammpneKpaaaetcna (IOCBETKa KHOPOK INHINKAaHa naCnnee octaOTc).
* Ecnn B 3aMke 3axnraHna Ha aBTOMObnne HET
nonoKeHHA ACC, BO u36exHaHne pa3pRKn
aKKyMnTOpA He 3a6bTe BbIKNoHTb
annapat. Дя STOrO He06xOJMo HaxTaB n
yapedXnBaT KhoNkY OFF), NOKa He NoracHe
dncnne.
2 HaxmTe KlaBnUy OPEN, CdBnHbTe nepedHIOI NaHeJIb BnpaBO N CHMmTe ee, CJeRka NotaHyB Ha c6Ba Jebbl kpaI.
PpmeaHn
Ecnn BbI CHMae TaHeNb Prr BNKIOeHNOM nHTAHNN, OHO ABTomaTHueCKN OTKNIOaETC BO 136EXAHNE NOBpeJzHdHr promKOrOBOpTeJIeN.
- CtapaiTeBcHe pOAnbIepeHIO pAneHb. He NaabIiBaIte CnIIbKOM CnIbHO Ha peepHIO pAneHb Ie eoKOJIIO
He noDBepraTne nepedHIOIO naHEnb BO3dEcTBIO TENa/ByBICOKOI TEMNepatypbl NINN BnAxAHOCTN. CstaPaeTceb He OCTabJIrTe ERO BnpnnapKOBaHNo MaunHe NINn HApn6OpHoi DOCKe/NoLOUKe 3a 3aDnHM CNDEHbEM.
Cobet
Ecnn Bby ynochte nepedHIOU naHeb c co6oB, nomctnte ee B npnilraembl cneuaNbHbI qytnrp.
UctaHOBKa nepeDnei naHei
HaIoxnTe OTBepCTne AHa nepeDHei nAheJIn Ha UThbIpeK BHa annapate, a 3aTEM yCTaHOBnTe IeByIO CTOPOHy Ha MeCTo, CJIerKa Haxkab Ha Hee.
PpimeyaHne
He cTaBbTe HnHcero Ha BHyTpEHHIO NOBepXHOCTb nepeDneI naHEn.
YctaHOBka Yacob
YacbI daHHoro annapapa TMeHOT 24- YacOByU INDnKaUIO.
1 HaKmTe KhONKy (OPEN) n BCTaBbTe Kaccety.
Bocnpoun3BeDeneHaunetcnaBTOMaTnueckn.
2 3aKpoIe IpeepHIO IO naHeJIb.
EcIn KaccTea yKe BCTabJeHa,To nHa NaHauAna BOCpOn3BeDHeNnHECKOJIbKO pa3 HaXMMTe KONKy SOURCE),NOKa HnICnIe He NOBHTcHaDnCb“FWD”nn“REV”
FWD:BOCpOuN3BODnTcraCTOpOHa, 06paueHHa BBepx.
REV: BOCIPON3BODNTCACTOPOHA, 06paueHHa BHN3.
Bocnpon3bOoNTcTcSTOpHa, o6paueHnHa BBepx.
Bocnpo3BoDntcStopoha,6paueHHaBHN3.

| Чтоби | НжмITE |
| Измен综合体 | MODE (▲▶) |
| Нарравлике BOCРОИЗBEДЕНИЙ KACCБТbl | |
| Останов综合体 BOCРОИЗBEДЕНИЙ | OFF |
| ИзBLEчы кAccсETY | OPEN, 3aTem▲ |
Ecnn Hactpoika Ha 3aDaHHyO CTanuH He pa6otaet
- ABTomatnuecka Hactpoika/ Pexim Mecthoro Noncka
ABTomatnuecka Hactpoika:
Haxmnte Ha OndHy n3 CTOpOH KhONKn (SEEK) DnA NOnCKa CTAHcUN (aBTOMATNuecka HAcTpOJa).
ПОИС OCTАНOBИТСЕ, KОДA yCTPOICTBO найдET радиocтанцIO. ПОВТОПЯТe пpoцeдур, пoka He БудET найда нухная радиocтанцИ.
Pekm Mecthoro nonka:
EcInn abTOMaTnuecka HacTpoNka npepbIBaetc CnIuKoM YacTo, HaxkMaJTe SENS),NOKa He NOBNTc INHdNKaTOP "LOCAL-ON".
OTo6pa3ntcHnHdNkaun“LCL”.
HacTpoiKa 6yIeT BbIPOHrTaBcT OToJIbKO Ha CTaHcIIN C OTHOcNITeIbHO CnIbHbIMCnIHHaJAMN.
ДЯ OTMeHbI peKIMa MecTHOrO nonCKa haxMnte "LOCAL-OFF".
COBET
Ecnn n3BecTHa qactota paJnoctaHcun, KOtOpyo Tpe6yETc npocnyuatb, haxmnte Ha odHy n3 CTOPON KhoNk (SEEK) n He OTnYckaHTe ee, noka He 6ydt HaJeDaHa HxJHra Yactota, 3aTeM haxmMaTe KhoNk (SEEK) dJa ToHOn HAcTpoKn YactOTbl (pyHna HAcTpoKa).
npoOnJxHne Ha cNe dyUoiEe CtpaHnue
KaueCTBO 3Byka NOBbIaETCa, HO CnHnA1 CTaHOBUTcMAHOHOPOHueCKM (NCHe3aET HnDnKauJNA “ST").
YTo6bI BepHyTbCBApeXIM O6bIyHOrO BocnpOn3BeDeHnB, BbIepePte "MONOFF".
Cobet
Ecnn 3aTpynHeH npnem B dnaana3oHe FM, yctanOBHTe nD SDO 3naueHne "OFF" (ctp. 17).
CoxpaHeHne B namrToIbKO Heo6XoDmblx paAnocTaHcN
MoxhoBpyHyIO 3aDaTb HxKyHyO paAnocTaHcNIO IJIJIIOBo BbIbpaHHoH HOMepHOKhONKn.
1 HaxnmaTe KhoNky (SOURCE),YTO6bI Bbl6paTb paHnoOpnemMHNK.
2 Haxmnte HeckoIbko pa3 KhONky MODE DnBb6opa dnaana30Ha.
3 HaxuMaIte Ha OndHy n3 CTOpOH KHOJKN (SEEK)ДЯнHAcTpOyKnHa paAnocTaHcNIO, KOtOpYIO CneJeYET COxpaHnTb B pAmrTn.
4 HaxMMTe HxKHyIO HOMepHyIO KONKy (OT 1 DO 6) I He OTnyckaIte ee B TeueHne 2 cekyHd, noka He noRbntcHaDnncb "MEM:
Ha dincnjnee oTo6paKaetaHnDnKaaIy, COOTBETCTBYUOJAA HOMepHOH KONKe.
PpmeaHne
PnnponbIke coXpaHnHT bpyrYIO paINocTahuio dIa ODHNI TOJ KHe HOMepHO KNKNO ppeBldyuaar paINocTahuia 6bEET ydaheNA.
CoxpaHeHne Ha3BaHn paIIOCTaHcN
- Namrmbctahcni
Moxho npincboinb Ha3BaHne KaKdoi
paadinocctaHnN i COxpanHT b E O namrtn.
Ha3BaHne Tekyuee cTaNu, HkOTOpyU
bblnoJIHeHaHCTpoKa, OTo6paXaetcHa
daicnnee. Ha3BaHne cTaNu MoKeT
coepkaTb He 6oJee 8 CmMBolOB.
1 HaCTpoTecb Ha cTaHcUHO,Ha3BaHne KOtOpO Bbl XOTnTe coXpaHnTb.
2 HaxMMTe KHONKy (LIST) Ha 2 cekyHdbI.
3 BBeDHTe CUMBOJBI.
Haxmaite KhoNky perynipoBkn rpoMkoCTn +/-ДЯ BbIbopa Heo6xOdmoro Cmmbola.
$$ \begin{array}{l} \mathbf {A} \leftrightarrow \mathbf {B} \leftrightarrow \mathbf {C} \dots \leftrightarrow 0 \leftrightarrow 1 \leftrightarrow 2 \dots \ \leftrightarrow + \leftrightarrow - \leftrightarrow * \dots \leftrightarrow {} ^ {* 1} \leftrightarrow \mathbf {A} \end{array} $$
$$ ^ {* 1} (n p o 6 e n) $$
2 HaJy HxHbI CNB0J,HaKMnTe SEL.
HaHHeT MmRaTb CneJeUoUsn CmBOn.

Повторе DeиctBnЯ 1 n 2 ДЯ BBOda BCero Ha3BaHnY.
4 TTo6bI BepHyTbCByB pexHM O6bIyHOrOpnpHeMa paAnOpporpAmM, HaxMMTeKHOKnKy LIST Ha 2 CekyHdbI.
Cobet
TObbI NcnpaBHTb IIN CTpeBt ha3BaHne, IpocTo BBeDNTe CmBONbl IOBepx CTapbIX IIN BBeDNTe
YdaJIeHHe Ha3BaHnpaIIOCTaHcN
1 HaXMMTe KONky LISTHa 2 ceKyHdbI.
2 Haxmnte KhoNky DSPL Ha 2 cekyHdbI.
IIOBRTCAHa3BaHnA,3aHeceHHbIE B nAMrTb.
3 Haxmnte HeckoIbKO pa3 KhoNky peryIINPOBKN rPOMKoCTn +/-, YTO6bl Bbl6paTb CTaHcIuHO, Ha3BaHne KOtOpOHeo6XODIMO cTepeTb.
4 HaxMnte KhoNky SEL Ha 2 cekyHdbI.
HaIINcB 6yDcT cTePta.
KpNByUO 3KBaIaN3epa MoKHO BbIbpaTb IJIa7 My3blKaIbHbIX TINOB (XPLOD (3KCIIOJ), VOCAL (BOKAJ), CLUB (KJIY6), JAZZ (JXA3), NEW-AGE (HbIO-3IJK), ROCK (POK), CUSTOM (3AADABAEMbl) n OFF (3KBaIaN3ep BblIKJ)).
Bb6op KpnbOu 3KbaIaI3epa
1 Haxmnte KhoNky SOURCE, YTo6bI Bbl6paTb NCTOuHNK (paAnOpnneMHNK, KaccetTa, KOMNaKT-DnCK NJI MHNiDnCK).
2 Haxmaite KhoNky EQ3, noka He NOBtca Tpe6yMa8 KpNBa8 3KBaJai3epa.
Pn KaKJDOM NocLeDyIOUeM HaxKaTIN KHOKN (EQ3) N3MeHReETcHaDnICb.
YTO6blOTKJIIOUHTb3ΦΦeKT 3KBAIaI3epa,BbI6epnte“OFF”
Hac troponka Kpmbo 3Kbana3epa
Moxho coxpaHbI BbIIOJIHrTb HacTpoiKn 3KbAla3epa DnIpa3JIuHbIX DnIaNa3OHOB YaCTOT.
1 HaXMMTe KONKy (SOURCE), YTO6bI Bbl6paTb NCTOCHNK (paHIOnpHEMHNK, KACCETa, KOMNAKT-DNCK JNJM MHNuDnCK).
2 HaxMMTe KhoNky EQ3 HeCKoJIbKO pa3, yTO6bl Bbl6paTb HxHHyIO KpNByIO əKBaIaN3epa.
3 HacpoiKa KpBOn 3KbAlaHepa.
HaXMMTE KHONKY SEL HeCKOJIbKOpa3, YTO6bI Bbl6paTb HxKHbINdnaNa3OH YaCTOT.
—PepetacobahHoe Bocnpoun3BedeHne
MoxHO Bbipatb:
SHUF-ALBM*1 —ДЯВОСПОНЗBEDEHINAJIb6OMOB TEKUIM DOnOJIHNTeJIbHbIM npOINrPbIbATEJIEM KOMNAKT-DIACKOB,IMEIoUIMФyHKUIO YnpaBJIeHINFaJ lamM MP3,B cIyuaHNoIPOcJIeOBAteJIbHOCTI.
SHUF-DISC-ДЯВОСРОНЗBEDEHINKOMПОЗИЦМ TEKUYSUERO DNUCKA BCLYUHAHNOI NOCLEIDOBATIELBOHOCTN.
SHUF-CHGR-ДЯ BOCPOn3BEdeHnA KOMNo3NIM TEKUIMM DOJONIHTeJIbHbIM NpOINpbIbATEJIEM KOMNaKT-DINCKOB/MHNIDNCKOB B CnyaHaHNO NocJeIOBATEJIbHOCTN.
SHUF-ALL*2--IJI BOCnpOn3BedeHnRA BCEK COMNo3uNHa HAc BCEX NODKNUOeHHbIXYcTPOiCtBax IJI KOMnAKT-DINCKOB/MNIHNDINCKOB B CnyuaHNOHnIOscJeIDoBaTeNbHOCTn.
1 Bo3MOKHO TOnbKO npn NpOKnIooHEn
DOnONHInTeBHOrO yCTPoiCTBa dIy KOMNakT-
DNCKOB, IMeHOUeO FyHKUIO ynpaBLeHnA
FaiNamn MP3.
2 Bo3MOxHToTbKO B Tom Cnyaee,ecnI NOJKnIOYeHbI DBa WnI HeCKoJIbKO DOONHIneHbHx npOnrPbIbATEJe KOMNaKT-DINCKOB/MNHN-DNCKOB.
Bo BpemBocpnOn3BeDeHnnaHXmMaTe KhONky 4 (SHUF), nokaHa DnCnlee He NOrBntc HxKbI npaMeTp.
BkIIOUHTcpeXIM NpeTeCobBaHOrO BOCPON3BeDeHn.
YTo6bI BepHyTbCABpeXIM O6bIyHOrO BocpOn3BeDeHnA, Bbl6epuTe "SHUF-OFF".
PpmeaHne
IpeTacobHoe BocnpbnBeHeNEKOMnO3nIcM c npOnrpbBaTeNei KOMnAKT-DNCKOB MHNH-DNCKOB C nmoUo fyhKnCn "SHUF-ALL" HeB0mXHO.
Mapknipobka komnaKT-Dncka
UcTpoiCTBO6yTeTzIKJIuYeCKN BOCPON3BOJNTbIaCK BOBpeMBAOHa3BaHnI.
3 BBeDHTe CUMBOJBI.
HaKMaTe KhoNkPy perynipOBKn rPOMKOCTn +-ДпЯ BbIbopa Heo6XoDMORO CmMBoJa.
$$ \begin{array}{l} \mathbf {A} \leftrightarrow \mathbf {B} \leftrightarrow \mathbf {C} \dots \leftrightarrow 0 \leftrightarrow 1 \leftrightarrow 2 \dots \ \leftrightarrow + \leftrightarrow - \leftrightarrow * \dots \leftrightarrow - ^ {* 1} \leftrightarrow \mathbf {A} \end{array} $$
$$ ^ {* 1} (n p o 6 e n) $$
HaHJa HUxHbI CNMBOJ, HaXMMTe SEL. HaHcHT MIRaTb CNeDyUOuN CNMBOJ.
3ПОВТОРпЕ ДЕСТВИА 1 И 2 ДЛЯ BBOДA BCERO HA3BaHЯ.
4ДЯ BO3BpaTa B peXIM O6blHoro BOCnpon3BeDEHnHAxMnTe KHOIky LIST Ha 2 cKeYHdbI.
COBeTbI
•Утбы Истравити Лп с谈起ь наразане, постот ВБЕДNTE CBМВОЛы NOВЕХ CTарьх Лп ВБЕДNTE
- MoXHO BbINOHNITb MapKnPOBky KOMNaKT-DnCKOB HA yCtpoiCTBe, He NmEIOUeM FyHKuIN CUSTOM FILE, ecN ONo IOnKNOHcEO K npOrrpbIbaTeIIO KOMNaKT-DnCKOB, y KOTOPOr 3Ta FyHKuIN NMeETc. NfOpMaun O DnCKe BBOIDTCB namTb npOrrpbIbATEJIaN KOMNaKT-DnCKOB C fYHKuIN CUSTOM FILE.
PpmeaHne
Bocnpo3BedeHne B peximme REP-TRACK/SHUF 6byet npnoctaHobelno, noka He 3abepuTcra peJaKtnpOBAHnE Na3BaHnA.
Pn HnPaBnBHom 6paueHnn 6aTapeKa MoKET B3OpBaTbCra. He npe3apKaTb, He pa3bnpaTb, He npDHocNTb KOrHIO.
ИЗВлесене усточтва
1 CHIMMTE 3aunTHyO MaHKeT.Y.
1 CHIMMTE nepeHIOI nHaJIb (CTp. 8).
2ДЯСНТЯЗAUHTHOJ MaHKeTbI
ИСПОЛБ3Yte KJIQUHДЛ
ДемоHTаК.
He cIbIweH 3ByKOBoN CnHaJ.
-Функця 3ByKOBOrO CnHana OTKJIQUeHa (CTp.16).
Подключен ДОпОЛнITeьнblуycINITeIb,И He NcOЛБ3yETcB BCTpoEHnbl yCINITeJIb MOUHOCtN.
IponaJa/He OTo6paXaetcNnDnKaunB OkHe nncnne.
-ДиСПЛЕМ OTКЛЮЧаETСА,ЕСПИHAЖАТУДЕРЖИВATБ KHONKу (OFF).
→HaxMnTe u yndePxNBAuTe KhONKy OFF CHOBA, NOKa He DnCnJIe Hb BKJIIOHTcR.
- CHIMITE nepeHIO paHeJIb I npOTpIte KOHTaKtBI. IOpO6HbIE CBeDEHnA CM. B pa3dene "UmcTka KOHTaKTOB" (CTp. 23).
I3 namrTu ydaJIeHbI
3anporpammmpoBaHHbIe paNIOCTaHcIMn UctaHOBka BpeMeH.
Ipeperopen npedoxpanHTeJIb.
CnbIweH yM, KOrda KJIIOU 3axnraHn
HaxoNTcB IIOJoxeHN ON, ACCIIN OFF.
IpoBOna HnnpaBnJIbH OIOcOeINHeNbIK
pa3bemy 3neKtpoNTaHn
BCNOMORAteIbHOrOobOpyIOBaHnI
ABTOMO6nla.
Ha annapat He nodaetc nitaHne.
- Пюоверы сеоннен.Еси Вс coeINHnB bInONHebl npaBnIbHO, пюовьтnpedoxpaHnteJb.
B aBTOMObIne oTCyTCTByET INoIoxKeHHe ACC KJIIOUa 3axKurHaHn.
→Haxmnte KhoNky SOURCE (nIN BCTaBbTe KaCCety),yTObI BKJIIOHTb yCTpOImCTBO.
Ha annapaT noCToHHo nOdaetc nHTaHne.
B aBTOMO6NJIe OTCyTCTByET NIOJXeHHe ACC KJIoua 3aKnraHn.
PpneMa aHTeHHa He BbIDBnraeTc.
B npnemnoaHTeHne OTCyTCTByeT peJe.
Bocnpon3BeDHeNe kaccET
3Byk nckaxaetcra
3aŋra3HeHa MaHHToΦoHHa rOJOBKa.
He ydaetcBbINOJHHTb npeDbapntbHyu HactpoKy.
BBeINTe BnAmrTb npaBnIbHyO yactOTy.
-Перетааьмь радиогналсишkom cnab.
CTaHnHa He npHHMaetcA.
3Byk cOpboKjaetcI NOMexAMN.
ПодcoeINHte npOBd nHTaHnnpiEMHO aHTeHHbI (CINHm) mIn npOBdNTaHn yCTpoiCTBa (KpaCHbI) KnpOBdy nTaNHa YcNlTeH aHTeHHbIabTomo6nJI.(ToNbKO eCnHa 3aDHeM/6OKOBOM CTKeJIe aBTOMo6nJIyCTaHOBHeHa BCTPOeHHa aHTeHHaDnana3OHOB FM/AM.)
-Пюоверътпоюсоевнене abTomo6иьногаHTehbl.
- He BbyDnBraetcA bTOMoBnJIbHa aHTeHHa.
→PpOBeBpTe POnCoEiHHeHne PpOBoa nHTAHnI PrnEMHO aHTEHbI.
-Пюоверьтей actotу.
Korda BkIIOueH peXm DSO,3ByK INHOJa COIPOBOXkaETcH NOMExaMn.
YctaHOBnTeДЯpeXIMaDSO 3HaueHne“OFF"(cTp.17).
He ydaetcBbINONHHTb ABTOMaTnueckyio hactpoiKy.
Длг рекима мостсоги посякаястановли有很大аметр "ON"
YctaHOBnTeДЯрexKIMaMeCTHOro
PONCKA3NaueHne“OFF”(cTp.11).
-Перетааьмь радиocнгнл сишКOM cnab6.
→BbINONHnTe pyHyIO hAcTpoiKy.
Muraet Haidnncb "ST"
- BbINONHITe TOHyIO HAcTPOIky YAcTOTbl.
-Перетааьмьй радиocгнал сишkom cnab6.
YCTaHOBNTepeXIM MOHOΦoHnueCKOrO pInema (cTp.12).
CteopnporpaMMbl pinnHMaHTc KaK MOHOFOHNueckne.
Annapat haxoINTcB pexIme MOHOFOHueCKOTo npEma paAnOpPOrpAMM.
OTKJIIOUHTe peXIM MOHOΦOHHueCKOrO npHema (CTp. 12).
Bocnpoun3BeDeHne KOMNaKT-dnCKa/MNHn-DnCKa
IMeIOT MeCTO npoBaJIb3Byka.
Ha MHNI-DINCKE OTCYTCTBYOT KOMN03NIUH.*2
→YCTaHOBnTeДЯBOCpON3BeDEHnMRHH-ДNCK C 3aINCAHHbIMn Ha HEMKOMP03nRmN.
ERROR\*1
KOMNaKT-DnCK 3aRpa3HeH nIIN BCTaBHeH HIXKHeC CTOpOHOB BBepx.*2
→ПочNTITEИпnpaВиьHO yCTaHOBnTE KOMnAKT-ДИСК.
MHHI-DNCK He BOCPON3BOJNTCA 13-3a HAIINHnIpo6JIembl.*2
→BCTaBbTe npyroMmHn-ndCK.
- KomnaKT-/MUNH-DNCK HEB03MOXHO BOCpon3BecTN 13-3a HAJIINU INPO6JIeMbI.
→BcTaBbTe pyroKOMNaKT-/MHNI-DNCK.
FAILURE
「pOMKOROBOpNTeIN/YcNJIHTeIN IOKJIUChEBi HnPaBUNbHO.
→ДЯ npOBeKn NOdkHNoUeHn CM. pyKOBoDCTBO NO yCTaHOBKe.
HI TEMP
Tempepatya B caNohe npBbIaet 50^
→ПоДОЖДИТЕ,пOKа TemпераТураз
ONyCTHITСН HNXe 50°C.
NO DISC
B yctpoiCTBO He BcTaBJIeH KOMnakT-/ MUNH-DACK.
→BctaBbTe KOMNaKT-/MnHn-ДИСКВ yCTPOIcTBO.
NO MAG
B yctpoCTBO He BCTaBJIeH MaRa3IN dIy KOMnAKT-ДИCKOB/MHN-ДИCKOB.
→BCTaBbTe Maar3nH B pOnIrpbIbATEJIb KOMNaKT-IMCKOB/MHN-IMCKOB.
NO MUSIC
BnpoirpbyBaTeIbIyKOMnAaT-DnCKOB C paJnAm MP3 BCTaBJeH KOMnAaT-DnCK, He coDepeKaun My3bikaihBbIX paJnOB.
→BCTaBtE KOMNaKT-DnCK, coepKaun My3bIkaJIbHbIe faIbI, B pOnIpbIbATEnb IJRA KOMNaKT-DnCKOB c faIaNmMP3.
NOT READY
KpbIka npOnIrPbIbATEJIa MHN-IMCKOB OTKpbITa,IIIM MHN-DINCKN yCTaHOBJIeHbI HENpaBnIbHO.
→3aKpOHTe KpbIbIKy npOuRpbIbATEJI MmHn-ДИСКOB ИЛУ yCTaHOBNTe MmHn-ДИСКIN ppaBnIbHO.
OFFSET
3TO MOXeT O3HaayaTb HEnCnpaBHOcTb yCTpoiCTBa.
→Поберът coeДиненYe. Ecnn coo6шенио ob oшибke He Исчezаet Cдиспля, образитесь Kблжайшему dnilepy Sony.
RESET
Pa60ta npOuRpbIbATEJI KOMnAKT-/MmHINDACKOB HeBO3MOXHa N3-3a HAnuHnI npo6JIeMbI.
→Haxmnte KhoNky RESET ha yctpoIcTbe.
^1 ПгИ ВОЗнКов�им Иел�адки В БразмВОБпОНЗБЕДЕНΥ KOMПАкТ-ИЛМИМИДСКА КEROHМЕ РЕОТБРЖАЕТСHAДИЗПЕ.
2 Ha dinçnPee OTo6pa3ntcHomep DnCKa, YBnIoueOcrApnUHnOH HEnoJaKn.
Ecnn B pe3yIbTaTe npednaraembIX
deiCTBn HEnoJaKHe 6yTeYcTpaHeHa,
obpaTntecb 3a NMOuK 6JnxKaWEmy
dInlepy Sony.
Co06eHHa
L.SEEK +/-
Bo Bpem aBtOMaTnueeCKo NaCTPOiKN BkJIoueH peXIM MeCTHOI NOUCKa (ctp.11).
“L L L”NNN “n
IocntnHyTo NaHaoNo NJI KHeue DnCKa, INpoDOnJKeHne HeB03MOxHO.