
MSA 220 CB - Saw STIHL - Free user manual and instructions
Find the device manual for free MSA 220 CB STIHL in PDF.
| Product type | Cordless chainsaw |
| Brand | STIHL |
| Model | MSA 220 CB |
| Weight (without battery, guide bar or chain) | 2.9 kg |
| Approved batteries | STIHL AP, STIHL AR |
| Oil tank capacity | 210 cm³ (0.21 l) |
| Chain pitch | 3/8" P |
| Maximum chain speed | 23.3 m/s |
| Sprocket | 6 teeth for 3/8" P |
| Sound pressure level (LpA) | 89 dB(A) |
| Sound power level (LWA) | 100 dB(A) (measured 102 dB(A), guaranteed 104 dB(A)) |
| Vibration level – control handle | 3.6 m/s² |
| Vibration level – tubular handle | 4.8 m/s² |
| Battery temperature range (use and storage) | -10 °C to +50 °C |
| Guide bar lengths | 30 cm, 35 cm, 40 cm |
| Chain brake | Yes, automatic and manual |
| Lubrication | Bar and chain oil |
| Usage | Wood sawing, pruning, felling (small to medium diameter) |
| Safety features | Hand guard, chain catcher, bumper spike, chain brake |
| Power source | Lithium-ion 36 V battery |
Frequently Asked Questions - MSA 220 CB STIHL
User questions about MSA 220 CB STIHL
0 question about this device. Answer the ones you know or ask your own.
Ask a new question about this device
Download the instructions for your Saw in PDF format for free! Find your manual MSA 220 CB - STIHL and take your electronic device back in hand. On this page are published all the documents necessary for the use of your device. MSA 220 CB by STIHL.
USER MANUAL MSA 220 CB STIHL
2 Guide to Using this Manual. 32
3 Overview 32
4 Safety Precautions. 33
5 Preparing the Saw for Operation 40
6Assembling the Saw. 41
7 Engaging and Disengaging the Chain Brake 43
8 Removing and Fitting the Battery. 43
9 Switching the Saw On/Off. 43
10 Testing the Chain Saw and Battery. 44
11 Operating the Saw. 45
12 After Finishing Work. 49
13 Transporting. 49
14 Storing. 50
15 Cleaning. 50
16 Maintenance 50
17 Repairing. 51
18 Troubleshooting 51
19 Specifications. 52
20 Bar and Chain Combinations. 53
21 Spare Parts and Accessories. 54
22 Disposal 54
23 EC Declaration of Conformity 54
24 UKCA Declaration of Conformity 54
25 General Power Tool SafetyWarnings.....55
1 Introduction
Dear Customer,
Thank you for choosing STIHL. We develop and manufacture our quality products to meet our customers' requirements. The products are designed for reliability even under extreme conditions.
STIHL also stands for premium service quality. Our dealers guarantee competent advice and instruction as well as comprehensive service support.
STIHL expressly commit themselves to a sustainable and responsible handling of natural resources. This user manual is intended to help you use your STIHL product safely and in an environmentally friendly manner over a long service life.
We thank you for your confidence in us and hope you will enjoy working with your STIHL product.
Dr. Nikolas Stihl
IMPORTANT! READ BEFORE USING AND KEEP IN A SAFE PLACE FOR REFERENCE.
2 Guide to Using this Manual
2.1 Applicable Documents
The local safety regulations apply.
In addition to this User Manual, read, understand and keep the following documents:
-User Manual for STIHL AR battery
- User Manual for "AP belt bag with connecting cable"
Safety notices and precautions for STIHL AP battery
- User manual for STIHL AL 101, 300, 500 chargers
- Safety information for STIHL batteries and products with built-in battery: www.stihl.com/safety-data-sheets
2.2 Warning Notices in Text

DANGER
This notice refers to risks which result in serious or fatal injury.
- Serious or fatal injuries can be avoided by taking the precautions mentioned.

WARNING
This notice refers to risks which can result in serious or fatal injury.
- Serious or fatal injuries can be avoided by taking the precautions mentioned.
NOTICE
This notice refers to risks which can result in damage to property.
- Damage to property can be avoided by taking the precautions mentioned.
2.3 Symbols in Text

This symbol refers to a chapter in this instruction manual.
3 Overview
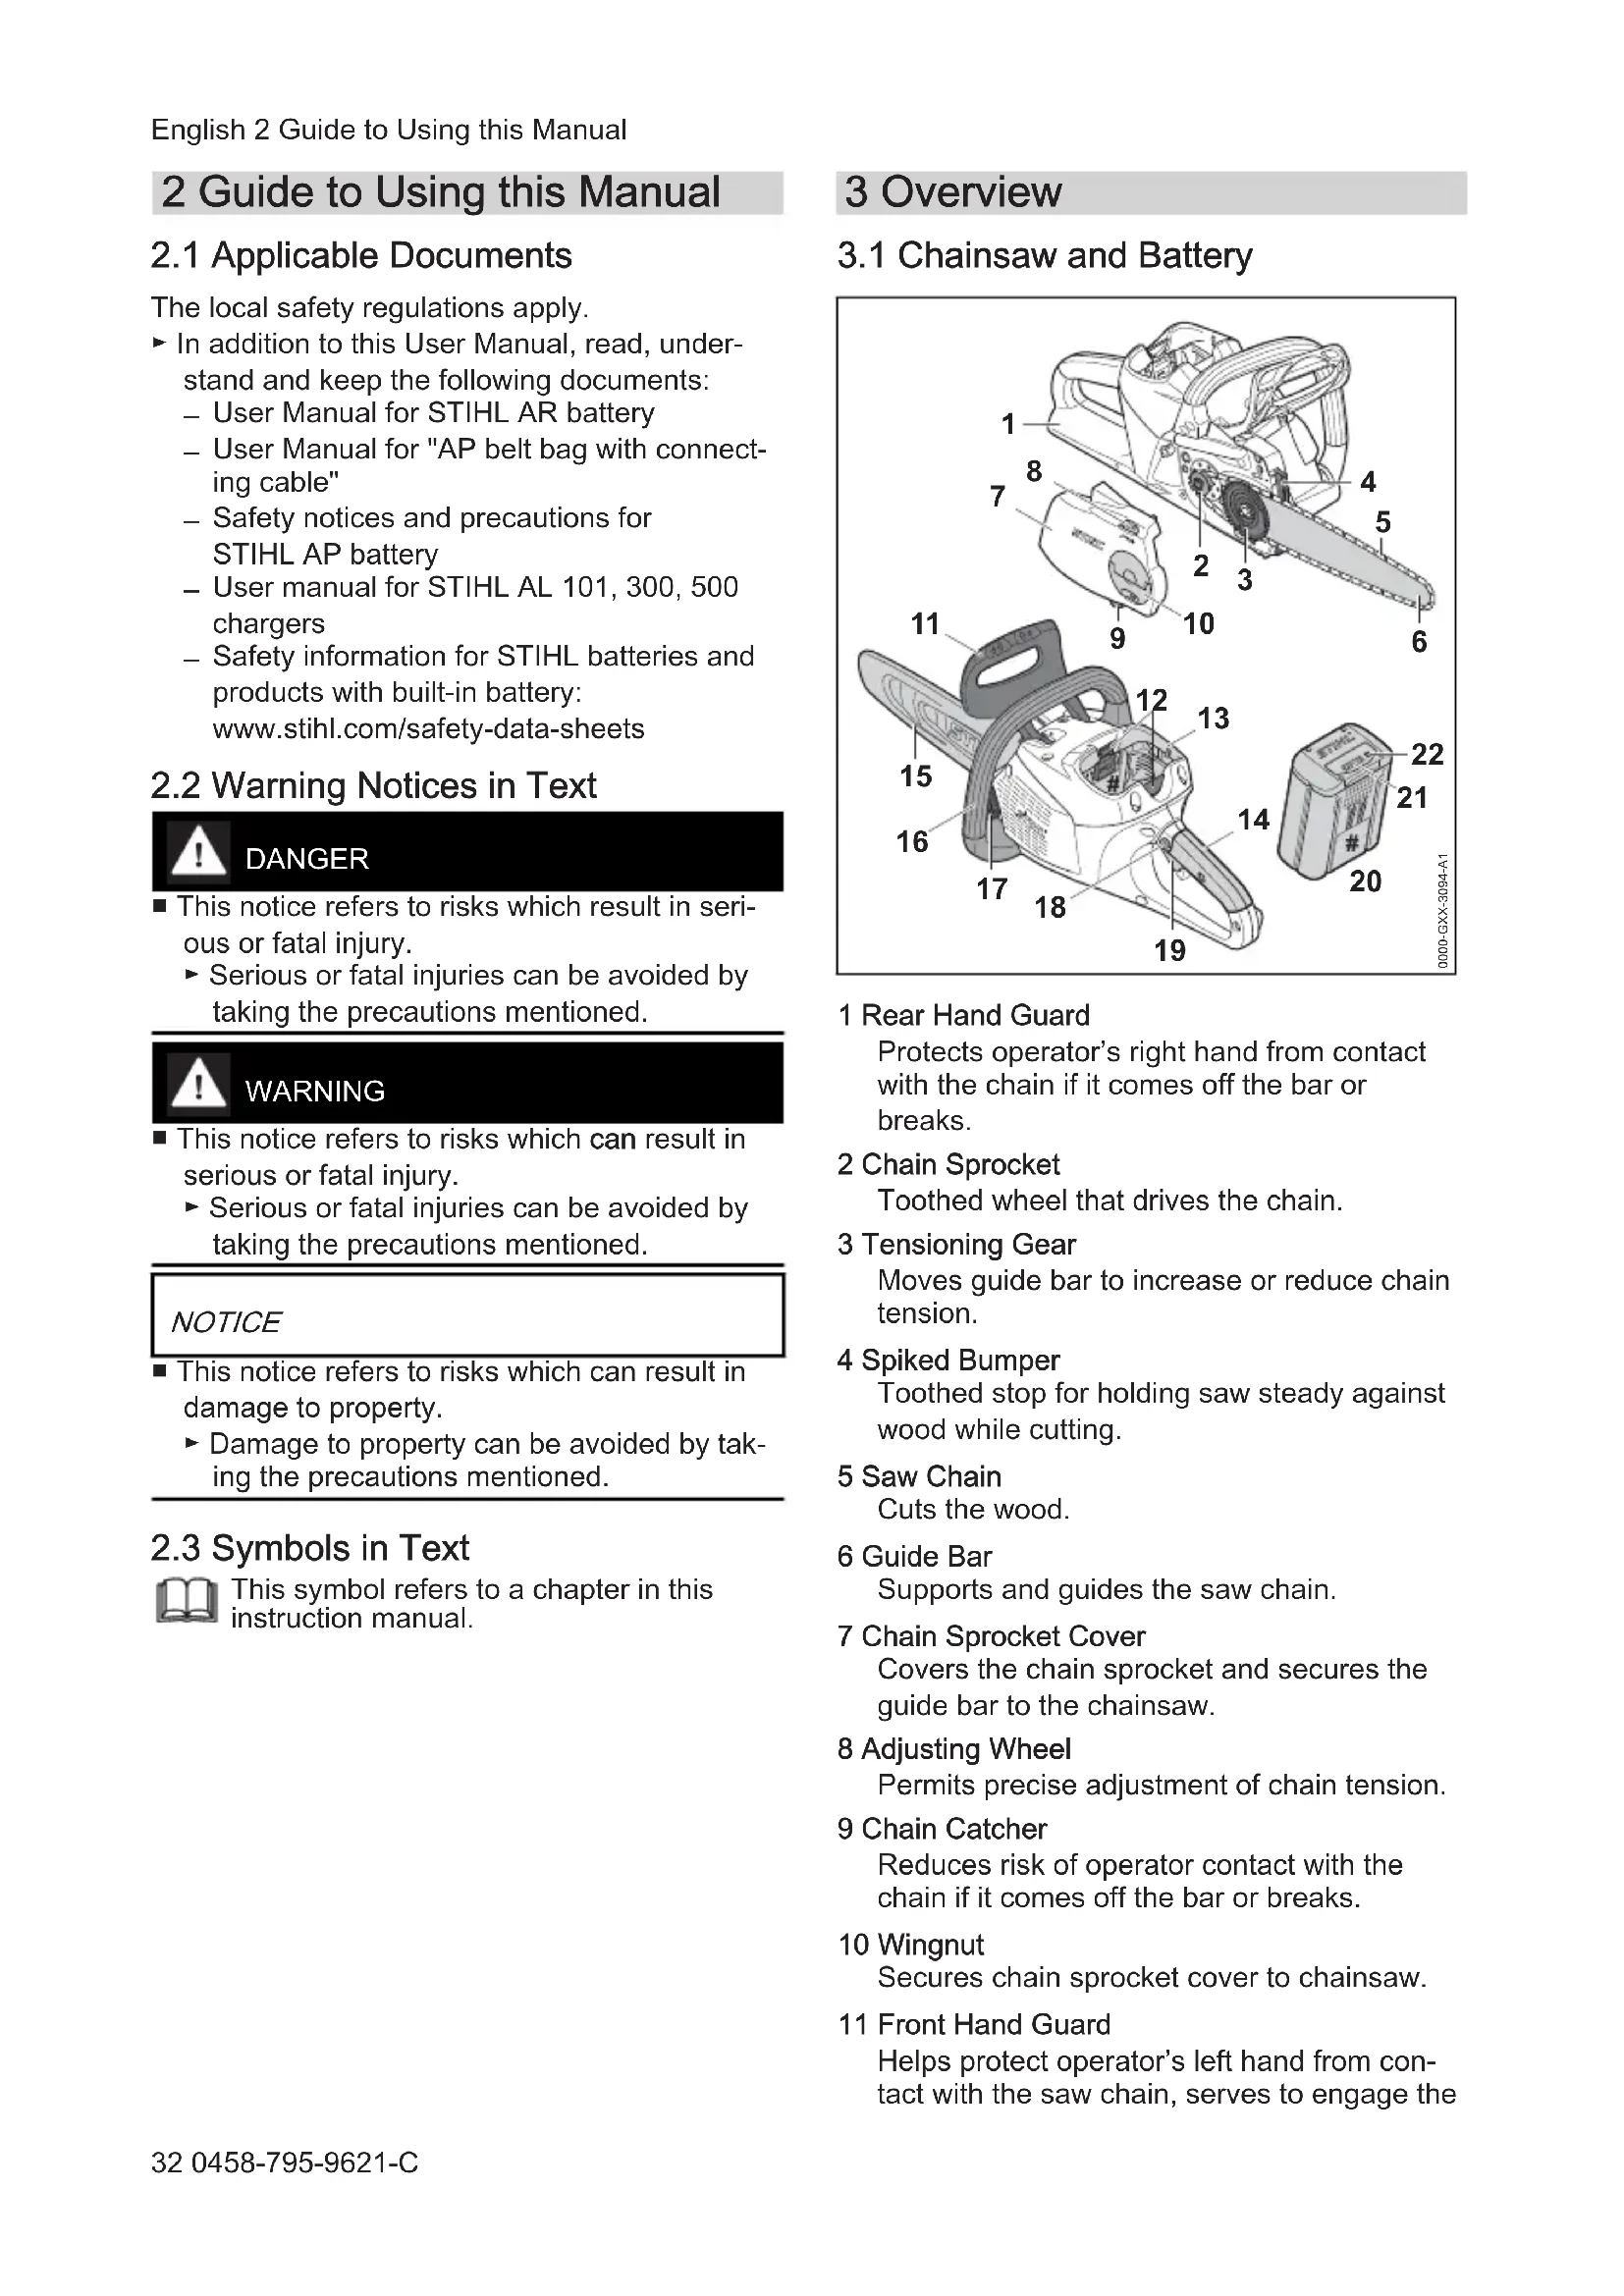
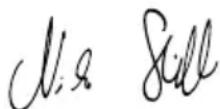
3.1 Chainsaw and Battery
1 Rear Hand Guard
Protects operator's right hand from contact with the chain if it comes off the bar or breaks.
2 Chain Sprocket
Toothed wheel that drives the chain.
3 Tensioning Gear
Moves guide bar to increase or reduce chain tension.
4 Spiked Bumper
Toothed stop for holding saw steady against wood while cutting.
5 Saw Chain
Cuts the wood.
6 Guide Bar
Supports and guides the saw chain.
7 Chain Sprocket Cover
Covers the chain sprocket and secures the guide bar to the chainsaw.
8 Adjusting Wheel
Permits precise adjustment of chain tension.
9 Chain Catcher
Reduces risk of operator contact with the chain if it comes off the bar or breaks.
10 Wingnut
Secures chain sprocket cover to chainsaw.
11 Front Hand Guard
Helps protect operator's left hand from contact with the saw chain, serves to engage the
4 Safety Precautions English
chain brake and activates the chain brake by inertia in certain kickback situations.
12 Locking Lever
Secures the battery in the battery compartment.
13 Battery Compartment
Accommodates the battery.
14 Control Handle
For operating, holding and controlling the chainsaw.
15 Chain Scabbard
Helps protect user from contact with saw chain.
16 Handlebar
For holding, controlling and carrying the chainsaw.
17 Oil Tank Cap
Closes the oil tank.
18 Lockout Button
Unlocks the trigger.
19 Trigger
Switches the chainsaw on and off.
20 Battery
Supplies power to the chainsaw.
21 LEDs
Indicate battery's state of charge and malfunctions.
22 Button
Activates the LEDs on the battery.
Rating Label with Serial Number
3.2 Symbols
Meanings of symbols that may be on the chainsaw and battery:

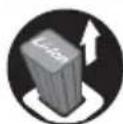
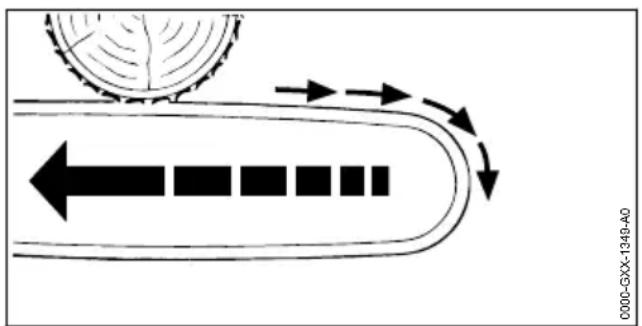
This symbol shows the direction of rotation of the chain.
Turn in this direction to tension the saw chain.
This symbol marks the chain oil tank.


The chain brake is engaged in this direction.

The chain brake is disengaged in this direction.
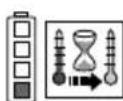
1 LED glows red. Battery too hot or too cold.
4 LEDs flash red. There is a malfunction in the battery.
Length of guide bar that may be used.

LwA Guaranteed sound power level according to directive 2000/14/EC in dB(A) in order to make sound emissions of products comparable.
The data next to this symbol indicates the energy content of the battery according to the cell manufacturer's specification. The energy content available during operation is lower.

Do not dispose of the product with your household waste.
4 Safety Precautions
4.1 Warning Symbols
Meanings of warning symbols on the chainsaw or the battery:
Observe safety notices and take the necessary precautions.

Read, understand and keep the User Manual.

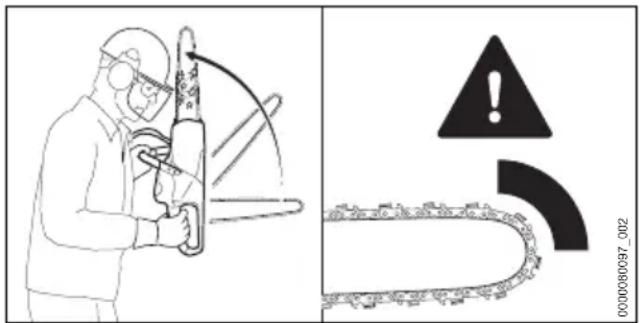
Wear protective glasses, ear muffs and a hard hat.

Hold the chainsaw firmly with both hands.

Observe the safety notices on kickback and take the necessary precautions.
Remove the battery during work stoppages, transport, storage, maintenance or repair.
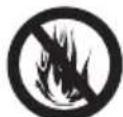
Protect battery from heat and fire.

Do not immerse battery in fluids.
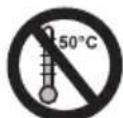
Observe the permitted battery temperature range.
English 4 Safety Precautions
4.2 Intended Use
The STIHL MSA 220 C chainsaw is designed for cutting wood,limbing and felling small diameter trees,and maintaining trees.
The chainsaw may be used in the rain.
The chainsaw is powered by a STIHL AP battery or a STIHL AR battery.
If it is necessary to work on a safe raised platform, the chainsaw may be used only with a STIHL AP battery inserted directly in the saw.
WARNING
- Batteries not explicitly approved for the chainsaw by STIHL may cause a fire or explosion. This can result in serious or fatal injuries and damage to property.
- Use the chainsaw with a STIHL AP battery or a STIHL AR battery.
Using the chainsaw or the battery for purposes for which they were not intended may result in serious or fatal injuries and damage to property.
Use the chainsaw as described in this instruction manual. - Use the battery as described in this instruction manual or the instruction manual for the STIHL AR battery.
4.3 The Operator
WARNING
- Users without adequate training or instruction cannot recognize or assess the risks involved in using the chainsaw and battery. The user or other persons may sustain serious or fatal injuries.

Read, understand and save the instruction manual.
If the chainsaw or battery is passed on to another person: Always give them the instruction manual.
Make sure the user meets the following requirements:
- The user must be rested.
-
The user must be in good physical condition and mental health to operate and work with the chainsaw and battery. If the user's physical, sensory or mental ability is restricted, he or she may work only under the supervision of or as instructed by a responsible person.
-
The user is able to recognize and assess the risks involved in using the chainsaw and battery.
- The user must be of legal age or is being trained in a trade under supervision in accordance with national rules and regulations.
- The user has received instruction from a STIHL servicing dealer or other experienced user before working with the chainsaw for the first time.
- The user must not be under the influence of alcohol, medication or drugs.
If the user is working with a chainsaw for the first time: Practice cutting logs on a sawhorse or other support.
If you have any queries: Contact a STIHL servicing dealer for assistance.
4.4 Clothing and Equipment
WARNING
- Long hair can become entangled in the saw during operation. This can result in serious injuries.
-
Tie up long hair so that it is above shoulder level.
-
Objects can be thrown through the air at high speed during operation. This can result in personal injury.

Wear close-fitting safety glasses. Suitable safety glasses that have been tested and labeled in accordance with EN 166 or national standards are available from retailers.
STIHL recommends that you wear a face shield.
Wear a long-sleeved, snug-fitting upper garment.
- Noise occurs during operation. Noise can harm your hearing.

Wear hearing protection.
Falling objects can cause head injuries.

If there is a danger of falling objects during operation: Wear a safety hard hat.
- Dust can be whipped up during operation: Whipped up dust can damage the respiratory passages and cause allergic reactions.
If dust is whipped up and forms a cloud: Wear a dust respirator mask.
4 Safety Precautions English
- Inappropriate clothing can snag on wood, brush or the saw. Not wearing suitable clothing may result in serious injury.
Wear snug-fitting clothing.
Do not wear a scarf or jewelry.
The user can come into contact with the rotating saw chain during operation. This can result in serious injuries.
- Wear long trousers with cut-retardant inserts.
The user can be cut by the wood during operation. The user can come into contact with the saw chain during cleaning and maintenance work. This can result in personal injury.
Wear work gloves made of durable material.
Wearing unsuitable footwear may cause you to slip or stumble. Contact with the rotating saw chain can result in cuts. This can result in personal injury.
- Wear chainsaw boots with cut retardant inserts.
4.5 Work Area and Surroundings
4.5.1 Chainsaw
WARNING
-
Bystanders, children and animals are not aware of the dangers of the chainsaw or thrown objects. Innocent bystanders, children and animals may be seriously injured and damage to property may occur.
-
Keep bystanders, children and animals away from the work area.
Do not leave the chainsaw unattended.
Make sure that children cannot play with the chainsaw. -
Electrical components of the chainsaw can produce sparks. Sparks may cause a fire or an explosion in an easily combustible or explosive environment. This can result in serious or fatal injuries and damage to property.
-
Do not work in an easily combustible or explosive environment.
4.5.2 Battery
WARNING
-
Bystanding people, children and animals cannot recognise or evaluate the dangers posed by the battery. This may result in serious injury to bystanding people, children and animals.
-
Keep bystanding people, children and animals out of the way.
Do not leave the battery unattended. -
Make sure that children cannot play with the battery.
The battery is not protected against all ambient conditions. If exposed to certain ambient conditions, the battery may catch fire or explode. This may result in serious injury to people and damage to property.

- Protect the battery from heat and fire.
Do not throw the battery into a fire.
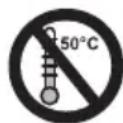
Use and store the battery at temperatures between - 10^ and +50^ .

Do not immerse the battery in liquids.
- Keep the battery away from metallic objects.
Do not expose the battery to high pressure.
Do not expose the battery to microwaves. - Protect the battery from chemicals and salts.
4.6 Safe Condition
4.6.1 Chainsaw
The chainsaw is in a safe condition if the following points are observed:
- The chainsaw is not damaged.
- The chainsaw is clean.
- The chain catcher is not damaged.
- The chain brake is operating properly.
- The controls function properly and have not been modified.
- The chain lubrication is operating properly.
- Wear marks on the chain sprocket are not deeper than 0.5 ~mm .
- A combination of guide bar and saw chain recommended in this User Manual is mounted.
- The guide bar and saw chain are properly mounted.
- The saw chain is properly tensioned.
- Only original STIHL accessories designed for this chainsaw model are fitted.
- The accessories are correctly attached.
- The oil tank cap is closed.
WARNING
If not in safe condition, components may no longer operate correctly and safety devices may be disabled. This may result in serous or fatal injury to people.
Work only with an undamaged chainsaw.
If the chainsaw is dirty: Clean the chainsaw.
English 4 Safety Precautions
Work only with an undamaged chain catcher.
- Never modify your chainsaw. Exception: Mounting a combination of guide bar and saw chain recommended in this User Manual.
If the controls do not function properly: Do not use your chainsaw.
- Only fit original STIHL accessories designed for this chainsaw model.
- Mount the guide bar and saw chain as described in this User Manual.
- Attach accessories as described in this User Manual or in the User Manual for the accessories.
- Never insert objects in the chainsaw's openings.
- Close the oil tank cap.
Replace worn or damaged labels.
If you have any doubts, be sure to consult a STIHL dealer.
4.6.2 Guide Bar
The guide bar is in a safe condition if the following points are observed:
Guide bar is not damaged.
Guide bar is not deformed.
- The minimum groove depth is maintained, 19.3.
- Bar rails are free from burrs.
- Bar groove is not pinched or splayed.
WARNING
If the guide bar is not in a safe condition, it can no longer support and guide the saw chain properly. The rotating saw chain can jump off the guide bar. This can result in serious or fatal injuries.
Work only with an undamaged guide bar.
If the groove depth is less than the minimum depth: Mount a new guide bar.
- Deburr the guide bar every week.
If you have any queries: Contact your STIHL servicing dealer.
4.6.3 Saw Chain
The saw chain is in a safe condition if the following points are observed:
- Chain is not damaged.
- Chain is properly sharpened.
- The service marks on the cutters are still visible.
WARNING
If components do not comply with safety requirements, they will no longer function
properly and safety devices may be rendered inoperative. This can result in serious or fatal injuries.
Work only with an undamaged saw chain.
Sharpen the chain properly.
If you have any queries: Contact your STIHL servicing dealer for assistance.
4.6.4 Battery
The battery is in safe condition when the following conditions are met:
The battery is not damaged.
- The battery is clean and dry.
- The battery is working and has not been modified.
WARNING
The battery cannot function safely if it is not in safe condition. There is a risk of serious injury to persons.
Use an undamaged and functioning battery.
- Do not charge a damaged or defective battery.
If the battery is dirty or wet: clean the battery and allow it to dry.
Do not modify the battery.
- Do not insert objects into the apertures in the battery.
- Never connect the battery terminals to metallic objects and cause a short circuit.
Do not open the battery.
Replace worn or damaged warning signs.
- Fluid may leak from a damaged battery. If the fluid contacts the skin or eyes, this may cause irritation.
Avoid contact with the fluid.
In the event of contact with the skin: wash the affected areas with plenty of soap and water.
In the event of contact with the eyes: rinse the eyes with plenty of water for at least 15 minutes and seek medical attention.
A damaged or defective battery may emit an unusual odour, smoke or catch fire. This may result in serious or fatal injury to people and damage to property.
If the battery emits an unusual odour or smoke: do not use the battery and keep it away from flammable materials.
If the battery catches fire: try to extinguish the battery using a fire extinguisher or water.
4.7 Working
4.7.1 Cutting
WARNING
Always work within calling distance of others in case help is needed.
Make sure than persons outside the work area are within calling distance.
The user cannot concentrate on the work in certain situations. The user can lose control of the saw, stumble or fall and be seriously injured.
Work calmly and carefully.
If light and visibility are poor: Do not use your saw.
Operate the saw alone.
Do not work above shoulder height.
Watch out for obstacles.
- Stand on the ground while working and keep a good balance. If it is necessary to work at a height and the chainsaw is used with a cable connected to a power supply: Use a lift bucket.
If you begin to feel tired: Take a break.
- The rotating saw chain can cut the operator. This can result in serious injuries.
Do not touch the rotating saw chain.
- If the saw chain is blocked by an object: Switch off the chainsaw, engage the chain brake and remove the battery. Then remove the object causing the blockage.
- The rotating chain becomes hot and expands. If the chain is not lubricated sufficiently or not re-tensioned at regular intervals, it may come off the guide bar or break. This can result in serious injuries and damage to property.
Use special chain oil.
- Check oil level in tank regularly during cutting work. Before the oil tank runs empty: Fill up with chain oil.
- Check chain tension regularly during cutting work. If chain tension is insufficient: Tension the chain.
If the behavior of the saw changes during operation or feels unusual, it may no longer be in a safe condition. This can result in serious injuries and damage to property.
-
Stop work, remove the battery and contact your STIHL servicing dealer for assistance.
-
Saw vibrations may occur during operation.
Wear gloves.
Take regular breaks.
If signs of circulation problems occur: Seek medical advice.
Sparks may occur if the rotating chain makes contact with a hard object. Sparks may cause a fire in an easily combustible location. This can result in serious or fatal injuries and damage to property.
- Do not work in an easily combustible location.
Note that the saw chain continues to rotate for a short period after you release the trigger. The rotating saw chain can cut the user. This can result in serious injuries.
Wait for the chain to come to a standstill.
WARNING
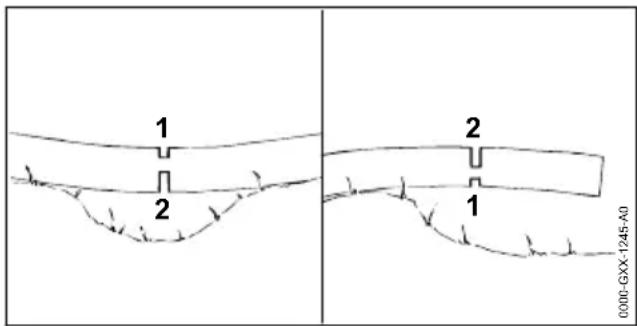
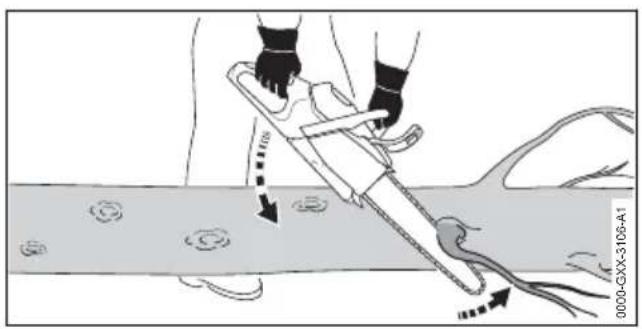
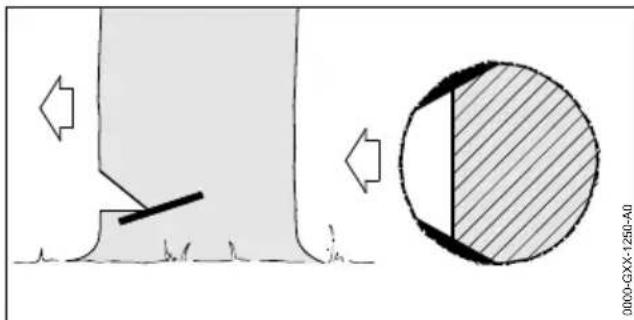
The guide bar can be pinched when cutting wood that is under tension. The user can lose control of the saw and be seriously injured.
Make a relieving cut in the compression side (1) first, then perform bucking cut at the tension side (2).
DANGER
- Working near live electric cables can result in accidental contact with the chain and damage the cables. This can result in serious or fatal injuries.
Do not work near live electric cables.
4.7.2 Limbing
WARNING
If the underside of the felled tree is limbed first, it will no longer be supported on the ground by branches. The tree can move during cutting work. This can result in serious or fatal injuries.
Cut through large limbs on the underside of the tree only after it has been bucked.
Do not stand on the log while limbing it.
A branch may fall to the ground during limbing. The user may trip, fall or be seriously injured.
Limb from the base to the crown of the tree.
4.7.3 Felling
WARNING
Inexperienced users cannot assess the dangers when felling a tree. Persons may be seriously or fatally injured and property may be damaged.
The user needs relevant knowledge of felling technology and experience of felling work.
If anything is unclear, consult an experienced expert for assistance and to determine the appropriate felling technique.
A tree and branches can fall on bystanders or objects during felling. The larger the falling parts are, the greater the risk of serious or fatal injury to people. Damage to property may occur.
Determine direction of fall so that the area in which the tree falls is clear.
Do not allow bystanders, children or animals within 2.5 tree lengths of the work area.
- Remove broken or dead branches from the tree crown before felling.
If bent or withered branches cannot be removed from the tree crown, consult an experienced expert for assistance and to determine the appropriate felling technique.
- Be aware of the tree crown and crowns of neighboring trees, and keep clear of falling branches.
- When the tree falls the trunk could break or spring back in the direction of the user. This may result in serious or fatal injury to the user.
Plan a sideways escape path behind the tree.
- Walk backwards along the escape path and observe the falling tree.
Do not walk backwards down slopes.
-
Obstacles in the work area and on the escape path can hinder the user. The user may trip and fall. This may result in serious or fatal injury to the user.
-
Remove all obstacles from the work area and escape path.
If you cut into or through the hinge, stabilizing strap or holding strap too soon, the intended direction of fall cannot be controlled or the tree may fall prematurely. Persons may be seriously or fatally injured and property may be damaged.
Do not cut into or through the hinge.
Cut through the stabilizing strap or holding strap last.
If the tree begins to fall too soon: Abandon the felling cut and retreat along the escape path.
- Kickback can occur if the rotating chain in the upper quadrant of the bar nose makes contact with a hard felling wedge and is suddenly braked. There is a risk of serious or fatal injury.
Use aluminum or plastic felling wedges.
If the tree does not fall all the way to the ground or gets caught on another tree, the operator cannot finish the operation in a controlled manner.
- Stop the felling operation and use a cable winch or suitable vehicle to pull the tree to the ground.
4.8 Reactive Forces
4.8.1 Kickback
Kickback can be caused for the following reasons:
- The rotating saw chain in the upper quadrant of the bar nose makes contact with a hard object and is suddenly braked.
- The rotating saw chain is pinched at the bar nose.
The chain brake cannot prevent kickback.
WARNING
If kickback occurs, the saw can be thrown up in the direction of the operator. The operator can lose control of the saw and be seriously or fatally injured.
Hold the saw firmly with both hands.
Always keep your body out of the plane of the cutting attachment.
4 Safety Precautions English
- Operate the saw as described in this instruction manual.
Do not cut with the upper quadrant of the bar nose.
Always cut with a properly sharpened and tensioned saw chain. - Use a reduced kickback saw chain.
Use a guide bar with a narrow radius nose.
Always cut with the chain running at full speed.
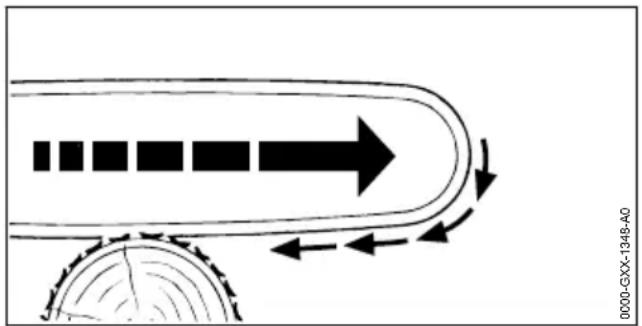
4.8.2 Pull-in
The saw is pulled away from the operator when the bottom of the bar is used for cutting.
WARNING
If the rotating chain makes contact with a hard object and is suddenly pinched, the saw is abruptly jerked away from the operator. The operator can lose control of the saw and be seriously or fatally injured.
Hold the saw firmly with both hands.
- Operate the saw as described in this instruction manual.
- Keep the guide bar straight in the cut.
Apply the spiked bumper properly.
Always cut with the chain running at full speed.
4.8.3 Pushback
The saw is pushed back toward the operator when the top of the bar is used for cutting.
WARNING
If the rotating chain makes contact with a hard object and is suddenly pinched, the saw can
be abruptly pushed back toward the operator. The operator can lose control of the saw and be seriously or fatally injured.
- Hold the saw firmly with both hands.
Operate the saw as described in this instruction manual. - Keep the guide bar straight in the cut.
Always cut with the chain running at full speed.
4.9 Transporting
4.9.1 Chainsaw
WARNING
The saw may turn over or shift during transport. This may result in personal injuries and damage to property.
Remove the battery.
Engage the chain brake.
Fit the scabbard so that it completely covers the guide bar.
- Secure the chainsaw with lashing straps or a net to prevent it turning over and moving.
4.9.2 Battery
WARNING
The battery is not protected against all ambient conditions. The battery may be damaged if it is exposed to certain ambient conditions and damage to property may occur.
- Never transport a damaged battery.
- Store the battery in non-conductive packaging.
The battery may turn over or shift during transport. This may result in personal injuries and damage to property.
- Pack the battery in packaging in such a way that it cannot move.
- Secure the packaging so that it cannot move.
4.10 Storing
4.10.1 Chainsaw
WARNING
Children are not aware of and cannot assess the dangers of a chainsaw and can be seriously injured.
English 5 Preparing the Saw for Operation
Remove the battery.
Engage the chain brake.
- Fit the scabbard so that it completely covers the guide bar.
- Store the saw out of the reach of children.
- Dampness can corrode the electrical contacts on the saw and metal components. This can damage the saw.
Remove the battery.
- Store the saw in a clean and dry condition.
4.10.2 Battery
WARNING
Children are not aware of and cannot assess the dangers of the battery and can be seriously injured.
- Store the battery out of the reach of children.
The battery is not protected against all ambient conditions. The battery may be damaged if it is exposed to certain ambient conditions.
- Store the battery in a clean and dry condition.
- Store the battery in an enclosed location.
- Store the battery separately from the chain saw and charger.
- Store the battery in non-conductive packaging.
- Store the battery at temperatures between -10^ and +50^ .
4.11 Cleaning, Maintenance and Repair
WARNING
The saw may start unintentionally if the battery is left in place during cleaning, maintenance or repair operations. This may result in serious injury to people and damage to property.
Remove the battery.
Aggressive cleaning agents, a water jet or pointed objects can damage the chainsaw, guide bar, the saw chain and the battery. If the saw, guide bar, saw chain or battery are not cleaned correctly, components may no longer
function properly or safety devices may be rendered inoperative. They may cause serious injury to persons.
Clean the saw, guide bar, saw chain and battery as described in this instruction manual.
If the saw, guide bar, saw chain or battery are not properly serviced or repaired, components may no longer function properly or safety devices may be rendered inoperative. This may result in serous or fatal injury to people.
- Do not attempt to service or repair the chainsaw or battery.
If the chainsaw or the battery require servicing or repairs: Contact your STIHL servicing dealer for assistance.
Service or repair the guide bar and saw chain as described in this User Manual.
The user may be cut by the sharp cutters while cleaning or servicing the saw chain. This may result in injury to the user.
Wear work gloves made from resistant material.
5 Preparing the Saw for Operation
5.1 Preparing the Saw for Operation
Perform the following steps before starting work:
Make sure the following components are in a safe condition:
-Chain saw, 14.6.1.
Guide bar, 4.6.2.
Saw chain, 4.6.3.
Battery, 4.6.4.
Check the battery, 10.7.
- Recharge the battery fully as described in the instruction manual for the STIHL AL 101, 300, 500 chargers.
Clean the saw, 15.1.
Mount the bar and chain, 6.1.1.
Tension the saw chain, 6.2.
Fill up with chain oil, 6.3.
Check the chain brake, 10.4.
Check the controls, 10.5.
Check chain lubrication, 10.6.
If you cannot carry out this work: Do not use your chainsaw and contact your STIHL servicing dealer for assistance.
6 Assembling the Saw English
6 Assembling the Saw
6.1 Mounting and Removing the Bar and Chain
6.1.1 Mounting the Guide Bar and Saw Chain
The guide bar and saw chain combinations that can be used with the chain sprocket are listed in the specifications, 20.1.
- switch off chain saw, engage chain brake and remove battery

Open the handle (1) of the wing nut (2).
- Rotate the wing nut (2) counterclockwise until the chain sprocket cover (3) can be removed.
Remove the chain sprocket cover (3).
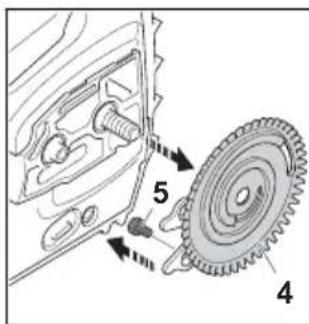
Remove the tensioning gear (4).
Remove the screw (5).
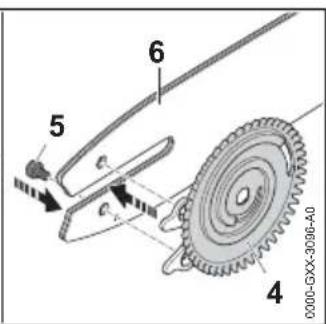
- Place the guide bar (6) on the tensioning gear (4) so that both pegs of the tensioning gear (4) sit in the bores of the guide bar.
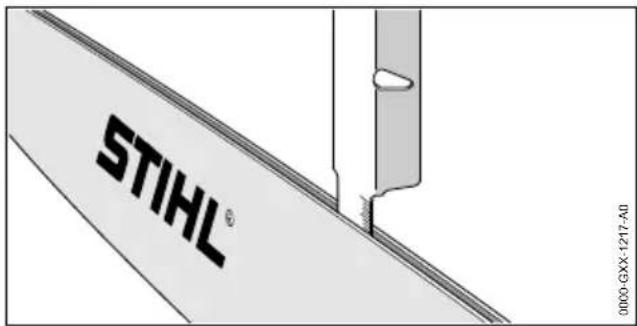
The guide bar (6) may be fitted either way round. The logo on the guide bar may also be upside down.
Insert and tighten down the screw (5) firmly.

Fit the saw chain in the guide bar groove so that the arrows on the tie straps on the top of the bar point in the direction of rotation.
Turn the tensioning gear (4) clockwise as far as it will go.
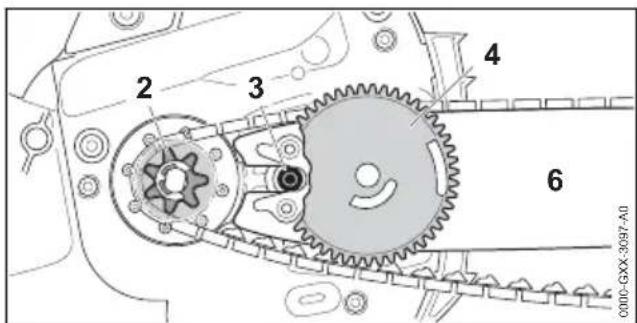
Fit the guide bar with tensioning gear and saw chain on the saw and check the following points:
- The tensioning gear (4) points towards the user.
- The drive links of the saw chain are seated in teeth of the chain sprocket (2).
- The head of screw (3) is seated in the slot in the guide bar (6).
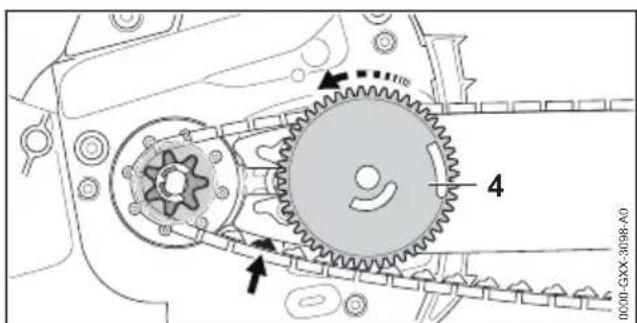
Disengage the chain brake.
- Rotate the tensioning gear (4) counterclockwise until the saw chain fits snugly against the guide bar. Make sure the drive links of the saw chain engage the guide bar groove.
The guide bar and saw chain are positioned against the chainsaw.
Fit the chain sprocket cover so that it is flush with the chainsaw.
If the chain sprocket cover is not flush with the chainsaw: Twist the adjusting wheel and reposition the chain sprocket cover.
The teeth of the adjusting wheel engage with the teeth of the tensioning gear.
- Rotate the wing nut clockwise until the chain sprocket cover sits tightly at the chainsaw.
- Close the handle of the wing nut.
6.1.2 Removing the Bar and Chain
- Switch off the chain saw, engage the chain brake and remove the battery.
Raise the grip of the wingnut.
English 6 Assembling the Saw
- Rotate the wingnut counterclockwise until the chain sprocket cover can be removed.
- Remove the sprocket cover.
- Turn the tensioning gear clockwise as far as stop.
The chain is now slack.
Remove the bar and chain.
Take out the screw in the tensioning gear.
Remove the tensioning gear.
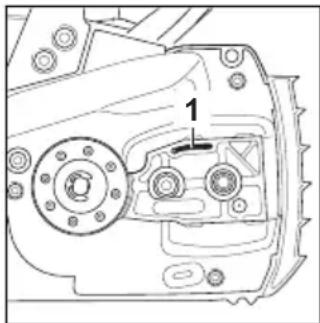
6.2 Tensioning the Saw Chain
The saw chain expands or contracts during cutting work. Chain tension changes as a result. Check chain tension regularly during operation and readjust if necessary.
- Switch off the chainsaw, engage the chain brake and remove the battery.
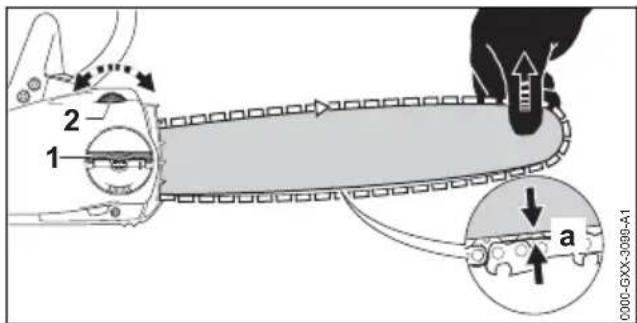
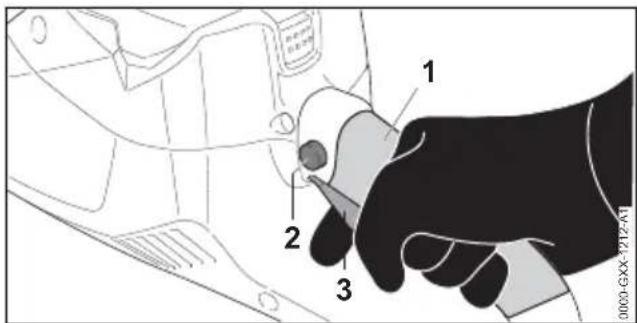
- Raise the grip of the wingnut (1).
- Rotate the wingnut (1) two turns counterclockwise.
The wingnut (1) is loose.
Disengage the chain brake.
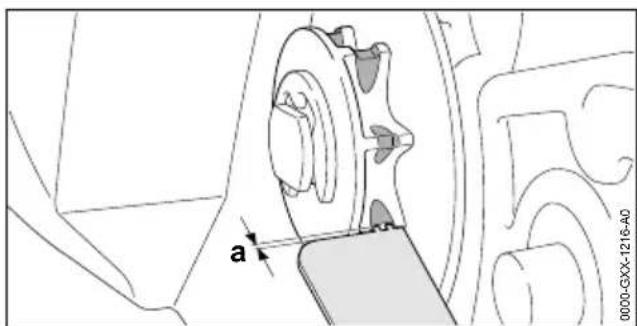
- Hold the bar nose up and turn the tensioning screw (2) clockwise or counterclockwise until the following points apply:
- Chain sag 'a' in the center of the bar is 1 - 2 mm
The chain can still be pulled easily along the bar with two fingers.
- While still holding the bar nose up, rotate the wingnut (1) clockwise until the chain sprocket cover is firmly seated.
If chain sag 'a' in the center of the bar is not 1 -2 mm: Readjust chain tension. - Fold down the grip of the wingnut (1).
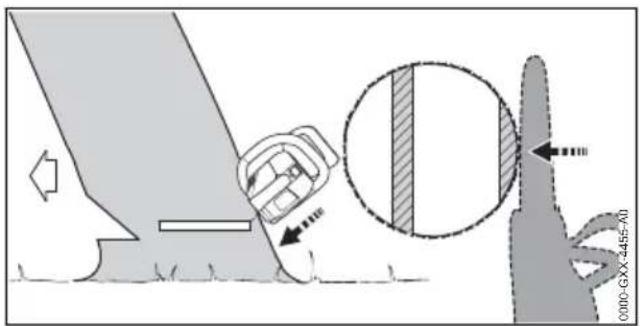
6.3 Filling Up with Saw Chain Oil
The saw chain oil lubricates and cools the rotating chain.
STIHL recommends you use a STIHL saw chain oil or an equivalent chain oil approved for chainsaws.
-
switch off chain saw, engage chain brake and remove battery
-
Place your chainsaw on a level surface so that the oil tank cap faces up.
- Use a damp cloth to clean the oil tank cap and the area around it.
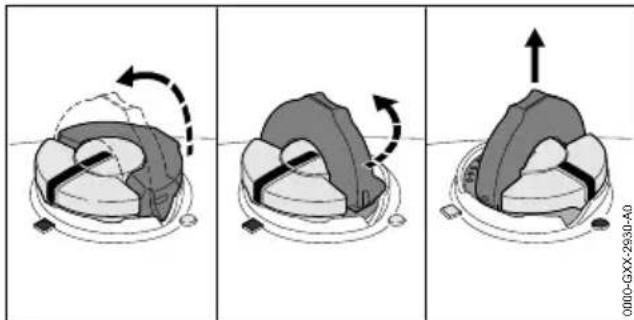
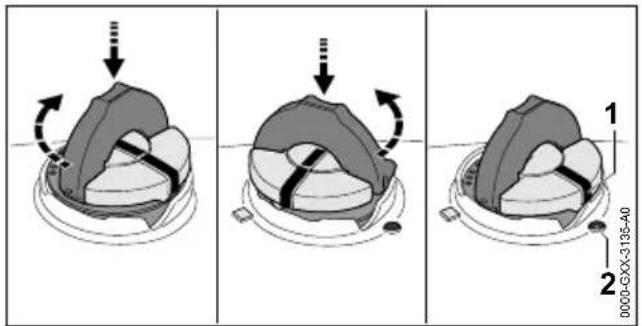
- Swing the grip on the oil tank cap to the vertical position.
Turn the oil tank cap counterclockwise as far as it will go. - Remove the oil tank cap.
- Fill up with saw chain oil, taking care not to spill any oil and not to overfill the tank.
If the grip on the oil tank cap has dropped into the closed position: Raise the grip until it is vertical.
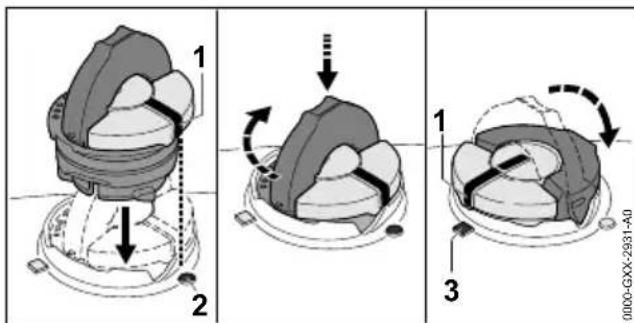
- Place the oil tank cap in the filler opening so that mark (1) lines up with mark (2).
Press the oil tank cap down and rotate it clockwise as far as it will go.
The oil tank cap snaps into place. The mark (1) points to mark (3).
- Check to see if the oil tank cap can be pulled upwards and off.
If the oil tank cap cannot be pulled upwards and off: Fold down the grip on the oil tank cap.
The oil tank is closed.
If the oil tank cap can be pulled upwards and off, perform the following steps:
- Place the oil tank cap in the filler opening – in any position.
Press the oil tank cap down and rotate it clockwise as far as it will go.
Press the oil tank cap down and rotate it counterclockwise until mark (1) points to mark (2).
Now try again to close the oil tank.
If the oil tank still cannot be closed properly: Do not use the chainsaw and contact a STIHL dealer for assistance.
The chainsaw is not in a safe condition.
7 Engaging and Disengaging the Chain Brake
7.1 Engaging the Chain Brake
The saw is equipped with a chain brake.
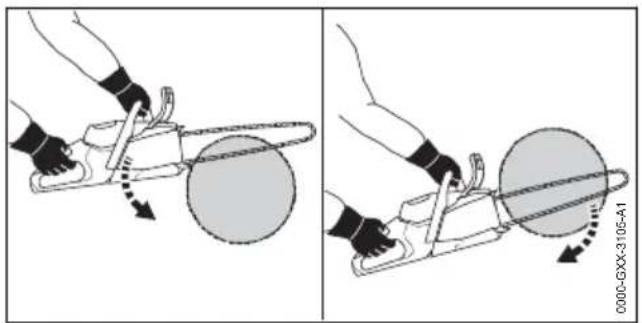
The chain brake is activated by the inertia of the front hand guard if the kickback force is high enough or can be engaged by the operator.
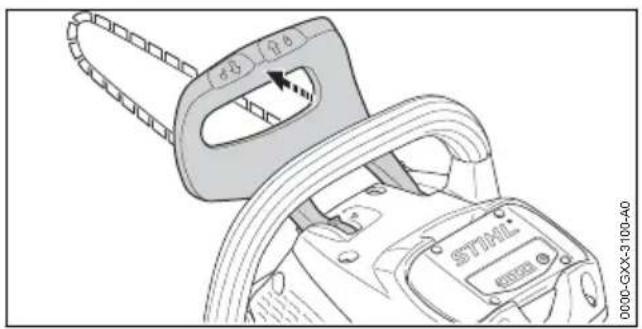
- Push the hand guard away from the front handle with your left hand. The hand guard engages with an audible click. The chain brake is engaged.
7.2 Disengaging the Chain Brake

Pull the hand guard toward the front handle with your left hand. The hand guard engages with an audible click. The chain brake is disengaged.
8 Removing and Fitting the Battery
8.1 Inserting the battery
Engage the chain brake.
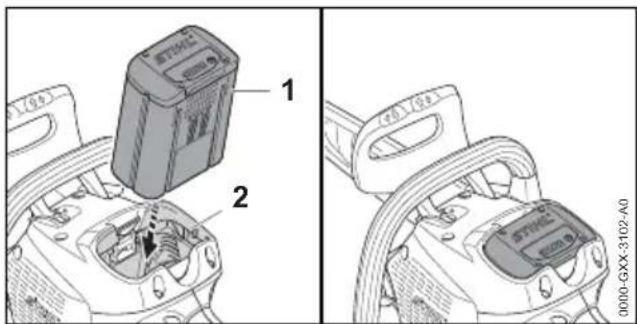
- Push the battery (1) into the battery compartment (2) as far as stop.
The battery (1) engages with a click and is now locked.
8.2 Removing the Battery
- Stand the saw on a level surface.
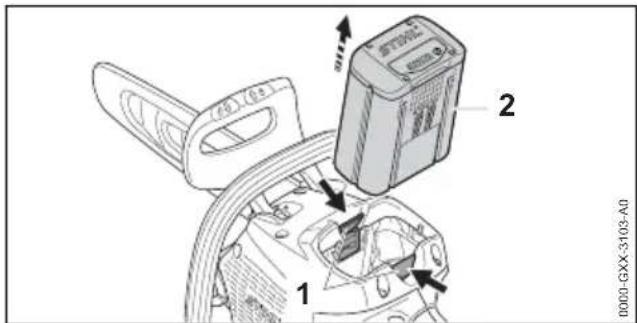
Press both locking levers (1). The battery (2) is unlocked and can be removed.
9 Switching the Saw On/Off
9.1 Switching On
Disengage the chain brake.
English 10 Testing the Chain Saw and Battery
- Hold the saw with your right hand on the grip area (1) of the control handle - wrap your thumb around the control handle.
Depress the lockout button (2) with your thumb and hold it there. - Pull the trigger (3) with your index finger and hold it there.
The motor is accelerated and the chain rotates. Release the lockout button (2).
- Hold the saw with your left hand on the front handle - wrap your thumb around the handle-bar.
9.2 Switching Off
Release the trigger.
The chain stops rotating.
If the chain continues to rotate: Engage the chain brake, remove the battery and contact your STIHL servicing dealer for assistance. The saw has a malfunction.
10 Testing the Chain Saw and Battery
10.1 Checking the Chain Sprocket
- Switch off the chain saw, engage the chain brake and remove the battery.
Disengage the chain brake.
Remove the chain sprocket cover.
Remove the bar and chain.
- Use a STIHL gauge to check the wear marks on the sprocket.
If wear marks are deeper than a = 0.5 mm: Do not use your chain saw and contact your STIHL servicing dealer.
The chain sprocket must be replaced.
10.2 Checking the Guide Bar
- Switch off the chain saw, engage the chain brake and remove the battery.
Remove the chain and guide bar.
Measure depth of bar groove with scale on STIHL filing gauge.
Install a new guide bar if one of the following points applies:
Guide bar is damaged.
- Measured bar depth is less than specified minimum depth, 9.3.
Bar groove is pinched or splayed.
If you have any queries: Contact your STIHL servicing dealer.
10.3 Checking the Saw Chain
- Switch off the chainsaw, engage the chain brake and remove the battery.
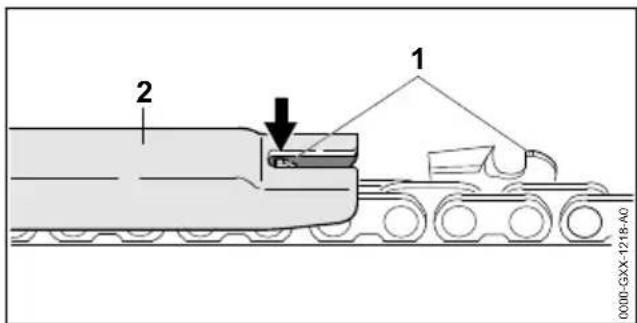
- Use a STIHL filing gauge (2) to check the height of the depth gauges (1). The STIHL filing gauge must match the chain pitch.
If a depth gauge (1) projects from the filing gauge (2): Lower the depth gauge (1), 6.3.
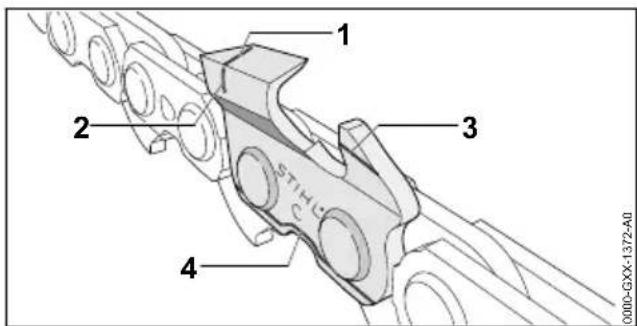
- Make sure the service marks (1 to 4) on the cutters are visible.
If one of the service marks is not visible on a cutter: Do not use your chainsaw and contact your STIHL servicing dealer.
11 Operating the Saw English
- Use a STIHL filing gauge to check that a filing angle of 30^ has been maintained on all cutters. The STIHL filing gauge must match the chain pitch.
If a filing angle of 30^ has not been maintained: Resharpen the saw chain.
If you have any queries: Contact your STIHL servicing dealer for assistance.
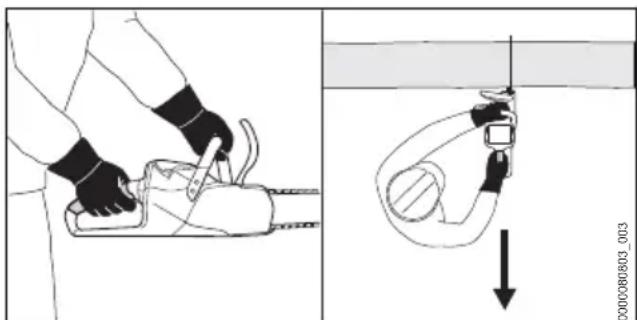
10.4 Testing the Chain Brake
Engage the chain brake and remove the battery.

WARNING
The chain's cutters are very sharp. There is a risk of cut injuries.
- Wear work gloves made of durable material.
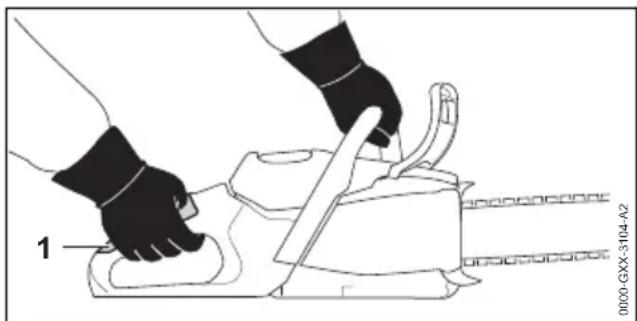
Try to pull the chain along the guide bar by hand. If the chain cannot be pulled along the bar by hand, the chain brake is functioning.
If the chain can be pulled along the bar by hand: Do not use your chain saw and contact your STIHL servicing dealer. The chain brake is defective.
10.5 Checking the controls
Lockout button and trigger
Engage chain brake and remove battery.
- Attempt to pull the trigger lever without depressing the lockout button.
If the trigger can be pulled: Do not use your chainsaw and contact your STIHL servicing dealer.
The lockout button is defective.
Press and hold the lockout button.
Press and release the trigger.
If the trigger is stiff or does not spring back to its idle position: Do not use your chainsaw and contact your STIHL servicing dealer for assistance.
The trigger is defective.
Switching on the chainsaw
Insert battery.
Disengage the chain brake.
Press and hold the lockout button.
Press and hold the trigger. The saw chain starts running.
- Release the trigger.
The saw chain stops running.
If the chain continues to rotate: Engage the chain brake, remove the battery and contact your STIHL servicing dealer.
Your saw has a malfunction.
10.6 Checking Chain Lubrication
Fit the battery.
Disengage the chain brake.
- Hold the guide bar over a light surface.
Switch on the saw.
Chain oil is thrown off the chain and is visible on the light surface. Chain lubrication is operating properly.
If no chain oil can be seen:
Fill up with chain oil.
Check chain lubrication again.
If chain oil is still not visible on the light surface: Do not use your chain saw and contact your STIHL servicing dealer. Chain lubrication is defective.
10.7 Testing the Battery
Press button on battery. The LEDs glow or flash.
If the LEDs do not glow or flash: Do not use the battery and contact your STIHL servicing dealer.
There is a malfunction in the battery.
11 Operating the Saw
11.1 Holding and Controlling the Chainsaw
- Hold and control the chainsaw with your left hand on the handlebar and your right hand on the grip area (1) of the control handle so that your left thumb wraps around the handlebar and your right thumb wraps around the control handle.
11.2 Sawing

WARNING
If kickback occurs, the chainsaw can be thrown up in the direction of the operator. This may result in serious or fatal injury to the user.
Always cut with the chain running at full speed.
Do not cut with the upper quadrant of the guide bar nose.
- Begin the cut with the chain running at full speed and keep the guide bar vertical.
Engage the spiked bumper and use it as a fulcrum.
Guide the full width of the guide bar into the wood and reposition the spiked bumper as required.
Take the weight of the chainsaw at the end of the cut.
11.3 Delimbing
Support the chainsaw on the log.
- With the chain running at full speed, pivot the guide bar downward against the limb.
Cut through the limb with the top of the guide bar.

If the limb is under tension: Make the relieving cut (1) into the compression side and then perform the bucking cut (2) from the tension side.
11.4 Felling
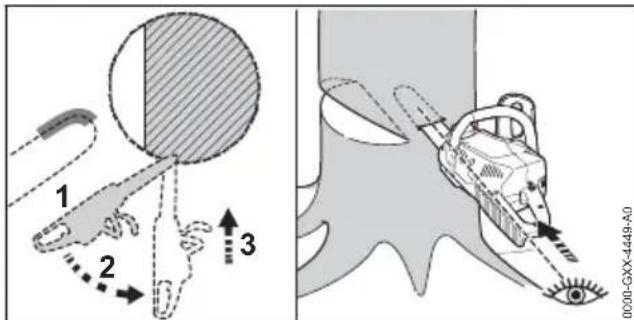
11.4.1 Determining direction of fall and escape path
Determine direction of fall so that the area in which the tree falls is clear.
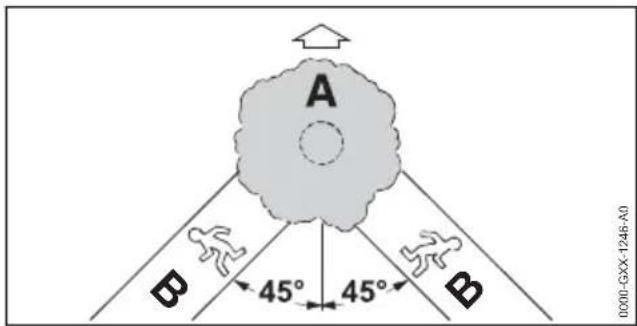
Observe the following points when planning escape path (B):
- Escape path (B) at an angle of 45^ to direction of fall (A).
- No obstacles on the escape path (B).
- The top of the tree can be observed.
If the escape path (B) is on a slope, it must be parallel to the slope.
11.4.2 Preparing work area at base of tree
- Remove obstacles from work area at tree base.
Remove growth from tree base.
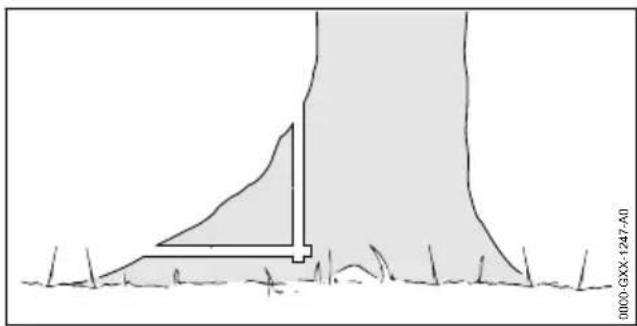
If the tree has large, healthy buttress roots: Make vertical cut first and then a horizontal cut, and remove the resulting piece.
11 Operating the Saw English
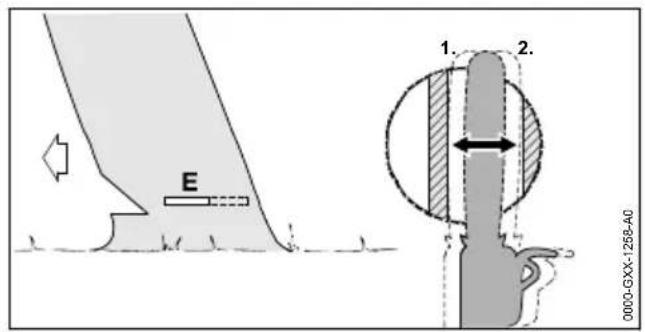
11.4.3 Basic information on felling cut
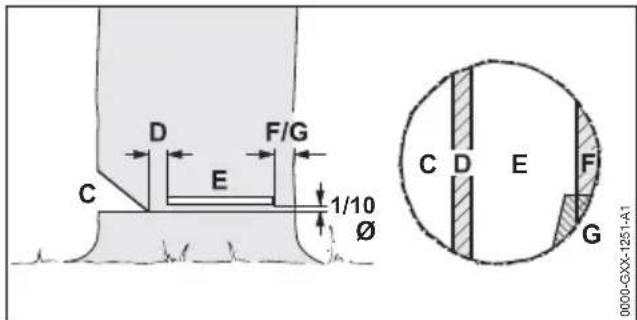
C Felling notch
The felling notch determines the direction of fall.
D Hinge
The hinge helps control the falling tree. The width of the hinge is 1/10 of the trunk diameter.
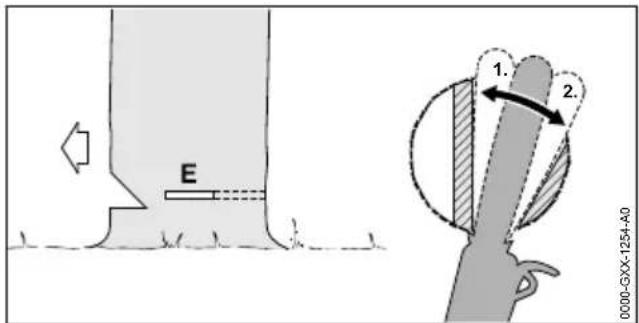
E Felling cut
The tree is felled with the felling cut. The felling cut is 1/10 of the trunk diameter (at least 3 cm) above the bottom of the felling notch.
F Stabilizing strap
The stabilizing strap supports the tree and helps prevent it from falling prematurely. The width of the stabilizing strap is 1/10 to 1/5 of the trunk diameter.
G Holding strap
The holding strap supports the tree and helps prevent it from falling prematurely. The width of the holding strap is 1/10 to 1/5 of the trunk diameter.
11.4.4 Cutting the felling notch
The felling notch determines the direction in which the tree falls. Country-specific standards for making the felling notch must be observed.
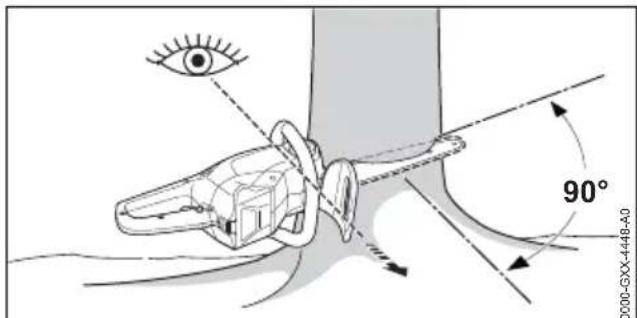
Position the saw so that the felling notch is an right angles to the direction of fall and the saw is close to the ground.
Make the horizontal cut.
Make the angle cut at 45^ to the horizontal cut.
If the wood is sound and long-fibered:
Observe the following points when making sapwood cuts:
- The cuts must be the same at both sides.
- The cuts must be at the same height as the bottom of the felling notch.
- The width of the cuts is 1/10 of the trunk diameter.
The trunk does not splinter when the tree falls.
11.4.5 Plunge cutting
Plunge cutting is a technique required for felling.
Begin cut with the lower portion of the guide bar nose - with chain running at full speed.
Cut until depth of kerf is twice the width of the guide bar.
- Swing the saw into plunge-cutting position.
Perform the plunge cut.
11.4.6 Selecting the Appropriate Felling Cut The choice of appropriate felling cut depends on the following conditions:
- The natural inclination of the tree
The tree's branch formation - Damage to the tree
The tree's state of health - If there is snow on the tree: the snow load
The direction of slope - Wind direction and speed
- Nearby trees, if any
There are different features of these conditions. Only two features are described in this Instruction Manual.
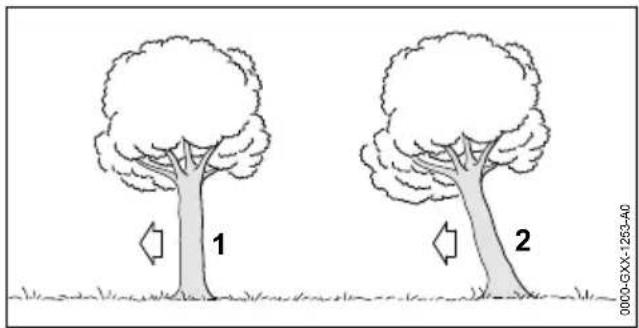
1 Normal tree
A normal tree is vertical and has an even crown.
2 Leaner
A leaner stands at an angle and the crown faces in the direction of fall.
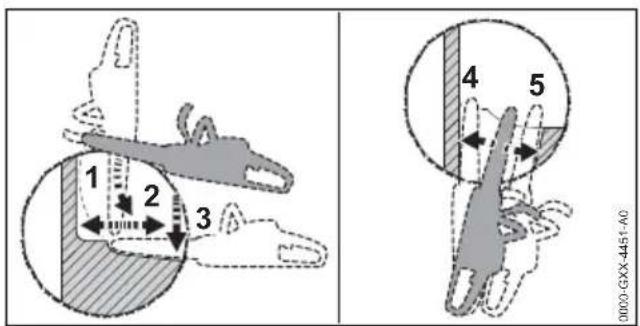
11.4.7 Felling normal, small diameter tree
A normal tree is felled with a felling cut and stabilizing strap. This felling cut must be performed if the tree diameter is less than the guide bar's length.
Shout a warning.
- Plunge the guide bar into the felling cut until it is visible at the other side of the trunk, 11.4.5.
Apply the spiked bumper behind the hinge and use it as a pivot.
Enlarge felling cut in direction of hinge.
Enlarge felling cut in direction of stabilizing strap.

-
Insert a felling wedge. The felling wedge must match the tree diameter and the width of the felling cut.
Shout a warning. -
With outstretched arms, cut through the stabilizing strap horizontally from outside at the same level as the felling cut. The tree falls.
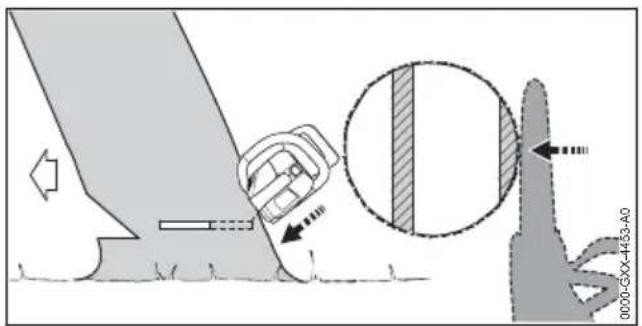
11.4.8 Felling normal, large diameter tree
A normal tree is felled with a felling cut and stabilizing strap. This felling cut must be performed if the tree diameter is greater than the guide bar's length.
Shout a warning.
Apply the spiked bumper at the same height as the felling cut and use it as a pivot.
- Hold the saw horizontally and swing it into the felling cut as far as possible.
Enlarge felling cut in direction of hinge.
Enlarge felling cut in direction of stabilizing strap.
Move to the other side of the tree.
- Plunge the guide bar into the felling cut at the same height.
Enlarge felling cut in direction of hinge.
- Enlarge felling cut in direction of stabilizing strap.

- Insert a felling wedge. The felling wedge must match the tree diameter and the width of the felling cut.
Shout a warning. - With outstretched arms, cut through the stabilizing strap horizontally from outside at the same level as the felling cut. The tree falls.
12 After Finishing Work English
11.4.9 Felling a small diameter leaner
A leaner is felled with a felling cut and holding strap. This felling cut must be performed if the tree diameter is less than the guide bar's length.
Shout a warning.
- Plunge the guide bar into the felling cut until it is visible at the other side of the trunk, 11.4.5.
Enlarge felling cut in direction of hinge.
Enlarge felling cut in direction of holding strap.
Shout a warning.
- With arms outstretched, cut through the holding strap from outside at a downward angle. The tree falls.
11.4.10 Felling a large diameter leaner
A leaner is felled with a felling cut and holding strap. This felling cut must be performed if the tree diameter is greater than the guide bar's length.
Shout a warning.
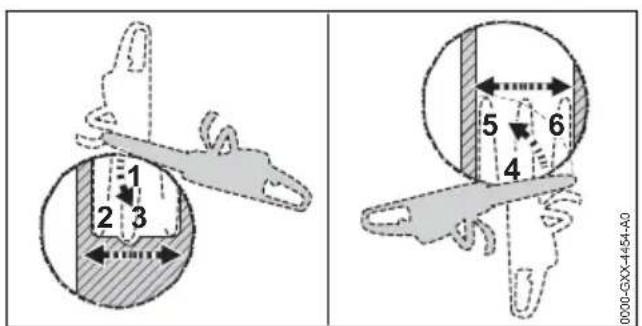
Apply the spiked bumper behind the holding strap at the same height as the felling cut and use it as a pivot.
- Hold the saw horizontally and swing it into the felling cut as far as possible.
Enlarge felling cut in direction of hinge.
- Enlarge felling cut in direction of holding strap.
Move to the other side of the tree.
Apply the spiked bumper behind the hinge at the same height as the felling cut and use it as a pivot.
- Hold the saw horizontally and swing it into the felling cut as far as possible.
Enlarge felling cut in direction of hinge.
Enlarge felling cut in direction of holding strap.
Shout a warning.
- With arms outstretched, cut through the holding strap from outside at a downward angle. The tree falls.
12 After Finishing Work
12.1 After Finishing Work
- Switch off the chain saw, engage the chain brake and remove the battery.
If the saw is wet: Allow the saw to dry.
If the battery is wet: Allow the battery to dry.
Clean the saw.
Clean the bar and chain.
Loosen the wingnut. - Rotate the adjusting wheel two full turns counterclockwise.
The chain is now slack.
Tighten down the wingnut.
- Fit the scabbard so that it completely covers the guide bar.
Clean the battery.
13 Transporting
13.1 Transporting the Chainsaw
- switch off chain saw, engage chain brake and remove battery
- Fit the chain scabbard so that it completely covers the guide bar.
Carrying the chainsaw
- Carry the chainsaw by holding the front handle in your right hand with the guide bar pointing to the rear.
Carrying the chainsaw in a vehicle
- Secure the saw to prevent turnover and movement.
13.2 Transporting the Battery
-
Switch off the chain saw, engage the chain brake and remove the battery.
Make sure the battery is in a safe condition.
Observe the following points when packing the battery: -
The packaging must be non-conductive.
- Make sure the battery cannot shift inside the packaging.
- Secure the packaging so that it cannot move.
The battery is subject to the requirements for the transport of dangerous goods. The battery is classified as UN 3480 (lithium-ion batteries) and has been tested in accordance with UN Manual of Tests and Criteria, Part III, sub-section 38.3.
For transport regulations see www.stihl.com/ safety-data-sheets
14 Storing
14.1 Storing the Chainsaw
- Switch off the chainsaw, engage the chain brake and remove the battery.
-
Fit the scabbard so that it completely covers the guide bar.
Observe the following points when storing the saw: -
Saw is out of the reach of children.
- The saw is clean and dry.
If you store the saw for more than 30 days: Remove the bar and chain.
14.2 Storing the Battery
STIHL recommends that you store the battery with a charge between 40% and 60% (2 LEDs glow green).
Observe the following points when storing the battery:
Battery is out of the reach of children.
- Battery is clean and dry.
Battery is in an enclosed space.
- Store the battery separately from the saw and charger.
Battery is in non-conductive packaging.
- Battery is in a temperature range between -10^ and +50^ .
15 Cleaning
15.1 Cleaning the chainsaw
- switch off chain saw, engage chain brake and remove battery
Clean the chainsaw with a damp cloth or STIHL resin solvent.
Clean vents with a paintbrush.
Remove the chain sprocket cover.
Clean the area around the chain sprocket with a damp cloth or STIHL resin solvent.
- Remove foreign objects from the battery compartment and clean the battery compartment with a damp cloth.
Clean the electrical contacts in the battery compartment with a paintbrush or soft brush.
Fit the chain sprocket cover.
15.2 Cleaning the Bar and Chain
- Switch off the chainsaw, engage the chain brake and remove the battery.
Remove the bar and chain.
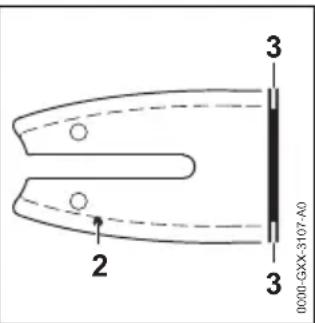
- Clean the oil port (1), oil inlet hole (2) and bar groove (3) with a soft brush or STIHL resin solvent.
Clean the saw chain with a soft brush or STIHL resin solvent.
Mount the bar and chain.
15.3 Cleaning the Battery
Clean the battery with a damp cloth.
16 Maintenance
16.1 Maintenance Intervals
The maintenance intervals are dependent on the environmental and operating conditions. STIHL recommends the following maintenance intervals:
Chain brake
- Have the chain brake serviced by a STIHL servicing dealer at the following intervals:
Full-time usage: every 3 months
Part-time usage: every 6 months - Occasional usage: every 12 months
17 Repairing English
Weekly
Check the chain sprocket.
Check and deburr the guide bar.
- Check and sharpen the saw chain.
Monthly
- Have the oil tank cleaned by a STIHL servicing dealer.
16.2 Deburring the Guide Bar
A burr can build up on the outer edge of the guide bar.
- Remove burr with a flat file or a STIHL guide bar dressing tool.
If you have any queries: Contact your STIHL servicing dealer.
16.3 Sharpening the Saw Chain
Correctly sharpening saw chains requires a lot of practice.
STIHL files, STIHL filing aids, STIHL sharpeners and the brochure "Sharpening STIHL Saw Chains" help you achieve the right results. To obtain the brochure visit http://www.stihl.com/ sharpening-brochure.
STIHL recommends you have saw chains sharpened by a STIHL servicing dealer.
The chain's cutters are very sharp. There is a risk of cut injuries.
Wear work gloves made of durable material.
-
File each cutter with a round file so that the following points are observed:
-
Round file matches the chain pitch.
- File from the inside to the outside of the cutter.
- Hold the file at right angle to the guide bar.
-
Maintain a filing angle of 30^ .
-
File down the depth gauges with a flat file so that they are level with the STIHL filing gauge and parallel to the service mark. The STIHL filing gauge must match the chain pitch.
If you have any queries: Contact your STIHL servicing dealer for assistance.
17 Repairing
17.1 Repairing the Chainsaw and Battery
The chainsaw, guide bar, saw chain and battery cannot be repaired by the user.
If the saw, guide bar or saw chain is damaged: Do not use your saw, guide bar or saw chain, and contact your STIHL servicing dealer for assistance.
If the battery has a malfunction or is damaged: Replace the battery.
18 Troubleshooting
18.1 Troubleshooting Chainsaw or Battery
Fault LEDs on the
battery
Saw does not start when switched on.
1 LED flashing green.
Cause Remedy
1 LED emits red light.
State of charge of the battery is too low.
The battery is too warm or too cold.
- Recharge the battery fully as described in the User Manual for the STIHL AL 101, 300, 500 chargers.
Engage chain brake and remove battery.
| Fault LEDs on the | battery | Cause Remedy | |
| ▲ Allow the battery to cool down or warm up. | |||
| 3 LEDs flash red. | Malfunction in saw. ▲ Engage chain brake and remove battery. ▲ Clean electrical contacts in the battery compartment. ▲ Insert battery. ▲ Disengage the chain brake. ▲ Switch on the saw. ▲ If 3 LEDs continue to flash red: Do not use your chainsaw and contact your STIHL servicing dealer for assistance. | ||
| 3 LEDs emit red light. | Chainsaw is too hot. ▲ Engage chain brake and remove battery. ▲ Allow the chainsaw to cool down. | ||
| 4 LEDs flash red. | There is a fault in the battery. | ▲ Engage the chain brake, remove and refit the battery. ▼ Disengage the chain brake. ▼ Switch on the saw. ▼ If 4 LEDs continue to flash red: Do not use the battery and contact your STIHL dealer for assistance. | |
| No electrical contact between the chainsaw and battery. | ▲ Engage chain brake and remove battery. ▲ Clean electrical contacts in the battery compartment. ▲ Insert battery. | ||
| Saw or battery | damp. ▲ Allow saw or battery to dry. | ||
| Saw cuts out during operation. | 3 LEDs emit red light. | Chainsaw is too hot. ▲ Engage chain brake and remove battery. ▲ Allow the chainsaw to cool down. | |
| There is an electrical fault. | ▲ Engage the chain brake, remove and refit the battery. ▼ Switch on the saw. | ||
| Chainsaw run-time is too short. | The battery is not fully charged. | ▲ Recharge the battery fully as described in the User Manual for the STIHL AL 101, 300, 500 chargers. | |
| The battery life has been exceeded. | ▲ Replace battery. | ||
| Smell of smoke or burning in the cutting area. | The saw chain has not been correctly sharpened. | Sharpen chain as specified. | |
| Insufficient saw chain oil in the oil tank. | Fill up with saw chain oil. | ||
| The chain lubrication system is supplying insufficient saw chain oil. | Do not use the chainsaw. Consult a STIHL dealer. | ||
| The saw chain is over-tensioned. | Tension the saw chain as specified. | ||
| The chainsaw is not being used properly. | Have correct use explained, then practice. | ||
19 Specifications
19.1 STIHL MSA 220 C Chainsaw
Approved batteries:
- STIHL AP
-
STIHL AR
-
Weight without battery, guide bar and saw chain 2.9kg
Max. oil tank capacity: 210 cc (0.21 l)
For battery life see www.stihl.com/battery-life.
20 Bar and Chain Combinations English
19.2 Chain Sprockets and Chain Speeds
The following chain sprockets may be used:
6-tooth for 3 / 8'' P
Maximum chain speed: 23.3m / s
19.3 Minimum Groove Depth of Guide Bars
The minimum groove depth depends on the pitch of the guide bar.
- 3 / 8^ P:5 mm
19.4 STIHL AP battery
- Battery Technology: Lithium-ion
Voltage: 36 V
Capacity in Ah: see rating label
Energy content in Wh: see rating label
Weight in kg: see rating label - Permissible temperature range for operation and storage: -10^ to +50^
19.5 Sound Values and Vibration Values
The K-value for sound pressure levels is 2 dB(A).
K-value for sound power levels is 2 dB(A). The
K-value for vibration level is 2m / s^2
MSA 220 C 3/8" P
Sound pressure level L_pA measured according to EN 60745-2-13:89 dB(A)
20 Bar and Chain Combinations
20.1 STIHL MSA 220 C Chainsaw
Sound power level LWA measured according to EN 60745-2-13: 100 dB(A)
Vibration level ahv measured according to EN 60745-2-13:
Control handle: 3.6m / s^2
- Handlebar: 4.8 m/s^2
The vibration levels indicated were measured according to a standardized test method and can be used as a basis for comparing electric power tools. The vibration levels actually occurring may vary from the values indicated, depending on the type of application. The vibration levels indicated can be used for an initial estimate of the vibration stress. The actual vibration stress has to be estimated. The times when the electric power tool is switched off and the times when it is switched on but running under no load can be taken into account in the estimate.
For information on compliance with Employers' Vibration Directive 2002/44/EC see www.stihl.com/vib.
19.6 REACH
REACH is an EC regulation and stands for the Registration, Evaluation, Authorisation and Restriction of Chemical substances.
For information on compliance with the REACH regulation see www.stihl.com/reach.
| Pitch Drive | link gauge/groove width | Length | Guide bar Number of teeth, spro-cket nose | Number of drive links | Saw chain | |
| 3/8" P 1.3 mm | 30 cm | 30 cm | Rollomatic E | 9 | 44 | 3/8" PS3 |
| CM 35 50 | ||||||
| CM 40 55 | ||||||
| 30 cm 44 | 3/8" PSCM 35 50 | |||||
| CM 40 55 | ||||||
| 30 cm 44 | 3/8" PM3CM 35 50 | |||||
| CM 40 55 | ||||||
| 30 cm 44 | 3/8" PD3CM 35 50 | |||||
| CM 40 55 | ||||||
| The cutting length of a guide bar depends on the chainsaw and the saw chain being used. The actual cutting length of a guide bar may be less than the specified length. | ||||||
21 Spare Parts and Accessories
21.1 Spare parts and accessories
STIHL These symbols indicate original STIHL spare parts and original STIHL accessories.
STIHL recommends the use of original STIHL spare parts and accessories.
Despite ongoing market observation, STIHL is unable to judge the reliability, safety and suitability of other manufacturers' spare parts and accessories; accordingly, STIHL cannot warrant for the use of those parts.
Original STIHL spare parts and original STIHL accessories are available from STIHL dealers.
22 Disposal
22.1 Disposing of Chainsaw and Battery
Contact the local authorities or your STIHL dealer for information on disposal.
Improper disposal can be harmful to health and pollute the environment.
Take STIHL products including packaging to a suitable collection point for recycling in accordance with local regulations.
Do not dispose with domestic waste.
23 EC Declaration of Conformity
23.1 STIHL MSA 220 C Chainsaw
declare under our sole responsibility that
Category: Cordless chainsaw
Manufacturer's brand: STIHL
- Model: MSA 220 C, Serial identification: 1251
conforms to the specifications of Directives 2011/65/EU, 2006/42/EC, 2014/30/EU and 2000/14/EC and has been developed and built in compliance with the versions of the following standards valid at the production date: EN 55014-1, EN 55014-2, EN 60745-1 and EN 60745-2-13.
The EC type examination test was carried out pursuant to Directive 2006/42/EC, Art. 12.3(b) at:
The measured and guaranteed equivalent sound power level has been determined in accordance with Directive 2000/14/EC, Annex V.
MSA 220 C
Measured sound power level: 102 dB(A)
- Guaranteed sound power level: 104 dB(A)
The technical documents are stored at ANDREAS STIHL AG & Co. KG Produktzulassung.
The year of manufacture, country of manufacture and serial number are applied to the chainsaw.
Done at Waiblingen, 03.02.2020
Dr. Jürgen Hoffmann, Director Product Certification & Regulatory Affairs
24 UKCA Declaration of Conformity
24.1 STIHL MSA 220 C Chainsaw
UK CA
declare under our sole responsibility that
Category: Cordless chainsaw
Manufacturer's brand: STIHL
- Model: MSA 220 C, Serial identification: 1251
conforms to the relevant provisions of UK regulations The Restriction of the Use of Certain Hazardous Substances in Electrical and Electronic Equipment Regulations 2012, Supply of Machinery (Safety) Regulations 2008, Electromagnetic Compatibility Regulations 2016 and Noise Emission in the Environment by Equipment for use Outdoors Regulations 2001 and has been manufactured in compliance with the following standards in the versions valid on the date of produc
25 General Power Tool SafetyWarnings English
tion: EN 55014-1, EN 55014-2, EN 60745-1 and EN 60745-2-13.
The type examination was carried out by: Intertek Testing & Certification Ltd, Academy Place, 1-9 Brook Street, Brentwood, Essex, CM14 5NQ, United Kingdom
- Certification number: ITS UK MCR 37
The measured and guaranteed sound power levels have been determined in accordance with UK regulation Noise Emission in the Environment by Equipment for use Outdoors Regulations 2001, Schedule 8. MSA 220 C
Measured sound power level: 102 dB(A)
Guaranteed sound power level: 104 dB(A)
The technical documents are stored at ANDREAS STIHL AG & Co. KG.
The year of manufacture, country of manufacture and serial number are indicated on the chainsaw.
Waiblingen, 2022-03-31
Dr. Jürgen Hoffmann, Director Product Certification & Regulatory Affairs
25 General Power Tool SafetyWarnings
25.1 Introduction
This chapter reproduces the pre-formulated, general safety precautions specified in the IEC 62841 standard for hand-held motor-operated electric tools.
STIHL is obliged to publish these texts.
The safety precautions and warnings on avoiding an electric shock given under "Electrical Safety" do not apply to STIHL cordless products.

WARNING
- Read all safety warnings, instructions, illustrations and specifications provided with this power tool. Failure to follow all instructions listed below may result in electric shock, fire and/or serious injury. Save all warnings and instructions for future reference.
The term "electric power tool" in the safety warnings refers to mains-operated (corded) power tools or battery-operated (cordless) power tools.
25.2 Work area safety
a) Keep work area clean and well lit. Cluttered or dark areas invite accidents.
b) Do not operate power tools in explosive atmospheres, such as in the presence of flammable liquids, gases or dust. Power tools create sparks which may ignite the dust or fumes.
c) Keep children and bystanders away while operating a power tool. Distractions can cause you to lose control.
25.3 Electrical safety
a) Power tool plugs must match the outlet. Never modify the plug in any way. Do not use any adapter plugs with earthed (grounded) power tools. Unmodified plugs and matching outlets will reduce risk of electric shock.
b) Avoid body contact with earthed or grounded surfaces, such as pipes, radiators, ranges and refrigerators. There is an increased risk of electric shock if your body is earthed or grounded.
c) Do not expose power tools to rain or wet conditions. Water entering a power tool will increase the risk of electric shock.
d) Do not abuse the cord. Never use the cord for carrying, pulling or unplugging the power tool. Keep cord away from heat, oil, sharp edges or moving parts. Damaged or entangled cords increase the risk of electric shock.
e) When operating a power tool outdoors, use an extension cord suitable for outdoor use. Use of a cord suitable for outdoor use reduces the risk of electric shock.
f) If operating a power tool in a damp location is unavoidable, use a residual current device (RCD) protected supply. Use of an RCD reduces the risk of electric shock.
25.4 Personal safety
a) Stay alert, watch what you are doing and use common sense when operating a power tool. Do not use a power tool while you are tired or under the influence of drugs, alcohol or medication. A moment of inattention while operating power tools may result in serious personal injury.
English 25 General Power Tool SafetyWarnings
b) Use personal protective equipment. Always wear eye protection. Protective equipment such as a dust mask, non-skid safety shoes, hard hat or hearing protection used for appropriate conditions will reduce personal injuries.
c) Prevent unintentional starting. Ensure the switch is in the off-position before connecting to power source and/or battery pack, picking up or carrying the tool. Carrying power tools with your finger on the switch or energising power tools that have the switch on invites accidents.
d) Remove any adjusting key or wrench before turning the power tool on. A wrench or a key left attached to a rotating part of the power tool may result in personal injury.
e) Do not overreach. Keep proper footing and balance at all times. This enables better control of the power tool in unexpected situations.
f) Dress properly. Do not wear loose clothing or jewellery. Keep your hair and clothing away from moving parts. Loose clothes, jewellery or long hair can be caught in moving parts.
g) If devices are provided for the connection of dust extraction and collection facilities, ensure these are connected and properly used. Use of dust collection can reduce dust-related hazards.
h) Do not let familiarity gained from frequent use of tools allow you to become complacent and ignore tool safety principles. A careless action can cause severe injury within a fraction of a second.
25.5 Power tool use and care
a) Do not force the power tool. Use the correct power tool for your application. The correct power tool will do the job better and safer at the rate for which it was designed.
b) Do not use the power tool if the switch does not turn it on and off. Any power tool that cannot be controlled with the switch is dangerous and must be repaired.
c) Disconnect the plug from the power source and/or remove the battery pack, if detachable, from the power tool before making any adjustments, changing accessories, or storing power tools. Such preventive safety measures reduce the risk of starting the power tool accidentally.
d) Store idle power tools out of the reach of children and do not allow persons unfamiliar with the power tool or these instructions to operate the power tool. Power tools are dangerous in the hands of untrained users.
e) Maintain power tools and accessories. Check for misalignment or binding of moving parts, breakage of parts and any other condition that may affect the power tool's operation. If damaged, have the power tool repaired before use. Many accidents are caused by poorly maintained power tools.
f) Keep cutting tools sharp and clean. Properly maintained cutting tools with sharp cutting edges are less likely to bind and are easier to control.
g) Use the power tool, accessories and tool bits etc. in accordance with these instructions, taking into account the working conditions and the work to be performed. Use of the power tool for operations different from those intended could result in a hazardous situation.
h) Keep handles and grasping surfaces dry, clean and free from oil and grease. Slippery handles and grasping surfaces do not allow for safe handling and control of the tool in unexpected situations.
25.6 Battery tool use and care
a) Recharge only with the charger specified by the manufacturer. A charger that is suitable for one type of battery pack may create a risk of fire when used with another battery pack.
b) Use power tools only with specifically designated battery packs. Use of any other battery packs may create a risk of injury and fire.
c) When battery pack is not in use, keep it away from other metal objects, like paper clips, coins, keys, nails, screws or other small metal objects, that can make a connection from one terminal to another. Shorting the battery terminals together may cause burns or a fire.
d) Under abusive conditions, liquid may be ejected from the battery; avoid contact. If contact accidentally occurs, flush with water. If liquid contacts eyes, additionally seek medical help. Liquid ejected from the battery may cause irritation or burns.
e) Do not use a battery pack or tool that is damaged or modified. Damaged or modified bat
25 General Power Tool SafetyWarnings English
teries may exhibit unpredictable behaviour resulting in fire, explosion or risk of injury.
f) Do not expose a battery pack or tool to fire or excessive temperature. Exposure to fire or temperature above 130^ may cause explosion.
g) Follow all charging instructions and do not charge the battery pack or tool outside the temperature range specified in the instructions. Charging improperly or at temperatures outside the specified range may damage the battery and increase the risk of fire.
25.7 Service
a) Have your power tool serviced by a qualified repair person using only identical replacement parts. This will ensure that the safety of the power tool is maintained.
b) Never service damaged battery packs. Service of battery packs should only be performed by the manufacturer or authorized service providers.
25.8 Chain Saw SafetyWarnings
General safety warnings for chain saws
a) Keep all parts of your body away from the saw chain when the chain saw is operating. Before you start the chain saw, make sure the saw chain does not touch anything. Your clothing or parts of your body may get caught in the saw chain in consequence of a moment of inattention while operating a chain saw.
b) Always hold the chain saw with your right hand on the rear handle and your left hand on the front handle. Holding the chain saw the other way round increases the risk of injury and is not permitted.
c) Always hold the chain saw by the insulated handles because the saw chain may touch hidden electric wires. Any saw chain contact with a live wire may energize metallic parts of the power tool and result in an electric shock.
d) Wear eye protection. Further protective equipment for hearing, head, hands, legs and feet is recommended. Suitable protective clothing helps reduce the risk of injury from flying wood chips and accidental contact with the saw chain.
e) Never work with a chain saw while standing in a tree, on a ladder, on a roof or other
instable surface. There is a risk of injury in such situations.
f) Always keep proper footing and operate the chain saw only when standing on a fixed, secure and level surface. A slippery surface or instable support could cause the operator to lose control of the chain saw.
g) When cutting a limb that is under tension be alert for spring back. When the tension in the wood fibers is released the spring loaded limb may strike the operator and/or throw the chain saw out of control.
h) Use extreme caution when cutting brush and saplings. The slender material may catch the saw chain and be whipped toward you or pull you off balance.
i) Carry the chain saw by the front handle with the chain saw switched off and the saw chain away from your body. When transporting or storing the chain saw, always fit the protective cover. Proper handling of the chain saw will reduce the likelihood of accidental contact with the moving saw chain.
j) Follow the instructions for lubricating, chain tensioning and changing the guide bar and saw chain. Improperly tensioned or lubricated chain may either break or increase the chance for kickback.
k) Cut wood only. Do not use chain saw for other than the intended purposes. Example: do not use chain saw for cutting metal, plastic, masonry or non-wood building materials. Use of the chain saw for operations different than intended could result in a hazardous situation.
1) Do not attempt to fell a tree before you understand the risks involved and how to avoid them. The felling of a tree involves the risk of severe injury to the saw operator and for bystanders.
m) Follow all the instructions for removing accumulated material from the chainsaw and for storing or servicing the chainsaw. Make sure that the switch is set to "Off" and the battery block has been removed. Unexpected startup of the chainsaw during removal of accumulated material or during maintenance work may cause severe injuries.
français
25.9 Causes and operator prevention of kickback
Kickback may occur when the nose or tip of the guide bar touches an object, or when the wood closes in and pinches the saw chain in the cut.
Tip contact in some cases may cause a sudden reverse reaction, kicking the guide bar up and back towards the operator.
Pinching the saw chain along the top of the guide bar may push the guide bar rapidly back towards the operator.
Either of these reactions may cause you to lose control of the saw which could result in serious personal injury. Do not rely exclusively upon the safety devices built into your saw. As a chain saw user, you should take several steps to keep your cutting jobs free from accident or injury.
Kickback is the result of chain saw misuse and/or incorrect operating procedures or conditions and can be avoided by taking proper precautions as given below:
- Maintain a firm grip, with thumbs and fingers encircling the chain saw handles, with both hands on the saw and position your body and arm to allow you to resist kickback forces. Kickback forces can be controlled by the operator, if proper precautions are taken. Do not let go of the chain saw.
- Do not overreach and do not cut above shoulder height. This helps prevent unintended tip contact and enables better control of the chain saw in unexpected situations.
Only use replacement guide bars and saw chains specified by the manufacturer. Incorrect replacement guide bars and saw chains may cause chain breakage and/or kickback. - Follow the manufacturer's sharpening and maintenance instructions for the saw chain. Decreasing the depth gauge height can lead to increased kickback.
Table des matieres
Chere cliente, cher client,
2.1 Documents applicable
1 led brandt rood. De accu is te warm of te koud.
De schakelhendel is defect.
- Introduction
- Guide to Using this Manual
- Applicable Documents
- Warning Notices in Text
- DANGER
- WARNING
- NOTICE
- Symbols in Text
- Overview
- Chainsaw and Battery
- Safety Precautions English
- Rating Label with Serial Number
- Symbols
- Safety Precautions
- Warning Symbols
- Intended Use
- The Operator
- Clothing and Equipment
- WARNING
- Work Area and Surroundings
- Chainsaw
- Battery
- Safe Condition
- Chainsaw
- English 4 Safety Precautions
- Guide Bar
- Saw Chain
- Battery
- Working
- Cutting
- Limbing
- Felling
- Reactive Forces
- Kickback
- Transporting
- Chainsaw
- Battery
- Storing
- Chainsaw
- Battery
- Cleaning, Maintenance and Repair
- Preparing the Saw for Operation
- Preparing the Saw for Operation
- Assembling the Saw
- Mounting and Removing the Bar and Chain
- Mounting the Guide Bar and Saw Chain
- Removing the Bar and Chain
- English 6 Assembling the Saw
- Tensioning the Saw Chain
- Filling Up with Saw Chain Oil
- Engaging and Disengaging the Chain Brake
- Engaging the Chain Brake
- Disengaging the Chain Brake
- Removing and Fitting the Battery
- Inserting the battery
- Removing the Battery
- Switching the Saw On/Off
- Switching On
- Switching Off
- Testing the Chain Saw and Battery
- Checking the Chain Sprocket
- Checking the Guide Bar
- Checking the Saw Chain
- Operating the Saw English
- Testing the Chain Brake
- Checking the controls
- Lockout button and trigger
- Switching on the chainsaw
- Checking Chain Lubrication
- Testing the Battery
- Operating the Saw
- Holding and Controlling the Chainsaw
- Sawing
- Delimbing
- Felling
- Determining direction of fall and escape path
- Preparing work area at base of tree
- Normal tree
- Leaner
- Felling normal, small diameter tree
- Felling normal, large diameter tree
- After Finishing Work English
- Felling a small diameter leaner
- Felling a large diameter leaner
- After Finishing Work
- After Finishing Work
- Transporting
- Transporting the Chainsaw
- Carrying the chainsaw
- Transporting the Battery
- Storing
- Storing the Chainsaw
- Storing the Battery
- Cleaning
- Cleaning the chainsaw
- Cleaning the Bar and Chain
- Cleaning the Battery
- Maintenance
- Maintenance Intervals
- Chain brake
- Repairing English
- Weekly
- Monthly
- Deburring the Guide Bar
- Sharpening the Saw Chain
- Repairing
- Repairing the Chainsaw and Battery
- Troubleshooting
- Troubleshooting Chainsaw or Battery
- Fault LEDs on the
- battery
- Cause Remedy
- Specifications
- STIHL MSA 220 C Chainsaw
- Chain Sprockets and Chain Speeds
- Minimum Groove Depth of Guide Bars
- STIHL AP battery
- Sound Values and Vibration Values
- Bar and Chain Combinations
- STIHL MSA 220 C Chainsaw
- REACH
- Spare Parts and Accessories
- Spare parts and accessories
- Disposal
- Disposing of Chainsaw and Battery
- EC Declaration of Conformity
- STIHL MSA 220 C Chainsaw
- UKCA Declaration of Conformity
- STIHL MSA 220 C Chainsaw
- UK CA
- General Power Tool SafetyWarnings
- Introduction
- Work area safety
- Electrical safety
- Personal safety
- Power tool use and care
- Battery tool use and care
- Service
- Chain Saw SafetyWarnings
- Causes and operator prevention of kickback
- Table des matieres
- Documents applicable
Brand : STIHL
Model : MSA 220 CB
Category : Saw