
BCL101 - Lighting BLACK & DECKER - Free user manual and instructions
Find the device manual for free BCL101 BLACK & DECKER in PDF.

| Brand | Black & Decker |
| Model | BCL101 |
| Product type | LED Flashlight |
| Light source | LED |
| Power source | Rechargeable lithium-ion battery pack 12V MAX (GoPak) |
| Rated voltage | 12 V |
| Battery capacity | Not specified (estimated: 2 Ah) |
| Charging time | Approximately 4 to 6 hours with 2.4 A charger |
| Lighting autonomy | Not specified (estimated: 4 hours) |
| Swivel function | Yes, 90 degrees |
| Built-in USB port | Yes, to charge mobile devices (up to 2.4 A) |
| Charge level indicator | 4 LEDs |
| Protection rating | IP20 (lamp only) |
| Warranty | 2 years |
| Maintenance | Clean with a damp cloth and mild soap |
| Included accessories | Micro USB cable, transport cap |
| Intended use | Indoor/outdoor lighting |
| Safety | Do not immerse, do not expose to heat, read the instructions |
| Approximate weight | 0.5 kg |
| Approximate dimensions | 20 x 5 x 5 cm |
Frequently Asked Questions - BCL101 BLACK & DECKER
User questions about BCL101 BLACK & DECKER
0 question about this device. Answer the ones you know or ask your own.
Ask a new question about this device
Download the instructions for your Lighting in PDF format for free! Find your manual BCL101 - BLACK & DECKER and take your electronic device back in hand. On this page are published all the documents necessary for the use of your device. BCL101 by BLACK & DECKER.
USER MANUAL BCL101 BLACK & DECKER
LUZ LED GOPAK 12 V MAX*
BCL101
Please read before returning this product for any reason.
If you have a question or experience a problem with your BLACK+DECKER purchase, go to: http://www.blackanddecker.com/instantanswers
If you can't find the answer or do not have access to the Internet, call 1-800-544-6986 from 8 a.m. to 5 p.m. EST Mon. - Fri. to speak with an agent. Please have the CATALOG NUMBER available when you call.
To register your new product, visit www.BlackandDecker.com/NewOwner
Definitions: Safety Alert Symbols and Words
This instruction manual uses the following safety alert symbols and words to alert you to hazardous situations and your risk of personal injury or property damage.
DgGER: Indicates an imminently hazardous situation which, if not avoided, will result in death or serious injury.
WITING: Indicates a potentially hazardous situation which, if not avoided, could result in death or serious injury.
CAITON: Indicates a potentially hazardous situation which, if not avoided, may result in minor or moderate injury.
(without word) Indicates a safety related message.
NOTICE: Indicates a practice not related to personal injury which, if not avoided, may result in property damage.
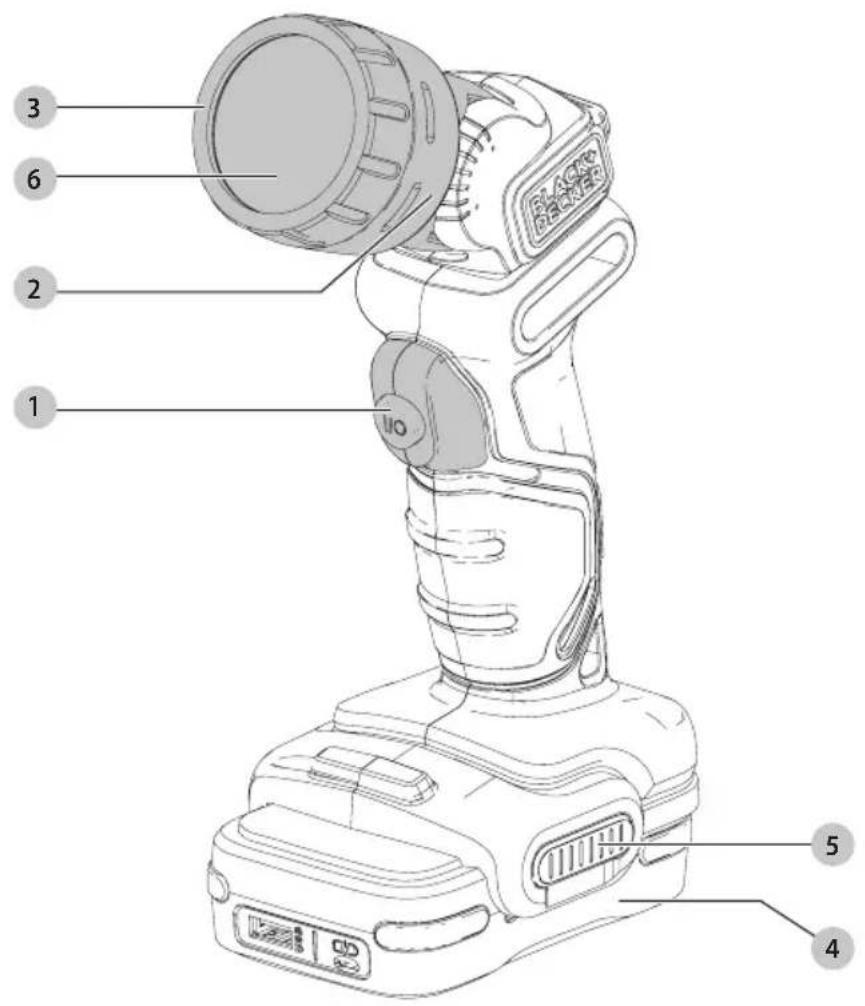
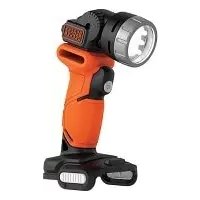
Fig. A
1 On/Off button
2 Pivoting LED light housing
3 Lens cover assembly
4 Battery
5 Battery release button
6 Lens
WARNING! Read all safety warnings and all instructions. Failure to follow the warnings and instructions may result in electric shock, fire and/or serious injury.
WARNING: To reduce the risk of injury, read the instruction manual.
Imported by. Black & Decker (U.S.) Inc., 701 E. Joppa Rd. Towson, MD 21286

BlackandDecker.com 1-800-544-6986
English
Important Safety Instructions
WARNING! When using the worklight, precautions should always be followed, including the following:
a) Read all the instructions before using the worklight.
b) To reduce the risk of injury, close supervision is necessary when a worklight is used near children.
c) Turn the worklight off when not in use and before servicing or cleaning.
d) Do not operate any worklight after it malfunctions or is dropped or damaged in any manner. Return worklight to the nearest authorized service facility for examination, repair, or electrical or mechanical adjustment.
e) To reduce the risk of electrical shock, do not put worklight in water or other liquid. Do not place or store worklight where it can fall or be pulled into a tub or sink.
f) Only use attachments recommended or sold by the manufacturer.
g) This worklight is intended for indoor use.
NOTE: This worklight has a rating of IP20 which means it has some level of protection from dust ingress. Refer to IEC60529 IP20 for the specific meaning of this rating. The battery does not have an IP rating on its own. Do not submerge worklight or battery in liquid.
SAVE THESE INSTRUCTIONS
SPECIFIC SAFETY RULES
WARNING: When using electric appliances, basic instructions should always be followed, including the following:
- Read all the instructions before using the appliance.
Only use attachments recommended or sold by the manufacturer. - During or immediately after use, don't lay light flat on lens surface.
- Don't touch lens surface when bulb is lit or immediately after use.
- Handle light with care around any flammable surface.
- Do not expose light or battery to wet or damp areas. Do not expose light or battery to rain or snow.
- Do not wash light or battery with water or allow water to get inside light or battery.
- While light is in use, do not cover with cloth or other flammable materials due to increased risk of fire.
- Do not operate without lens cover assembly attached.
- For indoor household use only.
WARNING: Burn hazard. Do not operate flashlight or battery near flammable liquids or in gaseous or explosive atmospheres. Internal sparks may ignite fumes causing personal injury.
WARNING: The lens gets very hot during use. To reduce the risk of burns, do not touch hot lens. To reduce the risk of fire, keep away from combustible materials while in operation.
CAUTION: When not in use, place tool on its side on a table surface where it will not cause a tripping or falling hazard. Some tools with large battery packs will stand upright on the battery pack but may be easily knocked over.
SAVE THESE INSTRUCTIONS
Additional Safety Information
WARNING: Do not place the worklight position which may cause anyone to intentionally or unintentionally stare into the light. Serious eye injury could result.
The label on your tool may include the following symbols. The symbols and their definitions are as follows:
V.....volts
Hz.....hertz
min.........minutes
or DC....direct current
Class I Construction (grounded)
../min.........per minute
BPM . . . . . . . . . . . . . . . . . . . . . . . . . . . . . . . . . . . . . . . . . . . . . . . . . . . . . . . . . . . . . . . . . . . . . . . . . . . . . . . . . . . . . . . . . beats per minute
IPM............impacts per
minute
RPM . revolutionsper minute
sfpm surface feet per minute
SPM.........strokes per minute
A. .amperes
W.....watts
or AC......alternating current
or AC/DC....alternatingor
direct current
Classll
Construction
(double insulated)
n_0 no load speed n.. rated speed
...earthing terminal
..safety alert symbol
visible radiation
wearrespiratory protection
weareye protection
O .wearhearing protection
...readall documentation
BATTERIES
The battery pack is not fully charged out of the carton. Before using the battery pack, read the safety instructions below and then follow charging procedures outlined. When ordering replacement battery packs, be sure to include the catalog number and voltage.
READ ALL INSTRUCTIONS
Important Safety Instructions for All Battery Packs
WARNING: Read all safety warnings and all instructions for the battery pack, and power tool. Failure to follow the warnings and instructions may result in electric shock, fire and/or serious injury.
- Do not charge or use the battery pack in explosive atmospheres, such as in the presence of flammable liquids, gases or dust. Inserting or removing the
charging cable from the battery pack may ignite the dust or fumes.
- NEVER force the battery pack into cable insertion or tool insertion. DO NOT modify the battery pack in any way as battery pack may rupture causing serious personal injury.
DO NOT splash or immerse in water or other liquids. - Do not store or use the tool and battery pack in locations where the temperature may reach or exceed 104^ (40^) (such as outside sheds or metal buildings in summer). For best life store battery packs in a cool, dry location.
NOTE: Do not store the battery packs in a tool with the trigger switch locked on. Never tape the trigger switch in the ON position.
- Do not incinerate the battery pack even if it is severely damaged or is completely worn out. The battery pack can explode in a fire. Toxic fumes and materials are created when lithium ion battery packs are burned.
- If battery contents come into contact with the skin, immediately wash area with mild soap and water. If battery liquid gets into the eye, rinse water over the open eye for 15 minutes or until irritation ceases. If medical attention is needed, the battery electrolyte is composed of a mixture of liquid organic carbonates and lithium salts.
- Contents of opened battery cells may cause respiratory irritation. Provide fresh air. If symptoms persist, seek medical attention.
WARNING: Burn hazard. Battery liquid may be nable if exposed to spark or flame.
WARNING: Fire hazard. Never attempt to open the battery pack for any reason. If the battery pack case is cracked or damaged, do not attempt to use or charge. Do not crush, drop or damage the battery pack. Do not use a battery pack or charger that has received a sharp blow, been dropped, run over or damaged in any way (e.g., pierced with a nail, hit with a hammer, stepped on). Damaged battery packs should be returned to the service center for recycling.
Storage Recommendations
- The best storage place is one that is cool and dry, away from direct sunlight and excess heat or cold.
- For long storage, it is recommended to store a fully charged battery pack in a cool dry place out of the charger for optimal results.
NOTE: Battery packs should not be stored completely depleted of charge. The battery pack will need to be recharged before use.
The RBRC Seal
The RBRC^® (Rechargeable Battery Recycling Corporation) Seal on the nickel cadmium, nickel metal hydride or lithium-ion batteries (or battery packs) indicates that the costs to recycle these batteries (or battery packs)
at the end of their useful life have already been paid by

BLACK+DECKER. In some areas, it is illegal to place spent nickel cadmium, nickel metal hydride or lithium-ion batteries in the trash or municipal solid waste stream and the Call 2 Recycle® program provides an environmentally conscious alternative.
Call 2 Recycle, Inc., in cooperation with BLACK+DECKER and other battery users, has established the program in the United States and Canada to facilitate the collection of spent nickel cadmium, nickel metal hydride or lithium-ion batteries. Help protect our environment and conserve natural resources by returning the spent nickel cadmium, nickel metal hydride or lithium-ion batteries to an authorized BLACK+DECKER service center or to your local retailer for recycling. You may also contact your local recycling center for information on where to drop off the spent battery. RBRC is a registered trademark of Call 2 Recycle, Inc.
Important Charging Notes
- Longest life and best performance can be obtained if the battery pack is charged when the air temperature is between 65^ - 75^ (18^ - 24^) . DO NOT charge the battery pack in an air temperature below 40^ (4.5^) or above 104^ (40^) . This is important and will prevent serious damage to the battery pack.
- If the battery pack does not charge properly:
a. Check operation of receptacle by plugging in a lamp or other appliance;
b. Check to see if receptacle is connected to a light switch which turns power off when you turn out the lights;
c. Move the power adapter and battery pack to a location where the surrounding air temperature is approximately 65^ - 75^(18^ - 24^)
d. If charging problems persist, take the tool, battery pack and USB cable to your local service center.
- The battery pack should be recharged when it fails to produce sufficient power on jobs which were easily done previously. DO NOT CONTINUE to use under these conditions. Follow the charging procedure. You may also charge a partially used pack whenever you desire with no adverse effect on the battery pack.
Transportation
WARNING: Fire hazard. Do not store or carry the dry pack so that metal objects can contact
exposed battery terminals. For example, do not place the battery pack in aprons, pockets, tool boxes, product kit boxes, drawers, etc., with loose nails, screws, keys, etc. Transporting batteries can possibly cause fires if the battery terminals inadvertently come in contact with conductive materials such as keys, coins, hand tools and the like. The US Department of Transportation Hazardous Material Regulations (HMR) actually prohibit transporting batteries in commerce or on airplanes in carry-on baggage UNLESS they are properly protected from short circuits. So when transporting individual battery packs, make sure that the battery terminals are protected and well insulated
English
from materials that could contact them and cause a short circuit.
CAITON: GoPak battery terminal cap should be used when battery is not connected to a power tool. Terminal cap is provided for use whenever the battery is out of the tool. Remove cap before placing battery into tool.
FCC requirements for all digital devices
This device complies with Part 15 of the FCC Rules and Industry Canada License-exempt RSS standard(s). Operation is subject to the following two conditions:
- This device may not cause harmful interference, and
- This device must accept any interference received, including interference that may cause undesired operation.
Changes or modifications not expressly approved by the party responsible for compliance could void the user's authority to operate the equipment.
This equipment has been tested and found to comply with the limits for a Class B digital device, pursuant to Part 15 of the FCC Rules. These limits are designed to provide reasonable protection against harmful interference in a residential installation. This equipment generates, uses, and can radiate radio frequency energy and, if not installed and used in accordance with the instructions, may cause harmful interference to radio communications. However, there is no guarantee that interference will not occur in a particular installation. If this equipment does cause harmful interference to radio or television reception, which can be determined by turning the equipment off and on, the user is encouraged to try to correct the interference by one of the following measures:
- Reorient or relocate the receiving antenna.
- Increase the separation between the equipment and receiver.
- Connect the equipment into an outlet on a circuit different from that to which the receiver is connected.
- Consult the dealer or an experienced radio/TV technician for help.
CANICES-3(B)/NMB-3(B)
Getting Started
- The micro USB port 7 on the BLACK+DECKER GoPak 2 in 1 battery is only to be used for charging the GoPak.
- The USB A port 14 on the BLACK+DECKER GoPak 2 in 1 battery is only to be used for powering USB devices (Phone/Tablet/MP3/Wearable/Game Controller/etc.).
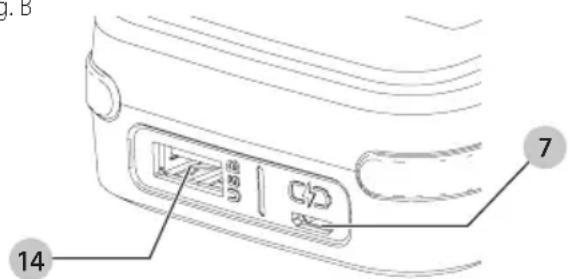
Fig. B
Charging the BLACK+DECKER GoPak 2 in 1 Battery (Fig. C, D)
WARNING: Never attempt to charge the K+DECKER GoPak 2 in 1 battery using the tool terminals on the GoPak.
WARNING: You should only charge the GoPak+DECKER GoPak 2 in 1 battery using UL or CSA approved USB ports rated for charging high performance devices. The GoPak can pull more current than acceptable with older USB ports. An error message may display on your computer if the computer is used to charge the GoPak.
- Plug the micro USB cable 8 into a USB power supply (not included).
- Plug the micro USB plug of your charger cord into the GoPak micro USB port 7.
- As the GoPak charges, the state of charge LEDs will illuminate. The illuminated LED(s) indicate the state of charge of the pack. The blinking LED indicates the next level of charge in progress. The state of charge button 9 is disabled during charging only.
- The completion of charge is indicated by all four LEDs turning off. Pressing the state of charge indicator button 9 will illuminate all four LEDs. The battery is fully charged and may be used at this time or left on the charger.
- Recharge discharged batteries as soon as possible after use or battery life may be greatly diminished. For longest battery life, do not discharge batteries fully. It is recommended that the batteries be recharged after each use.

Fig. C
State of Charge Indicator (Fig. D)
The BLACK+DECKER GoPak 2 in 1 battery is equipped with a state of charge button 9 with a four LED display.
The state of charge is an indication of approximate levels of charge remaining in the battery according to the following indicators:
| 96-100% charged |
| 76-95% |
| 51-75% |
| 26-50% |
| Pack needs to be ch |
To actuate the state of charge, press the state of charge button. A combination of the four LEDs will illuminate designating the level of charge left. When the level of charge in the battery is below the usable limit, the state of charge Indicator LEDs will either not light or the bottom LED will blink.
NOTE: The LED state of charge will only display once the state of charge button is pressed.
Fig. D
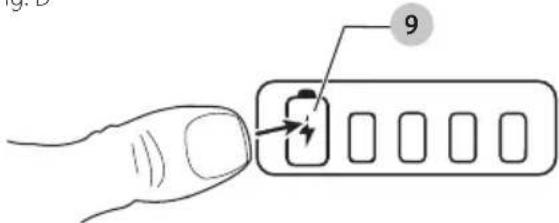
- Press state of charge button at anytime to display the remaining level of charge.
NOTE: The state of charge is only an indication of the charge left on the battery. It does not indicate tool functionality and is subject to variation based on product components, temperature and end-user application.
nOTE: GoPak battery terminal cap should be used when battery is not connected to a power tool. Terminal cap is provided for use whenever the battery is out of the tool. Remove cap before placing battery into tool.
SAVE THESE INSTRUCTIONS FOR FUTURE USE
COMPONENTS (FIG. A)
WARNING: Never modify the power tool or any part of it. Damage or personal injury could result.
Refer to Figure A at the beginning of this manual for a complete list of components.
Intended Use
Your BLACK+DECKER LED light has been designed for lighting applications. This product is intended for household, consumer use only.
DO nOT use under wet conditions or in presence of flammable liquids or gases.
DO nOT let children come into contact with the tool. Supervision is required when inexperienced operators use this tool.
ASSEMBLY AND ADJUSTMENTS
WARNING: To reduce the risk of serious personal injury, turn unit off and remove the battery pack before making any adjustments or removing/ installing attachments or accessories. An accidental start-up can cause injury.
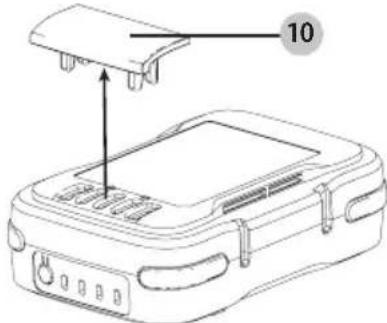
GoPak Tool Terminal Cap (Fig. E)
A battery storage and carrying cap 10 is provided for use whenever the battery is out of the tool. Remove the cap as shown in Figure E before placing battery onto tool.
Fig. E
OPERATION
WARNING: To reduce the risk of serious personal injury, turn unit off and remove the battery pack before making any adjustments or removing/ installing attachments or accessories. An accidental start-up can cause injury.
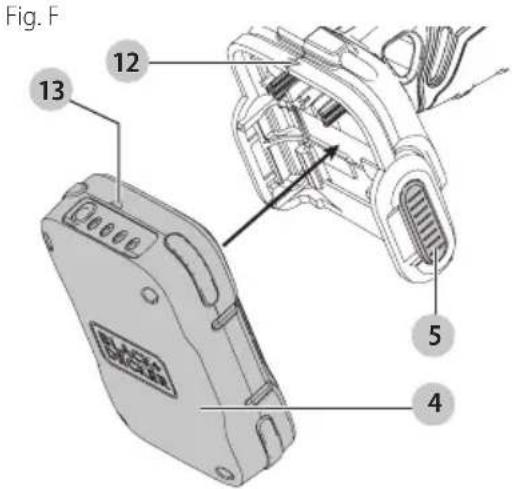
Installing and Removing the GoPak 2 in 1 Battery in a Power Tool (Fig. F)
WARNING: Remove any connected USB cords from the GoACK+DECKER GoPak 2 in 1 battery before connecting the GoPak to the compatible tool.
- Remove the tool terminal cap if installed on the BLACK+DECKER GoPak 2 in 1 battery.
- To power a compatible GoPak 12V MAX* power tool, align the tool terminals on the foot of the tool with the terminal slots on the battery 4 as shown in Fig. F.
NOTE: The state of charge indicator will face the rear of the tool and the USB ports will face the front. The arrow on the battery will align with the arrow on the tool as shown in Fig. F.
- Snap the BLACK+DECKER GoPak 2 in 1 battery into the foot of the tool. The arrow 13 on the battery will align with the arrow 12 on the tool. Ensure the battery is fully seated and fully latched into position before using
- To remove the BLACK+DECKER GoPak 2 in 1 battery from the tool, depress the two battery release buttons 5 located on the tool and pull the BLACK+DECKER GoPak 2 in 1 battery off the tool.
NOTE: The BLACK+DECKER GoPak 2 in 1 battery USB ports are disabled when the trigger is pulled.
English
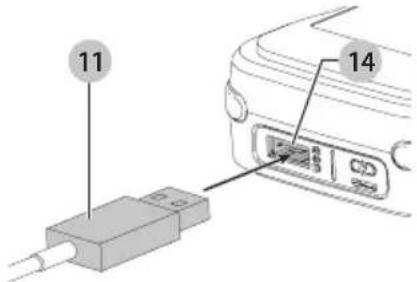
Using the GoPak 2 in 1 battery to charge your USB device (Fig. G)
Plug the USB A end of your device specific cable 11 into the BLACK+DECKER GoPak 2 in 1 battery 14 and the other end of the cable into a UL or CSA listed compatible device (Phone/Tablet/MP3/Wearable/ Game Controller/etc.). Charging will start automatically. Fig.G
Functionality
The BLACK+DECKER GoPak 2 in 1 battery can power your compatible BLACK+DECKER 12V GoPak MAX* tools or power/charge your mobile devices. The compact, slim battery housing is designed for portability.
-GoPak Charge Input: Up to 2.4A
-GoPak Power Output: Up to 2.4A*
** Actual input charge rate is dependant upon power adapter (not included).
***Actual output rate is dependant on the device.
USB Power Port
The BLACK+DECKER GoPak 2 in 1 battery is equipped with a USB Type A power port. It delivers up to 2.4 amp total current.
NOTE: The current delivered to device is dependent on user device and user's chosen cable.
WARNING: Ensure the terminal cap is securely attached to the BLACK+DECKER GoPak 2 in 1 battery when using it to power/charge your device.
Install terminal cap on the tool terminals.
Device charging from USB will start automatically when device is connected.
- To turn OFF, disconnect USB device.
Proper Hand Position (Fig. H)
WARNING: To reduce the risk of serious personal injury, AYs use proper hand position as shown.
Proper hand position requires one hand on the main handle.
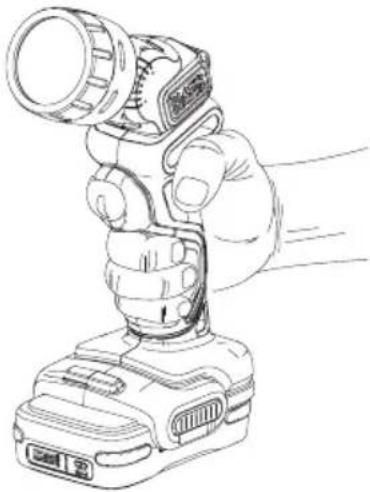
Fig. H
On/Off Button (Fig. A)
- To turn the light on, press the on/off button 1.
- To turn it off, press the button again.
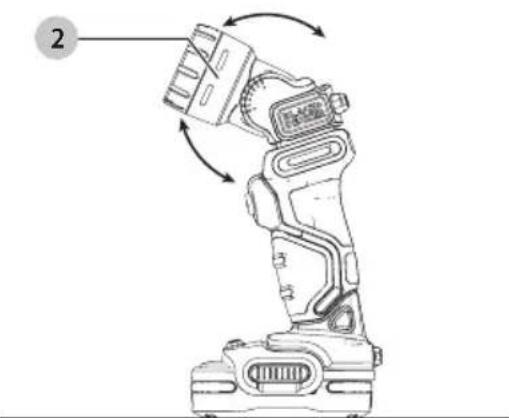
Pivoting The Light Housing (Fig. I, J)
- The LED light housing 2 can be pivoted by lifting it to different positions within the 90 degree pivot range.
- The LED flashlight can also be positioned on the battery end to provide a greater range of light coverage as shown in Figure J.
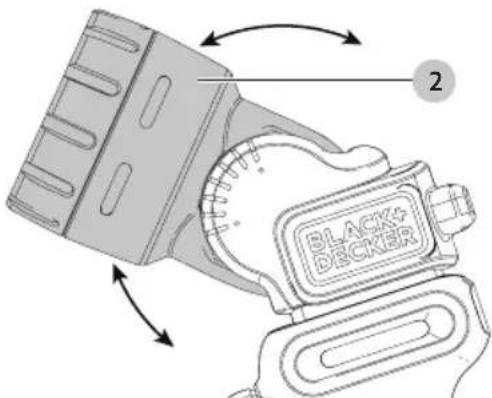
Fig.1
Fig.J
MAINTENANCE
WARNING: To reduce the risk of serious personal injury, turn unit off and remove the battery pack before making any adjustments or removing/ installing attachments or accessories. An accidental start-up can cause injury.
IMPORTANT: To assure product SAFETY and RELIABILITY, repairs, maintenance and adjustment should be performed by authorized service centers or other qualified service organizations, always using identical replacement parts.
Cleaning
WARNING: Never use solvents or other harsh chemicals for cleaning the non-metallic parts of the tool or power supply. These chemicals may weaken the plastic materials used in these parts. Use a cloth dampened only with water and mild soap. Never let any liquid get inside the tool or power supply; never immerse any part of the tool or power supply into a liquid.
NOTE: Remove tool and both USB cables from GoPak before cleaning.
Use only mild soap and a damp cloth to clean the tool or power supply. Many household cleaners contain chemicals which could seriously damage plastic. Also, do not use gasoline, turpentine, lacquer or paint thinner, dry cleaning fluids or similar products.
TROUBLESHOOTING
- The GoPak will not power your device or charge.
a. The LED closest to the state of charge button will blink red when attempting USB functionality.
- The GoPak is too hot or too cold. Allow the GoPak to cool down or warm up.
-
The GoPak will not power your compatible tool.
-
Attempt to charge the battery. If the LED fails to come on refer to number 1 in Troubleshooting.
Repairs
The BLACK+DECKER GoPak 2 in 1 battery is not serviceable.
WARNING: To assure product SAFETY and BILITY, repairs, maintenance and adjustment (including brush inspection and replacement) should be performed by a BLACK+DECKER factory service center or a BLACK+DECKER authorized service center. Always use identical replacement parts.
TWO-YEAR LIMITED WARRANTY
Black & Decker (U.S.) Inc. warranties this product to be free from defects in material or workmanship for a period of two (2) years following the date of purchase, provided that the product is used in a home environment. This limited warranty does not cover failures due to abuse, accidental damage or when repairs have been made or attempted by anyone other than BLACK+DECKER and its Authorized Service Centers. A defective product meeting the warranty conditions set forth herein will be replaced or repaired at no charge in either of two ways:
The first, which will result in exchanges only, is to return the product to the retailer from whom it was purchased (provided that the store is a participating retailer). Returns should be made within the time period of the retailer's policy for exchanges. Proof of purchase may be required. Please check with the retailer for its specific return policy regarding time limits for returns or exchanges.
The second option is to take or send the product (prepaid) to a BLACK+DECKER owned or authorized Service Center for repair or replacement at BLACK+DECKER's option. Proof of purchase may be required. BLACK+DECKER owned and authorized service centers are listed online at www.blackanddecker.com. This warranty does not apply to accessories. This warranty gives you specific legal rights and you may have other rights which vary from state to state or province to province. Should you have any questions, contact the manager of your nearest BLACK+DECKER Service Center. This product is not intended for commercial use, and accordingly, such commercial use of this product will void this warranty. All other guarantees, express or implied, are hereby disclaimed.
IATin AMERiCA: This warranty does not apply to products sold in Latin America. For products sold in Latin America, check country specific warranty information contained in the packaging, call the local company or see the website for warranty information.
FREE WARning LABEL REPIACEMEnT: If your warning labels become illegible or are missing, call 1-800-544-6986 for a free replacement..
Accessories
WARNING: Since accessories, other than those offered by BLACK+DECKER have not been tested with this product, use of such accessories with this tool could be hazardous. To reduce the risk of injury, only BLACK+DECKER recommended accessories should be used with this product.
Recommended accessories for use with your tool are available at extra cost from your local dealer or authorized service center. If you need assistance in locating any accessory, please contact BLACK+DECKER, call 1-800-544-6986.
Black & Decker (U.S.) Inc.
701 East Joppa Road, Towson, MD 21286
Part No. N507075
BCL101
JULY 2017
Copyright © 2017 BLACK+DECKER


- Definitions: Safety Alert Symbols and Words
- English
- Important Safety Instructions
- SAVE THESE INSTRUCTIONS
- SPECIFIC SAFETY RULES
- Additional Safety Information
- BATTERIES
- READ ALL INSTRUCTIONS
- Important Safety Instructions for All Battery Packs
- Storage Recommendations
- The RBRC Seal
- Important Charging Notes
- Transportation
- FCC requirements for all digital devices
- Getting Started
- Charging the BLACK+DECKER GoPak 2 in 1 Battery (Fig. C, D)
- State of Charge Indicator (Fig. D)
- SAVE THESE INSTRUCTIONS FOR FUTURE USE
- COMPONENTS (FIG. A)
- Intended Use
- ASSEMBLY AND ADJUSTMENTS
- GoPak Tool Terminal Cap (Fig. E)
- OPERATION
- Installing and Removing the GoPak 2 in 1 Battery in a Power Tool (Fig. F)
- Using the GoPak 2 in 1 battery to charge your USB device (Fig. G)
- Functionality
- USB Power Port
- Proper Hand Position (Fig. H)
- On/Off Button (Fig. A)
- Pivoting The Light Housing (Fig. I, J)
- MAINTENANCE
- Cleaning
- TROUBLESHOOTING
- Repairs
- TWO-YEAR LIMITED WARRANTY
- Accessories
Brand : BLACK & DECKER
Model : BCL101
Category : Lighting