
XR-C353 - Car stereo SONY - Free user manual and instructions
Find the device manual for free XR-C353 SONY in PDF.
User questions about XR-C353 SONY
0 question about this device. Answer the ones you know or ask your own.
Ask a new question about this device
Download the instructions for your Car stereo in PDF format for free! Find your manual XR-C353 - SONY and take your electronic device back in hand. On this page are published all the documents necessary for the use of your device. XR-C353 by SONY.
USER MANUAL XR-C353 SONY
FM/MW/LW Cassette Car Stereo
Operating Instructions EN
INHcTpkyKuIyno3KcNpyaTaUIN RF
For installation and connections, see the supplied installation/connections manual.
Thank you for purchasing the Sony Cassette Car Stereo. This unit lets you enjoy a variety of features by using a rotary remote.
In addition to the tape playback and the radio operation you can expand your system by connecting an optional CD/MD changer (XR-C353 only).
Table of contents
This Unit Only
Getting Started
Resetting the unit 4
Detaching the front panel 4
Preparing the rotary remote 4
Setting the clock 5
Cassette Player
Listening to a tape 5
Playing a tape in various modes 6
Radio
Memorising stations automatically
- Best Tuning Memory (BTM) 7
Memorising only the desired stations. 7
Receiving the memorised stations 7
Other Functions
Using the rotary remote 8
Adjusting the sound characteristics 9
Muting the sound. 9
Changing the sound and beep tone 9
With Optional Equipment
CD/MD Changer (XR-C353 only)
Playing a CD/MD 10
Scanning the tracks - Intro scan. 11
Playing tracks repeatedly
— Repeat play 11
Playing tracks in random order Shuffle play 11
Additional Information
Precautions 12
Maintenance. 13
Dismounting the unit 13
Location of controls 14
Specifications 15
Troubleshooting guide 16
Index 18
Getting Started
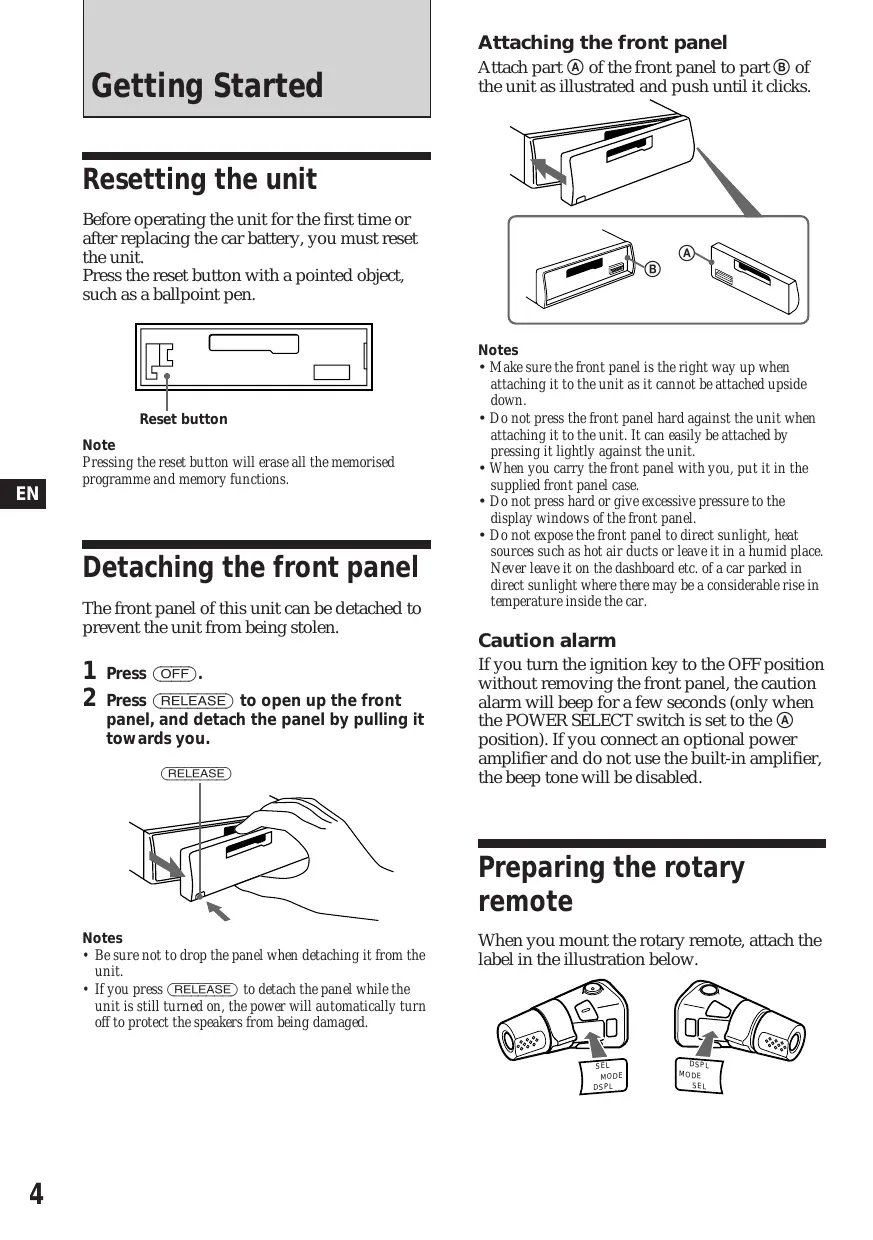
Resetting the unit
Before operating the unit for the first time or after replacing the car battery, you must reset the unit.
Press the reset button with a pointed object, such as a ballpoint pen.
Note
Pressing the reset button will erase all the memorised programme and memory functions.
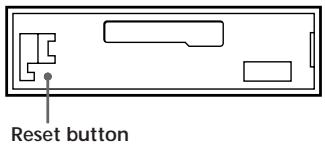
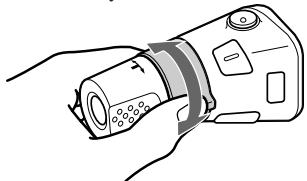
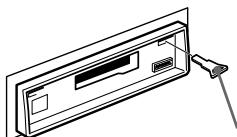
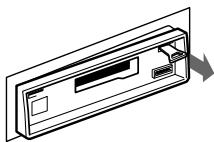
Detaching the front panel
The front panel of this unit can be detached to prevent the unit from being stolen.
1 Press (OFF).
2 Press (RELEASE) to open up the front panel, and detach the panel by pulling it towards you.
Notes
- Be sure not to drop the panel when detaching it from the unit.
- If you press (RELEASE) to detach the panel while the unit is still turned on, the power will automatically turn off to protect the speakers from being damaged.
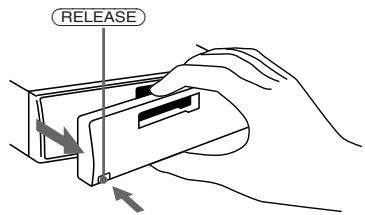
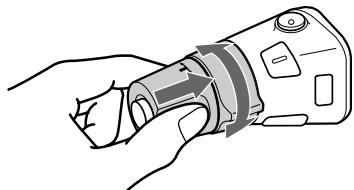
Attaching the front panel
Attach part A of the front panel to part B of the unit as illustrated and push until it clicks.
Notes
- Make sure the front panel is the right way up when attaching it to the unit as it cannot be attached upside down.
- Do not press the front panel hard against the unit when attaching it to the unit. It can easily be attached by pressing it lightly against the unit.
- When you carry the front panel with you, put it in the supplied front panel case.
- Do not press hard or give excessive pressure to the display windows of the front panel.
- Do not expose the front panel to direct sunlight, heat sources such as hot air ducts or leave it in a humid place. Never leave it on the dashboard etc. of a car parked in direct sunlight where there may be a considerable rise in temperature inside the car.
Caution alarm
If you turn the ignition key to the OFF position without removing the front panel, the caution alarm will beep for a few seconds (only when the POWER SELECT switch is set to the ④ position). If you connect an optional power amplifier and do not use the built-in amplifier, the beep tone will be disabled.
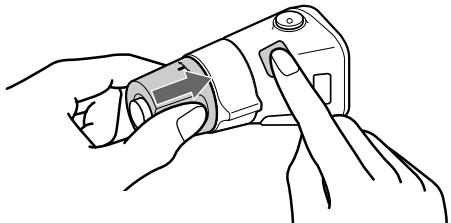
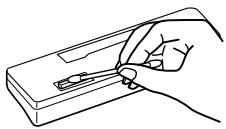
Preparing the rotary remote
When you mount the rotary remote, attach the label in the illustration below.
Setting the clock
The clock has a 24-hour digital indication.
For example, setting it to 10:08
1 Press OFF or DSPL during operation.
2 Press DSPL for two seconds.

The hour digit flashes.
1 Set the hour digits.

To go forward
To go backward

Press SEL momentarily.

The minutes digits flashes.
Set the minute digits.

To go forward
To go backward

3 Press DSPL momentarily.

The clock starts.
Note
If the POWER SELECT switch on the bottom of the unit is set to the 3 position, the clock cannot be set unless the power is turned on. Set the clock after you have turned on the radio.
Cassette Player
Listening to a tape
Insert a cassette.

Playback will start automatically.
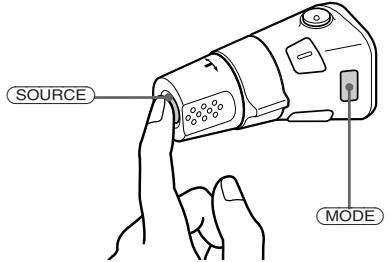
If a cassette is already inserted, press SOURCE repeatedly until "TAPE" is displayed.
The side facing up is being played.
The side facing down is being played.
Tip
To change the tape transport direction, press MODE) during tape playback.
| To | Press |
| Stop playback | OFF |
| Eject the cassette | ▲ |
Fast-winding the tape
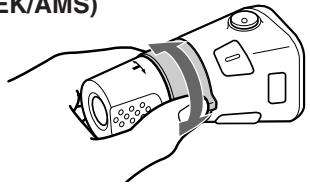
During playback, press either side of (SEEK/AMS) for two seconds.

Fast-forward
Rewind
To start playback during fast-forwarding or rewinding, press MODE (▶).
Locating the beginning of a track — Automatic Music Sensor (AMS)
You can skip up to nine tracks at one time.
During playback, press either side of (SEEK/AMS) momentarily.

To locate the succeeding tracks
To locate the preceding tracks
Note
The AMS function may not work when :
- the blanks between tracks are shorter than 4 seconds
- there is noise between tracks
- there are long sections of low volume or quiet sections.
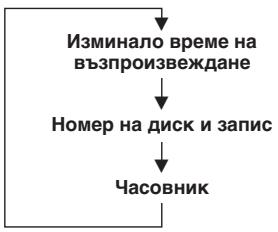
Changing the displayed items
Each time you press DSPL momentarily during tape playback, the displayed item changes as follows:

* While the ATA function is activated.
Playing a tape in various modes
Searching for the desired track - Intro scan
Press ① during playback.
"INTRO" appears on the display.
The first 10 seconds of all the tracks are played.
When you find the desired track, press again. The unit returns to the normal playback mode
Playing tracks repeatedly -Repeat play
Press ② during playback.
"REP" appears on the display.
When the current played track is over, it will be played again from the beginning.
To cancel this mode, press again.
Playing a CrO_2 or metal tape
Press 4 when you want to listen to a CrO_2 (TYPE II) or metal (TYPE IV) tape.
"MTL" appears on the display.
To cancel this function, press 4.
Switching to the radio while fast-winding a tape
Automatic Tuner Activation (ATA)
Press ⑤ during playback.
"ATA" appears on the display.
When fast-forwarding or rewinding with (SEEK/AMS), the tuner will turn on automatically.
To cancel this mode, press ⑤.
Skipping blanks during tape playback — Blank skip
Press 6 during playback.
"BL.SKIP" appears on the display.
Blanks longer than eight seconds will automatically be skipped during tape playback.
To cancel this mode, press 6.
Memorising stations automatically
Best Tuning Memory (BTM)
This function selects from the currently received band the stations with the strongest signals and memorises them in order of their frequency.
PREVENTING ACCIDENTS!
When tuning in while driving, use the automatic tuning or memory preset search function instead of manual tuning.
1 Press SOURCE repeatedly to select the tuner.
Each time you press (SOURCE), the source changes as follows:
TAPE TUNER CD/MD (XR-C353 only)
2 Press MODE repeatedly to select the band.
Each time you press MODE, the band changes as follows:
FM1 FM2 FM3 MW LW
3 Press (BTM) for two seconds.
Notes
- The unit will not store stations with weak signals on the preset number buttons. If there are only a few stations received, some preset number buttons will remain empty.
- When there is a preset number indicated on the display, the unit will store stations on all preset number buttons from the one currently displayed.
Memorising only the desired stations
Up to 6 stations on each band (FM1, FM2, FM3, MW and LW) can be stored on the preset number buttons in the order of your choice. Therefore, 18 FM stations can be memorised. If you try to store another station on the same preset number button, the previously stored station will be erased.
1 Press (SOURCE) repeatedly to select the tuner.
2 Press MODE repeatedly to select the band.
3 Press (SEEK/AMS) to search for the station you wish to store on a preset number button.
4 Press the desired preset number button (1) to (6) for two seconds.
The number of the selected preset number button appears on the display.
Receiving the memorised stations
1 Press (SOURCE) repeatedly to select the tuner.
2 Press MODE repeatedly to select the band.
3 Press the preset number button (① to ⑥) momentarily on which the desired station is stored.
Tip
Press either side of (PRESET/DISC) to receive in order the stations stored in the memory (Preset Search Function) (XR-C353 only).
Changing the displayed items
Each time you press DSPL, the display changes between the frequency and the clock.
If you cannot tune in a preset station
Press either side of (SEEK/AMS) momentarily to search for the station (automatic tuning).
Scanning stops when a station is received.
Press either side of the button repeatedly until the desired station is received.
Note
If the automatic tuning stops too frequently, press (LCL) momentarily to lights up "LCL" on the display (local seek mode). Only the stations with relatively strong signals can be tuned in.
Tip
If you know the frequency, press and hold either side of (SEEK/AMS) until the desired station is received (manual tuning).
Other Functions
Using the rotary remote
The rotary remote works by pressing buttons and/or rotating controls.
You can control the optional CD and MD changer by the rotary remote.
By pressing buttons (the SOURCE and the MODE buttons)
Every time you press (SOURCE), the source changes as follows:
TAPE TUNER CD/MD (XR-C353 only)
Pressing MODE changes the operation in the following ways:
- the tape transport direction.
- the band, FM1 FM2 FM3 MW LW .
- the CD/MD changer. (XR-C353 only)
Tip
You can turn on this unit by pressing (SOURCE) on the rotary remote.
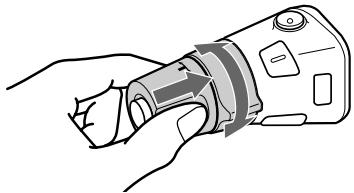
By rotating the control (the SEEK/ AMS control)
Rotate the control momentarily and release it to:
- Locate the beginnings of the tracks on the tape. Rotate and hold the control, and release it to fast-wind the tape. To playback, rotate and hold the control again, and release it.
- Locate a specific track on a disc. Rotate and hold the control until you locate the specific point in a track, then release it to start playback. (XR-C353 only)
- Tune in the stations automatically.
Rotate and hold the control to tune in the specific station.
By rotating the control while pushing in (the PRESET/DISC control)
Push in and rotate the control:
- Receive the stations memorised on the preset button.
- Change the disc. (XR-C353 only)
Other operations
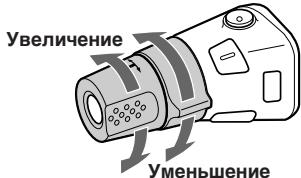
Rotate the VOL control to adjust the volume.
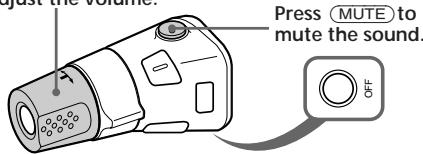
Press MUTE to mute the sound

Press DSPL to change the display items.
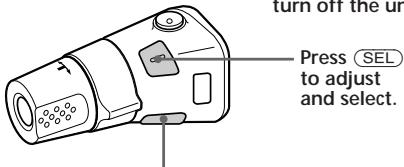
Changing the operative direction
The operative direction of controls is factory preset as in the illustration below.
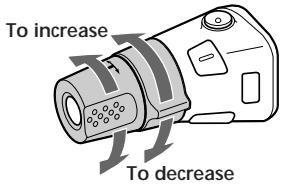
If you need to mount the rotary remote on the right side of the steering column, you can reverse the controls' operative direction.
Press (SEL) for two seconds while pushing in the VOL control.
Adjusting the sound characteristics
1 Select the item you want to adjust by pressing (SEL) repeatedly.
VOL (volume) BAS (bass) TRE (treble) BAL (balance) FAD (fader)
2 Adjust the selected item by pressing either (+) or (-) .
Adjust within three seconds after selecting. (After three seconds the button will again serve as the volume control button.)
Muting the sound
Press MUTE
The "MUTE" indication flashes.
To restore the previous volume level, press again.
Tip
The unit decreases the volume automatically when a telephone call comes in (Telephone-mute function) (XR-C353 only).
Changing the sound and beep tone
Boosting the bass sound — D-Bass
You can enjoy clear and powerful bass sound. The D-bass function boosts the low frequency singal with a sharper curve than conventional bass boost.
You can hear the bass line more clearly even if the vocal sound is the same volume. You can emphasize and adjust the bass sound easily with the D-bass control. This effect is similar to the one you get when you use an optional subwoofer system.
Moreover, the Digital D-bass* function creates even sharper and more powerful bass sound than Analog D-bass.
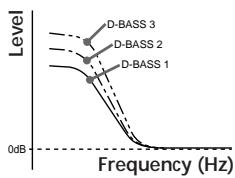
Digital D-BASS
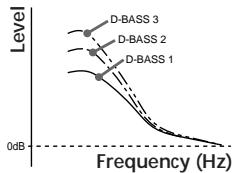
Analog D-BASS
Adjusting the bass curve
Turn the D-BASS control to adjust the bass level (1, 2 or 3).
"D-BASS"* appears in the display.
To cancel, turn the control to the OFF position.
- If an optional CD changer has the Digital D-BASS function, "DIGITAL D-BASS" appears on the display during CD playback (XR-C353 only).
Muting the beep tone
Press ⑥ while pressing SEL.
To obtain the beep tone again, press these buttons once more.
Note
If you connect an optional power amplifier and do not use the built-in amplifier, the beep tone will be disabled (XR-C353 only).
With Optional Equipment
CD/MD Changer (XR-C353 only)
You can control up to two CD or MD changers with this unit.
Playing a CD/MD
Press SOURCE until the desired changer indication appears on the display.
CD/MD playback starts.
When a CD/MD changer is connected, all the tracks play from the beginning.
Note
Even if you select an MD changer, "CD" appears in the display.
Selecting CD/MD changers (when several CD/MD changers are connected)
Press MODE repeatedly to select the desired CD/MD changer.
Changing the displayed items
Each time you press DSPL during CD/MD playback, the item changes as follows:
Locating a specific track
Automatic Music Sensor (AMS)
During playback, press either side of (SEEK/AMS) once for each track you wish to skip.

To locate the succeeding tracks
To locate the preceding tracks
Locating a specific point in a track
- Manual search
During playback, press and hold either side of SEEK/AMS. Release the button when you have found the desired part.

To search forward
To search backward
Switching to other discs
During playback, press either side of PRESET/DISC.
To return to the previous disc
To advance to the next disc
Scanning the tracks
— Intro scan
The first 10 seconds of all the tracks on the current disc are played in order. After the first disc is over, the next disc is played.
Press ① during playback.
"INTRO" appears on the display.
When you find the desired track, press again.
The unit returns to the normal CD/MD playback mode.
Playing tracks repeatedly
— Repeat play
To repeat a track
Press ② repeatedly during CD/MD playback until "REP 1" is displayed.
To repeat a disc
Press ② repeatedly during CD/MD playback until "REP 2" is displayed.
To repeat all the discs in the current changer
Press ② repeatedly during CD/MD playback until "REP 3" is displayed.
Each time you press ② the display changes as follows:
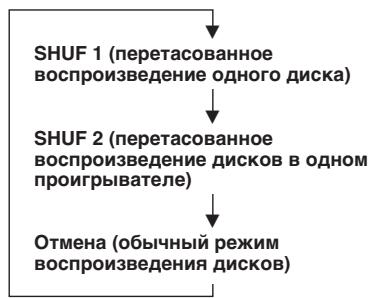
Playing tracks in random order — Shuffle play
To play the tracks on the current disc in random order
Press ③ repeatedly during CD/MD playback until "SHUF 1" is displayed.
To play all the tracks in the current changer in a random order
Press ③ repeatedly during CD/MD playback until "SHUF 2" is displayed.
Each time you press ③ the display changes as follows:
If you press ① during shuffle play, the first 10 seconds of all tracks will be played in random order.
Additional Information
Precautions
- If your car was parked in direct sunlight resulting in a considerable rise in temperature inside the car, allow the unit to cool off before operating it.
- If no power is being supplied to the unit, check the connections first. If everything is in order, check the fuse.
- If no sound comes from the speakers of a 2-speaker system, set the fader control to the centre position.
- When the tape is played back for a long period, the cassette may become warm because of the built-in power amplifier. However, this is not a sign of malfunction.
If you have any questions or problems concerning your unit that are not covered in this manual, please consult your nearest Sony dealer.
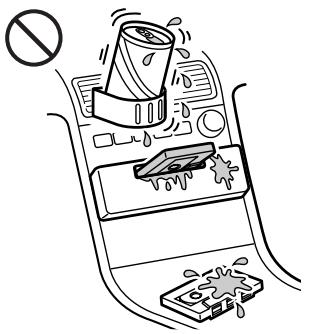
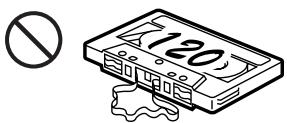
To maintain high quality sound
If you have drink holders near your audio equipment, be careful not to splash juice or other soft drinks onto the car audio. Sugary residues on this unit or cassette tapes may contaminate the playback heads, reduce the sound quality, or prevent sound reproduction altogether.
Cassette cleaning kits cannot remove sugar from the tape heads.
Notes on Cassettes
Cassette care
- Do not touch the tape surface of a cassette, as any dirt or dust will contaminate the heads.
- Keep cassettes away from equipment with built-in magnets such as speakers and amplifiers, as erasure or distortion on the recorded tape could occur.
- Do not expose cassettes to direct sunlight, extremely cold temperatures or moisture.
- Slack in the tape may cause the tape to be caught in the machine. Before you insert the tape, use a pencil or similar object to turn the reel and take up any slack.
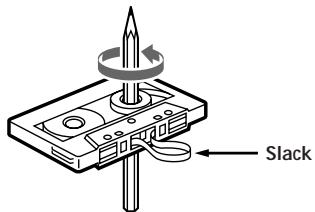
Distorted cassettes and loose labels can cause problems when inserting or ejecting tapes. Remove or replace loose labels.

Cassettes longer than 90 minutes
The use of cassettes longer than 90 minutes is not recommended except for long continuous play. The tapes used for these cassettes are very thin and tend to be stretched easily. Frequent playing and stopping of these tapes may cause them to be pulled into the cassette deck mechanism.

Maintenance
Fuse Replacement
When replacing the fuse, be sure to use one matching the amperage rating stated on the fuse. If the fuse blows, check the power connection and replace the fuse. If the fuse blows again after replacement, there may be an internal malfunction. In such a case, consult your nearest Sony dealer.

Warning
Never use a fuse with an amperage rating exceeding the one supplied with the unit as this could damage the unit.
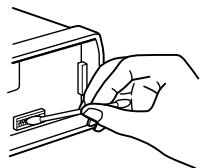
Cleaning the Connectors
The unit may not function properly if the connectors between the unit and the front panel are not clean. In order to prevent this, open the front panel by pressing (RELEASE), then detach it and clean the connectors with a cotton swab dipped in alcohol. Do not apply too much force. Otherwise, the connectors may be damaged.
Main unit
Back of the front panel
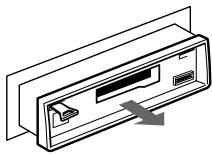
Dismounting the unit
1
Release key (supplied)
2
3

4
Location of controls
Refer to the pages for further details.
SEEK/AMS button 5,6,7,8,10,11
SOURCE button (TAPE/TUNER/CD/MD) 5,7,10
3 (+ - ) (volume/bass/treble/balance/fader control) button 5,9
4 MODE () button During tuner reception: BAND select 7
During tape playback: Transport direction change 5
During CD/MD playback: CD/MD Changer select 10
OFF button 4,5
DSPL (display mode change/time set) button 5, 6, 8, 10
7 (eject) button 5
8 During radio reception: Preset number buttons 7
During tape/CD/MD playback:
① INTRO button 6, 11
② REPEAT button 6, 11
③ SHUF (Shuffle) button* 11
MTL (Metal) button 6
⑤ ATA (Automatic Tuner Activation) button 6
⑥ BL.SKIP (Blank Skip) button 6
9 RELEASE(front panel release) button 4, 13
10 Reset button (located on the front side of the unit hidden by the front panel) Press this button when you use this unit for the first time, when you have changed the car battery, or when the buttons of this unit do not function properly.
11 MUTE button 9
12 SEL (control mode select) button 5, 9, 10
13 POWER SELECT switch (located on the bottom of the unit) See "POWER SELECT Switch" in the Installation/Connections manual.
14 Display window
15 BTM (Best tuning memory) button 7
16 PRESET/DISC button* 7, 11 During tuner reception: Preset station select 7
During CD/MD playback: Disc select 11
17 LCL button 8
18 D-BASS control 9
- XR-C353 only
The illustration of the front panel in the manual is of the XR-C353.
Specifications
Cassette player section
Tape track 4-track 2-channel stereo
Wow and flutter 0.08% (WRMS)
Frequency response 30 - 20,000 Hz
Signal-to-noise ratio 58 dB
Tuner section
FM
Tuning range 65.0 - 74.0 MHz (at 30 kHz step) 87.5 - 108.0 MHz (at 50 kHz step)
Aerial terminal External aerial connector
Intermediate frequency 10.7 MHz
Usable sensitivity 8 dBf
Selectivity 75 dB at 400 kHz
Signal-to-noise ratio 65 dB (stereo), 68 dB (mono)
Harmonic distortion at 1 kHz 0.5% (stereo), 0.3% (mono)
Separation 35 dB at 1 kHz
Frequency response 30 - 15,000 Hz
Capture ratio 2 dB
MW/LW
Tuning range MW:531-1,602 kHz LW:153-281 kHz
Aerial terminal External aerial connector
Intermediate frequency 10.71 MHz/450kHz
Sensitivity MW: 30 V LW: 50 V
Power amplifier section
Outputs Speaker outputs (sure seal connectors)
Speaker impedance 4-8 ohms
Maximum power output 35W× 4 at 4 ohms
General
| Outputs | Power aerial control lead Power amplifier control lead (XR-C353 only) Telephone mute control lead (XR-C353 only) Line out (XR-C353 only) |
| Tone controls | Bass ±8 dB at 100 Hz Treble ±8 dB at 10 kHz |
| Power requirements | 12 V DC car battery (negative ground) |
| Dimensions | Approx. 188 × 58 × 181 mm (w/h/d) |
| Mounting dimensions | Approx. 182 × 53 × 164 mm (w/h/d) |
| Mass | Approx. 1.2 kg |
| Supplied accessories | Parts for installation and connections (1 set) Front panel case (1) Rotary commander RM-X2S |
| Optional accessories | Bus cable (supplied with an RCA pin cord) RC-61 (1 m), RC-62 (2 m) RCA pin cord RC-63 (1 m), RC-64 (2 m), RC-65 (5 m) |
| Optional equipment | CD changer CDX-705 (10 discs), CDX-T60 (6 discs), CDX-T62 (6 discs), MD changer MDX-60, MDX-61 Source selector YA-C30 |
Design and specifications are subject to change without notice.
Troubleshooting guide
The following checklist will assist in the correction of most problems you may encounter with your unit.
Before going through the checklist below, refer to the operating procedures.
General
| Problem | Cause/Solution |
| No sound. | ·Adjust the volume with ⊙. ·Set the fader control to the center position for 2-speaker systems. |
| Indications do not appear on the display. | Remove the front panel and clean the connectors. See “Cleaning the Connectors” in “Maintenance” for details. |
| No beep tone. | ·An optional power amplifier is connected and you are not using the built-in amplifier (XR-C353 only). ·The beep tone is muted. |
Tape playback
| Problem | Cause/Solution |
| Playback sound is distorted. | Contamination of the tape head. → Clean the head. |
| The AMS does not operate correctly. | ·There is noise in the space between tracks. ·A blank space is too short (less than four seconds). ·▶■ on (SEEK/AMS) is pressed immediately before the following track. ·▲ on (SEEK/AMS) is pressed immediately after the track starts. ·A long pause, or a passage of low frequencies or very low sound level is treated as a blank space. |
Radio reception
| Problem | Cause/Solution |
| Preset tuning is not possible. | • Store the correct frequency. • The broadcast is too weak. |
| Automatic tuning is not possible. | The broadcast is too weak. → Use manual tuning. |
Disc play (XR-C353 only)
| Problem | Cause/Solution |
| Playback sound skips. | A dusty or defective disc. |
| Display | Cause | Solution |
| E-01 | The disc magazine is not inserted in the CD/MD changer. | Insert the disc magazine with discs into the CD/MD changer. |
| E-02 | No disc is inserted in the disc magazine. | Take out the magazine and insert a disc. |
| E-04 | The disc is dirty. | Clean the disc. |
| The disc is inserted upside down. | Insert the disc correctly. | |
| E-99 | The CD/MD changer cannot be operated because of some problem. | Press the reset button on the unit. |
| TEMP | The ambient temperature is more than 50°C. | Wait until the temperature goes below 50°C. |
If the above-mentioned solutions do not help to improve the situation, consult your nearest Sony dealer.
Index
A
Automatic Music Sensor (AMS) 6, 10
Automatic tuning 8
Automatic Tuner Activation (ATA) 6
B
Balance 9
Bass 9
Best Tuning Memory (BTM) 7
Blank skip 6
C
Caution alarm 4
CD playback 10
Clock 5
D, E
DIGITAL D-BASS (D-Bass) 9
Display 6,10
F, G, H
Fader 9
Fast-forward 5
Front panel 4
Fuse 13
I, J, K
Intro scan 6,11
L
Local seek mode (LCL) 8
M, N, O
Manual search 11
Manual tuning 8
MD playback 10
METAL 6
Mute 10
P, Q
Preset search 7
R
Radio 7
Repeat play 6, 11
Reset 4
Rewind 5
Rotary remote 4,8,9
s
Shuffle play 11
T, U, V, W, X, Y, Z
Tape playback 5
Telephone mute 10
Treble 9
Witamy!
3 HaTnCHETe KpaTko 6yToH DSPL.
10:08
YacOBHnKbT 3aNoUyBa da pa6Otn.
3a6eKka B cnyau, ye pReBKnIOuBaTeIaRr POWER SELECT, pa3noJoxEn Ha doJIHATA cTpaHa ha anapata e noCTABeH bNOLOXeHEMe 3, YacOBHHKbT MOKe da 6bJe cBepeH cAmO, aKO eNEKtpo3axpAHBaHToE e BKNIOHeNo. CBepeTe yAcOBHnKa, cnE kaTO cTe BKNIOUHIn n ENEKtpo3axpAHBaHToHa paAnoapanaPaTa.
-ФункцЯ Best Tuning Memory (BTM)
C nomouTa Ha Ta3n 0yHKuIN OTe KUINr YecToTeH 06XBaT Ce 36BpuT CaMO CTaHUNTE C Hau-CnIeH CNHaN I Ce 3aNaMeTBAr TpeHa Ha TxAxHaTa YecToTA.
IPEJOTBPATBAHE HA INHUNDEHTN!
PnHacTpoBaHe No BpeMe Ha zoOpnpaHe, n3IOn3BaJTe ΦyHKUraTa 3a ABTomAtuHa HAcTpoKa IIN ΦyHKUraTa 3a TbPcEHe Ha npEdapnteHIO 3aNaMeTeHn CTaHcNBMecTo pBuHa HAcTpoKa.
1 HatackaTe NocJeDoBaTeJHo 6yToHa SOURCE,3aJaN36epTe3aN3TOUHKn paDnOanapata.
Пи BCЯКО haTnCKaHe Ha 6yToHa SOURCE I3TOUHKnbT Ce npOMeHЯ, KaKTo CneДBa:
TAPE TUNER CD/MD (CaMo 3a XR-C353)
2 HATnCKaIte NocJeIOBaTeJIHo 6byToHa MODE),3a Da n36epeTe YecTeToH o6xBAr.
BceKn nT, KOrato HaTncHete 6yToHa MODE), YecTOTHNAT Oxbat Ce npOMeHRAkTO CneDBA:
FM1 FM2 FM3 MW LW
3HaTNCHeTe 6byToHa BTM 3a DBe ceKyHdN.
3a6eJekn
AnapatbT HMa da 3aametBa paiaocTaHcNn C louHn C HomepnpaHnTe 6yToHn 3a npedbarntHa hactpoiKa. B clyuay, ye morat Da ce pniemat do6pe no-manko cTAHcNt OT HomepnpaHnTe 6yToHn, HAKON 6yToHn ige octahat Hen3no3BaHn.
B cnuyan, Ye na ekpaHa nMa noka3n Homep Ha 6byToH, anapatbT ue 3aanaMeTba PaAnOCTaHmN HA BCNUKn Homepnapa6 ByToH 3a npEdbAPNTeHa HAcTpoKa O T Hero Harope.
3aapanetTBAHe cMo Ha XeJahnTe paNocTaHcnn
OT BCEKN 06XbaT MoTaJa 6bJaT
3aNaMeTeHn Do 6paNIOCTaHcHn (FM1, FM2, FM3, MW n LW) c NOMOuTa Ha
HomepRanHe 6byToHn 3a npEdbapnteHa
hAcTpoiKa B peI No BaW n36Op.
CLeDoBaTEnHO, B 6xBaT FM mOrat da ce
3aNaMeTAT 18 paNIOCTaHcHn.
B Cnyau, Ye nCKaTe Da 3aNaMeTtne HoBa
paNIOCTaHcHn C Beue n3NoJ3BaH HomepRanH
6byToH, Ue Ce n3Tpne npEduHnHaTa
3aNaMeTeHa paNIOCTaHcHn.
1 HatackaiTe NocJeIOBaTeHNo 6bToHa SOURCE,3a da n36epete 3a n3TOuHnK paDnoanapata.
2 HaTnCKaIte NocJIeIOBaTeJHNo 6yToHa MODE),3a Da n36peTe YecTOTHNn o6xBaT.
3 Hatackaite 6byToHa (SEEK/AMS), 3a da hamepnte paHIOCTaHcIraTa, KOJTO mckaTe Da 3aNaMeTHe C HOMepnpaH 6byToH 3a PpeDbapnteJIHa HAcTPOJa.
4 HaTnchTe n 3aApbXTe 3a OKoJIO DBe ceKyHdN JxelaHn Homepnpan 6yToH (OT ①do ⑥).
Homepbt Ha n3bpaHn 6yToH 3a npedBaPteJIHa HacTpoJa ce noBBA Ha ekpaHa.
HaTnCKaHTo Ha 6yToHa MODE npomehpa6oTaTa, KaKTo CJIeJBa:
- NOCOKata Ha DBNIXEHNE Ha JeHTata
- 06xbata, FM1 → FM2 → FM3 → MW → LW
- yctpoiCTBO 3a cmHa Ha CD/MD (Camo 3a XR-C353).
Cbbet
Bue Moxete Da BkIOuHTe anapata KaTO HATNCHETe 6yToHa (SOURCE) Ha potaioHHOTO dNCTaHIOHOH ynpabJIHe.
Upe3 3aBbPtaHe Ha peryIaTopa (SEEK/AMS)
3aBbptete Ieko peryanaTopa n roocbo6oTe 3a da:
- Hamepnte NaHaJaTa Ha 3aIncnTe Ha IeHTata. 3a6bp3o npehabnBaHe Ha IeHTata, 3aBbPteTe n 3aDpbKTe n CneI ToBa OCbo6OJepepyNaTopa. 3a Bb3PpOn3BExKaHe 3aBbPteTe n 3aDpbKTepepyNaTopa OTHOBnHaKpa rOOCbo6OJeTe.
- Hamepnte onpeidenen 3annc ha dncka. 3aBptete n 3aDpBXte perynaTopa, DOKaTO HamepTe onpeideneno MRCTO OT 3aNca n CneT TOBA ro OCBOOJeTe, 3a da 3anoue He Bz3npou3BExdHeTo (CaMo 3a XR-C353).
HactponteHa cTaHcunTe aBtOMaTnUHO. 3aBbPteN 3aDpXKe pErynatOpa,3a Da Hactponte Ha onpeDeJeHa cTaHcIy.
Чрет haТиСкане Ha perулалotа И endHOBpeMeHHOT My 3aВьтанe (peryuIalopa PRESET/DISC)
HaTnchHe n 3aBbPTepepyLaTopa 3a:
HaTnCHeTe 6yToHa ⑥,ДOKaTO HaTnCKaTe 6yToHa SEL.
3a daakTbupate OTHOBO 3ByKOBnCnHaJI, HATNCHE Te3N 6yTOH OUe BeDhBX.
3a6eJexKa
B cnuya, ye CbpxeTe DOnbHnHteneH yCnBaTeN He n3non3BaTe BrpaDeHeny yCnBaTeN, 3BkyOBaTn CunHan 1ue 6be De3aKTHInpuan (Camo 3a XR-C353).
CdoTbHnTeHNo o6OpyDbaHe UcTpoIcTB0 3a CmHa Ha CD/MD (CaMo 3a XR-C353)
CTo3n anapaT moXeTe da ynpaBnBaTe do DBe yctpoNCTBa 3a cmHa ha CD nIN MD.
HaTnCKaIte 6byToHa MODE nocLeNoBaTeIHO,3aJa n36peTe JeenaHOTO yCTpoIcTBo 3a CMHa Ha CD/MD.
PpomHa Ha ekpaHHaTa HΦopMaun
Binharn KORATO haTINCHETe 6yToHa (DSPL) no Bpeme Ha B3npOn3BExkDaHe Ha CD/MD, ekpaHHaTa INΦopMaunCe npOMeha, KaKTo CneDbA:
Hamiapahe Ha onpeidenen 3annc -ФункцЯ Automatic Music Sensor (AMS)
По Врeme Ha Bьзпpon3Бекданe,HaTиСнЧе eДнATA OT CTpaHNTe Ha6byToHa (SEEK/AMS) NO BeДнБЖ 3a BCEKN3aNc, KОЛTO NCKATE DA npeckOuHte.

3a Hammpane Ha CneBaun 3aHnCn
3aHamipaneHa npednHn 3annc
HamipeHa onpeJeIeHO MrcTo ot 3aInc
-Функцma Manual Search
ПО ВЕме На Вьзпpon3Вевkaн Натисны И зарьхто сда Na OТ Стравино на 6утона (SEEK/AMS).
Ocbo6oTe 6yToHa, cIeI KaTo HamepuTe XeJahOTo MRCTO.

3a TbpcHe Hnpei
3a TbpcHe Ha3a
PpeBknIouBaHe Ha npyr nDnCKOBe
ПО Врeme на Вьзпpon3Вждане Натисные edna OT CTpaHnTe Ha 6уToHa (PRESET/DISC).
3a BpBshaHe KbM npednweH dNcK
3a npemHaBaHe KbM cIeBdAaDnCK
PperIeI Ha 3aIncs
-ФункцЯ Intro scan
IocneIOBateHNo ce Bb3npoN3BexJaT nbpBnTe DeceT CeKHyDn OT BCNUKn 3aPiNCn Ha TeKyuNn DaNc. CneJ KpaHa NpBnN DaNc, ce Bb3npoN3BexJa cNeDbAunrT.
HaTnCHete 6yToH ① noBpeMe Ha Bb3Pon3BexKahe.
Ha ekpaHa ce noBBA nHnKaunra "INTRO".
Korato hamepnte kejana 3a nnc, ha tnche Te OTHO6byToHa. UpeBt ce Bpbca B HopMaen pexnM 3a Bb3npn3BexKaHe Ha CD/MD.
PnBb3npoun3BexJaheOT CD/MD: 136opHa yctpoiCTBO 3a CMHa Ha CD/MD 11
5 ByToH OFF 4, 5, 6
6 ByToH DSPL (cMaHa Ha pExmHa Ha ekpaHa/CBepBaHe Ha YacOBnK) 5,6, 8,11
7 ByToH (eject) 6
8При радиоюпсmaHe: HomeprpaHn 6yToHn 3a npedbarHTeHa nactpoKa 7,8
Пи Вьзпpon3Вждане о CD/MD:
① ByToH INTRO 6, 12
② ByToH REPEAT 7,12
③ ByToH SHUF (Shuffle)* 7, 12
④ ByToH MTL (Metal) 7
⑤ ByToH ATA (Automatic Tuner Activation) 7
⑥ ByToH BL.SKIP (Blank Skip) 7
9 ByToH RELEEASE (ocbo6oxkaBa IInueBnnaHe) 4,15
10 ByToH Reset (pa3noJoxen OTnped Ha anapata, cKpnt 3ad InueBna nanei) HAtnche To3n ByToH npn PbPBOHaJauHNo IyCKaHe Ha anapata, npn CmHa Ha akymylatopHaTa 6aTeprn nn Korato 6byToHte Ha anapata He fynuHnIpaT npaBnIHO.
11 ByToH MUTE 10
12 ByToH SEL (n36Op Ha pexm Ha ynpaBJIeHne) 5, 10, 11
13ПпевклioчbaTeI POWER SELECT (pa3noJoxeH Ha doJHaTa cTpaHa Ha anapata) BnK "ПпевклioчbaTeI POWER SELECT" BpbkoOДCTBOTO 3a ИнсталupaHe/ CBbp3BaHe.
14 Ekpan
15 Bytoh BTM (Hactpoika Best tuning memory) 7
16 ByToH PRESET/DISC* 8,12
Pn paAnOpnpMaHe:
N36Op Ha npEaBapntHo hAcTpoeHa CTaHcIa 8
PpneMaH 65,0-74,0 MHz
(πρι 30 kHz cTBnka)
87.5-108.0MHz
(πρι 50 kHz cTBnka)
AHTeHcKynyH BbHseH aHTeHcKynyHr
MekdHHa YecToTa 10,7 MHz
N3noJ3BaEMAyBCTBtENHOCT 8 dBF
75dB npn 400 kHz
HnBO CnHaJ/7yM 65 dB (ctpeo),
68 dB (MOHO)
XapMOHnUHn n3KpNBBaHnN npn 1 kHz
0,5% (ctpeo),
0,3% (MOHO)
Pa3delenHe 35 dB npn 1 kHz
UcctOTHa xapaKTepcntika
30-15.000Hz
HnBOHa3axBaT 2dB
MW/LW
Obxat 3a hactpoika MW:531-1.602 kHz
LW: 153 - 281 kHz
AHTENHEKNYIHyBbHHeN AHTENHEKNYIHyMEXdHNHa YecToTa10,71 MHz/450 kHz
UyBCTBNTeHOCT MW: 30 V
LW: 50~ V
Pa3delenycnIbATEn
I3BOJN I3BOJN 3a
BVCOKOROBOpnteJI
(KIeMM CbC CNyPHO 3axBa7aHe)
UmneandaHbVBCOKOROBOpnteInTe
4-8ohms
MaKcImaJIHa n3XoJaIa MoUHOCT
35 W × 4 (npu 4 ohms)
PazdeJ o6z
I3B0Dn
Пюводник 3a
ynpableneHa
ABTOMATUHa aHTeHa
PpOBoDnK 3a
ynpaBHeHne Ha yCnBaTeJ
(Camo 3a XR-C353)
PpOBoDNK 3a
ynpabJIeHne Ha
TeIeDohHTo
3aargyuushaBHe (Camo 3aXR-C353)
Bb3npo3Bexdane Ha MD 11
E, X
Ekpan 6,11
En.npepnataTe1 15
3, N, U
3aŋnyuəbaNae 10
K
KacetocpoH 6
1
JinueB nane 4
M
METAL 7
H,O
Hnckn 10
#
IpeDynpedntenHcHnA1 4
PpeHacTpoKa 4
PpeHabBaHe Happe 6
IpeHabBaHe Ha3aD 6
P, C
PaananaapaT 7
PotaunHNO nctaHnOH ynpabHe 5, 9,10
PbUHa HacTpoiKa 8
T, y
Tepeponho 3aŋyuwaBaHe 10
Φ,X,
ФункцЯ Automatic Music Sensor (AMS) 6, 12
ФункцЯ Automatic Tuner Activation (ATA) 7
ФункцЯ Best Tuning Memory (BTM) 7
Функциа Blank skip 7
ФункцДIGITAL D-BASS (D-BASS) 10
Функлma Intro scan 6,12
Функциа Local seek mode (LCL) 8
DIGITALIS D-BASSZUS (D-Bass) 10
E
Elnemitasa 10
Elore beallitott allomasok keresese 7
Első panel 4
Ipeed Hauanom Nolb30BaHnA
Ipehenactpoika annapaata. 4
OTeJIeHHe nepeDne NaHeI 4
IIOIroTOBka K IOnb3OBAHnIO BpaaIooIMcA DInCTAHUONHHbIM NepeKlHouaTeJIeM 5
UctaHOBKa BpeMeHH Ha Yacax. 5
MarHnToΦoH
IpocnyuBaHne MaHnHTbIX 3aInCei .6
Pa3nHbIe peKmbl BocnpOn3BeJeHnMaHHTHO 3aIncn 6
PapnopnpemHK
ABTOMaTnueckn BvOd paNIOCTaHcIb N pAMrTb 一3aONOMuHaHHe ONTMaMbHO NaCTpoiKn (BTM). 7
BvO B namrTb TOnIbKO Tex CtaHcN, KOTOpble Bac INTEpeCyIOT 8
BknHoueHne XpaHnIuXcB NpMaTn paAnocTaun
PpOhyHKUH
Пользованны врашаюшмсяпегкlioчateлем Дистанционноуnpавlenna 9
Perynipobka napameTpob 3ByuHaHna.10
OTKJIIOUeHHe 3Byka 10
IpoDcTpOka 3ByuHaHnMaHHTOnblI ToHaJIbHoCTn IpeDyIpEiTeJIbHOr OcHana 11
DonoHnTeIbHa aannapaTypa
Mhoro3apAньийkomnaKT/MD- npounpbyBaTeJIb(TOЛьКо ДЯ moDeJN XR-C353)
Bocnpoun3BeDeHne KOMNaKT/MD-dncka.....12
CkaHnpoBaHne DOpOKeK - CkaHnPbAHne IIO BCTyNTeJIbHbIM fpaarmEtam 12
Повторное ВоснpondиЗеведные дорожек
- Повтор ВоснpondиЗеведnia ..... 13
Bocnpoun3BedeHne Iopoxek B cnyaHno nocJeIOBaTeJIbHocTn -IpeTeacOBaHHoe BOCnpoun3BedeHne..13
DOnOpHnTeJIbHaN HhΦopMaζη
Mepbl npedoctopoxhoctn 14
Uxo3a annapatom 15
Демонохannapata 16
PacnoJoxHeOpraHOBynpaBHeHn1 17
Texnueckne daHHbIe 18
PykoBocTBo no yctpaHEnIO HenOnaIok ..19
Aanbaunthbinyka3TeJIb 21
YacbI IMeHOT 24-acaOByIO UnppoByIO
HINKauHIO
Bot kaK npOn3BODnTcY cTaHOBKa, HApPmEp, Ha 10:08:
1 Bo Bpempa6oTbI MaHHTOJIbI HaxMnTe OFF mN DSPL.
2 B TeueHne DByxCeKyHd ydepxnBaTe KHOKNy DSPL B HAXKATOM NIOJXeHN.

Mnraotunpbyaacob.
1 YctaHOBnTe HxHbI yac.

InepebOa Bnpeed
InepebOaHa3a

2 Haxmnte n otnyctnTe KhoNky SEL.

MuraTcnpbIMHyT.
3 YctaHOBNTe MNHyTbI.

ДлпаpeвodaВперд
InepeB0daHa3a

3 Haxmnte n OTnyctnte KhoNky DSPL.

YacbHaHnHaIOT OTCHT BpEmHI.
PpmeaHne
Ecnn nepekniouateIb POWER SELECT Ha HnKHeN CTOpOHe KOpNyCa hXoDNTcB N03uNn 8,TO BpEmHa Yacax MoXNo yCTaHOBt bToIbKO npn BKIOeHHOM NITaHm MaHHTOnbl. B aTOM cnyae, IpexJe Yem yCTaHabJIbTa Yacbl, BKIOUHTe paAIO.
ПрослuyшваимеMaRGHTHbIX 3aINceseI
YctaHOBtKe Kaccety.
Bocnpoun3BeDeHneHaunHaetcABTOMaTnueeKn.
EcInB MaHHTOΦOHe yXe eCTb KaCCeTa, HaxmMaIte KHOKNy SOURCE DoTex nop, noka Ha dncnnee He noaBntc cNoBO "TAPE".
TAPE
Bocnpoun3bOuNTcTcPoHa,6paueHHa BBepx.
TAPE
Bocnpon3BODNTCCTOPoHa,6paueHHaBHn3.
Cobet
YTO6bI N3MEHnB HnPABJIeHHe DnBXeHn JENTb BO BpEMBOCPON3BeDEHn,HaXmITE KHOJky MODE
YTo6bI nepeiTu OT nepeMOTK JeHTbK BOCpOn3BeHeHNO, HaxMnTe MODE
Поньн haалзвуковдорожк — Атоматческmy3bikabHbI ceHCOP (AMS)
PnnoNCKe moKHO 3a OdnH pa3 npOnyCTntb Do DeBRTn DOpOKeK.
Bo BpemBocnpOn3BeHnHaXMMTe c OdHOn nIu dpyrO CTOpOHbI KHOKNy (SEEK/AMS) u cpa3y Je OTNcyTne ee.

HaxoKdHnOHOH n3
NoCleDyoHuxDopOKeK
HaxoKdHnOHOHn3
PpeBdyuNXDopOKeK
PpmeaHne
Функлг AMS moKeT He cpa60TaB, ecN:
- May3bl Mekdy Iopoxkamn npoJnxiaOTcH MeHbWe YetbIpex CekyHd
B nay3ax meKdy doPOxKamn npncyTCTByeT wym
B 3aannn nmeoTc nnHHbIe yacTkncnoHHKeHHOnr pomKocTbIO nn63Byka.
CmeHa npaMeTpOB, BbIBoDmMbIX Ha dncnle
Пи Кждом KОРТКOM HЯКATи HA KHOнКу DSPL BO BpemB BOCpon3BedeHnM MaHHTHOn 3aINcN HaДИСпЛeI NOCJIeOBOaTeJIbHO BBIOJATC:

Pa3JnUHbIe peXkMbI BOCpOu3BeDeHnMaRHTHO 3aINcN
POMHHTE O B63OPACHOCTN DBNXEHN!
Bo Bpem ynpablenna ABTomobnem cneyet nIb30BaTbcf yHKuEn aBOMatueeKo hAcToPkn pInemHnka nn HAcToPkoN Pn Pamrtn, Ho He HAcToPkoB bpyHyIO.
BBoD B NaMaTb TOJbKO Tex cTaHcN, KOTOpbIe Bac nHTepecyIOT
Ioi cooTBeTcByUOuMMHomepaMn nporpamMbIx N03uN BbMoKTe B npOn3B0JbHOM nopRdKe 3aHeCTN B pAmrBdo WeCTn paNIOCTAHuN B KAcKOM uD nAnO3HOB (FM1, FM2, FM3, MW u LW). TaKIM o6pa3OM, B pAmrN pPiemHnKa MoKet XpaHtbcr DO BOCemHaDaTu CTaHcN DnANo3OHa FM. Ppi BBoDe B pAmrTB HOBO CTaHcN IOd yXe 3aHbTbIM HOMepom npOrpamMHoN PO3uN XpaHbShaac PoD 3TN MHomepOM cTaHcN I3 pAmrTcTnpaEtCra.
1 Переклочитесь на радионремнок посядовательным Нжатим KMONKU SOURCE.
2 BbIbeRte dHaana3OH nocJeIOBaTeJIbHbIM HaxaTHeM KHONKU MODE).
3 HaxaTnEM KHONKU (SEEK/AMS) NaHnTe NOCK CTAHcUN, KOtOpYb Bb XOTnTE 3aHECTN B NAMrTB IOd TEM IIN INhBIM HOMEPOm PpOrpaMMHOI PO3uNN.
4 HaxmTe KhoNky C COOTBETCTBYUOUM HOMEpOM (1 - 6) u ydepxnBaIte ee B TeueHne Dbyx CeKYHd.
Homep Bb6paHHoI nporpAMMHOI O3nIIN NOBnEeTcHa dncnnee.
BkIoueHne XpaHauXcB PnAmTn paAnocTaHcN
1 Переклочитесь на радионремнок последователовим Нжатим KMONKU SOURCE.
2 BbIbeRnTe dHaana3OH nocJeIOBaTeJIbHbIM HaXaTHeM KHOpKN MODE).
3 Haxmnte n OTnycntne KhoNky c HOMEpOM (1 - 6) ,noD KOToPbIM 3aHecea B nAMrTb HxKHa r CTaHcIy.
Cobet
CmeHa npaMeTpOB, BbIBOdImbIX Ha dncnle
Pn KaKdom HkaTn KhoNk DSPL Ha Dcnpie NooepedNo BbIOaTcyaCToTa npHmAmoCTaHcNn IN TeKyuee Bpemr.
Ecnn 6bapxNtB 3aHeceHHyIO B namTb CTaHcIHO He ydaetc
Haxmnte n OTnyctnte c IIO6oB CTOpOnbI KHOJNky (SEEK/AMS), YTO6bl Haatb aBTOMaTnueckn PONCK HUxHOI CTaHcnn (ФуннкцЯ aBTOMaTnueckOHaCTpoKn).
ПОИС OCTанБЛВИВаETСРп OBHAPУЖЕНTOI ИИ NHOД CTAHЦИ. HAXIMaIte COOTBETCTBYUOу CTOPOHY KHONK NOCJIeDObATEbHo Do TEx NOP, NOKA He NaIdeTe HUxHryu CTAHЦИ.
PpmeaHne
Ecnn ABTomatnueckm IONCK npepbBaetcra CnIuKOM qACTo, HaxMNTe N OTNyCTNTe KHOJky LCL ,TTO6bI HaIcnIeBbICBeTHnAcb HADINCb "LCL" (peXIM MeTHorO noncka). B 3tOM peXIme npneMHNK NaCTpaNBaeTc TOnko H cTAHcN C OTHOCNTELBO CHNbHBIM CNRHAJN
Cobet
Ecnn Bbl 3haete qactoty hckomoi ctaHnn, haxmte CIOBOI CTOPOHbI KHOJky (SEEK/AMS) u ydepXnBaIe 6e, noka 3Ta cTAuYne he bdyet HauDeHa (pyHnaHACTPOKa).
Прочné Функции
CNYKHTIITOKJIIOUeHIN3BYKc.
KhONKa cNYKNT dNf OTKJIOUeHnMaHHTOJIbI.
Khonka DSPL cnyxnt nla CMeHbI npaMetpoB, BbIOBIMbIX Ha dncnne.
CmeHa pa6oJero HnpaBLeHnna BpaaIoozeroc nepeKJIouHaTeJIa
YctaHOBJIeHHoe I3rOToBHTeIeM pa6ooye HnpaBLeHne BpaAuaOJceroCnpeKJIIOUaTeI NOKa3aHo Ha pncyHKe HnXke.
EcIn Bam Heo6xOdImo CMOHTnpOBaTb BpauaOuIcIpepeKJIouCATEnb DnCTaHcIOHHO rypabJeHHc npaBoi CTOpOHb pyLeBoKoJOnHKn, Bbl MoKeTe N3MeHtB erO pa6OeE haNPaBNeHHe Ha npOTINBOJNOJXHOe.

YtapanBaa pyKoTky VOL, haxMnte KhONKy n He otnyckaaiTe ee B TeueHne DByx cekyHd.
Perylnpobka napametpoB 3ByaHnIy
1 Bb6epnte napameTp, noJlekauPeryInpOBKe, nocJeIOBaTeIbHbIMnKaTneM KONKSEL. PanaMeTpblpeKJIouaOTcB cIeNyUoemnopAKe:
VOL (rpoMkoctb) BAS (Hn3Kne
aactoTbI) TRE (BbICOKne aactoTbI) BAL (6aNaHc npabbIX nLebIX
rpoMKorOBOpnteNe) FAD (6aNaHc
nepeDHHx 3aDHHx rpoMKorOBOpnteNe)
2 OtperynpyuIte BbI6paHHbI napaMeTp C NOMOJIbIO KHOJKN + IJI.
PerynipOBky cneJeT haunHaB B npedeJax
Tpex ceKyHn NocLe Bb6opa napaMeTpa. (Yepe3 Tprn ceKyHdbI KHOJa BHObB
npno6peTaet fynkCIO peryJIaTopa
rpoMkoCTn.)
OTKJIIOUeHne 3Byka
Haxmnte KhONky MUTE
Ha dncnlee mraet haadncb "MUTE".
HaxmMaTe KhoNky SOURCE, Noka Ha
IaCnPHe He NoBNTcN HdNkaTOp
HyxNOro Bam npOnrpbIbATEn.
BocnpOn3BeDeHne KomnakT/MD-Dncka
HaunHaeTcR.
Пи подкнluочени komпakт/MD- npOnrрьВATEЯ Bce DoPoJKNДИСКА BOCnPOn3BOJDaTc CHaJaA.
CmeHa npaMeTpOB, BbIBoDnMbIX Ha dncnne
YTo6bI BOCnpOn3BecTn B ClyuayHOn NocJeIOBaTeJIbHOCTN BCE DOPOXKn BBi6paHHoro DnCKa,
HaxkMaTe Ha KhoNky ③ BO BpEma BocPon3BeHeNn KOMNaKT/MD-DnCka, NOKa Ha DnCnJIe He NoRbNTc HAdnncb "SHUF 1".
YTo6bI BOCnpOn3BecTn B CInyauHNo IocNeIOBaTeJIbHOCTN BCE DnCKn B npOurpbIbATEJe,
HaxkMaIte Ha KhoNky ③ BO BpeMBAocPOn3BeDeHnKOMNaKT/MD-DnCka, NOKa Ha DnCpJIe He NOrBnTcH NaDnncb"SHUF2".
PnKaKdOM HaxaTN KHOJIKN ③ Ha DCNIIeEOcNEOBoTeIbHO NOBnEeTc:
Ecnn BO Bpemn nepetacobahoro
Bocnpom3BeDnHn Hkxtb KHONKY ①,TO B
CnyaHNOH NocNedOBaTeNbHOCTN 6ydyT
BOcPON3BODNTCBN BCTynNTbHbIe ppaMeHTbl
BceXdoPOxEK npOOnKHTenbHOCTbNo 10
CeKYH KaxDbI.
(apedetacobahhoe Bocnpoun3BedeHne)*
④ KhonkaMTL(JeHtaMeTaJn)7
⑤ Khonka ATA (aBtOMaTHueckoe BKNIOeHne paIHO) 7
⑥ Khonka BL.SKIP (nponyck nay3) 7
9 KhoNka RELEEASE (OCTbIKOBKa nepeDneH naHeJI) 4,15
10 Khonka nepehacptpoKn (haxodntcna cnpd n Koprnyca noj npepdne nahebjo). HaxkmaTe 3Tu KhoNky nepei Tem, KaB BnepBbIe NaaTb NOb3OBAtbcra MaHNToJoi, NocIe 3AmHebl aKKymyIaTopa B aBTOMObnJe, a TaKxBe CnYae, eCIn HapUshIoCb cyHKImOnHIOBaHne KHOON kypabNeHHa annapaTom.
11 Khonka MUTE 10
12 KhoNka SEL (Bb6oppeXnMa ynpaBHeHn) 5, 10, 11
13 PepeKJIIOUaTeIb POWER SELECT (HaxOДИТСЯHa HIXHNe CSTOpOHe KOpnyca) CM. pa3dien "PepeKJIIOUaTeIb POWER SELECT"В руКOBODCTBE NO MONTaJy n IOДКЛIOUeHnIO.
14 OkHO DCnPJIeA
15 Khonka BTM (3aONMaHaHne ONTImaJIbHOH HAcTpOuKN) 7
16 KhoNka PRESET/DISC* 8,12
Pn npneMe paDnopepa:
BkIouHe npeAIOCTaHcui,
XpaHrauxxC8 B NaMRTn npneMHnKa 8
Pn BocpOn3BeDeHn CD/MD-DnCKOB:
Bb6op dNcKa 12
17 KhoNka LCL 8
18 Perynatop D-BASS 11
NCTOARHHOROTOKa(MACCA
OTpUcaTeIbHa)
Tb
Pnpi6Jn3nteJbHo
EcnipneIIOxKeHHbIe BbIe cNooc6bI He nomoraIOT, o6paTntecb K 6JInxKaIWeMy dInepy fIpMbly Sony.
Алфавиньи уka3телb
A
ABTomatnueckoe BKnHoueHne paDno (ATA) 7
ABTomatnuceckmy3bikalhblcHcOp (AMS) 6,12
ABTomatWuecka HacTpoika 8
6
BaJIaHc 10
BaIaHc npeDnIX n 3aDnIX
rpoMkoROBOpnte ne 10
B
BbICOKueyactOTb1 10
Bocnpon3BeDeHne KOMnKT-DnCKOB 12
Bocpon3BeDeHne MarHnTHbIX 3aInCe6
Bocnpoun3BeJeHne MD-dnckOB 12
Bpaaounncy nctaHOnhbl
pepekIIOuHaTeIb 5,9,10
Γ,
DIGITAL D-BASS (D-Bass) 11
Ducnnei 6,12
E, K, 3, N, K, Π
3aONMHaHHe ONTmAmJIbHOH NaCTpoIKN (BTM) 7
M
MecThbI NOnCK (LCL) 8
METAL 7
H
Hn3Kne yactotbl 10
0
OTKIIIOUeHHe 3Byka 10
#
IpeepnnaheIb 4
Ipeemotka BnepeD 5
IpeemOTkaHa3aD 5
IpepehacTroika 4
Ipeetacobahhoe Bocpon3BedeHne 13
TOBTOP BOCPON3BedeHn7,13
Ponck BpyHyio 12
Ponckno namrtn 8
PpeoXpaHnTeJIb 15
PpeDynpEeINTeBbHcIgHaJI 4
Iponyck nay3 7
P
PaDnO 7
Puchna HacTpoKa 8
C
CkaHnObaHHe BCTyTnTeIbHbIX
dparmeHToB 6,12
T
Teneponna nay3a 10