MDX-C8500R - Car stereo SONY - Free user manual and instructions
Find the device manual for free MDX-C8500R SONY in PDF.
User questions about MDX-C8500R SONY
0 question about this device. Answer the ones you know or ask your own.
Ask a new question about this device
Download the instructions for your Car stereo in PDF format for free! Find your manual MDX-C8500R - SONY and take your electronic device back in hand. On this page are published all the documents necessary for the use of your device. MDX-C8500R by SONY.
USER MANUAL MDX-C8500R SONY
FM/MW/LW Compact Disc
Player

CDX-C8000RX
CDX-C8000R
FM/MW/LW MiniDisc
Player

MDX-C8500R
Operating Instructions GB
For installation and connections, see the supplied installation/connections manual.
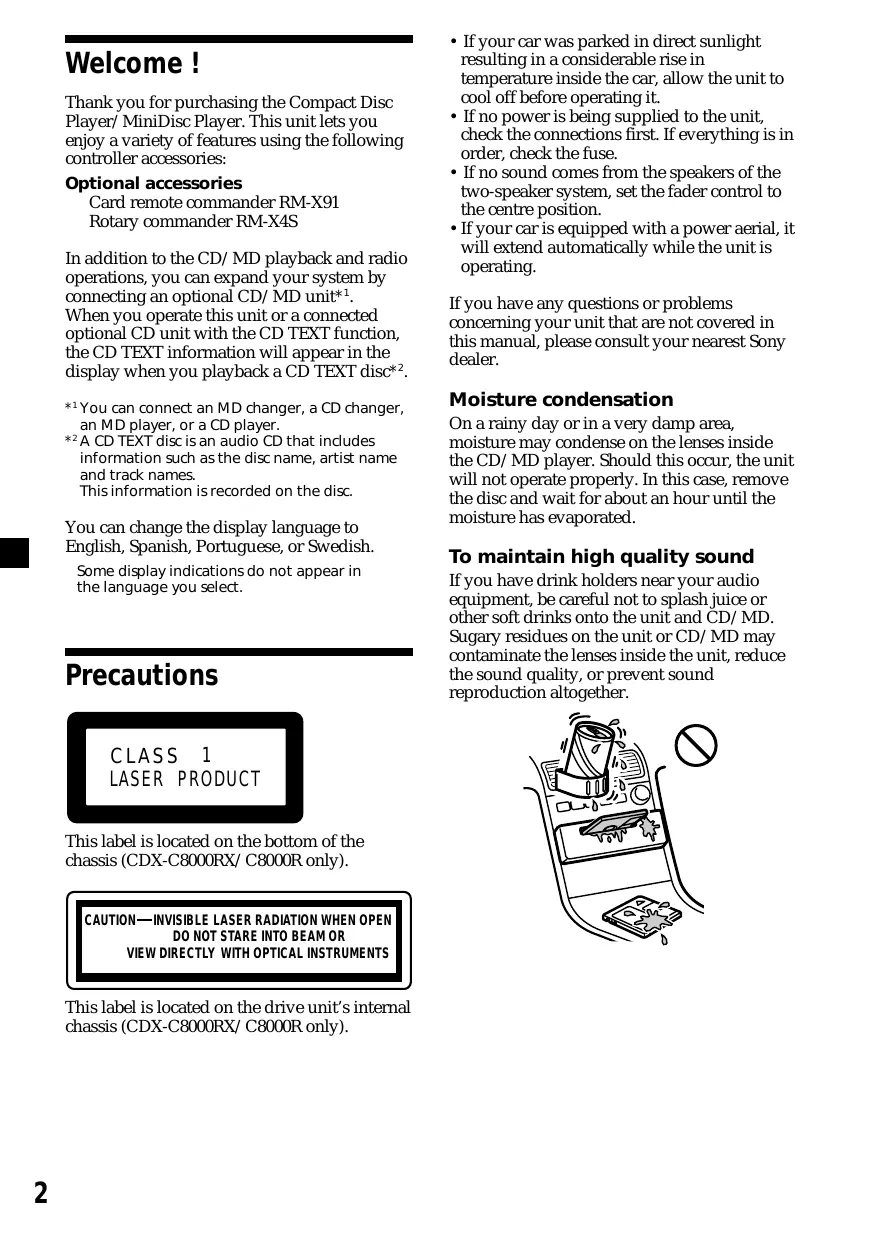
Thank you for purchasing the Compact Disc Player/MiniDisc Player. This unit lets you enjoy a variety of features using the following controller accessories:
Optional accessories
Card remote commander RM-X91
Rotary commander RM-X4S
In addition to the CD/MD playback and radio operations, you can expand your system by connecting an optional CD/MD unit*1. When you operate this unit or a connected optional CD unit with the CD TEXT function, the CD TEXT information will appear in the display when you playback a CD TEXT disc*2.
1 You can connect an MD changer, a CD changer, an MD player, or a CD player.
2 A CD TEXT disc is an audio CD that includes information such as the disc name, artist name and track names.
This information is recorded on the disc.
You can change the display language to English, Spanish, Portuguese, or Swedish.
Some display indications do not appear in the language you select.
Precautions
CLASS 1
LASER PRODUCT
This label is located on the bottom of the chassis (CDX-C8000RX/C8000R only).
CAUTION—INVISIBLE LASER RADIATION WHEN OPEN DO NOT STARE INTO BEAM OR VIEW DIRECTLY WITH OPTICAL INSTRUMENTS
This label is located on the drive unit's internal chassis (CDX-C8000RX/C8000R only).
- If your car was parked in direct sunlight resulting in a considerable rise in temperature inside the car, allow the unit to cool off before operating it.
- If no power is being supplied to the unit, check the connections first. If everything is in order, check the fuse.
- If no sound comes from the speakers of the two-speaker system, set the fader control to the centre position.
- If your car is equipped with a power aerial, it will extend automatically while the unit is operating.
If you have any questions or problems concerning your unit that are not covered in this manual, please consult your nearest Sony dealer.
Moisture condensation
On a rainy day or in a very damp area, moisture may condense on the lenses inside the CD/MD player. Should this occur, the unit will not operate properly. In this case, remove the disc and wait for about an hour until the moisture has evaporated.
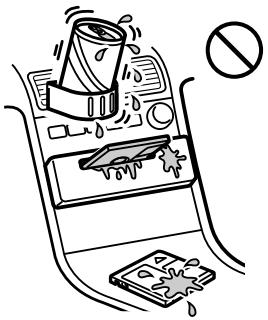
To maintain high quality sound
If you have drink holders near your audio equipment, be careful not to splash juice or other soft drinks onto the unit and CD/MD. Sugary residues on the unit or CD/MD may contaminate the lenses inside the unit, reduce the sound quality, or prevent sound reproduction altogether.
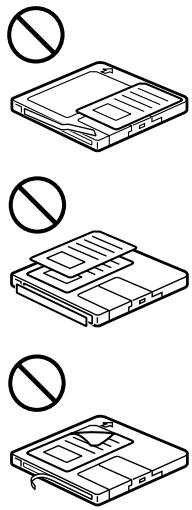
Notes on CDs
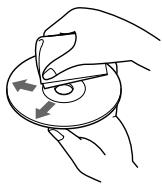
A dirty or defective disc may cause sound dropouts while playing. To enjoy optimum sound, handle the disc as follows. Handle the disc by its edge. To keep the disc clean, do not touch the surface.

Do not stick paper or tape on the labelled surface.

If you use the discs explained below, the sticky residue can cause the CD to stop spinning and may cause malfunction or ruin your discs.
Do not use second-hand or rental CDs that have a sticky residue on the surface (for example from peeled-off stickers or from ink, or glue leaking from under the stickers).
There are paste residue Ink is sticky

Do not use rental CDs with old labels that are beginning to peel off.
Stickers that are beginning to peel away, leaving a sticky residue

Do not use your CDs with labels or stickers attached.
Labels are attached
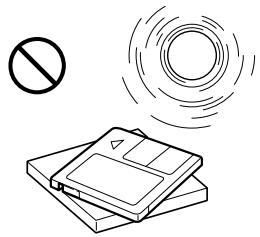
Do not expose the discs to direct sunlight or heat sources such as hot air-ducts, or leave them in a car parked in direct sunlight where there can be a considerable rise in the temperature inside the car.

Before playing, clean the discs with an optional cleaning cloth. Wipe each disc from the centre out.
Do not use solvents such as benzine, thinner, commercially available cleaners or antistatic spray intended for analog discs.
Notes on CD-R discs
- You can play CD-Rs (recordable CDs) on this unit. However depending on the conditions of the recording equipment or the CD-R disc itself, some CD-Rs cannot be played on this unit.
- You cannot play a CD-R that is not finalized (Finalization is necessary for a recorded CD-R disc to be played on the audio CD player).
- You cannot play CD-RWs (rewritable CDs) on this player.
When you play 8 cm CDs
Use the optional Sony compact disc single adaptor (CSA-8) to protect the CD player from damage.
Notes on MDs
Since the disc itself is housed in a cartridge, free from accidental contact with your fingers and dust, MDs can withstand a certain degree of the rough handling. However, dirt or dust on the surface of the cartridge or a warped cartridge may cause a malfunction. Observe the following for best results.
Never touch the surface of the disc itself by deliberately opening the shutter on the cartridge.
When you eject the MD, the shutter may be open. In such a case, close the shutter immediately.
Do not expose the MD to direct sunlight or heat sources such as hot air-ducts. Do not leave it in a car parked in direct sunlight where there can be a considerable rise in temperature. Make sure the MD is not left on the dashboard or rear tray of a car, etc. where the temperature can also be excessive.
Notes on attaching labels
Be sure to attach labels on cartridges correctly, as failing to do so may cause the MD to become stuck in the unit.
- Attach the label in a suitable position.
- Remove old labels before putting new ones on.
- Replace labels that are beginning to peel away from the MD.

Cleaning
Wipe the surface of the MD cartridge from time to time with a soft dry cloth.

Table of contents
Location of controls 6
Getting Started
Resetting the unit 8
Detaching the front panel 8
Turning the unit on/off 9
How to use the menu 9
Setting the clock 9
CD/MD
Listening to a CD with CDX-C8000RX/CDX-C8000R only 10
Listening to an MD with MDX-C8500R only 11
Playing a CD or MD (with optional CD/MD unit) 12
Playing tracks repeatedly
— Repeat Play 14
Playing tracks in random order Shuffle Play 14
Labelling a CD — Disc Memo (For a CD unit with the custom file function) 15
Locating a disc by name - List-up (For a CD unit with the custom file function or an MD unit) 16
Selecting specific tracks for playback Bank (For a CD unit with the custom file function) 17
Radio
Memorising stations automatically
— Best Tuning Memory (BTM) 18
Memorising only the desired stations 18
Receiving the memorised stations 19
RDS
Overview of the RDS function 20
Displaying the station name 20
Retuning the same programme automatically -Alternative Frequencies (AF) 20
Listening to traffic announcements 22
Preseting the RDS stations with the AF and TA data 23
Locating a station by programme type 23
Setting the clock automatically 24
DAB
Overview of DAB 25
Basic operations of DAB 25
Presetting DAB services automatically BTM 26
Preseting DAB services manually
— Manual Preset Memory 27
Listening to a DAB programme 28
Settings on the audio reception 29
Locating a DAB service by programme type (PTY) 29
DSP
Setting the equalizer 30
Selecting the listening position 31
Selecting a soundstage menu — Dynamic Soundstage Organizer (DSO) 31
Adjusting the balance (BAL) 32
Adjusting the front and rear fader 32
Adjusting the volume of the subwoofer(s).... 33
Listening to each programme source in its registered DSO
— Source Sound Memory (SSM) 34
Selecting the spectrum analyzer 34
Other Functions
Labelling the rotary commander 35
Using the rotary commander 35
Attenuating the sound 37
Changing the sound and display settings..... 37
Additional Information
Maintenance 38
Dismounting the unit 39
Specifications 40
Troubleshooting guide 41
Location of controls
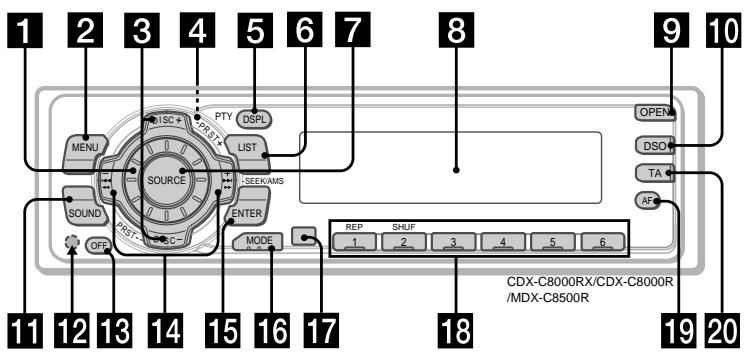
Refer to the pages listed for details.
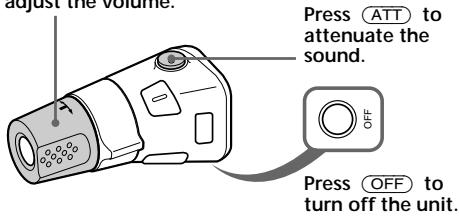
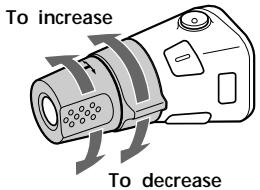
Volume control dial
2 MENU button 9, 13, 15, 16, 17, 18, 19, 21, 23, 24, 26, 27, 29, 30, 32, 33, 34, 38
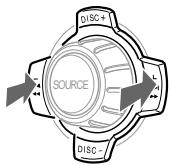
DISC/PRST + / - (cursor up/down) button 9,13,15,16,17,18,19,21,23,24,26, 27,29,30,32,33,34,38
During radio reception: Preset stations select 19,25,26,27
During CD/MD playback: Disc change 13
4 (eject) button (located on the front side of the unit behind the front panel) 10, 11
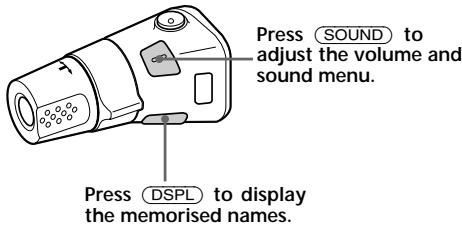
5 DSPL/PTY (display mode change/programme type) button 12, 13, 15, 20, 24, 29
6 LIST button
Disc Memo 15
List-up 16, 28
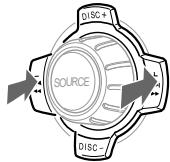
7 SOURCE (Tuner/CD/MD) button 9,11,12,13,16,18,19,25,26,30,31, 32,33,34
8 Display window
9 OPEN button 8, 10, 11, 39
10 DSO button 32
11 SOUND button 30, 31, 32, 33
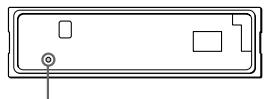
Reset button (located on the front side of the unit behind the front panel) 8
13 OFF button* 8, 9, 11
14 SEEK/AMS + / - (cursor left/right) button 9,13,15,17,19,21,23,24,25,29,30, 31,32,33,34,38
Seek 17, 18, 19, 25, 27
Automatic Music Sensor 13
Manual search 19
15 ENTER button 9, 10, 13, 15, 16, 17, 18, 19, 21, 23, 24, 26, 27, 28, 29, 30, 32, 33, 34
16 MODE button
During radio reception: BAND select 18, 19, 22, 25
During CD or MD playback: CD/MD unit select 12, 16
17 Receptor for the card remote commander
18 Number buttons
During radio reception: Preset number select 18, 19, 21, 26, 27
During CD/MD playback:
① REP 14
② SHUF 14
19 AF button 20, 21, 23
TA button 22, 23
- Warning when installing in a car without ACC (accessory) position on the ignition key switch
- Be sure to press OFF on the unit for two seconds to turn off the clock display after turning off the engine.
- When you press OFF only momentarily, the clock display does not turn off and this causes battery wear.
Location of controls
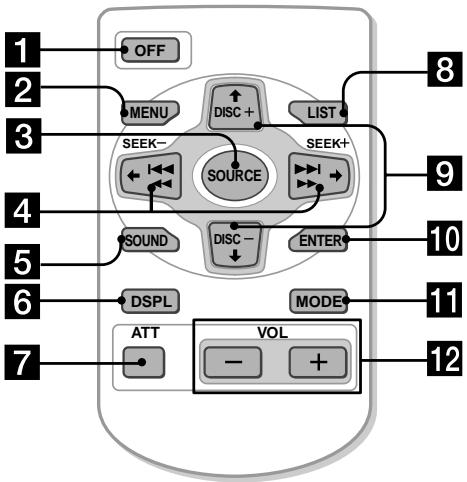
Card remote commander RM-X91 (option)

The corresponding buttons of the card remote commander control the same functions as those on this unit.
1 OFF button
2 MENU button
3 SOURCE button
4 SEEK/AMS (cursor / ) buttons
5 SOUND button
6 DSPL/PTY button
7 ATT button
8 LIST button
9 DISC/PRST (cursor / ) buttons
10 ENTER button
11 MODE button
12 VOL buttons
A unit turned off by pressing OFF for two seconds cannot be operated with the card remote commander unless SOURCE on the unit is pressed or a disc is inserted to activate the unit first.
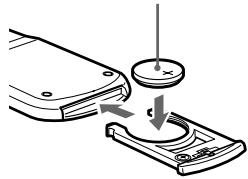
Replacing the lithium battery
When the battery becomes weak, the range of the card remote commander becomes shorter. Replace the battery with a new CR2025 lithium battery.
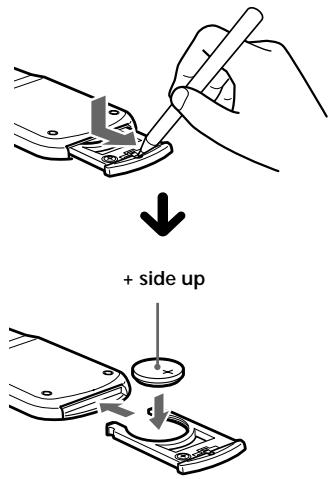
Notes on lithium battery
- Keep the lithium battery out of the reach of children. Should the battery be swallowed, immediately consult a doctor.
- Wipe the battery with a dry cloth to assure a good contact.
- Be sure to observe the correct polarity when installing the battery.
- Do not hold the battery with metallic tweezers, otherwise a short-circuit may occur.
WARNING
Battery may explode if mistreated.
Do not recharge, disassemble, or dispose of in fire.
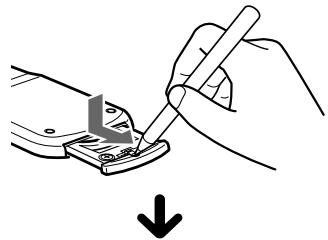
Resetting the unit
Before operating the unit for the first time or after replacing the car battery, you must reset the unit.
Remove the front panel and press the reset button with a pointed object, such as a ballpoint pen.
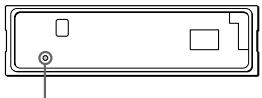
Reset button
Note
Pressing the reset button will erase the clock setting and some memorised functions.
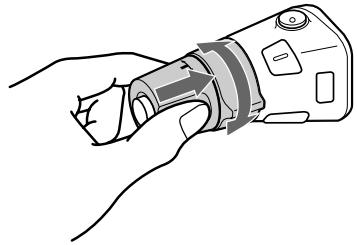
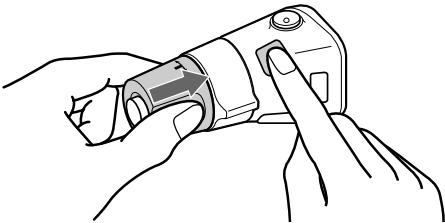
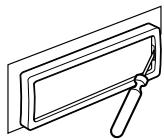
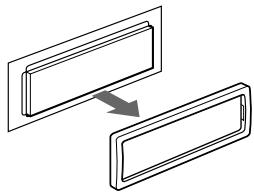
Detaching the front panel
You can detach the front panel of this unit to protect the unit from being stolen.
1 Press OFF.
2 Press (OPEN), then slide the front panel to the right side, and pull out the left side of the front panel.
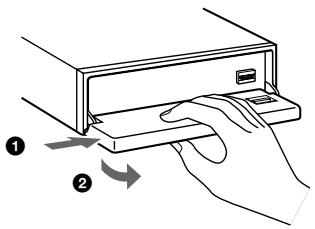
Notes
- Do not put anything on the inner surface of the front panel.
- Be sure not to drop the panel when detaching it from the unit.
- If you detach the panel while the unit is still turned on, the power will turn off automatically to prevent the speakers from being damaged.
- When carrying the front panel with you, use the supplied front panel case.
Attaching the front panel
Place the hole A in the front panel onto the spindle 8 on the unit as illustrated, then push the left side in.
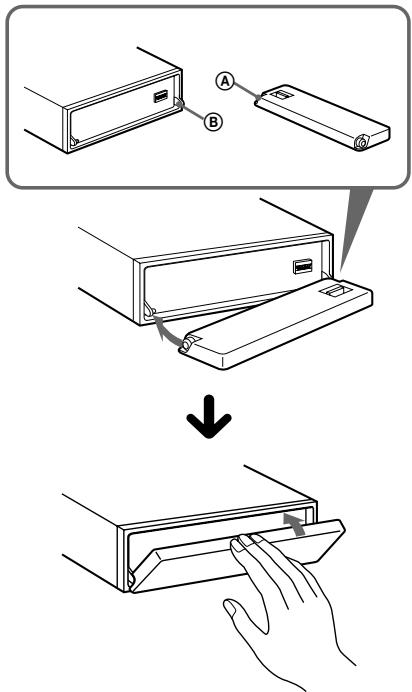
Notes
- Be careful not to attach the front panel upside down.
- Do not press the front panel too hard against the unit when attaching it.
- Do not press too hard or put excessive pressure on the display window of the front panel.
- Do not expose the front panel to direct sunlight or heat sources such as hot air ducts, and do not leave it in a humid place. Never leave it on the dashboard of a car parked in direct sunlight or where there may be a considerable rise in temperature.
Caution alarm
If you turn the car ignition off without removing the front panel, the caution alarm will beep for a few seconds.
Turning the unit on/off
Turning on the unit
Press (SOURCE) or insert a disc in the unit. For details on operation, refer to page 10 (CD/MD) and page 18 (Radio).
Turning off the unit
Press OFF to stop CD/MD playback or radio reception (the key illumination and display remains on.)
Press OFF for two seconds to completely turn off the unit.
Note
If your car has no ACC position on the ignition key switch, be sure to turn the unit off by pressing OFF for two seconds to avoid car battery wear.
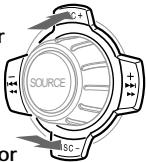
How to use the menu
This unit is operated by selecting items from a menu.
To select, first enter the menu mode and choose up/down (+/- of DISC/PRST), or choose left/right (-/+ of SEEK/AMS)).
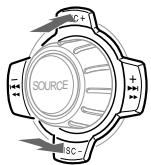
DISC/PRST
(+) : To select upwards
(-): To select downwards

SEEK/AMS
(-): To select leftwards
(+) : To select rightwards
Setting the clock
The clock uses a 24-hour digital indication.
Example: To set the clock to 10:08
1 Press (MENU), then press either side of (DISC/PRST) repeatedly until "Clock" appears.

1 Press ENTER.
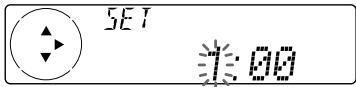
The hour indication flashes.
Press either side of DISC/PRST to set the hour.
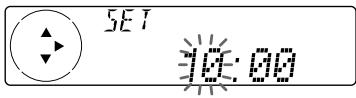
Press (+) side of (SEEK/AMS).
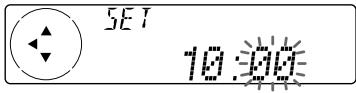
The minute indication flashes.
Press either side of DISC/PRST to set the minute.
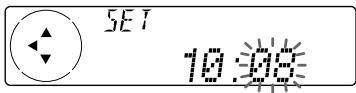
continue to next page
10:08
The clock starts.
After the clock setting is completed, the display returns to normal playback mode.
Tip
You can set the clock automatically with the RDS feature (see page 24).
Note
In the initial setting, the clock indication appears while the unit is turned off.
When you select the "on" setting of the "D.info" item (page 37), you can see the clock indication in the upper part of the display while you are enjoying any source.
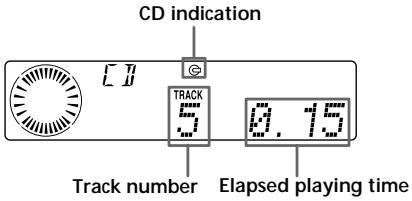
CD/MD

CDX-C8000RX/CDX-C8000R:
In addition to playing a CD with this unit alone, you can also control external CD/MD units.

MDX-C8500R:
In addition to playing an MD with this unit alone, you can also control external CD/MD units.
If you connect an optional CD unit with the CD TEXT function, the CD TEXT information will appear in the display when you playback a CD TEXT disc.
Listening to a CD with CDX-C8000RX/CDX-C8000R only
1 Press (OPEN) and insert the CD. Playback starts automatically.
2 Close the front panel.
Tip
To play back an 8 cm CD, use the optional Sony compact disc single adapter (CSA-8).
If a CD is already inserted, press SOURCE repeatedly until "CD" appears.
When the last track on the CD is over
The track number indication returns to "1," and playback restarts from the first track of the CD.
| To | Press |
| Stop playback | OFF |
| Eject the CD | OPEN then▲ |
For details on operation, refer to
"Changing the display item" (page 12),
"Automatically scrolling a disc name,"
"Locating a specific track,"
"Locating a specific point in a track," and
"Locating a disc" (page 13).
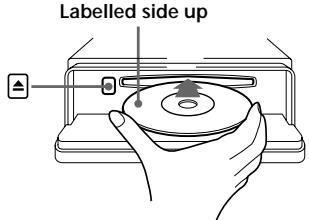
Listening to an MD with MDX-C8500R only
1 Press (OPEN) and insert the MD. Playback starts automatically.
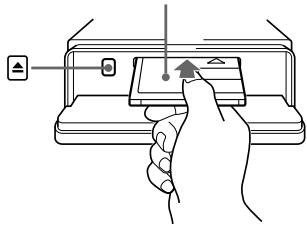
Labelled side up
2 Close the front panel.
If an MD is already inserted, press (SOURCE) repeatedly until "MD" appears to start playback.
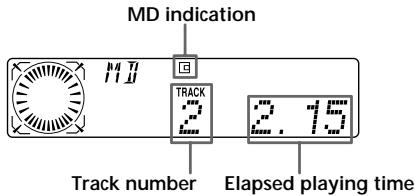
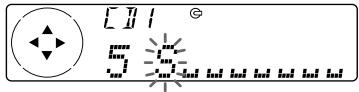
The title of the MD* and the track title will appear in the display window, then the playing time will appear.
* Only if these titles are prerecorded on the MD.
When the last track on the MD is over
The track number indication returns to "1," and playback restarts from the first track of the MD.
| To | Press |
| Stop playback | OFF |
| Eject the MD | OPEN then ▲ |
For details on operation, refer to "Changing the display item" (page 12), "Automatically scrolling a disc name," "Locating a specific track," "Locating a specific point in a track," and "Locating a disc" (page 13).
Playing a CD or MD
(with optional CD/MD unit)
1 Press SOURCE repeatedly to select "CD" or "MD."
2 Press MODE until the desired unit appears.
CD/MD playback starts.
All the discs in the current CD/MD unit is played from the top.
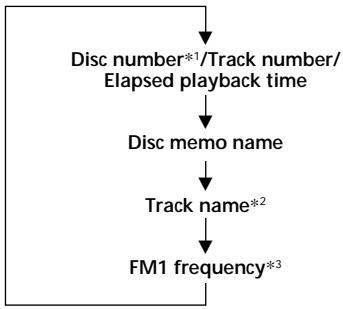
Changing the display item
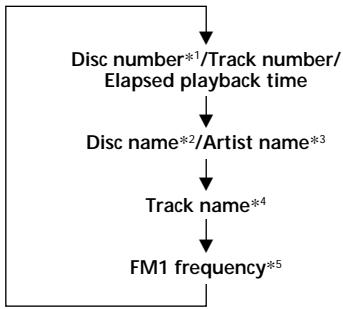
Each time you press DSPL/PTY during MD, CD or CD TEXT disc playback, the item changes as follows:
1 While an optional CD/MD unit is connected.
2 If you have not labelled the CD or CD TEXT disc, or if there is no disc name prerecorded on the MD, "NO D.Name" appears in the display.
3 If you playback a CD TEXT disc, the artist name appears in the display after the disc name. (Only for CD TEXT discs with the artist name.)
4 If the track name of a CD TEXT disc or MD is not prerecorded, "NO T.Name" appears in the display.
*5 While the AF/TA function is activated.
When you connect an optional CD unit, you can label CD and CD TEXT discs with a personalised name using the disc memo function. Refer to "Labelling a CD" (page 15). However, if you use personalised labels, they will always take priority over the original CD TEXT information when such information is displayed.
After you select the desired item, the display will automatically change to the Motion Display mode after a few seconds.
In the Motion Display mode, all the items are scrolled in the display one by one in order.
Tip
The Motion Display mode can be turned off. (See "Changing the sound and display settings" on page 37).
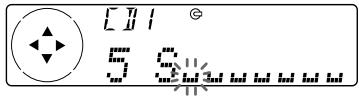
Automatically scrolling a disc name
— Auto Scroll
If the disc name, artist name, or track name on an MD or a CD TEXT disc exceeds 10 characters and the Auto Scroll function is on, information automatically scrolls across the display as follows:
- The disc name appears when the disc has changed (if the disc name is selected as the display item).
- The track name appears when the track has changed (if the track name is selected as the display item).
- The disc or track name appears depending on the setting when you press SOURCE to select an MD or CD TEXT disc.
If you press DSPL/PTY to change the display item, the disc or track name of the MD or CD TEXT disc is scrolled automatically whether you set the function on or off.
1 During playback, press (MENU).
2 Press either side of DISC/PRST repeatedly until "A.Scr" appears.
3 Press (+) side of (SEEK/AMS) to select "A.Scr on."
4 Press ENTER.
To cancel Auto Scroll, select "A.Scroll off" in step 3 above.
Note
For some CD TEXT discs with very many characters, the following cases may happen:
Some of the characters are not displayed.
Auto Scroll does not work.
Locating a specific track
Automatic Music Sensor (AMS)
During playback, press either side of (SEEK/AMS) momentarily for each track you want to skip.
To locate preceding tracks
To locate succeeding tracks
Locating a specific point in a track
- Manual Search
During playback, press and hold either side of SEEK/AMS. Release when you have found the desired point.
To search backward
To search forward
Note
If "kum" or "m" appears in the display, you have reached the beginning or the end of the disc and you cannot go any further.
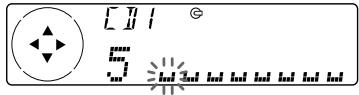
Locating a disc
Disc Selection
When an optional CD/MD unit is connected, press either side of DISC/PRST to select the desired disc. The desired disc in the current optional CD/MD unit begins playback.
Playing tracks repeatedly
— Repeat Play
The disc in the main unit will automatically repeat itself when it reaches the end. As repeat play, you can select:
- Repeat 1 - to repeat a track.
- Repeat 2 - to repeat a disc in the optional CD/MD unit.
During playback, press ① (REP) repeatedly until the desired setting appears in the display.

- "Repeat 2" is only available when you connect one or more optional CD/MD units.
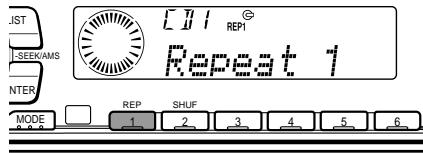
Repeat Play starts.
To return to normal playback mode, select "Repeat off" in the step above.
Playing tracks in random order — Shuffle Play
You can select:
- Shuf 1 – to play the tracks on the current disc in random order.
- Shuf 2 - to play the tracks in the current optional CD/MD unit in random order.
- Shuf All - to play all the tracks in all the optional CD/MD units in random order.
During playback, press (2) (SHUF) repeatedly until the desired setting appears in the display.

1 "Shuf 2" is only available when you connect one or more optional CD/MD units.
2 "Shuf All" is only available when:
- you connect one or more optional CD units, or two or more MD units (CDX-C8000RX/C8000R).
- you connect one or more optional MD units, or two or more CD units (MDX-C8500R).
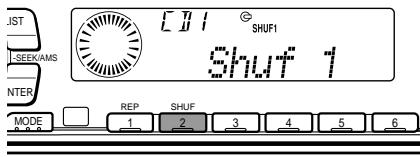
Shuffle Play starts.
To return to normal playback mode, select "Shuf off" in the step above.
Labelling a CD—Disc Memo
(For a CD unit with the custom file function)
You can label each disc with a personalised name. You can enter up to eight characters for a disc. If you label a CD, you can locate the disc by name (page 16) and select the specific tracks for playback (page 17).
1 Press (MENU), then press either side of DISC/PRST repeatedly until "Name Edit" appears.
2 Press ENTER.
Name edit mode
3 Enter the characters.
1 Press (+) side of DISC/PRST repeatedly to select the desired characters.
$$ \begin{array}{l} (A \to B \to C \to \dots Z \to 0 \to 1 \to 2 \to \ \dots 9 \rightarrow + \rightarrow - \rightarrow^ {*} \rightarrow / \rightarrow \backslash \rightarrow > \rightarrow < \ \rightarrow \dots \rightarrow \omega) \ \end{array} $$
If you press (-) side of DISC/PRST repeatedly, the characters will appear in reverse order.
If you want to put a blank space between characters, select "w" (underbar).
Press (+) side of SEEK/AMS after locating the desired character.
The next character flashes.
If you press (-) side of (SEEK/AMS), the previous character flashes.
Repeat steps 1 and 2 to enter the entire name.
4 To return to normal CD playback mode, press ENTER.
Tips
To erase or correct a name, enter "bar" (underbar) for each character.
- There is another way to start labelling a CD. Press and hold (LIST) for two seconds instead of steps 1 and 2. You can also complete the operation by pressing and holding (LIST) for two seconds instead of step 4.
Displaying the disc memo
Press DSPL/PTY during CD or CD TEXT disc playback.

Each time you press DSPL/PTY during CD or CD TEXT disc playback, the item changes as follows:
1 While an optional CD unit is connected.
2 If you connect an optional CD unit with the CD TEXT function, the CD TEXT information will appear in the display when you play a CD TEXT disc.
*3 While the AF/TA function is activated.
Erasing the disc memo
1 Press SOURCE repeatedly to select "CD."
2 Press MODE repeatedly to select the CD unit.
3 Press (MENU), then press either side of (DISC/PRST) repeatedly until "NameDel" appears.
4 Press ENTER.
5 Press either side of DISC/PRST repeatedly to select the disc name you want to erase.
6 Press ENTER for two seconds. The name is erased. Repeat steps 5 and 6 if you want to erase other names.
7 Press (MENU) twice. The unit returns to normal CD playback mode.
Notes
- When a personalised label is erased, the original CD TEXT information will appear in the display.
- When you erase all of the disc names, "No Data" appears in step 5.
Locating a disc by name
List-up (For a CD unit with the custom file function or an MD unit)
You can use this function for discs that have been assigned a custom name. For more information on disc names, refer to "Labelling a CD" (page 15).
1 Press (LIST).
The name assigned to the current disc appears in the display.
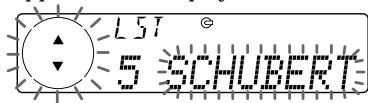
When you assign a disc memo label to a CD TEXT disc, it takes priority over the original CD TEXT information.
2 Press either side of DISC/PRST repeatedly until you find the desired disc.
To locate preceding discs
To locate succeeding discs
3 Press ENTER to play the disc.
Notes
After a disc name has been displayed for five seconds, the display returns to normal playback mode. To turn off the display, press (LIST).
- The track names are not displayed during MD or CD TEXT disc playback.
- If there are no discs in the magazine, "NO Disc" appears in the display.
- If a disc has not been assigned a custom file, "****" appears in the display.
- If the disc information has not been read by the unit, "?" appears in the display. To load a disc, first press the number button, then choose the disc that has not been loaded.
- Some letters cannot be displayed (during MD or CD TEXT disc playback).
Selecting specific tracks for playback — Bank
(For a CD unit with the custom file function)
If you label the disc, you can set the unit to skip or play the tracks of your choice.
1 Start playing the disc you want to label.
2 Press (MENU), then press either side of DISC/PRST repeatedly until "Bank sel" appears.
3 Press ENTER Bank edit mode

4 Label the tracks.
Press either side of (SEEK/AMS) repeatedly to select the track you want to label.
Press ENTER repeatedly to select "Play" or "Skip."
5 Repeat step 4 to set "Play" or "Skip" for all the tracks.
6 Press (MENU) twice.
The unit returns to normal CD playback mode.
Notes
- "NO Name" flashes for five seconds when an unlabelled disc is selected in step 3.
- You can set "Play" and "Skip" for up to 24 tracks.
- You cannot set "Skip" for all the tracks on a CD.
Playing specific tracks only
You can select:
- "Bank on" - to playback the tracks with the "Play" setting.
- "Bank inv" (Inverse) - to playback the tracks with the "Skip" setting.
1 During playback, press (MENU), then press either side of (DISC/PRST) repeatedly until "Bank off" appears.
2 Press (+) side of (SEEK/AMS) repeatedly until the desired setting appears.
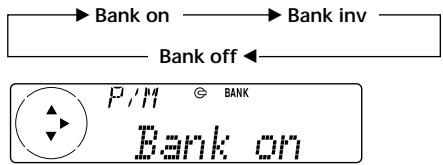
Playback starts from the track following the current one.
To return to normal playback mode, select "Bank off" in step 2 above.
Memorising stations automatically
Best Tuning Memory (BTM)
The unit selects the stations with the strongest signals and memorises them in the order of their frequencies. You can store up to 6 stations on each band (FM1, FM2, FM3, MW, and LW).
Caution
When tuning in stations while driving, use Best Tuning Memory to prevent accidents.
1 Press SOURCE repeatedly to select the.
tuner.
Each time you press (SOURCE), the source changes as follows:

- If the corresponding optional equipment is not connected, this item will not appear.
2 Press MODE repeatedly to select the band.
Each time you press MODE, the band changes as follows:

3 Press (MENU), then press either side of DISC/PRST repeatedly until "BTM" appears.
4 Press ENTER.
The unit stores stations in the order of their frequencies on the number buttons.
A beep sounds when the setting is stored.
Notes
- The unit does not store stations with weak signals. If only a few stations can be received, some number buttons will retain their former setting.
- When a number is indicated in the display, the unit starts storing stations from the one currently displayed.
- If a disc is not in the unit, only the tuner band appears even if you press (SOURCE).
Memorising only the desired stations
You can preset up to 18 FM stations (6 each for FM1, FM2, and FM3), up to 6 MW stations, and up to 6 LW stations in the order of your choice.
1 Press (SOURCE) repeatedly to select the tuner.
2 Press (MODE) repeatedly to select the band.
3 Press either side of (SEEK/AMS) to tune in the station that you want to store on the number button.
4 Press and hold the desired number button (1 to 6) until "MEM" appears. The number button indication appears in the display.
Note
If you try to store another station on the same number button, the previously stored station will be erased.
Receiving the memorised stations
1 Press (SOURCE) repeatedly to select the tuner.
2 Press MODE repeatedly to select the band.
3 Press the number button (1 to 6) on which the desired station is stored.
Tip
Press either side of (DISC/PRST) to receive the stations in the order they are stored in the memory (Preset Search Function).
If you cannot tune in a preset station
Press either side of (SEEK/AMS) to search for the station (automatic tuning).
Scanning stops when the unit receives a station. Press either side of (SEEK/AMS) repeatedly until the desired station is received.
Note
If the automatic tuning stops too frequently, press (MENU), then press either side of DISC/PRST repeatedly until "Local" (local seek mode) is displayed. Then press (+) side of SEEK/AMS to select "Local on." Press ENTER. Only the stations with relatively strong signals will be tuned in.
Tips
- When you select the "Local on" setting, "LCL Seek" appears while the unit is searching for a station.
- If you know the frequency of the station you want to listen to, press and hold either side of (SEEK/AMS) until the desired frequency appears (manual tuning).
If FM stereo reception is poor
— Monaural Mode
1 During radio reception, press (MENU), then press either side of (DISC/PRST) repeatedly until "Mono" appears.
2 Press (+) side of (SEEK/AMS) until "Mono on" appears.
The sound improves, but becomes monaural ("ST" disappears).
3 Press ENTER.
To return to normal mode, select "Mono off" in step 2 above.
Overview of the RDS function
Radio Data System (RDS) is a broadcasting service that allows FM stations to send additional digital information along with the regular radio programme signal. Your car stereo offers you a variety of services. Here are just a few: returning the same programme automatically, listening to traffic announcements, and locating a station by programme type.
Notes
- Depending on the country or region, not all of the RDS functions are available.
- RDS may not work properly if the signal strength is weak or if the station you are tuned to is not transmitting RDS data.
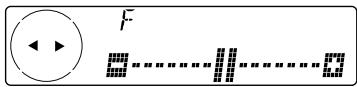
Displaying the station name
The name of the current station lights up in the display.
Select an FM station (page 18).
When you tune in an FM station that transmits RDS data, the station name appears in the display.
F11
BBC R1
Note
The **indication means that an RDS station is being received.
Changing the displayed item
Each time you press DSPL/PTY, the item changes as follows:
Station Name (Frequency) Programme type
Tip
The Motion Display mode can be turned off. (See "Changing the sound and display settings" on page 37.)
Retuning the same programme automatically
Alternative Frequencies (AF)
The Alternative Frequencies (AF) function automatically selects and retunes the station with the strongest signal in a network. By using this function, you can continuously listen to the same programme during a long-distance drive without having to retune the station manually.
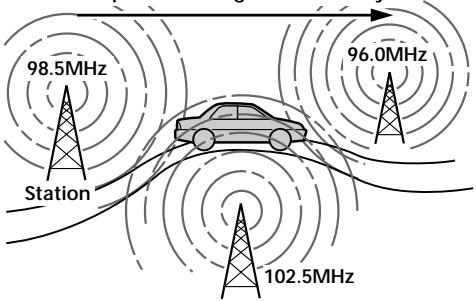
-Frequencies change automatically.
1 Select an FM station (page 18).
2 Press AF repeatedly until "AF on" appears.
The unit starts searching for an alternative station with a stronger signal in the same network.
Note
When there is no alternative station in the area and you do not need to search for an alternative station, turn the AF function off by pressing (AF) repeatedly until "AF off" appears.
Changing the display item
Each time you press AF, the item changes as follows:
AF on AF off
Notes
- When "NO AF" and the station name flash alternately, it means that the unit cannot find an alternative station in the network.
- If the station name starts flashing after selecting a station with the AF function on, this indicates that no alternative frequency is available. Press either side of (SEEK/AMS) while the station name is flashing (within eight seconds). The unit starts searching for another frequency with the same PI (Programme Identification) data ("PI Seek" appears and no sound is heard). If the unit cannot find another frequency, "NO PI" appears, and the unit returns to the previously selected frequency.
Listening to a regional programme
The "REG on" (regional on) function lets you stay tuned to a regional programme without being switched to another regional station. (Note that you must turn the AF function on.) The unit is factory preset to "REG on" but if you want to turn off the function, do the following.
1 During radio reception, press (MENU), then press either side of (DISC/PRST) repeatedly until "REG" appears.
2 Press (+) side of (SEEK/AMS) until "REG off" appears.
3 Press ENTER.
Note that selecting "REG off" might cause the unit to switch to another regional station within the same network.
To return to regional on, select "REG on" in step 2 above.
Note
This function does not work in the United Kingdom and in some other areas.
Local link function (United Kingdom only)
The Local Link function lets you select other local stations in the area, even if they are not stored on your number buttons.
1 Press a number button (① to ⑥) that has a local station stored on it.
2 Within five seconds, press the number button of the local station again.
3 Repeat this procedure until the desired local station is received.
Listening to traffic announcements
The Traffic Announcement (TA) and Traffic Programme (TP) data let you automatically tune in an FM station that is broadcasting traffic announcements even if you are listening to other programme sources.
Press TA repeatedly until "TA on" appears.
The unit starts searching for traffic information stations. "TP" appears in the display when the unit finds a station broadcasting traffic announcements. When the traffic announcement starts, "TA" flashes. The flashing stops when the traffic announcement is over.
Tip If the traffic announcement starts while you are listening to another programme source, the unit automatically switches to the announcement and goes back to the original source when the announcement is over.
Note "NO TP" flashes for five seconds if the received station does not broadcast traffic announcements. Then, the unit starts searching for a station that broadcasts it.
To cancel the current traffic announcement
Press TA. To cancel all traffic announcements, turn off the function by pressing TA until "TA off" appears.
Preseting the volume of traffic announcements
You can preset the volume level of the traffic announcements beforehand so you won't miss the announcement. When a traffic announcement starts, the volume will be automatically adjusted to the preset level.
1 Select the desired volume level.
2 Press for two seconds. "TA" appears and the setting is stored.
Receiving emergency announcements
If an emergency announcement comes in while you are listening to the radio, the programme will be automatically switched to it. If you are listening to a source other than the radio, the emergency announcements will be heard if you set AF or TA to on. The unit will then automatically switch to these announcements no matter which source you are listening to at the time.
Presetting the RDS stations with the AF and TA data
When you preset RDS stations, the unit stores each station's data as well as its frequency, so you don't have to turn on the AF or TA function every time you tune in the preset station. You can select a different setting (AF, TA, or both) for individual preset stations, or the same setting for all preset stations.
Presetting the same setting for all preset stations
1 Select an FM band (page 18).
2 Press AF and/or TA to select "AF on" and/or "TA on." Note that selecting "AF off" or "TA off" stores not only RDS stations, but also non-RDS stations.
3 Press (MENU), then press either side of DISC/PRST repeatedly until "BTM" appears.
4 Press (+) side of (SEEK/AMS) until "BTM" flashes.
5 Press ENTER.
Presetting different settings for each preset station
1 Select an FM band, and tune in the desired station (page 18).
2 Press () and/or () to select "AF on" and/or "TA on."
3 Press the desired number button (① to ⑥) until "MEM" appears. Repeat from step 1 to preset other stations.
Tip
If you want to change the preset AF and/or TA setting after you tuned the preset station, you can do so by turning the AF or TA function on or off.
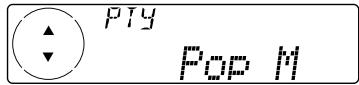
Locating a station by programme type
You can locate the station you want by selecting one of the programme types shown below.
| Programme types | Display |
| News | News |
| Current Affairs | Affairs |
| Information | Info |
| Sports | Sport |
| Education | Educate |
| Drama | Drama |
| Culture | Culture |
| Science | Science |
| Varied | Varied |
| Popular Music | Pop M |
| Rock Music | Rock M |
| Easy Listening | Easy M |
| Light Classical | Light M |
| Classical | Classics |
| Other Music Type | Other M |
| Weather | Weather |
| Finance | Finance |
| Children's Programmes | Children |
| Social Affairs | Social A |
| Religion | Religion |
| Phone In | Phone In |
| Travel | Travel |
| Leisure | Leisure |
| Jazz Music | Jazz |
| Country Music | Country |
| National Music | Nation M |
| Oldies Music | Oldies |
| Folk Music | Folk M |
| Documentary | Document |
| Not specified | None |
Note
You cannot use this function in some countries where no PTY (Programme Type selection) data is available.
1 Press (DSPL/PTY) during FM reception until "PTY" appears.
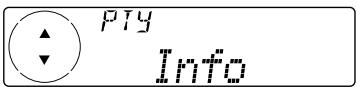
The current programme type name appears if the station is transmitting the PTY data. "---" appears if the received station is not an RDS station, or if the RDS data has not been received.
2 Press DISC/PRST repeatedly until the desired programme type appears. The programme types appear in the order shown in the table. Note that you cannot select "None" (Not specified) for searching.
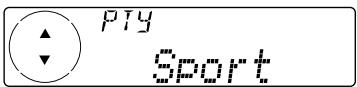
3 Press ENTER.
The unit starts searching for a station broadcasting the selected programme type. When the unit finds the programme, the programme type appears again for five seconds.
"NO" and the programme type appear alternately for five seconds if the unit cannot find the programme type. It then returns to the previously selected station.
Setting the clock automatically
The CT (Clock Time) data from the RDS transmission sets the clock automatically.
1 During radio reception, press (MENU), then press either side of (DISC/PRST) repeatedly until "CT" appears.
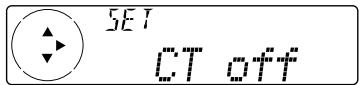
2 Press (+) side of (SEEK/AMS) repeatedly until "CT on" appears. The clock is set.

3 Press ENTER to return to the normal display.
To cancel the CT function
Select "CT off" in step 2 above.
Notes
- The CT function may not work even though an RDS station is being received.
- There might be a difference between the time set by the CT function and the actual time.
Overview of DAB
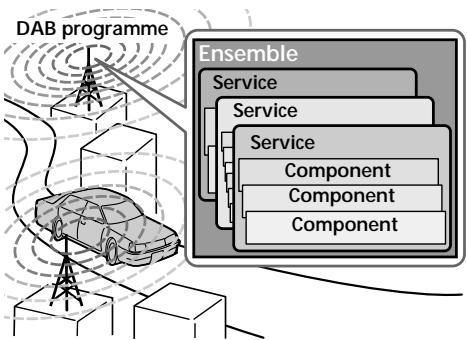
DAB (Digital Audio Broadcasting) is a new multimedia broadcasting system that transmits audio programmes with a quality comparable to that of CDs. This is made possible by the use of a microcomputer in the DAB tuner which uses the radio signals sent from multiple aerials and multi-path signals (reflected radio waves) to boost the strength of the main signal. This makes DAB almost immune to radio interference even in a moving object such as a car.
Each DAB station bundles radio programmes (services) into an ensemble which it then broadcasts. Each service contains one or more components. All ensembles, services, and components are identified by name, so you can access any of them without having to know their frequencies.
Notes
- The DAB system is actually in a testing phase. This means some services have not been sufficiently defined or are presently being tested. At present, such services are not supported by the optional DAB tuner unit XT-100DAB.
- DAB programmes are broadcast in Band-III (174 to 240 MHz) and L-Band (1,452 to 1,492 MHz), with each band divided into channels (41 in Band-III and 23 in L-Band). One ensemble is broadcast per channel by each DAB station.
Basic operations of DAB
Searching for the Ensemble and Service
Automatic Tuning
1 Press (SOURCE) repeatedly to select the tuner.
2 Press MODE repeatedly to select "DAB."
3 Press and hold either side of (SEEK/AMS) until "Seek +" or "Seek -" appears.

4 Press either side of (SEEK/AMS) to search the desired service.
Note
The "indication flashes while the unit is searching the Ensemble.
Selecting the Ensemble
— Manual Tuning
If you know the channel number of Ensemble, follow the procedure below to tune in.
1 Press (SOURCE) repeatedly to select the tuner.
2 Press MODE repeatedly to select "DAB."
3 Press either side of DISC/PRST until "Ch. XXX" appears.

4 Press either side of DISC/PRST repeatedly until the desired channel number appears.
Tip
More than one channel broadcast the same Ensemble.
Receiving the memorised services
Following procedure is available after presetting the service. For details on presetting the services, refer to "Presetting DAB services automatically," and "Presetting DAB services manually" (page27).
1 Press (SOURCE) repeatedly to select the tuner.
2 Press MODE repeatedly to select "DAB."
3 Press either side of DISC/PRST repeatedly to select the preset service.
Tip
There is another way to receive the preset service. Press number buttons (① to ⑥) on which the desired service is stored.
Presetting DAB services automatically - BTM
The BTM (Best Tuning Memory) function picks out DAB ensembles and automatically assigns the services within the ensembles to preset service numbers. The unit can preset up to 40 services. If services have been previously set, the BTM function operates under the following conditions:
- If you activate the BTM function while listening to a preset service, the unit will store detected services (by overwriting) only to preset numbers higher than that of the current present service.
- If you activate the function while listening to a service that is not preset, the unit will replace the contents of all preset numbers.
- In both cases above, if the unit detects a service that is identical to one already preset, the previously stored service remains unchanged and the newly detected service is not preset.
1 While listening to a DAB programme, press (MENU).
2 Press either side of DISC/PRST repeatedly until "BTM" appears.
3 Press ENTER.
A beep sounds when the service is stored. After activating the BTM function, the unit tunes the service assigned in the preset memory 1 automatically.
Note
If the unit can only tune in a few services, the BTM function may not assign services to all the preset service numbers.
Presetting DAB services manually — Manual Preset Memory
You can also preset DAB services manually or delete a service which is already preset. Note that up to 40 services (preset either by the BTM function or manually) can be preset to the unit's memory.
1 While listening to a DAB programme, press (MENU).
2 Press either side of DISC/PRST repeatedly until "PresetEdit" appears, then press ENTER.
3 Select the service and the preset number you want to preset.
Press either side of (SEEK/AMS) to select the service.

Press either side of DISC/PRST to select the preset number.

3 Press ENTER
4 Press either side of DISC/PRST to select "Over Wrt."
Each time you press (-) side of DISC/PRST, the edit command changes as follows:
Over Wrt Insert* Delete Over Wrt
- "Insert" does not appear if the maximum number of services (40) is already preset in memory.
To preset other services, repeat steps 3 and 4.
5 Press ENTER.
Replacing the services in preset memories
Press either side of DISC/PRST to select "Over Wrt" in step 4, then press ENTER.
Adding the services in preset memories
Press either side of DISC/PRST to select "Insert" in step 4, then press ENTER.
Erasing the services in preset memories
Press either side of DISC/PRST to select "Delete" in step 4, then press ENTER.
Tip There is another way to preset the service. After receiving the service, press the number button (1) to (6) until a beep sounds.
Listening to a DAB programme
Follow the procedure below to tune in a DAB programme manually.
You can also store DAB services in the unit's memory for instant tuning (see “Presetting
DAB services automatically" on page 26).
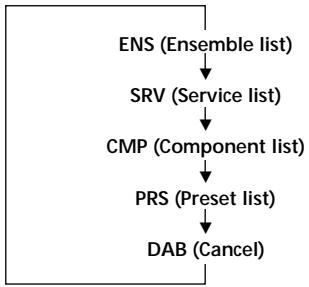
1 While listening to a DAB programme, press LIST repeatedly until the Ensemble List appears.
2 Press either side of DISC/PRST until the desired ensemble appears, then press ENTER.
3 Press LIST repeatedly to until the Service List appears.
4 Press either side of DISC/PRST repeatedly until the desired service appears, then press ENTER.
5 Press LIST repeatedly until the Component List appears.
6 Press either side of DISC/PRST until the desired component appears, then press ENTER.
Tip
To check the name of the current component, ensemble or service, press LIST repeatedly until the respective list appears in the display. The name of the currently selected item flashes.
Changing the display item
When you press LIST once, the list selected last time appears.
Each time you press LIST, the list changes as follows:
Automatic updating of the ensemble list
When you perform the BTM function for the first time, all the ensembles available in your area are automatically stored. When you perform the BTM function again, the contents of these lists are updated in accordance with the conditions described on page 26.
An ensemble is added to the respective list when it is received during Automatic Tuning or Manual Tuning but is unlisted.
An ensemble is also deleted from the respective list when:
- you select an ensemble from the list, but it cannot be received.
- you perform Automatic Tuning or Manual Tuning to receive a listed ensemble, service, or the component, but it cannot be received.
Settings on the audio reception
DAB can contain multi-channel audio. You can select main or sub-channel for reception. Also, if you turn on the DRC (Dynamic Range
Control) function, the dynamic range on the service which supports DRC can automatically be extended.
The following items can be set:
- Main/Sub - to selects channel between "Main" (main-channel) and "Sub" (sub-channel).
- DRC - to turn on or off the function.
1 While listening to a DAB programme, press (MENU).
2 Press either side of DISC/PRST repeatedly until "DRC" or "Main (or Sub)" appears.
3 Press either side of (SEEK/AMS) to select the desired setting (Example: "on" or "off").
4 Press ENTER.
Note
"Main (or Sub)" appears in the menu only when the unit is receiving a multi-channel programme.
Locating a DAB service by programme type (PTY)
You can use the PTY (Programme type selection) function to tune in the programme you want.
1 While listening to a DAB programme, press DSPL/PTY.
2 Press either side of DISC/PRST repeatedly to select the programme type.
The programme types appear in the order shown on the page 23.
3 Press ENTER
Setting the equalizer
You can select an equalizer curve for five music types (Rock, Vocal, Groove, Techno, and Custom).
You can store and adjust the equalizer settings for frequency and level.
Selecting the equalizer curve
1 Press SOURCE to select a source (tuner, CD, or MD).
2 Press (SOUND) repeatedly until "EQ" appears.
Each time you press (SOUND), the item changes as follows.
EQ (equalizer curve) POS (listening position)
BAL(right-left) F(front speaker volume)
(rear speaker volume)
SUB (subwoofer volume) VOL (volume)
EQ (equalizer curve)

3 Press either side of (SEEK/AMS) to select the desired equalizer curve.
Each time you press (SEEK/AMS), the item changes as follows.
Rock Vocal Groove Techno
Custom off Rock
To cancel the equalizing effect, select "off." After three seconds, the display returns to the normal playback mode.
Adjusting the equalizer curve
1 Press (MENU).
2 Press either side of DISC/PRST repeatedly until "EQ Tune" appears, then press ENTER.
3 Press either side of (SEEK/AMS) to select the desired equalizer curve, then press ENTER.
Each time you press (SEEK/AMS), the item changes as follows.
Rock Vocal Groove Techno Custom off Rock
4 Select the desired frequency and level.
Press either side of SEEK/AMS to select the desired frequency.
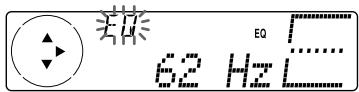
Each time you press (SEEK/AMS), the frequency changes as follows:
62Hz 157Hz 396Hz 1.0kHz 2.5kHz 6.3kHz 16.0kHz
Press either side of DISC/PRST to adjust the desired volume level.
The volume is adjustable by 1 dB steps from -12dB to +12dB .
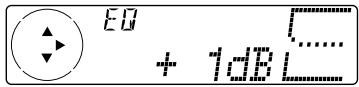
To restore the factory-set equalizer curve, press ENTER for two seconds.
5 Press (MENU) twice.
When the effect setting is complete, the normal playback mode appears.
Selecting the listening position
You can set a delayed time for the sound to reach the listeners from the speakers. In this way, the unit can simulate a natural sound field so that you feel as if you are in the centre of the sound field no matter where you sit in the car.
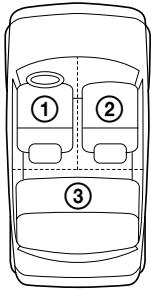
| Display window | Centre of sound field |
| POS All | Normal setting (① + ② + ③) |
| POS Front | Front part (① + ②) |
| POS Front-R | Right front (②) |
| POS Front-L | Left front (①) |
| POS Rear | Rear part (③) |
| POS off | Cancel |
1 Press SOURCE to select a source (tuner, CD, or MD).
2 Press (SOUND) repeatedly until "POS" appears.

3 Press either side of (SEEK/AMS) to select the desired listening position. Each time you press (SEEK/AMS), the item changes as follows.
All Front Front-R Front-L Rear off All
To cancel the POS mode, select "off." After three seconds, the display returns to the normal playback mode.
Selecting a soundstagedue menu
Dynamic Soundstage Organizer (DSO)
If your speakers are installed into the lower part of the doors, the sound will come from below and may not be clear.
The DSO (Dynamic Soundstage Organizer) function creates a more ambient sound as if there were speakers in the dashboard (virtual speakers).
Soundstage menu
| Memory presets Meaning | |
| DSO 1, 2, and 3 | Virtual speakers (Standard) |
| Wide | Virtual speakers (Wide) |
| off | Cancel |
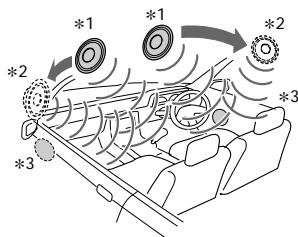
Image of virtual speakers
1 Standard
2 Wide
*3 Acutual speakers position (lower part of the front doors).
Selecting the DSO
1 Press SOURCE to select a source (tuner, CD, or MD).
2 Press repeatedly to select the desired DSO mode. Each time you press , the mode changes as follows.

To cancel the DSO mode, select "off." After three seconds, the display returns to the normal playback mode.
Adjusting the balance (BAL)
You can adjust the sound balance from the left and right speakers.
1 Press SOURCE to select a source (tuner, CD, or MD).
2 Press (SOUND) repeatedly until "BAL" appears.

3 Press either side of (SEEK/AMS) to adjust the balance.
After three seconds, the display returns to the normal playback mode.
Adjusting the front and rear fader
1 Press SOURCE to select a source (tuner, CD, or MD).
2 Press (SOUND) repeatedly until "F" for the front speakers or "R" for the rear speakers appears.
3 Press either side of (SEEK/AMS) to adjust the volume of front/rear speakers.
4 Press (MENU) twice.
After three seconds, the display returns to the normal playback mode.
Adjusting the cut-off frequency and the output volume level for the front/rear speakers
To match the characteristics of the installed speaker system, you can adjust the output volume level and the cut-off frequency of the speakers.
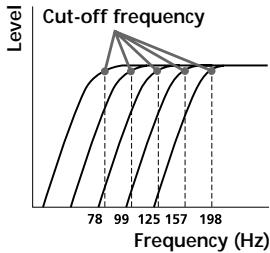
1 Press (MENU).
2 Press either side of DISC/PRST repeatedly until "Front HPF" or "Rear HPF" appears, then press ENTER.
3 Select the desired frequency and level.
Press either side of (SEEK/AMS) to select the cut-off frequency.
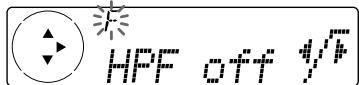
Each time you press (SEEK/AMS), the frequency changes as follows:
$$ \begin{array}{l} \text {o f f} \leftrightarrow 7 8 \mathrm {H z} \leftrightarrow 9 9 \mathrm {H z} \leftrightarrow 1 2 5 \mathrm {H z} \leftrightarrow \ 1 5 7 \mathrm {H z} \leftrightarrow 1 9 8 \mathrm {H z} \end{array} $$
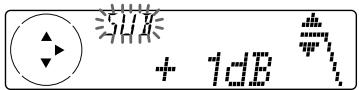
Press either side of DISC/PRST to adjust the volume level. The volume is adjustable by 1 dB ste from -12dB to +12dB
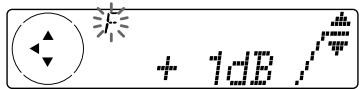
4 Press (MENU) twice.
When the effect setting is complete, the normal playback mode appears.
Tip
When you lower the volume all the way down, "ATT" appears and the cut-off frequency is disabled.
Adjusting the volume of the subwoofer(s)
1 Press SOURCE to select a source (tuner, CD, or MD).
2 Press (SOUND) repeatedly until "SUB" appears.

3 Press either side of (SEEK/AMS) to adjust the volume level.
4 Press (MENU) twice.
After three seconds, the display returns to the normal playback mode.
Tip
When you lower the volume all the way down, "Sub ATT" appears and the cut-off frequency of the subwoofer is disabled.
Adjusting the frequency of the subwoofer(s)
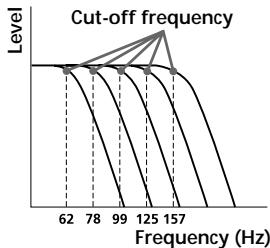
To match the characteristics of the connected subwoofer(s), you can cut out the unwanted high and middle frequency signals entering the subwoofer(s). By setting the cut-off frequency (see the diagram below), the subwoofer(s) will output only low frequency signals so you can get a clearer sound image.
1 Press MENU.
2 Press either side of DISC/PRST repeatedly until "SUB LPF" appears, then press ENTER.
continue to next page
3 Select the desired frequency and level.
Press either side of SEEK/AMS to select the desired frequency.
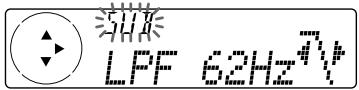
Each time you press (SEEK/AMS), the frequency changes as follows:
$$ \begin{array}{l} 6 2 \mathrm {H z} \leftrightarrow 7 8 \mathrm {H z} \leftrightarrow 9 9 \mathrm {H z} \leftrightarrow 1 2 5 \mathrm {H z} \leftrightarrow \ 1 5 7 \mathrm {H z} \leftrightarrow \text {o f f} \end{array} $$
Press either side of DISC/PRST to adjust the desired volume level. The volume is adjustable by 1 dB steps from -12 dB to +12 dB.
4 Press (MENU) twice.
After the frequency setting is complete, the display returns to the normal playback mode.
Listening to each programme source in its registered DSO
Source Sound Memory (SSM)
Each time you return to the same source, you can hear the same DSO menu and equalizer curve registered for that source, even after changing the programme source or turning the unit off and then on again.
Selecting the spectrum analyzer
The sound signal level is displayed on a spectrum analyzer. You can select a display pattern from 1 to 6, or the automatic display mode.
| Mode | Display patterns |
| SA 1 | |
| SA 2 | |
| SA 3 | |
| SA 4 | |
| SA 5 | |
| SA 6 | |
| off | Cancel |
| SA Auto | All of these display patterns appear one by one automatically. |
1 Press SOURCE to select a source (tuner, CD, or MD).
2 Press (MENU).
3 Press either side of DISC/PRST repeatedly until "SA" appears.
4 Press (+) side of (SEEK/AMS) repeatedly to select the desired setting. Each time you press (+) side of (SEEK/AMS), the setting changes as follows:

5 Press ENTER.
Other Functions
You can also control this unit with the rotary commander (option).
Labelling the rotary commander
Depending on how you mount the rotary commander, attach the appropriate label as shown in the illustration below.
Using the rotary commander
The rotary commander works by pressing buttons and/or rotating controls.
You can also control an optional CD/MD unit with the rotary commander.
By pressing buttons (the SOURCE and MODE buttons)
Each time you press SOURCE, the source changes as follows:
$$ \text {T u n e r} \rightarrow \mathrm {C D} ^ {} \rightarrow \mathrm {M D} ^ {} $$
- If the corresponding optional equipment is not connected, this item will not appear.
Pressing MODE changes the operation in the following ways:
Tuner: FM1 FM2 FM3 MW LW DAB
- CD unit: CD1 → CD2 → ...
- MD unit*: MD1 → MD2 → ...
- If the corresponding optional equipment is not connected, the item will not appear.
By rotating the control (the SEEK/AMS control)

Rotate the control momentarily and release it to:
- Locate a specific track on a disc. Rotate and hold the control until you locate the specific point in a track, then release it to start playback.
- Tune in stations automatically. Rotate and hold the control to find a specific station.
By pushing in and rotating the control (the PRESET/DISC control)
Push in and rotate the control to:
- Receive the stations memorised on the number buttons.
- Change the disc.
Other operations
Rotate the VOL control to adjust the volume.
Tip If your car has no ACC (accessory) position on the ignition key switch, be sure to press OFF for two seconds to turn off the clock indication after turning off the engine.
Changing the operative direction
The operative direction of controls is factory-set as shown below.
If you need to mount the rotary commander on the right hand side of the steering column, you can reverse the operative direction.
Press (SOUND) for two seconds while pushing the VOL control.
Tip You can also change the operative direction of these controls with the unit (see "Changing the sound and display settings").
Attenuating the sound
Press ATT on the rotary commander or the card remote commander. "ATT on" flashes momentarily.
To restore the previous volume level, press ATT again.
Tip
When the interface cable of a car telephone is connected to the ATT lead, the unit decreases the volume automatically when a telephone call comes in (Telephone ATT function).
Changing the sound and display settings
The following items can be set:
SET
Clock (page 9)
- CT (Clock Time) (page 24)
- Beep - to turn on or off the beeps.
- RM (Rotary Commander) - to change the operative direction of the controls of the rotary commander.
- Select "norm" to use the rotary commander as the factory-set position.
-
Select "rev" when you mount the rotary commander on the right side of the steering column.
-
Multi language (language selection) - to change the display language to English, Spanish, Portuguese, or Swedish.
DIS
- D.Info (Dual Information) - to display the clock and the play mode at the same time (on) or to display the information alternately (off).
- Amber/Green* - to change the illumination colour to amber or green.
- SA (Spectrum Analyzer) - to change the display pattern of the equalizer display.
-
Dimmer - to change the brightness of the display.
-
Select "Auto" to dim the display only when you turn the lights on.
- Select "on" to dim the display.
-
Select "off" to deactivate Dimmer.
-
Contrast - to adjust the contrast if the indications in the display are not recognisable because of the unit's installed position.
-
M.Dspl (Motion display) - to turn the motion display to 1, 2, or off.
A.Scrl (Auto Scroll) (page 13) -
CDX-C8000R/MDX-C8500R only
SND
- EQ Tune (Equalizer tuning) - to adjust the frequency and volume level of equalizer curve.
- Front HPF (High pass filter for the front pre-output) - to select the cut-off frequency of the front pre-output.
- Rear HPF (High pass filter for the rear pre-output) - to select the cut-off frequency of the rear pre-output.
- SUB LPF (Low pass filter for the subwoofer output) - to select the rcut-off frequency of the subwoofer output.
continue to next page
1 Press (MENU).
2 Press either side of DISC/PRST repeatedly until the desired item appears. Each time you press (-) side of DISC/PRST, the item changes as follows:
Example:
Clock CT Beep RM Multi language D.Info SA Dimmer Contrast A.Scrl M.Dspl Local Mono EQ Tune Front HPF Rear HPF SUB LPF Name Edit NameDel BTM
Note
The displayed item will differ depending on the source.
Tip
You can easily switch among categories ("SET", "DIS", "P/M", "SND" and "EDT") by pressing and holding either side of DISC/PRST for two seconds.
3 Press either side of (SEEK/AMS) to select the desired setting (Example: "on" or "off").
4 Press ENTER.
After the mode setting is complete, the display returns to normal playback mode.
Additional Information
Maintenance
Fuse replacement
When replacing the fuse, be sure to use one matching the amperage rating stated on the original fuse. If the fuse blows, check the power connection and replace the fuse. If the fuse blows again after replacement, there may be an internal malfunction. In such a case, consult your nearest Sony dealer.
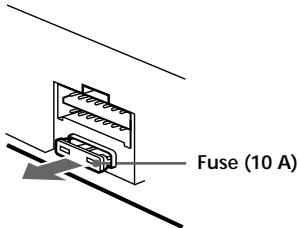
Warning
Never use a fuse with an amperage rating exceeding the one supplied with the unit as this could damage the unit.
Cleaning the connectors
The unit may not function properly if the connectors between the unit and the front panel are not clean. In order to prevent this, open the front panel by pressing (OPEN), then detach it and clean the connectors with a cotton swab dipped in alcohol. Do not apply too much force. Otherwise, the connectors may be damaged.
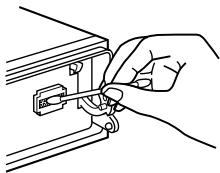
Main unit
Back of the front panel
Notes
- For safety, turn off the engine before cleaning the connectors, and remove the key from the ignition switch.
- Never touch the connectors directly with your fingers or with any metal device.
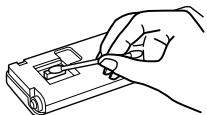
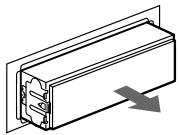
Dismounting the unit
1 Press the clip inside the front cover with a thin screwdriver, and gently pry the front cover free.
2 Repeat step 1 on the left side. The front cover is removed.
3 Use a thin screwdriver to push in the clip on the left side of the unit, then pull out the left side of the unit until the catch clears the mounting.
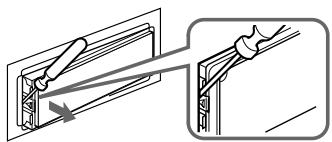
4 Repeat step 3 on the right side.
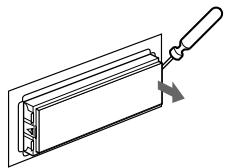
5 Slide the unit out of the mounting.
Specifications
Disc player section
CD player (CDX-C8000RX/CDX-C8000R):
system Compact disc digital audio system
Signal-to-noise ratio 90 dB
Frequency response 10-20,000 Hz
Wow and flutter Below measurable limit
MD player (MDX-C8500R):
Signal-to-noise ratio 90 dB
Frequency response 10-20,000 Hz
Wow and flutter Below measurable limit
Tuner section
FM
Tuning range 87.5 - 108.0 MHz
Aerial terminal External aerial connector
Intermediate frequency 10.7 MHz/450 kHz
Usable sensitivity 8 dBf
Selectivity 75 dB at 400kHz
Signal-to-noise ratio 66 dB (stereo),
72 dB (mono)
Harmonic distortion at 1kHz
0.6% (stereo),
0.3% (mono)
Separation 35 dB at 1kHz
Frequency response 30-15,000 Hz
MW/LW
Tuning range MW:531-1,602kHz
LW:153-279kHz
Aerial terminal External aerial connector
Intermediate frequency 10.7 MHz/450 kHz
Sensitivity MW: 30~ V
LW: 40~ V
Power amplifier section
Outputs Speaker outputs (sure seal connectors)
Speaker impedance 4-8 ohms
Maximum power output 50W× 4 (at 4 ohms)
General
| Outputs | Audio outputs Power aerial relay control lead Power amplifier control lead Telephone ATT control lead |
| Power requirements | 12 V DC car battery (negative ground) |
| Dimensions | Approx. 178 × 50 × 183 mm (w/h/d) |
| Mounting dimensions | Approx. 182 × 53 × 162 mm (w/h/d) |
| Mass | CDX-C8000RX/ CDX-C8000R: Approx. 1.3 kg MDX-C8500R: Approx. 1.2 kg |
| Supplied accessories | Parts for installation and connections (1 set) Front panel case (1) |
| Optional accessories | Card remote commander RM-X91 Rotary commander RM-X4S BUS cable (supplied with an RCA pin cord) RC-61 (1 m), RC-62 (2 m) |
| Optional equipment | Compact disc single adaptor CSA-8 CD changer (10 discs) CDX-828, CDX-737 MD changer (6 discs) MDX-65 Other CD/MD units with the Sony-BUS system Source selector XA-C30 DAB tuner unit XT-100DAB |
U.S. and foreign patents licensed from Dolby laboratories Licensing Corporation.
Design and specifications are subject to change without notice.
Troubleshooting guide
The following checklist will help you remedy the problems you may encounter with your unit. Before going through the checklist below, check the connection and operating procedures.
General
| Problem | Cause/Solution |
| No sound. | ·Cancel the ATT function. ·Set the front or rear fader control to the centre position for two-speaker system. ·Rotate the dial clockwise to adjust the volume. |
| The contents of the memory have been erased. | ·The power cord or battery has been disconnected. ·The reset button has been pressed. →Store again into the memory. |
| Indications do not appear in the display. | Remove the front panel and clean the connectors. See “Cleaning the connectors” (page 39) for details. |
| No beep sound. | The beep sound is cancelled (page 37). |
| The card remote commander does not function. | ·Remove any obstacles blocking the signal path from the card remote commander to the unit. ·Point the card remote commander at the receptor on the unit. |
CD/MD playback
| Problem | Cause/Solution |
| A disc cannot be loaded. | • Another MD is already loaded. • The MD is forcibly inserted upside down or in the wrong way. |
| Playback does not begin. | Defective MD or dirty CD. |
| CD/MD will not be ejected. | You have closed the front panel or pushed the disc forcibly into the unit while the unit was ejecting the disc after you pressed (▲). →Press the reset button to initialize the unit. |
| The operation buttons do not function. | Press the reset button. |
| The sound skips due to vibration. | • CDX-C8000RX/CDX-C8000R: The unit is installed at an angle of more than 60°. MDX-C8500R: The unit is installed at an angle of more than 20°. • The unit is not installed in a sturdy part of the car. |
| The sound skips. | A dirty or defective disc. |
| Cannot turn off the “……” indication. | You cannot label CDs unless you connect a CD unit with the custom file function. →Press LIST for two seconds. |
Radio reception
| Problem | Cause/Solution |
| Preset tuning is not possible. | • Memorise the correct frequency. • The broadcast signal is too weak. |
| Automatic tuning is not possible. | The broadcast signal is too weak. → Use manual tuning. |
| The stations cannot be received. The sound is hampered by noises. | Connect an power aerial control lead (blue) or accessory power supply lead (red) to the power supply lead of a car's aerial booster. (When your car has built-in FM/MW/LW aerial in the rear/ side glass only.) |
| The “ST” indication flashes. | • Tune in the frequency accurately. • The broadcast signal is too weak. → Set to Mono mode (page 19). |
RDS
| Problem | Cause/Solution |
| The SEEK starts after a few seconds of listening. | The station is non-TP or has weak signal. →Press (AF) or (TA) repeatedly until “AF off” or “TA off” appears. |
| No traffic announcements. | • Activate “TA.” • The station does not broadcast any traffic announcements despite being TP. →Tune to another station. |
| PTY displays “None.” | The station does not specify the programme type. |
DSP
| Problem | Cause/Solution |
| No sound, or sound is too low. | The volume of the speakers may have been automatically lowered in order to maximise the effect of the listening position adjustment. →Press either side of (SEEK/AMS) to adjust the balance. The speaker balance can be set separately for DSP on mode and DSP off mode (page 32). |
| The volume level cannot be increased. | The DSO function is activated and all the filters for the volume level are adjusted to +12 dB. |
The following indications will flash for about five seconds, and an alarm sound will be heard.
Error displays (when an optional CD/MD unit is connected)
| Display | Cause | Solution |
| NO Mag | The disc magazine is not inserted in the CD/MD unit. | Insert the magazine in the CD/MD unit. |
| NO Disc | No disc is inserted in the CD/MD unit. | Insert discs in the CD/MD unit. |
| NG Discs | A CD/MD cannot play because of some problem. (A dirty or defective disc.) | Insert another CD/MD. |
| Error | A CD is dirty or inserted upside down.* | Clean or insert the CD correctly. |
| An MD does not playback because of some problem.* | Insert another MD. | |
| Blank | No tracks have been recorded on an MD.* | Play an MD with recorded tracks on it. |
| Push Reset | The CD/MD unit cannot be operated because of some problem. | Press the reset button on the unit. |
| Not Ready | The lid of the MD unit is open or the MDs are not inserted properly. | Close the lid or insert the MDs properly. |
- The disc number of the disc causing the error appears in the display.
If the above-mentioned solutions do not help improve the situation, consult your nearest Sony dealer.
;Bienvenido!
1 Dial de control de volumen
Boton MENU 9, 13, 15, 16, 17, 18, 19, 21, 23, 24, 26, 27, 29, 30, 32, 33, 34, 38
3 Botón DISC/PRST +/- (cursor arriba/ abajo) 9, 13, 15, 16, 17, 18, 19, 21, 23, 24, 26, 27, 29, 30, 32, 33, 34, 38
14 Botón SEEK/AMS +/- (cursor izquierda/ derecha) 9, 13, 15, 17, 19, 21, 23, 24, 25, 29, 30, 31, 32, 33, 34, 38
Busqueda 17, 18, 19, 25, 27
15 Botón ENTER 9, 10, 13, 15, 16, 17, 18, 19, 21, 23, 24, 26, 27, 28, 29, 30, 32, 33, 34
16 Botón MODE
Durante la recepción de la radio: Señeción de banda (BAND) 18, 19, 22, 25
CAUTION—INVISIBLE LASER RADIATION WHEN OPEN
DO NOT STARE INTO BEAM OR
VIEW DIRECTLY WITH OPTICAL INSTRUMENTS
Den har etiketten finner du pa enchetens interna chassi (endast CDX-C8000RX/ C8000R).
Stalla in equalizern 30
1 Volymkontroll
2 MENU-knapp 9, 13, 15, 16, 17, 18, 19, 21, 23, 24, 26, 27, 29, 30, 32, 33, 34, 38
DISC/PRST + / - (markorupp/ned)knapp 9,13,15,16,17,18,19,21,23,24,26 27,29,30,32,33,34,38
Under radiomottagning: Val av forinstalda kanaler 19,25,26,27
Satta fast frontpanelen
Soka after foregående skivor
Soka after afterfoljande skivor
Stalla in equalizern
"ATT on" blinkar till.
Rotary commander RM-X4S
Regular o balanco (BAL) 32
Regular o fader 32
Regular o volume de som do(s) altifalante(s) secundario(s) de graves 33
1 Botão de controlo do volume
2 Tecla MENU 9, 13, 15, 16, 17, 18, 19, 21, 23, 24, 26, 27, 29, 30, 32, 33, 34, 38
3 Teclas DISC/PRST +/- (mover cursor para cima/baixo) 9, 13, 15, 16, 17, 18, 19, 21, 23, 24, 26, 27, 29, 30, 32, 33, 34, 38
Colocar o paine frontal
2 Carregue no lado (+) de (SEEK/AMS)进驻 in the area, where you can find a lot of shops.
Displaying the disc memo
Regular o balanco (BAL)
Distortion harmonica a 1 kHz
0,6% (estereo),
0,3% (mono)
Separação
35 dB a 1 kHz
Cabo BUS (fornecido com
um cabo de pinos RCA)
RC-61 (1m) , RC-62 (2m)
Equipamento optional
Adaptador para
CD single CSA-8
Permutador de CDs
(10 discos)
CDX-828, CDX-737
Permutador de MDs
(6 discos)
MDX-65
MD com oSYSTEMa Sony
BUS
Selector de fonte
XA-C30
Sintonizador DAB
XT-100DAB
Patentes dos E.U.A. e estrangeiras licenciadas da Dolby Laboratories Licensing Corporation.
He noDBepraiTE MD BO3dEiCTBnIO npMOrO
COIHeHORO CBeta IIN NCTOCHIKOB TEJIa,
TakIX, KaK OboRpeBaTeI IN BO3dyXa. He
OCTaBnIte MD B aBTOMo6Hne,
3anapKObaHHom Ha COIIHcEneKe, rDe MOKet
PpON30HTN 3HaauNTbHoe NOBbIeHne
TEMnepaTypbl.
He ocTabIyTe MD ha npnbopHoi DoCKe nnHa nOJIke 3a 3aDHmCtEKJOM aBTOMo6nla, rDe OHI TaKKe MOrT POnBepHyTbcnpeBy.

OHaKlenBaHmN 3TNKeTOK
CTapaTecb npaBnIbHO HaKJIeNbTaB 3tIKeTKn Ha KapTpIdXn, NocOJIbKy B npOTNBHom cIyae MD moryT 3acTeBaTaB b annapate.
- HaKJIeBaIte 3TnIkeTky B npEynCMOTpeHHOM dIg 3TOrMoCte.
- ChmMaTe CstapbIe 3TNKeTkn, npExJde Yem
- pNkJIeNBaTb HOBbie.
- Chmajte cTapbIe 3TnKeTkn, KaK TOnJIbKO OHN HaunHaiOT OKJEnBaTbcr OT MD.
OuNTKa MHHI-DNCKOB
BpMa OT BpEmHn IpOTpaIte NOBepxHocTb KapTpIaKa MD cyXoMrrKoT prNoOko.

Copepkanme
PacnoJoxHeOpraHOBynpaBLeHn6
HaayabHbIe onepaun
IpeyectaHObKa npametpoB annapaTa ....8
ChraTne npepdne naheN 8
BkIIOueHne/BbIKIOueHne annpapaTa 9
KaK nOJIb3OBaTbcr MeHIO 9
YcTaHOBka YacOB 9
CD/MD
PocnyuBaHne CD-KacaetcTOnbKO MoJeen CDX-C8000RX/ CDX-C8000R 10
Bocnpo3BeDeHne CD nIM MD (cIcNpOJIb3OBAHnEM dOnOpJHnTeJIbHOro npOIRpbBaTeJIa CD/MD) 12
15 KlaBnua ENTER 9, 10, 13, 15, 16, 17, 18, 19, 21, 23, 24, 26, 27, 28, 29, 30, 32, 33, 34
16 KnaBnua MODE
Pnp npneMe paHnopepea: BbI6Op dHaana30Ha (BAND) 18,19,22,25
Pnp npocnyuBauHH CD/MD: Bbl6Op npOnrpbBaTeJIa CD/MD 12,16
17 CeHcOp dIJI npHeMa CnHana OT 6ecIpoBODHorO nylbTa DnCTaHUnOHHO ynpabJeHHA
18 HoomepHbIe KJIaBnIu
Pnp npneMe paJIoNEpeDa: KJIaBNIu C HOMepAMN 3anporpamMnpoBaHHbIX CTaHcNl 18,19,21,26,27
Ppi npocnyuBaHH CD/MD:
① REP (noBtop) 14
② SHUF ("pepeTaCObaHHeo" Bocnpoun3BedeHne) 14
9 Knabuia AF 20, 21, 23
20 KlaBnna TA 22, 23
*PpeoctepexeHne OTHOCHTbHO annapatpybl,ycTaHOBLeHHoB aBTOMObnle,3AMOK 3axnraHnB KOTOPOM He NMeet OTdeIbHoro noIOXeHNs (ACC) dna OTKIOUeHNs NOcEOEINHeHNO annapatpybl. PocJIe BbIKIOueHN DBrAteJH He 3a6bIBaIte HaxaTb Ha DBe cKyHdbI KhONkY OFFHa annapate, C TEM yTO6bI OTKIOUCHNTuΦep6nat Yacob. PInC cnliuKOM kpaTkOM haxaTNI OFF UcΦep6nat HE OTKIOUaETcY, TTo BeJeT K pa3pndke AKKymIaTOpHNo bataen.
PacnoJoxeHne opraHOB ynpabJeHnA
BecnpoBOJHOI npbI dt nIcTaHcUHnHO ynpaBHeHn R M-X91 (npno6peTaETcA dOIOJIHTeJIbHO)
KnaBnHa 6ecnpoBoHOM npIbTe
DnCTaHcUOnHOrO ynpaBLeHnBaBIOJHrOT
Te JxE cyHKuIN, CTO IN COOTBeTCTBYIOUne
KnaBnHa Ha cAMOM pONrPbIBaTeNe.
1 KJIaBnsha OFF
2 Kjabuwa MENU
3 KlaBnua SOURCE
4 KlaBnSSEEK/AMS (Kypcop /
5 KnaBnua SOUND
6 KnaBnsa DSPL/PTY
7 KJIaBnHa ATT
Klajnsha LIST
9 KlaBmUn DISC/PRST (Kypcop /
10 KJIaBnwa ENTER
11 KlaBnsa MODE
12 KlaBnVOL
Iocne BbIKJIOUeHnA anIInapaTa HaxKaTHeM Ha DBe CekyHdbI KJIaBUNI OFF ynpabJIbTbIMC NMOOuIyNbTa dCTaHcUHOHORO ynpaBJeHn MOxHO TOLbKO B TOM cNyae,ecNl ChaHaJa OAnrB BKIOUYtB erO,HaxBaH Ha HeM KJIaBNUI y SOURCE IIN BCTaBIV DnCK.
3aMeHa JInTneBO6aTapeiKn
Korda 6aTapeiKa caIntcra, daIbHoCTb
deIcTBnIe BCnpoBOdHOrO npIbTa
DInCTaHIOHOHOrO ynpaBLeHnR cOKpaUaTeCRA.
3aMeHnTe CEBuYIO 6aTapeKy Ha HOByIO
JIITneBvIO 6aTapeKy CR2025.
CTopoHOH co 3HaKoM + KBepxY
O IintneBoB 6aTapeKe
He nbitaiTecb ee nepe3apAunb nn pa3o6paTb n He 6pocaiTe eB OROHb.
HaujalbHbIe onepaun
IpeyectaHOBKa napameTpob annapaTa
Ipeep nepBIM NcNoJIb3OBAHMe annapaTa
nII nocLe 3aMeHbI aBTOMOBINbHOro
aKkymyIaTopa Bam cneJyET npOn3BecTn
nepeyCTaHOBV KAnoJxEHbIX B NaMrtb
npOnrPbIBaTeNnaPamEtPOB.
ChnMIte nepeHIOU NaHeJI h NaXmITe
KHONKY peyeCTaHOBV N NOMOuBJO
3aoCTpeHHORo ppeDMeta, HApnMpE,
7apIKOBoi pyKn.
KhONka nepeycTaHOBKn
PpmeaHne
PnHaKATNI KHOKNI NpeyeCTaHOBKn IpoONcXoNT CTnPAHNE YCTaHOBNeHHOR No Yaacx BpeMeHNu HEKOTOpbIX dpyrNx 3aHeCEHHbX B nAmTb NapameTpOB.
Сн我不是 поедим панели
BcIeIax IpeoTbpaueHn Kpaxn annapata Bb moKTe cHb T Heo nepeHIO nHaHeIb.
1 Haxmte KnaBnuy (OFF).
2 HaxmTe KJIaBnUy OPEN, cBnHbTe nepeHIOI naHeJIb BnpaBO n CHmTe ee,NotAHyBaCe6IeBbIKpaI.
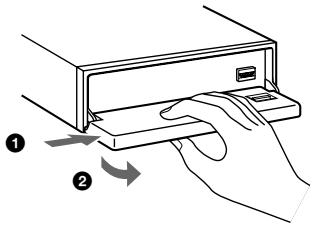
PpimueaHn
He CTabte HnyeTo ha BHTpeHHIO NOBepxHOCTb nepdneHnaneHn.
- CtapaiTeBc Hye npOHTb NpeDIOHO paHEnb npi ee OTOeINENHm OT aanpata.
Ecnbl Chmae Taheh npn BkUohHOM nTaHHO, OHO ABTomuCeCKN OTKIOueCTBO u36exAHNE NOBpeJdHn rPOMKOrOBpTeJIeN.
- EcINBBy yHOCIne nepaHIO paHEnb Cc6oB,TO nOmeTHe ee B npnIraeMb cIeuaJIbHbIy fYTNpR.
UctahOBKa nepeDneH naHeJI
HaJoxnTe OTBepCtne AHa nepeDnei naHeHn Ha 1tBipeK BHa annapaTe, KaN oKa3aHO Ha pncyHke, a 3aTeM BDbInhTe JeByO CTOpOHy BHYtpb.
PpmeuHn
He yctanabnbaTe nepeDIOI naHelb Bepxne CTOPOHBHN3.
-Пи установке панели Н ппжима调解е слишков Сильно К ппогрьвateл.
He naabIwBaIte He HaJzImaIte CnIshKOM CnIbHO Ha OKoIko DNcIIeR, PaCNOJoxEHoe Ha nepeDeHn paHenn.
He noDBepraTte nepeHIOI npHbI npMOMy B03dEeTbNcoLJIeHbIX LyueHmNtOcHnKOB TEPNa, TaKIN, KaK aTOMoBnIbHaN peYka, Hne octabJIte ee BO bLaXHM MeTe. HnKOrJa, Hne octabJIte ee Ha npIbOpHOJ DoCKe aTOMoBnIa, 3anaPkoBaHnO Ho cOnHcIeNeE mNb DpyrInx MecTaX, Ige Bo3MOxHO 3HaUHTelbHOe NOBIISeHne TEMnepaTyPbl.
Ppeynpexkaioi cnHnA
EcIn Bbl, noBepHyB KJIIOU 3aKnIraHnI, nepeBEnI erO B nIoNOXeHne BbIKN, He OTOcEiINHb NpeEHIIO IaHEnb, B TeueHne HeCKoJIbKnx CekyHd 6yJeT CbIWeH cnHaJIbHb3yMMep.
Включен/ Выключене annapata
BkIoueHne annapata
HaKMMTe (SOURCE) IJIN BCTaBbTe DnCK B yCTpoIcTBo. IOnoJIHnTeJIbHbIe CBeJeHnI PO 3KcIIpyatauIM cM. Ha cTp. 10 (CD/MD) n cTp. 18 (PaJIoNpIeMnIK).
BbikloueHne annapata
HaKMMTe OFF),TOOCTaHOBNtB BOCpOn3BeDeHne CD/MD nI npIeM paAnOpPOrpaMM(IOcCBtKa KnaBnU INDnKaZnHa DnCnJIee OCTaOTcA).
HaxmaiTe OFF B TeueHne DByx CekyndIra NOJHOro BbIKNoUeHnAannapaTa.
PpmeaHne
EcnHa3amKe 3axKraHnBaWei MaunHbI HeT noJooHeHHAACC, He 3a6yIbTe BBykKnUHTb AnnapaT hKaatMeEH OFFB TeYeHeN DByX CekYHd BO n36ExAHne pa3pRkn AkkyMylTota.
Kak noJIb30BaTbcr MeHIO
Данныnpогьвateл pa6oTaet npn nOMOuBbIbOpa napaMeTpOB m3 MeHIO. ДЯ BbIbOpa BBeDnTe ChaHaJa peXmM MeHIO, a 3aTEM BbIbepnTe up/down (BBePx/BHN3) (KNaBnWe +/- DISC/PRST), Ии BbIbepnTe left/right (BnEBo/BnpaBo) (KNaBnWe -/+ SEEK/AMS).

DISC/PRST
(+) BbI6opa BBepx
(-):ДЯ BBIbopa Bn3

SEEK/AMS
YcTaHOBKa YacOB
YacbI daHHoro annapaTa IMeHOT 24-YacOByIO INHdNKaUIO.
Приимер: установka чавов на 10:08
1 HaxmTe KlaBnUy (MENu), 3aTem nocJeIOBaTeIbHo HaxmMaIte Ha IIO6yIO CTOpOHy KlaBnUIM DISC/PRST DO IOBHeHnHa DnCpJee HADnncn "Clock".
1 Haxmnte ENTER
Hauhnae MTMaTaB INdNkaTOp Yaca.
HaximMaTeJIIO6yIOCTOPOHyKlaBmU DISC/PRST JIyYCTaHOBKn Yaca.
3 Haxmnte Ha NomeeHHy 3hakom (+) CTOPOHy KnaBnH (SEEK/AMS).
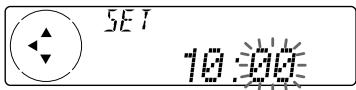
HaunhaeT Mngatb INHnKaTOp MNHyT.
HaximMaTeIIO6yU CTOpOHy KnaBmUs DISC/PRST JIyYCTaHOBKN MHNyTbI.
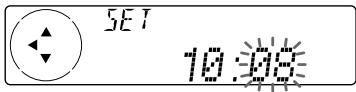
npoDolXeHne Ha cIeMyUoSe CTpaHnue
10:08
Yacbl noJn.
BbMOxKe He ToIbKO npocLyuINBaTb MD c nOMOuH DaHHOro pOnIrpbIBaTeJIa, Ho u ynpaBnTb DOnOHHTeJIbHbIMn npOnIrpbIBaTeJIaMn CD/MD.
EcnnoKluoayTcdoonHnTehBn npOnrpbBaTeb CD c cyHKnei CD TEXT, nHphiopMaun CD TEXT noaBnreTcna DnCnIee BO BpeM BoCnpOu3BeDeHHN KOMnAKT-DnCKa co cTaHapToM CD TEXT.
Bocnpo3BeJeHne CD uJN MD
- KaKne-To ɪn 3 ḤaKOB Ha ðncΠnee He NɔRbTc.
-ФункцЯ Auto Scroll pa6oTaTb He 6yTeT.
HaxoJdHHe HxKHOI DOpOxKn - ABTOMaTueckn My3bIkaJIbHbI ceHcop (AMS)
Bo BpemBocpon3BeDennKpaTko
haxkmaIte Ha IIObOy CTOpOHy
KlaBnH -NO ONDHomy pa3y
Ha KaKdyIO DopoXkKy, KOTOpY IO Bbl
XOTNe IpOnyCTNtB.
Дя HaxoXdEHHa npdeIyuxn dopoxek
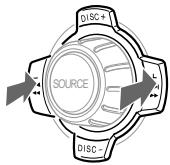
BbMOxKeTe N0Ib3OBAtbc3 TToN cyHKUnei
PnIMeHNTJIbHO K DnCKaM, NOJyUHBuIM
aBTOpCKoe HnIMeHOBaHHe. PIOpO6Hee O
Ha3BaHnIX DnCKOB paCCKa3bIBaetcB Ba3JeE
"PiNCBOEHne Ha3BaHnI CD" (CTp. 15).
1 HaxMnTe (LIST).

* Ecnn COOTBETCTBYUOaJ dONOLHNTbHa
annapatypa He noDKLIOyeHa, 3Ta No3Nua Ha
dncnnee He noBHTcR.
2 NocJeIOBaTeIbHbIM HaXaTHeM KJIaBnIe MODE BbI6epNte Dnana3OH BOJH.
BbMOxKeTe 3aHcTb NpAMrTb Do 18 cTaHcN FM (No 6 cTaHcN Ha KaKdBi n3 NoDnAna3oHOB FM1, FM2 u FM3), Do 6 cTaHcN MW u Do 6 cTaHcN LW B JIO60nOCNeDoBaTeJbHOCTn NO CBOeMy BbIbOpy.
1 NocJeIOBaTeIbHbIM HaKaTneM KJIaBNIU SOURCE Bbl6epNTe B KaueCTBe IcTOUHnKa CnHaJa paAnOpnpemHnK.
2 NocneioBaTeIbHbIM HaxaTHeM KnaBnU W MODE BbI6epnte Dnana3OH BOJH.
3 HaxmHa Ha IIO6yO CTOPOHy KnaBnHn (SEEK/AMS), HAcTpoNTEcB Ha BOJHy CTaHm, KOTOPYo XOTnTe 3aHeCTn B NaMaTb PoD DaHHoH HOMepHOI KNaBnWei.
4 HaxmTe HxHyIO HomepHyIO KlaBnUy (c 1 no 6) n npdoJIkaIte Ha Hee HaxMaTb Do IOBHeHnHa DnCnPlee HaDnsc "MEM".
HaДисплjee 3aropaeTcH Omepe DaHHoN KJIaBnIu.
PpmeaHne
Ecnn Bb3aHocnTe B namrTb HOByo cTaHnIO NOHomePHoN KNaBnIe, 3a KOtOpO yXe 3aKpePnHeApyra CTaHnIy, To MecTo paee 3aHeceHHoB N naMaTb CTaHnIM 3aimet HOBa r cTaHnIy.
B 3aBnCmOCTN O CTpaHbI N peHNoHa MOrY 6bItb DoCTyHbI He BCE fynKUIN RDS.
CnCTema RDS MOKeT He Cpa60TaB DoJnxHbIM oBpA3OM, ECnn NepeDaBaEMb CnHnA CnHbKo CMa 6nn ECnn CTAnu, Ha BOHy KOTOpO Bbl NaCTponNcB, He nepeDaet DaHbX RDS.
Инданкацnia Ha3BaHnA CTaHcN
Ha3BaHne pInHnMaemO B daHHbIMoMeHT CTaHcINBbCBeuHBaEtca Ha DCnPlee.
Bb6epnte ctaunio FM (cm. ctp. 18)
Ecn Bn Hacptponncb Ha ctaunio FM, KOTOPa nepedaet daHbIe RDS, To na3BaHne 3Toi ctaunz 3aIopaeTcna DaicnPee.
F11
BBC R1
PpimeyaHne
Инданаць "..." OзначаET, УTo npинmaetcRсгнад CTанцIN RDS.
U3meHHe nokaahn dncnpea
Пи Кадом Нахати BamкlaВш DNPL/PTY nOKa3aHnДИСПЛЕМЕнIOTcCneДуОшm O6pa3OM:
Ha3BaHne cTaHcunn (Hactota) TUn nporpammbi
-AlbTepeHaTnBhble yacToTbI (AF)
ФункияалытейнвьхчacTOT (AF)
abTomatueckn BbIbnaeT BOLHy c HanboJeCnIbHbIM CngHaJOM B daHHoI
paIoNToPcHcJIaIOHNOHcTeN I nepeHaCTpanBaetcHa Hee. BlaarOapar 3ToI ΦyHKuINb MokTe Bo BPem DaIbHnx NOE3dOK HnpepbIBHO CnyuTaB ONDY N Ty Je npOrpamMy, He NCblTbIBaH Heo6XODmOCTN BrpyHu npeHaCTpanBaTb PnEMMHK c OdHOb BOJIbHa DpyrIy.
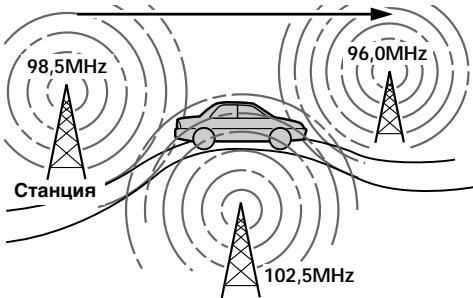
CmeHa yactOT ocUyIeCTBJIaETcABTOMaTHueCKn.
1 BbIepeHte cTaHcHIO FM (cm. cTp. 18).
2 NocJeDoBaTeIbHo HaxImaIte AF Do nOABJIeHnHa DnCnJee HaDnCn "AF on".
Annapat haunhaet nonck pa6oTaUoero Ha aIbTePHaTnBHO B0NHe dpyrOTopeaTnka c 6oJee CnIbHbIM CnHaNOM B3TOJ Xe paNDOTpaHCJIuOHHO CETN.
PpmeaHne
EcnnBaHHom paHone HeT aIbTePHaTHBHO rpeDatUHa Ka EIN BAM HeO6XoIMOCtN erO NcKaTb,OTKIOHTe FyHKuMIO AF nocEIOBAtenbHbIM HAKaTneM KABuMN (AF)do NOBHeHHa HmCnnee HaADNN "AF off".
I3MeHeHne nOKa3aHm DnCnJeA
3aHeceHne B NaMaTb OOnHaKOBbIX yCTaHOBOKДЯ BCex npEdyctaHOBLeHHbIX CTaHcN
1 BbI6epHTe dnaHa3oH FM (cM. cTp. 18).
2 HaxaTneM AF n/nn T A Bbl6epnte "AF on" n/nn "TA on."
Yyntte,TOBcnyaeBb6opaBaMn“AF off"nn“TAoff”BNaMTb3aHOCTcH TeTobkoCTaHcun,TPaHCnpyUOuNe DaHHbIe RDS,HoNdpyrneCTaHcun.
3 HaXMMTe (MENU), 3aTeM nocJeIOBaTeIbHo HaxMMaMeTe Ha IIO6yIO CTOPOHy (DISC/PRST), NOKa Ha dncnJIee He NOBHTcRa HAdnncb "BTM".
4 HaximmaTe Ha NOMEeHHyO 3HaKOM (+) CTOPHY KJIaBnIu (SEEK/AMS), NOKa Ha DIncPiJe He 3amIrGaet HaNIMCb "BTM".
5 HaxMMTe ENTER.
3aHeceHne B nAmrTb pa3JInuHbIX yCTaHOBOK dIJI KAKdoI npDeYcTaHOBJeHHoI CTaHCIN
1 BbI6epnTe dHaana3OH FM n HacTpoiTecb Ha HyxHyIO Bam cTaHcNIO (CM. cTp. 18).
2 HaxaHem AF n/nu T A BBi6epnte "AF on" n/nu"TA on".
3 HaXMMte HxHxHyIO HOMepHyIO KnaBnUy (c 1 NO 6), noka He nOraBNTcR INHdkaun "MEM".
ДлгзанecньВпamтБдpynxCTaHци NOBTOPHTBCEшаг,начногсОпаци1.
Cobet
Ecnn Bbl XOTHTe N3MeHnTb 3aHeceHHbIe B NaMaTb napametbp AF n/nn TA nocne HaCTpOKn Ha npedyctahOBLeHHy O tAnu, Bbl Moxete 3To cDenatb NocpeDCTBOM BKIIIOUeHn/BykIIIOueHn fynKmN AF n/TA.
HaxoKdEHe cTaHcUIn NO TnPy npOprpAMMbI
BbMOxTe HaHTn HxKHyIO BaM cTaHcIIO, BbIpaB OdINn I3 NepeuNCleHHbIX HNXe TINOB npOrpaMM.
ABytOMaTnuecka yCTaHOBka YacOB
YacbI npneMHnka yCTaHaBnBAIoTc aBTOMaTHueCKn PnnpneMe daHHbIX CT (BpeM),pepeDaBaembIX cTaHnmaRDS.
Ponck KomnlekoB u ycnyr
— ABTomatnueckKa Hactpoika
1 NocneIobaTeJIbHbIM HaxKaTnEm KnaBmU (SOURCE) Bbl6epNTe B KaueCTBe nCTOUYHkA TIOHeP.
2 ПослесоваTeьнБИМ Нжатем Клавиши MODE ВьберптЕ "DAB"(LJAB).
3 Haxmnte Ha IIO6yO cTOpOny KlaBnShn SEEK/AMS u YapedxHbaiTe ee B HaxtaTom NOIIOXKeHn, NOKa Ha IINcPJIee He IONBtCnHaIpnCb "Seek +" mIn "Seek -".

N HnIkaIaIy "Insert" He NOBHTCH, ECIN B NaMTb yKe 3arpye MaKcMmaJIbHoe KonJHeCTBO ycnyr (40).
YTO6bI 3aHeCTn B nAmrTb DpyrHne ycLyHn, NOBtOpTe onepaunn 3 u4.
5 Haxmnte ENTER.
3aMeHa ycIyr, 3aHeceHHbIX B nAmrTb Ha nporpamMhblix N03nuaX
HaxaTneM HaIIObUO CTOpOHy KJIaBnIu DISC/PRST Bbl6epNTe npi OcyuEcTBJeHn onepaun4KOMaHny“OverWrt”,3atem HaxmITE ENTER
I6abHeHne HObIx ycnyr K 3aHeceHHbIM B nAmTb Ha nporpamMHbIX NO3nux
HaxaTneM HaIIObUO CTOpOHy KJIaBnUI n DISC/PRST BbIbepNTe pIn OcUSeCTBJeHn oNepaun4KOMaHdy“Insert”,3aTe m Haxmnte ENTER
CTnpaHne ycIyR,3aHeceHHbIX B namrTaHa npoPpamMhBix N03nuaX
HaxaTneM HaIIObUO CTOpOHy KJIaBnIu DISC/PRST Bbl6epNTe npi OcyUeCTBJeHn onepaun4KOMaHny“Delete”,3aTe m HaxmITE ENTER
Cobet
3aHeCTn yCnyry B NaMaTb MoXHO INHbIM CnOcO6OM: NOcNE HAcTpoKnHa NHyKHyU YCNYr HaXmITE COOTBeTCTByUOyIO HomePHyO KNaBnUy (C 10 ⑥) TAKHM O6pa30M, YTO6bI pO3ByuA CNHaH.
Послшанne nporpaMM LAB
ДягТOrOчTOбblBpyHyIOHAcTpoNTbCЯТу илИнHyIO npOrpamMy LAB,ВынОЛнITE ОпИСанье HNKe Oпeрaци. ПOMIMо 3TOr,ДЯ OсуJCeCTBJIeHIN MOMeHTaJIbHOH NaCtpoKи Bbl MoKTe ЗАс electу cIyryLcAB bЯмТь ппeMHnka (Cm.pa3dJeI "AByTomATuYeCKoe 3aHecHne b ЯmaTb yClyr LAB"Ha cTr.26).
1 Bo Bpem npocnyuBaHn nporpamMbI LAB nocJeDoBteNo haxHMaiTe KJabNsiy LIST DO NOBHeHn Ha DncPJIe nepeHr KOMJIeKCoB.
2 HaximmaTe Ha IIO6yO CTOpOHy KlaBmUH DISC/PRST),Noka Ha DnCnPlee He NOBITc O6O3HaueHne HyXHOro KOMPiKeKca,3aTEM HAXMITE ENTER
3 NocJeIOBaTeIbHO HaxmMaTe KlaBnSy LIST DO NOBHeHnHa dncnlee nepeHrycnyr.
4 NocneIOBaTeIbHO NaXMaIte Ha IIO6yIO CTOpOHy KlaBnIIN DISC/PRST DO NOBJIeHNA DIncNJIee 0bO3NaYeHn HxKHO yCnyr, 3aTeM hXKMITE ENTER
5 NocJeIOBATEbHO HAXIMaTe KJaBnSy LIST DO NOBHeHna Ha DnCJIe eepeHr KOMNoHEtOB.
6 HaxmMaTe Ha IIO6yO CTOpOHy KlaBmShi DISC/PRST DO NOBJIeHnHa DIncJIee 06o3HaueHnH HyXHOrO KOMNoHEHTa,3aTeM HaxmTe ENTER
Cobet
TTo6bI npOBepntb Ha3BaHne npocnyuBaeMoro B daHHbIMOMeHT KOMTOHEHTA, KOMnEKeCA INN yCNYr, NOcNEIOBAteNBbIM HAaTHEM KJIaBmUIN LIST BbIENeTE Ha DCnPEe COOTBETCTBYOUInn peueHeB. H BEM dyet MMrTaHa3BaHBe BbIbapHHoB DaHHbIMOMeHT No3uIN.
I3MeHeHne BbIBeDEHHoHa DnCnJIe I03nCmN
PnOdHOKpaTHOM HaxaTmN KlaBnSi HA DcNpIe NOBJnEeTcNpeyeHb, BbIbpaHbI BamN B IpeBdyuyn pa3. Pn KaXDom HaxaTmN KlaBnSi (LIST) nepeYeH MeHReTcN cJeDyUoMn O6pa3OM:
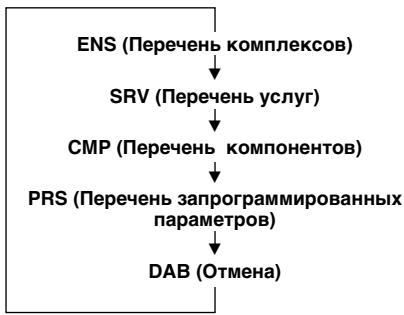
Bb6op KpnbOu 3KbaIaI3epa
1 HaKMTe KONKY (SOURCE), YTO6bl BbI6paTb NCTOCHNK (npHemHHK, CD mNMD).
2 HaxuMaTe KONky SOUND, NOKa He NOBHTcH INDnKAunra "EQ".
Пи Кадом Наоти Вамn SOUND noka3aHЯ ДИСплг МЕнHotc cIeDyUOIM O6pa3OM:
EQ (kpmba3kBaan3epa) POS (noonxehne npocnyuubnha) BAL (6baanc neb.-npab.) F (rpomKoCTb nepeHero rpomKorOBopnten) R (rpomKoCTb 3aHero rpomKorOBopnten) SUB (rpomKoCTb Hm3KoAcTOTHO rpmOBOpnten) VOL (rpomKoCTb) EQ (kpmba3kBaan3epa)

3 HaXMMTe Ha OndHy n3 CTOpOH KHOPIKn SEEK/AMS, YTO6bI BvI6paTb Tpe6yEmyIO KpNByIO 3KBaJIaI3epa.
При Кадом Нахати Bamu (SEEK/AMS) nokazanЯ ДИСПЛЕМЕHRIOTc r CLEdYIOUIM O6pa3OM:
Rock Vocal Groove Techno Custom off Rock
YTo6bI OTKHOnuTb 3OpFekr EKBaJna3epa, BbIepeInTe "off". Ypeez TpN cekyHbI Ha DnCnlee BHOBb NORBtca HnDnKaunr O6bIyHOro pexIma BocnpOn3BeDeHn.
Hac tropknbo3Kbala3epa
1 HaxMMte KhONky (MENU).
2 HaxmMaIte Ha Odyu n3 CTOpOH KhONKn DISC/PRST), NOKa He NOBITcR INdInKaIgna "EQ Tune", 3aTeM HaxmTe KhONKy ENTER.
3 HaxmTe Ha OndHy n3 CTOpOH KhONKn (SEEK/AMS), 7TO6bl BbIbpaTb Tpe6yEmyO kPnBvO 3kBaIaJI3epa, 3aTeM HaxmTe KhONKy (ENTER). Pnpi KaJDom Haxatm Bamn (SEEK/AMS) NOKa3aHmN DInCIIpe MeHJIOTc CJeDyUOIm 06pa3OM:
Rock Vocal Groove Techno Custom off Rock
4 BbI6epnte Tpe6yeMyo qactOTy npOBeHb.
1 4To6bI BbI6paTb Tpe6yeMyo YacTOrY, HaxMMTe Ha OndHy N3 CTOPOH KHOPIKN (SEEK/AMS).
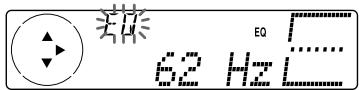
Yepe3 TpN cekyHdbI Ha dncnlee BHOBb NORBNTcN INdNkaun ObbyuHOro peKIma BOCPON3BeDeHn.
BbI6Op MeHIO 3ByuHaHnA
-ФункциДиHamMuYeCKOrO 3ByuHnR(DSO)
EcIINrpoMkOrOBOpHTeYcTaHOBNeHbIB HnXHeN qactn DBepe, 3ByK Chn3y MoXet 6bITb Hepa36OpuHBiM.
DSO (Dynamic Soundstage Organizer) -Функши Динамческо 3Byuань - co3daet 60JIe 6ObEMHOE 3ByuHNe, ри КOTOPOM BO3HnKaeВBneaTlneHne,ЧTO rPOMKOROBOpINTeIи HaxOДТСЯ Hab naHelen prinbopoR abTomObUJIr (BnPTuAJIbHbe IrpOMKOROBOpINTeI).
MeHIO 3ByaHnA
1 HaKMTe KONKy (SOURCE), YTO6bI BbI6paTb NCTOuHnK (npHemHnK, CD nM MD).
2 HaxmuTe KONky SOUND, noka He NOBNTcHnDnKaun "BAL".
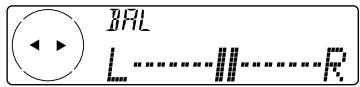
3 HaXMMTe Ha OndHy m3 CTOpOH KHOJKN (SEEK/AMS), YTObI HAcTpOHTb 6aJIaHC.
Yepe3 TpN CekyHdbI Ha dncnnee BHOBb NOBvTcR INdNkaun ObbyHOrO peKIma BOCPOn3BeDeHn.
HactpoJa rpoMkoCTn 3ByaHna nepeDnHex n 3aDnHex rpOMKOrOBOpnteJe
1 HaKMTe KONKy SOURCE, YTO6bl BbI6paTb NCTOuHnK (npneMHnK, CD nMMD).
2 HaximaiTe KhoNky SOUND, noka He NOBNTcH INDkaCnIaF "F" dJIe PpeDHnx rPOMKOrOBOpHTeJe nJIu R" -ДЯ 3aDHnx rPOMKOrOBOpHTeJe.

3 HaXMnTe Ha OndHy n3 CTOpOH KOnHKn (SEEK/AMS), YTObI OTperyUInpOBA Tb rpOMKocTb IpeEaHnx/3aDnHex rpOMKOrOBOpHTeJIe.
4ДавждынжмITE KONКY (MENU).Череш Трп секунды на диспee BHOБь NOВИТСА ИДИКацЯ OБЧИНО ржIMa BOCПОНЗBEDEHIN.
HactpoKa rpaHnUHO qAcTObI N BbIXoHOrO yPoBnA rPOMKocTn IJI npeDnHex/3aDnHex rpOMKOROBopnteJe
Длгобсчесня COOTBETCTBnXaPakTePrcNTkMycTaHOBNeHNoAkyCTuYeCKoNcTcMeblMOxHOHaCtPoNTbBbIXoHNOyUPOBHe rPOMKoTnI rpaHnHyOuCaCTOTy rPOMKOrOBOpnteJe.
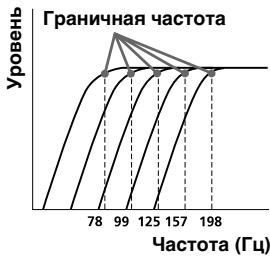
1 HaxMMte KhONky (MENU).
2 Haximmaite Ha Ondy n3 cTOpOH KhoNkU DISC/PRST, Noka He NoBtca INdkaaia "Front HPF" mIn "Rear HPF", 3aTeM Haxmte KhoNky ENTER.
3 BbI6epnte Tpe6yeMyo qactoty npoBeHb.
Hakmnte Ha OndHy n3 CTOPOH KhoNKn (SEEK/AMS),YTO6bI BbIbpaTb rpaHnHyIO YacToTy.
1 Haxmte KhoNky (SOURCE), YTO6bl BbI6paTb NCTOuHNK (npneMHNK, CD nM MD).
2 HaxuMaTe KONky SOUND, noka He NOBtca INdkaCua "SUB".

3 HaxMMte Ha OndHy n3 CTOpOH KOnHKn (SEEK/AMS), yTo6bI OTpeRyInpoBaTb ypoBeHb rPOMKOCTn.
4ДвждынжмITE KhoNkY (MENU).Yepe3 TrpncKyuHdbHa dmcPiee BHOBbPONBNTcHINdIKAuOObbHuORo pexImaBOCnpOn3BeDeHn.
Cobet
Pn yMeHbIeHm rPoMKOCTn Do MmHmMya Ha dncnnee noBnEeTcN HmNkaun "Sub ATT", a rpaHnUHa qactota N3KoAcTofTHORrpoMkorOBOpHTeN OTKNoUaTeC.
HactpoJa YacTOTbI Hn3KoAcTOTbIX rpOMKOrOBOpnteJei
ДЯ obecneueHn COOTBcTcTBn
XapakTePrcNTKam NOdkIIOUeHHbIX
H3KOuactOTbIX rPOMKOrOBOpnteNe,MOxHO
Cpe3aTb HKeJNaTeNbIbe BblCOKoAcTOTbIe I
CpeDHeuacTOTbIe CnHaIbI,NOCTyNaIOuIe Ha
H3KOuactOTbIe rPOMKOrOBOpnteN. PocIe
YctaHOBKn rpaHNUHO qACTOTbI (CM.
DnAgrpAMMy HNXe) C H3KOuactOTbIX
rPOMKOrOBOpnteNe 6byDt BblDaBaTbcR
TONbKO H3KOuactOTbIe CnHaIbI, B
pe3yIbTaTe 6byTe nOlyuHeno YnCTOE 3ByaHne.

1 HaxMMTe KhONKy(MENU).
IpoOIOJIKeHHe Na CJIeDyUoIe CTpaHnIe
2 HaximaiTe Ha OndHy n3 CTOpOH KHONKn DISC/PRST),Noka Ha DiucJIee He NOABNTcM INdIkaUaJNA "SUB LPF", 3aTEM HAXMMTE KHOKNy ENTER.
3 BbI6epnte Tpe6yEmyo YacToTy uypoBeHb.
1 TTo6bI BbI6paTb Tpe6yeMyu YacToTy, HaxMMTe Ha OndHy N3 CTOPOH KHOPIKNI SEEK/AMS).
HaxaTHEM KJIaBnIsh DSPL HaIINJIeI BbIBOJrTc 3aHeCEHHbIe B IaMrtb H3BaHnI.
Cobet
Ecnn 3amok 3axnirahn Bawero abTomo6nna He
Imeet cheuunbHoro nnoxehnAA (dln
BKNIOHUY/OTKNOHUY NOcOeINHeHO
aannapatby), He 3ab6BaIte KaJdbI pa3 noCne
BbIKIOHUY DBNAtEJI Na IDbE CeKyHdbI HaxIMaTb
KnabNIy OFF)YTObI OTKIOHHT zupe6bNaT
yaCOB.
U3meHHe pa6oery HappaBHeHn
3aBODCKaYcTaHOBKa pa6oOero HAnpaBLeHnpeRyIaTOpOB noka3aHa Ha npINBOIDMOM HIXe pncyHke.

ДяумehbweHnA
EcIn BbXOTnTe CMOHTnpoBaTb NOBOPOTHbI nepeKIIouaTeJb Ha npabOi CTOpOHe KOJIOHNpyIeBOrO ynpaBJIeHn, TO MOKeTe N3MeHtB paOoo He npapBJIeHne peyIaTOpOB Ha o6paTHoe.
Haxmte KlaBnuy (SOUND) Ha IBecekyhdbI, OndHObpeMeHHo HaxmnaHapepylantop VOL.
Cobet
Pa6ooye HaprabIeHne 3Txn peryIaTOPOB NObOPOTHOpeKIIIOUATEB Bt KaTke MoXeTe MEHITb, IcNoJIb3yI dIg 3ToR O BaW npOIRpbIbATEB. (CM.pa3dJe "M3MeHHeNze 3aDaHHbIX npAmeTpOB 3Byka n DcCInNe).
Приглшени 3Byka
HaeKMTe ATT Ha NOBOPOTHom nepeKJIouaTeNe HnHa 6ecnpoBOdHOM nyIbTe dNCTaHcIOHHO ynpaBLeHn. Ha nCpIee HeHaDoIro 3aropaetcA "ATT on".
ДявOCCTaHOBJIeHЯпpeБыДушeroуровян rpoMkoCTN BHOBBHaXKMnTe ATT.
Cobet
EcnnnHTeppeChbKabelBaawero
ABTOMO6BnBHO TeneoHa NpoknHouen K npobody
ATT,To npocntyIeHm TeneoHoro 3BOHka
PnporpbBatEn ABtAMTuHeCKn ChxJaet
rpmOkctb (fynkua Telephone ATT).
I3meHeHne 3aDaHHbIX napametpoB 3ByKa I dncnpeJ
Moryt 6bItb 3aDaHbI cneDyOuIe npaMeTpbl:
SET
Clock (yacbl) (ctp. 9)
CT (Bpemr) (cTp. 24)
- Beep - BKJIIOUeHHe/BbIKJIIOUeHHe 3ByKOBORO cnHaJa.
RM (noBopOTbI dNCTaHcIOHHbI nepeKInOaTeJI) -ДЯ n3MeHeHr na6oery HnpaBNeHr peYJrTOpOB noBopOTHorO nepeKnIOuTeJI.
BbIbepnte“norm"ДЯИСПОЛБЗOBAHIN NOBOPOTHOrOпеpeKJIUpaTeЯВ INoIoxKeHIM,ОпeДeЛeEHOM I3rOToBHTeJEM.
BbIbepnTe "rev" B cIyuae MOtaja noBOpOTHO rpeKJIIOUaTeJIHa npaBOI CTOpOHe pyJNeBOI KOJOnHKn.
Multi language (Выборязka) -ДлЯ
ИЗМЕнгЯязka ДИСПLEЯ На aHRЛиСКИ,
ИСпАнСКИ, РОТУГАльСКИ ИПИ SBeДСКИ.
DIS
D. Info (Двоиная Инфорmaця) - OДИОВРЕМЕнь ПOKA3 Н дсплес уасов И ржима BOCПОНЗБЕДНЯ (ПОLOЖЕни "on") Или ПOKA3 3Тnx NO3и NMочepe徝но (ПОLOЖЕни "off").
Amber/Green*-ДЯИЗМЕнEHЯ CBeta NOcBETKHa HHTapHbI INI 3eJIeHbI.
SA (CneKtpaIbHbI aHaIIN3aTOp) -ДЯИЗМЕHEHЯ 3aJaHHO TIna HAcTpOiKN 3KBAJai3epa.
Dimmer (peocTaT) -ДяиИЗмениярковп посветкдИСПЛЯ.
-BbI6epnte "Auto"ToIbKO npnIpyuWeHHN IOcBETKIN DCnJIpeT OJbKO pN BKJIIOUeHHN CBETA B CaIOHe.
-BbIbePte“on"nI npIpyuweHnnoDCBETKnDcPnEa.
- BbIbepnTe "off"ДЯ BBIKJIOUeHINpeocTaTa.
-
Contrast (Kohtpact) - Дян Habсторки КоHTpaCTa, ecIn nOKa3aHЯ NaДИСплee nILOXO pa3JIuHmbl I3-3a NOLOXeHnY yCTaHOBKn npOINrpbBaTeJЯ.
M.Dspl(Движушmaс ДИСПЛЕ)-ДЯУстановkn ДИЖушeroCДИСПЛЕВ рекIM1,2,nll off(BbIKl.).
A.Scrl (ABTomatuecka npokpyTKa) - (ctp. 13). -
Tomboу mojen CDX-C8000R/MDX-C8500R
SND
(3a3eMJIeHHe MmHyCa Ha
maccy)
Pa3Mepbi
npn6n.178×50×183MM (w/B/r)
MOHTaxHbIe ra6apuTbI
npn6n. 182× 53× 162 Mm (W/B/r)
Macca
CDX-C8000RX/
CDX-C8000R:
Pn6n.1,3Kr
MDX-C8500R:
npn6J.1,2Kr
BxOJaIe B KOMPJIeKCT npHaJNeXHOCTN
TeTAnI DnM OMTaXaN