DA9KSWE - Air Conditioning DAEWOO - Free user manual and instructions
Find the device manual for free DA9KSWE DAEWOO in PDF.
User questions about DA9KSWE DAEWOO
0 question about this device. Answer the ones you know or ask your own.
Ask a new question about this device
Download the instructions for your Air Conditioning in PDF format for free! Find your manual DA9KSWE - DAEWOO and take your electronic device back in hand. On this page are published all the documents necessary for the use of your device. DA9KSWE by DAEWOO.
USER MANUAL DA9KSWE DAEWOO
natural_image
White modular air conditioner unit with ventilation slots and control panel (no visible text or symbols)EN USER MANUAL 4
NL GEBRUIKERSHANDLEIDING 12
DE GEBRAUCHSANWEISUNG 21
FR MODE D'EMPLOI 30
ES MANUAL DEL USARIO 39
User manual
1 INTENDED USE
The air conditioner is intended for cooling and removing moisture.
i Read the manual carefully before the first use.
2 SAFETY
2.1 Labels in this manual
WARNING A warning means that injury is possible if the instructions are not obeyed.
⚠️ CAUTION A caution means that damage to the equipment is possible.
i A note gives additional information, e.g. for a procedure.
2.2 Safety features
Automatic defrost
When frost builds up on the evaporation filter, the appliance starts defrosting. The power button blinks.
Overload protection
In the event of a power loss, the overload protection switches the appliance off. The appliance switches on after 3 minutes.
2.3 General safety instructions
General
⚠️ To prevent damage or malfunctions: Please take time and read the general safety instructions. This will avoid fire, explosions, electric shocks or other hazards that may result in damage to property and/or severe or fatal injuries.
The manufacturer is not liable for cases of material damage or personal injury caused by incorrect handling or non compliance with the safety instructions. In such cases, the warranty will be voided.
WARNING
This product can be used by children aged from 8 years and above and persons with reduced physical, sensory or mental capabilities or lack of experience and knowledge if they have been given supervision or instruction concerning use of the product in a safe way and understand the hazards involved. Children shall not play with the product. Cleaning and user maintenance shall not be done by children without supervision.
Do not open the refrigerant loop.
If the refrigerant leaks, immediately evacuate all persons in the room. Ventilate the room and contact the local fire department to inform them about the propane leakage. Do not enter the room until a qualified technician declares the room safe. Do not use a lighter, cigarette or other flammable item near the room.
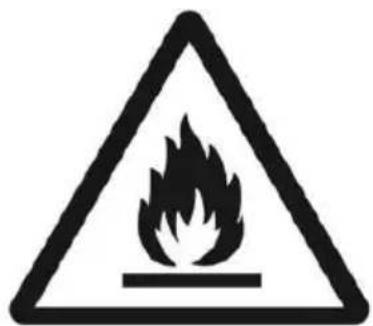
Only use R-290 (propane) gas as the refrigerant.
Do not get refrigerant in your eyes, on your skin or on your clothing.
Do not put force on the appliance.
Always check that the mains voltage corresponds to the voltage on the rating plate.
Only use original accessories from the manufacturer.
Do not spill any liquid on the appliance.
Never leave children unattended with the packaging material. The packaging material represents a danger of suffocation. Children frequently underestimate the danger. Always keep children away from the packaging material.
It is not permitted to open the product yourself or to have it opened, neither is it permitted to repair the product yourself or to have it repaired. This will void the warranties. Let any maintenance be carried out by certified maintenance personnel.
Do not block the ventilation holes.
Do not insert any objects in the ventilation holes.
Power cords should be placed so that they cannot be walked on and they cannot easily become trapped due to items resting on or against them. Pay particular attention to the power cords at plugs, sockets, and points where the cords exit the product.
⚠️ Disconnect the appliance from the power source during service or when not in use.
Do not operate the appliance with wet hands.
Do not leave the appliance unattended.
Do not unplug the appliance during operation.
Do not operate the appliance when damaged.
CAUTION
⚠️ Do not place the appliance near a heat source. This could damage the appliance.
⚠️ Place the appliance on a horizontal flat surface.
Remarks
We recommend that you retain the original carton and packaging materials in case it ever becomes necessary to return your product for service. This is the only way to safely protect the product against damage in transit. If you do dispose of the carton and the packaging materials, please remember to recycle with due care to the environment.
3.1 Unpacking
- Unpack the appliance carefully.
- Check the package contents as described below. If any item is missing, please contact your reseller.
We recommend that you retain the original carton and packaging materials in case it ever becomes necessary to return your product for service. This is the only way to safely protect the product against damage in transit. If you do dispose of the carton and the packaging materials, please remember to recycle with due care to the environment.
3.2 Package contents
i If any item is missing, please contact your reseller.
The following items are included in the received package:
- Exhaust hose
- Hose connector
- Window kit adapter
- Window kit
- Remote control
- Air conditioner
- User manual
4 FUNCTIONS
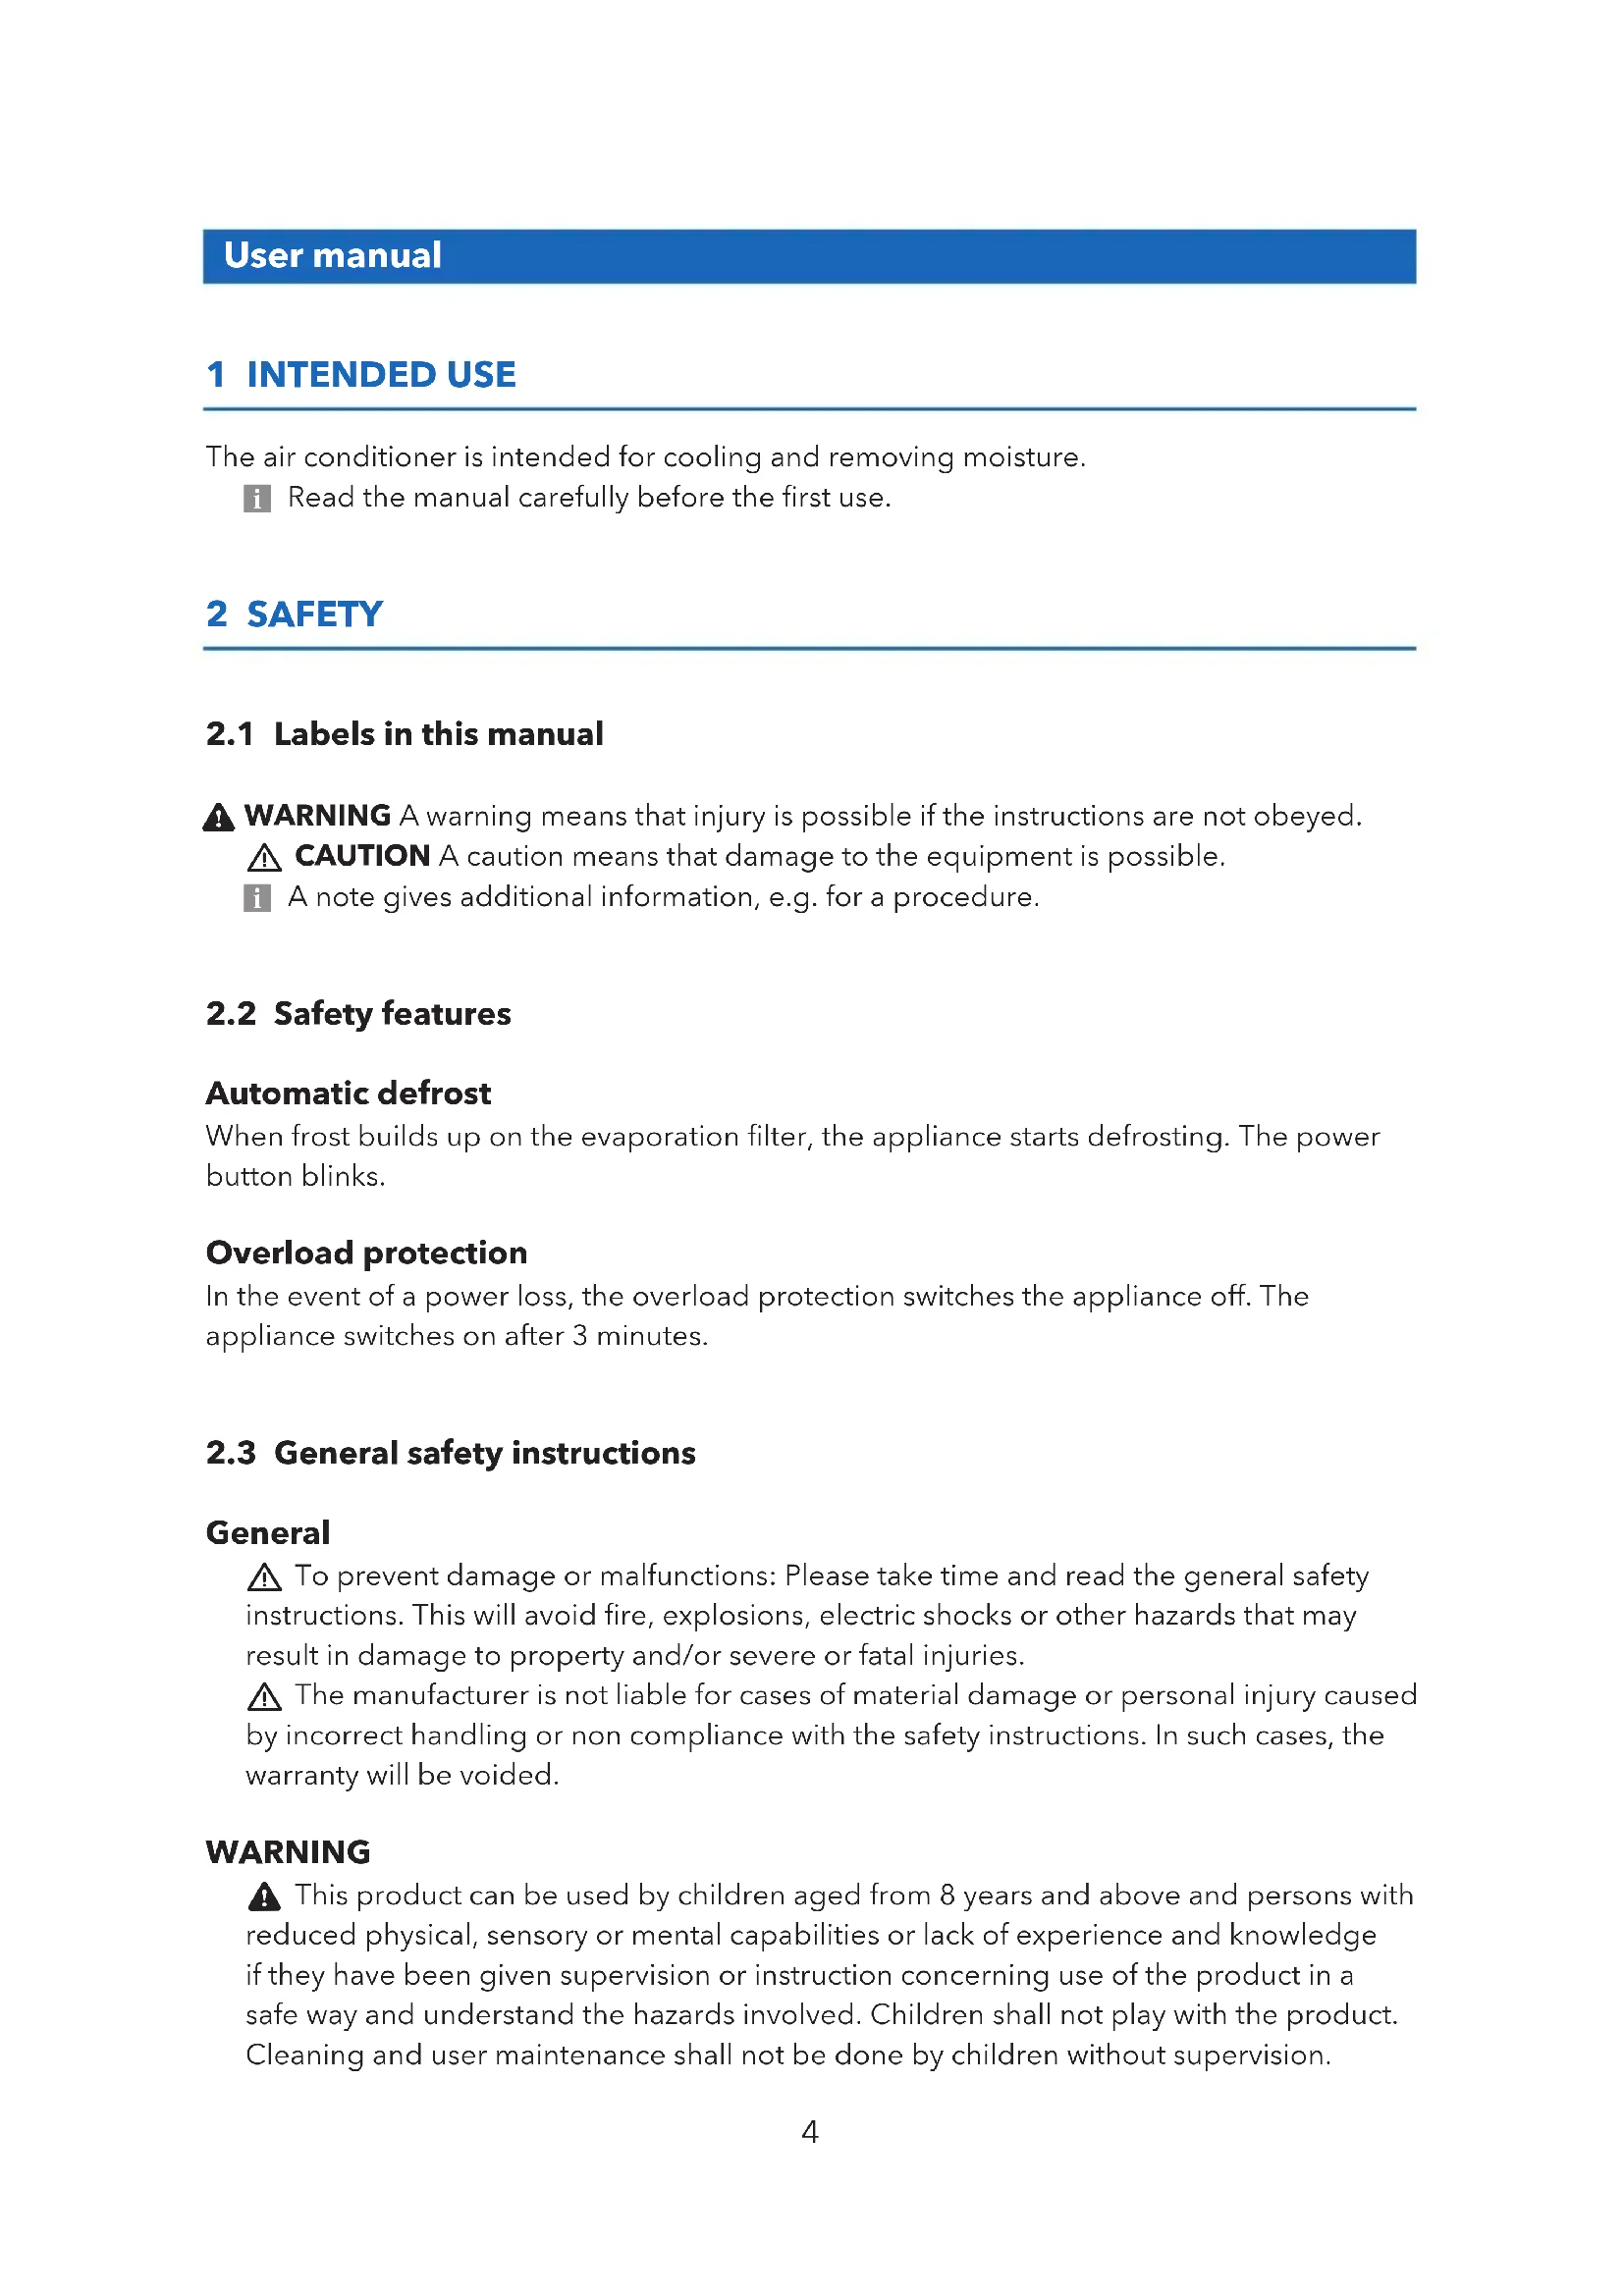
See image 1.
- Control panel
- Adjustable air outlet
- Handle
- Castor wheels (4x)
- Air inlet with air filter
- Air exhaust
- Drain
- Power cable
- Timer button
- Speed button
- Speed indicator
- Display
- Arrow button down
- Arrow button up
- Mode indicator
- Mode button
- Power button
- High button
- Low button
- Sleep button
- Cool button
- Dry button
- Fan button
- Change unit button
- Hose connector
- Window kit adapter
- Exhaust hose
- Window kit
5.1 Placing the appliance
- Appliance shall be installed, operated and stored in a room with a floor area larger than 9m^2 .
- Place the appliance on a horizontal flat surface.
- Keep minimum (50 mm) space around the appliance for optimal ventilation.
- Do not place the appliance near a heat source. This could damage the appliance.
- Do not expose the appliance to direct sunlight.
- Do not install the appliance where it could be subjected to:
-Mechanical vibration or shock
-Excessive dust
-Lack of ventilation, such as cabinet or bookcase
- Make sure the air inlet and outlet are not blocked, or close to loose objects e.g. curtains.
If the appliance is tipped more than 45^ , let the appliance stand in an upright position for 24 hours before use.
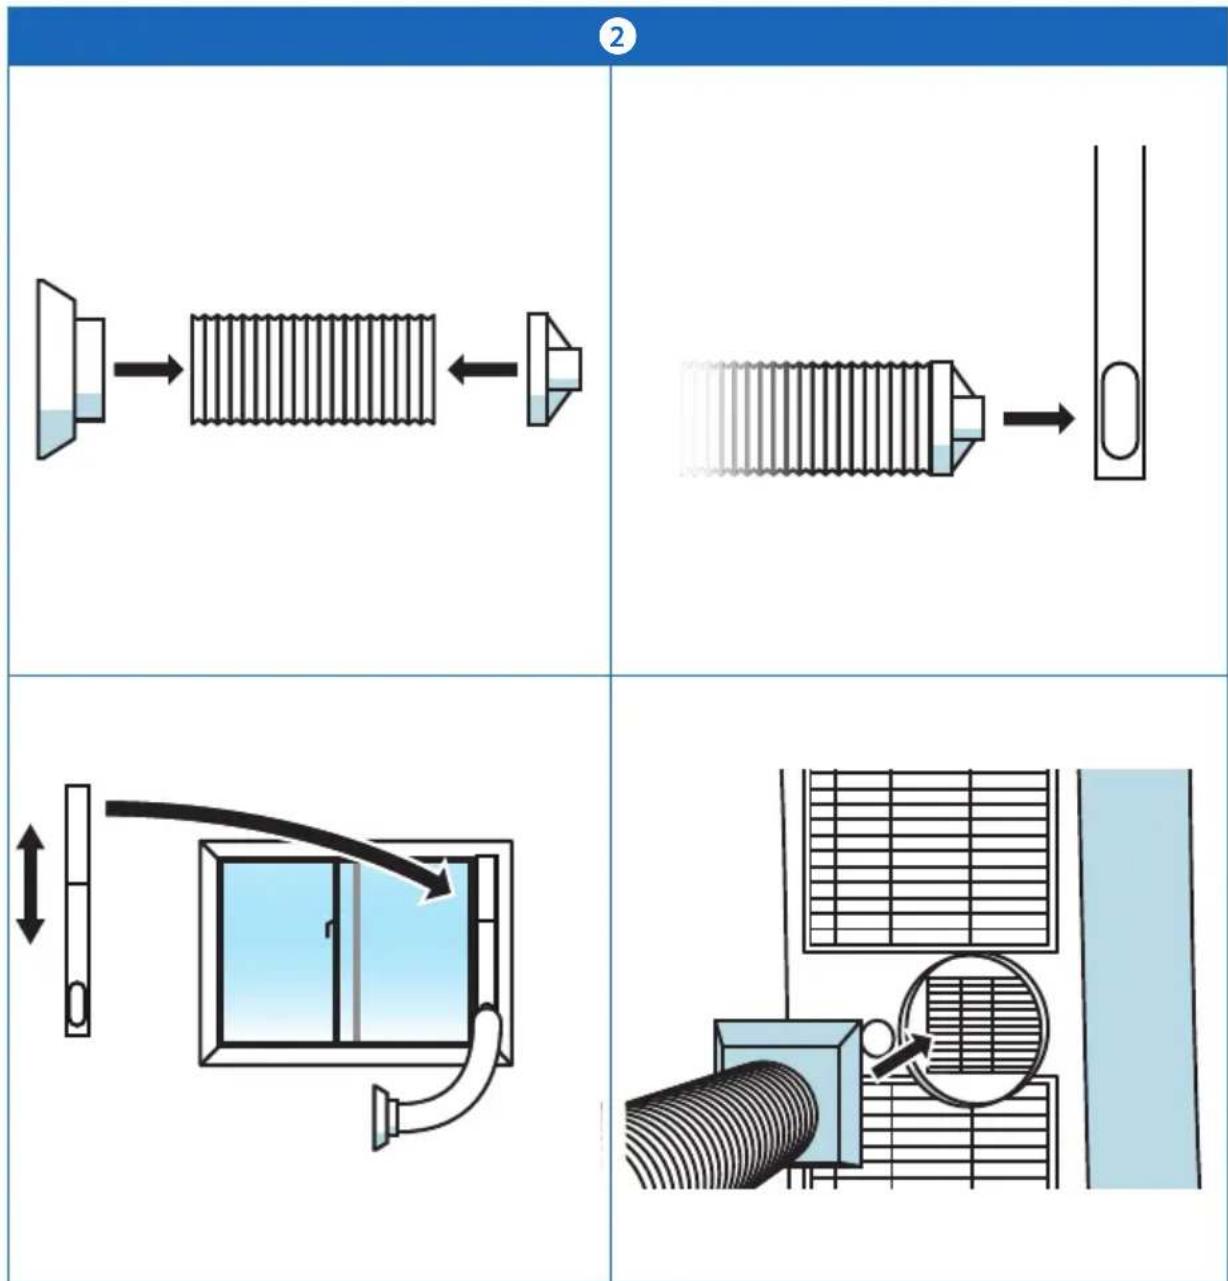
5.2 Connecting the exhaust hose
See image 2.
⚠️ Do not extend the exhaust hose with another hose.
- Connect the hose connector to the exhaust hose.
i Make sure to fully extend the exhaust hose.
- Connect the window kit adapter to the other end of the exhaust hose.
- Extend the window kit to fit the window opening.
- Lock the window kit between the window and the window frame.
- Connect the window kit adapter to the window kit.
- Connect the hose connector to the air exhaust of the appliance.
5.3 Make a WIFI connection (for DA9KSWE only)

- Download the Smart Life app for Android of iOS onto your phone via Google Play or the Apple App Store.
- Enable the WiFi function on your phone.
- Place the appliance within 5 meters of the router.
- Press and hold the timer button for 3 seconds. The wifi indicator starts flashing.
- Open the Smart Life app on your mobile phone.
- Press '+' to add a new device.
-
Select the air conditioner and follow the instructions in the app.
-
When connected the wifi indicator lights up.
- Press and hold the timer button for 3 seconds to disconnect the wifi connection.
6 OPERATION
- Press the power button to switch on the appliance.
i The appliance switches on after 3 seconds.
- Press the mode button to select the desired operation mode. The different modes are:
-Cool: air circulation and cooling
-Dry: low air circulation and dehumidifying
-Fan: air circulation without cooling
- Repeatedly press the speed button to select the desired speed.
- Use the arrow buttons to set the desired temperature.
- Press the power button to switch off the appliance.
i The appliance switches off after 10 seconds.
6.1 Sleep mode (remote control)
i The sleep mode can only be activated in cool mode.
- Press the sleep button on the remote control. Every hour the temperature increases by 1^ C.
6.2 Using the timer
When the appliance is switched on, the timer works as a shut of timer and vice-versa.
To cancel the timer, press the power button or press the arrow buttons repeatedly until the display shows '00'.
-
Press the timer button to switch on the timer function.
-
Use the arrow buttons to set the timer. The display shows the set time.
6.3 Storage
- Unplug the power cable and the window kit.
- Drain the water from the appliance.
- Clean the filter.
- Store the appliance in an upright position in a dry place.
7 CLEANING AND MAINTENANCE
⚠️ Turn the appliance off and remove the main plug out the socket before you start cleaning the device.
It is not permitted to open the product yourself or to have it opened, neither is it permitted to repair the product yourself or to have it repaired. This will void the warranties. Let any maintenance be carried out by certified maintenance personnel.
- Clean the outside of the appliance with a soft cloth. When the appliance is very dirty, dampen the cloth slightly with water and a neutral solution.
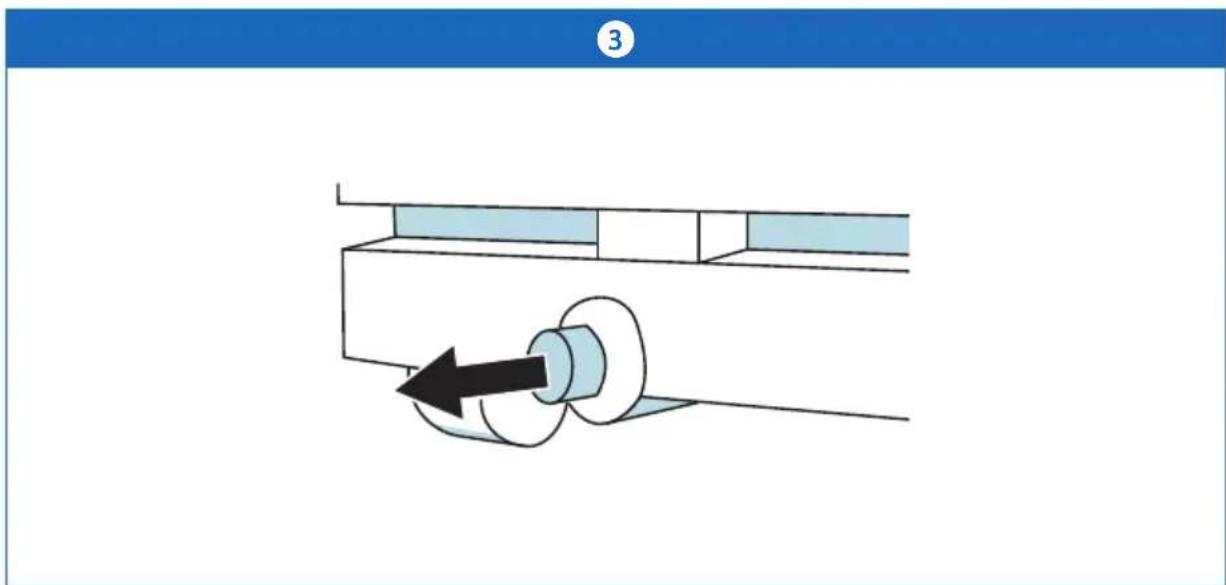
7.1 Draining the appliance
See image 3.
i Draining is only needed in dry mode.
i The appliance shuts off automatically when the reservoir is full.
i You can also drain the appliance automatically by attaching a drain hose to the drain. Place a drain reservoir on a lower level than the drain.
-
Carefully place the appliance above a sink.
-
Open the drain.
-
When the appliance is drained, close the drain.
7.2 Cleaning the filters
Do not touch the evaporation filter with bare hands.
-
Remove both filters from the appliance.
-
Clean the filter with a vacuum cleaner.
-
Rinse water through the filter in opposite direction of the airflow.
-
Let the filters completely dry before reinstalling
8 TROUBLESHOOTING
| Problem Possible cause Solution | ||
| The appliance does not switch on. | The power cable is not connected correctly. | Reconnect the power cable. |
| The water level in the reservoir is too high. The water level indicator lights up. | Empty the reservoir. | |
| The room temperature exceeds the working range. | Make sure the room temperature is between 5 - 35 °C. | |
| The appliance runs with reduced capacity. | A low fan speed is selected or the appliance runs in dry mode. | Select another mode or another fan speed. |
| The air filters are blocked. Remove objects from the air filters. When necessary, clean the filters. | ||
| There is an open door or window. | Close all doors and windows. | |
| The exhaust hose is detached. | Re-attach the exhaust hose. | |
| Water leakage occurs. The appliance has leaked while moving. | Be careful when moving the appliance. | |
| Replace the drain hose. | ||
| Straighten the drain hose.Unclog a clogged hose. | ||
| The appliance makes excessive noise. | The appliance is not placed on a flat and stable surface. | Choose a suitable location for the appliance. |
| Loose parts are vibrating. Tighten loose parts. | ||
| The noise sounds like flowing water. | This sound is coming from the refrigerant and is normal. | |
If the above solutions do not resolve the problem, please contact your reseller.
8.1 Error codes on the display
| Error code Possible cause Solution | ||
| E0 Communication fault | between PCB and display. | Contact your reseller. |
| E1 Temperature sensor is | broken. | |
| E2 Coil temperature sensor is | broken. | |
| Ft High water level in the | reservoir. | Empty the reservoir. |
• Cooling capacity: 9000 Btu
- WIFI: Included
- Mobile application: Smart Life (for DA9KSWE only)
- EER: Class A
• Power supply: 220 - 240 V / 50 Hz
• Sound pressure level: ≤54 dB (A)
• Sound power level: ≤65 dB
• Rated input (cooling): 1003 W
• Rated current (cooling): 4.5 A
• EER for cooling: 2.61
- Dehumidifying capacity: 21.6 L/day
• Air circulation: 330 m ^3 /h
• Body size: 350 x 348 x 701 mm
- Carton size: 405 x 379 x 884 mm
- Net weight: 23.5 kg
- Gross weight: 27 kg
• Application area: 12 - 18 m ^4
• Control type: Remote control and mobile application (for DA9KSWE only)
10 DISPOSAL OF USED ELECTRIC AND ELECTRONIC EQUIPMENT
The meaning of the symbol on the material, its accessory or packaging indicates that this product shall not be treated as household waste. Please, dispose of this equipment at your applicable collection point for the recycling of electrical and electronic equipments waste. In the European Union and other European countries which there are separate collection systems for used electrical and electronic product. By ensuring the correct disposal of this product, you will help prevent potentially hazardous to the environment and to human health, which could otherwise be caused by unsuitable waste handling of this product. The recycling of materials will help conserve natural resources. Please do not therefore dispose of your old electrical and electronic equipment with your household waste.
For more detailed information about recycling of this product, please contact your local city office, your household waste disposal service or the shop where you purchased the product.
Netherlands DA9KSWE-02.2021(1.0)