BWB800MA - Scale TANITA - Free user manual and instructions
Find the device manual for free BWB800MA TANITA in PDF.
User questions about BWB800MA TANITA
0 question about this device. Answer the ones you know or ask your own.
Ask a new question about this device
Download the instructions for your Scale in PDF format for free! Find your manual BWB800MA - TANITA and take your electronic device back in hand. On this page are published all the documents necessary for the use of your device. BWB800MA by TANITA.
USER MANUAL BWB800MA TANITA
19C6801-12988, AM No. 12991, AM No. 27995
Narrativa sobre la CEVI: HNC6061-1-21993
10C60501 1 2:1993
West Dragon, Middlesex
JRF /FRC United Kingdom
10: +44-1895-430577 510: +44-1896-428511
http://www.brida.co.uk
TANITA
TANITA Corporation
16.7.1 chama: Mavro-210 Itanashli
Incentive
10103368-2123/052964-0149-16103368-3705
TANITA Corporation of America, inc.
2025 South Electrobank Drive
Selection Heights: Illinois 70701 USA
101822 1350 326 4322
Tel: 147-810-9211
[3-847-540,926]
http://www.tanda.com
TANITA Health Equipment H.K.LTD.
Unit 301-303 3/F Wing On Plaza
62 Andy Ford, Tslimshokul East
Кварти, Ниги Копа
- 4M-2023-711
[1] +852-2398-5667
TANITA Europe GmbH
Credener Street 25
E-2105 Sistellian
Germany
[14] 112
Rev: 07031-618971
http://www.tinta.de
TANITA France S.A.
dibl amislo
- Revisand
[Unreadable]
SODD-fully
Tel:01-55-24-93-93
Fax:01-55-24 05 65
8.62年春日17日
TANITA
ELECTRONIC SCALE
BWB-800MA
SEPARATE III
INSTRUCTION MANUAL
natural_image
Line drawing of a digital balance scale with a digital display and cord (no text or symbols)
Please read this Instruction Manual carefully and keep it handy for future reference.
Table of Contents
□ Table of Contents 3
□ Applications
□ Safety Notes 4
Caution Symbols 4
Warning 4
△[Maintenance]
⚠[Instructions for Measurement] 5
- Product Assembly and Components 6
■ Product Components 6
■ Control Panel
Symbols and their Meanings
- Preparation for Use 8
■ Level Adjustment....\$
■ Installation of the Equipment....8
■ Prepare Power Source
- Operating Instructions 10
■ Measurement Procedures 10
■ Automatic Power Oil 10
- Troubleshooting 11
■ Possible problems 11
□ Specifications Back cover
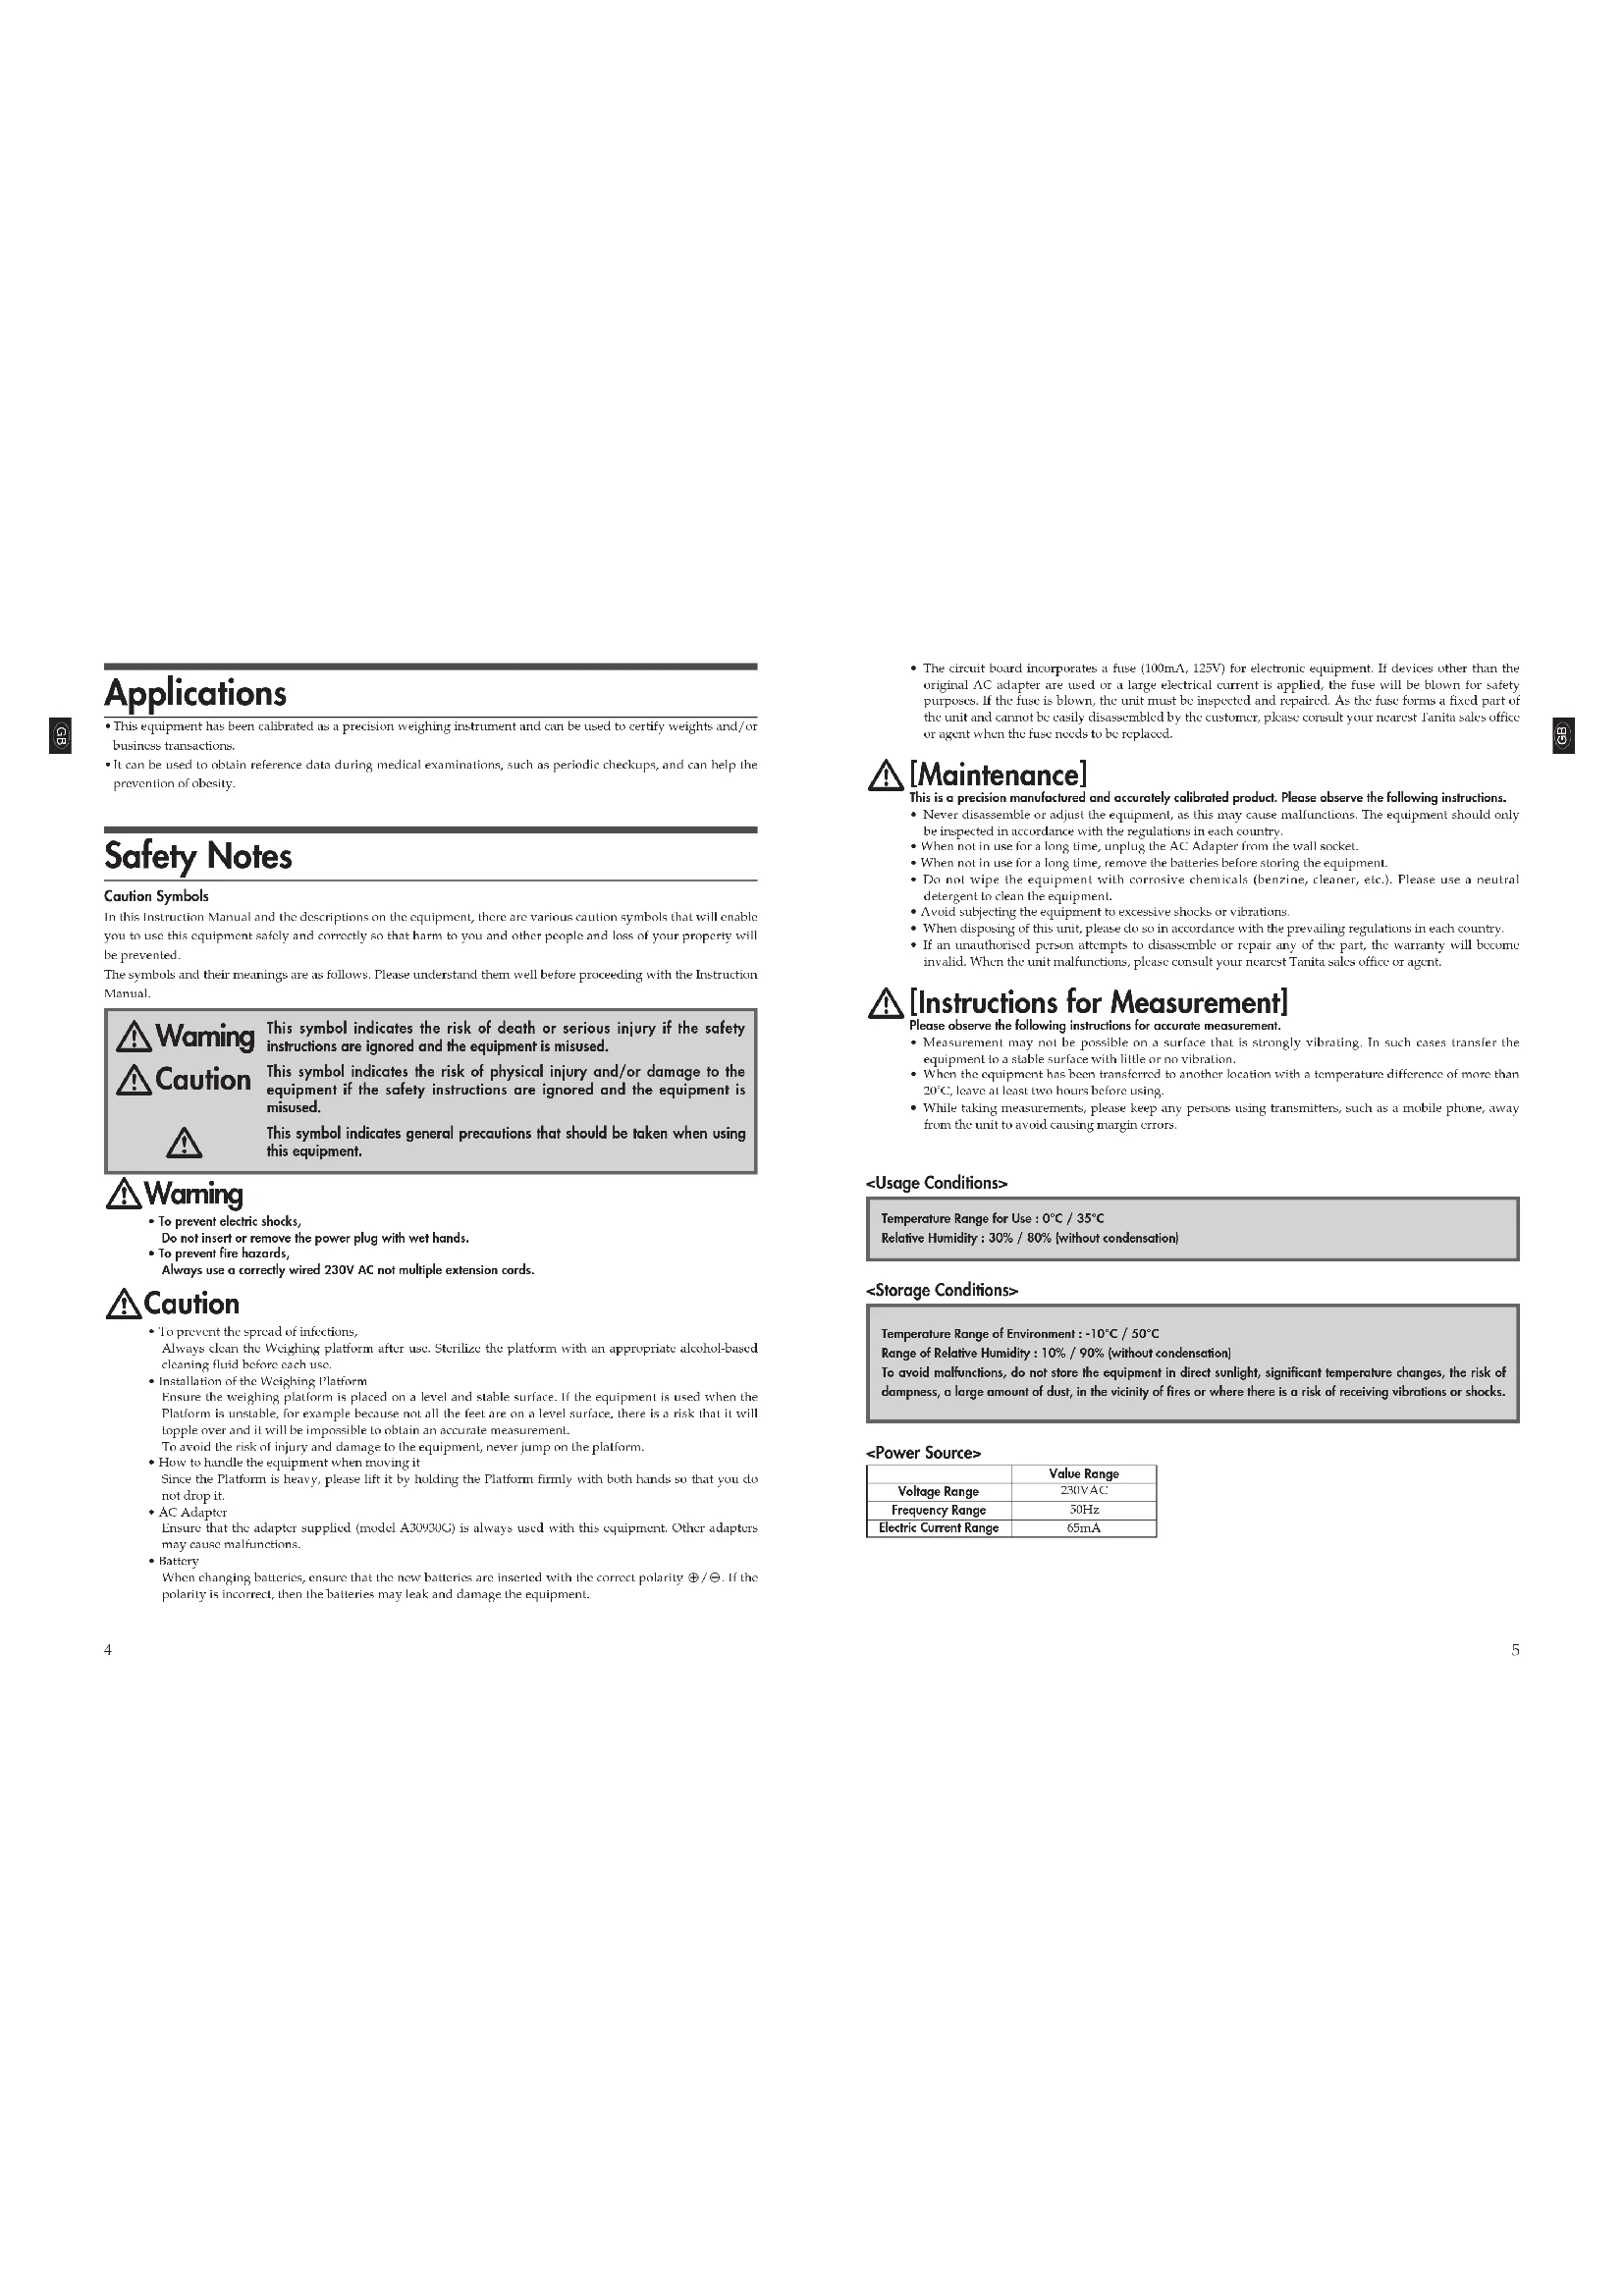
Applications
• This equipment has been calibrated as a precision weighing instrument and can be used to certify weights and/or business transactions.
- It can be used to obtain reference data during medical examinations, such as periodic checkups, and can help the prevention of obesity.
Safety Notes
Caution Symbols
In this Instruction Manual and the descriptions on the equipment, there are various caution symbols that will enable you to use this equipment safely and correctly so that harm to you and other people and loss of your property will be prevented.
The symbols and their meanings are as follows. Please understand them well before proceeding with the Instruction Manual.

This symbol indicates the risk of death or serious injury if the safety instructions are ignored and the equipment is misused.

This symbol indicates the risk of physical injury and/or damage to the equipment if the safety instructions are ignored and the equipment is misused.

This symbol indicates general precautions that should be taken when using this equipment.

Warning
- To prevent electric shocks,
Do not insert or remove the power plug with wet hands.
• To prevent fire hazards,
Always use a correctly wired 230V AC not multiple extension cords.

Caution
- To prevent the spread of infections,
Always clean the Weighing platform after use. Sterilize the platform with an appropriate alcohol-based cleaning fluid before each use. - Installation of the Weighing Platform
Ensure the weighing platform is placed on a level and stable surface. If the equipment is used when the Platform is unstable, for example because not all the feet are on a level surface, there is a risk that it will ripple over and it will be impossible to obtain an accurate measurement.
To avoid the risk of injury and damage to the equipment, never jump on the platform. - How to handle the equipment when moving it
Since the Platform is heavy, please lift it by holding the Platform firmly with both hands so that you do not drop it. - AC Adapter
Ensure that the adapter supplied (model A30930G) is always used with this equipment. Other adapters may cause malfunctions. - Battery
When changing batteries, ensure that the new batteries are inserted with the correct polarity / . If the polarity is incorrect, then the batteries may leak and damage the equipment.
- The circuit board incorporates a fuse (100mA, 125V) for electronic equipment. If devices other than the original AC adapter are used or a large electrical current is applied, the fuse will be blown for safety purposes. If the fuse is blown, the unit must be inspected and repaired. As the fuse forms a fixed part of the unit and cannot be easily disassembled by the customer, please consult your nearest Tanita sales office or agent when the fuse needs to be replaced.

[Maintenance]
This is a precision manufactured and accurately calibrated product. Please observe the following instructions.
- Never disassemble or adjust the equipment, as this may cause malfunctions. The equipment should only be inspected in accordance with the regulations in each country.
- When not in use for a long time, unplug the AC Adapter from the wall socket.
- When not in use for a long time, remove the batteries before storing the equipment.
- Do not wipe the equipment with corrosive chemicals (benzine, cleaner, etc.). Please use a neutral detergent to clean the equipment.
- Avoid subjecting the equipment to excessive shocks or vibrations.
- When disposing of this unit, please do so in accordance with the prevailing regulations in each country.
- If an unauthorised person attempts to disassemble or repair any of the part, the warranty will become invalid. When the unit malfunctions, please consult your nearest Tanita sales office or agent.
![TANITA BWB800MA - [Maintenance] - 1](/content/2026/03/510052/images/ad03f719554e320c041c4680323e82aa179c1c013fc2b84a99ccbc99d1a73bec.jpg)
[Instructions for Measurement]
Please observe the following instructions for accurate measurement.
- Measurement may not be possible on a surface that is strongly vibrating. In such cases transfer the equipment to a stable surface with little or no vibration.
- When the equipment has been transferred to another location with a temperature difference of more than 20°C, leave at least two hours before using.
- While taking measurements, please keep any persons using transmitters, such as a mobile phone, away from the unit to avoid causing margin errors.
Temperature Range for Use : 0°C / 35°C
Relative Humidity : 30% / 80% (without condensation)
Temperature Range of Environment : -10°C / 50°C
Range of Relative Humidity : 10% / 90% (without condensation)
To avoid malfunctions, do not store the equipment in direct sunlight, significant temperature changes, the risk of dampness, a large amount of dust, in the vicinity of fires or where there is a risk of receiving vibrations or shocks.
| Value Range | |
| Voltage Range | 230VAC |
| Frequency Range | 50Hz |
| Electric Current Range | 65mA |
1.Product Assembly and Components

■ Product Components Please verify that the following components are in the package.

text_image
Display Box Platform Level Gauge Battery CompartmentAccessories
AC Adapter
MODEL:A30930G
Bracket for Wall Installation
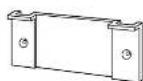
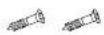
Fixing Screw for the Bracket [x 2]
Instruction Manual
6
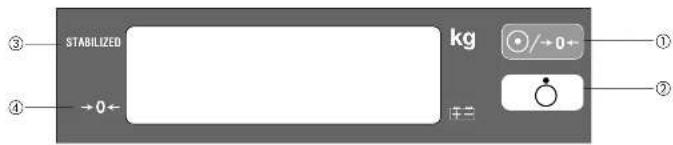
Control Panel
text_image
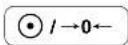
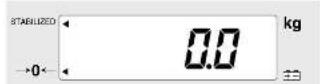
STABILIZED kg →0← 注2 ① ②① Turn on the power for the Display Box and reset the display to zero.
② Turn off the power for the Display Box.
③ STABILIZED * Due to the precision of this unit, the arrow may not appear immediately. This does not mean that the product is defective.
When there is no load on the platform, and the unit has zeroed, then an arrow will appear next to the words “→0←”.
* When a load is placed on the Platform, then the arrow will disappear.
■ Symbols and their Meanings
| : Display Unit On. | : Display Unit Off. | : Direct current | |||
| : Class II Equipment | : Type B applied part | : Zero reset | |||
| : Battery change is required | : Caution. Refer to the attached notes. | : Conformity with Medical Device Directive 93/42EEC |
7
2.Preparation for Use

Level Adjustment
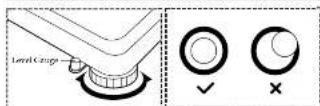
Adjust the height by rotating the adjustable feet
For accurate measurement, place the unit on as flat a surface as possible and adjust the level with the adjustable feet so the bubble in the level gauge is in the center of the frame.
Caution
Place the equipment on a level surface. If the equipment is not stable, for example because not all the feet are on a level surface, there is a risk that it will topple over and it will be impossible to obtain an accurate measurement.
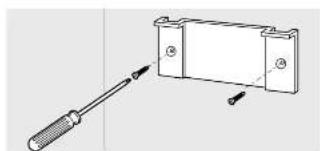
■ Installation of the Equipment
natural_image
Diagram of a screwdriver inserted into a rectangular component with mounting holes (no text or symbols)
natural_image
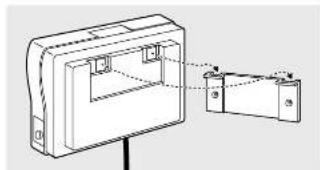
Technical line drawing of a mechanical component with two connected parts (no text or symbols)The Display Box can be placed on the table or hung on the wall.
① Attach the Bracket for Wall Installation onto the wall using the screws through the two holes in the Bracket. Ensure that the protruding edges of the Bracket are uppermost.
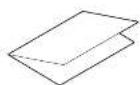
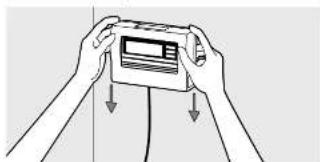
②Mount the Display Box onto the Bracket, inserting the hooks of the Display Box into the protruding edges of the Bracket.
natural_image
Illustration of two hands holding a card with arrows indicating downward motion (no text or symbols)③ Insure that the Display Box is firmly fixed to the Bracket by gently pulling down on the Display Box.
- If the Display Box is not fixed sufficiently, there is a danger that it may fall down. - Avoid installing the Display Box in a place where users may step on or get caught by the cable. - Do not swing the Display Box by the cable.

natural_image
Line drawing of a square digital balance scale with a digital display and cord (no text or symbols)8
Prepare Power Source
① When using the AC Adapter
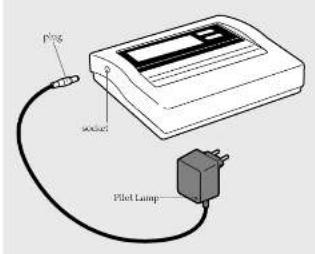
text_image
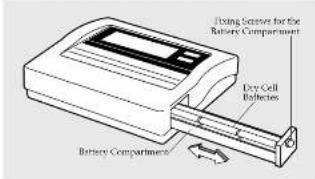
P/PG SDAI Pilot Lamp② When using dry cell batteries
text_image
Fixing Sensors for the Battery Compartment Dry Cell Dishes Battery Compartment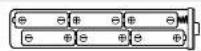
Insert the cable plug for the AC Adapter into the socket on the side of the Display Box, and insert the AC Adapter plug into a 230V AC main socket.
Then confirm the Pilot Lamp on the AC Adapter lights up.
Warning
• To avoid electric shocks, do not insert and remove the plug with wet hands.
Caution
• Use only the AC adapter (MODEL: A30930G) specified. Using an AC Adapter other than that specified may cause malfunctions.
Unscrew the Fixing Screws for the Battery Compartment on the right side of the Display Box and pull out the Battery Compartment. Place dry cell batteries in the correct positions as instructed inside the Battery Compartment and fix the Battery Compartment with the Fixing Screws.
If is displayed on the Display and s appears next to the symbol, please replace all the six batteries with new ones.
- Please change the batteries carefully to avoid dropping them on your feet.
- Ensure that the batteries are inserted with the correct polarity ⚪. The polarity is incorrect, then the batteries may leak and damage the equipment.
- When not in use for a long time, remove the batteries before storing the equipment
- When the equipment has been transferred to another location with a temperature difference of more than 20°C, leave at least two hours before using.
3. Operating Instructions

■ Measurement Procedures
- When the equipment has been transferred to another location with a temperature difference of more than 20°C, leave at least two hours before using. - While taking measurements, please keep any persons using transmitters, such as a mobile phone, away from the unit to avoid causing margin errors.
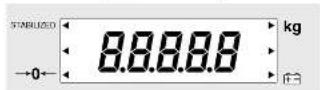

1. Press the Key 0
08888 will flash on the Display as shown on the left, then will 02 displayed and will appear next to ^ 0^ - ^ .
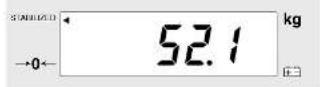
- Step on the Platform and Start Measurement Please step on the Platform.
An arrow (◀) will appear next to "STABILIZED" and the weight will be displayed.
3. Measurement is Completed
Please step off the Platform. Press the key and the power will be turned off. *If you continue measurement, please step off Platform and after confirming is displayed, then start measurement again.
■ Automatic Power Off
This equipment has an automatic power off function that automatically turns off the power in order to reduce battery consumption. If the display does not change for 20 minutes, the power will be automatically turned off.
4.Troubleshooting
Possible Problems
If problems occur, please refer to the following instructions before you ask for repairs.
| Problem Solution | |
| The unit does not turn on when the ☑ 1-0- key is pressed. | ·When Using with the AC Adapter Ensure that the AC Adapter cable is properly connected with the Display Unit. Ensure that the AC Adapter is correctly inserted in the mains socket. ·Using dry cell batteries The batteries may have run out. Confirm that the equipment is working by using the AC Adapter or new batteries. |
| Measurement is not correct. | ·Please confirm that all the adjustable feel are resting on a level surface. |
| Measurement does not become stable. Display turns on and off. | ·Measurement may be impossible in the case of excessive vibration. Use the equipment in another place. |
| ---- is displayed. | ·It is possible that the maximum weight capacity has been exceeded. Please stop measuring. |
| ...... is displayed. | ·Do not stand on or put objects on the Platform before starting measurement. Start measurement after confirming there is nothing on the Platform. |

Specifications
| Model | BWB-800MA | |
| Power source | AC adapter Centre minus MODEL A30030G CLASS 2Input Voltage : 230VAC 50Hz 65mAOutput Voltage : 9VDC±0.45VDCRated Current : 300mANo Load Input Voltage : 12VDC±0.6VDCAlkali battery (1.46) x 6, (Not included) | |
| Power Consumption | 0.25W max. | |
| Measurement System | Electrical resistance method | |
| Maximum Capacity | 200kg | |
| Minimum Graduation | 0.1kg | |
| Accuracy at first calibration | ±0.1kg | |
| Weighing Range | 2kg - 200kg | |
| Display | 1.CD (Liquid crystal) (Height of numerals 25mm) | |
| Temperature Range of Usage | 0 to 35°C | |
| Relative Humidity | 30 - 80% (without condensation) | |
| Size | Platform | 301 x 336 x 88 (mm) |
| Display box | 160 x 200 x 60 (mm) | |
| Battery life | approximately 100 hours of continuous use. | |
The product meets all the requirements under the three standards below:
Society Standard: LAX061-1:1990, AM No.1:1993, AM No.2:1993 IEC81601-1:1988, AM No.1:1991, AM No.2:1995
EMC Standard: EN-60601-1-21993 EC60601.1.2:1993
Medical Device Directory Standard: 93/42/EIC-1995
«Corporation Responsible in the EU Region»
TANITA UK LTD.
The Barn, Philpots Close Yiezslay.
West Draplan, Middlesex
[1] +4-188-4395/- 50 +46-1856-27611
http://www.briila.com
TANITA
TANITA Corporation
14-2.1-charge Mastro-sino Itaasshi-ku
10670,4917
10133961-2123/033961-048-5ac033967-3705
TANITA Corporation of America, inc.
2025 South Clarkmark Drive
Sriptech Heights, Inc. 10,302 U.S.A.
Tel: 157-840-9211
[3] 847-540-926
http://www.tanha.com
TANITA Health Equipment H.K.LTD.
Unit 301-303 SF Wing On Plaza.
62 Mody Food, Tslmshatsul East
Kowou, Hong Kong
Tel: +852-2032-111 Fax: +852-2188-5667
TANITA Europe GmbH
Dressdamer Street 25
1-7106 Sindelligen
Germany
Tel: 07031-61895 Fax: 07031-618971
http://www.tanba de
TANITA France S.A.
The Lermis
63 Boulz and Eppoder,
92203 Kruil
France Tel: 01-55-24-93-95
Fax:01-53-24 05-65
8.2546017011
TANITA
ELEKTRONISCHE WAAGE
BWB-800MA
SEPARATE III
BEDIENUNGSANLEITUNG

natural_image
Line drawing of a digital balance scale with a mounted device and cord (no text or symbols)
natural_image
Diagram of a screwdriver inserted into a rectangular component (no text or symbols)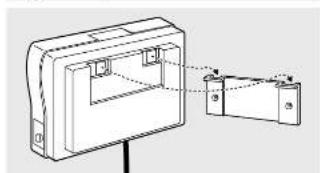
natural_image
Technical line drawing of a mechanical component with two connected parts (no text or symbols)natural_image
Illustration of two hands holding a card with arrows indicating downward motion (no text or symbols)
natural_image
Line drawing of a square digital scale with a connected cable and a digital display (no text or symbols)Medical Device Directory Standard: 93/42/EWG: 1993
«Corporation Responsible in the EU Region»
TANITA UK LTD.
The Barn, Philpeta Close, Yievsley.
West Dragon, Middlesex
JR: 788. United Kingdom
http://www.brija.com
TANITA
TANITA Corporation
14-2.1-charge Mastro-dio Itaasshi-ku
1029.3017
10.03.2861-2123/05.2961-048-16.03.2867-3705
TANITA Corporation of America, inc.
2025 South Clarkbrook Drive
Arlington Heights, Illinois 10301 U.S.A.
161832 (350) 276 4222 Tel: 167-840-241
- 017-510-221
http://www.tanba.com
TANITA Health Equipment H.K.LTD.
Unit 301-303 SF Wing On Plaza.
62 Mody Food, Tslmshatsul Eash
Kowde, Hong Kong
Tel: +402-2039-1117 Fax: +852-2188-5667
TANITA Europe GmbH
Dressdamer Street 25
1-7106 Sindelligen
Germany
Tel: 07631-61845
http://www.tinta.de
TANITA France S.A.
ZihLazm.-sls
63 Boulevard
92203 Keul
Hance Tel: 01-57-04-06-05
Tel: 01-33-24-89-89 Fax: 01-65-24-85-65
无法识别
TANITA
BALANCE ELECTRONIQUE
BWB-800MA
AVEC BOITIER D'AFFICHAGE AUTONOME Ⅲ
MANUEL D'UTILISATION

natural_image
Line drawing of a digital balance scale with a mounted device connected to a cable (no text or symbols)
natural_image
Diagram of a screwdriver inserted into a rectangular component with two pins, no text or symbols present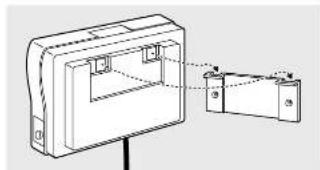
natural_image
Technical line drawing of a mechanical housing or enclosure with internal components and mounting bracket (no text or symbols)natural_image
Illustration of two hands holding a card with downward arrows indicating compression or dislocation (no text or symbols)
natural_image
Line drawing of a square digital balance scale with a digital display and cord (no text or symbols)text_image
Power jack Remote lumines Connector jackNORMES CFM: EN-61801-1-2:1993
EC6050112:1993
Norme Medical Device Directory :93/42/ EIC-1995
«Corporation Responsible in the EU Region»
TANITA UK LTD.
The Barn, Philpeta Close, Yievsley.
West Dragon, Middlesex
JR: 788. United Kingdom
http://www.brija.com
TANITA
TANITA Corporation
14-2.1-charge Mastro-dio Itaasshi-ku
1079.3017
10133961-2123/033961-048-5ac033967-3705
TANITA Corporation of America, inc.
2025 South Clarkbrook Drive
Arlington Heights, Illinois 10301 U.S.A.
161832 (330) 276 4222 Tel: 167-840-241
- 017-510-221
http://www.tanha.com
TANITA Health Equipment H.K.LTD.
Unit 301-303 SF Wing On Plaza.
62 Mody Food, Tslmshatsul Eash
Kowde, Hong Kong
Tel: 4352-2039-711
(4) +002-2550-3697
TANITA Europe GmbH
Dressdamer Street 25
1-7106 Sindelligen
Germany
Tel: 07631-61845
http://www.tanta.de
TANITA France S.A.
ZihLazm.-sls
63 Boulevard
92203 Keul
Hance Tel: 01-57-04-06-05
natural_image
Line drawing of a digital balance scale with a digital display and cord (no text or symbols)
natural_image
Diagram of a screwdriver inserted into a rectangular component with mounting holes (no text or symbols)
natural_image
Technical line drawing of a mechanical component with two connected parts (no text or symbols)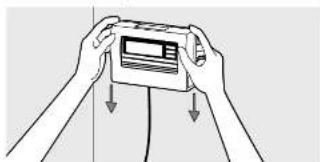
natural_image
Illustration of two hands holding a card with downward arrows indicating compression or dislocation (no text or symbols)
natural_image
Line drawing of a square digital balance scale with a digital display and cord (no text or symbols)The Barn, Philpots Close Yiezslay.
West Draplan, Middlesex
[1] +4-188-4395/- 50 +46-1856-27611
http://www.briila.com
TANITA
TANITA Corporation
14-2.1-charge Mastro-sino Itaasshi-ku
10670,4917
10133961-2123/033961-048-5ac033967-3705
TANITA Corporation of America, inc.
2025 South Clarkbrook Drive
Arlington Heights, Illinois 50301 U.S.A.
161832 (330) 276 4222 Tel: 167-840-241
- 017-510-221
http://www.tanba.com
TANITA Health Equipment H.K.LTD.
Unit 301-303 3-F Wing On Plaza.
62 Mody Road, Tsimshatsul East
Kowde, Hong Kong
Tel: 4352-2039-711
(4) +002-2550-3697
TANITA Europe GmbH
Dressdamer Street 25
1-7106 Sindelligen
Germany
Tel: 07631-61845
http://www.tanta.de
TANITA France S.A.
ZihLazm.-sls
63 Boulevard,
92203 Keul
Hance Tel: 01-57-04-06-05
Tel. 01-33-24-89-89
无法识别
TANITA
BÁSCULA ELECTRÓNICA
BWB-800MA
natural_image
Line drawing of a digital balance scale with a digital display and cord (no text or symbols)
natural_image
Diagram of a screwdriver inserted into a rectangular component with two circular holes (no text or symbols)