
Look Therm Perfection - Coffee machine MELITTA - Free user manual and instructions
Find the device manual for free Look Therm Perfection MELITTA in PDF.
| Product type | Filter coffee machine |
| Brand | Melitta |
| Model | Look Therm Perfection |
| Use | Domestic |
| Coffee type | Ground coffee |
| Compatible filter | Melitta 1x4 (paper filter) |
| Water tank | Removable with level indicator |
| Carafe | Glass thermal carafe with central valve lid |
| AromaSelector function | Aroma adjustment: mild (left) to bold (right) |
| Anti-drip system | Yes |
| Automatic shut-off | Yes, after brewing |
| Descaling indicator | Yes, red illuminated button |
| Water hardness setting | 4 levels (preset level 4) |
| Filter holder | Swivel and removable, dishwasher safe |
| Exterior cleaning | Soft damp cloth |
| Descaling | Recommended with Melitta Anti Calc product |
| Safety | Automatic shut-off, anti-overheating design |
| Cord length | Approx. 80 cm (integrated storage) |
Frequently Asked Questions - Look Therm Perfection MELITTA
User questions about Look Therm Perfection MELITTA
0 question about this device. Answer the ones you know or ask your own.
Ask a new question about this device
Download the instructions for your Coffee machine in PDF format for free! Find your manual Look Therm Perfection - MELITTA and take your electronic device back in hand. On this page are published all the documents necessary for the use of your device. Look Therm Perfection by MELITTA.
USER MANUAL Look Therm Perfection MELITTA
natural_image
Exterior view of a modern kitchen coffee maker with clear glass and stainless steel casing (no visible text or symbols)GB Operating Instructions
FR Mode d'emploi
A CALC-Taste | CALC button | voyant lumineux détartrage | CALC-knop | il tasto CALC Botón CALC | CALC-knap | CALC-knappen | CALC-knapp | CALC painike | khonka CALC
B START-Taste | START button | bouton de mise en marche | START-knop | il tasto START | Bóton de Inicio | START-knap | START-knappen | START-knapp | START painike | кнопka START
C Griff zum Öffnen des Schwenkfilters | handle to open the swing filter | porte-filtre amovible avec poignée | Groep om de zwenkfilter to oponen | Maniglia por aprirs il filtro oscillante | Manivela para abrir el filtro girstorio | håndtag til at ábne swingfilter | håndtag att öppna filterbehållaren | håndtak for á apne filterbeholderen | Suodatinsupplon sukaisukalva | рука для открывания поворотного держателя фильтра
Wassertankskala | water level display | Indicateur du niveau d'eau | waterpellindicator op de watertank | la scala graduata del serbatoio | Indicador nivel del agua | vandstands skala | nivägraderingen på tanken | skalering på vanntank | vesisällön mitta-asteikko | indikator urohaa aoda
Wassortankdockel | water tank lid | couvercle du réservoir à cau | doksel van het waterreservoir | il coperchio del serbatoio dell'acqua | Tapa del depósito de agua | vandtankens lág | locket till vattentanken | lokk til vanntank | vesisälion kansi | крышка резервуара для воды
F AromaSelector® | Selecteur d'arôme | aromavelger
Tropfstopp | drip stop | système anti-gouttes | druppelstop | la protezione antigocciolamento | dispositivo antigoteo | drypstoppet | droppstopp | dryprestopp | tippalukko | противокалельный клапан


Thank you for buying our Look® Therm filter coffee maker. We hope you will be very happy with it.
If you need further information or if you have any questions please contact Melitta® or visit us on the Internet at www.international.melitta.de
For your safety
CE The appliance complies with all valid European guidelines.
The appliance has been tested and certified by an independent test institute.
Please read the safety notes and the operating manual in full. To avoid danger you must pay attention to the safety and operating instructions. Melitta ^® is not liable for damage caused by ignoring these instructions.
1. Safety notice
This appliance is intended for use in households and similar areas, such as -
- in kitchens for employees in shops, offices and other commercial areas
• in agricultural companies - in motels, hotels and other residential facilities and bed and breakfast establishments Any other use is considered to be improper use and may result in personal injury or damage to property. Melitta® is not liable for damage caused by improper use.
Please observe the following instructions to avoid injuries in case of misuse:
- The appliance must not be placed in a cupboard during operation.
- Connect the appliance only to a properly installed earthed socket.
-
The appliance must always be disconnected from the power supply when unsupervised and before assembly, disassembly or cleaning.
-
During operation, parts of the appliance such as the steam outlet at the filter become very hot. Avoid touching these parts and avoid contact with hot steam.
- Do not open the filter holder during brewing.
- Do not use the appliance if the power cable is damaged.
- Do not allow the power cable to come into contact with liquids.
- Never immerse the appliance in water.
- Do not clean the parts that come into contact with food with aggressive cleaning agents or scouring cream. Remove detergent residues with clean water. Further information on cleaning can be found under "Cleaning and care".
- This appliance can be used by children from 8 years of age or older if they are supervised or have been instructed in the safe use of the equipment and have understood the potential hazards. Cleaning and maintenance must not be carried out by children, unless they are 8 years or older and are supervised. Keep the appliance and the power cable away from children under 8 years of age.
- The appliance may be used by persons with reduced physical, sensory or mental abilities or lack of experience and/or knowledge if they are supervised or have been instructed in the safe use of the appliance and have understood the potential hazards.
| Hardness setting | 1 | 2 3 4 | ||
| °dH | <7°dH | 7-14° dH | 14-21°dH | >21°dH |
| Flash rhythmCALC button 2 | ...■......■... | ...■■......■■... | ...■■■......■■■... | ...■■■■......■■■■... |
GB
Table 1
• Children must not play with the appliance
- Replacement of the power cable and all other repairs may only be carried out by Melitta® Customer Service or by an authorised repair shop.
Insulated jug
- Do not use the jug in the microwave.
- Do not place the jug on a hot stove.
- Do not use the jug to store dairy products or baby food, as there is a risk of bacterial growth.
- Do not lay the filled jug on its side, as liquid may escape.
- Clean the outer casing with a soft, damp cloth.
2. Before first use
- Ensure that the power supply in your home corresponds to that on the model plate on the base of the appliance.
- Place the appliance on a dry, level and stable surface.
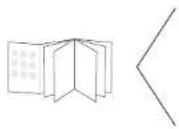
- Connect the appliance to a power source. Unused cable can be stored in the base of the appliance ①.
- All appliances have been tested during production for perfect functioning. Therefore there may be for example water deposits remaining. Rinse the appliance twice with the maximum amount of water and without a filter bag or ground coffee, in order to clean it.
- For the best coffee enjoyment and convenient use, the appliance is equipped with various features. These features are explained below.
3. Set water hardness
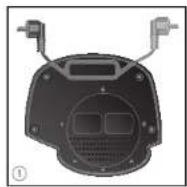
Depending on water hardness lime scale may build up in the appliance. This increases the appliance's energy consumption as lime scale on the heating element can prevent the water heating effectively. To avoid damage the appliance must be descaled regularly. The descaling display helps you in this. If the CALC-button ② is permanently lit this shows that the appliance needs to be descaled.
The appliance is pre-set for a high level of water hardness (level 4). You can find out the level of water hardness in your area by asking your local water provider or by using water hardness measuring strips available in the shops. For softer water the descaling display can be adjusted to descale less often:
- Hold down the CALC button ② for longer than 2 seconds. The CALC button starts to flash. In the factory settings the CALC button flashes briefly four times with the following pauses ....
- You can set the water hardness at three further levels. Each time you briefly press the CALC button ② the display changes to flashing one, two or three times, each time followed by a pause ( , , , , ).
- The settings and display are shown in the following table 1.
- Once you have set the desired hardness level, again hold the CALC button ② down for longer than two seconds. The light goes off and your settings are saved.
Please note:
• Water hardness cannot be programmed while brewing.
- The last water hardness level chosen remains even after removing the power cable.
4. Making coffee
- Ensure that the appliance is connected to the power source.
- Fill the water tank.
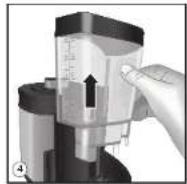
- Remove the detachable water tank by holding the recessed grip and pulling straight up ④.
- Remove the water tank lid and fill with the desired amount of fresh water from the tap. Using the water level indicator on the tank you an choose the correct number of cups.
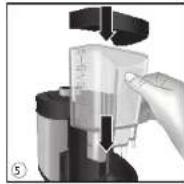
- Close the tank by replacing the lid and insert the tank back in the appliance. Please ensure that you replace the tank upright in the appliance. The guide rails on the appliance (left of the tank) will help you with this ⑤.
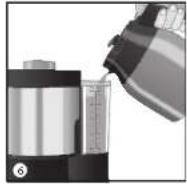
- Alternatively use the therm jug to pour the water into the tank in the appliance ⑥. The required amount of water can be seen on the water level indicator on the tank.
Small cup symbol = approx. 85 ml coffee per cup, large cup symbol = approx. 125 ml coffee per cup. - Close the lid on the water tank and place the therm
jug with closed lid in the appliance.
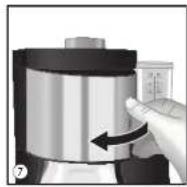
- Open the swing filter ⑦ to the left.
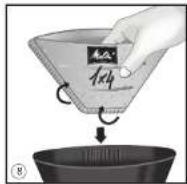
- Fold a Melitta® filter bag 1x4® at the embossed seam and place it in the filter holder ⑧. Press the filter bag into the filter holder by hand, to ensure a good fit.
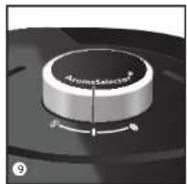
- Put the ground coffee into the coffee filter. We recommend using 6 g of coffee per large cup at a medium setting of the AromaSelector® ⑨.
- Alternatively, you can vary the taste of the coffee according to your personal preference using the same quantity of coffee. For a milder coffee, turn the AromaSelector® to the left (💡). For a stronger coffee, turn it to the right (💡).
- Swing the filter back into the appliance. An audible click tells you it is inserted properly.
- Turn the appliance on ③. Brewing begins.
- The appliance turns off automatically short after brewing. This avoids unnecessary use of electricity and saves energy. You can of course turn the machine off manually at any time.
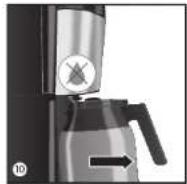
- The drip stop prevents your coffee from dripping, when you remove the pot from the appliance ⑩.
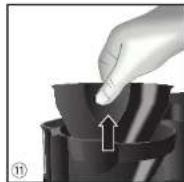
- With the help of the detachable inner ⑪ filter you can dispose of the filter bag simply and easily.
5. Using the therm jug
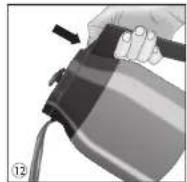
- The brewed coffee flows through the central valve in the insulated lid of the pot.
• To pour coffee press down on the sealing lever ⑫. - Remove the lid simply by pressing the seals on the side while lifting the lid up ⑬.
6. Cleaning and maintenance
External cleaning
- Switch off the machine before cleaning and disconnect the power cable.
- Allow the appliance to cool completely before cleaning it.
- Clean the parts that come into contact with coffee (jug, filter holder, etc.) after each use.
• The housing can be cleaned with a soft damp cloth. - The jug lid, the filter insert and the swing filter ⑪ can be washed in the dishwasher.
- Do not use harsh or abrasive cleaning agents.
Descaling
The CALC button ② lights up again if the appliance has been turned off without descaling. The CALC button will go off again only after the descaling programme has been completely finished. Based on the water hardness level you have set (see point 3) the descaling programme should be run promptly after the CALC button ② lights up.
- Follow the manufacturers instructions regarding amounts and pour the descaler into the water tank. We recommend using Melitta® „Anti Calc Liquid for Filter Coffee & Aqua Machines“.
- Briefly press the CALC button ②, it will start to flash.
- The descaling process will now run automatically. To remove even stubborn limescale the descaling process takes 25 minutes.
- Attention: Only by carrying out the descaling process completely will all limescale deposits be removed and the light on the CALC button will go off. The descaling process should therefore not be interrupted before it has run for the full 25 minutes.
- When the descaling process is completed the light on the CALC button will go off. The appliance will turn off automatically.
- At the end of the descaling process, the appliance should be rinsed twice through, using the maximum amount of water without coffee. This will remove any remaining limescale deposits.
7. Notes on disposal
- Appliances labelled with this symbol are subject to European guidelines for WEEE (Waste Electrical and Electronic Equipment.
- Electric appliances do not go in the household bin. Dispose of the appliance in an environmentally friendly way using suitable collection systems.
- Packaging materials are raw materials and can be recycled. Please recycle them.
Cher client, chère cliente,
WEEE (Waste Electrical and Electronic Equipment).

Brand : MELITTA
Model : Look Therm Perfection
Category : Coffee machine