USER MANUAL FCXE825VXE CANDY
- During cooking, moisture may condense inside the oven cavity or on the glass of the door. This is a normal condition. To reduce this effect, wait 10-15 minutes after turning on the power before putting food inside the oven. In any case, the condensation disappears when the oven reaches the cooking temperature.
Cook the vegetables in a container with a lid instead of an open tray.
- Avoid leaving food inside the oven after cooking for more than 15/20 minutes.
- WARNING: the appliance and accessible parts become hot during use. Be careful not to touch any hot parts.
- WARNING: the accessible parts can become hot when the oven is in use. Children must be kept at a safe distance.
- WARNING: ensure that the appliance is switched off before replacing the bulb, to avoid the possibility of electric shocks.
- WARNING: before initiating the automatic cleaning cycle:
- Clean the oven door;
- Remove large or coarse food residues from the inside of the oven using a damp sponge. Do not use detergents;
- Remove all accessories and the sliding rack kit (where present);
- Do not place tea towels
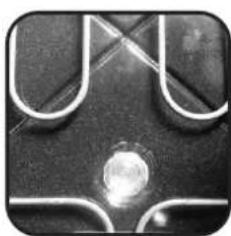
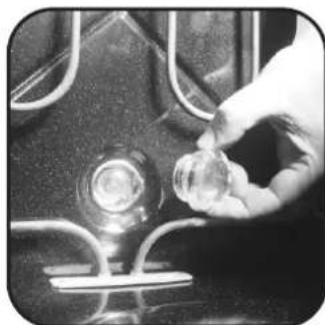
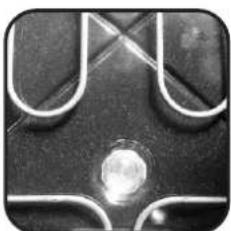
- In ovens with meat probe it is necessary, before making the cleaning cycle, close the hole with the nut provided. Always close the hole with the nut when the meat probe is not used.
Children under 8 must be kept at a safe distance from the appliance if not continuously supervised.
- Children must not play with the appliance. The appliance can be used by those aged 8 or over and by those with limited physical, sensorial or mental capacities, without experience or knowledge of the product, only if supervised or provided with instruction as to the operation of the appliance, in a safe way with awareness of the possible risks.
- Cleaning and maintenance should not be carried out by unsupervised children.
- Do not use rough or abrasive materials or sharp metal scrapers to clean the oven door glasses, as they can scratch the surface and cause the glass to shatter.
- The oven must be switched off before removing the removable parts and, after cleaning, reassemble them according the instructions.
- Only use the meat probe recommended for this oven.
- Do not use a steam cleaner for cleaning operations.
- Connect a plug to the supply cable that is able to bear the voltage, current and load indicated on the tag and having the earth contact. The socket must be suitable for the load indicated on the tag and must be having the earth contact connected and in operation. The earth conductor is yellow-green in colour. This operation should be carried out by a suitably qualified professional. In case of incompatibility between the socket and the appliance plug, ask a qualified electrician to substitute the socket with another suitable type. The plug and the socket must be conformed to the current norms of the installation country. Connection to the power source can also be made by placing an omnipolar breaker between the appliance and the power source that can bear the maximum connected load and that is in line with current legislation. The yellow-green earth cable should not be interrupted by the breaker. The socket or omnipolar breaker used for the connection should be easily accessible when the appliance is installed.
- The disconnection may be achieved by having the plug accessible or by incorporating a switch in the fixed wiring in accordance with the wiring rules.
- If the power cable is damaged, it must be substituted with a cable or special bundle available from the manufacturer or by contacting the customer service department.
The type of power cable must be H05V2V2-F.
- Failure to comply with the above can compromise the safety of the appliance and invalidate the guarantee
- Any excess of spilled material should be removed before cleaning.
- During the pyrolytic cleaning process, surfaces can heat up more than usual, children must therefore be kept at a safe distance.
- The appliance must not be installed behind a decorative door in order to avoid overheating.
- When you place the shelf inside, make sure that the stop is directed upwards and in the back of the cavity. The shelf must be inserted completely into the cavity
- WARNING: Do not line the oven walls with aluminum foil or single-use protection available from stores. Aluminum foil or any other protection, in direct contact with the hot enamel, risk melting and deteriorating the enamel of the insides.
- WARNING: Never remove the oven door seal.
- No additional operation/setting is required in order to operate the appliance at the rated frequencies.
Safety Instructions
4
- General warnings
1.1 Declaration of compliance
1.2 Safety hints
1.3 Recommendations
1.4 Installation
1.5 Electrical connection
Accessories
5
2.1 Oven equipment
2.2 Rotisserie
2.3 U-SEE
2.4 Removing and cleaning wire racks
Cleaning the oven
6
Description of the display
7
4.1 Before using the oven for the first time
4.2 Using the end of cooking timer
4.3 Setting The Correct Time
4.4 Use Of Touch Control Clock Programmer
4.5 How to use the oven
4.6 Cooking tips
Service centre
9
1. GeneralWarnings
Read the instructions carefully to make the most of your oven. We recommend you keep the instructions for installation and use for later reference, and before installing the oven, note its serial number in case you need to get help from the after-sales service.
When you have unpacked the oven, make sure that it has not been damaged in any way. If you have any doubts at all, do not to use it. Contact a professionally qualified person. Keep packing materials such as plastic bags, polystyrene, or nails out of the reach of children because they are dangerous to children.
The company shall not be liable if the instructions provided in this document are not complied with.
! NOTE: Functions, properties and accessories of ovens which are mentioned in this manual, can be change depending on oven models.
1.1 Declaration of Compliance
By placing the C mark on this product, we are confirming compliance to all relevant European safety, health and environmental requirements which are applicable in legislation for this product.
1.2 Safety Hints
- The oven must be used only for the purpose for which it was designed. It must only be used for cooking food. Any other use, e.g. as a form of heating, is an improper use of the oven and is therefore dangerous.
The manufacturers cannot be held responsible for any damage caused by improper, incorrect or unreasonable use.
When using any electrical appliance you must follow a few basic rules.
- Do not pull on the power cable to remove the plug from the socket.
- Do not touch the oven with wet or damp hands or feet.
- Do not use the oven unless you are wearing something on your feet.
- It is not generally a good idea to use adapters, multiple sockets for several plugs or cable extensions.
- If the oven breaks down or develops a fault switch it off at the mains and do not touch it.
- If the cable is damaged it must be replaced promptly.
When replacing the cable, follow these instructions.
Remove the power cable and replace it with one of the H05VV-F type. The cable must be able to bear the electrical current required by the oven.Cable replacement must be carried out by properly qualified technicians.
The earthing cable (yellow-green) must be 10mm longer than the power cable.
Use only an approved service centre for repairs and ensure that only original parts are used. If the above instructions are not adhered to the manufacturers cannot guarantee the safety of the oven.
The oven you have just acquired has the described technical characteristics and you must not make any modifications to it.
- Do not store flammable products in the oven; they can catch fire if the oven comes on accidentally.
- Do not press on and do not let children sit on the oven door.
- Use kitchen oven gloves, when putting into or removing a dish from the oven.
1.3 Recommendations
- After each use of the oven, a minimum of cleaning will help keep the oven perfectly clean.
- Do not line the oven walls with aluminium foil or single-use protection available from stores. Aluminium foil or any other protection, in direct contact with the hot enamel, risks melting and deteriorating the enamel of the insides.
- In order to prevent excessive dirtying of your oven and the resulting strong smokey smells, we recommend not using the oven at very high temperature. It is better to extend the cooking time and lower the temperature a little.
Identification plate
In addition to the
accessories supplied with the oven, we advise you only use dishes and baking moulds resistant to very high Temperatures.
1.4 Installation
The manufacturers have no obligation to carry this out. If the assistance of the manufacturer is required to rectify faults arising from incorrect installation, this assistance is not covered by the guarantee. The installation instructions for professionally qualified personnel must be followed. Incorrect installation may cause harm or injury to people, animals or belongings. The manufacturer cannot be held responsible for such harm or injury.
The kitchen unit in which the oven is to be fitted must be made of material resistant to temperatures of at least 70^ .
The oven can be located high in a column or under a worktop. Before fixing, you must ensure good ventilation in the oven space to allow proper circulation of the fresh air required for cooling and protecting the internal parts. Make the openings specified on last page according to the type of fitting.
1.5 Electrical Connection
THE ELECTRICAL CONNECTION SHOULD BE CARRIED OUT BY AN APPROVED CONTRACTOR OR TECHNICIAN WITH SIMILAR QUALIFICATIONS.
The installation receiving the appliance must comply with the standard in force in the installation country.
The manufacturer does not accept any responsibility if this provision is not complied with.
Connection to the network must be by earthed socket outlet, or by means of a multipole circuit-breaker, in compliance with the installation country.
The installation must be protected by suitable fuses, and have wires with a large enough cross-section to supply the oven normally.
CONNECTION:
The oven is fitted with a power lead for connecting exclusively to a voltage of 220-240 V AC across the phases or across phase and neutral.
Connection must be carried out having first checked:
-the supply voltage indicated on the meter,
The lead protection wire (green/yellow) connected to the earth terminal of the oven must be connected to the earth terminal of the installation.
Caution:
- Have the earth continuity of the installation checked by an electrician before making the connection.
The manufacturer will not be liable for any incident, or the possible consequences that may arise from the use of the oven not earthed, or connected to an earth with defective continuity.
NB: Do not forget that the oven may require after-sales service. Also, locate the socket outlet so that the oven can be connected once it is removed from its space.
Power supply cable: If the power supply cable has to be changed, please have this done by the after-sales service or by someone with similar qualifications.

2. Accessories (According To Model)
2.1 Oven Equipment 2.3
(According To Model)U·S∈E
It is necessary to do an initial cleaning of the equipment before the first use of each of them. Wash them with a sponge. Rinse and dry off.
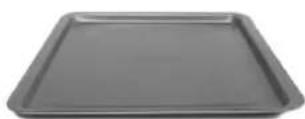
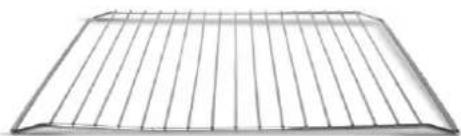
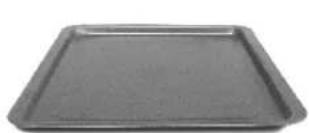
The shelf can take moulds and dishes.

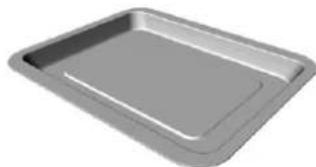
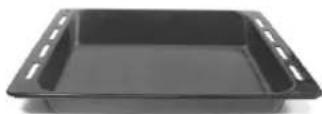
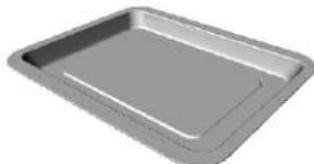
The drip tray catches the juices from grilled foods.
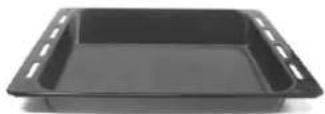

Never use he drip tray as a roasting tray as fat deposits can be quickly spread throughout the oven, which produces excess smoke. Never place the drip tray directly on the oven bottom.
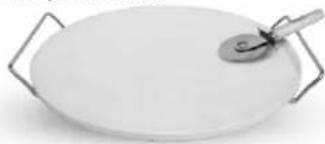
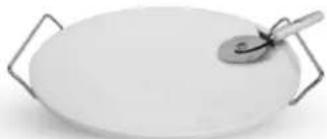
The pizza stone for a risper pizza equipped according to the model with its stand and the pizza roller.
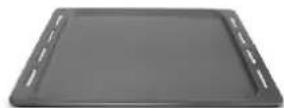
The pastry tray must be placed on the shelf. It is for cooking small pastries like choux, biscuits, meringues, etc... Never place the pastry tray directly on the oven bottom.
Lateral wire grid if included.
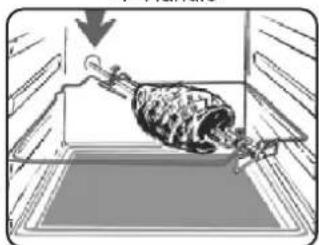
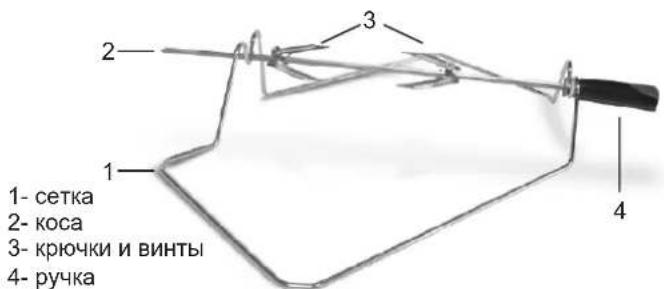
2.2.Rotisserie
No pre-heating is required for rotisserie cooking. Cooking with the door closed. The energy consumption is 90 - 95% less than traditional system.
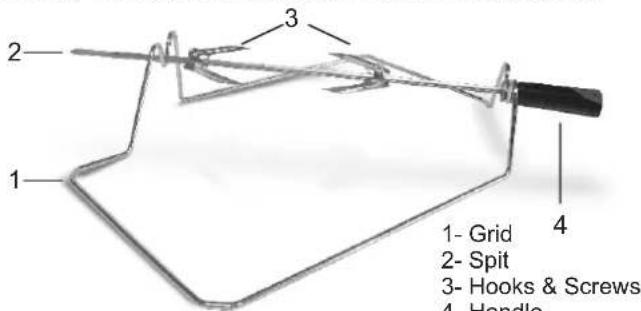
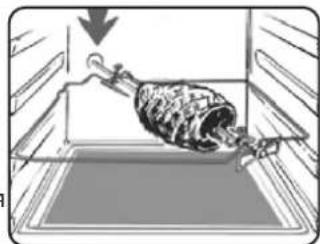
HOW TO USE TURNSPIT
- Unscrew the hooks
- Put the spit into the meat
- Fix the meat with the hooks
- Tighten the screws
- Insert the spit into the motor hole
- The handle
When the oven is in use, any unused accessories should be removed from the oven.
Is an illumination system which replaces the traditional « light bulb ». 14 LED lights are integrated within the door. These produce white high quality illumination which enables to view the inside of the oven with clarity without any shadows on all the shelves.
Advantages :
U·seeSystem, besides providing excellent illumination inside the oven, lasts longer than the traditional light bulb its easier and to maintain and most of all saves energy.
Optimum view
- Long life illumination
- Very low energy consumption, -95% in comparison with the traditional illumination High
"Appliance with white light LED of the 1M Class according to IEC 60825-1:1993 + A1:1997 + A2:2001 (equivalent to EN 60825-1:1994 + A1:2002 + A2:2001); the maximum light power emitted 459nm < 150uW.
Not observed directly with optical instruments.
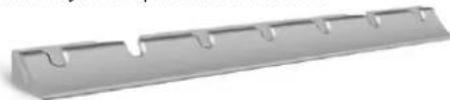
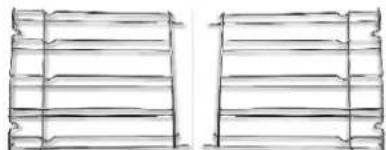
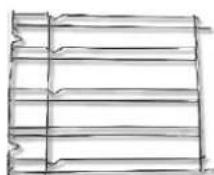
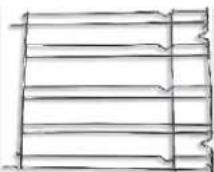
2.4 Removing And Cleaning Wire Racks
1- Remove the wire racks by pulling them in the direction of the arrows (see below)
2- To clean the wire racks either put them in the dishwasher or use a wet sponge, ensuring that they are dried afterwards.
3- After the cleaning process install the wire racks in reverse order.
3. Cleaning The Oven
- Wait for the oven to cool down before doing any cleaning by hand.
- Never clean your oven with abrasive cleaners, wire wool or sharp objects, or the enamel may be damaged beyond repair.
- Only use soapy water or bleach (ammonia) cleaners.
- Never line the oven sides with aluminium foil.
GLASS PARTS
We recommend you wipe clean the glass door with absorbent kitchen paper every time you use the oven. If the spattering is heavy, then you can clean with a well squeezed sponge and detergent, and rinse. Do not use harsh abrasive cleaners or sharp metal scrapers to clean the oven door glass since they can scratch the surface, which may result in shattering of the glass.
OVENDOOR SEAL
If this gets dirty, clean the oven seal with a slightly damp sponge.
ACCESSIONS
Clean them with a sponge soaked in soapy water. Rinse with clean water and dry off. Avoid abrasive cleaners.
DRIP TRAY
After grilling, remove the drip tray from the oven. Take care to pour the warm grease into a container. Wash and rinse the drip tray in hot water with a sponge soaked in washing up liquid. If residues remain attached, soak them off in water and detergent. It can also go in a dishwasher or be cleaned with a commercial oven cleaner.
Never place a soiled drip tray in the oven.
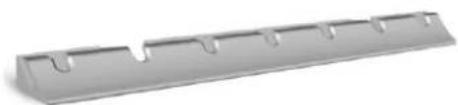
Self-cleaning Oven With Catalytic
Special self-cleaning panels covered in a micro-porous coating are available as optional extras for all models. If they are fitted, the oven no longer needs to be cleaned by hand.
The fat that is splattered onto the sides of the oven during roasting is eliminated by the microporous coating which breaks the fat down by catalysis and transforms it into gas.
Excessive splattering may nevertheless block the pores and therefore hinder self-cleaning. The self-cleaning capacity may be restored by switching on the empty oven to maximum for about 10-20 minutes. Do not use abrasive products, metal cleaning wads, sharp objects, rough cloths, or chemical products and detergents that may permanently damage the catalytic lining.
It is a good idea to use deep roasting trays to roast fatty foods such as joints of meat etc. and to put a tray underneath the grill to catch surplus fat. If the walls of the oven are so thickly coated in grease that the catalytic lining is no longer effective remove surplus grease with a soft cloth or sponge soaked in hot water.
The lining must be porous for self-cleaning to be effective.
N.B.: All catalytic linings currently on the market have a working life of about 300 hours. They should therefore be replaced after about 300 hours.
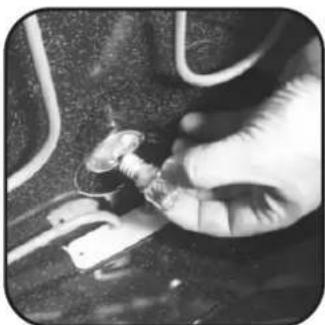
OVEN LIGHTING (According To Model)
Disconnect the power supply from the oven before cleaning or replacing the lamp.
The bulb and its cover are made of material resistant to high temperatures.
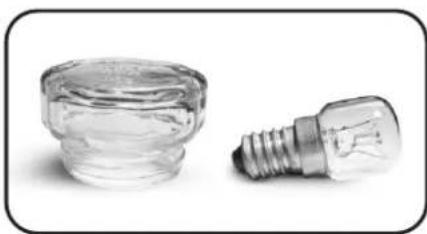
Bulb characteristics:
230 V AC - 25W-E 14 base Temperature 300^ to change a defective bulb, just:
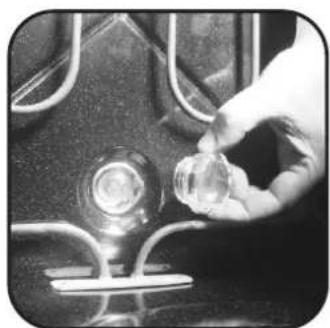
- Unscrew the glass cover,
-Unscrew the bulb,
-Replace it with the same type: see characteristics above,
After replacing the defective bulb, screw back the protective glass cover.
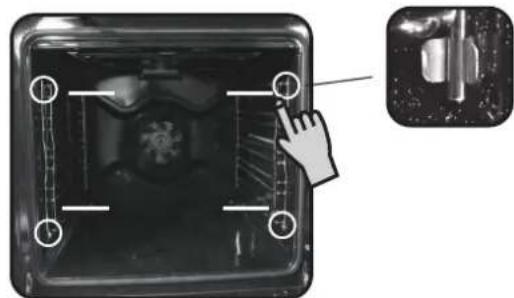
CLEANING THE DOOR GLASS
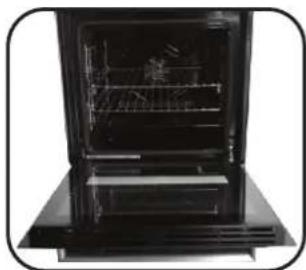
Internal door glass of this oven can be removed and cleaned. In order to clean the internal glass follow these instructions;
- Open the door of the oven. (Picture1)
Picture 2
Picture 1
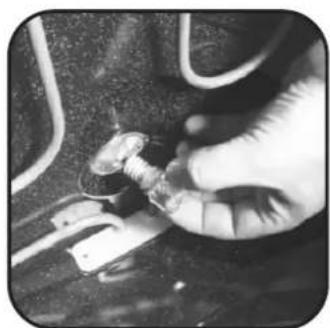
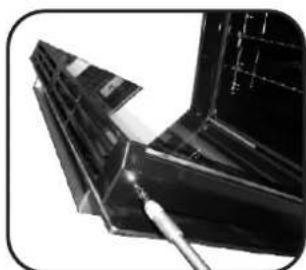
- Remove the screws as shown in Picture (Picture 3)

Picture 4
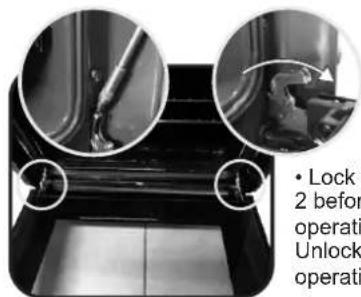
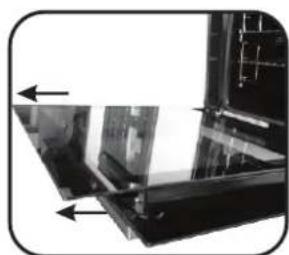
The hinges as shown in Picture 1 are starting the cleaning operation.
Unlock the hinges when the cleaning operation is finished. (Picture 2)
Picture 3
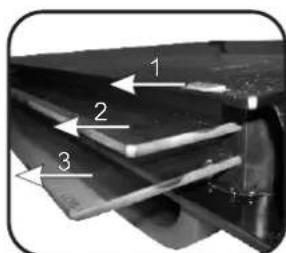
- Remove the top metallic cover by pulling it upwards. (Picture 4)
Picture 5
- Remove the glass by gently pulling it out of the door frame (Picture 5)
Picture 6
*For Pyrolytic ovens, please remove also 2nd and 3 glasses. (Picture 6)
After cleaning the glass reassemble the parts in the reverse order of removal.
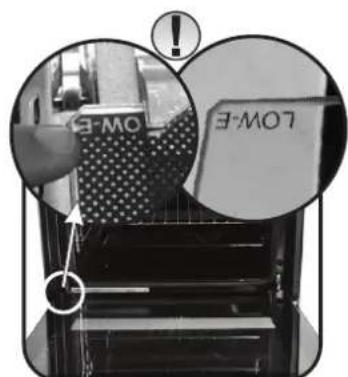
- ON ALL GLASES LOW-E sign must be properly readable and must be positioned on the left corner of the door, close to the left side hinge. In this way the printed surface of the 1^st glass will remain INSIDE the door.
Picture 7
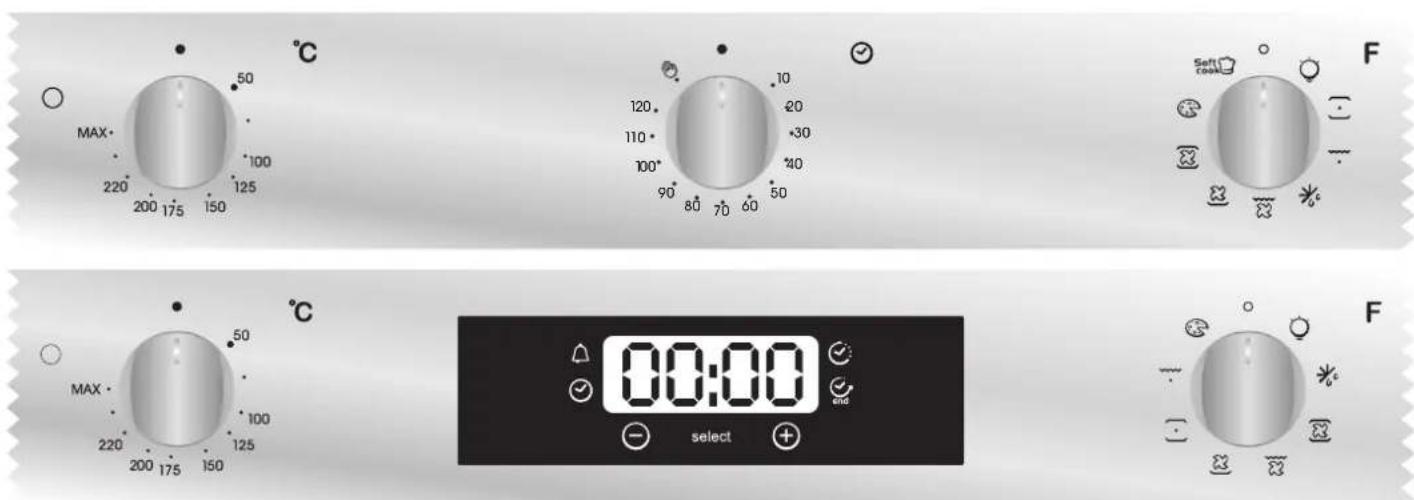
4. Description Of The Display (According To Model)
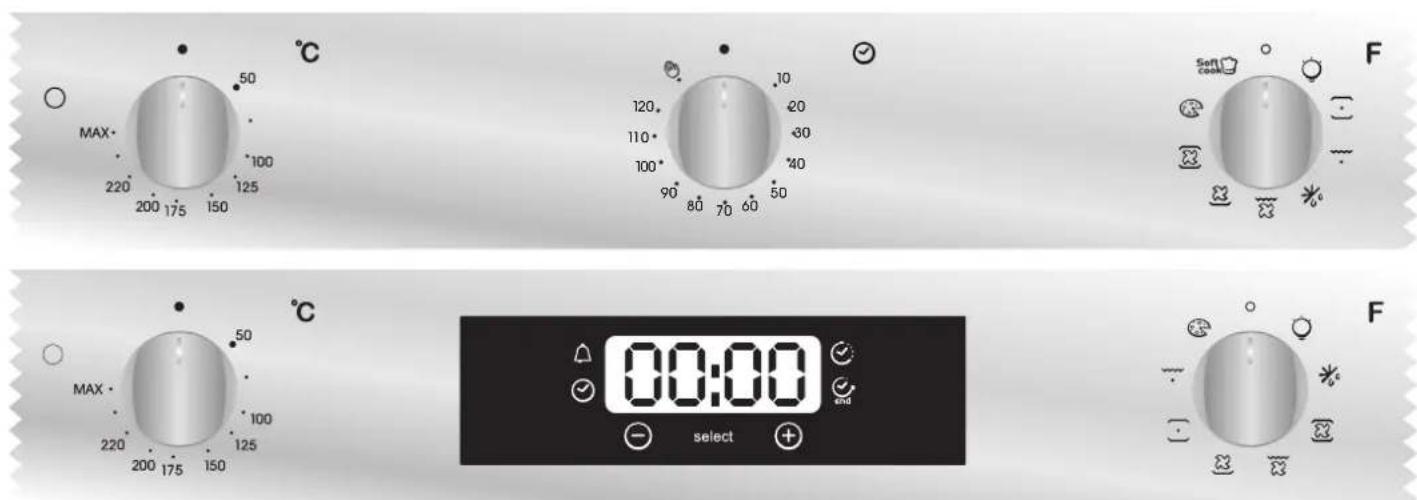
4.1 Before Using The Oven For The First Time 4.2 Using The End Of Cooking Timer
PRELIMINARY CLEANING
Clean the oven before using for the first time:
-Wipe over external surfaces with a damp soft cloth.
-Wash all accessories and wipe inside the oven with a solution of hot water and washing up liquid.
-Set the empty oven to the maximum temperature and leave on for about 1 hour, this will remove any lingering smells of newness. Ensure that the room is well ventilated while this is being done.
- THINGS TO REMEMBER
Confirmation of operation on timer
Modification must be confirmed by pressing the button.
Stopping the oven:
This may be necessary if you have input an incorrect instruction.
To stop the oven .... turn back the function selector knob to the Stop Position.
The cooling fan :
This protects the control panel and electronics from heat damage.
It begins and then stops automatically even when the oven is switched off.
Oven lighting :
By turning to the light symbol, you can switch on the oven light when it is not in use.
When the oven is in use, the light stays on during all of the oven functions and when the door is opened.
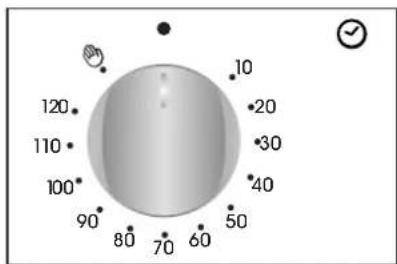
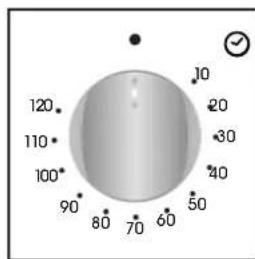
This control enables to set the desired cooking time (max. 120 min.) the oven will automatically switch off at the end of the set time.
The timer will count down from the set time return to the O position and switch off automatically.
For normal use of oven set the timer to the position.
To set the oven ensure the timer is not on the O position.
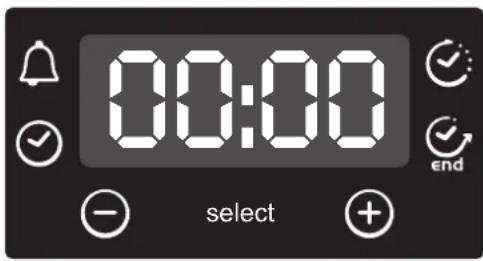
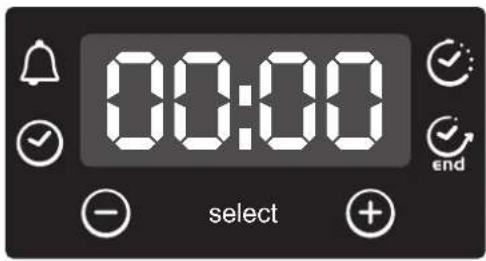
WARNING: the first operation to carry out after the oven has been installed or following the interruption of power supply (this is recognizable the display pulsating and showing 12:00) is setting the correct time. This is achieved as follows.
-Push the central button 4 times
-Set time with"-"+"+” buttons.
- Release all buttons.
ATTENTION: The oven will only operate providing the clock is set.
4.4 Use Of Touch Control Clock Programmer
| FUNCTION | HOW TO ACTIVATE IT | HOW TO SWITCH ITOFF | WHAT IT DOES WHAT | IT IS FOR |
| KEY LOCK | ·Child Lock function is activated by touching Set (+) for a minimum of 5 seconds. From this moment on all other function are locked and the display will flash STOP and preset time intermittently. | ·Child Lock function is deactivated by touching touchpad Set (+) again for a minimum of 5 seconds. From this moment on all functions are selectable again. | | |
| MINUTE MINDER | ·Push the central button 1 times
·Press the buttons "-" "+" to set the required time
·Release all the buttons | ·When the set time as elapsed an audible alarm is activated (this alarm will stop on its own, however it can be stopped immediately by pressing the button) SELECT. | ·Sounds an alarm at the end of the set time.
·During the process, the display shows the remaining time. | ·Allows to use the oven as alarm clock (could be activated either with operating the oven or with out operating the oven) |
| COOKING TIME | ·Push the central button 2 times
·Press the buttons "-" or "+" to set the lenght of cooking required
·Release all buttons
·Set the cooking function with the oven function selector | ·When the time is elapsed the oven will switch off automatically. Should you wish to stop cooking earlier either turn the function selector to 0, or set time to 0:00 (SELECT and "-" "+" buttons) | ·It allows to preset the cooking time required for the recipe chosen.
·To check how long is left to run press the SELECT button 2 Times.
·To alter/change the preset time press SELECT and "-" "+" buttons. | ·Push any button to stop the signal. Push the central button to return to the clock function |
| END OF COOKING END | ·Push the central button 3 times ·Press the buttons "-" "+" to set the time at which you wish the oven to switch off
·Release the buttons
·Set the cooking function with the oven function selector | ·At the time set, the oven will switch off. To switch off manually, turn the oven function selector to position O. | ·Enables you to set the end of cooking time
·To check the preset time push the central button 3 times
·To modify the preset time press buttons SELECT + "-" "+" | ·This function is typically used with "cooking time" function. For example if the dish has to be cooked for 45 minutes and needs to be ready by 12:30, simply select the required function, set the cooking time to 45 minutes and the end of cooking time to 12:30.
·At the end of the cooking set time, the oven will switch off automatically and an audible alarm will ring.
·Cooking will start automatically at 11:45 (12:30 minus 45 mins) and will continue until the pre-set end-of-cooking-time, when the oven will switch itself off automatically.
WARNING.
If the END of cooking is selected without setting the length of cooking time, the oven will start cooking immediately and it will stop at the END of cooking time set. |
COOKING MODE
All cooking should be carried out with the door closed.
BORTHOM + FAN - The combination of the bottom heating element and fan is ideal for fruit flans, tarts, quiches and pastries. It prevents food from becoming too dry and encourages bread dough to rise. Place the shelf in the bottom position in the oven.
- BOTTOM - Using the lower element. Ideal for cooking all pastry based dishes. Use this for flans, quiches, tarts, pâté and any cooking that needs more heat from below.
*Bottom ^+ TOP - Both top and bottom heating elements are in use. This method is ideal for all traditional roasting and baking.When cooking red meat, roast beef, leg of lamb, game, bread or foil wrapped foods.
3^* BOTTOM ^+ TOP ^+ FAN - Both top and bottom heating elements are used in conjunction with the fan, which circulates hot air throughout the oven. We recommend this method for poultry, pastries, fish and vegetables. By using this method better heat penetration is achieved and cooking and preheating times are also reduced. The fan cooking option allows you to cook different foods together at different positions in the oven all at the same time, providing even heat distribution but without the risk of mingling tastes and smells. When cooking different foods at the same time allow a further 10 minutes.
CIRCULAR HEATING ELEMENT + FAN - Air that has been heated is blown by the fan onto the different levels. It is ideal for cooking different types of food at the same time (e.g. Meet and fish) without mixing tastes and smell. It cooks very gently and is ideal for sponge cakes, pastries, etc.
GRILL - Using the top heating element. Success is guaranteed for mixed grills, kebabs and gratin dishes. The grill should be pre-heated to a high temperature for 5 minutes. White meats should always be placed at some distance from the grill element, the cooking time is slightly longer but the meat will be more succulent. Red meat and fish fillets can be placed directly onto the shelf with the drip tray placed beneath on lower shelf position.
GRILL + FAN - The top heating element is used in conjunction with the fan which circulates the hot air around the oven. Pre heating is recommended for red meats but is not necessary for white meats. Grilling is ideal for cooking thicker food items such as pork or poultry. Food to be grilled should be placed directly at the centre of the middle shelf.
By sliding the drip tray underneath the shelf it will ensure that any juices are collected. For best results always make sure that the food is not too close to the grill element and turn the food over half way through the cooking time.
GRILL + TURNSPIT + FAN - The advantage of using the top oven element at the same time as the fan and rotisserie is that the food is evenly cooked, preventing it from becoming dry and tasteless. The rotisserie is programmed to continue rotating for approximately five minutes after cooking, making full use of the residual oven heat. No preheating is required for rotisserie cooking.
DEFROST - When the dial is set to this position. The fan circulates hot air around the frozen food so that it defrosts in a few minutes without the protein content of the food being changed or altered.
The temperature is preset in 40^ constant, no regulation is possible.
REEP WARM - This is recommended to reheat precooked foodstuff, positioning the shelf on the second level from top, or to defrost bread pizza or pastry by positioning the shelf on the lower level. The temperature is preset in 60^ constant, no regulation is possible.
ZZA - With this function hot air circulated in the oven to ensure perfect result for dishes such as pizza or cake.
COOK - Soft cook is the function for the confectionery and the bread. Thanks to its reduced fan speed, this function increases oven internal damp. The increased damp creates the ideal conditions of cooking for those foods that need to maintain an elastic consistence while they are cooking (ex. cakes, bread, biscuits) avoiding surface breakages.
- Tested in accordance with the CENELEC EN 60350-1 used for definition of energy class.
4.6 Cooking Tips
It is better not to salt meats until after cooking as salt encourages the meat to spatter fat. This will dirty the oven and make a lot of smoke.
Joints of white meat, pork, veal, lamb and fish can be put into the oven cold. The cooking time is longer than in a preheated oven, but it cooks through to the centre better as the heat has more time to penetrate the joint.
Correct preheating is the basis of successful red meat cookery.
GRILLS
- Before loading the grill:
- Remove the meat from the refrigerator a few hours before grilling. Lay it on several layers of kitchen paper. This improves seizing, making it tastier and avoids it staying cold at the centre.
Add pepper and spices to the meat before grilling, but add any salt after cooking. This way it will seize better and stay juicy. Baste all the food to be cooked with a little oil. This is best done with a wide flat basting brush. Then sprinkle with more pepper and herbs (thyme, etc.).
Never pierce the food during cooking even when you turn it. This lets the juice out and it becomes dry.
BAKING
Avoid using shiny tins, they reflect the heat and can spoil your cakes. If your cakes brown too quickly, cover them with greaseproof paper or aluminium foil.
Caution: The correct way to use foil is with the shiny side in towards the cake. If not the heat is reflected by the shiny surface and does not penetrate the food.
Avoid opening the door during the first 20 to 25 minutes of cooking: Souffles, brioches, sponge cakes, etc. will tend to fall. You can check if cakes are done by pricking the centre with a knife blade or metal knitting needle. If the blade comes out nice and dry, your cake is ready and you can stop cooking. If the blade comes out moist or with bits of cake attached, continue baking but slightly lower the thermostat so that it is finished off without burning.
5. Service Centre
Before calling the Service Centre.
If the oven is not working, we recommend that:
-
Check that, if the oven is properly plugged into the power supply. If the cause of the fault cannot be detected:
-
Disconnect the oven from the mains, do not touch the oven and call the after sales service.
Before calling the Service Centre remember to make a note of the serial number on the serial number specifications plate.
The oven is supplied with a guarantee certificate that ensures that it will be repaired free of charge by the Service Centre whilst under guarantee.

This appliance is marked according to the European directive 2012/19/EU on Waste Electrical and Electronic Equipment (WEEE). WEEE contains both polluting substances (which can cause negative consequences for the environment) and basic components (which can be reused). It is important to have WEEE subjected to specific treatments, in order to remove and dispose properly all pollutants, and recover and recycle all materials.
Individuals can play an important role in ensuring that WEEE does not become an environmental issue; it is essential to follow some basic rules:
WEEE shall not be treated as household waste.
-
WEEE shall be handed over to the relevant collection points managed by the municipality or by registered companies. In many countries, for large WEEE, home collection could be present.
-
When you buy a new appliance, the old one may be returned to the retailer who has to collect it free of charge on a one-to-one basis, as long as the equipment is of equivalent type and has the same functions as the supplied equipment.
ENERGY SAVING AND RESPECTING THE ENVIRONMENT
Where possible, avoid pre-heating the oven and always try to fill it. Open the oven door as infrequently as possible, because heat from the cavity disperses every time it is opened. For a significant energy saving, switch off the oven between 5 and 10 minutes before the planned end of the cooking time, and use the residual heat that the oven continues to generate. Keep the seals clean and in order, to avoid any heat dispersal outside of the cavity. If you have an electric contract with an hourly tariff, the "delayed cooking" programme makes energy saving more simple, moving the cooking process to start at the reduced tariff time slot.
2.3 U·S∈E (A SECONDA DEI MODELLI)

m = 311 ;
1.2 MEPbI INPEIOCTOPOXHOCTN
-Духовka DoJIXHа ИСоьТБОВТСТОЛБКО NO ee ПяМOMу
НЗЧАУЕНИК,TOECTB,TOTBJKOДЯ ПИРТОВЛЕNHЯ ПИSU.ПЮБLE
Дургп Климен� Духовки,НарпUMер,ИСоьТБОВHAнe ee ДЯ
богра经 NOMeUeHЯ,ЗANpeUaHOTc,ТAK KAK OHI YBJIYOTc
ОпАСыIMN.
-ПОНБОДNTЕЛь He HeceT OTBETCTBeHHOCt b3 KaKHe-JIN60 NOBpeXJdHnR, BbI3BaHHbIe HeIpaBUNbHbIM NcIOJIb3OBaHnEM dYxOBKn IINN He6peXhblm ObaIeHNem C Hei.
Pnncno30BaHm 3neKtpnp6opOB cneyet co6nOdaTb Cneyuoune OCHOBhIe npaBnA texHKn 6e3OnaCHOCTN:
Pn n3BneHm BNkK Ka6eN nTaHn N3 3NeKtpuecko pO3ETKn Cnydyet DePKaTbCra 3a BNky, a He 3a cAm Ka6eJb. He npKaacaiTeCb K dyXOBKe MOKpbIMn IJI BnaXHBIMn pyKaAMn IIN HORAMN.
He noIb3yIteCb dYxOBKo, ecn Ha BaInx Horax HET o6yBN. He noIb3yIteCb nepExoDHNKamn, TpoHKNAMN N/INyUdINHHTeBhIMN UHypAMN.
B cnyae noBpeKDeHnA DxyOBKn B pe3yIbTaTe ee nAeHnA nnNo dpyroon npuHne, BblKIOUHTe DxyOBKy, OTCoeDNHnTe Ka6JIbNITaHnO T3NeKTPOcETn H He DoTpaINBaNTecb Do DxyOBKn.
Bcnyae noBpeJxHnna Ka6eI nHTaHn ero Heo6xoHm0 3ameHtB doJIKhbIM o6pa3OM.
OToeHNHTe Ka6Bn 3aMeHInTe ero HObIM Ka6eJEM Tnna H05RR-F, H05VVF, Hnn H05V2V2-F. Ka6eJb DoJKeH NMeTb DOCTaTOUYHO Harpy3OHyIO CnOC6HOcTB, YTO6bl npOnyckaTb TOK, NOptpeBnEMy dYxOBKOi.
3aMeHa Ka6eIa DoJXHa BbINOJIHrTbcra KBaIIuΦnUpOBaHHbIM CneuaNCTOM.
PpOBo3a3eMJIeHn(JeITo-3eJIeHb)DOnJKeH 6bITb Ha 10 MM dnnHHe eocTaNbHbIX npOBoOB Ka6eI.
Дя Bынг HeHЯ peMOHTa NOJb3yItecb ycnyramn TOnbKO YTBepKdEHHORo cepBnCHORO ueHTpa, n npocneIte 3a TeM, YTO6bl NcNOb3OBaJIncb TOnbKO pIpMeHHbe 3anaChbIe qacTn. PnH Hec6bIOHeHN pINBeAeHHbIX BblSe Tpe6oBaHni np03BOIDTeH Me MoXET rApHaTnpOBaTb 6e3OaNCHOCb DyXOBKn. -He I3MeHЯrTe XapaKTepnCTIKu DyXOBKn NpyTEM BBeDeHnR B ee KOHCTpyKcuHO KaKx-JIb6 MOmΦnKaqun.
-He xpaHnTe B dyXOBKe rOpOue MaTePnAbI, TAK KaK npn ClyuHOM BKIOUeHmN DxyOBKn OHMOrT BOCnNaMeHtbcra.
-He pa3peaIte DeTAM caIITbCn Ha DBepCu yXOBKn nIN NOBNCATb He Hei.
-ПиЗларузkeВДухOBkyПИИИИЗВЛЧЕHENI3 Hee ПИИПОЛьзУТecb 3aUHTbIMNперчтам.
1.3 PEKOMEHDAUIN
- Iocne KaKJOrO nCnOJIb3OBAHnIaDyXOBKn BbINOJIHnIe Te ee NCTKy.
- He NOKpbIbAte BHyTpeHHHe NObepxHOCTn DyXOBKn aIOMMHNBEBO
ΦoJIbRou nDpyrIMN OAnHpa3OBBiIMN yNAKOBOuHBiIM MATEpHaJaAMNI KOTOpBle npOdaOTCB Xo3OcHTBeHHbIX Ma3aHnx. AIOMNHEBaB
ΦoJIbRa nIIN DpyroYnaKOBOuHBiIM MATEpHaI Prn KoTHAKTe C
ROPaYe 3MaIInPOBaHHoN NOBepxHOCTbO DyXOBKn MOKeT
PacIINaBtBCn IOBpeDHTB BHyTpeHHIOU 3MaIInPOBaHHyIO
NOBepxHOCTb DyXOBKn.
- Bo n36ExaHHe Ype3MePHoro 3aRpa3HeHnIaDyXOBKn bIeJeHnE
CnJIbHOro DblMa n 3aNaxOB He peKOMEHdyETcNcNoIb3OBAbT
dYxOBKy C oeyHb BbcOKoN TempehATypOn. JyUhe HEMHO
YMeHbShNTb TempehATpy N YbeJIuHTb BpEmr pnproTOBJeHn
TIuNi.
PacnopTna Ta6nUka
BIOONHeHnK IOCTABNREMbIM B KOMJIKeTc
npHaDnEKeHcTcMn peKomeHnyTeC nCnOJIb3OaTb TOnJIbKO TepMOCTOnyIOncSyU N TeP MoCTOn Kne FOPOMoCHN DnA BblNeuK.

1.4 YCTAHOBKA
OTBeTCTBHeHHOCt 3a yCTaHOBky DyXOBKn HeCet NOnb3OBeTeJIb. POnn3BOJNTeJIb He O6ra3AH BblNoHrAeY cTaHOBky 3NeKTpOpn6opa. EcnIOTpe6yeTc NOMoIb PmOn3BOJNTeJIa YcTaPAnHnE HncnPpABHOCTei, BblBaHHbIX HEnpaBnIbHO JycTAHOBKO, To 3a 3Ty pa6Ot BydET BbICTabIIe ChET, TAK KAK 3Ta pa6Ota He BXoHT B Ccpepy DeIcTBnIg rapaHTNI.
CneuHaNCT, BbIOJHraIoum yCTaHOBky DuxOBKn, DoJIKeH COJIHOATb INCTpyKUIN NO yCTaHOBKe. HenpaBnIBhAry CytAOHBKa MOKe HAnEChTb BPeD 3DOPOBbNo IIODe N KINBOTbIX, a TaKKe PInBEcTN K OnpYe IMyUeCTBa. POn3BOJNTb He HecET OTBeCTBeHHOCt 3a TaKHe Notepn.
MaTePnAJIbI, KOToPbIMN OTeJaHO NOpMeUeHne, B KOTOpOM yCTaHaBnIBaETCa DyXOBKa, DoJKNbI BblepKINBaTb TempePaTypy He Hnke 70^
DyXOBka MoKET yCTaHaBnBaTbCBA B BepxHei YacTN CToKN NIN PNO paOoey noBepxHocTbIO.
IpeNd TEM KAK 3aKpeNtB DyXOBky npOBePbTe, YTO B OTCKe, Ie yctHaHnBaEeTcayDyXOBka, o6ecneuBaEeTcHopMaIbHna CInpKyuIaNBO3dyA; 3TO Heo6xOAnMo DnO xOnJaXDeHnnyDyXOBKn H 3aunbl ee DetanepoT ne perepeBa. CdenaIte OTBepCTnra, NOKa3aHHbIe Ha NoCNeJeHne CTpaHnue DaHHoro pykoBoDCTBa, B COOTBeTCTBnC TINOM yCTaHOBKn.
1.5 NOДКПЮЧЕНЕ K ЗЛЕKTPOCETN
IIOKJIIOUHNE K 3JEKTPOCETIN DOJXHO BbIIOJIHRTbcR COTPYUDNIKOM YTBEPXKEHHORO CEPBNCHO UHTPA IIN CNIELNAJNTCTOM, IMEIOUIM COOTBETCTBYIOUYKBAINIΦIKALNIO.
IopKJIIOUeHne K 3JNEKTPOCeT N OJIXHO BbINOJIHrTBcB CootBeTCTBmC DeNCTByIOUcMM 3JNeKTpoTeXHnueCKMm IpaBnIaMn HOpMaMn.
IpoIN3BOJNTeH He HecET OTBeTCTBeHHOCTH 3a NOBpeXJeHnRA B03HNKUHe I3-3a TORO, YTO yCTaHOBKa 3JIeKTpOpnpbopa He 6blna BblIOJIHeHa B COOTBeTCTBm C npabUNAm N 3JIeKTpObe3OnaCHOCTn. DxyOBKa DoJXHa NODIKIOVAbC K PO3Etke, Ch6KeHHoN KOHTAKTOM 3a3emHeHnN, INN DOJXHa NODIKIOVAbC Yepe3 MHORONIOCHbY aBTOMaTNeCKH bIKNIQUaTeJIb, B COOTBeTCTBm C 3JIeKTPOTEXHueCKHMn PabUNaMn HOPMaMn, DeIcTBYIOUmm B CTpaHe, rDe BBIOJNHReTcYCTaHOBKa 3JIeKTpOpnpbopa.
Pn noKnHoueHN dyXOBK K 3neKTPoCeTn DOJKNbI nCNoB3OBAtbcra NoXoJaUne npedoxpaHnten N npoBoa aDocTaToHc6oBworo ceHn.
IPOKIIIOUHNEH:
DyXOBka ChabkeHa Ka6eHem NITaHn IINI NOKNOUeHn K 3JIeKTPocetn 230 B nepemeHHoro ToKa (MeKdy DByMaJn MEXky pa3oN HEnTpaJIbIo).
Pepei noKnIOueHnEM 3JIeKTPoPnpBopa K 3JIeKTPocetn npOBepbTe:
HanpajkeHnB3JIeKtpocEtN
TOK, npn KOtOpom Cpa6aTaBbAet ABTomAtuYeckn BbIKIouaTeNb PpOBoD 3aUHTHO 3a3EmHeHna (KeJTo-3eJIeHbI), NOcOeINHeHHb K KJIeMe 3a3EmHeHna dyXOBKn, DOnJxH 6bTb NOcOeINHeH K KOHTaKTy 3a3EmHeHna 3JeKTPOCeTN.
BHIMaHHe:
- Ppei nOdkHoueHnEM dYXOBKn IPOBepbTe OTCyTcTBne o6pbIBA B cEN 3aunTHoro 3aemHeHn.
-ПОНЗБОДТЕЛБ He HeCET OTBETCTBEHHOCTHa NOBPEKDEHnI HeCCHACTHbIe Cnyan, BO3HNIKUHe N3-3a TOrO, YTO DyXOBKa He 6blNa 3a3eMJIeHa, INI IN3 3a HaJIIny O6pbIBa B cENI 3aUNTHORO 3a3eMJIeHnI.
BAKHOE 3AMEUAHHE: He 3a6bIbAte O TOM, yTo MoKeT NOtpe6oBaTcBn oocne npdoaXHoe 06ClykNbAHe NdyXOBKn. 3NeKtpuecka po3eTka, ot KOTopoN 3AnNTbIbAeTcN dyXOBKa, DOnJxHa pacNoJaTaBcB TAKOM MecTe, yTo6bl nOcne n3MeHeHn MeCTOnONIOXeHn NdyXOBKn ee CHOba MoXHo 6bIIO NODKJIQUHTb K 3NeKtpuecko po3eTke.
Ka6eJIb NtAHnHa: 3aMeHa Ka6eJIb NtAHnHa DoJIXHa BbINONHrTbc rCnyK6b0 nocIenpoJaXHOro O6cNyXnBaHnHa IIN CpeUaNCTOM, IMeIOuM DOCTaTOHyU KBaIINΦkauNo.
2. TEXHOJIOΓNIA PRO/EXP'R
2.1 INHADJIEXKHOCTN DYXOBKN
Ipeed nepBbIM nCnOJIb3OBaHHeM dYXOBKn BbIMOnTe ee npHaJNeKxHocTn r6kOi. CnIoNCHInTe BOoN I BbCyUInTe. Ha noIKy MOxHO CTaBnTB φOpMOuKN IINr BbIneKu N KxOHHyIO nocydy.
IЯ c6opa cokOB, BbIeJRAUxxCra npn nprirotobHeHH NuaHa rPnne, nCNoJIb3yETcR noDOnH.
Hukoeda He ucnolb3yume nodoh 6 kauecmee npomueh aJn npuzomoeHua, maK KAK omloKeHua Kupa Moaym 6bICMPO paCnpocmpaHmbc no o6bemy dyxoeku, ymo npueodum K co3daHU CunbHOO dbima.
B KOMNNEKT NOCTABKN HeKOTOpbIX MODeJIe BXODIT KAMEHb IIN nprirotOBHeHn XpCYTae NtCbl, a TaKKe NoCDTabKa IIn Hero n pONIk DnA pa3pe3AHn NtCbl.
PpOtnBHeB DnB BbIneueKn DoJnxH yCTaHaBJIbBaTbcra Ha nonKy. OH npEHa3HaueH dnn pnproTOBHeHn MeIKoB bIneueKn, TAKo KaK, HAnpIMep, 3Knepebl, neyeHbe, 6e3e, nT. n.HNKOrda He CtaBbTe npOTBeH bNpRyKn npRMO ha dHO dyXOBKn.
BokobblpepoBoNoHyu ceKy,ecnBknOueHbI.
2.2 BEPTJI
IpynproTOBHeHn HnHa BepTe He Tpe6yETc npEbpnteHbHO paoTpeBa dYxOBKn. PpN 3OM DBepua dYxOBKn DOJXHa 6bl 3akpbIta.
Iotppe6JIeHHe 3JIeKTPo3HeprHa 90-95% MeHbSe, YcE NpN IcNoJIb3OBAHm TpaDnUHOHcCtEmbl.
KAK IcIIOJIb3OBATb BEPTJI
- OtkpyTne KpOyKn
- Hacadnte MraCo Ha BepTeI
3.3aФИКСИРУМЯСОHAВERTENE C NOMOUIK KPOKOB
4.3aTnHeKpHouKn
5.YctaHOBtBeBepTeIN CnueuaHbHbIe KpyTAAuNE OTBepCTN
- OToCoeDInHnTe pyuKy
KordaDyXOBka pa6oTaET, B HeH He DoJHKHO 6bITb HEnCNoB3yeMbIX npHaJaNExKHOCTeI.
2.3 U.SEE 3aBncnt OT MoJeN.
B DxyOBKe BmecTo 06bHOn JAmNoUKN HakaJIINBaHN
NCnONb3yETcra CBTeODnOHNa CnCTema OCBeueHn. B DBepuy DxyOBKn BCTpoeHO14 CBTeODNOOB (DNRA MoDEeN 6e3 CNCTeMb I npoJNTuYeCKO OChTkn) nnn 10 MoUhBX CBTeODNOOB (DNRA MoDEeN CnCTeMoN PnpOJTNUeCKO OChTkn). 3TO
06ecneuNaBcT BHyTpN DxyOBKn BBICOKOKaYeCTBeHHOE
OCBeueHHe N6BelIM CBtOM 6e3 TeHeI OT NOIK.
PpeMmUeCTBa:
DHaHna CnCTema, Kpome TOrO, yTo OHa oBeCneuBaet npeBOxCoHHe OCBeUeHne BHyTpN DxyOBKn, IMeet 6oJee dIINTeBHBn CpOK cnyKbI, Yem 6blHnA lamNoouKa HakaINBaHn N IOTpeBnE rTOpa3do MeHbWe 3NeKTPo3Heprnn.
-ONTImaJIbHoeOCBeueHne
-BoIbwoI cpoK cnyXbI
-OueHb Hn3Koe NoTppe6JIeHHe 3JIeKtpo3Heprnn (Ha 95% MeHbIe Yem obuHra JAMNoUka HakaJIuBaHn)
1-CHIMMTE MetaJIINueckne HAnpaBnIOUe NToTHyB INX B HAnpaBnEHm YKa3aHHbIX CTpeKamH Ha pncyHke.
2-Pon3BeNTeOChTkyMeTALNueckxHnnpABnIOxNX NOMB INX B NOcyDOMOEHOH MaUNHe NIN OCHTNB PnN NMOUIN BnAIXHO R6Kn. IpocyWnte MeTALNueckne HnnpABnIOxne NOCNE OCHCTKNI.
3-Pocne oucTkn yctaHOBnTe MeTaNNueckne HappaBnIOuine B o6paTHOM npRKe.

3. UNCTKAДУXOBKIN
-NepeD BbINOHeHHeM pyHoi YnCTKn daTe DxyOBKe OcTbIHyTb.
HkoIHa He NOn3yTeCb DnA UCTKn DxyOBKn a6pa3uHBbIMN CHTAUIMN CpeCTBaMn, MeTaJIINHeCKm MOaANKAMn, IN OCTpIMN PpeDMaTMe. 3To MOKeT npBcTn K HEBOcCTaHOBNOMOMY NOBpeXJHMO 3MaJIINPOBAHHbX NOBepxHOCTeN DYXOBKn.
-ICnOJIb3yIe ToJIbKO MblbHyIO BDOY IIN OTBeJIbAIOUne YNCTaIe CpeIcTBA (Ha OCHOBE aMMnaka).
-нкога He nokpbBaIte 6OKOBbie cTeHKn DyXOBKn anlOMnHeBOB foJIbfoi.
CTEKJIHHbIE DETAJIN
NocleKaJOrO NcNoIb3oBAnHry DyXOBKn peKOMeHdyETcR OOnuTaCTeKJIaHNHyDBePuy DxyOBKn C NOMOUsbBnITbIBaHOue KxOHHO ByMaRn. B Cnyae CnIbHorO 3arp3HeHry DBePcbl DyOBKn Bl MoKeTe NcNOIb3oBAt TnE oe OChTkn CMOeHHyB PaactBope DeTePreHTa XopoIo OTKaTyUgKy.
*HnkOrda He noIb3yTebc abpa3nBbIMn YnCTraUIMn CpeDCTBAMN, N OCTpbIMN PpeDMetAMN, TAK KAK OHN MOryt Nouapaanatb CTekNo, YTO MOKeT PnPBecTu K erO pactpecknBaHHo.
YIIOHTHINJIbHA NPOKIAKA DBEPLbI DYXOBKN
Ecn npoknka 3arpa3Hnna, ouncntte ee c nOMOu bO cnerKa CMOeHHo r6Kn.
PINHADJIENKHOCTN
OuCTNe PnuaHApNEXHOCT N NOMUbIy6KIM,CMoeyHHO BMbIbHO BoDE. CNOIOCHHTe IN XN CTOn BODo H BcCyUHTe. He NOJIb3YHTeC abp4aINBbHM INCTAUMM CpeDCTBAM.
IODIOH
Iocne npirotoBnEHHa Hrnpne N3BnKeNte NoDOnH 3 dYXOBKn. OctopoxHo CneTe Tnblk XmP B KOHTeHep. BbIMOnTe NOdOn Hryko, CMoeyHHO B rOpayem BOHOM pactBope MOUoJeu KIOKCTI.
EcHnHaNoDHOeOCTaIINcB npuropEBWne OCTaTKn Knpa, 3AMoUHTe NODDH BBODE CMOUIMCpeCTBOM.
TADON TaKKe MOXHO BbIMbITb B NOCyDMoEHyOH MaUNHe HIN ONUCTHTC NOMOUBIO CNEUaHBO HNCTAUEO CPEDTB DnA DYXOBOK.
HnkOrda He yctaHaBnBaIte B dyXOBky rpa3HbI noDIOH.
OCBEHNE B DYXOBKE (3aBnT OT MoJeN.)
IpeepBbINONHeHEmUcTKnNIM3aMeHbI NAMNOyKnO6ra3aTeJbHOOTcoeHNHTeDyXOBkyOT 3NeKTPocEtN.
JAMNOKa H ee 3aUNTHbI KOINAPOK IN3ROTOBJIeHbI IN3 JAKOCTOKNOROMATEPnana.

XapakTepeNTKnJaMNoUKn:
230 B nepemehHoro ToKa - 25 BT - UOKoJIb E 14, TempepaTypa 300 °C
YTo6bl ZameHHTb lamNoHQy:
BbIePNHTeCTeKJIaHHbIKoJINaQOK.
BbBepHTeJaMnOky,
BBePHnTe HOByIO lamNoKy TORO Je Tnna (CM. npeCTaBHeHHbIe Bblwe xapakTePcTnK),
-Notce 3aMeHbI HeNCpABHOJ lamNoCHB BBePHnTe 3aunTHbI CTeKJIHHbIKoJINaHOK.
YNCTKA CTEKJIHHOI DBEPUbI DYXOBORO WKAΦA DBepua DxyoBoro WkaPAMoKET 6bITb CHrTa n pa3o6paHa dIy ONUCTKN ee BHeuHNx IN BHYTpEHNX NOBepxHOCTe. IINrTO rTObI pOnn3BcTn ONUCTKY BHYTpEHrero CTekna, cNeDyIte CNEduOUM HNCTpykUmaR:
- OTKpoIe DBepu DyXOBoro ukaΦa. PncyHok 1 (Figure 1)
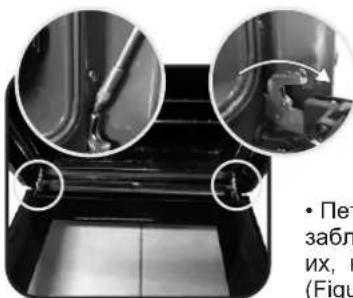
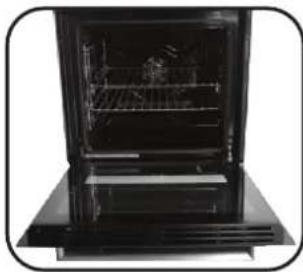
Figure 1
-ПeТлдверцы dуховоушkaфа 3a6лokировны.Ра6лokирун Te nX,Кak yka3aHo Ha pncyHke 2 (Figure 2),ДЯТOrO,ЧTo6bl ChrTb DBepuy.
- YdaHTE BnHTbI KaK NOKa3aHOHa pncyHke 3 (Figure 3)
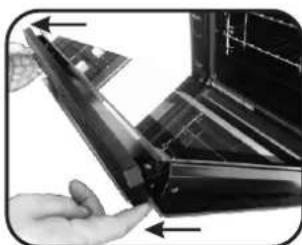
Figure 2
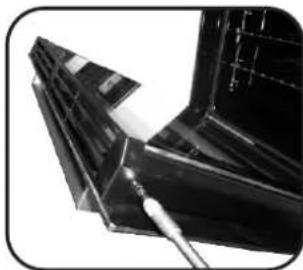
Figure 3
-
CHHIMTE BepXHIO MU MetaJIINueckyIO KpbIiKU,NOTAHyB ee BBepx, KAK yka3aHO Ha pncyHke 4 (Figure 4)
-
CHINMTE CTEKNO, OCTOPOKHO
NOTAHYB ERO IN3 paMKN DBepuJI, KAK
yka3aHO Ha pncyHke 5 (Figure 5).
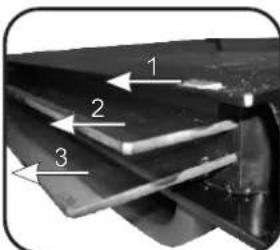
Figure 4
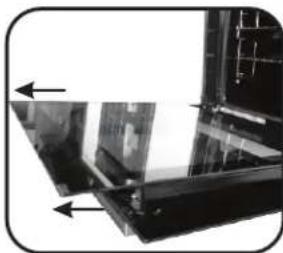
Figure 6
Figure 5
*ДяДухOBbIX UkaФOB C
ПирOTnueeCKO OYNCKOr,
NOKaIyIcTa, CHIMTe TaKKe
BTOPOe N TpeTbe CTeKNa, KaK
Yka3aHNo Ha pncyHke 6 (Figure 6)
-ПоспеЗаьершеняочсткдеврсь,сobерпteee,пpon3veядяствьбраTHOMнордke
HA BCEX CTEKJAX 3HaK LOW-EdoJKeH npaBnIbHo YIaTbcNIOJKeH 6bITb paONOKeH B neBOM yIy NDBepn, pAOM c NeBOI neTnei. TaKIM o6pa3OM, HaneYaTaHHbI CMBOH NapeBOM CTeKNe OCTaETcC BHyTpEHHN CTOPHOI DBepbl.
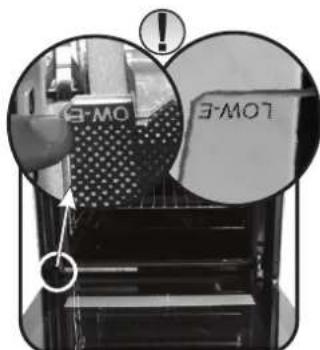
Figure 7
4.1 IEPED IEPBbIM NcIOnb3OBAHNEM DUXOBKN
- UNTKA INPEED INEPBbIM NcNOJIb3OBAHnEM
Ipei nepBbIM IcnoJIb3OBAHHeM dYXOBKn OChCTHTe ee CNeDyIOUIM oBaPazOM:
IpoTpTe HApxHbIe NOBepXHOCTN DyXOBKn MmKoB BnaxHO TpIKoN.
BbMoTe Bce npHaDnHexHOCTN npoTpTE BHyTpEHHe NOBepXHOCTN DyOBK TpKN, CMOeHHOB B rOpHem BOHDOM PACTBOE XIKOKO MOUero CpeCTBA.
JaTe npa6oTaTb nyToD yXOBKe npMakcImaIbHoI Tempeata B TeueHne OJHOrO Yaca. 3To Heo6xOIMo dIra TOrO, 706bl ydaNTb N DYOBKN 3anaxn. PnBbINOHNHeHHN 3ToI ONepaun NOMeUeHne, B KOTOpom yCTaHOBNeHa DYXBKa, DOnkHO XopoIO npOBETpVBtCBs.
BEUNO KOTOPbIX HE CJEyET 3AebiBATb
NoTBePKeHHe OpeaunBbIOJIHHeMOc NOMOuBo TaMepa 13MeHeHn PAnamETPOB DOnKhbl NoTBePKeJdTaBC c NOMOuBo HAKaTNI KHOKN.
BbIKIOueHue dyxOaKu:
3Ta onaunna MoKeT Notpe6oBaTcB C cnyae BBOda HnepaBnHoi KOMaHbI. YTo6bl BIKHouHT dyXOBky ... ycTaHOBNTe pyuNpOraPmMPOBaHbN B nonOKeHne CTOTI.
3amok om demeu:
TObb 3aBnokpoBaT DeIcTBne OprHOB ynpabHeHna DyXOBKn, BBye pN Te QyN KU HIO 3amKaOT dTeen.CM.pa3den "PpopammmoBaHne-3AMOK OT dTeen".
OxnaqdaouuueBemunmop:
3aunuetae nane ly npabneHn n 3neKtpoHbIe ycTpoICTBa O T nepeperba. OH BkIOHaETcABTOmatueckn BblIOHaeTc npB bIKIOHeyn DxOBKn.
OcbeueHue e dyxoek:
YTO6bl BKNIOHTb OCEUHNE B DYXOBKe, HJXHO yCTAHOBNTb pyKy nporpAMMPOBaHn Ha CNMBON OCEUHn.
Ecnn dxyobka pa6oTaET, lamnoouka byet ropetb npn Bblbope IIObof yHKmN, n 6ydt npoDOnkataB ropetb nocne OTKpbBaHn DBePcbl.
4.2 INCINb30BAHNETAIMEPAOKOHUAHNBAPEMEHNIPNFTOTOBJIENH
PnnoMOnoIeTOnfynKmNMOxHOyCTaHOBnTb Tpe6yEmoe Bpme npriTOBOTNeHnRA (MaKc.120 MnH),NO nCTeueHHn KOTopoR OdyXOBKa ABOTMATHeCKN BblKnIOHTcR.
TaimepOTCCHTAETBPEMOTYCTAHOBNEHHOROdo noNoKeHNOABTOMaTHuecknBBIKHOHTC8.
IINCNOB3OBAHNAIyXOBKNB O6bIYHOM pEXKHe, yCTAHOBNTe NIOXKeHne
BKNIOHNEINIITbI npOBepBe, TTo6bI TaMep He HaxoDnnc B NoIOKeHHN 0.
IPEyIPEKJEHNE: yCTaHOBKa BpeMeHn Ipon3BOIDTCB INepBbIE NOcNE yCTaHOBKn DxyOBKn NIN Nocne OTKJIIOUeHn 3JNkTPuueCTBa (Heo6xoIMOCtB B 3TOM 6yTeT OTo6paKeHa B BVNe npbCnpuyOero DnCnnner 12:00). YCTaHOBKa BpeMeHn DOCTnraETc CnEYOLmnyTem:
-HaXMMTe UeHTpaJIbHyIO KHOIIky 4 pa3a
-Hactpoika BpemK HhOkiKaMn""+
-OTnyCTnTE KhoNkN
BHIMAHHE: Lyxobka 6ydeT pa6oTaTb ToJbKo nocJe yCTaHOBKn YacOB.
4.4 TAIMEPC CEHCOPHBIM YIPTABJIENHEM
| Функция | Въюочие | Оъюочие | Что Въюочие | Д�� чero |
| Зашита от deteted | Функция «Дetectский замок» Въюочия рпн Нжати и уdeckжанни Клавиши Set (+) не Мени 5 секун.С оторо моментаbelowsomeхунлд.
Заблесоровы и на диспee мигает STOPиTekушee врем. | Д�� оъюочия Функции «Дetectский замок» сиза Нжати и уdeckжitebelowset (+) не Мени 5 секун.
Послы оторо Belowsomeхунлд.
Вьовь.stahobячся DOCTUПБИМ. | | |
| Таймер | •НожмITE цentralbnyк коньу 1 заа | •Когда установенhoe времпостechет,раздостся 38уковов синhal. Пи оъюочия синhalппөр karлготся Атмати checks.
Он таску loхлбпьпсь.
Нжати врем KMONKII Select. | •ВьюочeET 38уковов синhalп NOOKHOTAHIN ystahOBENHORO времпсь
•Вхode procssca Na disciпee оразkaetся OCTabuueecсь врем. | •Зта Функция поэвльет И споблзовы Духовky в Качев trade bdyindlbyika (можног).
нсспльовы в сп;
Вьюочень, тak и рпь Вьюочenь Духовke) |
| Времприготовлия | •НожмITE цentralbnyк коньу 2 заа
•НожмITE коньи ("-"). Ил(+)Ддя установки trpebyemoro времпсь пrngotoblenу
•Отуystе коньи
•Уstановite ржим пrngotoblenу等相关 ромоши ручки вьбopa Функции | •Пи оъюочия установенhoe времпостechет,раздостся 38уковов синhal.
Астмати checks.Едney Вь
хотITE Вькючсяbelow.
Установite ручу Blбoga
Функции в поожденье 0 Ил
Установite врем 0:00SELECT
И коньи ("-" "+") | •ПозвоггET установы trpebyemoe времпсь пrngotoblenу Bv6paanbixх 步бунь
•Чебул彬 рожерпь, сокльбов времпсь коньу SELECT
•Д�� иэменая установенhoe времпсь
Нжати врем "+"
•Д�� иэmеная установенhoe времпсь
Нжати врем "+"
•Пи оъюочия установы Tr.
Функции врем "+"
•Пи оъюочия установенhoe времпсь
Nashmite END и коньу:"+” | |
| Оkonчанце пrngotobleniya end | •НожмITE цentralbnyк коньу 3 заа
•НожмITE коньи ("-"). Ил(+)Ддя установки времпсь Okнок
•Отуystе коньи
•Уstановite ржим пrngotoblenу等相关 ромоши ручки вьбopa Функции | •В уstановенhoe времдуховka Вькючся. Д�� руногу Вькючся.
Пи оъюочия ручу Blбoga
Функции в поожденье 0.
•Д�� иэmеная установенhoe времпсь
Нжати врем "+"
•Д�� иэmensа установенhoe времпсь
Нжати врем "+"
•Пи оъюочия установенhoe времпсь
Nashmite END und Konskny:"+ | | •Зта Функция обьчно И споблзуETСВЕСТССССССССССССССССССССССССССССССССССССССССССССССССССССССССССССССССССССССССССССССССССССССССССССССССССССCSCSCSCSCSCSCSCSCSCSCSCSCSCSCSCSCSCSCSCSCSCSCSCSCSCSCSCSCSCSCSCSCSCSCSCSCSCSCSCSCSCSCSCSCSCSCSCSCSCSCSCSCSCSCSCSCSCSCSCSCSCSCSCSCSCSCSCSCSCSCSCSCSCSCSCSCSCSCSCSCSCSCSCSCSCSCSCSCSCSCSCSCSCSCSCSCSCSCSCSCCSCSCSCSCSCSCSCSCSCSCSCSCSCSCSCSCSCSCSCSCSCSCSCSCSCSCSCSCSCSCSCSCSCSCSCSCSCSCSCSCSCSCSCSCSCSCSCSCSCSCSCSCSCSCSCSCSCSCSCSCSCSCSCSCSCSCSCSCSCSCSCSCSCSCSCSCSCSCSCSCSCSCSCSCSCSCSCSCSCSCSCSCSCSCSCSCSCSCSCH
•Одгшалдух trade bvyнлд.
•Одгшалдух trade bvyнлд.
•Одгшалдух trade bvyнлд.
•Одгшалдух trade bvyнлд.
•Одгшалдух trade bvyнлд.
•Одгшалдух trade bvyнлд.
•Одгшалдух trade bvyнлд.
•Одgшалдух trade bvyнлд.
•Одgшалдух trade bvyнлд.
•Одgшалдух trade bvyнлд.
•Одgшалдух trade bvyнлд.
•Одgшалдух trade bvyнлд.
•Одgшалдух trade bvyнлд.
•Одgшалдuroу.
•Одgшалдuroу.
•Одgшалдuroу.
•Одgшалдuroу.
•Одgшалдuroу.
•Одgшалдuroу.
•Одgшалдuroу.
•Одgшалдuroу.
•Одgшалдuroу.
•Одgшалдuroу.
•Одgшалдurou.
•Одgшалдurou.
•Одgшалдurou.
•Одgшалдurou.
•Одgшалдurou.
•Одgшалдurou.
•Одgшалдurou.
•Одgшалдurou.
•Одgшалдurou.
•Одgшалдurou.
•Одgшалдuroу.
•Одgшалдuroу.
•Одgшалдurou.
•Одgшалдurou.
•Одgшалдurou.
•Одgшалдurou.
•Одgшалдurou.
•Одgшалдurou.
•Одgшалдurou.
•Одgшалдuroу.
•Одgшалдuroу.
•Одgшалдuroу.
•Одgшалдurou.
•Одgшалдurou.
•Одgшалдurou.
•Одgшалдurou.
•Одgшалдurou.
•Одgшалдurou.
•Одgшалдuroу.
•Одgшалдuroу.
•Одgшалдurou.
•Одgшалдuroу.
•Одgшалдurou.
•Одgшалдurou.
•Одgшалдurou.
•Одgшалдurou.
•Одgшалдurou.
•Одgшалдurou.
•Одgшалдurou.
•Одgшалдurou.
•Одgшалдuroу.
•Одgшалдurou.
•Одgшалдurou.
•Одgшалдurou.
•Одgшалдurou.
•Одgшалдurou.
•Одgшалдurou.
•Одgшалдurou.
•Одgшалдuroу.
•Одgшалдurou.
•Одgшалдuroу.
•Одgшалдurou.
•Одgшалдurou.
•Одgшалдurou.
•Одgшалдurou.
•Одgшалдurou.
•Одgшалдurou.
•Одgшалдuroу.
•Одgшалдurou.
•Одgшалдurou.
•Одgшалдuroу.
•Одgшалдurou.
•Одgшалдurou.
•Одgшалдurou.
•Одgшалдurou.
•Одgшалдurou.
•Одgшалдurou.
•Одgшалдuroу.
•Одgшалдuroу.
•Одgшалдuroу.
•Одgшалдuroу.
•Одgшалдurou.
•Одgшалдurou.
•Одgшалдurou.
•Одgшалдurou.
•Одgшалдurou.
•Одgшалдuroу.
•Одgшалдurou.
•Одgшалдurou.
•Одgшалдurou.
•Одgшалдuroу.
•Одgшалдurou.
•Одgшалдurou.
•Одgшалдurou.
•Одgшалдurou.
•Одgшалдurou.
•Одgшалдuroу.
•Одgшалдurou.
•Одgшалдurou.
•Одgшалдuroу.
•Одgшалдuroу.
•Одgшалдurou.
•Одgшалдurou.
•Одgшалдurou.
•Одgшалдurou.
•Одgшалдurou.
•Одgшалдuroу.
•Одgшалдurou.
•Одgшалдuroу.
•Одgшалдurou.
•Одgшалдuroу.
•Одgшалдurou.
•Одgшалдurou.
•Одgшалдurou.
•Одgшалдurou.
•Одgшалдurou.
•Одgшалдuroу.
•Одgшалдurou.
•Одgшалдuroу.
•Одgшалдuroу.
•Одgшалдurou.
•Одgшалдurou.
•Одgшалдurou.
•Одgшалдurou.
•Одgшалдurou.
•Одgшалдurou.
•Одgшалдuroу.
•Одgшалдurou.
•Одgшалдuroу.
•Одgшалдuroу.
•Одgшалдuroу.
•Одgшалдurou.
•Одgшалдurou.
•Одgшалдurou.
•Одgшалдurou.
•Одgшалдurou.
•Одgшалдuroу.
•Одgшалдuroу.
•Одgшалдurou.
•Одgшалдurou.
•Одgшалдuroу.
•Одgшалдurou.
•Одgшалдurou.
•Одgшалдurou.
•Одgшалдurou.
•Одgшалдurou.
•Одgшалдuroу.
•Одgшалдuroу.
•Одgшалдurou.
•Одgшалдuroу.
•Одgшалдuroу.
•Одgшалдurou.
•Одgшалдurou.
•Одgшалдurou.
•Одgшалдurou.
•Одgшалдurou.
•Одgшалдuroу.
•Одgшалдuroу.
•Одgшалдuroу.
•Одgшалдurou.
•Одgшалдuroу.
•Одgшалдurou.
•Одgшалдurou.
•Одgшалдurou.
•Одgшалдuroу.
•Одgшалдurou.
•Одgшалдurou.
•Одgшалдurou.
•Одgшалдuroу.
•Одgшалдurou.
•Одgшалдuroу.
•Одgшалдurou.
•Одgшалдurou.
•Одgшалдurou.
•Одgшалдuroу.
•Одgшалдurou.
•Одgшалдurou.
•Одgшалдuroу.
•Одgшалдurou.
•Одgшалдurou.
•Одgшалдuroу.
•Одgшалдurou.
•Одgшалдurou.
•Одgшалдuroу.
•Одgшалдuroу.
•Одgшалдurou.
•Одgшалдurou.
•Одgшалдuroу.
•Одgшалдurou.
•Одgшалдurou.
•Одgшалдuroу.
•Одgшалдurou.
•Одgшалдurou.
•Одgшалдurou.
•Одgшалдuroу.
•Одgшалдurou.
•Одgшалдurou.
•Одgшалдuroу.
•Одgшалдuroу.
•Одgшалдurou.
•Одgшалдuroу.
•Одgшалдurou.
•Одgшалдurou.
•Одgшалдuroу.
•Одgшалдurou.
•Одgшалдurou.
•Одgшалдuroу.
•Одgшалдurou.
•Одgшалдuroу.
•Одgшалдurou.
•Одgшалдurou.
•Одgшалдuroу.
•Одgшалдurou.
•Одgшалдurou.
•Одgшалдuroу.
•Одgшалдuroу.
•Одgшалдuroу.
•Одgшалдurou.
•Одgшалдurou.
•Одgшалдuroу.
•Одgшалдurou.
•Одgшалдurou.
•Одgшалдuroу.
•Одgшалдurou.
•Одgшалдuroу.
•Одgшалдuroу.
•Одgшалдurou.
•Одgшалдurou.
•Одgшалдuroу.
•Одgшалдurou.
•Одgшалдurou.
•Одgшалдuroу.
•Одgшалдuroу.
•Одgшалдurou.
•Одgшалдuroу.
•Одgшалдuroу.
•Одgшалдurou.
•Одgшалдurou.
•Одgшалдuroу.
•Одgшалдurou.
•Одgшалдurou.
•Одgшалдurou.
•Одgшалдuroу.
•Одgшалдuroу.
•Одgшалдurou.
•Одgшалдurou.
•Одgшалдuroу.
•Одgшалдurou.
•Одgшалдuroу.
•Одgшалдurou.
•Одgшалдurou.
•Одgшалдuroу.
•Одgшалдuroу.
•Одgшалдurou.
•Одgшалдurou.
•Одgшалдuroу.
•Одgшалдuroу.
•Одgшалдurou.
•Одgшалдurou.
•Одgшалдuroу.
•Одgшалдuroу.
•Одgшалдuroу.
•Одgшалдurou.
•Одgшалдurou.
•Одgшалдuroу.
•Одgшалдuroу.
•Одgшалдurou.
•Одgшалдurou.
•Одgшалдuroу.
•Одgшалдurou.
•Одgшалдuroу.
•Одgшалдuroу.
•Одgшалдurou.
•Одgшалдurou.
•Одgшалдurou.
•Одgшалдuroу.
•Одgшалдuroу.
•Одgшалдurou.
•Одgшалдurou.
•Одgшалдuroу.
•Одgшалдuroу.
•Одgшалдurou.
•Одgшалдuroу.
•Одgшалдurou.
•Одgшалдuroу.
•Одgшалдurou.
•Одgшалдuroу.
•Одgшалдurou.
•Одgшалдurou.
•Одgшалдuroу.
•Одgшалдuroу.
•Одgшалдurou.
•Одgшалдuroу.
•Одgшалдurou.
•Одgшалдuroу.
•Одgшалдuroу.
•Одgшалдurou.
•Одgшалдurou.
•Одgшалдuroу.
•Одgшалдuroу.
•Одgшалдurou.
•Одgшалдurou.
•Одgшалдurou.
•Одgшалдuroу.
•Одgшалдuroу.
•Одgшалдurou.
•Одgшалдuroу.
•Одgшалдurou.
•Одgшалдuroу.
•Одgшалдurou.
•Одgшалдurou.
•Одgшалдuroу.
•Одgшалдuroу.
•Одgшалдuroу.
•Одgшалдurou.
•Одgшалдurou.
•Одgшалдurou.
•Одgшалдuroу.
•Одgшалдuroу.
•Одgшалдurou.
•Одgшалдurou.
•Одgшалдurou.
•Одgшалдuroу.
•Одgшалдuroу.
•Одgшалдuroу.
•Одgшалдurou.
•Одgшалдurou.
•Одgшалдuroу.
•Одgшалдuroу.
•Одgшалдuroу.
•Одgшалдurou.
•Одgшалдurou.
•Одgшалдurou.
•Одgшалдurou.
•Одgшалдuroу.
•Одgшалдuroу.
•Одgшалдurou.
•Одgшалдurou.
•Одgшалдuroу.
•Одgшалдuroу.
•Одgшалдuroу.
•Одgшалдuroу.
•Одgшалдurou.
•Одgшалдurou.
•Одgшалдuroу.
•Одgшалдuroу.
•Одgшалдurou.
•Одgшалдurou.
•Одgшалдurou.
•Одgшалдurou.
•Одgшалдuroу.
•Одgшалдuroу.
•Одgшалдurou.
•Одgшалдuroу.
•Одgшалдurou.
•Одgшалдuroу.
•Одgшалдuroу.
•Одgшалдuroу.
•Одgшалдurou.
•Одgшалдurou.
•Одgшалдuroу.
•Одgшалдuroу.
•Одgшалдurou.
•Одgшалдuroу.
•Одgшалдurou.
•Одgшалдurou.
•Одgшалдurou.
•Одgшалдuroу.
•Одgшалдuroу.
•Одgшал徳
•Одgшал徳
•Одgшал徳
•Одgшал徳
•Одgшал徳
•Одgшал徳
•Одgшал徳
•Одgшал徳
•Одgшал徳
•Одgшал徳
•Одgшал徳
•Одgшал徳
* Oс�н;
* Oс�н;
* Oс�н;
* Oс�н;
* Oс�н;
* Oс�н;
* Oс�н;
* Oс�н;
* Oс�н;
* Oс�н;
* Oс�н;
* Oс�н;
* Oс�н;
* Oс�н;
* Oс�н;
* Oс�н;
* Oс�н;
* Oс货;
* Oс货;
* Oс货;
* Oс货;
* Oс货;
* Oс货;
* Oс货;
* Oс货;
* Oс货;
* Oс货;
* Oс货;
* Oс货;
* Oс货;
* Oс货;
* Oс货;
* Oс货;
* Oс货;
* Oс货;
* Oс货;
* Oс货;
* Oс供货;
* Oс供货;
* Oс供货;
* Oс供货;
* Oс供货;
* Oс供货;
* Oс供货;
* Oс供货;
* Oс供货;
* Oс供货;
* Oс供货;
* Oс供货;
* Oс供货;
* Oс供货;
* Oс供货;
* Oс供货;
* Oс供货;
* Oс供货;
* Oс供货;
* Oс供货;
* Oс货;
* Oс货;
* Oс货;
* Oс货;
* Oс货;
* Oс货;
* Oс货;
* Oс货;
* Oс货;
* Oс货;
* Oс货;
* Oс货;
* Oс货;
* Oс货;
* Oс货;
* Oс货;
* Oс货;
* Oс货;
* Oс货;
* Oс货物;
* Oс货物;
* Oс货物;
* Oс货物;
* Oс货物;
* Oс货物;
* Oс货物;
* Oс货物;
* Oс货物;
* Oс货物;
* Oс货物;
* Oс货物;
* Oс货物;
* Oс货物;
* Oс货物;
* Oс货物;
* Oс货物;
* Oс货物;
* Oс货物;
* Oс货物;
* Oс货;
* Oс货;
* Oс货;
* Oс货;
* Oс货;
* Oс货;
* Oс货;
* Oс货;
* Oс货;
* Oс货;
* Oс货;
* Oс货;
* Oс货;
* Oс货;
* Oс货;
* Oс货;
* Oс货;
* Oс货;
* Oс货;
* Oсу;
* Oсу;
* Oсу;
* Oсу;
* Oсу;
* Oсу;
* Oсу;
* Oсу;
* Oсу;
* Oсу;
* Oсу;
* Oсу;
* Oсу;
* Oсу;
* Oсу;
* Oсу;
* Oсу;
* Oсу;
* Oсу;
* Oсу;
* Oс:
* Oс:
* Oс:
* Oс:
* Oс:
* Oс:
* Oс:
* Oс:
* Oс:
* Oс:
* Oс:
* Oс:
* Oс:
* Oс:
* Oс:
* Oс:
* Oс:
* Oс:
* Oс:
* Oс:
* Oс:
* Oс:
* Oс:
* Oс:
* Oс:
* Oс;
* Oс;
* Oс;
* Oс;
* Oс;
* Oс;
* Oс;
* Oс;
* Oс;
* Oс;
* Oс;
* Oс;
* Oс;
* Oс;
* Oс;
* Oс;
* Oс;
* Oс;
* Oс;
* Oс;
* Oс;
* Oс;
* Oс;
* Oс;
* Oс;
* Oс
* Oс
* Oс
* Oс
* Oс
* Oс
* Oс
* Oс
* Oс
* Oс
* Oс
* Oс
* Oс
* Oс
* Oс
* Oс
* Oс
* Oс
* Oс
* Oс
* Oс
* Oс
* Oс
* Oс
* Oс
* Oс;
* Oс
* Oс
* Oс
* Oс
* Oс
* Oс
* Oс
* Oс
* Oс
* Oс
* Oс
* Oс
* Oс
* Oс
* Oс
* Oс
* Oс
* Oс
* Oс
* Oс
* Oс
* Oс
* Oс
* Oс)
* Oс
* Oс
* Oс
* Oс
* Oс
* Oс
* Oс
* Oс
* Oс
* Oс
* Oс
* Oс
* Oс
* Oс
* Oс
* Oс
* Oс
* Oс
* Oс
* Oс
* Oс
* Oс
* Oс
* Oс
* Oс)
* Oс)
* Oс)
* Oс)
* Oс)
* Oс)
* Oс)
* Oс)
* Oс)
* Oс)
* Oс)
* Oс)
* Oс)
* Oс)
* Oс)
* Oс)
* Oс)
* Oс)
* Oс)
* Oс)
* Oс)
* Oс)
* Oс)
* Oс)
* Oс)
* Oс)-
* Oс)
* Oс)
* Oс)
* Oс)
* Oс)
* Oс)
* Oс)
* Oс)
* Oс)
* Oс)
* Oс)
* Oс)
* Oс)
* Oс)
* Oс)
* Oс)
* Oс)
* Oс)
* Oс)
* Oс)
* Oс)
* Oс)
* Oс)
* Oс)
* Oс))
* Oс)
* Oс)
* Oс)
* Oс)
* Oс)
* Oс)
* Oс)
* Oс)
* Oс)
* Oс)
* Oс)
* Oс)
* Oс)
* Oс)
* Oс)
* Oс)
* Oс)
* Oс)
* Oс)
* Oс)
* Oс)
* Oс)
* Oс)
* Oс)
* Oс);
* Oс)
* Oс)
* Oс)
* Oс)
* Oс)
* Oс)
* Oс)
* Oс)
* Oс)
* Oс)
* Oс)
* Oс)
* Oс)
* Oс)
* Oс)
* Oс)
* Oс)
* Oс)
* Oс)
* Oс)
* Oс)
* Oс)
* Oс)
* Oс)
* Oс")
* Oс)
* Oс)
* Oс)
* Oс)
* Oс)
* Oс)
* Oс)
* Oс)
* Oс)
* Oс)
* Oс)
* Oс)
* Oс)
* Oс)
* Oс)
* Oс)
* Oс)
* Oс)
* Oс)
* Oс)
* Oс)
* Oс)
* Oс)
* Oс)
* Oс)}
* Oс)
* Oс)
* Oс)
* Oс)
* Oс)
* Oс)
* Oс)
* Oс)
* Oс)
* Oс)
* Oс)
* Oс)
* Oс)
* Oс)
* Oс)
* Oс)
* Oс)
* Oс)
* Oс)
* Oс)
* Oс)
* Oс)
* Oс)
* Oс)
* Oс�)
* Oс)
* Oс)
* Oс)
* Oс)
* Oс)
* Oс)
* Oс)
* Oс)
* Oс)
* Oс)
* Oс)
* Oс)
* Oс)
* Oс)
* Oс)
* Oс)
* Oс)
* Oс)
* Oс)
* Oс)
* Oс)
* Oс)
* Oс)
* Oс)
* Oc)
* Oc)
* Oc)
* Oc)
* Oc)
* Oc)
* Oc)
* Oc)
* Oc)
* Oc)
* Oc)
* Oc)
* Oc)
* Oc)
* Oc)
* Oc)
* Oc)
* Oc)
* Oc)
* Oc)
* Oc)
* Oc)
* Oc)
* Oc)
* Oc)
* Oс)
* Oс)
* Oс)
* Oс)
* Oс)
* Oс)
* Oс)
* Oс)
* Oс)
* Oс)
* Oс)
* Oс)
* Oс)
* Oс)
* Oс)
* Oс)
* Oс)
* Oс)
* Oс)
* Oс)
* Oс)
* Oс)
* Oс)
* Oс)
* Oо)
* Oс)
* Oс)
* Oс)
* Oс)
* Oс)
* Oс)
* Oс)
* Oс)
* Oс)
* Oс)
* Oс)
* Oс)
* Oс)
* Oс)
* Oс)
* Oс)
* Oс)
* Oс)
* Oс)
* Oс)
* Oс)
* Oс)
* Oс)
* Oс)
* OС)
* Oс)
* Oс)
* Oс)
* Oс)
* Oс)
* Oс)
* Oс)
* Oс)
* Oс)
* Oс)
* Oс)
* Oс)
* Oс)
* Oс)
* Oс)
* Oс)
* Oс)
* Oс)
* Oс)
* Oс)
* Oс)
* Oс)
* Oс)
* Oс)
* Os)
* Oс)
* Oс)
* Oс)
* Oс)
* Oс)
* Oс)
* Oс)
* Oс)
* Oс)
* Oс)
* Oс)
* Oс)
* Oс)
* Oс)
* Oс)
* Oс)
* Oс)
* Oс)
* Oс)
* Oс)
* Oс)
* Oс)
* Oс)
* Oс)
* Oа)
* Oс)
* Oс)
* Oс)
* Oс)
* Oс)
* Oс)
* Oс)
* Oс)
* Oс)
* Oс)
* Oс)
* Oс)
* Oс)
* Oс)
* Oс)
* Oс)
* Oс)
* Oс)
* Oс)
* Oс)
* Oс)
* Oс)
* Oс)
* Oс)
* O с)
* Oс)
* Oс)
* Oс)
* Oс)
* Oс)
* Oс)
* Oс)
* Oс)
* Oс)
* Oс)
* Oс)
* Oс)
* Oс)
* Oс)
* Oс)
* Oс)
* Oс)
* Oс)
* Oс)
* Oс)
* Oс)
* Oс)
* Oс)
* Oс)
* Oф)
* Oс)
* Oс)
* Oс)
* Oс)
* Oс)
* Oс)
* Oс)
* Oс)
* Oс)
* Oс)
* Oс)
* Oс)
* Oс)
* Oс)
* Oс)
* Oс)
* Oс)
* Oс)
* Oс)
* Oс)
* Oс)
* Oс)
* Oс)
* Oс)
* Oб)
* Oс)
* Oс)
* Oс)
* Oс)
* Oс)
* Oс)
* Oс)
* Oс)
* Oс)
* Oс)
* Oс)
* Oс)
* Oс)
* Oс)
* Oс)
* Oс)
* Oс)
* Oс)
* Oс)
* Oс)
* Oс)
* Oс)
* Oс)
* Oс)
* Ocd)
* Oс)
* Oс)
* Oс)
* Oс)
* Oс)
* Oс)
* Oс)
* Oс)
* Oс)
* Oс)
* Oс)
* Oс)
* Oс)
* Oс)
* Oс)
* Oс)
* Oс)
* Oс)
* Oс)
* Oс)
* Oс)
* Oс)
* Oс)
* Oс)
* Od)
* Oс)
* Oс)
* Oс)
* Oс)
* Oс)
* Oс)
* Oс)
* Oс)
* Oс)
* Oс)
* Oс)
* Oс)
* Oс)
* Oс)
* Oс)
* Oс)
* Oс)
* Oс)
* Oс)
* Oс)
* Oс)
* Oс)
* Oс)
* Oс)
* O地)
* O地)
* O地)
* O地)
* O地)
* O地)
* O地)
* O地)
* O地)
* O地)
* O地)
* O地)
* O地)
* O地)
* O地)
* O地)
* O地)
* O地)
* O地)
* O地)
* O地)
* O地)
* O地)
* O地)
* O地)
* O里)
* O地)
* O地)
* O地)
* O地)
* O地)
* O地)
* O地)
* O地)
* O地)
* O地)
* O地)
* O地)
* O地)
* O地)
* O地)
* O地)
* O地)
* O地)
* O地)
* O地)
* O地)
* O地)
* O地)
* O地)
* O
O地)
O地)
O地)
O地)
O地)
O地)
O地)
O地)
O地)
O地)
O地)
O地)
O地)
O地)
O地)
O地)
O地)
O地)
O地)
O地)
O地)
O地)
O地)
O地)
O地)
O地)
O地)
O地)
O地)
O地)
O地)
O地)
O地)
O地)
A
O地)
O地)
O地)
O地)
O地)
O地)
O地)
O地)
O地)
O地)
O地)
O地)
O地)
O地)
O地)
O地)
O地)
O地)
O地)
O地)
O地)
O地)
O地)
O地)
O地)
O地)
O地)
O地)
O地)
O地)
O地)
O地)
O地)O地)
O地)
O地)
O地)
O地)
O地)
O地)
O地)
O地)
O地)
O地)
O地)
O地)
O地)
O地)
O地)
O地)
O地)
O地)
O地)
O地)
O地)
O地)
O地)
O地)
O地)
O地)
O地)
O地)
O地)
O地)
O地)
O地)
(O地)
O地)
O地)
O地)
O地)
O地)
O地)
O地)
O地)
O地)
O地)
O地)
O地)
O地)
O地)
O地)
O地)
O地)
O地)
O地)
O地)
O地)
O地)
O地)
O地)
O地)
O地)
O地)
O地)
O地)
O地)
O地)
O地)
O 地)
O地)
O地)
O地)
O地)
O地)
O地)
O地)
O地)
O地)
O地)
O地)
O地)
O地)
O地)
O地)
O地)
O地)
O地)
O地)
O地)
O地)
O地)
O地)
O地)
O地)
O地)
O地)
O地)
O地)
O地)
O地)
O地)
O地)
O地)
O地)
O地)
O地)
O地)
O地)
O地)
O地)
O地)
O地)
O地)
O地)
O地)
O地)
O地)
O地)
O地)
O地)
O地)
O地)
O地)
O地)
O地)
O地)
O地)
O地)
O地)
O地)
O地)
O地)
O地)
O地)
O地)
○
O地)
O地)
O地)
O地)
O地)
O地)
O地)
O地)
O地)
O地)
O地)
O地)
O地)
O地)
O地)
O地)
O地)
O地)
O地)
O地)
O地)
O地)
O地)
O地)
O地)
O地)
O地)
O地)
O地)
O地)
O地)
O地)
O地)/
O地)/
O地)/
O地)/
O地)/
O地)/
O地)/
O地)/
O地)/
O地)/
O地)/
O地)/
O地)/
O地)/
O地)/
O地)/
O地)/
O地)/
O地)/
O地)/
O地)/
O地)/
O地)/
O地)/
O地)/
O地)/ |
4.5 KAK IOJb3OBATbcr DyXOBKOI
-PEKIMblI PNPOTOBJIENHNIU
PnirroBneHne nui Bcra da DonxHObblno HnHrTbcra TOnbko C3akpbTOI DBepue DxyOBKn.
HARPEB CHN3Y + BEHTNIJTOP - Ncnonb3yIOTc HnKnn HArpeBaTeIbHbI 3JIeMeHT N BeHTNIJTOP. 3TO T MeToD nDeaIbHO NOxOHT dI npiroTOBJIeHn OTKpblTbIX pINPOB C pP yKTOBOH NaHHKO, pINPOKOB c0TKpblTOH pKyTOBOH NaHHIO, n pINPOKHBx.Ipn 3OM BIneueKa He nepeCyUINBaETc No6ecneuINBaETc NObEM TcTa. YctaHOBe NTb INHKeHoJIOKeHne.
HARPEB CHN3Y - Icnonb3yer c HnKnnn HarpeBaTebnbln 3nemeH.3OT MeTOn nDeaIbHO IOXoDIT dIg npiroTOBHeHnIO6bIX MyhBx INeIIN. Ucnonb3yte erO dJI npiroTOBHeHn OTkpblTx NiporOB C pkykTOBn Hm rOHOH NaunHKo, NipOROB C 3abapHbIM KpemOM n paAnuHoi HauHHKO, NipoxKOB C OTkpblTo fpykTOBOH NaunHKo, NipoxKOB C MAcOM nPi pb60n Dpyro NnU, dNpriTOBHeHnKOTOpOHpe6byet c 60ee HnEHCMBnHarpeCBn
HARPEBCHN3Y HAPREBCBEPXY-Ncnonb3yOITcBepxHH NnHXHH HAPBEATEIbHbIe 3neMeHTbI. TmTeoI dEaIbHO pXQNT DnTpaMnIOHrTO 3axapINBaHnN nDnBblneKn. OH nCNoIb3yETcP npnPiROTOBJIeHN YepHOrO Mca, IOBdINHbI, HOrn rHeHaKa,IuH, Xn6a,bnnnpOdyKToB, 3aBePhTybxΦoNby.
HARPEB CHIN3Y + HAPREB CBEPXY + BEHTNJIATOP - NcnoNb3yIOTcBepxHn n HnKnnHARpeBaTeNbHbte 3neMeNTb, aTakKe pa6oraet BEN TNIJATOP, c NOMOuHo KOTOPRo O cyueeBnEaTcR cnPKyIaIpyrOBo3dYxAB DxyOBke. 3OT MeToD peKomeHdyETcNcNOlb30BaTb dNpriTOBNEHn DOMauHeHNTuBb, BIneUKN, p5b6n OBOoue. PnncNoB3oBAHn 3r OTO MeOda ObecneuBaEe TnyUee npOHKnHOBeHn TENa BHyTpB NiUs, n TaXke CHNkaEtCBApeM npriTOBHeHn NiUs n PpeDbapntEnbHoro pa3orpeBa. MeToD npriTOBHeHn NiUs c NcNoB3 OBaHnEM BeHTNJIaTOpa NcBOJraT qHOBpeMeHNO rOTOBtB pa3NiHbE BVdu NiUs Ha pa3hIx NOnkax DxOBKn. Pn 3TOM o6ceNuBaTc R BoJe e paB HoMepHoepacnPepenHeHn TE Na n PpeDOrBaPaTaAeTc NoIOuEHe OndHMnDom NiUs 3anaxApyr OTo BVda NiUs PnOgHOBpeMeHHOM npriTOBHeHn pa3hIx BIVoBNIu CnDeYeTyBeNInb TBeMnpriTOBHeHn NiUs HA 10MNHyT.
Pyr JbHARPEBATENBbHINJEMEH+BEHTNIAIROTPNcnonb3yIOCTBepxHn HNXHNHARpeBaTeNbHbIEeMeHtbl,aBKeHarpeBaTeNBbHnEmeHTKpyrnofOoMbNOCyuEcTBNaETCnPKyIaIraRTOpAeBO3dyxaBdyXOBke.3To MeTO npriroTOBneHHNIuNCBEHTNIAITopOM.
PnIb -NcnoB3yETc BepxHn HArpeBaTeNbHbI 3JeMeHT. 3OT MeOJnDeaIbHOnoDxOuTIDn I npDToBLeHn pa3NJUHb6IOHa rpnne,Ke6a6OB, n rpaTHOB (6bnDa, 3aneueHHbIe NOcbpOM).rpnb OdoJhen PpeBaRtBHo paoorpeBaTbc DO BlicOKo TEMepaTbpB TeueHne 5 MNHyT.Kyckn 6eNoRo Mca DoNkHbI paCnonaratbc Ha OdnHakOBom pacCToHmOt HArpeBaTeNbHOro3JeMeHTa rpnna.Bpemr npiroTOBHeHn NnI npn 3TomyeNnuBaetc,HMOcNOyuaetc 60one cOHbIM. YepHoe McoN pIne pb6MoXHO KnaCTb npmo Ha peWeK TY,ND KotOpuyo Heo6xOIMO yctAHOBtB NODOH dNc6opa KNDIOCTN.
33 PUNb + BEHTNJYTOP - Vcnonb3yIOTc BepxHn HArpeBteNBhnn 3nemENT n BeHTnJIaTOp, C NOMOuBo KOTOPo OcyueCTBnEeTCnUPKnyLmRrnpUero BOzDyxa B DxyOBke.ДЯ npiroTOBneHnue YepHO rMa ca peKOMeHdyeTc npedBaPntEBhnh pa30rpeBdYXOBKn, a dNpiroTOBNeHn6eNOOMca npedBaPntEBhnh pa30rpeBdYxOBKn He Tpe6yeTc. PpiroTOBJeHn e HarpIne NdeAIBHO noxDnIT dIra 3azapnbHaHn 6oBshkXcKOB Mca NDomAWeHn NTtBu. PpiroTaNbMaema Ha rpIne Niua pacnonaraetc B CEHTpe cpeHne noKN.
ДлясбopaсokOB,KOTopbIe BbldeJIaHOTcprnpnPnIroTOBNEHIN\PuUHa rIpIne,NotNkYhXHOyCTaHOBnTbNdoDnJdC6pBaJHKoCTn.DnI npOnyHeHONmAlNbHbXpe3ynbTaTOBnpOcLnTe 3a Tem,yTo6bl npIroTaNbMaMae\PuHaPeacnOraNanacBcNtKOM6n3KOOT HarpeBaTeNBHOrO3JIeMeHTaPnIa,NpeBepHerNTKe Kyckn\PuOla npOietBpeMpaBHOeNOBnHEBpeMeHInPnIROTOBNeHINu
Nb + BEPTEN + BEHTNJTOP - PpenMyueCTBOM daHHORMeToOaIpyroTOBLeHnINuIN, BKOTOpOM NcONb3yeTCB epXnHn HarpeBaTe NbHbIeNeMeHT, BeHTNJTOp, INBePeJ,ABJeTcT O, QTO Nnua npoxapnBaETc paBHOMepHO, INpn 3OM He cTAHOBITc cyxoi H be3BkychoH. BepTe 6dTe npdoJIkTa bpaauTbcr np6bn3ntelhbo euenTbMHyTNocEeBikLIOueHARpeBa.3To06ecneHBAeTTNONHOe
NCNb3OBaHne octabWeroC8 DxyOBKe Tennn. Pnp npiroTOBneHN NINu Ha BepTeNe IpeBapntbHbI pa3orpeB DxyOBKn He Tpe6yeTcR.
PA3MOPAXNBAHNE - Korga pyka perynipobkn yctaHOBHeA B 3TO NIOJXHe, C NOMOJIbIO BeHTINJIaTopa OcyIeCTBJIeTcR UPKyIaIe TEnILO Bo3Dyxa BOKpyr 3amOpOKeHHbIX npOyKTo, YTO ObecneuBaET INx pa3MOPaXnBAHne B TeueHne HECKoJIbKnx MmHT 6e3 N3MeHeHn CoedePxAHn B NIIe NpOTeHOB.
DNEPXAHE NIIU B PA3OPTOM COCTOHN
3TOT peXIM peKOMeHdyeTcIyI pa3orpeBaHnI NIIu, paCNOJIOKeHHoH Na OONke, yCTaHOBJIeHHoH Na BTOPOI PO3NIUIN CBepxY, INI DNJa pa3MOPaXINBaHHN IINI BbIeueKIn, paCNOJIOKeHHbIX Ha NOJIke, yCTaHOBJIeHHO HnIKHN YDObEh.
NcnoB3yETcNoCToHHaTEmnepaTypa 60 ^ C ,TeMnepaTypa HpeRynpyetc.
HILLA-B 3TOMpeKIMe BdyoxBKe npOcnxOaNT uNpKJyIaJIyA H03dyxa, yTO o6ecneuBaet npeBOcXoNDhbe pe3yNbTaTb NpNtOBoNEHH TAKHX 6NJOD KAK NIIUa NN KEKC.
Soft 3Ta cyHKnIgI IIN pNIROTOBHeHNG KOHNTEPCKNX INDeHNI n Xne6a.5NaOapra CHNKeHHo CKopoCTN KOHBekuNN yBENHBAeTC BNAxKHOCTb BYHTPN DXYOBKn. NObBIUEHHAR BNAxKHOCTb CO3aET NDeAIBhIE YCNOB INpNIROTOBHeHNG IND 6HIO, KOHCNEtHuN KOTOpBX DOJXHb 6bITb 3NaCTNuHBO B PPOCECE PPNIROTOBHeHNG (HANPMep, INporn, Xne6, NeueHbe) IN He DONyckaTeCpACTpeckBaHne.
NcBtTao B COOTBeCTBn C CENELEC EN 60350-1Ipy onpeJeHnKnaacnnotpe6nHnAnektpo3Heprn.
4.6 COBETbI NO PnIroTOBNEHIO NIIuN
PeKOMeHdyETcC oINb MRCO nocJe erO npriROBnEHn, TAK KAK COJIb Bb3bBAeT pa36pb3rNBaHne Jxnpa. PpN 3OM dYXOBKa 3aRpa3nETCN OOBpEyTCBdM.
Kcyk BeIoro MCA (CBNHnHa, TeJrTHNa, rHHeHOK), N pbl6a MOryt NOMeUaTbcB XoNOHyD yXOBKY. PpN 3OM BpEmy npriROTOBnEHn NIIuN cyDEt 60JIbWe BPEmHn npriROTOBnEHn NIIuN B npedBaPntJIbHO pa3orpeToJ dYXOBKe, HO Kyckn Mca 6dUT NyUwe npoxkapNAbCBAeB CpeDuHe, TAK KAK BpEmy npOHKnHOBeHn TEINa BHYTpB NIIuN npN 3OM yBeJIuNBAeTcN.
PpAunbHb npedBaPntJIbHb pa3orpeB dYXOBKn RBLraTc HEOxOIMMbIM ycNoBnEM DnI YcNeuHOR npriROTOBnEHn YepHOro Mca.
PNIIGOTOBJIEHNEIINHNAIJIIE:
- Peped 3aay3ko nuu dna npusomoeHn Ha apune: BbInbTe Mco n3 xoIodnBnka 3a HeckOJIbKO YacOB Do eropnpiroTOBHeHnHa rPine. IonoXnte ero Ha HeckOJIbKO CnoEB KxOHHO (BnTbBAHOe) 6yMaN. 3To ObecneHT ydaJIHe Bnarn n NyuHnn nporpeMca B cepdHnE. Peped npiroTOBHeHm Mra HA rPine Nocblte ero nepcem n DpyrIMn Cneunm, Ho He CoJInte ero nepei npiroTOBHeHm. IocOnite Mco Nocne ero npiroTOBHeHn. B 3tOM cNYae Mco 6yDeT 60Jee coHyBM.CmaXbTe Mco TOKIM CnoEm pactNTeBHO rMaCna. 3To NyUe BCero DeNaTb C nOMoubIO NploCKO uHPOKON KCTN. 3Ate m epe Naocblte Mro nepcem N DpyrIMn Cneunm (HanpimEp, Ye6peom).
- Bo vpeM npuzomoeHnru niu:
HnKOrDa He npokalbIaBte Mco BO Bpemr ernpTOBneHn, daxe KOrDa bbl erpepebopaHbAeTe.3To pNpBeTc TOMy,UTO m3Ma cbyet BBiteKaTb COK, n OHO Byet cTAHOBtCBs CYXM.
ПРИГOTOBJIЕНIE BbINEΥКИ:
HnkOrda He nOlb3yntecb 6nctTzIMN foOpMoKAMN, OHN OTPaKaIOT TENNO, NMOYt NCnOpTnB BaUN NpOxKN NN NpOxKhIe. EcnBaUN NpOxKN NpDpyMnHBaOTc CNIIkOM 6blcTo, NOKoJIte INX JnHOHePPOHuaeMOn BymarO INN ANHmHneBOI FOJIbRoN.
BHHMaHHe: 6necTaaCtOPOHa FOJbIg DOnKHa 6bITb
6bpaSeHa K NpOxKAM. B npOTnHOM Cnyae TEnNo 6yDet
OTpaxaTbca 6necTaeNOBepXHOCTbIO H He 6yDet npOHKaTb B nIuSy.
He omkpbbaume deepuy dyxoxeku e meuehne nepebx 20-25 Muhym npuzomoeneHua: cyfne, cdo6hble bnyochn, BnCKBnTbM OORY TOCCTb. Bbl MOKTe npoBePnT, roTOBA Jn BIneYka, pOKoONB ee B CEHTpe HOXOM NnM MetaJIINCeCKO Bn3aJIbHO NcMIeJ. EcNl Ne3BHe HOXA BByOXoNT N3 BblNeCKU YnCTbIM N CyXM, TO BIneYka rTOBa, N Bbl MOKTe OCTaHOBNb TnpOeCC BIneKaHNA. EcNl Ne3BHe HOXA BByOXoNT N3 BblNeCKI BnAKnHbIM INC HAnNIuWMH Na Hem QactNUKAM BIneYKn, PpOOnkTIte BIneKaHnE, Ho HEMHOr yMeHBWnte TemnepaTyD nToro, YTo6bl BIneYka He NoTropela.
5.CEPBCHbI UEHTP
PpeKdE qem N03BOHHTb B cepBnchbl ueHTp.
EcnnyxOBKa He pa6oTaet:
- PpOBeBpTe, yTo OHa npaBnIbHO NODKIIIOUeHa K3NeKTpOcETN.
EcIn Bbl He MoXeTe CaMOCToRrIbHo ONpeDenITb PnpuHny
HeNCpPaBHocTn:
- OToCoeDInHnTe DnyObky OT 3JNeKTpOceTn, He npNkacaI TeCb K Hei, n o6paTnTEcb 3a NOMOsbIO B cepBnCbHn ZeHTp.
IpeTemKanNo3BOHnTB B cepBnchbI cHTp 3aHnWite cepHHbHOmePn3dEeNya, yka3aHHbIBero NaCnOpTHoTabnUyKe. Ecn He nCTeK cpoK DeiCTBna rapaHTn, yka3aHHbIB rapaHTnHOM TaHOHe, peMOHTn3dEeNBA cepBnCHom ceHTpe 6ydet BBINOJIHeh 6ecnNaTHO.

Данньи ппбор Имeel МаркироВу B COOTBETCTBUN C EBponeNcKoДиpeKTHBOI 2012/19/EC o6 OTXOdax npOn3BOdCTBa 3JNEKTPnueCKORI n 3JNEKTPoHNOrO obOpyOBAHIN (WEEE). OTxObl npOn3BOdCTBA 3JNEKTPnueCKORI n 3JNEKTPoHHO obOpyOBAHIN coDePkaT 3aRpy3HraIOUne BeuEcTBA (KOTOpbIe MOrYT HeratNBHO BNnTB Ha OkpyKaHIoU cyEу) IN OCHOBHbIe KOMNoHEtBI (KOTOpbIe NODJIeKAT
noBTOpHOMy nCNoIb3ObaHHo).BaKHO, yTo6bl OTxObl npOn3BOJcTBA 3NeKTPnueckoro n 3NeKTPoHHOrO o6OpyOBaHnroNobepraNCb CneuaJIbHoN obpa60Ke C cEInbU ydaJeHnru I yTuIN3aunn BCex 3aRpy3HNOuixn BeueCTB, a TaKxe pereHepaunn noBTOpHOrO nCNoIb3ObaHHaNBce MATEpnaIOB.
KaKbMoKeT CEnaTb CyueCTBeHHb BkJaB NpeDoTbpaUeHne 3KoONruecknx np6nem, Bbl3bIbAebMbIX OTXODAMN pON3BOCDTBa 3JKeTpUeCKTOI N3JeKTPOHHO O6OpyDObAHN; DnA 3TORBOaxHO npuDEPKNBaTcR HeKOTOpbIX OCHOBHIX npaBNI:
-HeIb3aO6paUaTbcraCOTXoAMnPOn3BOJCTBa3JeKTPnueCKOrn3JeKTPoHHoroOBpyoDBAHn,KAcC6bITOBBIMNOTXoAMn.
- OTxOdbI npOn3BOoCTBa 3JNeKtpUeCKOrO n 3JNeKtpoHOrO o6OpyDoBAHn CneDyET NpeEJaBaTb B NyHKtBc6opa, KOHTpOnuPyEmble opraHamM MeCTHO Bnactn ININ 3apeInctPnpoBAHHbIMN KOMNaHmMn. Bo MHornx cTpaHax HAnuNN 60nbWOrO KOnuYeCTBa OTxOOB npOn3BOoCTBa 3JNeKtpUeCKOrO n 3JNeKtpoHOrO o6OpyDoBAHn C6op OTXoD OcyUeCTBnAETCn Ha Domy.
- Ppi NOKynke HOBOrO npN6Opa CstapbI npN6Op MOxHO BO3BpaTnTB pO3HnUHOMy TOPROBOMy PpeDnPnTnIO, KOTOPoe 083aHO npINrTa bero 6ecnPaTHo Ha OCHOBe B3aUMHO-OHO3NaHORO COOTBETCTBnE, ecnn 3To npN6Opbl aHaONuHOro Tnna, INBO3BpaUaEMbl npN6Op IMeet Te JeXfYNKcUN, YTO IN IpoDaBaEMbl.
3HEPROCBEPEXEHNEI 3AUINTA OKPYKAOUIEIN CPEblI NO BO3MOXHOCTn CNeDyET N36eRaTb PneDbapNTelbHOrO HArpeBa dyxOBoro uKaFa n Bcerda 3anONHraT bero NOnHocTbIO.OTkpBBAIte DBepuy DxyOBoro uKaF a Ka KMOHpoEke, TAK KaN pNkKaJDMoe OTkpBTHn TENl OpaeeNBHeHn 3KOHOOM 3JEKTPO3HEPRn BbIKNouayTe DxyOBo WkaF 3a 5-10 MNHTdo NNAnHypEmo OKOHuaHN BpeMeHn PNiroTOBHeHn, TaKIM o6pa3OM NcNOb3yeTcR OCTaToOHoe TEnlLO, BbipabTaIBaemoe dYxOBbIM uKaFOM. YInIOThnTe cNeDyET COePExaT B VNCtote IN B NaJIeKaeM CoCTOHN BO N36eKaHne pacnpocTpahenHn TEIIa 3a PpeIb KaMEpbI. B Cnyae ecIn B BaWem DorOBope Ha 3JEKTPOCHa6KeHne PpeDyCMaTPBaETc NOacBOH TApH, TO npOrpMaMA "OTcpOCha PnIROTOBHeHn" ynpOuaet Pnpcecc 3KOHOMm 3JEKTPO3HEprn 6laRoapr OTCpOKe HauJa nPoCecca npiroTOBHeHn DO HauAna DeiCTBn IbGroTHORo TapHa.
Varnostna Navodila
52
2. TEHNOLOGIJA PRO/EXP'R
2.1 OPREMA PEÇICE (odvisno od modela)
USTEDA ENERGIJE I BRIGA ZA OKOLIS
Ukoliko je moguce, izbjegavajte nepotrebno zagrijavanje prazne pečnice. Vrata otravarjte sto je manje moguce, kako biste smanjili gubitak topline iz unutrasnjosti. Za značajnu ušedu energije, iskličite pečnici 5 do 10 minuta prije planiranog završetka pečenja i iskoristite preostalu toplnu pečnice. Održavajte brve cistima i prižanje da su pravilno učvrscene, kako biste izbjugli gubitak topline. Ukoliko imate dvotarifno brojillo, iskoristite funkcjiju odgode početka pečenja za period jeftinije elektrickne energije.
Tel: 039.2086.1 Fax: 039.2086.403
www.candy-group.com
CANDY
GARANTI BELGESI
ANKASTRE FIRIN
Accessories (According to model)
87
Assistance technique
91
2.1 EQUIPEMENT DU FOUR
2.3 U·S∈∈ (PAR MODELE)
The manufacturer will not be responsible for any inaccuracy resulting from printing or transcript errors contained in this brochure. We reserve the right to carry out modifications to products as required, including the interests of consumption, without prejudice to the characteristics relating to safety or function.
IT