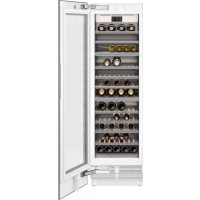
RW466765 - Wine cellar GAGGENAU - Free user manual and instructions
Find the device manual for free RW466765 GAGGENAU in PDF.



| Product type | Built-in wine cabinet |
| Brand | Gaggenau |
| Model | RW466765 |
| Bottle capacity | 70 to 99 bottles depending on configuration (18" and 24" models) |
| Temperature zones | 2 or 3 independent zones |
| Temperature range | 5 °C to 20 °C (adjustable) |
| Recommended temperature | 11 °C (52 °F) |
| Display lighting | LED with multiple lighting modes |
| Connectivity | Home Connect (Wi-Fi) for remote control |
| Door opening | Automatic (Push-to-open or Pull-to-open) |
| Door alarm | Yes, audible signal if door open too long |
| Screen lock for cleaning | Yes (disables buttons for 10 seconds) |
| Rest mode | Yes (disables certain functions for energy saving) |
| Adjustable air humidity | Yes, activation via menu |
| Display | Touch screen with brightness, color settings, etc. |
| Power supply | 110-120 V, 60 Hz, 10-16 A |
| Maximum current | 6 A |
| Refrigerant | R600a (eco-friendly, flammable) |
| Weight | Up to 500 kg depending on model |
| Exterior material | Stainless steel (maintenance with specific products) |
| Cleaning | Soft cloth, warm water and mild dish soap |
| Included accessories | Shelves, mounting hardware, manual |
| Spare parts | Available from customer service (original parts) |
| Self-diagnosis | Integrated program to detect faults |
| Warranty | See provided service booklet |
Frequently Asked Questions - RW466765 GAGGENAU
User questions about RW466765 GAGGENAU
0 question about this device. Answer the ones you know or ask your own.
Ask a new question about this device
Download the instructions for your Wine cellar in PDF format for free! Find your manual RW466765 - GAGGENAU and take your electronic device back in hand. On this page are published all the documents necessary for the use of your device. RW466765 by GAGGENAU.
USER MANUAL RW466765 GAGGENAU
Important safety instructions 3
Definitions 3
About these instructions 3
Introduction 3
Restriction of user group 3
Risk of explosion 3
Risk of electric shock 4
Fire hazard/Danger due to refrigerants 4
Risk of fire 4
Risk of suffocation 4
Damage 5
Weight 5
State of California Proposition 65 Warnings 5
Intended use 6
Environmental protection 6
Packaging 6
Old appliances
Installation and connection 7
Contents of package 7
Technical data 7
Installing the appliance 7
Check built-in cut-out 7
Side-by-side installation 7
Saving energy 8
Before using for the first time 9
Electrical connection 9
Getting to know your appliance 10
Appliance 10
Operating controls 11
Equipment 11
Operating the appliance 12
Switching the appliance on 12
Switching off and disconnecting the appliance 12
Setting the temperature 12
Display light 12
Humidity 12
Display lock for cleaning 13
Self-test 13
Setting the brightness of the control panel 13
Switching standby display on and off 13
Setting the display screen 13
Setting the touch field color 13
Setting the touch field tone type. 14
Setting the touch field tone volume 14
Setting the signal tone volume 14
Dimming when door is opened and closed 14
Setting the temperature unit 14
Setting the language 14
Resetting to the factory settings 15
Switching demo mode on or off 15
Rest mode 15
Automatic door opening 16
Home network 16
Automatic display lock for cleaning 16
Alarm 16
Door alarm 16
Home Connect 17
Setting up Home Connect 17
Connecting the refrigerator to the Home
Connect app 18
Installing updates for the Home Connect
software 18
Customer Service access 18
Deleting network settings 19
Information on data protection 19
Wine storage cabinet 20
Loading bottles 20
Tips for storing wine 22
Drinking temperatures 22
Cleaning 23
Cleaning the display 23
Cleaning the appliance interior 23
Cleaning the equipment 23
Care instructions for stainless steel surfaces 23
Noises 24
Normal noises 24
Preventing noises 24
Lighting 24
Faults – what to do? 25
Appliance 25
Customer service 26
Appliance self-test 26
Repair order and advice on faults 26

Important safety instructions
READ INSTRUCTIONS - DO NOT DISCARD!
Definitions

WARNING
Non-observance of this warning could result in death or serious injuries.

CAUTION
Non-observance of this warning could result in slight or moderately serious injuries.
NOTICE
Non-observance of this information could damage the appliance.
Note: This indicates important information and/or tips.
About these instructions
- Read and follow the operating and installation instructions. They contain important information on how to install, use and maintain the appliance.
- Retain all documents for subsequent use or for the next owner.
Introduction
- This appliance complies with the relevant safety regulations for electrical appliances.
- The refrigeration circuit has been checked for leaks.
Restriction of user group
- Avoid placing children and vulnerable persons at risk.
- This appliance may be used by children and persons who have reduced physical, sensory or mental abilities or inadequate experience and/or knowledge, provided they are supervised or have been instructed on how to use the appliance safely and have understood the resulting dangers.
- Children should be supervised to ensure that they do not play with the appliance.
Risk of explosion
- If the appliance's ventilation openings are sealed, a leak in the refrigeration circuit may result in a flammable mixture of gas and air.
Keep ventilation openings in the appliance enclosure or in the built-in structure clear of obstruction. - Never use electric devices inside the appliance (e.g. heaters or electric ice makers).
- Do not store products which contain flammable propellants (e.g. spray cans) or explosive substances in the appliance.

Important safety instructions
READ INSTRUCTIONS - DO NOT DISCARD!
Risk of electric shock
Improper installations or repairs may put the user at considerable risk.
- When installing the appliance, make sure that the power cord does not get jammed or is not damaged.
- If the power cord is damaged, immediately disconnect appliance from the power supply.
- Do not use multiple outlets, extension leads or adapters.
- Before servicing or modifying the appliance, pull out the power plug or switch off the fuse. Before cleaning, switch off the appliance with the main On/Off switch. Fittings can be safely adjusted while the appliance is switched on.
- Never cut through or remove the power cord's third conductor (grounding conductor).
- Never clean the appliance with a steam cleaner. The steam may penetrate electrical parts and cause a short circuit.
- The appliance, cable and accessories should only be repaired or replaced by the manufacturer, customer services, or a similarly qualified person.
- Only use original parts supplied by the manufacturer.
These parts come with a guarantee from the manufacturer that they satisfy the safety requirements.

Fire hazard/Danger due to refrigerants
The tubes of the refrigeration circuit contain a small quantity of an environmentally friendly but flammable refrigerant (R600a). If the refrigerant escapes, it may injure your eyes or ignite.
- Do not damage the tubes.
If the tubes are damaged:
- Keep open flames and ignition sources away from the appliance.
- Ventilate the room.
- Switch off the appliance and unplug the power cord.
- Please contact customer service.

Risk of fire
Portable multi-outlet power strips and portable power supplies may overheat, causing a fire.
- Never leave portable multi-outlet power strips or portable power supplies behind the appliance.
Risk of suffocation
- If the appliance features a door lock: keep the key out of the reach of children.
- Keep children away from the packaging and its parts.

Important safety instructions
READ INSTRUCTIONS - DO NOT DISCARD!
Damage
To avoid damage:
- Do not stand or lean on the base, runners or doors.
- Keep plastic parts and door seals free of oil and grease.
- Pull the power plug – not the power cord.
Weight
The appliance is very heavy. The appliance should always be transported and set up by at least 2 people.
→ "Installing the appliance" on page 7
State of California Proposition 65 Warnings
This product may contain a chemical known to the State of California, which can cause cancer or reproductive harm. Therefore, the packaging of your product may bear the following label as required by California:
STATE OF CALIFORNIA PROPOSITION 65 WARNING: / AVERTISSEMENT ISSUE DE LA PROPOSITION 65 DE L'ÉTAT DE LA CALIFORNIE:

WARNING / AVERTISSEMENT
Cancer and Reproductive Harm / Cancer et dommages à la reproduction - www.P65Warnings.ca.gov.
Intended use
Use this appliance
• only for storing wine.
- only in the home and in the home environment.
- only according to these operating instructions.
This appliance is intended for use at an elevation of no more than 2000 meters above sea level.
Environmental protection
Packaging
All materials are environmentally safe and recyclable:
- Dispose of packaging in an environmentally responsible manner.
- Please ask your dealer or inquire at your local authority about current means of disposal.
Old appliances
Valuable raw materials can be reclaimed by recycling old appliances.
WARNING
Children may become locked in the appliance and suffocate!
Before disposing of your old appliance:
- Remove the door.
- Leave shelves and bins in the appliance to prevent children from climbing in.
- Keep children away from the discarded appliance.
CAUTION
Refrigerant and harmful gases may escape.
Do not damage the tubes of the refrigeration circuit and insulation.
- Pull out the power plug.
- Cut through the power cord.
- Have the appliance disposed of properly.
Installation and connection
Contents of package
After unpacking all parts, check for any damage during transport.
If you have any complaints, please contact the dealer from whom you purchased the appliance or our customer service.
→ "Customer service" on page 26
The delivery consists of the following parts:
• Built-in appliance
• Equipment (depending on model)
• Installation material
• Instruction manual
• Installation instructions
- Customer service booklet
• Warranty enclosure
• Information on the energy consumption and noises
Technical data
Refrigerant, cubic capacity and further technical specifications can be found on the rating plate.
→ "Getting to know your appliance" on page 10
Installing the appliance
Installation location
The weight of the appliance may be up to 500 kg depending on the model. The base must be sufficiently stable and should not give. If necessary, reinforce the floor.
Check built-in cut-out
The cut-out must fulfill these criteria:
• Anti-tilt bracket must be fitted
- Cut-out depth min. 24" (610 mm), for flush installation 25" (635 mm)
- rectangular
- stable – the side panels and the top must be min. 5/8" (16 mm) thick and securely attached to the floor or wall
• Depth of shortest side panels min. 4" (100 mm)
Side-by-side installation
Observe the specifications in the installation instructions for a side-by-side installation.
If a partition wall is required between the appliances it must be at least 5/8" (16 mm) wide.
Saving energy
If you follow the instructions below, your appliance will use less power.
Note: The arrangement of the equipment does not affect the energy consumption of the appliance.
Installing the appliance
| Keep the appliance out of direct sunlight. The appliance needs to cool less frequently at low install the appliance as far away as possible from heating elements, cooker and other heat sources: ambient temperatures and therefore consumes less power. | |
| At least 1 14 " (3 cm) from electric or gas cookers. | |
| At least 11 34 " (30 cm) from oil or solid-fuel cookers. | |
| Select an installation location at a room temperature of approx. 68 °F (20 °C). | |
| Do not cover or block the ventilation openings. The appliance needs to cool less frequently if the warm ventilate the room daily. | air can escape and therefore consumes less power. |
Using the appliance
| Open the appliance door only briefly. The air in the appliance does not warm up so intensely. | |
| Transport cooled wine in a cool bag and place in the appliance quickly. | The appliance needs to cool less frequently and therefore consumes less power. |
| Always leave a space between the bottles and the back panel. | The air can circulate, and the temperature will remain constant. The appliance needs to cool less frequently and therefore consumes less power. |
| Do not cover or block the ventilation openings. The appliance consumes less power if the warm air | |
| Vacuum the ventilation openings once a year. | can escape freely. |
Before using for the first time
- Remove information material, adhesive tape and protective foil.
- Clean the appliance.
→ "Cleaning" on page 23
Electrical connection

CAUTION
Do not connect the appliance to electronic energy saver plugs.
Note: You can connect the appliance to mains-controlled and sine-controlled inverters.
Mains-controlled inverters are used for photovoltaic systems which are connected directly to the national grid. Sine-controlled inverters must be used for isolated applications. Isolated applications, e.g. on ships or in mountain lodges, are not directly connected to the national grid.
- After installing the appliance, wait at least 1 hour before connecting it to prevent damaging the compressor.
- Check that the outlet was installed according to the regulations and complies with the requirements.
Requirements for outlets
Outlet with 110 V ... 120 V
Protective conductor 60 Hz
Fuse 10 A ... 16 A
Maximum simultaneous load
Appliance 6 A
- Connect the appliance to an outlet near the appliance. The outlet must also be freely accessible following installation of the appliance.
If free access is impossible, an all-pole isolating switch must be integrated into the permanent electrical installation according to the installation regulations.

WARNING
Risk of electric shock!
Never use multiple outlets, extension cords or adapters.
The appliance must be grounded correctly. Never cut through or remove the power cord's third conductor (grounding conductor).
Risk of electric shock!
If the power cord is too short, never use multiple outlets or extension cords. Instead, please contact customer service.
Getting to know your appliance
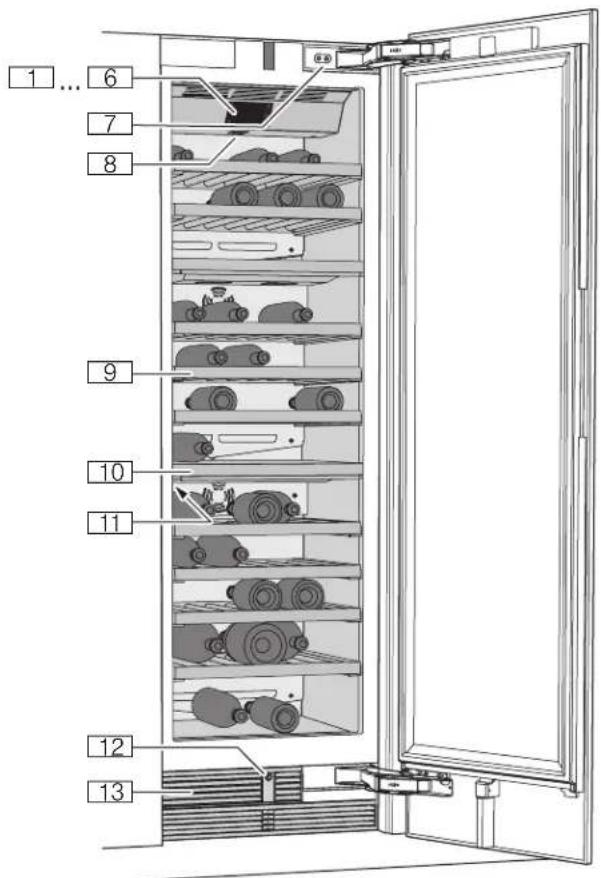
Appliance
* Not all models.
(...P Operating controls
X Door damper
`Main On/Off switch
h Shelf
)" Partition
)* Rating plate
)2 Automatic door opening
): Ventilation opening
Operating controls
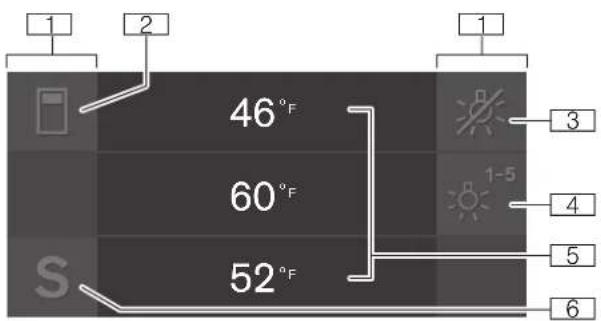
(Touch fields
There are sensors under the touch fields. Touching the symbol calls up the respective function.
0 button
Opens the menu for changing the temperature and humidity.
8 桑 button
Switches the display light off.
@ 📄 button
Opens the menu for switching between the different light scenarios.
H Wine storage cabinet temperature
display Indicates the set temperature in °F/ °C. Depending on the appliance model in question, 2 or 3 cabinets are displayed.
PS button
Opens main menu.
Main menu
Press S button to open the main menu.
In the main menu you can find:
- Basic settings
• Display lock for cleaning - Self-test
• Rest mode (when active)
→ "Operating the appliance" on page 12
Basic settings menu
To access the Basic settings menu:
- Press S button.
- Press < button to move to the menu item Basic settings.
- Open the menu using √ button.
In the Basic settings menu you will find the following submenus and setting options:
- Brightness
- Standby screen
- Display screen
- Touch field color
- Touch field tone type
- Touch field tone volume
• Signal tone volume
• Dimming when door is opened and closed - Temperature unit
- Language
- Factory settings
- Demo mode
- Rest mode
• Automatic door opening
• Home network
• Automatic display lock for cleaning
→ "Operating the appliance" on page 12
Equipment
Shelf
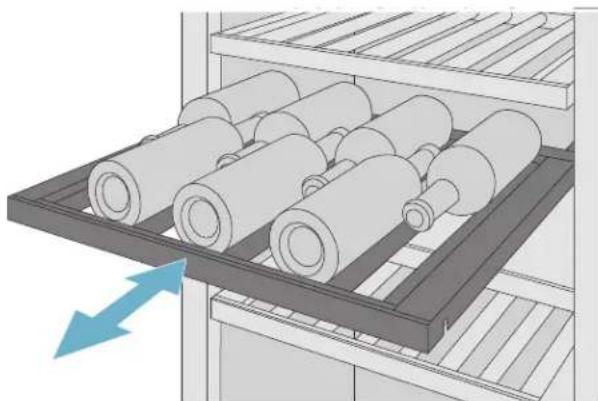
You can pull out the shelves to reach the wine bottles more easily.
Note: The shelves separating the climate zones are not movable.
natural_image
Illustration of cylindrical storage racks with a blue arrow indicating flow direction (no text or symbols)Additional shelf
You can install additional shelves to store more wine bottles or to provide better support to the bottles on the fixed shelves.
Operating the appliance
Switching the appliance on
- Press the main On/Off switch.
The appliance starts cooling and the light is switched on when the door is open. - Set the required temperature.
→ "Setting the temperature" on page 12
Operating tips
- When the appliance has been switched on, it may take several hours until the set temperatures have been reached.
- The front sides of the housing are partly heated slightly. This prevents condensation in the area of the door seal.
Switching off and disconnecting the appliance
Switching off the appliance
- Press the main On/Off switch.
The appliance is no longer cooling.
Disconnecting the appliance
If you do not use the appliance for a prolonged period:
- Pull out mains plug or switch off fuse.
The appliance is no longer cooling. - Clean the appliance.
3.Leave appliance open.
Setting the temperature
Recommended temperature
Wine storage cabinet: 11 °C/52 °F
Wine storage compartment
- Use ☐ button to select the required compartment.
- Repeatedly press /+ button until the display indicates the required temperature.
- The appliance stores the setting and automatically returns to the main screen after a few seconds.
Display light
You can use the preprogrammed light modes to illuminate your wine bottles when the door is closed. The individual climatic zones have different illumination levels.
Using the display light
- Press 📄 button to open the Display light menu.
- Select a light mode or press ☑ button to switch the display light off.
- Press √ button.
The setting is saved.
Switching display light off
- To switch the display light off, press 桑 button.
Note: This also hides the 📄 button for opening the Display light menu. Press the button again to unhide the 📄 button.
Humidity
If bottles with natural corks are stored for longer than 4 weeks, the natural corks may shrink if the humidity is too low.
To prevent this from happening, store old wine bottles in such a way that the cork is kept wet and increase the humidity.
Switching humidity on and off:
- Use ☐ button to select the required compartment.
-
To switch on the higher humidity level, press button.
The symbol appears in the display.
To switch off, press ⚠ button.
The symbol appears in the display. -
The appliance stores the setting and automatically returns to the main screen after a few seconds.
Display lock for cleaning
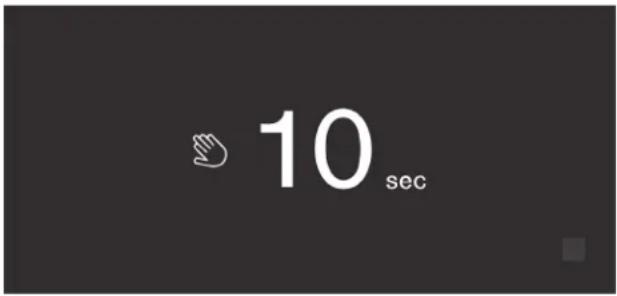
You can use this function to switch off the touch function of the controls for 10 seconds. During this time you can clean the display.
→ "Cleaning the display" on page 23
-
Press S button to open the main menu.
-
Press ▶ button.
The cleaning display appears, and the countdown starts.
Self-test
This function can be used to start fault analysis on your appliance.
→ "Appliance self-test" on page 26
Setting the brightness of the control panel
- Press S button to open the main menu.
- Press < button to move to the menu item Basic settings.
- Press √ button.
- Press \_ button to open the menu item Brightness.
- Press <> buttons to set the required brightness.
- Press √ button.
The setting is saved. - Press X button to exit the menu.
Switching standby display on and off
If you switch on the standby screen, you can select what is displayed on the control panel when the door is closed.
- Press S button to open the main menu.
- Press < button to move to the menu item Basic settings.
- Press √ button.
-
Press > button to move to the menu item Standby screen.
-
Press \_ button.
- Use <> buttons to select whether the standby screen is switched on or off.
- Press √ button.
- When the standby screen has been switched on, you can use <> buttons to select whether the logo or the temperature is displayed with the functions switched on.
- Press √ button.
The setting is saved. - Press X button to exit the menu.
Setting the display screen
You can choose between the settings Reduced and Standard. With the setting Reduced only the temperature and active special functions are displayed on the control panel after a short period without operation. If the touch fields are touched, all keys will be visible again.
With the setting Standard all keys always remain visible.
- Press S button to open the main menu.
- Press < button to move to the menu item Basic settings.
- Press √ button.
- Press > button to move to the menu item Display screen.
- Press \_ button.
- Press <> buttons to move to the required setting.
- Press √ button.
The setting is saved. - Press X button to exit the menu.
Setting the touch field color
- Press S button to open the main menu.
- Press < button to move to the menu item Basic settings.
- Press √ button.
- Press > button to move to the menu item Touch field color.
- Press \_ button.
- Press <> buttons to move to the required setting.
- Press √ button.
The setting is saved. - Press X button to exit the menu.
Setting the touch field tone type.
You can change or switch off the sound of the tones generated when pressing keys.
- Press S button to open the main menu.
- Press < button to move to the menu item Basic settings.
- Press √ button to open the menu item.
- Press > button to move to the menu item Touch field tone type.
- Press \_ button to open the menu item.
- Press <> buttons to select the required setting.
- Press √ button.
The setting is saved. - Press X button to exit the menu.
Setting the touch field tone volume
You can adjust the volume level of the sounds generated when pressing keys.
- Press S button to open the main menu.
- Press < button to move to the menu item Basic settings.
- Press √ button to open the menu item.
- Press > button to move to the menu item Touch field tone volume.
- Press \_ button to open the menu item.
- Press <> buttons to select the required setting.
- Press √ button.
The setting is saved. - Press X button to exit the menu.
Setting the signal tone volume
You can adjust the volume level of the signal tones generated e.g. with alarms.
- Press S button to open the main menu.
- Press < button to move to the menu item Basic settings.
- Press √ button to open the menu item.
- Press > button to move to the menu item Signal tone volume.
- Press \_ button to open the menu item.
- Press <> buttons to select the required setting.
- Press √ button.
The setting is saved. - Press X button to exit the menu.
Dimming when door is opened and closed
If dimming is switched on, the light will slowly become brighter when the door is opened, and then slowly darker when it is closed.
Switching dimming on or off when opening and closing the door
- Press S button to open the main menu.
- Press < button to move to the menu item Basic settings.
- Press √ button.
- Press > button to move to the menu item Dimming when door is opened and closed.
- Press \_ button.
- Press > button to move to the menu item On or Off. Confirm by pressing √ button.
Setting the temperature unit
You can choose between the unit °C and °F.
- Press S button to open the main menu.
- Press < button to move to the menu item Basic settings.
- Press √ button.
- Press < button to move to the menu item Temperature unit.
- Press \_ button.
- Press <> buttons to move to the required unit.
- Press √ button.
The unit will be changed. - Press X button to exit the menu.
Setting the language
- Press S button to open the main menu.
- Press < button to move to the menu item Basic settings.
- Press √ button.
- Press < button to move to the menu item Language.
- Press \_ button.
- Press <> buttons to move to the required language.
- Press √ button.
The display restarts, and the start screen is displayed.
Resetting to the factory settings
- Press S button to open the main menu.
- Press < button to move to the menu item Basic settings.
- Press √ button.
- Press < button to move to the menu item Factory settings.
- Press \_ button.
A signal tone sounds, and a message to confirm reset appears. - Press √ button.
All settings are reset to the factory settings. - Press X button to exit the menu.
Switching demo mode on or off
The cooling function of the appliance is switched off. All other functions can be used.
Note: Do not store any food items in demo mode as the appliance remains at room temperature.
- Press S button to open the main menu.
- Press < button to move to the menu item Basic settings.
- Press √ button.
- Press < button to move to the menu item Demo mode.
- Press \_ button.
- Press <> buttons to select the setting On or Off.
- Press √ button.
The setting is saved. - Press X button to exit the menu.
Rest mode
The appliance switches off the following:
• Automatic door opening
Note: With handle-free installation, please note that you will not be supported when opening the door during this time.
To open the door in this case, reach from below under the bottom panel of the unit.
- Audible signals
- Interior light
- Messages on the control panel
• Background illumination of control panel is reduced
Switching Rest mode on or off
Displaying or hiding rest mode in the main menu
To use rest mode, you first have to display the function in the main menu:
- Press S button to open the main menu.
- Press < button to move to the menu item Basic settings.
- Press √ button.
- Press <button to move to the menu item Rest mode. Press \_button.
- Press > buttons to move to the menu item Available or Not available. Confirm by pressing √ button.
- Press X button to exit the menu.
The function is displayed or hidden in the main menu.
Switching rest mode on
- Press S button to open the main menu.
- Press Ⓤ button to open the view Rest mode duration.
- Press -/+ buttons to change the duration.
- Press ▶ button to start.
The appliance switches all listed functions off.
Switching rest mode off
- After the selected time elapses, the appliance switches over to normal operation.
- To end rest mode before expiry of the selected time, press ■ button.
Automatic door opening
The automatic door opening function supports you in opening the door.
As soon as you activate this function, automatic door opening moves out and supports you in opening the door.

CAUTION
Repeatedly closing the door too early will cause automatic door opening to wear out or fail.
Do not close the door as long as automatic door opening is still moved out.
If you have nevertheless closed the door, leave it closed for 5 minutes. Automatic door opening will re-adjust itself.
Open the menu item Automatic door opening:
- Press S button to open the main menu.
- Press < button to move to the Basic settings menu.
- Press √ button to open the menu.
- Press < button to move to the menu item Automatic door opening.
- To change the setting, press \_ button.
Switching on Push-to-open system
In an installation situation without handles you can select the Push-to-open system. Your appliance will then open a crack if you press lightly on the door.
Note: Please note that automatic door opening is disabled if Rest mode is activated.
- Open the menu item Automatic door opening.
- Select menu item Push-to-open system.
- Press √ button to open the menu item.
- Select Opening force. Here you can select the level of force required to activate automatic door opening.
- Select Opening duration. Here you can select how long the door should remain open a crack before it closes again automatically.
Note: If the door only remains open a crack, the appliance checks once a second whether the door is still ajar. After the selected opening duration elapses, the appliance will close the door automatically.
Switching on Pull-to-open system
In an installation situation with handles you can select the Pull-to-open system. Your appliance will support you in opening the door as soon as you pull on the handle.
- Open the menu item Automatic door opening.
- Select menu item Pull-to-open system.
- Press √ button to open the menu item.
- Select Opening force. Here you can select the level of force required to activate automatic door opening.
Switching off automatic door opening
- Open the menu item Automatic door opening.
- Select menu item Off.
Home network
You can use this function to establish a connection between the refrigerator and your mobile device.
→ "Home Connect" on page 17
Automatic display lock for cleaning
You can use this function to select whether the automatic clean lock is switched on automatically when the door is opened.
- Press S button to open the main menu.
- Press < button to move to the menu item Basic settings.
- Press √ button.
- Press < button to move to the menu item Automatic display lock for cleaning.
- To change the setting, press \_ button.
Alarm
Door alarm
If the appliance door is open for a long time, the door alarm (continuous audible signal) switches on.
- Close door. The audible warning signal is switched off.
Home Connect
This appliance is Wi-Fi-capable and can be controlled remotely using a mobile device.
Note: Wi-Fi is a registered trade mark of the Wi-Fi Alliance.
In the following cases, the appliance functions like a refrigerator without a network connection and can still be operated manually via the controls:
- The appliance is not connected to a home network.
- The availability of the Home Connect function depends on the availability of Home Connect services in your country. Home Connect services are not available in every country. You can find more information on www.home-connect.com.
Note: Please observe the safety information in this instruction manual. Ensure that this is also observed if you operate the appliance via the Home Connect app and are not at home when doing so.
→ "Important safety instructions" on page 3
Follow the instructions in the Home Connect app as well.
Setting up Home Connect
Notes
- Wait at least 2 minutes after switching on the appliance before setting up Home Connect. Only then is internal appliance initialization complete.
- Take note of the Home Connect supplementary sheet, which is supplied with the appliance or is available for download at www.gaggenau.com together with the instructions. Enter the E-number of your appliance in the search field.
You can connect your appliance to the home WLAN network (Wi-Fi) in 3 basic steps.
- Install the app.
- Connect your refrigerator to the home WLAN network (Wi-Fi).
- Connect the refrigerator to the Home Connect app.
Home network menu
Here is how to open the Home network menu:
- Press S button to open the main menu.
- Press < button to move to the menu item Basic settings.
- Press √ button to open the menu item.
- Press < button to move to the menu item Home network.
- Press \_ button to open the menu item.
Note: The first time you open the menu, you will be automatically guided through initial setup. Follow the instructions on the control panel. For further information, please also see the following chapters.
-
Press <> buttons to select the required submenu.
-
Press X button to exit the menu.
The following sub-menus can be found in the Home network menu:
- Connection
- Connect to app
- Software update
- Delete network settings
Setting up the connection to the home network
The first time you open the menu, you will be automatically guided through initial setup. Follow the instructions on the control panel.
-
Install the Home Connect app on your mobile device.
-
Open the Home network menu on your refrigerator.
-
Open the app on your mobile device.
-
Log in or register with the app if access is not yet available.
-
Check the router of your home network to see if a WPS function is available for automatic connection.
-
If this function is available, start automatic network connection with √ button.
Follow the instructions on the control panel.
- Start manual network connection if this function is not available, if you're not sure whether the function is available, or if automatic network connection failed.
The refrigerator temporarily generates its own network for connecting the mobile device.
- Start manual network connection in the app of your mobile device.
As soon as the refrigerator is connected to the mobile device, a connection between the refrigerator and your home network is established.
Note: If the connection cannot be established, check whether there is sufficient reception.
→ "Verifying signal strength" on page 18
Verifying signal strength
The signal strength is displayed in the start window of the Home network menu. The signal strength should be at least 50 %. If the signal strength is too weak, the connection may be interrupted.
Improving signal strength
- Place the router closer to the refrigerator.
- Check that screening walls do not interfere with the connection.
• Install a repeater to make the signal stronger.
Connecting the refrigerator to the Home Connect app
Use this menu to connect your refrigerator to mobile terminal devices.
- Install the Home Connect app on your mobile terminal device and log in or register.
- Open the Home network menu on your refrigerator.
- Press > button to move to the menu item Connect to app.
- Press \_ button to open the menu item.
- Confirm the prompt to display the refrigerator in the app.
- Open the app and wait until the refrigerator is displayed.
Press Add to confirm the connection between the app and the refrigerator.
If the refrigerator is not automatically displayed, click on Add appliance in the app and follow the instructions. As soon as your refrigerator is displayed, add it with +. - Follow the instructions in the app until the process is complete.
Installing updates for the Home Connect software
The refrigerator checks at regular intervals whether updates are available for the Home Connect software.
If an update is available, a little exclamation mark S appears on the S^ button.
Installing the update:
- Press S^ button.
The special menu Home network note opens. - Press √ button to open the menu item.
A note window with the necessary steps for installing the new software appears. - To close the note window, press √ button.
- Open the Home network menu on your refrigerator. → "Setting up Home Connect" on page 17
- Press > button to move to the menu item Software update.
-
Press \ button to open the menu item.
Note: The \ button is only visible if an update is available.
The software is installed. -
A note appears when installation is complete.
-
Press √ button to close the note.
Customer Service access
If you contact Customer Service, they can access your appliance and view its status after you have given your consent. You need to have your appliance connected to your home network for this.
Further information about Customer Service access and its availability in your country is available under www.home-connect.com in the Help & Support area.
- Contact Customer Service.
→ "Customer service" on page 26 - Confirm the start of Customer Service access in the app.
During Customer Service access the symbol 📋 appears on the control panel. - As soon as Customer Service has obtained the necessary data, they end access.
Note: You can interrupt remote diagnosis early by switching off Customer Service access in the Home Connect app.
Deleting network settings
If there is a problem when trying to establish a connection, or if you would like to register the appliance in a different home WLAN network (Wi-Fi), the Home Connect settings can be reset.
- Open the Home network menu on your refrigerator.
- Press > button to move to the menu item Delete network settings.
- Press \_ button to open the menu item.
- Confirm the prompt to delete the network settings.
To then reconnect the appliance to the home WLAN network (Wi-Fi), perform initial setup again.
→ "Setting up the connection to the home network" on page 17
Information on data protection
The first time your Home Connect appliance is registered on a WLAN home network connected to the Internet (Wi-Fi), your appliance will transmit the following types of data to the Home Connect server (initial registration):
- Unique appliance identification (consisting of appliance codes as well as the MAC address of the installed Wi-Fi communication module).
- Security certificate of the Wi-Fi communication module (to ensure a secure data connection).
- The current software and hardware version of your domestic appliance.
- Status of any previous resetting to factory settings.
This initial registration prepares the
Home Connect functions for use and is only required when you want to use these Home Connect functions for the first time.
Note: Please note that the Home Connect functions can be utilized only in conjunction with the Home Connect app. Information on data protection can be called up in the Home Connect app.
Wine storage cabinet
Loading bottles
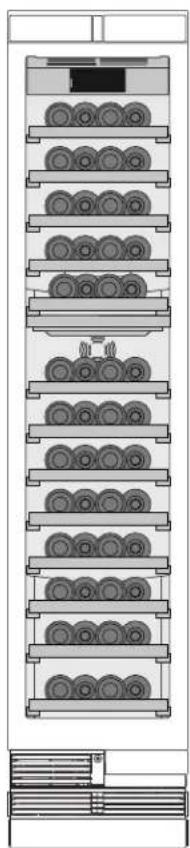
To store the maximum number of wine bottles:
• store the bottles as indicated
- check that the bottles do not exceed the specified dimensions
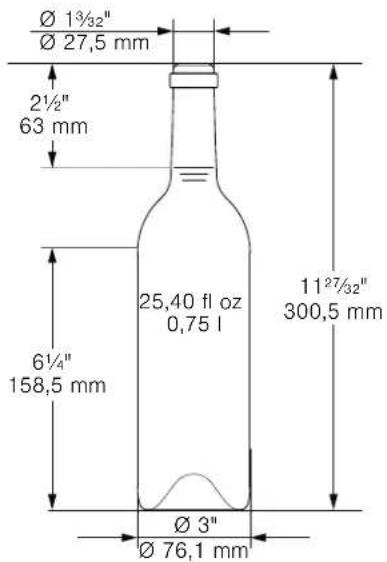
Standard bottle size
You can ideally utilize the volume of your appliance with Bordeaux bottles of this size.
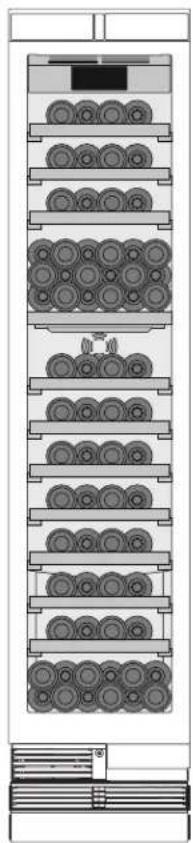
Storage example with standard bottles
18" appliance: 70 standard bottles
24" appliance: 99 standard bottles
natural_image
Diagram of a multi-tiered storage unit with circular components, no text or symbols present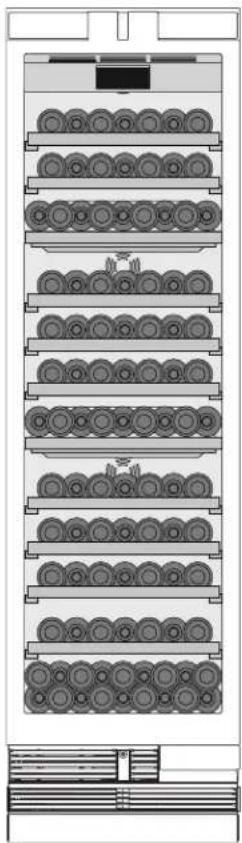
natural_image
Technical line drawing of a multi-tiered storage or rack system with circular components (no text or symbols)Loading with additional shelves
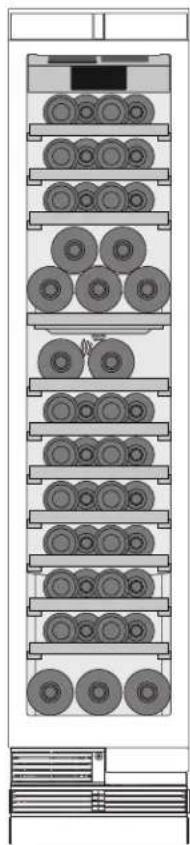
You can change the storage options of your appliance by installing additional shelves.
18" appliance: 52 standard bottles
24" appliance: 88 standard bottles
natural_image
Diagram of a multi-tiered rack-mounted storage unit with circular components (no text or labels)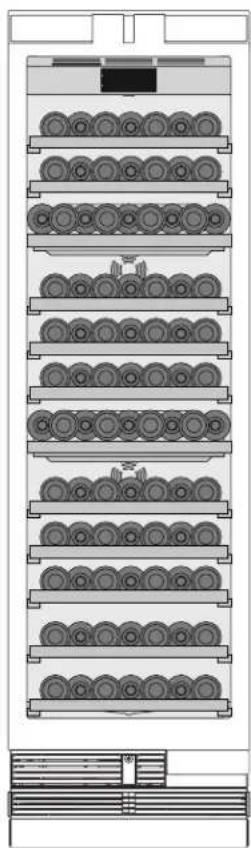
natural_image
Technical diagram of a multi-tiered storage or rack system with circular components, no visible text or symbolsStorage example for different bottle sizes
natural_image
Diagram of a multi-tiered rack-mounted device with circular components, no visible text or symbols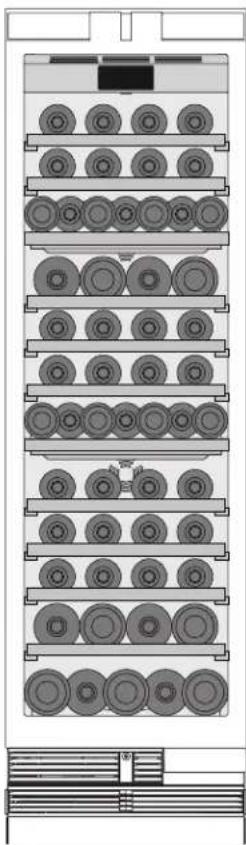
natural_image
Technical diagram of a multi-tiered mechanical or electrical component with circular components and mounting brackets (no text or symbols)Tips for storing wine
- Unpack wine bottles – do not store in crates or cartons in the wine storage compartment.
- If bottles with natural corks are stored for longer than 4 weeks, the natural corks may shrink if the humidity is too low.
To prevent this from happening, store old wine bottles in such a way that the cork is kept wet and increase the humidity.
→ "Humidity" on page 12
- The open bottle shelves allow continuous air circulation. As a result, excess humidity is quickly removed.
- Before the wine is enjoyed, it should be slowly warmed up (chambré): take e.g. rosé wine out of the appliance approx. 2–5 hours before drinking, and red wine 4–5 hours before drinking. This will ensure that the wine is at the correct drinking temperature. White wine, on the other hand, should be placed on the table just before drinking. Sparkling wine and champagne should be chilled in the refrigerator for a short while before drinking.
- Remember that wine should always be cooled slightly lower than the ideal serving temperature, as its temperature increases as soon as it is poured into a glass.
Drinking temperatures
The correct serving temperature is crucial for the taste and therefore your enjoyment of the wine.
We recommend the following drinking temperatures for serving the wine:
| Type of wine Drinking temperature | |
| Full-bodied red Bordeaux 65 °F (18 °C) | |
| Côtes du Rhône red, Barolo 64 °F (17 °C) | |
| Full-bodied red Burgundy, red Bordeaux | 61 °F (16 °C) |
| Port 59 °F (15 °C) | |
| Young red Burgundy 57 °F (14 °C) | |
| Young red wines 54 °F (12 °C) | |
| Young Beaujolais, all white wines with little residual sugar | 52 °F (11 °C) |
| Old white wines, full-bodied Chardonnay | 50 °F (10 °C) |
| Sherry 49 °F (9 °C) | |
| Young white wines, from late vintage onward | 46 °F (8 °C) |
| White wines, Loire, Entre-deux-Mers | 45 °F (7 °C) |
Cleaning

CAUTION
Avoid damaging the appliance and the equipment.
- Do not use abrasive, chloride-based or acidic cleaning agents or solvents.
- Do not use scouring or abrasive sponges. The metallic surfaces may corrode.
- Never clean the shelves or bins in the dishwasher. The parts may become deformed.
Cleaning the display
The change in temperature and humidity can cause the controls to steam up.
Switch the clean lock on before cleaning.
→ "Display lock for cleaning" on page 13
Use a clean micro-fiber cloth for cleaning.
Cleaning the appliance interior
Proceed as follows:
- Press main On/Off switch.
- Take out bottles and store in a cool location if possible.
- Clean the appliance with a soft cloth, lukewarm water and a little pH-neutral washing-up liquid.

CAUTION
The rinsing water must not run into the light or through the drainage hole into the evaporation area.
- Wipe door seal with clear water and dry thoroughly with a cloth.
- Switch appliance back on and put in bottles.
Cleaning the equipment
To clean, take the removable parts out of the appliance. → "Equipment" on page 11
Care instructions for stainless steel surfaces
When taking care of and cleaning stainless steel surfaces, use only cleaning agents suitable for stainless steel and a stainless steel cleaning cloth.
You can purchase a suitable stainless steel cleaning cloth from customer service.
To prevent visible scratches, clean the stainless steel surface in the direction of the structure.
Noises
Normal noises
Droning: A motor is running, e.g. refrigerating unit, ventilator.
Bubbling, buzzing or gurgling: Refrigerant is flowing through the tubes.
Clicking: Motor, switches or solenoid valves are switching on or off.
Preventing noises
Appliance is not level: Align appliance using a water level. Adjust the height of the feet. If the feet have already been moved right out, but the appliance is still not level, place e.g. a thin wooden plate underneath.
Bins, shelves or storage compartments wobble or stick: Check the removable equipment and re-insert if required.
Bottles or containers are touching each other: Move bottles or containers away from each other.
Lighting
Your appliance features a maintenance-free LED light.
Only customer service or authorized technicians may repair the light.
Faults – what to do?
Before you call customer service, use this table to check whether you can rectify the fault yourself.
Appliance
| Temperature differs greatly from the set value. | |
| Switch off appliance for 5 minutes.→ "Switching off and disconnecting the appliance" on page 12If the temperature is too warm, check temperature again after a couple of hours.If the temperature is too cold, check temperature again on the following day. | |
Displays do not light up.
| The power plug has not been inserted properly. Connect the power plug. |
| The fuse has tripped. Check the fuses. |
| The power has failed. Check whether the power is on. |
The refrigeration unit is switching on more frequently and for longer.
| The appliance was opened frequently. Do not open the appliance unnecessarily. |
| The ventilation openings are covered up. Remove obstructions. |
Appliance is not cooling, display and lighting are lit.
| Demo mode is switched on. Switch demo mode off. | → | "Switching demo mode on or off" on page 15 |
The door does not open when pressed.
| A special mode has switched off automatic door opening. | To open the door, reach from below underneath the bottom panel of the unit or switch off special mode.→ "Switching Rest mode on or off" on page 15 |
| Pull-to-open is switched on. Switch the appliance to Push-to-open.→ "Automatic door opening" on page 16 | |
| The opening force is set too high. Select a lower setting for the opening force.→ "Automatic door opening" on page 16 | |
| The fuse has tripped. Check the fuses. | |
| The power has failed. Check whether the power is on. | |
Customer service
If you are unable to rectify the fault, please contact our customer service. We will always find an appropriate solution in order to avoid unnecessary visits by engineers.
The contact information for your nearest customer service can be found here or on the enclosed customer service list.
When calling, please state the product number (E-Nr.) and the production number (FD), which can be found on the rating plate.
→ "Getting to know your appliance" on page 10
Trust the expertise of the manufacturer. You can therefore be sure that the repair is carried out by trained service engineers who carry original spare parts for your home appliances.
Appliance self-test
Your appliance features a self-test program which displays the fault your customer service can rectify.
- Press S button to open the main menu.
- Press > button to move to the menu item Self-test.
- Press √ button to start the self-test.
The self-test starts. - If faults are present, they will be displayed. In this case follow the instructions.
- The appliance restarts.
- The message that the self-test has finished is displayed for 10 seconds. To acknowledge the message, press √ button.
When the self-test has ended, the appliance switches over to normal operation.
Repair order and advice on faults
Contact information for all countries can be found on the enclosed customer service list.
US 877 442 4436 toll-free
natural_image
Illustration of cylindrical storage racks with an arrow indicating flow direction (no text or symbols)Configurer Home Connect
Remarques
natural_image
Diagram of a vertical rack-mounted storage unit with multiple circular components (no text or labels)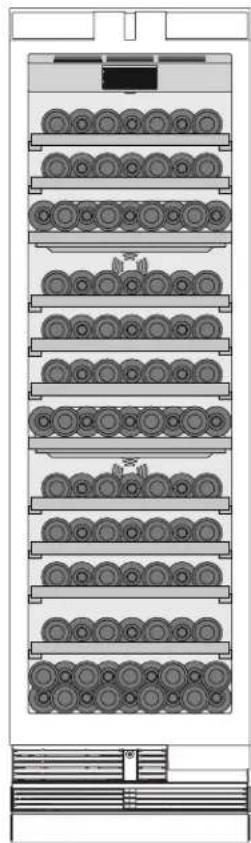
natural_image
Technical diagram of a multi-tiered storage or rack system with circular components (no text or labels)natural_image
Technical line drawing of two vertical storage racks with circular components, no text or symbols presentnatural_image
Technical line drawing of two vertical storage racks with circular components, no text or symbols presentnatural_image
Illustration of cylindrical rollers inside a rack, with an arrow indicating direction (no text or symbols)natural_image
Diagram of a vertical rack-mounted storage unit with multiple circular components (no text or labels)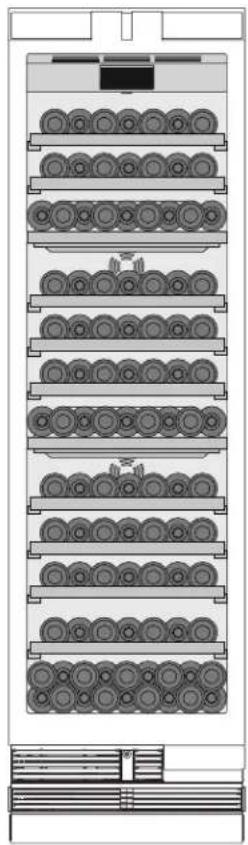
natural_image
Technical diagram of a multi-tiered storage or rack system with circular components and a control panel (no text or labels)natural_image
Technical line drawing of a multi-tiered rack-mounted device with circular components (no text or symbols)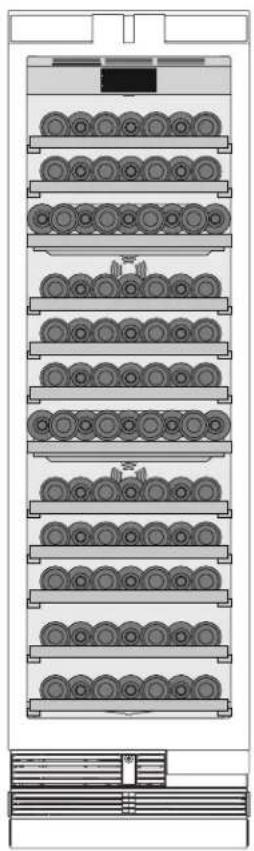
natural_image
Technical line drawing of a multi-tiered cylindrical mechanical or electrical component with no visible text or symbolsnatural_image
Diagram of a multi-tiered rack-mounted device with circular components, no visible text or symbols
natural_image
Technical line drawing of a multi-tiered cylindrical mechanical or electronic component with no visible text or symbols1901 Main Street, Suite 600
Irvine, CA 92614
1-877-442-4436
www.gaggenau.com/us
© 2020 BSH Home Appliances

- Important safety instructions 3
- Intended use 6
- Environmental protection 6
- Installation and connection 7
- Getting to know your appliance 10
- Operating the appliance 12
- Alarm 16
- Home Connect 17
- Wine storage cabinet 20
- Cleaning 23
- Noises 24
- Lighting 24
- Faults – what to do? 25
- Customer service 26
- Important safety instructions
- READ INSTRUCTIONS - DO NOT DISCARD!
- Definitions
- WARNING
- CAUTION
- NOTICE
- About these instructions
- Introduction
- Restriction of user group
- Risk of explosion
- Risk of electric shock
- Fire hazard/Danger due to refrigerants
- Risk of fire
- Risk of suffocation
- Damage
- Weight
- State of California Proposition 65 Warnings
- Intended use
- Environmental protection
- Packaging
- Old appliances
- Installation and connection
- Contents of package
- Technical data
- Installing the appliance
- Installation location
- Check built-in cut-out
- Side-by-side installation
- Saving energy
- Before using for the first time
- Electrical connection
- Requirements for outlets
- Maximum simultaneous load
- Risk of electric shock!
- Getting to know your appliance
- Appliance
- Operating controls
- Main menu
- Basic settings menu
- Equipment
- Shelf
- Additional shelf
- Operating the appliance
- Switching the appliance on
- Operating tips
- Switching off and disconnecting the appliance
- Switching off the appliance
- Disconnecting the appliance
- Setting the temperature
- Recommended temperature
- Wine storage compartment
- Display light
- Using the display light
- Switching display light off
- Humidity
- Display lock for cleaning
- Self-test
- Setting the brightness of the control panel
- Switching standby display on and off
- Setting the display screen
- Setting the touch field color
- Setting the touch field tone type.
- Setting the touch field tone volume
- Setting the signal tone volume
- Dimming when door is opened and closed
- Setting the temperature unit
- Setting the language
- Resetting to the factory settings
- Switching demo mode on or off
- Rest mode
- Switching Rest mode on or off
- Displaying or hiding rest mode in the main menu
- Switching rest mode on
- Switching rest mode off
- Automatic door opening
- Open the menu item Automatic door opening:
- Switching on Push-to-open system
- Switching on Pull-to-open system
- Switching off automatic door opening
- Home network
- Automatic display lock for cleaning
- Alarm
- Door alarm
- Home Connect
- Setting up Home Connect
- Notes
- Home network menu
- Setting up the connection to the home network
- Verifying signal strength
- Improving signal strength
- Connecting the refrigerator to the Home Connect app
- Installing updates for the Home Connect software
- Customer Service access
- Deleting network settings
- Information on data protection
- Wine storage cabinet
- Loading bottles
- Standard bottle size
- Storage example with standard bottles
- Loading with additional shelves
- Tips for storing wine
- Drinking temperatures
- Cleaning
- Cleaning the display
- Cleaning the appliance interior
- Cleaning the equipment
- Care instructions for stainless steel surfaces
- Noises
- Normal noises
- Preventing noises
- Lighting
- Faults – what to do?
- Customer service
- Appliance self-test
- Repair order and advice on faults
- Configurer Home Connect
- Remarques
Brand : GAGGENAU
Model : RW466765
Category : Wine cellar