ET2020AGKK - Desktop computer ASUS - Free user manual and instructions
Find the device manual for free ET2020AGKK ASUS in PDF.

| Product type | All-in-One Computer |
| Brand | ASUS |
| Model | ET2020AGKK |
| Dimensions (approx.) | Width: 48 cm, Height: 33 cm, Depth: 3 cm |
| Weight (approx.) | 5.5 kg |
| Power supply | External power adapter |
| Main functions | TV viewing, recording, multimedia playback, electronic program guide |
| Care and cleaning | Clean with a soft, dry cloth. Do not use liquid or abrasive products. |
| Safety | Unplug before cleaning. Do not obstruct ventilation openings. Use on a stable surface. |
| Spare parts and repairability | Contact ASUS after-sales service or an authorized center. |
| General information | Built-in screen, Processor and memory according to configuration (see complete manual). |
Frequently Asked Questions - ET2020AGKK ASUS
User questions about ET2020AGKK ASUS
0 question about this device. Answer the ones you know or ask your own.
Ask a new question about this device
Download the instructions for your Desktop computer in PDF format for free! Find your manual ET2020AGKK - ASUS and take your electronic device back in hand. On this page are published all the documents necessary for the use of your device. ET2020AGKK by ASUS.
USER MANUAL ET2020AGKK ASUS
Before launching your TV Tuner application, check if your digital TV-in or analog TV-in cable is connected.
Launching your TV Tuner Application
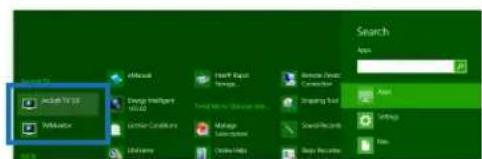
To launch ArcSoft TV 5.0 in Windows® 8, do one of the following:
From the Windows desktop, click the Arcsoft TV 5.0 icon.
NOTE: The Arcsoft TV desktop shortcut icon is not available for AIO ET2300

- Click to launch the search screen for applications. Type "Arcsoft" in the search field and click the Arcsoft TV icon from the search results.
Setting up your TV Tuner Application
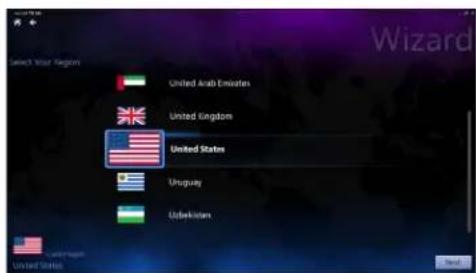
To set up ArcSoft TV 5.0:
- On the main menu, click Live TV.
- The Setup Wizard will launch to guide you through setting up your TV Tuner application. Select your country or region and click Next to continue.
-
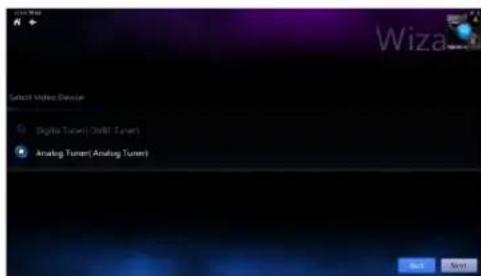
The Setup Wizard will attempt to detect the installed TV Tuner device. Select the appropriate TV tuner card which came with your All-in-One PC.
-
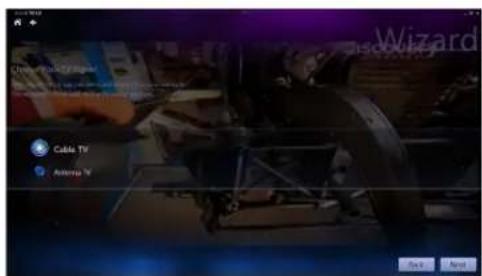
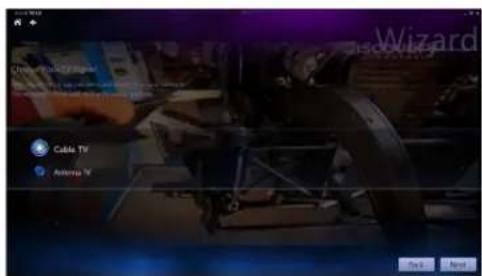
Select the type of television service you use.
-
Select Cable TV for cable television.
-
Select Antenna TV for television received via an antenna.
-
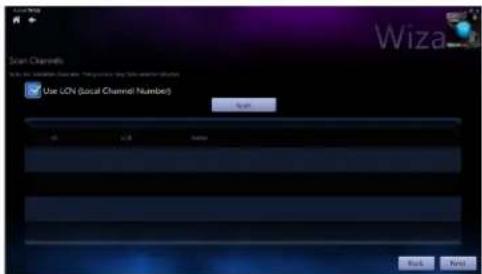
Click Scan to begin scanning for available channels.
-
If your All-in-One PC came with both an analog and digital TV tuner, the Setup Wizard will prompt you to set up your second TV tuner.
-
Select Yes to set up the second TV Tuner.
- Select No to complete the Setup Wizard.

- Click Finish to complete the Setup Wizard.

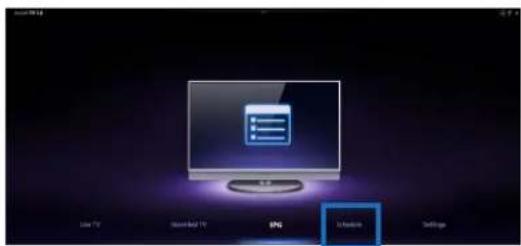
Scheduling recordings of TV broadcasts
To schedule recordings of TV broadcasts:
- On the main menu, click Schedule.
-
On the left panel, click Add.
-
Configure the following options:
Program Name
- Channel
Frequency
- Start Date/Time - Specify the date/time of recording.
Duration - Specify length of recording.
- Shut down the computer when finished recording
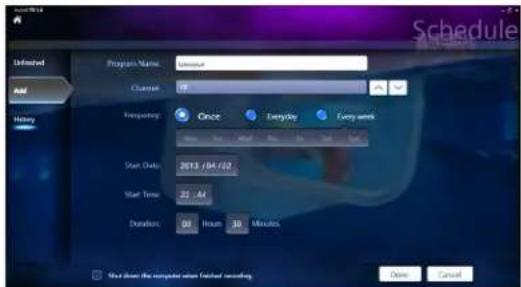
- Click Done to save settings and schedule recording.
NOTE: The All-in-One PC needs to be powered on to automatically record TV broadcasts.
- To schedule additional recordings, repeat steps 1~4.
NOTE: The number of recordings you can schedule is limited by the available storage on your All-in-One PC.
Using the Entertainment Program Guide (EPG)
The EPG displays the time and TV programs playing on a specified channel and date.
NOTE: EPG is only available for All-in-One PCs with a digital TV tuner.

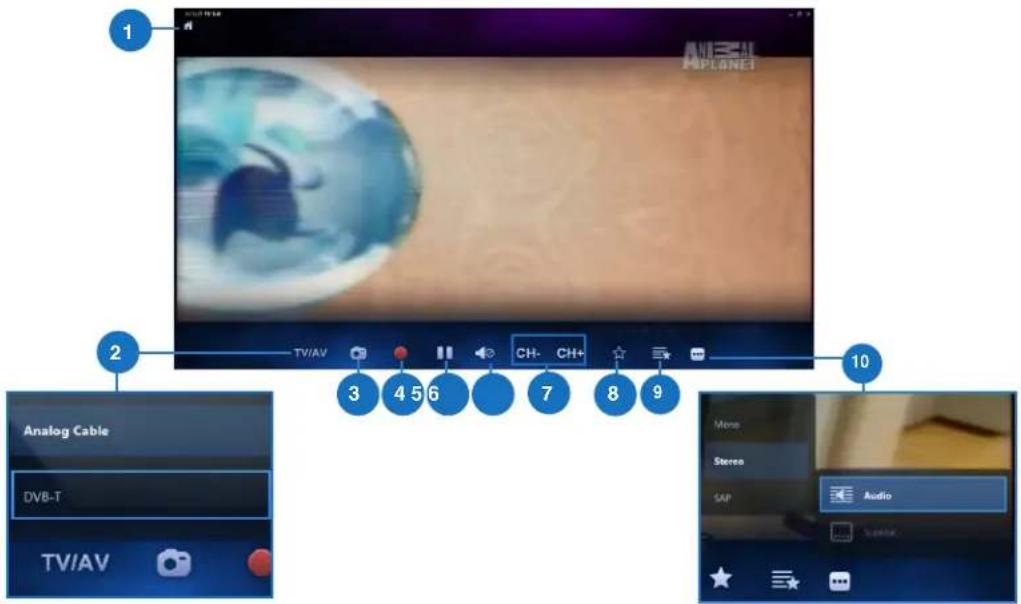
Using the Live TV Onscreen Controls
Home button
Click this icon to go to the Arcsoft TV 5.0 main menu.
2 TV/AV
Click this button to toggle between analog TV and digital TV.*
*This item is only available for All-in-One PCs with both an analog and digital TV tuner.
Take a screenshot
Click this button to take a screen capture of the video or media playing.
4 Record
Click this button to begin recording the television broadcast.
5 Pause
Click this button to pause recording or playback.
Volume Controls
Click this button to display onscreen volume controls to increase/decrease volume.
CH-/CH+
Click this button to increase or decrease the channel by one.
8 Add to Favorites
Click this button to add this channel to the Favorites list.
9 Favorites List
Click this button to display list of saved Favorites.
Subtitles and Audio Tracks
Click this button to display list of available subtitles and audio channels/tracks.
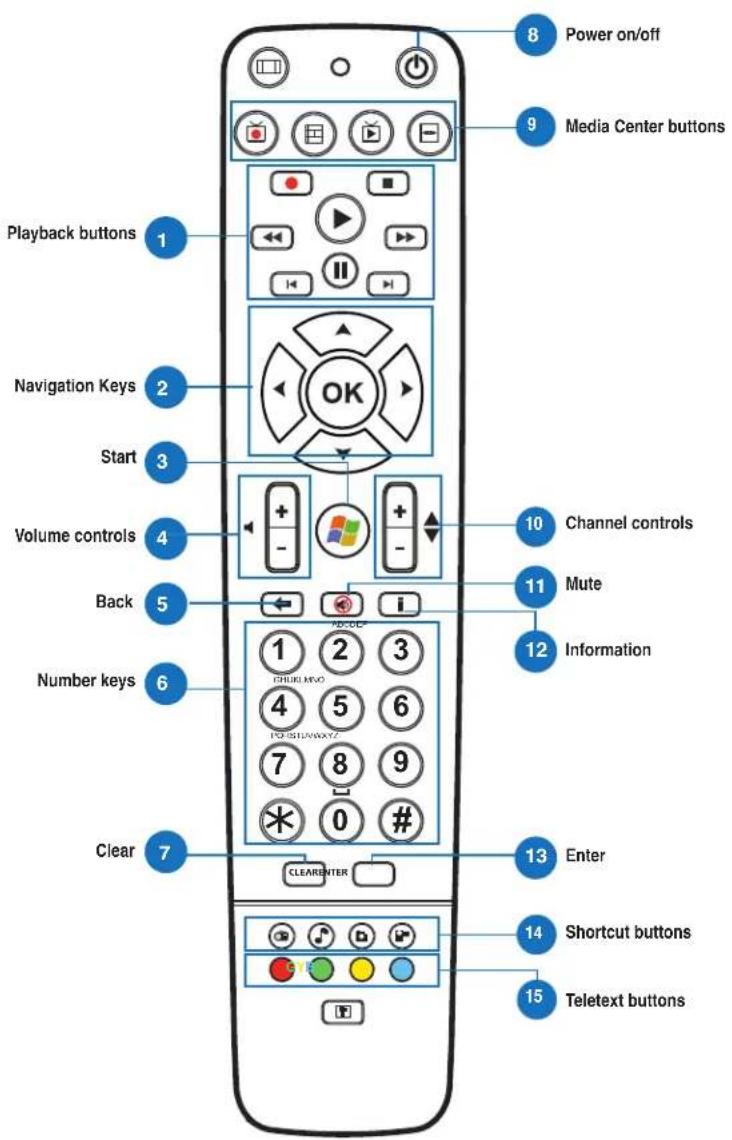
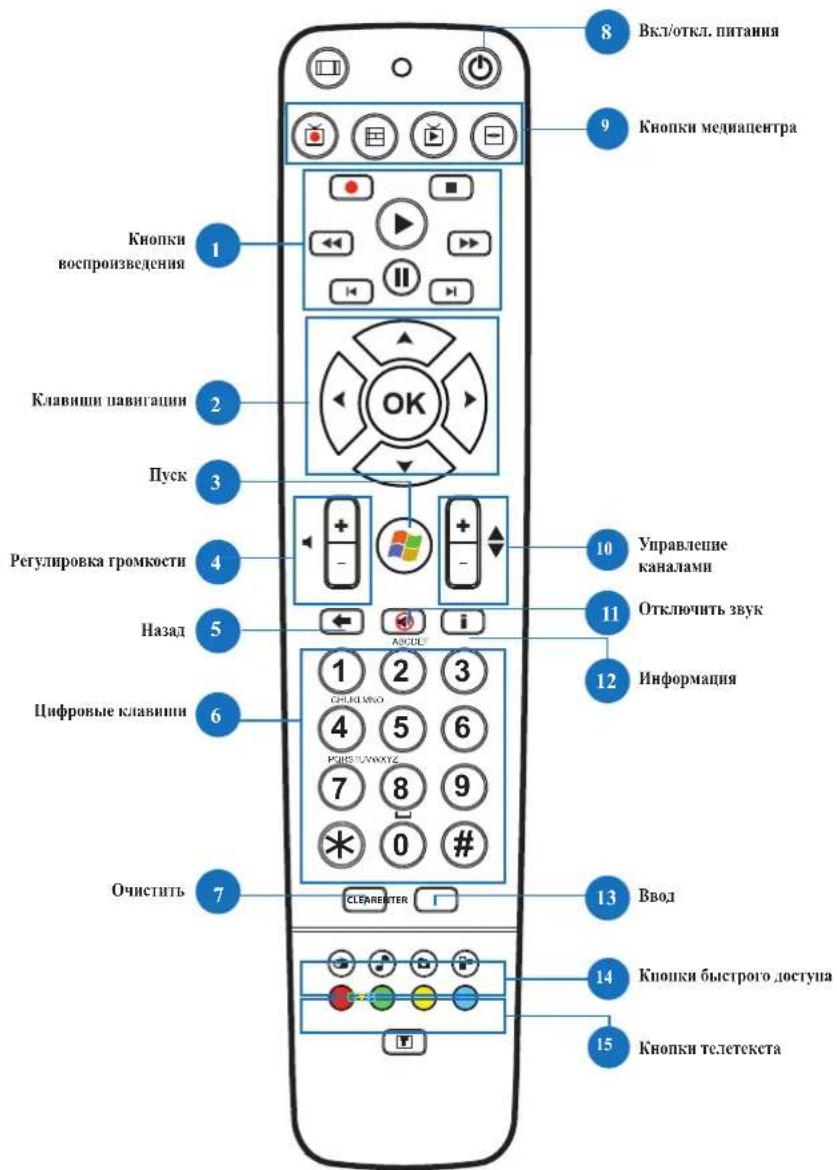
Using the Remote Control

Playback Buttons

Play
Starts playing media. If playback is paused, pressing this button begins playback from the current position.

Pause
Pauses media playback at the current position.

Stop
Stops playing media at the current position.

Record
Record the TV show to disk. If pressed while Live TV is on, records the current show. If pressed from the EPG screen, records a TV show or TV series to disk.

Fast Forward
Speeds up the playback of the media file to the first forward value (3X).

Rewind
Reverses direction of playback and speeds up the time base to the first rewind value (3X).

Skip Forward
Skipping forward one increment when this button is pressed.

Skip Back
Skipping backward one increment when this button is pressed.

Navigation Keys

Press the up/down keys to move through the menu bar in a submenu.
Press the up/down keys to decrease/increase a numerical value.
Press the left/right keys to move through the main menus in the Home screen.
Press the left/right keys to move through the items in a submenu.
Press OK to confirm the selection.


Start*
Takes the user to the Windows Media Center Start menu.
*This button is only available for All-in-One PCs installed with Windows Media Center.
| 4 | Volume controls Press the (+) button to increase the volume by one unit. Press the (-) button to decrease the volume by one unit. | |
| 5 | Back Moves back one position in the user interface, | |
| 6 | Number keys | |
| 7 | Clear Clear any entered user input. | |
| 8 | Power on/off Press this button to put the All-in-One PC to sleep mode. Press a second time to wake up the system from sleep mode. | |
| 9 | Media Center Buttons* | |
| Record TV Displays the Recorded TV page in Windows Media Center. | ||
| Guide Displays the media guide in Windows Media Center. | ||
| Live TV Shows live TV on the currently selected channel. | ||
| DVD menu Displays the DVD menu. | ||
| *These buttons are only available for All-in-One PCs installed with Windows Media Center. | ||
| 10 | Channel controls Increases/decreases the current channel by one. | |
| 11 | Mute Mutes the computer audio. | |
| 12 | Information Press to display information about the movie, video, or music. | |
| 13 | Enter Press this button to select an option or input text. | |

Media Center Shortcut buttons

Displays the main Radio page in Windows Media Center.

Displays the Music Library in Windows Media Center.

Displays the Picture Library in Windows Media Center.

Displays the Video Library in Windows Media Center.
*These buttons are only available for All-in-One PCs installed with Windows Media Center.

Teletext buttons*
Press these buttons to access Teletext features when available.
*These buttons are only available for All-in-One PCs installed with Windows Media Center.
NOTE:
- To avail of Windows Media Center features, you can purchase a Windows 8 Media Center Pack separately.
- You can download a version of this manual in a different language at the ASUS support site at http://support.asus.com
All-in-OnePC
English
All-in-One PC TV
Stručná príručka
Vaelg Yes (Ja), for at installere den andentv-tuner.
Vaelg No (Nej), for at fulldore installationsquiden.


9 Listen over favorite
Klik pa donne knap for at vise listen over gemte favoritkanaler.
10 Undertekster og lydspor
HagaWhile in this case, the bot is a bot that can be used to carry out the task.
Shut down the computer when finished
Bruke programguiden (EPG = Electronic Program Guide)
Viser hovedsiden for radio i Windows Media Center.

6 PeryHpOBKa rPOMKoCTH
HaKMHTe 3y HKOHNy JIpeYJINPOBKNr pOMKoCTH.
CH-/CH+
HaKMHTe 3Ty KHOINKy IIA CMeHb KaHaJa.
8 106abHbBn3paHHoe
HaKMHTe 3Ty KHOIIky IJINIO6aBHeHHI 3TOI KOHaIa B H36paHHe.
9 H36paHHoe
Haxmte 3ty KhoIky IIOOTo6paKeHH cIIcKa H36paHHe.
10 Cy6HTtpb H 3ByKOblE IopOzKN
HaKMHTc 3ry KHOHNYI IIOO6paKCHNIOCTyINHBIX CY6HTPOB H 3BYKOBBX KaHAIOB/IOPOJKeK.


All-in-One PC
HcnoJb3ObaHne npIbTa DY

6

KhoIKNBocpnOBcEHHN


Bocnpoh3Bectn
HaHHaet BOCpON3BedeHHe faHJa. Ecln BOCpON3BedeHHe npHOCTaHOBJeHO, HAKATHE 30T KHOJIKN HAHTET BOCpON3BedeHHe c TeKyuHII IO3HIN.
Hay3a
IphocTaHaBnBaet BocPOn3BeDenHe B TeKyuEi IIO3HmH.
Cron
OCTaHaBJIHBAeT BOCIIPOIH3BeDEHeHc.
3aenncb
3aHHcBbAeTeTenepeaay Ha Hsck. EcnH haxata npn IpocmoTpe nepeaun, 3aHHcBbAeTeKuyio npeaay. EcnH haxata Ha Kpahe EPG, 3aHHcBbAeTeTenepeaay Ha Hsck.
Nepemotka Bnepe
Yckopenoe (3X) Bocnpn3BeIeHne BnpeE.
Iepemotka nazad
Yckopenhoe (3X) Bocnpn3BcJeHne Ha3aI.
Bnepa
YBeJIHHBaETCKOpOCTbIepeMOTKNBIIepeHaOHN.
Ha3a
YBEINHBAeTCKOPOCTbIIEpEMOTKNHa3aHaODHH

Kjabnnn nabraun

HcnoIbayyTe KJIaBHHN BBepx/BHH3 IJI HAHBraHH B IOMeHO.
Hcno3yntKe KnaBnBBcpx/BHH3 nYBCJHCHH/YmChbIeHH 3NaChn.
HnoB3yIe KJIABHH BJEBO/BIIpaBO JIN HABHraIH N B IaBHOM MeHO.
HcnoIb3yIe KJIaBHN BIEBO/BIpaBO IIN HAIBHraIH NIO HNKTAM NOIMCHIO.
Haxmte OK JIOITBepKdEHHBb6opa.


Nyc
OTKpbBaet MeHIO Hyck B Windows Media Center.
^* Та КНПКА ДОСТУПА TOЛБКИ MA MOHOBLOUHOM KOMПьОтеpe C Windows Media Center.
All-in-OnePC
OTo6paKaeT cTpaHnUy H3o6paKeHnB Windows Media Center.

OTo6paKaTcTaHnUyBnEcoBWindowsMediaCenter.
*TH KIOHNIOCTYINBI TOIbKO HA MOIO6IOHOM KOIMBIOTepe c Windows Media Center.


KhoonK TcJeTeKcta*
HIOJIb3yIe 3N KHOIIKIN JIOCTyIIa K fYHKINM TeIEeKcTa, IIHn eO HAJIHN.
*TH KHOIIKNIOCTyIHbTOIbKO HA MOHOJIOHOM KOMIbIOTpe c Windows Media Center.
ПРИМЕЧАНЕ:
-ДИнIOIb3OBAHnФунknH Windows Media Center MoKHO npHo6peCTn Windows 8 Media Center OTeJIbHo.
PykoBoIOCTBO IOJIb3OBaTcIJHa npyROM a3bIKc MoKHO cKaaTa b c caTa ASUS http://support. asus.com