
Camedia D370 - Camera OLYMPUS - Free user manual and instructions
Find the device manual for free Camedia D370 OLYMPUS in PDF.
| Product type | Digital camera |
| Dimensions (W × H × D) | 135 mm × 71 mm × 50 mm |
| Weight (without batteries/card) | 190 g |
| Power supply | 4 AA alkaline batteries or 2 CR-V3 lithium batteries (LB-01) |
| Sensor | 1/3.2-inch CCD, 1.31 million pixels (gross) |
| Lens | Olympus 4.5 mm F4 (35mm equivalent) |
| Digital zoom | Up to 4× (1.6×, 2×, 3.2×, 4×) |
| LCD monitor | 1.5-inch, active matrix, approx. 114,000 pixels |
| Viewfinder | Real image optical viewfinder (with target mark) |
| Flash | Auto, red-eye reduction, fill-in, off, night scene, night scene/red-eye reduction |
| Flash range | Approx. 0.6 to 2.5 m (ISO 100) |
| Internal memory | 1 MB |
| External storage | SmartMedia card (4-128 MB) |
| Image quality | SHQ (1280×960), HQ (1280×960), SQ1 (1024×768), SQ2 (640×480) |
| Shutter speed | 1 to 1/2000 sec |
| White balance | Auto, presets (daylight, cloudy, tungsten, fluorescent) |
| Exposure metering | Digital ESP and spot metering |
| Self-timer | Approx. 12 sec |
| Burst mode | Approx. 1.3 fps (up to 8 shots in HQ) |
| Connectivity | USB (mass storage class), DC input jack |
| Special functions | Macro mode, movie mode (without sound), DPOF printing, panorama (Olympus CAMEDIA card) |
Frequently Asked Questions - Camedia D370 OLYMPUS
User questions about Camedia D370 OLYMPUS
0 question about this device. Answer the ones you know or ask your own.
Ask a new question about this device
Download the instructions for your Camera in PDF format for free! Find your manual Camedia D370 - OLYMPUS and take your electronic device back in hand. On this page are published all the documents necessary for the use of your device. Camedia D370 by OLYMPUS.
USER MANUAL Camedia D370 OLYMPUS
- The information contained in this manual may be subject to change without notice. For the latest information on the product names, model numbers, etc., please contact Olympus representative.
The information contained in this manual has been compiled by taking all possible measures to ensure its accuracy. However, if you find any errors or incomplete information, please contact Olympus representative. - It is prohibited by copyright laws to duplicate in part or in whole the information contained in this manual, except for personal use. Reproduction without permission of the copyright owner is prohibited.
- Olympus will not assume any liability for damages, loss of profit or claim from a third party due to improper use of this product.
- Olympus will not assume any liability for damages and loss of profit due to loss of image data resulting from servicing by a third party who is not designated by Olympus or from other causes.
The quality of the images shot with this product differs from that of the images shot with ordinary film-based cameras. Copyright © 2001 OLYMPUS OPTICAL CO., LTD.

Radio and Television Interference
Change or modifications not expressly approved by the manufacturer may void the user's authority to operate this equipment. This equipment has been tested and found to comply with the limits for a Class B digital device, pursuant to Part 15 of the FCC Rules. These limits are designed to provide reasonable protection against harmful interference in a residential installation. This equipment generates, uses, and can radiate radio frequency energy and, if not installed and used in accordance with the instructions, may cause harmful interference to radio communications.
However, there is no guarantee that interference will not occur in a particular installation. If this equipment does cause harmful interference to radio or television reception, which can be determined by turning the equipment off and on, the user is encouraged to try to correct the interference by one or more of the following measures:
- Adjust or relocate the receiving antenna.
- Increase the distance between the camera and receiver.
- Connect the equipment to an outlet on a circuit different from that to which the receiver is connected.
Only the included USB cable should be used to connect the camera to a personal computer (PC).

Page 2
4/24/01,3:36PM
Adobe PageMaker 6.5J/PPC


CONTENTS
PREPARATIONS 5
Names of parts 5
Attaching the strap 6
Loading the batteries 6
Using a smartmedia card (optional) .... 7
Turning the camera on/off 8
Adjusting the date and time 9
TAKING PICTURES 11
Taking pictures 11
Using the flash 12
Macro mode 13
Seli: 13
Digital Tele mode 14
Sequence mode 14
Exposure compensation 15
White balance 16
Image quality 17
Spot metering mode 18
PLAYING BACK PICTURES 19
Playing back an image 19
Index playback 19
Auto playback 20
Close-up playback 20
Erasing an image 21
Erasing all images 22
Protecting important images 22
OTHER FUNCTIONS 24
Recording a moving image 24
Playing back moving images 24
Recview 25
Beep sound 25
Adjusting the monitor brightness .... 25
Card format/memory setup 26
Memory back-up 27
Displaying image information 27
ERROR MESSAGES 29
Error codes 29
Specifications 30


Page 4
4/24/01,3:36PM
Adobe PageMaker 6.5J/PPC
PREPARATIONS

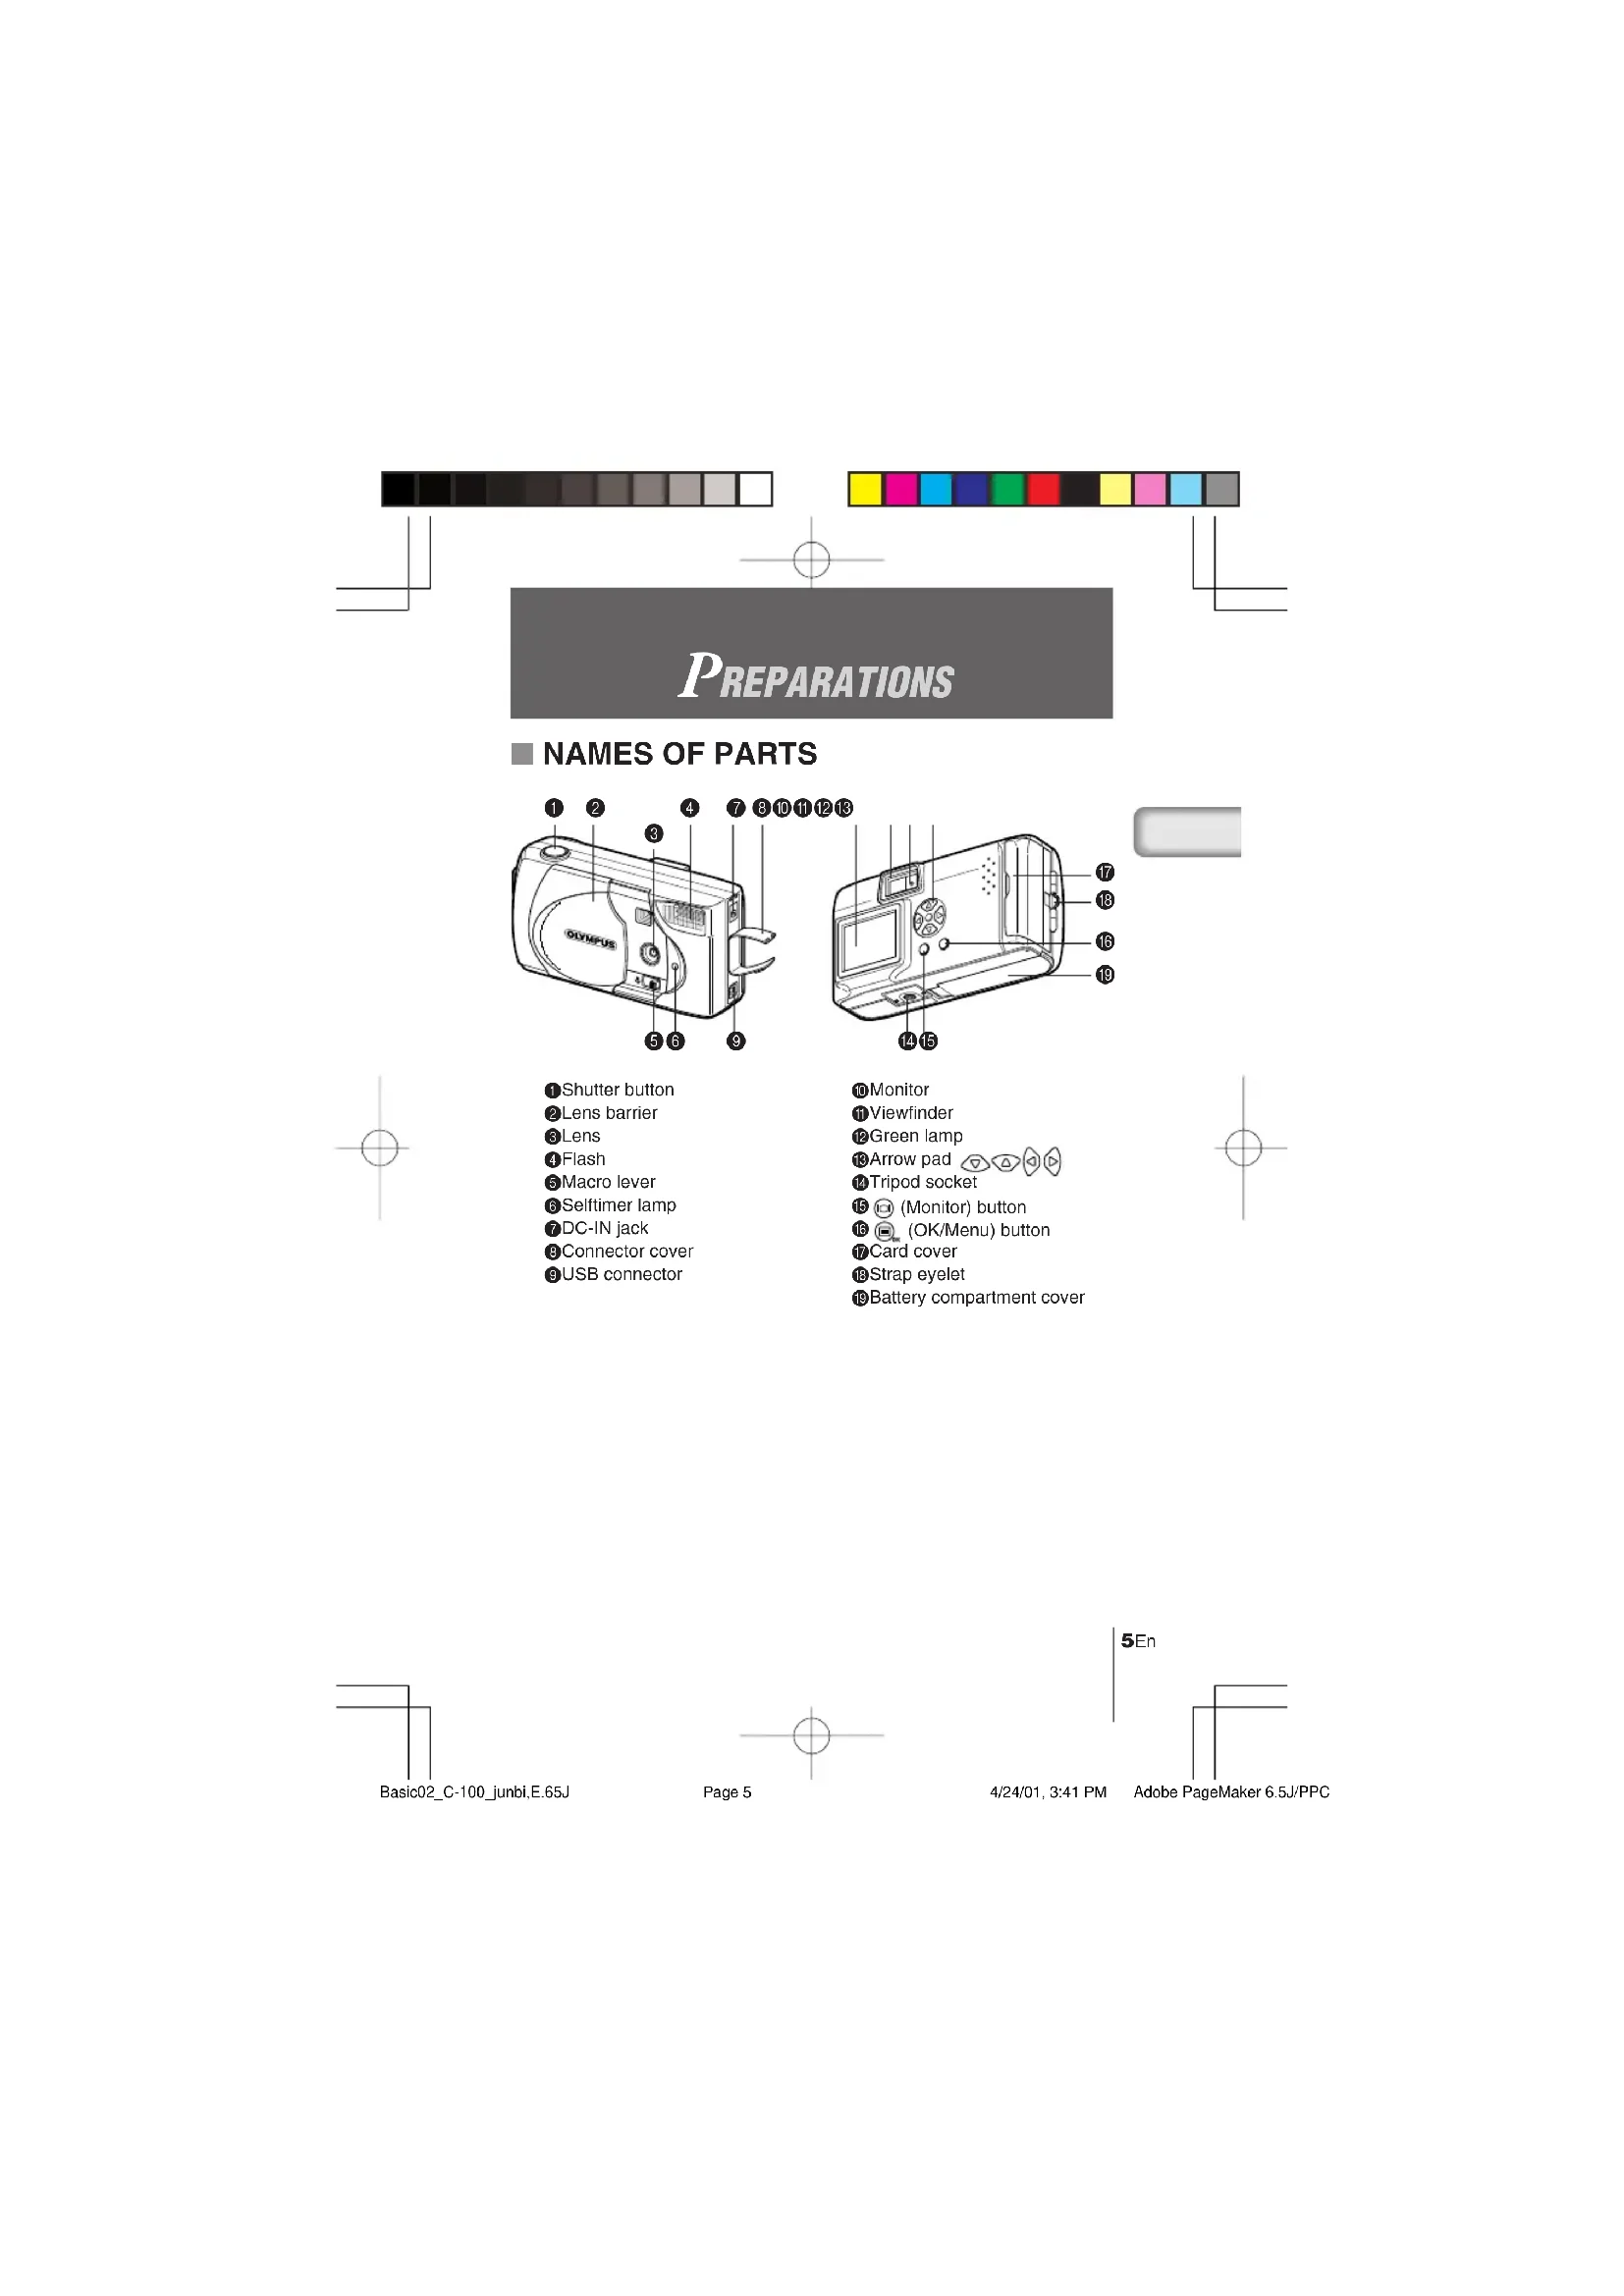
NAMES OF PARTS
1Shutter button
Lens barrier
Lens
Flash
Macro lever
Selftimer lamp
7DC-IN jack
Connector cover
USB connector
Monitor
Viewfinder
Green lamp
Arrow pad
Tripod socket
15 (Monitor) button
18 (OK/Menu) button
Card cover
Strap eyelet
Battery compartment cover


ATTACHING THE STRAP
1 Pass the short end of the strap through the strap eyelet.
2 Pass the long end of the strap through the loop.
3 Pull tight and check that the strap is securely attached.

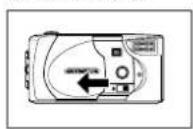
■ LOADING THE BATTERIES
This camera uses four AA alkaline (included), NiMH, lithium or NiCD batteries, or two CR-V3 lithium battery packs.
1 Check that the lens barrier is closed and both the monitor and the green lamp are off.
2 Pull the battery compartment cover toward A and pull up in the direction of B.
3 Insert the batteries as shown, making sure that they are correctly oriented.
4 Pull down the battery compartment cover in the direction of and close firmly by pressing the mark in the direction of .


- If the battery compartment cover is difficult to close, press on the mark and [OPEN] mark on the cover with your both thumbs without applying unreasonable force.
- If the camera is left without batteries for about one hour, all the settings will be reset to the default settings.
- When powering the camera by batteries, if the batteries start to run low, the red battery status will be displayed. When the batteries are close to exhaustion the LCD monitor turns off and the green lamp blinks.


USING A SMARTMEDIA CARD (OPTIONAL)
A SmartMedia card should be used if you need to store more pictures than the internal memory can hold. (Please see the chart on the following page.) SmartMedia is not included with this camera, it must be purchased separately.
This camera accepts only SmartMedia removable memory. If you insert a SmartMedia card, the image will be stored on the card and you can playback the image with the card. If you remove the card from the camera, the image will be stored on the Internal memory and you can playback the image with the internal memory.

1 Make sure that the camera is turned off.
Close the lens barrier and check that both the monitor and the green lamp are off.
2 Open the card cover.
3 Insert the SmartMedia card correctly as shown.
There is a mark showing the correct orientation of the card on the inside of the card cover.
To remove the card, grasp it with your fingertips and pull it out in the direction shown.
4 Close the card cover until it clicks.

Non-Olympus or non-Lexar cards, or cards formatted on other equipment, such as a PC, may not be recognized by the camera. Format the card with the camera before using it. See "Card format/Memory setup" (R26).

- Never open the card cover or remove the SmartMedia card or batteries when the camera is turned on. The data on the card may be lost, and once lost, it cannot be restored.
- The SmartMedia card is a precision instrument. Do not subject it to unreasonable force or impact. Do not touch the gold-colored metal area of the card.
7En


Some of the camera function are ignored if a write-protect seal is affixed to the SmartMedia card. When you use these functions, remove the seal from the card.
Write-protect seal


Approx. number of recordable images
| Card memory capacity | Image quality | SHQ HQ | SQ1 SQ2 | ||
| Internal memory Approx. 1347 | |||||
| 4 MB 6 | 12 | 16 | 29 | ||
| 8 MB | 12 | 24 | 33 | 58 | |
| 16 MB | 25 | 49 | 66 | 110 | |
| 32 MB | 51 | 99 | 132 | 221 | |
| 64 MB | 102 | 199 | 265 | 442 | |
| 128 MB | 204 | 399 | 532 | 887 | |

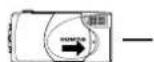
TURNING THE CAMERA ON/OFF
WHEN TAKING PICTURES
Turning the camera on ... Open the lens barrier.
The camera will turn on in Record mode.
Turning the camera off ... Close the lens barrier.
The camera will turn off.
Camera turns on

Camera turns off


- When the lens barrier is opened with no card inserted, "NO CARD" will be displayed on the monitor. This is not a malfunction. Use the internal memory of the camera to take pictures.
The camera's mode will change to power save mode if you do not carry out any operation for 3 minutes. To take pictures, turn the camera on.


WHEN PLAYING BACK PICTURES
Turning the monitor on... Press the button with the lens barrier closed.
The camera will turn on in Play mode and the monitor will turn on.
Turning the monitor off... Press the button.
The camera and the monitor will turn off.
Camera with the lens barrie closed

Monitor turns on

Monitor turns off

The camera's mode will change to power save mode if you do not carry out any operation for 3 minutes. To play back pictures, tum the camera on.

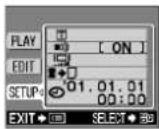
ADJUSTING THE DATE AND TIME
1 Press the button.
The monitor will turn on.
2 Press the button.
The menu will be displayed.
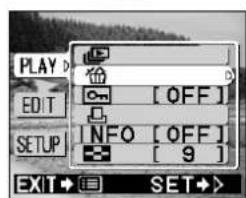
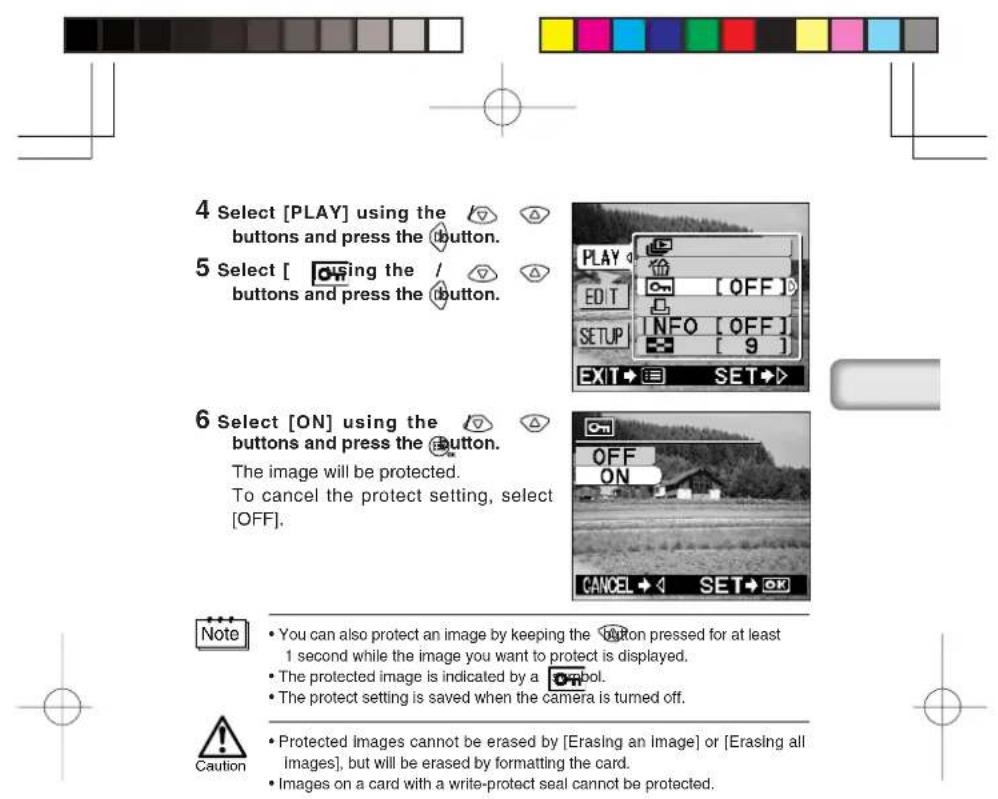
3 Select [SETUP] using the /buttons and press the button.
4 Select [ ] using the / buttons and press the button.
5 Select the date format [Y-M-D (Year-Month-Day), M-D-Y (Month-Day-Year) or D-M-Y (Day-Month-Year)] using the buttons, and press the button. The date adjustment screen will be displayed.


Basic02 C-100 junbi,E.65J

Page 9

9En
4/24/01,3:41PM
Adobe PageMaker 6.5J/PPC

6 Set the first item using the按钮 and press the button. Move to the next item.
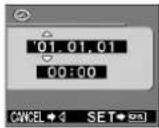
7 Repeat until the date and time settings are adjusted.

8 Press the button when the time reaches 00 seconds. Setting of the date and time is completed.
9 Press the button again. The date and time adjustment menu will be completed.
10 Press the button to turn the monitor off.

The date and time settings will be erased or become incorrect if the camera is left without batteries or the batteries are exhausted. Make sure that the date and time settings are correct before taking an important picture.

The date and time can be adjusted both in Record mode and Play mode using the same procedure.


Taking pictures
TAKING PICTURES
TAKING PICTURES USING THE VIEWFINDER
1 Slide the lens barrier open until it clicks.
2 Position the subject in the viewfinder using the Target mark.
To take pictures at a distance of less than 60cm (2ft.), see "Macro mode" (p.13).
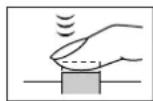
3 Press the Shutter button halfway.
The green lamp next to the viewfinder lights.
The exposure is locked while the Shutter button is pressed halfway.
4 Press the Shutter button fully.
The picture is taken.

TAKING PICTURES USING THE MONITOR
1 Open the lens barrier.
2 Press the button.
The monitor will turn on. Press the button again to turn the monitor off.
3 compose the picture by looking at the subject in the monitor.
4 Take the picture in the same way as you would when using the viewfinder.
Note
- If the green lamp blinks when the Shutter button is pressed halfway, the flash is not fully charged. The green lamp blinks while the camera is recording the picture taken. Wait for 2 to 40 seconds until the green lamp stops blinking.
- When the memory gauge is full, no more images can be taken. Wait a few seconds until the memory gauge goes off before taking any more pictures.
- When a picture is taken in bright light, such as sunlight, vertical lines may appear on the monitor. This is not a malfunction.
- The monitor is for checking the composition only. Check the hand jitter, focus and exposure accuracy afterwards by displaying the image on a PC.
- It will take longer to record a picture when the monitor is used.

11En


- Press the Shutter button gently. Pressing the button down hard will cause the camera to move, resulting in a blurred picture.
- Never remove the battery or AC adapter, open the card cover while the green lamp is blinking. The picture you have just taken may not be recorded and previous pictures may be destroyed.

USING THE FLASH
The flash automatically fires in lowlight and backlight conditions, but the flash mode can be selected to suit various conditions.
1 Open the lens barrier and press the button.
2 Select [CAMERA] using the button and press the button.
3 Select[] using the / button and press the button.
4 Select the flash mode using the button and press the button.
FLASH MODE SETTINGS
Auto (no display) : Flash fires automatically in low light or backlit conditions
(default setting)
Red-eye (6)
: Reduces the phenomenon of a subject's eyes appearing
red in the resulting picture
Flash on (Fires in any circumstances
Flash off (9)
: Does not fire regardless of the light conditions
Night view (
:Use this mode when taking night views
Night view/Red-eye () : Use this mode when taking people against a night view

e To confirm the current flash mode setting, press the button with the lens
barrier open.
Press the button after the confirmation to change the flash mode setting.
- Range of flash: - 2.5m/8ft
- All the flash mode settings except for Red-eye (6) will return to Auto mode
(default setting) when the lens barrier is closed.

The green lamp blinks while the flash is charging and the shutter button will not be pressed. Wait until the green lamp goes off.
- When taking pictures at close range using the flash, the appropriate brightness
may not be achieved and there may be pronounced shadows as a result.
Olympus recommends that you check the picture on the camera's LCD monitor.
The flash cannot be used in Sequence mode, Panorama mode and Movie
mode


MACRO MODE
Use this mode to take close-up pictures at a distance of less than 25-60cm (10*2ft.).
1 Open the lens barrier and slide the Macro lever across.
The monitor will turn on automatically and the symbol will be displayed.
To cancel Macro mode, slide the macro lever back to its original position.
2 Take the picture.
Macro mode is automatically cancelled when the camera is turned off.


Macro mode is canceled when the lens barrier is closed.

Make sure to slide the macro lever completely.
- When using the Macro mode, keep the distance between the camera and the subject at a distance of more than 25cm (10").
- If you try to take a picture at a distance of less than 25cm ( 10^ ), the autofocus will not work properly even though the Shutter button is released.
- If you use the flash in Macro mode, the brightness may not be correct and there may be pronounced shadows as a result. Olympus recommends that you check the picture on the camera's monitor.
SELFTIMER
1 Open the lens barrier and press the button.
2 Select [CAMERA] from the Camera menu screen using buttons and press the button.
3 Select [DRIVE] using the button and press the button.
4 Select [SELF-TIMER] using the / buttons and press the button. The Selftimer is now set. Press the button again to exit the menu.
5 Compose the picture on the monitor or in the viewfinder and press the Shutter button.
The Selftimer lamp on the front of the camera lights for 10 sec. and then blinks for 2 sec. before the picture is taken.
The Selftimer automatically goes off after the picture is taken.

The Selftimer is canceled automatically after the picture is taken.
- To cancel the Selftimer after the Shutter button has been pressed, shut the lens barrier off.

DIGITAL TELE MODE
This mode enables you to enlarge the image digitally to magnifications 1.6 × 2 × 3.2 × and 4 × .
1 Open the lens barrier and press the button.
2 The magnification changes in the sequence [1.6× 2.0× 3.2× 4.0× ] each time the button is pressed.
The magnification changes in the sequence [3.2× 2.0× 1.6× No display (1.0)] each time the button is pressed.
3 Take the picture.
- Press the button to turn the monitor off and cancel the Digital Tele mode.
- When the magnification is set to 3.2 × or 4 × , set the Quality mode to SQ2.

- Press the button to turn the monitor off and cancel Digital Tele mode.
The pictures taken in Digital Tele mode may become coarser.
■ SEQUENCE MODE
1 Open the lens barrier and press the button.
2 Select [CAMERA] from the Camera menu screen using the buttons, and press the button.
3 Select [DRIVE] using the button, and press the button.
4 Select [SEQUENCE] using the / buttons and press the button.
Sequence mode is now set. Press the button again to exit the menu.
5 Press the Shutter button and keep it pressed.
Picture-taking will continue while the Shutter button is pressed and stop when the button is released.
To return to normal recording mode, close the lens barrier and then reopen it.


Page 14
4/24/01, 3:39 PM
Adobe PageMaker 6.5J/PPC


- Sequence mode is canceled when the lens barrier is closed.
The flash cannot be used in this mode. - Since the shutter speed is set to the maximum 1/30 sec. to prevent hand jitter, the resulting picture may be darker than usual.
It takes a while to record the images taken in this mode. - The number of recordable pictures will vary depending on the image quality mode and whether a SmartMedia card is used.
If you intend to take a lot of pictures, a SmartMedia card is recommended.

EXPOSURE COMPENSATION
This mode enables you to change the brightness of the image.
1 Press the button with the lens barrier open.
2 Select [CAMERA] from the Camera menu screen using the buttons and press the button.
3 Select [ ] the / buttons and press the button.
4 Adjust the exposure compensation setting by press button to make the image darker and the button to make and press the button.
The exposure compensation is now set. Press the button again to exit the menu.
5 Take the picture.
You can continue taking pictures with the selected exposure compensation setting. Close the lens barrier to cancel the exposure compensation setting.

-
The setting of exposure compensation will be returned to ± 0.0 (default setting) when the lens barrier is closed.
-
When you adjust the exposure compensation, the image displayed on the monitor changes to the relevant brightness setting. If it is hard to see any difference because the subject is dark, display the recorded image on the camera's monitor to check the brightness.

Caution
- The desired brightness (exposure compensation) may not be obtained if the flash is used.
- The exposure compensation values may be inadequate if the subject is in extremely bright or extremely dark surroundings.

15En

WHITE BALANCE
This camera uses automatic white balance to shoot the subject in a natural-looking tone. However, it may sometimes be difficult to get satisfactory results automatically due to lighting or weather conditions. In such cases, change the white balance settings.

1 Press the button with the lens barrier open.
2 Select [PICTURE] from the Camera menu screen using the buttons and press the button.
3 Select [W]ng the / buttons and press the button.
4 Select the white balance setting and press the button. The white balance is now set. Press the button again to exit the menu.
5 Take the picture.
You can continue taking photos with the selected white balance setting. Close the lens barrier to cancel the white balance setting.
White balance settings
Auto (no display) : Automatically adjusts the white balance to ensure natural
colors (default setting).
Daylight Ensures natural colors outside in full daylight (sunny weather).
Cloudy (ensures natural colors outside in overcast daylight (cloudy weather).
Tungsten Light Ensures natural colors in tungsten light.
Fluorescent Light ():Ensures natural colors in fluorescent light.

The white balance setting will return to [AUTO] (default setting) when the lens barrier is closed.
- Natural colors are hard to obtain under a mixture of artificial and natural lighting or under fluorescent lights, etc.
- Select [ ] to obtain colors close to those under tungsten light.

The white balance may not function under special lighting.
- Check that the setting is the optimum setting by displaying the image on the monitor and checking the colors.
To determine if the selected setting is the best choice, always check the recorded image by playing it back on the camera's monitor.

Page 16
5/22/01,6:12PM
Adobe PageMaker 6.5J/PPC

■ IMAGE QUALITY
There are 4 kinds of image quality: SHQ, HQ, SQ1 and SQ2.
1 Press the button with the lens barrier open.
2 Select [PICTURE] from the Camera menu screen using the buttons and press the button.
3 Select [ ]ing the / buttons and press the button.
4 Select the image quality using the / buttons and press the button. Image quality is now set. Press the button again to exit the menu.
5 Take the picture.
You can continue taking photos in the selected image quality mode.
Image Quality modes
SHQ 1280 × 960 Pixels (For clear prints)
HQ 1280 × 960 Pixels (For viewing images on a PC)
SQ1 1024 × 768 Pixels (For e-mail attachments)
SQ2 640 × 480 Pixels (For taking a lot of pictures)
The Image Quality setting remains when the lens barrier is closed.

The image quality setting will remain even when the lens barrier is closed.
- The number of recordable images varies depending on the image quality setting and the storage method used. (The camera's internal memory capacity is 1MB, SmartMedia cards are currently available in 8MB to 128 MB capacities.)
- The number of pixels is the same for HQ and SHQ, but the compression rate is lower for SHQ, resulting in a clearer image when enlarged. SHQ also requires more time to record and play back images than HQ.
- When you change to a high image quality and the remaining recordable image count is low, the internal memory or SmartMedia card warning mark may be displayed. This indicates that there is insufficient memory space. If this happens, select a different image quality.
Warning mark


Page 17
01:3:40PM
17En

Adobe PageMaker 6.5J/PPC

SPOT METERING MODE
If a shot is backlit, ordinary photometric settings (Digital ESP Metering) will make the subject appear too dark. To compensate for this, switch the camera to Spot Metering Mode. This feature is used to obtain the right exposure regardless of backlighting.

1 Open the lens barrier and press the button.
2 Select [CAMERA] from the Camera menu screen using the buttons and press the button.
3 Select [using the / buttons and press the button.
4 Select [ $POT] using the / buttons and press the button.
Setting of spot metering is completed. Press the button again to exit the menu.
5 Press the Shutter button.
You can continue recording images in the selected metering mode. The metering mode will return to ESP mode when the lens barrier is closed and then reopened.

The metering mode will return to ESP mode (default setting) when the lens barrier is closed.


This mode is for displaying images one at a time on the monitor.
1 Press the button with the lens barrier closed.
The camera will turn on in Play mode. The last recorded image will be displayed on the monitor.
2 Press the /buptions.
Press the button to display the previous image and the button to display the next image.

3 Press the button.
The monitor will go off and the camera will turn off.

- If the button is pressed quickly twice (double-clicked) when the camera is in Record mode, the camera's mode will change to Play mode.
After the camera is turned on, the monitor may light momentarily and an image will be displayed after a short while. This is not a malfunction.
INDEX PLAYBACK
This mode is for displaying images in index mode from single-image playback mode.
1 Press the button with the lens barrier closed.
2 Press the button.
3 Press the button to move the green frame to the next image and the button to move the frame to the previous image.
4 Press the button.
The image in the green frame will be displayed.
Changing the number of images in the index playback
Select the number of images in the index playback from 4, 9 or 16.
1 Press the button with the lens barrier closed.

2 Press the button to display the Play menu screen.
3 Select [PLAY] using the button and press the button
4 Select [ ng the / buttons and press the button.
5 Select the number of images [4], [9] or [16] using the / button and press the button.
Setting of the number of images in the index display is completed. Press the button again to exit the menu.
AUTOPLAYBACK
In this mode all the images are automatically displayed one after another.
1 Press the button with the lens barrier closed.
2 Press the button to display the Play menu screen.
3 Select [PLAY] using the button and press the button
4 Select [ ]ing the / buttons and press the button.
5 Select [START] using the /buttons and press the button.
Auto Playback will start. Each image will be played back for 3 seconds starting from the image after the one currently displayed. To cancel Auto Playback, press the button.

If you display the Play menu while an image marked by the Moving Image symbol is being played, you cannot select [ ] display a still picture first.
CLOSE-UP PLAYBACK
Images can be played back in 4 stages of magnification: 1.5 ×, 2 ×, 2.5 × and 3 × .
1 Press the button with the lens barrier closed.
2 Press the button. The image will be magnified in the sequence [1.5× ] [2.0× ] [2.5× ] [3.0× ] each time the button is pressed.
3 Press the button. Scroll mode will be enabled. Scroll up or down, left or right, using the / / buttons to display the area you want to see. Press the button again to exit scroll mode.


4 Press the button after exiting scroll mode to return to the 1× single-image playback screen.

The above operation cannot be performed while an image marked by the Moving Image (Symbol is displayed. Display a still picture first.
ERASING AN IMAGE
1 Press the button with the lens barrier closed.
2 Display the image you want to erase and press the button.
3 Select [PLAY] using the buttons and press the button.
4 Select [ ]按钮ing the /按钮 and press the button.

5 Select [X] using the /按钮 and press the button. The image will be erased.


- You can also move to the erase menu by keeping the button pressed for at least 1 second while the image you want to erase is displayed.
- If the image you want to erase is protected or a write-protect seal is affixed to the SmartMedia card, the image cannot be erased. Unprotect the image or remove the write-protect seal on the SmartMedia card before attempting to erase the image.
- Erased images cannot be restored. Before erasing an image, be sure that you are not erasing important data.
ERASING ALL IMAGES
You can erase all the images in the internal memory or on the SmartMedia card.

- When erasing images in the internal memory, do not insert a SmartMedia card.
- When erasing images on a SmartMedia card, insert the card first.
1 Press the button with the lens barrier closed.
2 Press the button to display the Play menu screen.
3 Select [SETUP] using the button and press the button
4 Select [ ] using the / buttons and press the button.
5 Select [AERASE] using the / buttons and press the button.
6 Select [ ]thng the / buttons and press the button. All the images will be erased.

- Protected images will not be erased.
- If a write-protect seal is affixed to the SmartMedia card, the images on the card cannot be erased.
- Erased images cannot be restored. Before erasing, make sure that you are not erasing important data.
PROTECTING IMPORTANT IMAGES
1 Press the button with the lens barrier closed.
2 Display the image you want to protect.
3 Press the button to display the Play menu screen.


Page 22
4/24/01, 3:49 PM
Adobe PageMaker 6.5J/PPC

OTHER FUNCTIONS
RECORDING A MOVING IMAGE
In addition to still pictures, this camera has the ability to take movie pictures.
1 Press the button with the lens barrier open.
2 Select [CAMERA] using the button and press the button.
3 Select [DRIVE] using the / button and press the button
4 Select [VIE] using the / button and press the button.
Movie mode is now set and the monitor will automatically turn on. Press the button again to exit the menu.
5 Take the picture.
Press the Shutter button to start recording moving images. Recording stops when the Shutter button is pressed again.

- Movie mode is canceled when the monitor is turned off by pressing the button.
The flash cannot be used in Movie mode.
It takes a while to record the images taken in this mode.
The recordable time will vary depending on whether a SmartMedia card is
used.
Sound cannot be recorded.
PLAYING BACK MOVING IMAGES
1 Press the button with the lens barrier closed and display the desired image with the symbol indicated.
2 Press the button to display the Play menu screen.
3 Select [PLAY] using the button and press the button.
4 Select [ ]ing the / button and press the button.
5 Select [START] using the button and press the button. The moving image will be displayed.
24 En

Basic05_C-100_sonola,E.65J

Page 24

4/24/01,3:47PM
Adobe PageMaker 6.5J/PPC

REC VIEW
This function enables you to check an image by displaying it immediately after it is taken.
1 Open the lens barrier and press the button.
2 Select [SETUP] using the /按钮 and press the button.
3 Select [REC VIEW] using the button and press the button.
4 Select [ON] using the button and press the button.
ON: The last image taken is played back after shooting is completed.
OFF: The screen for shooting the next image is played back immediately
after shooting is completed.
Setting of the Rec View is completed.
Press the button again to exit the menu.

The Rec View mode is saved when the camera is turned off.
BEEP SOUND
This function enables you to turn the warning beep sound off.
1 Open the lens barrier and press the button.
2 Select [SETUP] using the /按钮 and press the button
3 Select [ ]ing the / button and press the button.
4 Select [OFF] using the
The beep sound will be turned off.
Press the button again to exit the menu.

The beep sound setting is not cancelled when the camera is turned off.
- You can also set the beep sound from the Play menu.

Page 25
5/22/01, 6:14 PM
25En

Adobe PageMaker 6.5J/PPC

3 Select [ ]using the / buttons and press the button.
4 Adjust the brightness of the monitor using the button and press the button.
Press the button to make the monitor brighter and the button to make it darker.
5 Press the button again.
Setting of monitor brightness is now completed.
Press the button again to exit the menu.

The setting is not cancelled when the lens barrier is closed.
- You can also set the monitor brightness from the Play menu.
CARD FORMAT/MEMORY SETUP
This function enables you to format the SmartMedia card or internal memory. Any images on the card or in the memory will be erased when the card or memory is formatted.

- When formatting the internal memory, do not insert a SmartMedia card.
- When formatting a SmartMedia card, insert the card first.
- Before using a non-Olympus SmartMedia card or a card formatted on a PC, format the card on the camera first. Olympus CAMEDIA brand SmartMedia cards do not require formatting.
1 Press the button with the lens barrier closed.
2 Press the button.
3 Select [SETUP] using the /button and press the button.
4 If you format the card, select [T] using the buttons and press the button. If you format the internal memory, select [T] using the buttons and press the button.
5 Select [FORMAT] using the buttons and press the button.
6 Select [FOMAT] using the / buttons and press the button. The card or internal memory will be formatted.

You can also format a card or the Internal memory from the Camera menu.


- All protected images will be erased. Once formatted, the SmartMedia card or Internal memory cannot be restored.
- Cards with a write-protect seal affixed to them cannot be formatted. Remove the seal before formatting the card. Do not re-use seals.
■ MEMORY BACK-UP
This function enables you to copy all image data recorded in the internal memory onto a SmartMedia card. Insert the card before following the procedure below.

1 Insert the SmartMedia card.
2 Press the button with the lens barrier closed.
3 Press the button.
4 Select [SETUP] using the /按钮 and press the button
5 Select [ ]the / buttons and press the button.
6 Select [ BACKUP] using the / buttons and press the button. All the images in the internal memory will be copied onto the card.
DISPLAYING IMAGE INFORMATION
This function enables you to set display or non-display of image information on the monitor while the image is played back. If you enable this function, these information is displayed for 5 seconds.
Image data display ON Image data display OFF


27En

1 Press the button with the lens barrier closed.
2 Press the button.
3 Select [PLAY] using the button and press the button
4 Select [INFO] using the button and press the button
5 Select [ON] using the /buttons and press the button. The image information will be displayed on the display screen. Press the button again to exit the menu.
Note
The image information setting will return to OFF (default setting) when the camera is turned off.


ERROR MESSAGES
ERROR CODES
| Monitor display Error | Remedy | |
| No card has been inserted or card is not detected. | Insert or reinsert card. | |
| Failure to record, display or erase. | Failure to record, display or erase Wipe the card terminal with cleaning paper and reformat. If unable to format, use another card. | |
| Card is write-protected. | To record, remove the protect seal. For details, refer to the instruction manual for the SmartMedia card. | |
| Smartmedia card is full. No more images can be recorded. | Insert another card or erase unwanted images. | |
| Internal memory is full. No more images can be recorded. | Use a SmartMedia card or erase unwanted images. | |
| No images can be displayed. | There are no images in the card. Take pictures and then playback. | |
| No images can be displayed. | There are no images in the internal memory. Take pictures and then playback. | |
| Selected image cannot be displayed. | Images on a card recorded with another brand of camera or images transferred from a PC cannot be displayed. | |
29En
SPECIFICATIONS
Product type: Digital camera (for recording and displaying)
Recording system: Digital recording, compatible with JPEG (based on DCF) and DPOF
Recording media: Internal memory 1MB, SmartMedia card (4MB, 8MB, 16MB, 32MB, 64M
No. of recordable frames: SHQ/Approx. 1, HQ/Approx. 3, SQ1/Approx. 4, SQ2/Approx. 7 (When using internal memory)
Sequence mode: 1.3 frames/second, 8 or more (HQ)
Erase: Single-frame erase/All frames erase
Image pickup element: 1/3.2 inch CCD solid-state image pickup 1,310,000 pixels (gross)
Recording image: 1280 × 960 pixels (SHQ/HQ mode)
1024 × 768 pixels (SQ1 mode)
640 × 480 pixels (SQ2 mode)
White balance: Full auto TTL
Preset (daylight, overcast, tungsten light, fluorescent light)
Lens: Olympus lens 4.5mm, F4, 5 elements
5 groups
(equivalent to 35mm lens on 35mm camera)
Photometric system: Digital ESP metering system with imager,
Spot Metering
Exposure control system: Programmed auto exposure
Aperture: f4, f8
Shutter*:
1 ~ 1/2000 sec. (used with mechanical shutter)
*Manual setting not available
Shooting range:
0.6m /2ft infinity (Standard mode)
0.25m ~ / 10^n ~ infinity (Macro mode)
Viewfinder:
Optical real image viewfinder (Target mark),
LCD monitor
LCD monitor:
1.5 inch TFT color LCD display
No. of pixels:
Approx. 114,000 pixels
On-screen display: Date/Time, frame number, protect, image
quality, battery level, file number, print service, menu, etc.
30
1/Basic06_C100-E.65J
Page 30
5/22/01, 6:15 PM
Adobe PageMaker 6.5J/PPC

Flash charging time: Less than approx. 6 sec. (at normal temperature with new battery)
Flash charging time: Less than approx. 6 sec. (at normal temperature with new battery)
Flash shooting range: 2.5m / 8ft (ISO100)
Flash modes: Auto (automatic flash activation in low light and backlight), red-eye reduction, flash off, flash on, night view, night view/red-eye
Focus: Pan-focus
Selftimer: Approx. 12 sec. delay
External connector: DC input terminal, USB interface (storage-class) Auto-connect
Date and time: Recorded with image data simultaneously
Automatic calendar function: Automatic adjustment in range of 1981 ~ 2031
Calendar power source: Backup by built-in capacitor
Card function: DPOF-compatible print service, Panorama assembly (Olympus CAMEDIA brand only)
Operating environment
Temperature: 0 - 40^ / 32 - 104^ (operation) -20 60^ / - 4 140^ storage
Humidity: 30 90% (operation) 10-90% (storage)
Power supply: Four AA alkaline batteries, AA nickel metal hydride batteries or AA NiCd batteries. Or two
CR-V3 lithium battery packs (LB-01)
manufactured by Olympus), or optional AC adapter.
AA manganese batteries cannot be used.
Dimensions: 123(W) × 65(H) × 44.5(D) mm
(4.8^ (W)× 2.6^ (H)× 1.8^ (D))
not including protrusions)
Weight: 190g/0.4lb (without batteries/card)
Design and specifications are subject to change without notice or obligation on the part of the manufacturer.

Page 31
5/22/01,6:16PM
31En


Adobe PageMaker 6.5J/PPC

INTRODOCTION
Vérification immediate 25
Bipsonore 25
MODE D'IMAGES ANIMÉES
-20 - 60°C (stockage)
Dimensions: 123(L) × 65(H) × 44,5(P) mm
(4MB,8MB,16MB,32MB,64MB,128MB)
0.25m - (Macro-Modus
Parte responsible: Olympus America Inc.
(4MB,8MB,16MB,32MB,64MB,128MB)
Declaration of conformity
Model Number: D-370L/C-100
Trade Name: OLYMPUS
Responsible Party: Olympus America Inc.
Address: 2 Corporate Center Drive, Melville, New York
11747-3157 USA
Telephone Number: 631-844-5000
This device complies with Part 15 of the FCC rules. Operation is subject to the following two conditions:
(1) This device may not cause harmful interference, and
(2) This device must accept any interference received, including interference that may cause undesired operation.
This Class B digital apparatus meets all requirements of the Canadian Interference-Causing Equipment Regulations

"CE" mark indicates that this product complies with the European requirements for safety, health, environment and customer protection.
商標
San-Ei Building, 22-2, Nishi Shinjuku 1-chome, Shinjuku-ku, Tokyo, Japan. (Customer support) Tel. 0426-42-7499 Tokyo
OLYMPUS AMERICA INC.
Two Corporate Center Drive, Melville, NY 11747-3157, U.S.A. Tel.631-844-5000
(Technical support) Tel.1-888-553-4448 (Toll-free) (First 30 days after purchase)
(Technical support) Tel. 1-631-844-5520 (After 30 days)
distec@olympus.com
OLYMPUS OPTICAL CO.(EUROPA) GMBH;
(Premises/Goods delivery) Wendenstraße 14-18, 20097 Hamburg, Germany.
Tel.040-237730
(Letters) Postfach 10 49 08, 20034 Hamburg, Germany.
(Hotline Numbers for customers in Europe)
Tel. 01805-67 10 83 for Germany
Tel. 00800-67 10 83 00 for Austria, Belgium, Denmark, France
Netherlands, Norway, Sweden, Switzerland
United Kingdom
Tel. +49 180 5-67 10 83 for Finland, Italy, Luxemburg, Portugal, Spain
Czech Republic
Tel. +49 40-237 73 899 for Greece, Croatia, Hungary and the Rest of
Europe
Our Hotline is available from 9 am to 6 pm (Monday to Friday)
(E-Mail) di/support@olympus-europa.com
Printed in Japan
1AG6P1P1014-AVT275302
- Radio and Television Interference
- CONTENTS
- PREPARATIONS 5
- TAKING PICTURES 11
- PLAYING BACK PICTURES 19
- OTHER FUNCTIONS 24
- ERROR MESSAGES 29
- Specifications 30
- PREPARATIONS
- ATTACHING THE STRAP
- ■ LOADING THE BATTERIES
- USING A SMARTMEDIA CARD (OPTIONAL)
- TURNING THE CAMERA ON/OFF
- WHEN TAKING PICTURES
- WHEN PLAYING BACK PICTURES
- ADJUSTING THE DATE AND TIME
- Taking pictures
- TAKING PICTURES USING THE VIEWFINDER
- TAKING PICTURES USING THE MONITOR
- Note
- USING THE FLASH
- FLASH MODE SETTINGS
- MACRO MODE
- SELFTIMER
- DIGITAL TELE MODE
- Take the picture.
- ■ SEQUENCE MODE
- Press the Shutter button and keep it pressed.
- EXPOSURE COMPENSATION
- WHITE BALANCE
- White balance settings
- ■ IMAGE QUALITY
- SPOT METERING MODE
- INDEX PLAYBACK
- AUTOPLAYBACK
- CLOSE-UP PLAYBACK
- ERASING AN IMAGE
- ERASING ALL IMAGES
- PROTECTING IMPORTANT IMAGES
- OTHER FUNCTIONS
- RECORDING A MOVING IMAGE
- PLAYING BACK MOVING IMAGES
- REC VIEW
- BEEP SOUND
- CARD FORMAT/MEMORY SETUP
- ■ MEMORY BACK-UP
- DISPLAYING IMAGE INFORMATION
- ERROR MESSAGES
- SPECIFICATIONS
- Operating environment
- INTRODOCTION
- MODE D'IMAGES ANIMÉES
- 商標
Brand : OLYMPUS
Model : Camedia D370
Category : Camera