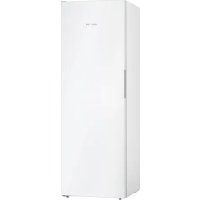
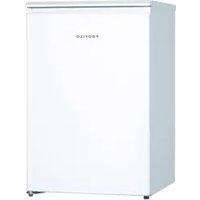
DF1033WEVV - Freezer Profilo - Free user manual and instructions
Find the device manual for free DF1033WEVV Profilo in PDF.


| Product type | Freezer |
| Brand | Profilo |
| Model | DF1033WEVV |
| Dimensions (H x W x D) | 85 cm x 60 cm x 65 cm (estimated) |
| Weight | Approximately 60 kg |
| Power supply | 220-240 V, 50 Hz |
| Energy class | A+ (estimated) |
| Usable volume | 200-250 liters (estimated) |
| Main functions | Quick freezing, ice maker, LED lighting |
| Maintenance and cleaning | Regular cleaning, manual defrosting, replacement of worn parts |
| Safety | Disconnect before any intervention, wear protective gloves, secure heavy components |
| Spare parts available | Door gasket, handle, hinges, shelf, frozen food bin, ice maker, LED lighting |
| Repairability | Repairable by the consumer according to the manual instructions |
| Provided documents | User and repair manual (543 pages, multilingual) |
| After-sales service | Contact available via the manual |
Frequently Asked Questions - DF1033WEVV Profilo
User questions about DF1033WEVV Profilo
0 question about this device. Answer the ones you know or ask your own.
Ask a new question about this device
Download the instructions for your Freezer in PDF format for free! Find your manual DF1033WEVV - Profilo and take your electronic device back in hand. On this page are published all the documents necessary for the use of your device. DF1033WEVV by Profilo.
USER MANUAL DF1033WEVV Profilo
4.3 CmHa Ha easy opening handle 11
4.3.1 Cbaine Ha easy opening handle 11
4.3.2 MoHTIpaHe Ha easy opening handle 11
4.4 CmHa Ha rohpata nHa Ta H BpaTata 12
4.4.1 CbaJIHe Ha naHTata Ha BpaTata. 12
4.4.2 MoHTpaHa Ha nHaTata Ha BpaTata 14
4.5 CmHa Ha roHaTa naHa Ha BpaTata (BpTa c dncnnei) 15
4.5.1 CbaJIHe Ha nHTaTa Ha BpaTata 16
4.5.2 MoHTpaHa Ha nAHTaHa HbPaTaTa 17
4.6 CmHa Ha DonHaTa NaHTa Ha BpaTaTa 18
4.6.1 CmHa Ha donHaTa naHTa Ha BpaTata 18
4.6.2 MoHTpaHa He Ha DonHaTa nHaTb HApataTa 19
4.7 CmHa Ha paTa 20
4.7.1 ⅡBaKaHa Ha paΦTa 20
4.7.2 MoHTnpaHe Ha paTbTa 20
4.8 CMHa Ha KOHTeHepa 3a 3amaeHN XpaHInTeJHH npOyKTH 21
4.8.1 3BaXdaHe Ha KOHTeHepa3aMPa3EH XpaHHTENn npOyKTn... 21
4.8.2 MoHTnpaHe Ha KOHTeHepa 3a 3ampa3EH npOyKn.. 21
4.9 CmHa Ha neDoreHepaTopa 22
4.9.1 3BaJdaHe HaJeDoreHepaTopa 22
4.9.2 MoHTIpaHHe HaJeDoreHepaTopa 22
4.10 CmHa Ha LED oCBetJeHHeTo otrope 23
4.10.1 CbAHe Ha LED ocBeTneHnETo 23
4.10.2 MoHTpaHe Ha LED ocBETnHHeTo OTrope 24
OTHOCHO To3n DokyMeHT
1.1 Baxha nHΦopMaζη
1.1.1 Uen
TeHc cBbETn 3a pEmOH T NOMarat Ha Ntpe6nTEnla da pEmOHtnpa cam ypeiB n BcOTBeTCTBnC pernameHTa 3a ekONOrOcb6p3No npoeKtnpaHe h ypeiNe (OT03.2021 r.).
Te cbIbpxkT INHΦOpMaJN KAK Da CMeHrTe ONpeDeneHn pe3epBn YactN, BKIOH-TEINHO pnpynpeKdEHN n PNCKOB.
Ako IMATE HRAKAKINBbnpoM,MOJIa CbIpKeTe Ce c HAUNO OTdEe 3a OBCnykBaHe Ha KInENTH. Hne HOCIM OTTOBOPHOCT 3a UETn, CaMO AKO CbBeNTe 3a peMOHT ca cna3eHN npabInHo.
1.2 06aCHeHne Ha cHMBOJInTe
1.2.1 HnBa Ha onaCHOCT
IpeynpeintenHnBaCe cBcTOrT OT CmBOJ nCnHaHa Dyma.CnrHaHaTa yMa noka3Ba cepno3HOCTTA Ha onaCHOCTTA.
| Ниво на п dedурждени 3начени | |
| ОПАСHОCT | Еспаразы新股у на п dedурждени.TО сбоб Shedени по Смьт ини сернони наразяваим. |
| ПРEDУПЕЖДЕНЕ | Еспаразы新股у на п dedурждени.TOT сбob Shedени по Смьт ини сернони наразяваим. |
| ВИМATEЛНО | Еспаразы新股у на п dedурждени.TOT сбob Shedени по Смьт ини наразяваим. |
| ВИМАМЕЛ | Еспаразы新股у на п dedурждени.TOT сбob Shedени по Смьт ини onMy-шостевни.$etп. |
Tabuua 1: Hua Ha onachocm
1.2.2 Cnmbon3a onachoct
CIMBOHTE3aONACHOCTCa CIMBOHNUH N3o6paXeHNA, KOHTO DaBaT INDINKAUHA 3a BnDa ONACHOCT.
BTo3n DOKyMeHCTe H3N013BaT CNEdHInTe CMBOIN 3a OnaCHOCT:
MoHTnpaIteB06paTeH peI.

PemOH
4.3 CmHa Ha easy opening handle
CneuaJIHHHHTpymeHTn:
Kpbctata oTBeptka PH2
N3nCKBaHe:
YpeBt E n3KIOUeH OT 3aXpaHbAHeTO.
BpaTaTa e oTbopeHa.
4.3.1 CbJIHe Ha easy opening handle
- Cibanete kanaeTo Ha easy opening handle (1).
- Pa3BnIe DaBaTa BnHTa (2).

Easy opening handle e cbaneHa.
4.3.2 MoNTIpaHHe Ha easy opening handle
Mexaan3mbt Ha easy opening handle Tp6ba Da 6bde npabnHn Hactpoen npenMOHTaKa.
PpabnHTo paaonooKeHne Ha 6ytaHnna Ppbt (1), Ha3b6eHnTe KaanpaTn (2) (3), npyKnHata (4) n orpaHnHnten (5) 3a MoHTax Ha BpTaTaTAt OtnBa e noKa3aHO Ha padkNata.


MoHTnpaTBeB6paTeHpei.

PemOH
4.4 CmHa Ha rohata naHt ha BpaTaTa
CneuaJIHHnHnCTpyMeHTN:
HakpaimHK Torx TX20 6,3 MM (1/4") [00340865]


IPEADYNPEXDEHNE
Teekn, o6emncTuypeu!
TpabMn Ha rpb6a MyckyInTe
OpeaunaHTa NO tctparrhaBe HA bpaTne HA ypeJa Tp8ba Da 13BbpuBa cAmo TO o6bUeHN CNEuAINCTn.
3a npemecTbaHeTo Ha ypeDa ca Heo5xoDmIM DbMa dyuH.
N3non3BaIte cAmo nOxOJn mHCTpyMeHTn ObOpyDaHe.

BHIMATEJIHO
Octpn pb6oBe!
HapaHbAHHoTnnp3BaHe
Hocete npedna3n pbkabu.


PNEAYNPEXEHNHE
PpnnnB3BaHe Ha HkNoHEn ypeN!
KocTHnΦpakTypn/HapaHbAHHoT npema3BaHe
YkpeneTe ypeuTE cpeu npnnB3BaHe.


BHMMATEJHO
Pnck OT nadaun yactn nopadn pa3xna6eHN BnHTOBe!
HpaHbHe npaPi napaun Yactn
3akpenete KOMNOEHTa, Taka He da He naHe.

BHIMAHHEI
Pnck OT nadaun yactn nopadn pa3xna6eHN BnHTOBe!
IobpeHa HpyrHuactn Ha ypeHa NmB Doma Ha KHeHTa, HAp. DbHO
TC
3akpenTe KOmnoHEHTa, Taka Ye Da He naHe.
N3nCKBaHe:
YpeBt en3KIOueHOT 3axpaHbHeTo.
BbtpseHHNTe pHTNHn Ha ypeDa ca OTCTpaHeHn.
4.4.1 CbanyHe Ha naHTata Ha BpataTa

PemOH
- NocTabete ypea Jernan Ha 3aHaTa cn Ctpana.

2.1.HatncheTe kanaeTo Ha rohpHaTa naHTa ot Dbete ctpaHn (1).
- N3BaJeTe KanaeTo Ha roPHaTa naHTa (2).
- CbaneTe kanaeTo Ha rohpHaTa naHTa (3).

PemOH
3.1.PaBmTeDbTaBNHTa(1).
- Cbane teropnata naHTa (2).

Tophata naHTa Ha BpaTata e CBaneHa.
4.4.2 MoHTnpaHe Ha naHTaTa Ha BpaTaTa
MOnTpaaTeB06paTeHpeJ.

PemOH
4.5CMHaHa rohpHata naHTa Ha Bpata (Bpata c dncnnei)
Cneunannn HNCTpyMeHTN:
HakpaHHK Torx TX20 6,3 MM (1/4") [00340865]
PDEUYPEKDEHNE
Teekn, o6emncTuypeu!
MoHTpaTBeBobpaTeHpeI.

PemOH
4.6CMHaHaDOnHaTaNaHTaHaBpTaTa
Cneunannn HNCTpyMeHTN:
HakpaHHK Torx TX20 6,3 MM (1/4") [00340865]

PDEYPNPEXDEHNE
Teekn, o6emncTuypeu!
MOHTnpaTeB06paTeH peI.

PemOH
4.8 CMraHa Ha KOHTeHepa 3a 3aMpa3eHN XpaHITeHN npOdykTN
N3nCKBaHe:
BpaTaTa e oTBopeHa.
4.8.1 3BaKaJaHe Na KOHTeHepa 3a 3ampa3eHn XpaHNTeHn npOyKTH
- 13bpnaTe DOKpaI KOHTeHepa 3a 3ampa3EH xpaHTeHH npOdykTN (1). 2. 13BaTe KOHTeHepa 3a 3ampa3EH xpaHTeHH npOdykTN (2).
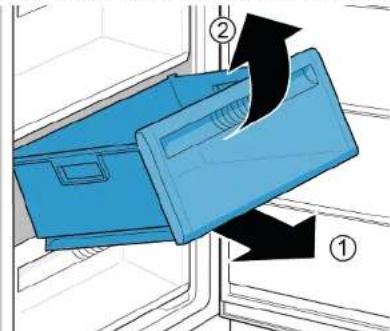
KohteHepb3a3aMPa3eHNxpaHntEHINpoIyKeTn eI3BaDHe.
4.8.2 MoHTnpaHe Ha KOHTeHepa 3a 3ampaehn XpaHHTEN npOdykTN
MoHTnpaTBeBopateHpei.

PemOH
4.9 CmHa Ha JeDoTeHepaTopa
M3nCKBaHe:
BpaTaTa e oTbopeHa.
4.9.1 N3BaxDaHe Ha neDorehepatopa
- Ⅰидьраиге рафты с кOTHEн�ера за зamраленхpaHITENH npOdyKTи и leDorehePATOpe (1).
2.Ocbo6oTe KyKnte (2).
3.ИЗва对接л endorehepaTopa(3).


JeDoreHepaTope n3BaAeH.
4.9.2 MoHTnpaHe HaJeIeOreHepaTopa
MoHTnpaTBeB0paTeHpeI.

PemOH
4.10 CMraHa HA LED oCBetneHneTo otrope
CneuaJIHHHnCTpymeHTN:
NnockaOTBeptKaBpbx2,4MMX0,4MMX60MM,B KOMPnEeTa[00341820]

BaWnAT ype n cHa6dene C LED ocBtneHme, KoTe He H3NcKbNa oI- DpBkKa. Toba ocBtneHme MOKe Da 6bJe peMOHTnpaHO CaMo OT CNEuHaNCTU ot cnykbaTa 3a 06cnykBaHe Ha KNHeTH NIN OT KBAHNuPapHn TexHnui!


ONACHOCT
Pmck ot TKOB yub npoprna tactn noanHanpexkHe!
OnAnOHCT 3a KWBOTA ot TKOB yub aB city nHnepBA
EeKtPrnTeKteTneAactn TpRbBa da ce pEmOHnpat OT KBAIINPHUNPAHn EeKToTeXHn.
CnepemoHTA Tp8Ba 1a Ce n3bBpiN npOBepKa 3a 6e30NaCHOCTcRlachO VDE 0701 mnn B cTbETCTBHe CbCneunHnHnTe 3a cTpaHATA paope6m.


ONACHOCT
PnCK OT TOKOB ydap npaH nuactn noH anpeXeHHe!
CmbptOT TOKOB ydap
NtKIOHOTe YEpDITE O t ENEKTPNHECKOTO 3aXpaHBAHe NOHE 60 CEYHNn PnpDl 3aONoBAHa peMOnTA.


BHIMATEJIHO
Octpn pb6oBe!
HapaHaBaHmO Tnpa3BaHe
Hocete npedna3n pbkauu.
N3nCKBaHe:
YpeBt e N3KIOUeHOT 3axpaHbAHeTO.
BpaTata e OTbopeHa
TopHnTe BbTpewHn pHTnHr Ce oTcpaHBAt.
4.10.1 CbajnHe Ha LED ocBtJeHneTo
- Ppemectete LED ocBETneHneto HnABO.

CbpbbaHTo KbEm ENEKtpnueckaT Mpeka H aLED oCBETneHHeTo e npekbcHATO.
2.Ocbo6oTe KyKte HaLEDocBeTneHMeTo.


PemOH
3.CBaIeTeLEDocBETHeHnETo,pNIMBKBaIKnroHanpei.

LEDOCBETHeHMeToeCBaneHo.
4.10.2 MoHTnpaHe Ha LED ocBETneHnTo OTrope
MOHTnpaTBeBobpaTeHpeI.
4.3 Zamjena rucke easy opening handle 34
4.3.1 Uklanjanje rucee easy opening handle 34
4.3.2 Postavljanje ruche easy opening handle 34
4.4 Zamjena gornjeg zgloba vrata 35
4.4.1 Uklanjanje zgloba vrata 35
4.4.2 Postavljanje zgloba vrata 37
4.3 Zamjena rucke easy opening handle
Specijalni alati:
OdvijaC Phillips PH2
Zahtjev:
Uredajieisklueniznapajanja.
Vrata su otvorena.
4.3.1 Uklanjanje rucke easy opening handle
- UklonitePoklopac rucke easy opening handle (1). 2.Odvijte dva vija (2).


Ručka easy opening handle je uklonjena.
4.3.2 Postavljanje rucke easy opening handle

4.3 Vymena Easy opening handle 56
4.3.1 Vyjutl Easy opening handle.. 56
4.3.2 Montaz Easy opening handle.. 56
4.4 Vymena horniho zavesu dvirek 57
4.4.1 Odstraneni zavesu dvirek 57
4.4.2 Montaz zavesu dvirek 59
4.5 Vymena horniho zavesu dvirek (dvifka s ukazatelem) 60
4.5.1 Odstraneni zavesu dvirek 61
4.5.2 Montaz zavesu dvirek 62
4.6 Vymena dolnlo hozavesu dvftek 63
4.6.1 Vymena dolniho zavesu dvifek 63
4.6.2 Montaz spodniho zavesu dvirek 64
4.7 Vymena odkladaci plochy 65
4.7.1 Vyjmuti odkladaci plochy.. 65
4.7.2 Montáz odkladaci plochy 65
4.8 Vymena zasobniku nazmrazené potraviny 66
4.8.1 Vyjmuti zasobniku nazmrazené potraviny 66
4.8.2 Montaz zasobniku nazmrazené potraviny 66
4.9 VymenaVyrobniku ledu 67
4.9.1 Vyjmuti vyrobniku ledu 67
4.9.2 Montaz vyrobniku ledu 67
4.10 Vymena LED horniho osvetleni 68
4.3 Vymena Easy opening handle
Speziální nástroje:
Sorg for at sikre apparater mod at glide.

PASPAI
Fare for nedfaldende deleg pga. Iosnede skruer!
ronskade pga.nedfaldende del
Sorg for at sikre componenten mod at falde ned.

BEM/ERK!
Fare for nedfaldende deleg pga. Iosnede skruer!
Sarg for at sikre componenten mod at falde ned.
Preindstilling:
Sorg for at sikre apparater mod at glide.


PAS PAI
Fare for nedfaldende deleg pga. Iosnedeskruer!
rsonskade pga. nedfaldende dele
Sorg for at sikre componenten mod at falde ned.

BEM/ERKI
Fare for nedfaldende dele pga. Iosnede skruer!
Sorg for at sikre componenten mod at falde ned.


FARE
Sorg for at sikre apparater mod at glide.

PAS PAI
Fare for nedfaldende deleg pga. Iosnedeskruer!
Ronskade pga, nedfaldende dele
Sorg for at sikre componenten mod at falde ned.

BEM/ERK!
Fare for nedfaldende dele pga. Iosnede skruer!
Sorg for at sikre componenten mod at falde ned.
Preindstilling:
Repair hints - Freezer
1 Concerning this document. 116
1.1 Important information 116
1.1.1 Purpose 116
1.2 Explanation of symbols 116
1.2.1 Danger levels.. 116
1.2.2 Hazard symbols 116
1.2.3 Structure of the warnings 117
1.2.4 General symbols 117
Safety. 118
2.1 General Safety instructions 118
2.1.1 All domestic appliances 118
Tools and aids. 119
Repair 120
4.3 Replacing easy opening handle 124
4.3.1 Removing easy opening handle 124
4.3.2 Installing easy opening handle 124
4.4 Replacing door upper hinge 125
4.5 Replacing door upper hinge (door with display) 128
4.7 Replacing shelf. 133
4.7.1 Removing shelf 133
4.7.2 Installing shelf 133
4.8 Replacing frozen food container. 134
4.8.1 Removing frozen food container 134
4.8.2 Installing frozen food container 134
4.9 Replacing ice maker 135
4.9.1 Removing ice maker 135
4.9.2 Installing ice maker 135
4.10 Replacing LED top light 136
4.10.1 Removing LED light. 136
4.10.2 Installing top LED light 137
Concerning this document
1.1 Important information
1.1.1 Purpose
These repair hints support consumer to repair appliances by himself according to the applicable eco-design regulation (as of 03/2021).
They contain information how to exchange defined spare parts including warnings and risks.
In case of questions, please contact our customer service. We will only be liable for damages if the repair hints have been followed properly.
1.2 Explanation of symbols
1.2.1 Danger levels
The warning levels consist of a symbol and a signal word. The signal word indicates the severity of the danger.
| Warning level Meaning | |
| Danger | Non-observation of the warning message will result in death or serious injuries. |
| Warning | Non-observation of the warning message could result in death or serious injuries. |
| Caution | Non-observation of the warning message could result in minor injuries. |
| Notice | Non-observation of the warning message could result in damage to property. |
Table 1: Danger levels
1.2.2 Hazard symbols
Hazard symbols are symbolic representations which give an indication of the kind of danger.
The following hazard symbols are used in this document:
| Hazard symbol Meaning | |
| ! | General warning message |
| Danger from electrical voltage | |
| Risk of explosion | |
| Danger of cuts | |
| Danger of crushing |
Concerning this document
| Hazard symbol Meaning | |
| Danger from hot surfaces | |
| Danger from strong magnetic field | |
| Danger from non-ionizing radiation |
Table 2: Hazard symbols
1.2.3 Structure of the warnings
Warnings in this document have a standardised appearance and a standardised structure.

Danger
Type and source of danger!
Possible consequences of ignoring the danger / warning.
Measures and prohibitions for preventing the danger.
The following example shows a warning that warns against electric shock due to live parts. The measure for avoiding the danger is mentioned.

Danger
Risk of electric shock due to live parts!
Death by electrocution
- Disconnect appliances from electrical supply at least 60 seconds before disconnecting repairs.
1.2.4 General symbols
The following general symbols are used in this document:
| Gen. symbol Meaning | |
| 1 | Identification of a special tip (text and/or graphic) |
| i | Identification of a simple tip (only text) |
| Identification of a link to a video tutorial |
| Gen. symbol Meaning | |
| Identification of required tools | |
| Identification of required preconditions | |
| Identification of a condition (if ..., then ...) | |
| Identification of a result | |
| [Start]Identification of a key or button | |
| [00123456] Identification of a material number | |
| Status Identification of displayed text / window(in the appliance's display) | |
Table 3: General symbols
Safety
2.1 General Safety instructions
2.1.1 All domestic appliances
Risk of electric shock due to live parts!
Errors by repairs involving electrical components can lead to electrical shock!
- Disconnect the appliance from the mains for at least 60 seconds before starting work.
After the repair have a safety test according VDE 0701 or country-specific regulations performed.
Risk of injury from sharp edges!
Wear protective gloves.
Risk of crushing during repair, maintenance, troubleshooting and service due to heavy and moving components
Wear protective shoes.
- Secure heavy components from falling down.
- Do not stick body parts into moving components.
Risk to the appliance's safety / function!
Only use original spare parts.
Risk of damage to electrostatically sensitive components (ESDs)!
- Do not touch the modules, including connections and conductor paths.

Tools and aids
| Designation Details Images | ||
| Protection cloth [00342013] | 60 cm x 50 cm | ### |
| Phillips screwdriver PH2 | ||
| Torr Bit TX20 [00340865] | 6.3 mm (1/4") | |
| Slotted screwdriver | Blade 2.4 mm x 0.4 mm x 60 mm, in the kit [00341820] | ① |
Prerequisite:
Door is open.
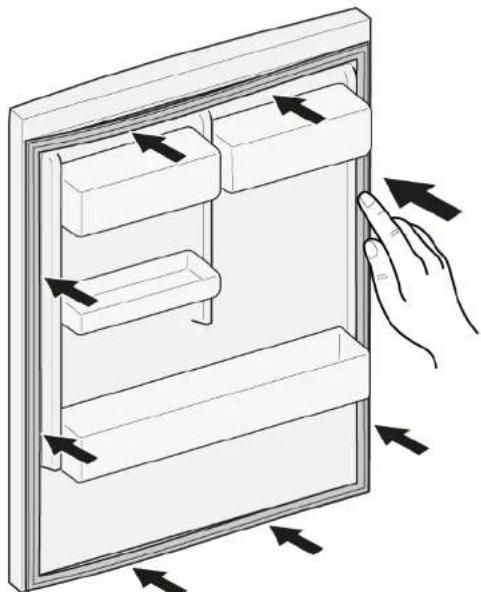
- Release door gasket from the groove on right and left corner.

- Pull out door gasket from groove.


Door gasket is removed.
| Thickness of new door gasket may deviate slightly from thickness of old door gasket. This will not affect closing behavior and long-term function. | |
| If your appliance has adjustable hinges or hinge attachments, you can optimize the closing behavior subsequently. | |
| Small side holes in door gasket are functional (required for ventilation). These are not production faults. |

Repair
- Check groove for gasket for damage.

- If groove for gasket is it is damaged.
- Contact customer service.
- Slight deformation of door gasket is normal and does not affect its function. It is recommended to straighten door gasket before inserting it into appliance.
Heat door gasket with a hair dryer or hot water and manually reshape it.
- Push corners of gasket at the top and bottom to the groove.


Repair
- Press whole gasket step by step into the groove.
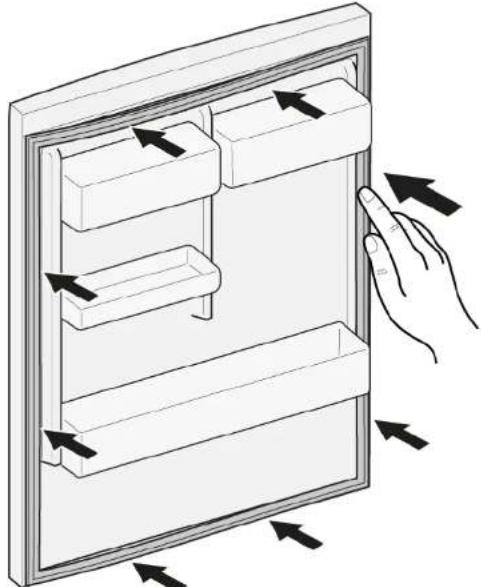

Door gasket is installed.
Slotted screwdriver Blade 10 mm x 1.6 mm x 200 mm
Prerequisite:
Appliance is disconnected from power supply.
Door is open.
4.2.1 Removing door handle
-
Remove two screw caps (1).
-
Unscrew two screws (2).
- Remove door handle (3).
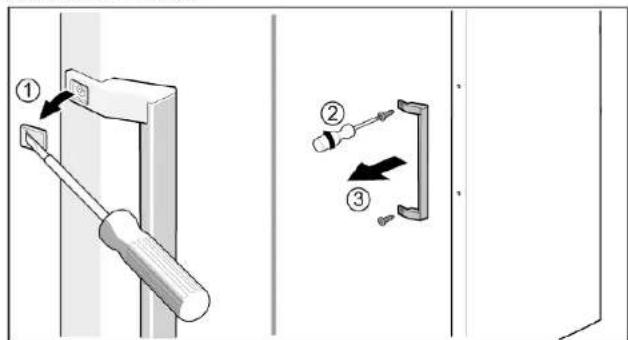

Door handle is removed.
Install in reverse order.

Repair
4.3 Replacing easy opening handle
Required tools:
Phillips screwdriver PH2
Prerequisite:
Appliance is disconnected from power supply.
Door is open.
4.3.1 Removing easy opening handle
- Remove easy opening handle cover (1).
- Unscrew two screws (2).


Easy opening handle is removed.
4.3.2 Installing easy opening handle
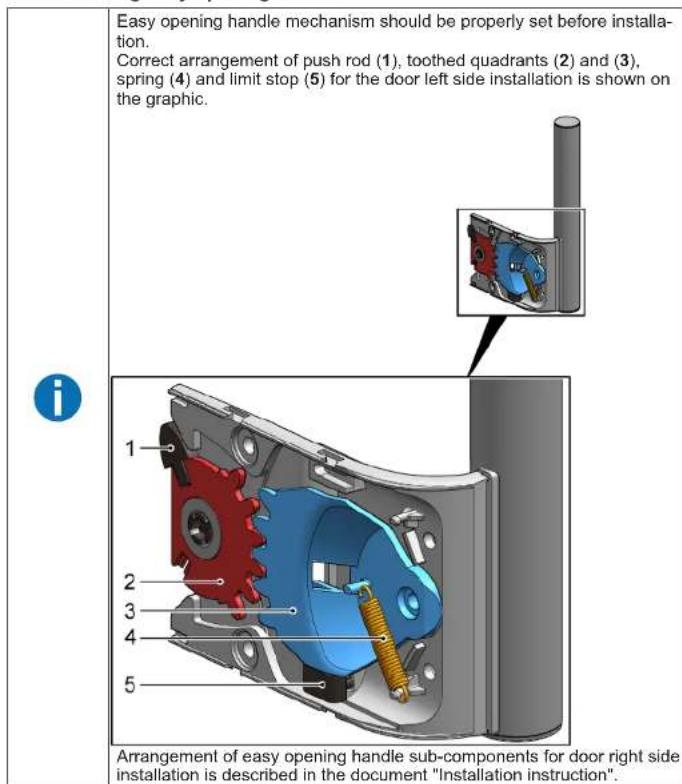
Install in reverse order.

Repair
4.4 Replacing door upper hinge
Required tools:
Torx Bit TX20 6,3 mm (1/4") [00340865]

Warning
Heavy, bulky appliances!
Back and muscle injuries
Appliance door removal operation should only be carried out by
trained specialists.
To move the appliance, two people are required.
Use only suitable tools and equipment.

Caution
Sharp edges!
Cut injuries
Wear protective gloves.

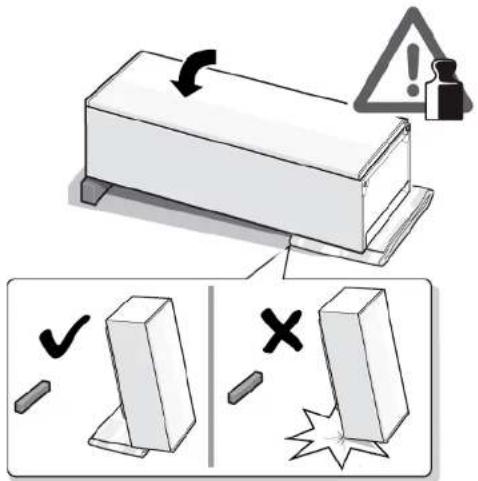
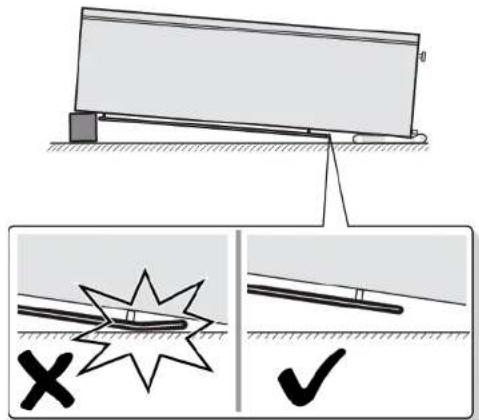
Warning
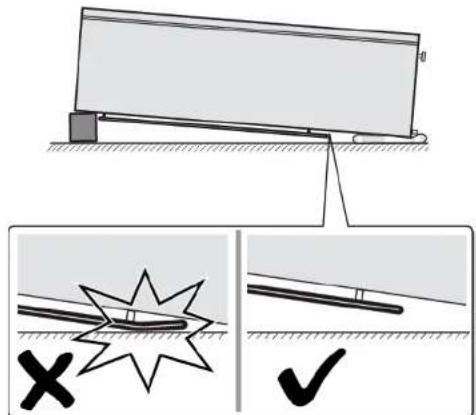
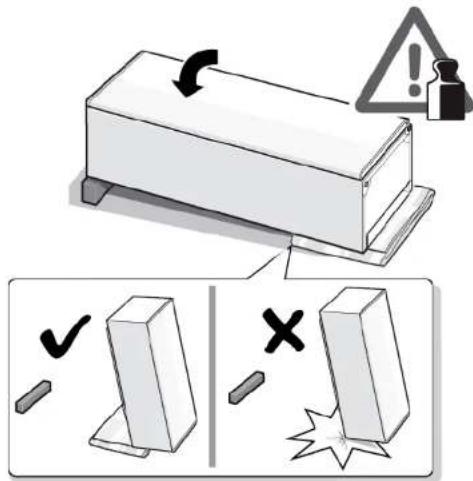
Slipping of tilted appliances!
Bone fractures / crush injuries
Secure appliances against slipping

Caution
Risk of falling parts due to released screws!
ury because of falling parts.
- Secure component from falling down.
Notice
Risk of falling parts due to released screws!
Damage to other parts of the appliance or at customers home e.g. bot
tom.
Secure component from falling down.
Prerequisite:
Appliance is disconnected from power supply.
Appliance interior fittings are removed.
- Place appliance on the back side.
-
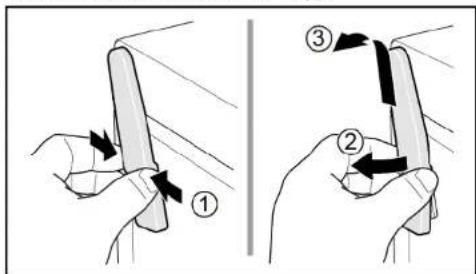
- Press upper hinge cover on both sides (1).
-
Move out upper hinge cover (2).
- Remove upper hinge cover (3).
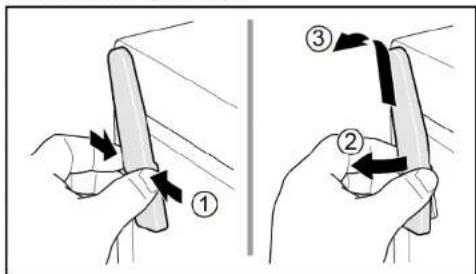

Repair
3.1. Unscrew two screws (1).
- Remove upper hinge (2).

Door upper hinge is removed.
4.4.2 Installing door hinge
Install in reverse order.

Repair
4.5 Replacing door upper hinge (door with display)
Required tools:
Torx Bit TX20 6,3 mm (1/4") [00340865]

Warning
Heavy, bulky appliances!
Back and muscle injuries
- Appliance door removal operation should only be carried out by
trained specialists.
To move the appliance, two people are required.
Use only suitable tools and equipment.

Caution
Sharp edges!
Cut injuries
Wear protective gloves.

Warning
Slipping of tilted appliances!
Bone fractures / crush injuries
Secure appliances against slipping

Caution
Risk of falling parts due to released screws!
ury because of falling parts.
- Secure component from falling down.

Notice
Risk of falling parts due to released screws!
Damage to other parts of the appliance or at customers home e.g. bot
tom.
- Secure component from falling down.

Danger
Risk of electric shock due to live parts!
Danger to life through electric shock in case of improper repair
Electric parts should be repaired by a qualified electricians.
After the repair have a safety test according VDE 0701 or country-specific regulations performed.

Danger
Risk of electric shock due to live parts!
Death by electrocution
- Disconnect appliances from electrical supply at least 60 seconds before starting repairs.
Prerequisite:
Appliance is disconnected from power supply.
Appliance interior fittings are removed.

Repair
- Place appliance on the back side.


Repair

2.1. Press upper hinge cover on both sides (1).
2. Move out upper hinge cover (2).
3. Remove upper hinge cover (3)
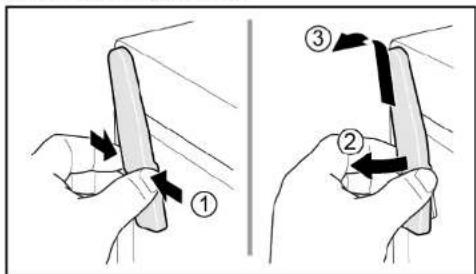
3.1. Remove cable box cover (1) 2. Remove cable protection (2)
3. Disconnect electrical connection (3).
4. Unscrew two screws (4)
5. Remove upper hinge (5).


Door upper hinge is removed.
Install in reverse order.

Repair
4.6 Replacing door lower hinge
Required tools:
Torx Bit TX20 6,3 mm (1/4") [00340865]




Prerequisite:
Appliance is disconnected from power supply.
Appliance interior fittings are removed.
Appliance is placed on the back side.

Upper hinge is removed. Page 128
4.6.1 Replacing door lower hinge
- Remove door.

2.1. Unscrew the screw (1).
- Turn lower hinge out (2).
- Remove lower hinge (3).
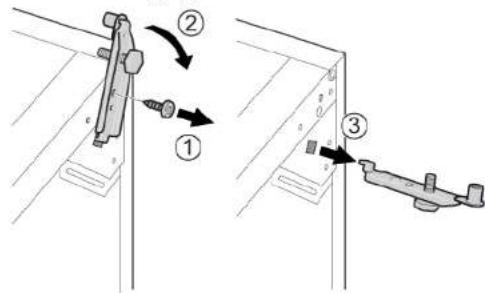

Lower hinge is removed.

Repair
Install in reverse order.

Repair
4.7 Replacing shelf
Prerequisite:
Door is open.
4.7.1 Removing shelf
Pull out shelf.

Shelf is removed.
4.7.2 Installing shelf
Install in reverse order.

Repair
4.8 Replacing frozen food container
Prerequisite:
Door is open.
4.8.1 Removing frozen food container
- Pull out frozen food container all the way (1). 2. Remove frozen food container (2).

Frozen food container is removed.
4.8.2 Installing frozen food container
Install in reverse order.

Repair
4.9 Replacing ice maker
Prerequisite:
Door is open.
4.9.1 Removing ice maker
- Pull out shelf frozen food container with ice maker (1).
- Release hooks (2). 3. Release hooks (3)
- Remove ice maker (3).

Ice maker is removed.
4.9.2 Installing ice maker
Install in reverse order.

Repair
4.10 Replacing LED top light
Required tools:
Slotted screwdriver Blade 2.4 mm x 0.4 mm x 60 mm, in the kit [00341820]

Your appliance features a maintenance-free LB
These lights may be repaired by customer service or authorised technicians only!


Danger
Risk of electric shock due to live parts!
Danger to life through electric shock in case of improper repair
Electric parts should be repaired by a qualified electricians.
After the repair have a safety test according VDE 0701 or country-specific regulations performed.


Danger
Risk of electric shock due to live parts!
Death by electrocution
- Disconnect appliances from electrical supply at least 60 seconds before starting repairs.


Caution
Sharp edges!
Cut injuries
Wear protective gloves.
Prerequisite:
Appliance is disconnected from power supply.
Door is open.
Upper interior fittings are removed.
4.10.1 Removing LED light
- Move the LED light to the left side.

LED light electrical connection is disconnected.
- Release LED light hooks.


Repair
- Remove LED light moving it forward.

LED light is removed.
4.10.2 Installing top LED light
Install in reverse order.
Remonditeave - Sögavkülmik
1 Selle dokumendiga seoses 139
1.1 Tahtis teave 139
1.1.1 Eesmark 139
1.2 Sumbolite selgitus 139
1.2.1 Ohutasemed 139
1.2.2 Ohusumbolid 139
1.2.3 Hoiatuste struktuur 140
1.2.4 Üldised sumbolid 140
Ohutus. 141
2.1 Uldised ohutusiuhised 141
2.1.1 Kofik kodumasinad 141
Tabel 1: Ohutasedmed
1.2.2 Ohusumbolid
| Üld.®,®,®,®,®,®,®,®,®,®,®,®,®,®,®,®,®,®,®,®,®,®,®,®,®,®,®,®,®,®,®,®,®,®,®,®,®,®,®,®,®,®,®,®,®,®,®,®,®,®,®,®,®,®,®,®,®,®,®,®,®,®,®,®,®,®,®,®,®,®,®,®,®,®,®,®,®,®,®,®,®,®,®,®,®,®,®,®,®,®,®,®,®,®,®,®,®,®,®,®,® | |
| Vajalike tõöristade tunnus | |
| Vajalike eeltingimuste tunnus | |
| Seisukorra tunnus (kui..., siis...) | |
| Tulemuse tunnus | |
| [Start]Klahvi või nupu tunnus | |
| [00123456] Matherjalinumbri tunnus | |
| Olek Kuvatava tekstli/akna tunnus (seadme ek- raanil) |
Tabel 3: Üldised sumbolid

Ohutus
2.1 Üldised ohutusjuhised
2.1.1 Kofik kodumasinad
m = 311
Mny avyicete TIOJovdc,ouMTpeiaqavopevwTov ouvdoewk KaT ovayuyuTw TAKETW.

EpyaIeia Kai BonOnmuata
Kivduvoa nAeKToTAnIaIaOw nAeKToPpOpWv Hepovl
Kivovoc yia n Tcwn atro naektpoanjia de Tepittwn akatannnc
Ta nKaTePka eepn TpeTTE va EITKeuaCovTAtIO EKTtAdeUeVOUC nKaTePOAOVOC.
Meta tvn etiokeun tpaayuatoonotse eAeyxo aopaaleiac oupovaoe to VDE 0701 n kavoviaqou ts nyukepkiyivxigw xapovaa

KINAYNO
Kivuvoc nAekptponnlag Aoyw nAektpooppw vepw!
Oavatoa nno nAektpoanlaia
ATTOOVOEETIE TIC OUKEUEC ATIO TIV TAPOXYI NAEKTPOKOU PEUATOCS TOAUXIAOTOV 60 DEUTEPAETTA ITPN EKVIKOTIE TEC ITHEKUEC
PouTnOeON:
Houakeunivai anoovudéevn atno tny npoxn 1popo0ooia
Apaipovtai ta eowtepiKa eapntmuata ooukeuC.
EπIOKεUN
4.5.1 Apaipoean npotas
- TOnoBEmrToE mouKeun otyn niow nIeupa.

EMIOKEUN
4.3 Inlocuirea easy opening handle 418
4.3.1 Demontarea easy opening handle 418
4.3.2 Montarea easy opening handle 418
4.4 Inlocuirea balamalei de sus a usii 419
4.4.1 Demontarea balamalei usii 419
4.4.2 Montarea balamalei usii 421
4.5 Inlocuirea balamalei de sus a uii (usau afisaj) 422
4.5.1 Demontarea balamalei uii 423
4.5.2 Montarea balamalei usii 424
4.6 Inlocuirea balamalei de jos a uui 425
4.6.1 Inlocuirea balamalei de jos a uui 425
4.6.2 Montarea balamalei de jos a ušii 426
Cap torx TX20 6.3 mm (1/4") [00340865]
Surubelinita platá Lama de 10 mm x 1,6 mm x 200 mm
Cerintă:
4.3 Inlocuirea easy opening handle
Scule speciale:
Surubelinita Phillips PH2
Cerinta:
Aparatul este deconnectat de la sursa de energia electrica.
Usa estedeschisa.
4.3.1 Demontarea easy opening handle
- Scoateti easy opening handle (1).
- Desurubati doua suruburi (2).


Cap torx TX20 6.3 mm (1/4") [00340865]


AVERTISMENT
Aparate grele, masive!
Accidentarea spatelui si leziuni musculare
Cap torx TX20 6.3 mm (1/4") [00340865]

AVERTISMENT
Aparate grele, masive!
Accidentarea spatelui si leziuni musculare
4.3 Vymena uchytky easy opening handle 441
4.3.1 Odoberanie uchytky easy opening handle 441
4.3.2 Montazuchtyk easy opening handle 441
4.3 Vymena uchytky easy opening handle
Spezialne nastroje:
4.3 Byta Easy opening handle 509
4.3.1 Ta bort Easy opening handle 509
4.3.2 Montera Easy opening handle 509
- Tryck in hela packningen i sparet bit for bit.

4.3 Byta Easy opening handle
Nödvändiga verktyg:
Phillips-skruvmejsel PH2
Forutsättning:
Apparaten ar bortkopplad fran stromforsorjning.
Dorren ar oppen.
4.3.1 Ta bort Easy opening handle
- Ta bort skyddet for Easy opening handle (1).
- Skruva ur de tvá skruvarna (2).


Easy opening handle har tagits bort.
4.3.2 Montera Easy opening handle

- OTHOCHO To3n DokyMeHT
- Baxha nHΦopMaζη
- Uen
- 06aCHeHne Ha cHMBOJInTe
- HnBa Ha onaCHOCT
- Cnmbon3a onachoct
- PemOH
- CmHa Ha easy opening handle
- CbJIHe Ha easy opening handle
- MoNTIpaHHe Ha easy opening handle
- CmHa Ha rohata naHt ha BpaTaTa
- IPEADYNPEXDEHNE
- BHIMATEJIHO
- PNEAYNPEXEHNHE
- BHMMATEJHO
- BHIMAHHEI
- CbanyHe Ha naHTata Ha BpataTa
- 4.5CMHaHa rohpHata naHTa Ha Bpata (Bpata c dncnnei)
- PDEUYPEKDEHNE
- 4.6CMHaHaDOnHaTaNaHTaHaBpTaTa
- PDEYPNPEXDEHNE
- CMraHa Ha KOHTeHepa 3a 3aMpa3eHN XpaHITeHN npOdykTN
- 3BaKaJaHe Na KOHTeHepa 3a 3ampa3eHn XpaHNTeHn npOyKTH
- MoHTnpaHe Ha KOHTeHepa 3a 3ampaehn XpaHHTEN npOdykTN
- CmHa Ha JeDoTeHepaTopa
- N3BaxDaHe Ha neDorehepatopa
- MoHTnpaHe HaJeIeOreHepaTopa
- CMraHa HA LED oCBetneHneTo otrope
- ONACHOCT
- CbajnHe Ha LED ocBtJeHneTo
- Zamjena rucke easy opening handle
- Uklanjanje rucke easy opening handle
- Postavljanje rucke easy opening handle
- Vymena Easy opening handle
- PASPAI
- BEM/ERK!
- PAS PAI
- BEM/ERKI
- FARE
- Preindstilling:
- Repair hints - Freezer
- Concerning this document
- Important information
- Purpose
- Explanation of symbols
- Danger levels
- Hazard symbols
- Structure of the warnings
- Danger
- General symbols
- Safety
- General Safety instructions
- All domestic appliances
- Tools and aids
- Repair
- Removing door handle
- Replacing easy opening handle
- Removing easy opening handle
- Installing easy opening handle
- Replacing door upper hinge
- Warning
- Caution
- Notice
- Replacing door upper hinge (door with display)
- Replacing door lower hinge
- Replacing door lower hinge
- Replacing shelf
- Removing shelf
- Installing shelf
- Replacing frozen food container
- Removing frozen food container
- Installing frozen food container
- Replacing ice maker
- Removing ice maker
- Installing ice maker
- Replacing LED top light
- Removing LED light
- Remonditeave - Sögavkülmik
- Ohusumbolid
- Ohutus
- Üldised ohutusjuhised
- Kofik kodumasinad
- m = 311
- EpyaIeia Kai BonOnmuata
- KINAYNO
- EπIOKεUN
- EMIOKEUN
- Inlocuirea easy opening handle
- Demontarea easy opening handle
- AVERTISMENT
- Vymena uchytky easy opening handle
- Byta Easy opening handle
- Ta bort Easy opening handle
- Montera Easy opening handle
Brand : Profilo
Model : DF1033WEVV
Category : Freezer