RM-LJ302 - Remote control SONY - Free user manual and instructions
Find the device manual for free RM-LJ302 SONY in PDF.

User questions about RM-LJ302 SONY
0 question about this device. Answer the ones you know or ask your own.
Ask a new question about this device
Download the instructions for your Remote control in PDF format for free! Find your manual RM-LJ302 - SONY and take your electronic device back in hand. On this page are published all the documents necessary for the use of your device. RM-LJ302 by SONY.
USER MANUAL RM-LJ302 SONY
Operating Instructions
RM-LJ302
Precautions
On safety
Should any solid object or liquid fall into the cabinet, unplug the receiver and have it checked by qualified personnel before operating it any further.
On operation
Before connecting other components, be sure to turn off and unplug the receiver.
On cleaning
Clean the cabinet, panel and controls with a soft cloth slightly moistened with a mild detergent solution. Do not use any type of abrasive pad, scouring powder or solvent such as alcohol or benzine.
If you have any question or problem concerning your receiver, please consult your nearest Sony dealer.
About This Manual
The instructions in this manual are for model RM-LJ302. Check your model number by looking at the lower left corner of the front side.
Conventions
The following icon is used in this manual:

Indicates hints and tips for making the task easier.
Before You Use Your Remote
Check that you received the following item with the remote:
LR6 (size-AA) alkaline batteries (3)
Inserting batteries into the remote
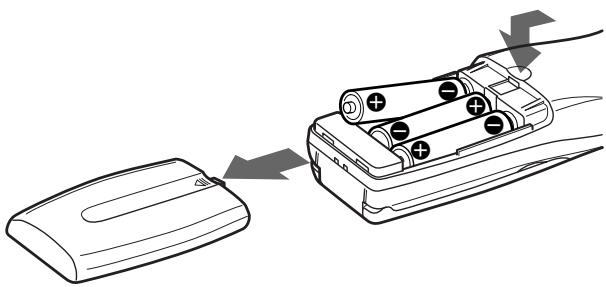
Insert three LR6 (size-AA) alkaline batteries with the + and - properly oriented in the battery compartment. When using the remote, point it at the remote sensor on the receiver.
natural_image
Diagram showing a battery holder with two batteries and an open lid, connected by arrows indicating direction (no text or symbols present)
When to replace batteries
Under normal conditions, the batteries should last for about 3 months. When the remote no longer operates the receiver, replace all the batteries with new ones.
Notes
- Do not leave the remote in an extremely hot or humid place.
- Do not use a new battery with old ones.
- Do not mix the alkaline batteries and other kinds of batteries. This remote is designed for use with the alkaline batteries only.
- Do not expose the remote sensor of the receiver to direct sunlight or lighting apparatuses. Doing so may cause a malfunction.
- If you don't use the remote for an extended period of time, remove the batteries to avoid possible damage from battery leakage and corrosion.
TABLE OF CONTENTS
Understanding the 2 way remote system
This remote operates under a 2 way remote system. With the two way remote system, the component responds to signals sent from the remote by sending additional signals (information about the status of the component, text data, etc.) back to the remote. Thus, operations are performed as a result of communication between the remote and the component.

flowchart
graph LR
    A["Remote"] <--> B["Component"]
When using a home entertainment system comprised of several components compatible with the 2 way remote system, please restrict 2 way remote system operation to a single component. Normally, turn off the 2 way remote system on all components except the receiver. If you would like to turn off the receiver's 2 way remote system, see "Setting up the 2 way remote" in the operating instructions supplied with the receiver.
Setting up the remote
At the time of shipping, the remote has not been customized to your receiver yet. Before you use the remote for the first time, do the procedure below to set up the remote so that it can control your receiver properly.
1 Press I/⏻ on the receiver to turn it on.
2 Point the remote towards the receiver and press SOUND FIELD, FUNCTION, or SUB.
and appear in the display window of the remote while it communicates with the receiver and identifies the receiver model.
When the communication ends, the remote is customized and provides the operation lists that match your receiver.
Location of Parts and Basic Remote Operations 4
Parts Description 4
Using the Lists 12
Chart of Lists 13
Selecting a Component 14
Selecting a Sound Field 15
Programming the Remote 16
Performing Several Commands in Sequence Automatically (Macro Play) 17
Downloading Data From the Receiver 18
Other Operations 20
Additional Information 22
Troubleshooting 22
Specifications 23
Location of Parts and Basic Remote Operations
This chapter provides information on the location of buttons and how to use them to perform basic operations.
Parts Description
text_image
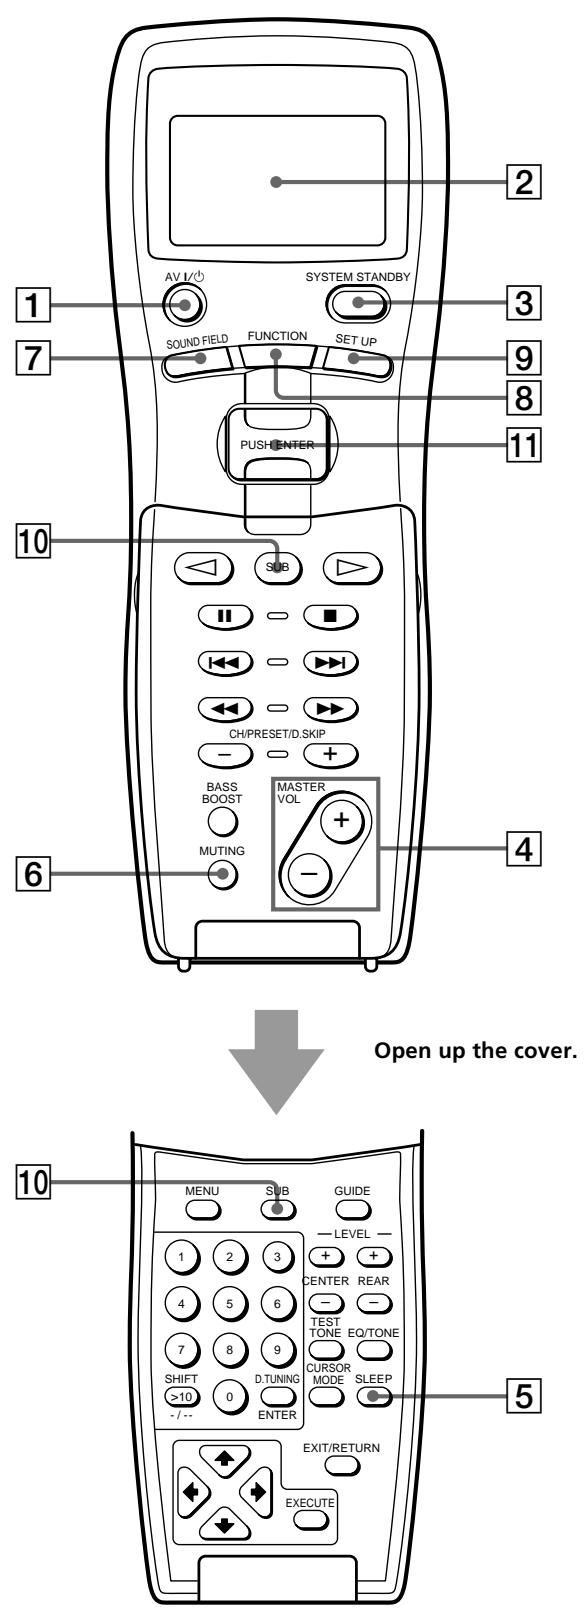
AV I/ SYSTEM STANDBY 3 1 7 SOUND FIELD FUNCTION SET UP 9 8 11 PUSH ENTER 10 SUB 4 BASS BOOST MASTER VOL 6 MUTING Open up the cover. 10 MENU SUB GUIDE — LEVEL — 1 2 3 CENTER REAR 4 5 6 — — 7 8 9 TEST TONE EQ/TONE SHIFT D.TUNING CURSOR MODE SLEEP >10 0 - / -- ENTER EXIT/RETURN EXECUTE1 AV I/ switch
Press to turn on or off the components that the remote is programmed to operate. For details on programming procedure, see "Programming the Remote" on page 16.
2 Display window
The current status of the selected component or a list of selectable items appears here.
Note
Characters other than letters of the alphabet or numbers may be displayed incorrectly on the remote, even if they appear correctly in the display window on the main unit.
3 SYSTEM STANDBY switch
Press to turn off the receiver and other Sony audio/video components at the same time. If you want to change the function of the SYSTEM STANDBY switch so that it turns on or off the receiver only, see page 16.
Note
Before you turn on the receiver, make sure that you have turned the MASTER VOLUME control on the receiver to the leftmost position to avoid damaging your speakers.
4 MASTER VOL +/- buttons
Press to adjust the volume level of all speakers at the same time.
5 SLEEP button
Press repeatedly to activate the sleep function and select the duration after which the receiver turns off automatically.
6 MUTING button
Press to mute the sound. The MUTING indicator on the receiver lights up when the sound is muted.
7 SOUND FIELD button
Press to display the sound field list. Press again to revert back to the component information.
8 FUNCTION button
Press to display the function (component) list. Press again to revert back to the component information.
See the table on page 9 for information on the buttons you can use to control each component.
If you want to change the contents of the function list to match your particular components, do the procedure “Programming the Remote” on page 16.
9 SET UP button
Press to display the set up list. Press again to revert back to the component information.
10 SUB button
While operating a component, press to display a list of operations that the corresponding buttons are not found on the remote. Then move the easy scroll key to select the operation, and then press the key to enter the selection. Press again to revert back to the component information.
See the table on pages 10 and 11 for information on the operations that appear when you press the SUB button.
11 Easy scroll key
While displaying a list, move up or down to select an item from the list, and then press to enter the selection.
text_image
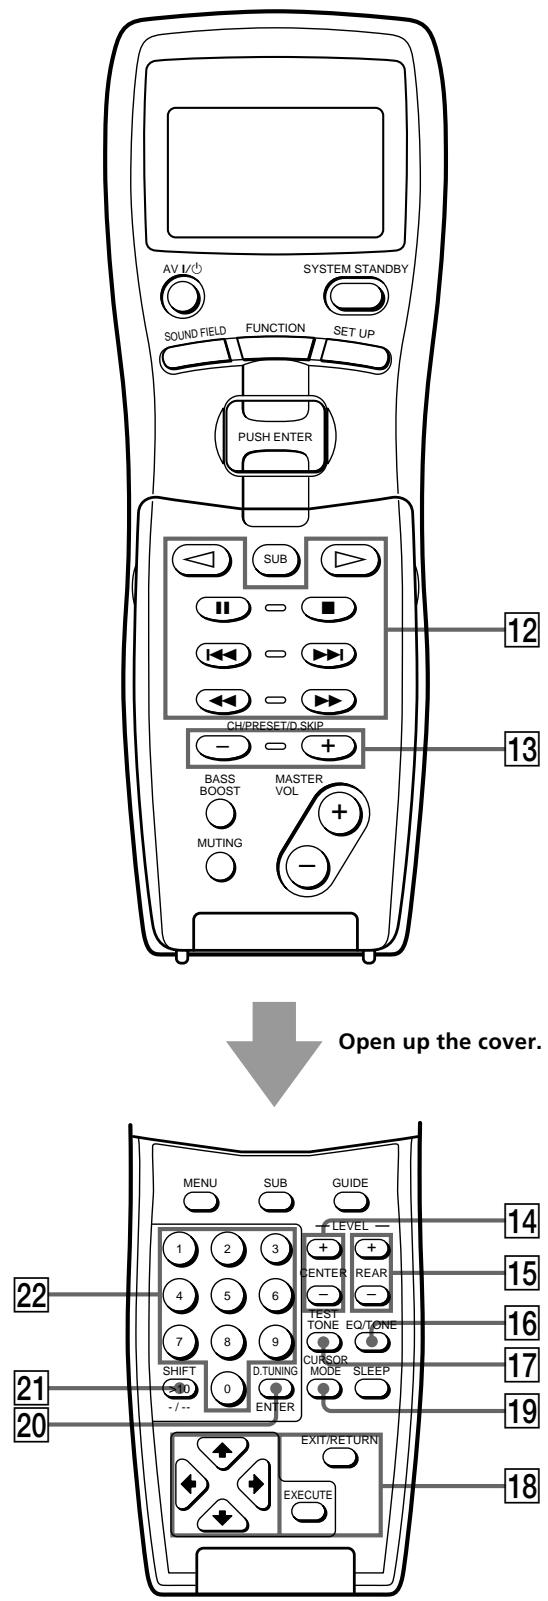
AV L/O SYSTEM STANDBY SOUND FIELD FUNCTION SET UP PUSH ENTER 12 13 CH/PRESET/D SKIP BASS BOOST MASTER VOL MUTING Open up the cover. MENU SUB GUIDE LEVEL 1 2 3 + CENTER REAR + - TEST TONE EO/TONE 7 8 9 CURSOR SHIFT D.TUNING MODE SLEEP -00 0 ENTER EXIT/RETURN 22 21 20 14 15 16 17 19 1812 Tape/disc operation buttons
The following table shows what components are operated by each button and the function of the buttons.
| Button(s) | Component(s) | Function |
| VCR, DVD player, LD player, video CD player, tape deck, MD deck, CD player, DAT deck | Starts play of the playback medium | |
| Tape deck | Starts play on the reverse side of the cassette | |
| VCR, DVD player, LD player, video CD player, tape deck, MD deck, CD player, DAT deck | Pauses play or recording or starts recording when the component is in recording standby | |
| VCR, DVD player, LD player, video CD player, tape deck, MD deck, CD player, DAT deck | Stops play | |
| / | VCR, DVD player, LD player, video CD player, tape deck (deck B only), MD deck, CD player, DAT deck | Skips tracks |
 | ||
See the table on page 9 for information on the buttons that you can use to control each component.
13 CH/PRESET/D.SKIP +/- buttons
Press repeatedly to select a preset station, channel, track, or a disc.
14 LEVEL CENTER +/- buttons
Press to adjust the volume level of the center speaker.
15 LEVEL REAR +/- buttons
Press to adjust the volume level of the rear speakers.
16 EQ/TONE button
Press to turn the equalizer or tone effect on or off. The TONE indicator on the receiver lights up when the effect is turned on.
Note that if you have adjusted the equalization or tone using the CURSOR MODE button and cursor buttons, the adjusted equalization or tone will be produced whenever you turn on the equalizer or tone effect.
17 TEST TONE button
Press to output a test tone.
18 Cursor buttons (↑/↓/←/→)
After pressing the CURSOR MODE button or SET UP button on the receiver, use the cursor buttons to make specific settings. For details refer to the Operating Instructions supplied with your receiver.
To perform menu operations on the VCR, DVD player, or SAT tuner, do the procedure below. If you don't do this, the cursor buttons merely operate the receiver.
1 Press FUNCTION and move the easy scroll key to select the VCR, DVD player, or SAT tuner.
2 Open up the cover on the remote.
CURSOR TYPE list appears.
If the list has disappeared before you go on to Step 3, press any of the cursor buttons to restore the list.
3 Move the easy scroll key to select the component that you selected in Step 1, then press the key to enter the selection.
EXECUTE button
After pressing the MENU or GUIDE button, use the cursor buttons to select a menu item, then press the EXECUTE button to enter the selection.
EXIT/RETURN button
Press to return to the previous menu or exit the menu while VCR, DVD, or SAT menu or SAT guide is displayed on the TV screen.
19 CURSOR MODE button
Press repeatedly to select a cursor mode, SURROUND, BASS/TREBLE (EQ), etc. The indicator for the selected cursor mode lights up on the receiver.
20 D.TUNING ENTER button
If you have selected tuner:
Press to enter Direct Tuning mode. For details on Direct Tuning procedure, refer to the Operating Instructions supplied with your receiver.
If you have selected VCR, DVD player, LD player, TV, cable box, satellite tuner, tape deck, MD deck, CD player, or DAT deck:
After selecting a channel, disc, or track using the numeric buttons, press this button to enter the selection. For details, refer to the Operating Instructions supplied with your receiver.
21 SHIFT >10 -/-- button
If you have selected tuner:
Press repeatedly to select a memory page for presetting radio stations or tuning to preset stations.
If you selected VCR, TV, cable box, satellite tuner, LD player, video CD player, tape deck, MD deck, or CD player:
Press before inputting a channel, disc, or track number of eleven or higher. For details, refer to the operation manual supplied with the respective components.
22 Numeric buttons (1 to 0)
Inputs the corresponding numeric value. On some components, pressing 0 selects 10. For details, refer to the operation manual supplied with the respective components.
text_image
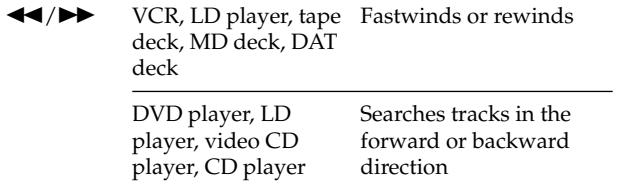
AV I/O SYSTEM STANDBY SOUND FIELD FUNCTION SET UP PUSH ENTER SUB BASS BOOST MASTER VOL MUTING - - - - - - - - - - - - - - - - - - - - - - - - - - - - - - - - - - - - - - - - - - - - - - - - - - - - - - - - - - - - - - - - - - - - - - - - - - - - - - - - - - - - - - - - - - - - - - - - - - - - - / -- - / EXIT/RETURN EXECUTE MENU SUB GUIDE LEVEL 1 2 3 + + REAR CENTER 4 5 6 - - TEST TONE EQ/TONE 7 8 9 CURSOR MODE SLEEP SHIFT D.TUNING >10 0 - / -- ENTER 24 2323 MENU button
When you have selected the VCR, DVD player, or SAT tuner, press this button to display VCR, DVD, or SAT menu on the TV screen. Then use the cursor buttons to perform the menu operations (see “18 Cursor buttons (♠/♦/♦/♦),” “EXECUTE button,” and “EXIT/RETURN button” on page 7).
Note
When you have selected VCR, the remote is set to control the VCR that corresponds with VCR 1 after you press the MENU button. Before pressing the button, make sure to set the VCR input mode to VCR 1.
GUIDE button
Press to display the SAT guide. Then use the cursor buttons on the remote to perform the menu operations (see “18 Cursor buttons (♠/♦/♦/♦),” “EXECUTE button,” and “EXIT/RETURN button” on page 7).
24 BASS BOOST button
Press to increase the bass of the front speakers. The BASS BOOST indicator on the receiver lights up when the function is turned on.
Table of buttons used to control each component
When you program the remote to control the following Sony or non-Sony components, you can use the buttons on the remote that are marked with circles. Note, however, that some buttons may not operate your component.
| Button\Component | VCR (VHS, Beta, 8mm) | Satellite tuner | DVD player | LD player | TV | Cable box | Tuner | Video CD player | CD player | MD deck | DAT deck | Tape deck (A and B) |
| AV I/⏻ | ● | ● | ● | ● | ● | ● | ● | ● | ● | |||
| SUB* | ● | ● | ● | ● | ● | ● | ● | ● | ● | ● | ● | ● |
| ◀ | ● | |||||||||||
| ▷ | ● | ● | ● | ● | ● | ● | ● | ● | ||||
| || | ● | ● | ● | ● | ● | ● | ● | ● | ||||
| ■ | ● | ● | ● | ● | ● | ● | ● | ● | ||||
| ◄◄/►►I | ● | ● | ● | ● | ● | ● | ● | ●** | ||||
| ◄◄/►► | ● | ● | ● | ● | ● | ● | ● | ● | ||||
| CH/PRESET/D.SKIP +/- | ● | ● | ● | ● | ● | ● | ● | ● | ● | |||
| Cursor buttons | ● | ● | ● | |||||||||
| MENU | ● | ● | ● | |||||||||
| GUIDE | ● | |||||||||||
| Numeric buttons | ● | ● | ● | ● | ● | ● | ● | ● | ● | ● | ● | |
| SHIFT >10 -/-- | ● | ● | ● | ● | ● | ● | ● | ● | ||||
| D.TUNING ENTER | ● | ● | ● | ● | ● | ● | ● | ● | ● | ● | ||
| EXIT/RETURN | ● | ● | ||||||||||
| EXECUTE | ● | ● | ● |
* For information on the operations that become available when you press the button, see the table on page 10.
**Deck B only.

If you have assigned TV to the USER 1 or 2 item in the IR SET (see page 16)
The remote is set to operate TVs only. In this case, only the following buttons are operable:
- CH/PRESET/D.SKIP +/- buttons
- MASTER VOL +/- buttons
- MUTING button
- Numeric buttons
- SHIFT >10 -/-- button
• D.TUNING ENTER button
Table of operations that appear when you press the SUB button
Press the SUB button to display a list of operations that the corresponding buttons are not found on the remote. The contents of the lists will vary according to the currently selected component. The following table shows the items in each list and the function of each item.
| Component | Item(s) | Function |
| VCR | REC | Starts recording |
| ANT TV/VTR | Selects the signal to be output from the antenna terminal of the VCR (TV signal or video signal) | |
| DISPLAY | Selects information displayed on the TV screen | |
| INPUT SEL. | Changes the input mode of the VCR | |
| SP/LP | Selects the playback speed | |
| Satellite tuner | JUMP | Toggles between the previous and current channels |
| DISPLAY | Selects information displayed on the TV screen | |
| ANT TV/DSS | Selects the signal to be output from the antenna terminal of the VCR (TV signal or DBS signal) | |
| FAVORITE | Displays the Favorite Station Guides | |
| CATEGORY | Displays the Guide Category list | |
| INDEX | Displays the Station Index | |
| DVD player | TITLE | Displays the Title menu. For details on the menu operation, see “To perform title and set up menu operations on the DVD player” on page 11. |
| DISPLAY | Selects information displayed on the TV screen | |
| MENU | Displays the Set up menu. For details on the manu operation, see “To perform title and set up menu operations on the DVD player” on page 11. | |
| SUB-TITLE | Displays the Subtitles | |
| S.TITLE CHG | Changes the Subtitle Language | |
| AUDIO CHG | Changes the sounds | |
| SEARCH | Changes the search mode | |
| CLEAR | Returns to the Continuous Play etc. |
a) "SIDE A/B" appears for non-Sony LD players.
b) These items do not appear if you have assigned TV to the USER 1 (or 2) item in the IR SET list (see page 16) and selected USER 1 (or 2) (see page 14).
c) Only with Sony TVs with the picture-in-picture function.
d) Only with Sony TVs that supports the wide-picture mode.
| Component | Item(s) | Function |
| LD player | SIDE A^a) | Selects side A of the disc |
| SIDE B^a) | Selects the side B of the disc | |
| DISPLAY | Selects information displayed on the TV screen | |
| PROGRAM | Programs the tracks | |
| REPEAT | Repeats current track or programmed tracks | |
| TV | JUMP | Toggles between the previous and current channels |
| DISPLAY | Selects information displayed on the TV screen | |
| TV/VTR | Changes the input mode of the TV | |
| P IN P^b) | Activates the picture-in picture function^c) | |
| POSITION^b) | Changes the position of the small picture^c) | |
| SWAP^b) | Swaps the small and large pictures^c) | |
| WIDE^b) | Selects the wide-picture mode^d) | |
| SUB CH + ^b) | Selects preset channels for the small picture^c) | |
| SUB CH - ^b) | ||
| Cable box | JUMP | Toggles between the previous and current channels |
| Tuner | FM/AM | Selects the FM or AM band |
| VIDEO CD player | TIME | Changes the time information |
| CD player | DISC | Selects a disce^e) |
| TRACK | Selects a track^e) | |
| CONTINUE | Selects Continuous Play | |
| SHUFFLE | Selects Shuffle Play | |
| PROGRAM | Selects Program Play | |
| REPEAT | Selects Repeat Play | |
| MD deck | CONTINUE | Selects Continuous Play |
| SHUFFLE | Selects Shuffle Play | |
| PROGRAM | Selects Program Play | |
| REPEAT | Selects Repeat Play | |
| DISPLAY | Changes the information on the display | |
| EDIT/NO | Selects editing operation or cancels editing | |
| YES | Performs editing operation | |
| REC | Pauses for recording | |
| DAT deck | REC | Pauses for recording |
| REPEAT | Starts Repeat Play | |
| CLEAR | Erases a track in the program etc. | |
| Tape deck | A-REC | Makes deck A pause for recording |
| B-REC | Makes deck B pause for recording |
e) Only with the Sony CD changer.
Note
If you have programmed the remote to control non-Sony components, note the following:
— All the items may not appear when you select a component.
— All the items displayed may not function.

To perform title and set up menu operations on the DVD /er
1 Select the DVD player from the function list.
2 Press SUB.
3 Move the easy scroll key to select "TITLE" (for the title menu) or "MENU" (for the set up menu), then press the key to enter the selection.
4 Open up the cover on the remote and move the easy scroll key to select "DVD" from the CURSOR TYPE list, then press the key to enter the selection.
5 Use the cursor buttons and the EXECUTE button to perform menu operations on the DVD player.
To exit the menu operation
1 Close the cover on the remote.
2 Press SUB.
3 Move the easy scroll key to select "TITLE" or "MENU," then press the key to enter the selection.
To display the DVD menu, use the MENU button. For details, see "23 MENU button" on page 8.
Using the Lists
This chapter describes how to display and use various lists. It also includes a chart showing all of the various lists.

text_image
AV I/ SYSTEM STANDBY SOUND FIELD FUNCTION SET UP SOUND FIELD PUSH ENTER EASY scroll key SUB CH/PRESET/D.SKIP BASS BOOST MASTER VOL MUTING +Brief descriptions of buttons for list operations
SOUND FIELD button: Press to display the sound field list. Press again to revert back to the component information.
FUNCTION button: Press to display the function (component) list. Press again to revert back to the component information.
SET UP button: Press to display the set up list. Press again to revert back to the component information.
Easy scroll key: While displaying a list, move this key up or down to select an item from the list, then press the key to enter the selection.
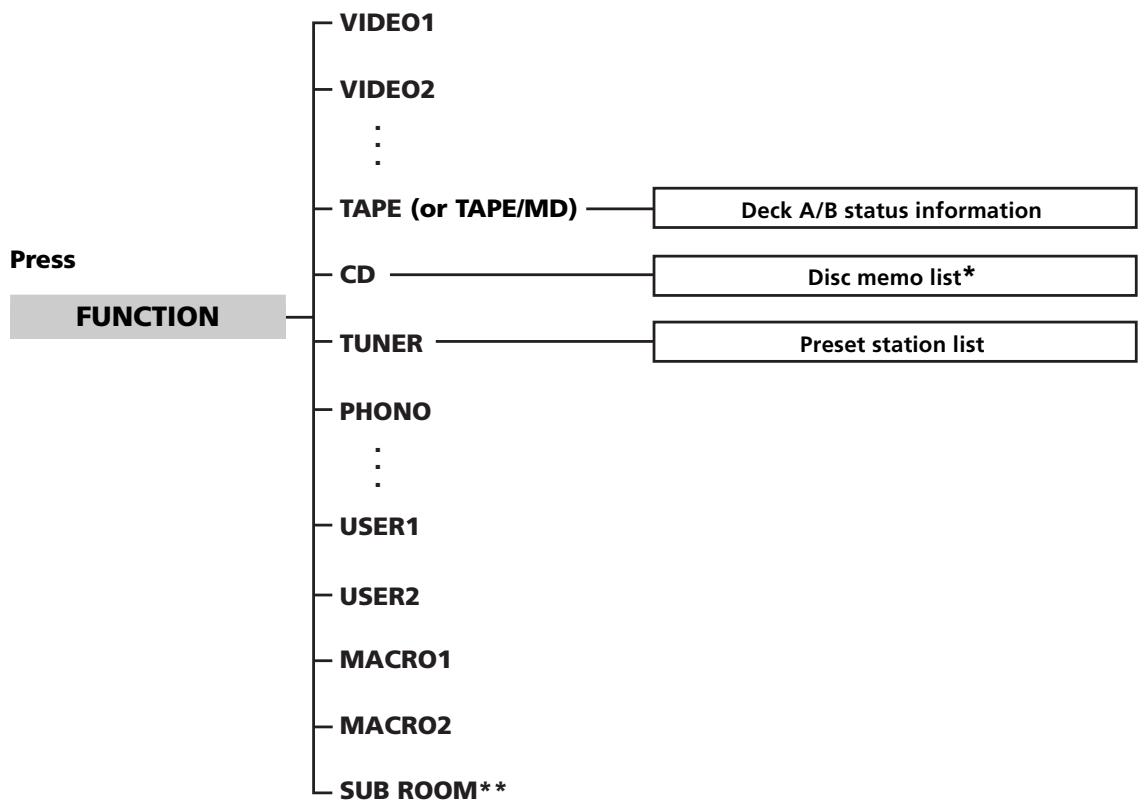
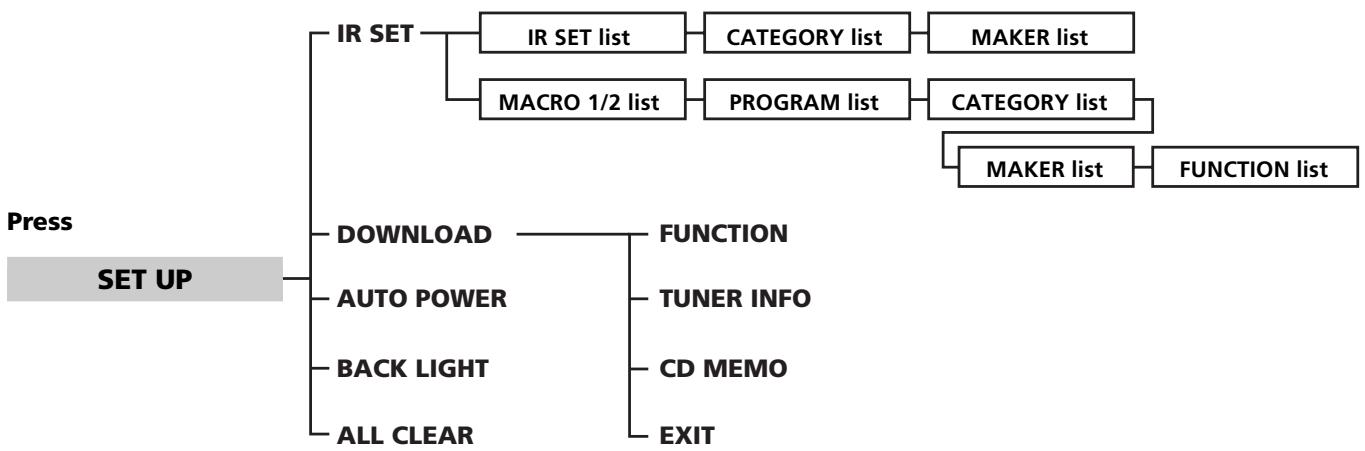
Chart of Lists
See the treelike chart below for the list hierarchy. Details on how to access each list is given from page 14. Some items have sub-lists that appear when you press the SUB button (see pages 10 and 11).
The configuration of the lists will vary depending on the receiver.
flowchart
graph TD
    A["Press FUNCTION"] --> B["VIDEO1"]
    A --> C["VIDEO2"]
    A --> D["TAPE (or TAPE/MD)"]
    D --> E["Deck A/B status information"]
    A --> F["CD"]
    F --> G["Disc memo list*"]
    A --> H["TUNER"]
    H --> I["Preset station list"]
    A --> J["PHONO"]
    J --> K["..."]
    A --> L["USER1"]
    L --> M["..."]
    A --> N["USER2"]
    N --> O["..."]
    A --> P["MACRO1"]
    P --> Q["..."]
    A --> R["MACRO2"]
    R --> S["..."]
    A --> T["SUB ROOM**"]
Press

flowchart
graph LR
    A["SOUND FIELD"] --> B["Sound field list"]
flowchart
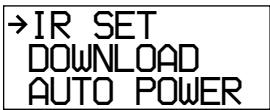
graph TD
    A["Press"] --> B["SET UP"]
    B --> C["IR SET"]
    C --> D["IR SET list"]
    D --> E["CATEGORY list"]
    E --> F["MAKER list"]
    C --> G["MACRO 1/2 list"]
    G --> H["PROGRAM list"]
    H --> I["CATEGORY list"]
    I --> J["MAKER list"]
    I --> K["FUNCTION list"]
    B --> L["DOWNLOAD"]
    L --> M["AUTO POWER"]
    L --> N["BACK LIGHT"]
    L --> O["ALL CLEAR"]
    L --> P["FUNCTION"]
    L --> Q["TUNER INFO"]
    L --> R["CD MEMO"]
    L --> S["EXIT"]
* Appears only when the receiver is connected to CONTROL A1/A1 II compatible CD changer (5, 50, 200, or 300 discs).
** Depending on the component you are using, this setting may not be displayed.
Selecting a Component
Basic procedure for selecting a component
Do the procedure below to select a component from the function list. Note that the components contained in the list will vary depending on the receiver.
1 Press FUNCTION.
The function list appears. The items in the list correspond with the jacks on the receiver.
2 Move the easy scroll key to select a component from the list, then press the key to enter the selection.
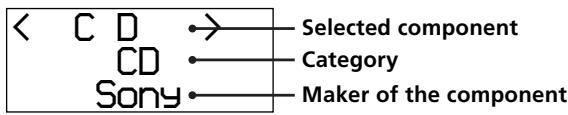
Information about the component appears in the display window.
A display example
text_image
< C D CD Sony Selected component Category Maker of the component
You can modify the components displayed
You can display the index name for the component. For details, see "Downloading Data From the Receiver" on page 18.

You can modify the category indication
The category indication tells you what component is actually connected to the jacks on the receiver. If a component is connected to jacks for which they are not originally meant, you can modify the category indication to match the component. For details, see “Programming the Remote” on page 15.

You can turn components on automatically
You can set the remote to automatically turn on a component when it is selected from the function list. For details, see "Using the auto power function" on page 20.
Depending on the component that you selected, you may have to do an additional procedure, or you may be able to obtain detailed information about the component by doing an additional procedure. For details, see "Additional procedure after selecting a component" on this page.
Additional procedures after selecting a component
If you have selected tuner
Do the procedure below after you have selected the tuner.
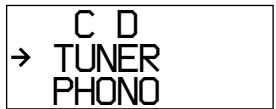
1 Move the easy scroll key.
The preset station list appears.
2 Move the easy scroll key to select the preset station, then press the key to enter the selection.
The current status of the component appears in the display window.
Note
If you have changed the contents of the preset station memory of the receiver, be sure to download the preset station memory from the receiver (see page 18) before you tune in to a preset station.
If you have selected CD player, tape deck, or MD deck
Detailed information about the component appears in the display window of the remote only if the component is compatible with CONTROL A1/A1 II.
The information that appears is as follows:
| If you have selected | The following information appears |
| CD player | The first 12 characters of the disc memo, track number, and track text |
| MD deck | The first 12 characters of the disc name, track number, and track name |
| tape deck, CD player, or MD deck | The current deck operation (▶, ▶ or ■) to the right of the component indication |
If you selected a Sony CD changer
1 Move the easy scroll key.
The DISC MEMO list appears.
2 Move the easy scroll key to select a disc, then press the key to enter the selection.
3 Start playback.
Note
If you have changed the discs in the changer, be sure to download the CD memos from the receiver (see page 18) or play the newly inserted disc(s) before you select a disc from the changer.
If you selected the tape deck
Move the easy scroll key to display the information about deck A or B.
Note
When the remote is programmed to control a non-Sony tape deck, the following may occur:
— The information about deck B is not displayed and you cannot switch between tape deck A and B.
— “TAPE A/B” is displayed and tape deck A and B switch automatically each time you press the easy scroll key, etc.
If you selected the sub room
Move the easy scroll key to select the source for the sub room, then press the key.
Note
Depending on the component you are using, "SUB ROOM" may not be displayed.
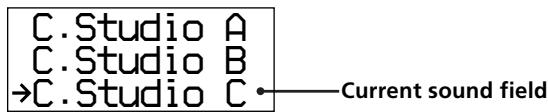
Selecting a Sound Field
Do the procedure below to select a sound field from the sound field list. Note that the sound fields contained in each list will vary depending on the receiver.
1 Press SOUND FIELD.
The sound field list appears.

2 Move the easy scroll key to select the sound field, then press the key to enter the selection.
The display reverts back to the component information after about ten seconds.
A display example
text_image
C. Studio A C. Studio B →C. Studio C •— Current sound fieldTo turn off the sound field
Move the easy scroll key to select either "S.Field OFF", "2ch Stereo", or "Auto Format" in the sound field list in the display. The sound field list that is displayed is different depending on the model.
Programming the Remote
You can customize the remote to match the components connected to your receiver. You can even program the remote to control non-Sony components and also Sony components that the remote is normally unable to control. The procedure below uses as an example a case in which a Kenwood LD player is connected to the VIDEO 2 jacks on the receiver.
Before you begin note that:
— You cannot change the settings of TUNER and PHONO.
— The remote can control only components that accept infrared wireless control signals.
Be sure to turn on the receiver and point the remote towards the receiver when performing the following procedure.
1 Press SET UP.
The set up list appears.
2 Move the easy scroll key to select "IR SET," then press the key to enter the selection.
The IR SET list appears.
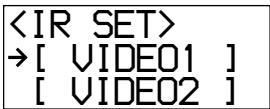
3 Move the easy scroll key to select the component ("VIDEO 2," for example), then press the key to enter the selection.
The CATEGORY list appears.
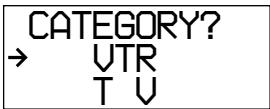
4 Move the easy scroll key to select the category (i.e., the component that is actually connected to the corresponding jacks; in this case, "LD"), then press the key to enter the selection.
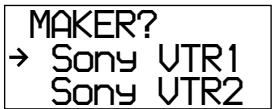
The MAKER list appears.
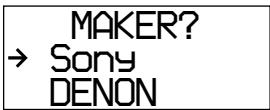
5 Move the easy scroll key to select the make of the component ("Kenwood," for example), then press the key to enter the selection.
When programming the remote to control Sony component
Select "Sony."
Programming is now completed.
To cancel programming
Move the easy scroll key to select "EXIT" from the IR SET list, or "CANCEL" from the CATEGORY list or MAKER list, then press the key to enter the selection.
You can change the function of the SYSTEM STANDBY switch The SYSTEM STANDBY switch is factory set to turn off the receiver and other Sony audio/video components (i.e., "ALL OFF" setting) as described on page 5. To change the setting, move the easy scroll key to select "STANDBY" from the IR SET list in Step 3 above, then select "ON/OFF" from the STANDBY list. The switch is now set to turn on or off the receiver only.

You can freely assign any component to USER 1 and 2 items in the IR SET list
1 Do Steps 1 and 2 in "Programming the Remote" on page 15.
2 Move the easy scroll key to select "USER 1" or "USER 2," then press the key to enter the selection.
3 Continue from Step 4 in "Programming the Remote" to select the category and maker of the component.
Performing Several Commands in Sequence Automatically (Macro Play)
The Macro Play function lets you link several IR codes in a sequential order as a single command. The remote provides 2 macro lists (MACRO 1 and 2). You can specify up to 8 IR codes for each macro list.
Setting the sequence of IR codes
1 Press SET UP.
The set up list appears.

2 Move the easy scroll key to select "IR SET," then press the key to enter the selection.
The IR SET list appears.
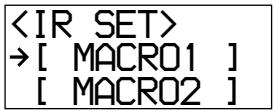
3 Move the easy scroll key to select "MACRO 1" (or "MACRO 2"), then press the key to enter the selection.
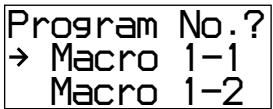
The PROGRAM list appears.
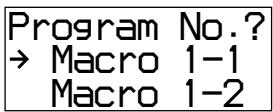
4 Move the easy scroll key to select the macro step number ("Macro 1-1" for example) then press the key to enter the selection.
The CATEGORY list appears.
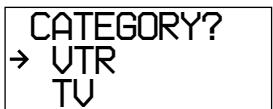
5 Move the easy scroll key to select the component category ("VTR" for example) then press the key to enter the selection.
The MAKER list appears.
6 Move the easy scroll key to select the maker, then press the key to enter the selection.
The FUNCTION list appears.
7 Move the easy scroll key to select the IR code for the operation you want to perform, then press the key to enter the selection.
The PROGRAM list reappears.
8 Repeat steps 4 through 7 to program up to 8 IR codes.
When you have finished programming IR codes Select "EXIT" in step 7.
To cancel programming
Move the easy scroll key to select "EXIT" or "CANCEL" during any step, then press the key to enter the selection.
To erase a programmed IR code
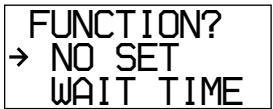
Move the easy scroll key to select "NO SET" from the FUNCTION list, then press the key to enter the selection.
To turn off all connected components
Move the easy scroll key to select "ALL OFF" from the FUNCTION list, then press the key to enter the selection.
To delay the output of an IR code
Move the easy scroll key to select "WAIT TIME" from the FUNCTION list, then press the key to enter the selection. This allows you to specify a 1 to 10 second delay (in 1 second increments) before outputting the IR code.
Performing Several Commands in Sequence Automatically (Macro Play)
Starting macro play
1 Press FUNCTION.
The function list appears.

2 Move the easy scroll key to select "MACRO 1" or "MACRO 2", then press the key to enter the selection.
The IR codes appear in the display window as they are performed.
Notes
- Pressing any of the following buttons during a macro play operation will cancel the macro play sequence before it is complete.
- AV I/
- SYSTEM STANDBY
- SOUND FIELD
- FUNCTION
- SET UP
- When the Macro Play function does not work properly, set "WAIT TIME" between each operation.
Downloading Data From the Receiver
The remote communicates with the receiver every time a button is pressed on the remote and displays the current operation status of the receiver on the display window. The remote can also download index names of the program sources, preset stations, CD memos*, and information indicating the presence or absence of a CD in each slot of a CD changer* from the receiver.
* Appears only when you have selected a Sony CD changer (5, 50, 200, or 300 discs) connected to the receiver using the CONTROL A1 cable.
Be sure to turn on the receiver and point the remote towards the receiver when performing the following procedure.
1 Press SET UP.
The set up list appears.
2 Move the easy scroll key to select "DOWNLOAD," then press the key to enter the selection.
The DOWNLOAD list appears.

3 To download index names
Move the easy scroll key to select "FUNCTION," then press the key to enter the selection.
To download preset stations
Move the easy scroll key to select "TUNER INFO," then press the key to enter the selection.
To download CD memos and information on the presence or absence of a CD in each slot of a CD changer
1 Move the easy scroll key to select "CD MEMO," then press the key to enter the selection.
The SORT menu appears in the display.

2 Move the easy scroll key to select "NUMBER" or "ALPHABET," then press the key to enter the selection.
The remote starts to download the data.

To cancel the downloading process
Move the easy scroll key to select "EXIT" from the DOWNLOAD list, then press the key to enter the selection.
Notes
- If you have changed the discs in the CD changer, be sure to download the CD memos from the receiver or play the newly inserted disc(s) before you select a disc from the changer.
- You can download the data only from the Sony CD changer (5, 50, 200, or 300 discs) connected to the receiver using the CONTROL A1 cable.
Note on downloading CD memos from the CD players
You can download CD memos only from the CONTROL A1/A1II-compatible Sony CD players. Depending on the CD player setting, it may take several minutes to download CD memos. For faster transmission, make the following CD player settings.
When an CONTROL A1/A1II-compatible Sony CD player is connected to the receiver
Check the following:
- The category for the CD function in the IR SET list is set to "CD1."
- The category for all other functions in the IR SET list is not set to "CD2."
You can check the current category setting by selecting a component from the function list (see page 14). Category indication appears on the second column in the display window.
When multiple CONTROL A1/A1II-compatible Sony CD players are connected to the receiver
When you use two CD players, set the COMMAND MODE selector on the back panel of the CD players to "CD1" or "CD2," respectively, and set the category in the IR SET list to match the corresponding player's COMMAND MODE selector position (see page 16). When you use three CD players, set the COMMAND MODE selector to "CD1," "CD2," or "CD3," respectively, and set the category in the IR SET list to match the corresponding player's COMMAND MODE selector position.
When setting category for the CD players, do not skip the number or select the same number to the multiple players.
When an CONTROL A1/A1II-compatible Sony CD player and a non-compatible Sony CD player are connected to the receiver
Set the COMMAND MODE selector on the back panel of the CONTROL A1/A1 II-compatible CD player to "CD2" and set the category in the IR SET list for the player to "CD2" (see page 16).
Set the COMMAND MODE selector on the back panel of the non-compatible CD player to "CD1" and set the category in the IR SET list for the player to "CD1" (see page 16).
Before downloading CD memos from the CONTROL A1/A1 II-compatible CD player, temporarily change the category setting of the non-compatible CD player to some other category ("VideoCD," for example). After downloading is completed, set the category setting of the non-compatible CD player to "CD1" again.
When using a non-Sony CD player in conjunction with Sony CD players
Program the remote to control the non-Sony CD player (see page 16).
See the sections above for settings of the Sony CD players.
Other Operations
Turning the backlight on or off
Each time you press a button on the remote, the backlight turns on. If you do the procedure below to turn off the backlight, you can make the batteries last longer.
1 Press SET UP.
The set up list appears.
2 Move the easy scroll key to select "BACK LIGHT," then press the key to enter the selection.
The BACK LIGHT list appears.
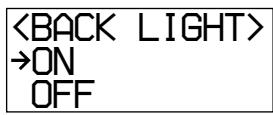
3 Move the easy scroll key to select "ON" or "OFF," then press the key to enter the selection.
Clearing all the contents of remote's memory
Be sure to turn on the receiver and point the remote towards the receiver when performing the following procedure.
1 Press SET UP.
The set up list appears.
2 Move the easy scroll key to select "ALL CLEAR," then press the key to enter the selection.
3 Move the easy scroll key to select "YES," then press the key to enter the selection.
The contents of remote's memory (i.e., all programming and downloaded data) are cleared.
Using the auto power function
With the auto power function turned on, the commander sends numerous codes to the appropriate Sony AV components when you select a video function.
Automatically, the components you have done IR setting turn on and the TV switches to VIDEO 1 input mode. This function works for Sony components only.
1 Press SET UP.
The set up list appears.
2 Move the easy scroll key to select "AUTO POWER," then press the key to enter the selection.
The AUTO POWER list appears.
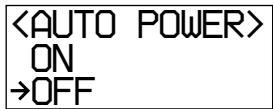
3 Move the easy scroll key to select "ON" or "OFF," then press the key to enter the selection.
Note
Switching to VIDEO 1 input may not be automatic on all Sony TVs. This is because some TVs cannot receive remote control codes immediately after being turned on.
Additional Information
Troubleshooting
If you experience any of the following difficulties while using the remote, use this troubleshooting guide to help you remedy the problem. Should any problem persist, consult your nearest Sony dealer.
The remote does not function.
→ Point the remote at the remote sensor 📄 on the receiver.
→ Remove any obstacles in the path between the remote and the receiver.
→ Replace all the batteries in the remote with new ones, if they are weak.
→ Make sure you select the correct function on the remote.
→ When you operate a programmed non-Sony component, the remote may not function properly depending on the model and the make of the component.
The component names appearing in the function list do not correspond to the jacks on the receiver./The sound field list does not appear.
→ The remote has not been initialized. Turn on the receiver, point the remote at the receiver, and press the SOUND FIELD, FUNCTION, or SUB button on the remote (see page 3).
The SOUND FIELD button does not work.
→ If the receiver has the 5.1CH (/DVD) INPUT jacks, the SOUND FIELD button becomes inoperable whenever you select the component connected to these jacks.
appears in the display window of the remote.
→ The batteries are running out. Replace all the batteries with new ones.
The function names that appear in the display windows of the receiver and the remote are different.
→ Select the correct function using the remote.
When the CD player, tape deck, or MD deck is connected to the receiver via CONTROL A1/A1II jacks, Auto Function does not work properly.
→ Reprogram the remote (see page 16).
"5.1CH" cannot be selected from the function list even though the receiver has 5.1CH (/DVD) INPUT jacks.
→ A communication error has occurred. Point the remote towards the receiver and select "5.1CH" from the function list again.
Specifications
| General | |
| Remote control system | Infrared control |
| Power requirements | 3 V DC with three LR6 (size-AA) alkaline batteries |
| Dimensions | 125 × 43 × 33 mm (5 × 1^3/_4 × 1^15/_16 inches) |
| Mass (approx.) | 130 g (4.5 oz) excluding batteries |
Design and specifications are subject to change without notice.