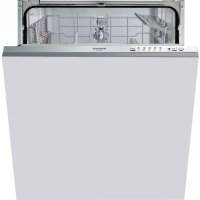
USER MANUAL HI 3010 HOTPOINT
PRODUCT. In order to receive more complete assistance,
please register your appliance on: www.hotpoint.eu/register

WWW
You can download the Safety Instructions and the User
Manual, by visiting our website docs.hotpoint.eu and
following the Instructions on the back of this booklet.
Before using the appliance carefully read Safety Instructions guide.
PRODUCT DESCRIPTION
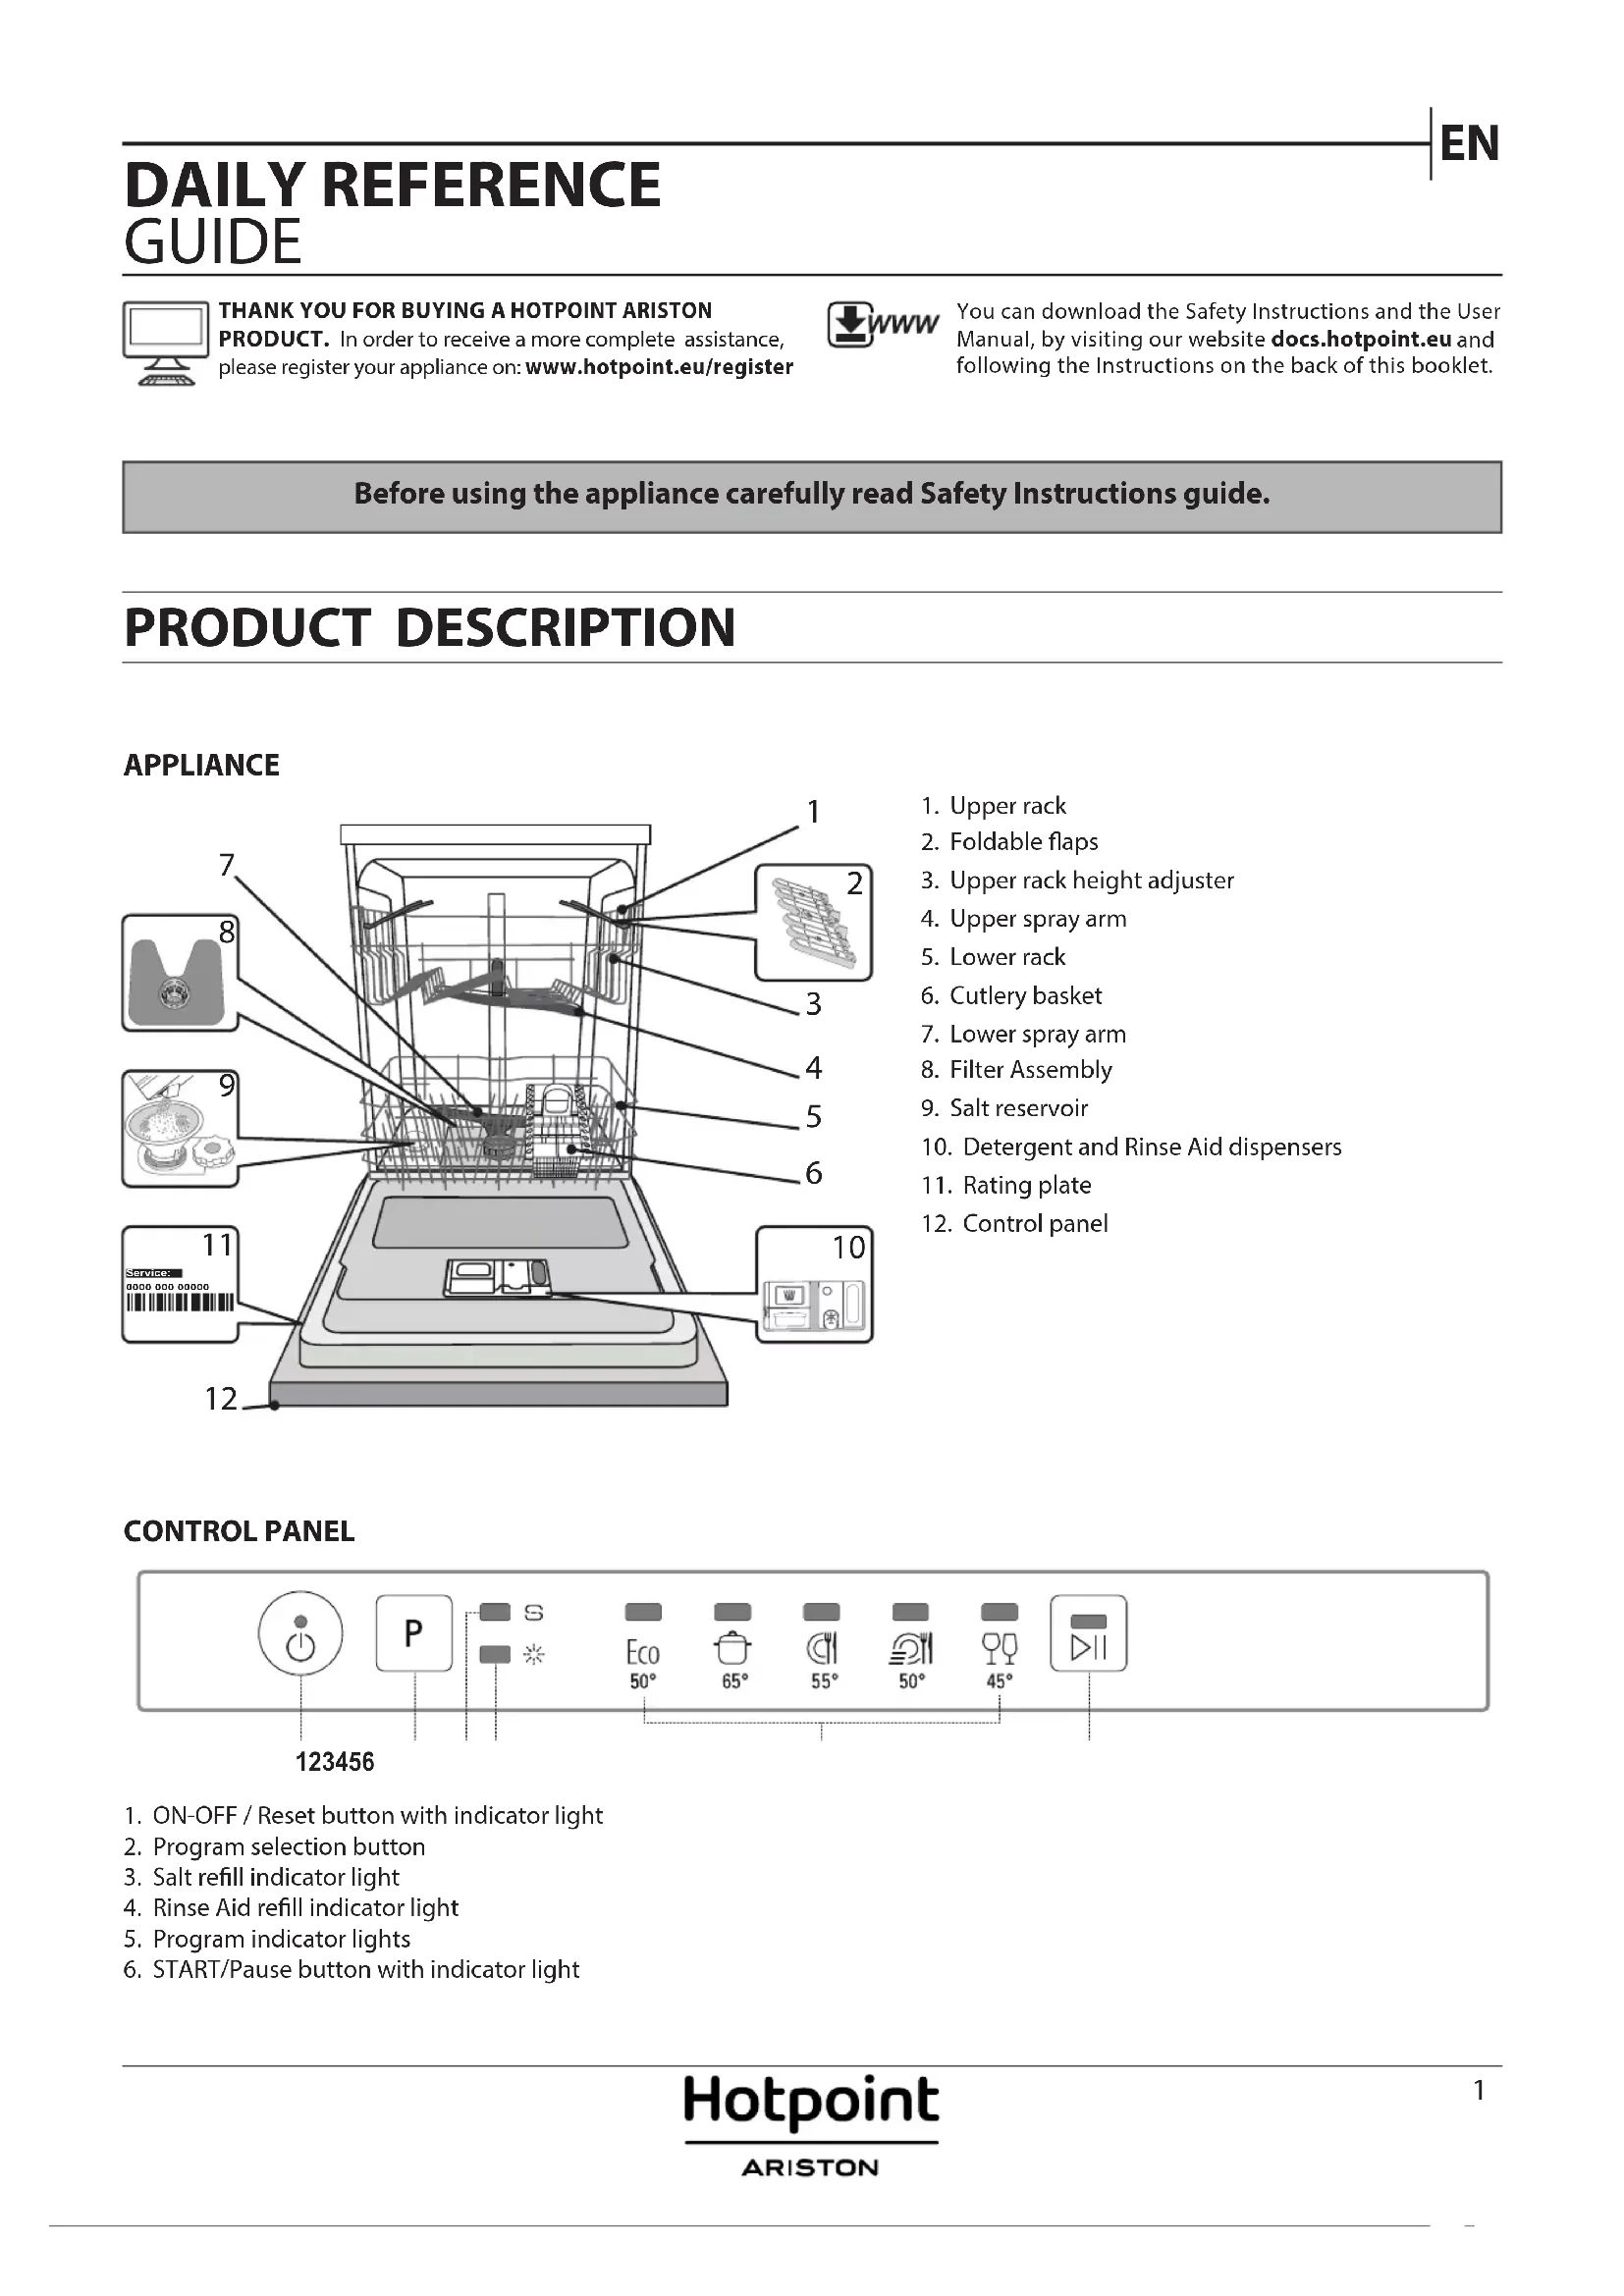
APPLIANCE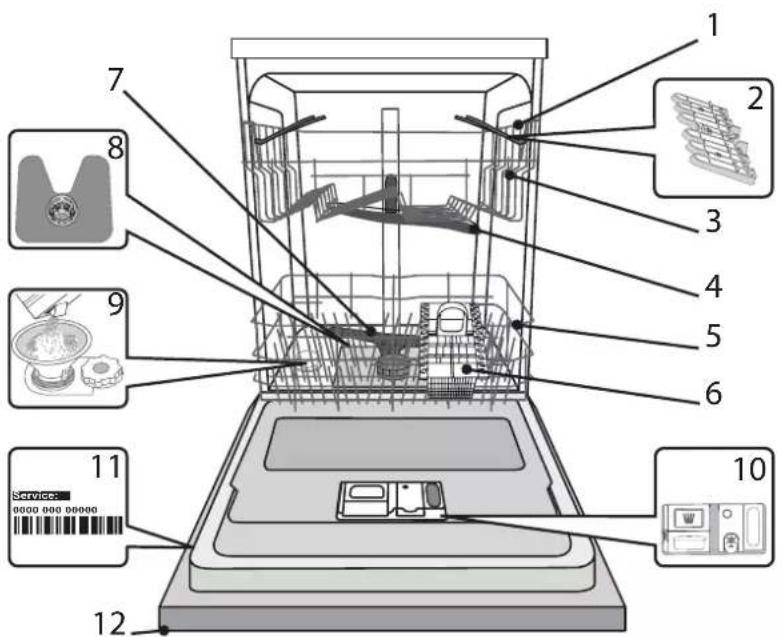
- Upper rack
- Foldable flaps
- Upper rack height adjuster
- Upper spray arm
- Lower rack
- Cutlery basket
- Lower spray arm
- Filter Assembly
- Salt reservoir
- Detergent and Rinse Aid dispensers
- Rating plate
- Control panel
CONTROL PANEL
- ON-OFF / Reset button with indicator light
- Program selection button
- Salt refill indicator light
- Rinse Aid refill indicator light
- Program indicator lights
- START/Pause button with indicator light
FIRST TIME USE SALT, RINSE AID AND DETERGENT
ADVICE REGARDING THE FIRST TIME USE
After installation, remove the stoppers from the racks and the retaining elastic elements from the upper rack.
FILLING THE SALT RESERVOIR
The use of salt prevents the formation of LIMESCALE on the dishes and on the machine's functional components.
- It is mandatory that THE SALT RESERVOIR NEVER BE EMPTY. It is important to set the water hardness.
The salt reservoir is located in the lower part of the dishwasher (see PRODUCT DESCRIPTION) and must be filled when the SALT REFILL indicator light on the control panel is lit.
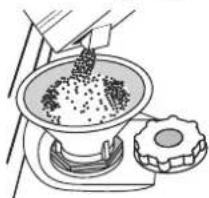
- Remove the lower rack and unscrew the reservoir cap (anticlockwise).
- Only the first time you do this: fill the salt reservoir with water.
- Position the funnel (see figure) and fill the salt reservoir right up to its edge (approximately 1 kg); it is not unusual for a little water to leak out.
- Remove the funnel and wipe any salt residue away from the opening.
Make sure the cap is screwed on tightly, so that no detergent can get into the container during the wash program (this could damage the water softener beyond repair).
Whenever you need to add salt, it is mandatory to complete the procedure before the beginning of the washing cycle to avoid corrosion.
SETTING THE WATER HARDNESS
To allow the water softener to work in a perfect way, it is essential that the water hardness setting is based on the actual water hardness in your house. This information can be obtained from your local water supplier.
The factory sets the default value for the water hardness.
- Switch on the appliance by pressing the ON/OFF button.
- Switch off the appliance by pressing the ON/OFF button.
- Hold down button P for 5 seconds, until you hear a beep.
- Switch on the appliance by pressing the ON/OFF button. The program indicator light of the current set level flashes.
- Press button P to select the desired hardness level (see WATER HARDNESS TABLE).
| Water Hardness Table |
| Level | °dH German degrees | °fH French degrees | °C Clark English degrees |
| 1 | Soft | 0 - 6 | 0 - 10 | 0 - 7 |
| 2 | Medium | 7 - 11 | 11 - 20 | 8 - 14 |
| 3 | Average | 12 - 16 | 21 - 29 | 15 - 20 |
| 4 | Hard | 17 - 34 | 30 - 60 | 21 - 42 |
| 5 | Very hard | 35 - 50 | 61 - 90 | 43 - 62 |
- Switch off the appliance by pressing the ON/OFF button. Setting is complete!
As soon as this procedure is complete, run a program without loading. Only use salt that has been specifically designed for dishwashers. After the salt has been poured into the machine, the SALT REFILL indicator light switches off.
If the salt container is not filled, the water softener and the heating element may be damaged as a result of limescale accumulation. Using salt is recommended with any type of dishwasher detergent.
FILLING THE RINSE AID DISPENSER
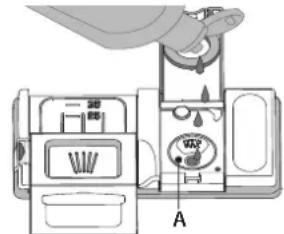
Rinse aid makes dish DRYING easier. The rinse aid dispenser A should be filled when the RINSE AID REFILL indicator light in the control panel is lit.
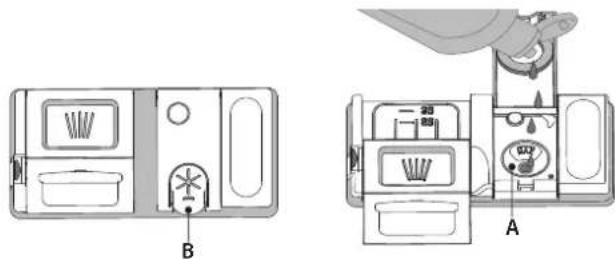
- Open the dispenser B by pressing and pulling up the tab on the lid.
- Pour in the rinse aid (max. 110 ml), making sure it does not overflow from the dispenser. If this happens, clean the spill immediately with a dry cloth.
- Press the lid down until you hear a click to close it.
NEVER pour the rinse aid directly into the appliance tub.
ADJUSTING THE DOSAGE OF RINSE AID
If you are not completely satisfied with the drying results, you can adjust the quantity of rinse aid used.
- Switch the dishwasher on using the ON/OFF button.
- Switch it off using the ON/OFF button.
- Press button P three times - a beep will be heard.
- Switch it on using the ON/OFF button. The program indicator light of the current set level flashes.
- Press button P to select the level of rinse aid quantity to be supplied.
- Switch it off using the ON/OFF button.
Setting is complete!
If the rinse aid level is set to 1 (ECO), no rinse aid will be supplied. The LOW RINSE AID indicator light will not be lit if you run out of rinse aid. A maximum of 5 levels can be set according to the dishwasher model. The factory setting is specific to the model, please follow instruction above to check this for your machine. - If you see bluish streaks on the dishes, set a low number (2-3). - If there are drops of water or limescale marks on the dishes, set a mid-range number (4-5).
FILLING THE DETERGENT DISPENSER
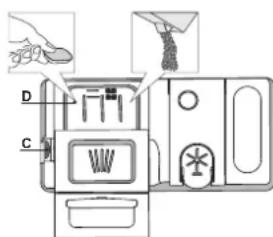
To open the detergent dispenser use the opening device C. Introduce the detergent into the dry dispenser D only. Place the amount of detergent for pre-washing directly inside the tub.
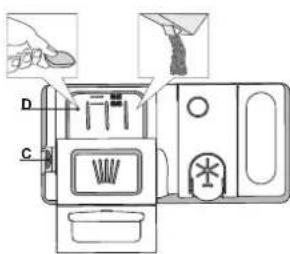
- When measuring out the detergent refer to the mentioned earlier information to add the proper quantity. Inside the dispenser D there are indications to help the detergent dosing.
- Remove detergent residues from the edges of the dispenser and close the cover until it clicks.
- Close the lid of the detergent dispenser by pulling it up until the closing device is secured in place.
The detergent dispenser automatically opens up at the right time according to the program.
Usage of detergent not designed for dishwashers may cause malfunction or damage to the appliance.
PROGRAMSTABLE
| Program | Drying phase | Duration of wash program (h:min)1) | Water consumption (litres/cycle) | Energy consumption (kWh/cycle) |
| 1. Eco 50° Eco | ✓ | 3:20 12.0 1.04 | | |
| 2. Intensive 65° 2:30 16,0 1.50 | ✓ | | | |
| 3. Mixed 55° 2:25 16.0 1.35 | ✓ | | | |
| 4. Fast Wash 50° | - | 1:00 11.5 1,10 | | |
| 5. Delicate 45° | ✓ | 1:30 11,5 1.10 | | |
ECO program data is measured under laboratory conditions according to European Standard EN 60436:2020.
Note for Test Laboratories:
For information on comparative EN testing conditions, please send an email to the following address: dw_test_support@whirlpool.com
Pre-treatment of the dishes is not needed before any of the programs.
*) Values given for programmes other than the eco programme are indicative only. The actual time may vary depending on many factors such as temperature and pressure of the incoming water, room temperature, amount of detergent, quantity and type of load, load balancing, additional selected options and sensor calibration. The sensor calibration can increase program duration up to 20 min.
PROGRAMS DESCRIPTION
Instructions on wash cycle selection.
1 ECO
Eco program is suitable to clean normally soiled tableware, that for this use, it is the most efficient program in terms of its combined energy and water consumption, and that it is used to assess compliance with the EU Ecodesign legislation.
2 INTENSIVE
Program recommended for heavily soiled crockery, especially suitable for pans and saucepans (not to be used for delicate items).
3 MIXED
Mixed soil. For normally soiled dishes with dried food residues.
4 FAST WASH
Program for limited quantity of normally soiled crockery. Ensures optimal cleaning performance in shorter time.
5 DELICATE
Program for delicate items, which are more sensitive to high temperatures, for example glasses and cups.
Notes:
Please note that cycle Fast Wash is dedicated for lightly soiled dishes.
LOADING THE RACKS
UPPER RACK
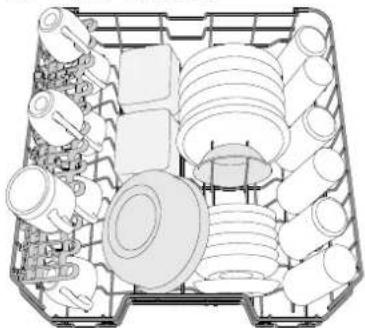
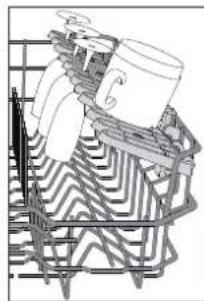
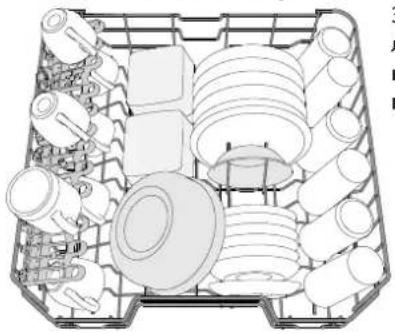
Load delicate and light dishes: glasses, cups, saucers, low salad bowls.
(loading example for the upper rack)
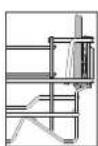
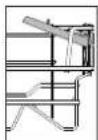
ADJUSTING THE HEIGHT OF THE UPPER RACK
The height of the upper basket can be adjusted: high position to place bulky crockery in the lower basket and low position to make the most of the tip-up compartments by creating more space upwards.
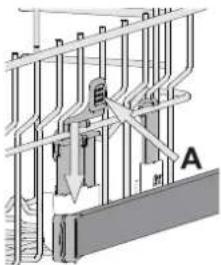
The upper rack is equipped with a Upper Rack height adjuster (see figure), without pressing the levers, lift it up by simply holding the rack sides, as soon as the rack is stable in its upper position. To restore to the lower position, press the levers (A) at the sides of the rack and move the basket downwards.
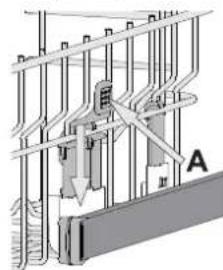
We strongly recommend that you do not adjust the height of the rack when it is loaded.
NEVER raise or lower the basket on one side only.
FOLDABLE FLAPS WITH ADJUSTABLE POSITION
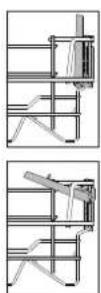
The side foldable flaps can be folded or unfolded to optimize the arrangement of crockery inside the rack.
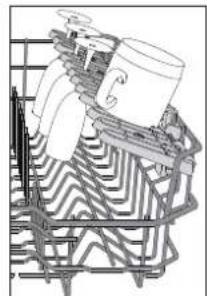
Wine glasses can be placed safely in the foldable flaps by inserting the stem of each glass into the corresponding slots.
Depending on the model:
- To unfold the flaps, slide them up and rotate, or release them from the snaps and pull them down.
- To fold the flaps, it is necessary
- to rotate them and slide them down, or pull them up and attach them to the snaps.
LOWER RACK

(loading example for the lower rack)
For pots, lids, plates, salad bowls, cutlery, etc. Large plates and lids should ideally be placed at the sides to avoid interference with the spray arm.
CUTLERY BASKET
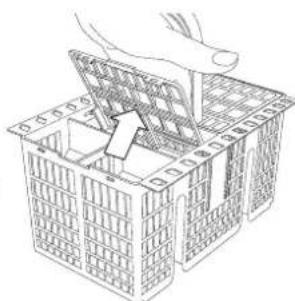
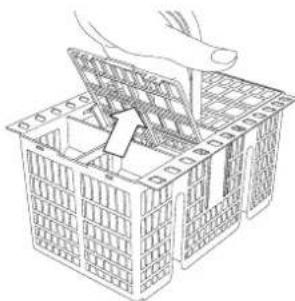
The basket is equipped with top grilles for improved cutlery arrangement. The cutlery basket should be positioned only at the front of the lower rack.
Knives and other utensils with sharp edges must be placed in the cutlery basket with the points facing downwards, or they must be positioned horizontally in the tip-up compartments on the upper rack.
DAILY USE
1. CHECK WATER CONNECTION
Check that the dishwasher is connected to the water supply and that the tap is open.
2. SWITCH ON THE DISHWASHER
Open the door and press the ON/OFF button.
- LOAD THE RACKS (see LOADING THE RACKS)
4. FILLING THE DETERGENT DISPENSER
5. CHOOSE THE PROGRAM AND CUSTOMISE THE CYCLE
Select the most appropriate program in accordance with the type of crockery and its soiling level (see PROGRAMS DESCRIPTION) by pressing the P button.
6. START
Start the wash cycle by pressing START/Pause button (led is lit) and closing the door within 4 sec. When the program starts you hear a single beep. If the door was not closed within 4sec., the alarm sound will be played. In this case, open the door, press START/Pause button and close the door again within 4 sec.
7. END OF WASH CYCLE
The end of the wash cycle is indicated by beeps and by the flashing of the indicator light of the selected program. Open the door and switch off the appliance by pressing the ON/OFF button.
Wait for a few minutes before removing the crockery - to avoid burns. Unload the racks, beginning with the lower one.
The machine will switch off automatically during certain extended periods of inactivity, in order to minimise electricity consumption. If the crockery is only lightly soiled or if it has been rinsed with water before being placed in the dishwasher, reduce the amount of detergent used accordingly.
MODIFYING A RUNNING PROGRAM
If a wrong program was selected, it is possible to change it, provided that it has only just begun: open the door, press and hold the ON/OFF button, the machine will switch off.
Switch the machine back on using the ON/OFF button and select the new wash cycle and any desired options; Start the wash cycle by pressing START/Pause button and closing the door within 4 sec.
Without switching off the machine, open the door (START/Pause led starts blinking) (be aware of HOT steam!) and place the crockery inside the dishwasher. Press the START/Pause button and close the door within 4 sec., the cycle will resume from the point at which it was interrupted.
ACCIDENTAL INTERRUPTIONS
If the door is opened during the wash cycle, or if there is a power cut, the cycle stops. Press the START/Pause button and close the door within 4 sec., the cycle will resume from the point at which it was interrupted.
ADVICE AND TIPS
TIPS
Before loading the baskets, remove all food residues from the crockery and empty the glasses. You do not need to rinse beforehand under running water.
Arrange the crockery so that it is held in place firmly and does not tip over; and arrange the containers with the openings facing downwards and the concave/convex parts placed obliquely, thus allowing the water to reach every surface and flow freely.
Warning: lids, handles, trays and frying pans do not prevent the sprayer arms from rotating.
Place any small items in the cutlery basket.
Very soiled dishes and pans should be placed in the lower basket because in this sector the water sprays are stronger and allow a higher washing performance.
After loading the appliance, make sure that the sprayer arms can rotate freely.
UNSUITABLE CROCKERY
- Wooden crockery and cutlery.
- Delicate decorated glasses, artistic handicraft and antique crockery. Their decorations are not resistant.
- Parts in synthetic material which do not withstand high temperatures. Copper and tin crockery. Crockery soiled with ash, wax, lubricating grease or ink.
The colours of glass decorations and aluminium/silver pieces can change and fade during the washing process. Some types of glass (e.g. crystal objects) can become opaque after a number of wash cycles too.
DAMAGE TO GLASS AND CROCKERY
- Only use glasses and porcelain guaranteed by the manufacturer as dishwasher safe.
- Use a delicate detergent suitable for crockery.
- Collect glasses and cutlery from the dishwasher as soon as the wash cycle is over.
TIPS ON ENERGY SAVING
- When the household dishwasher is used according to the manufacturer's instructions, washing tableware in a dishwasher usually consumes less energy and water than hand dishwashing.
- In order to maximize dishwasher efficiency it is recommended to initiate the wash cycle once dishwasher is fully loaded. Loading the household dishwasher up to the capacity indicated by the manufacturer will contribute to energy and water savings. Information on correct loading of tableware can be found in the Loading chapter. In case of partial loading it is recommended to use dedicated wash options if available (Half load/ Zone Wash, Multizone), filling up only selected racks. Incorrect loading or overloading the dishwasher may increase resources usage (such as water, energy and time, as well as increase noise level), reducing cleaning and drying performance.
- Manual pre-rinsing of tableware items leads to increased water and energy consumption and is not recommended.
HYGIENE
To avoid odour and sediment which can be accumulated in the dishwasher please run a high temperature program at least once a month. Use a teaspoon of detergent and run it without the loading to clean your appliance.
CARE AND MAINTENANCE
CLEANING THE FILTER ASSEMBLY
Regularly clean the filter assembly so that the filters do not clog and that the waste water flows away correctly.
Using the dishwasher with clogged filters or foreign objects inside the filtration system or spray arms may cause the unit to malfunction, resulting in loss of performance, noisy operation, or higher resource usage.
The filter assembly consists of three filters that remove food residues from the washing water and then recirculate the water.
The dishwasher must not be used without filters or if the filter is loose.
At least once per month or after every 30 cycles, check the filter assembly and, if necessary, clean it thoroughly under running water using a non-metallic brush, following the instructions below:
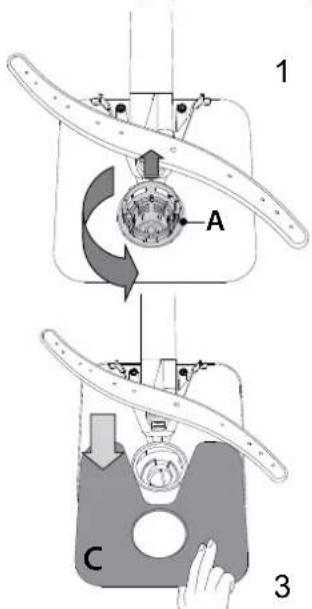
- Turn the cylindrical filter A counterclockwise and pull it out (Fig 1).
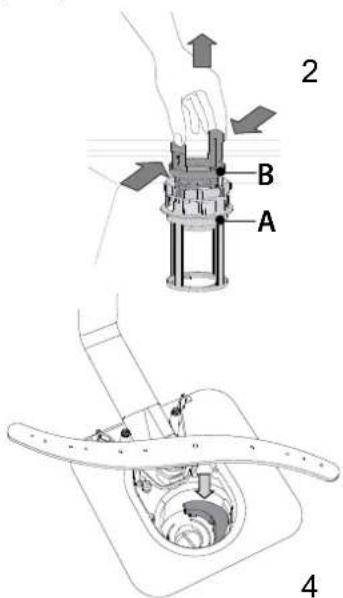
- Remove the cup filter B by applying slight pressure on the side flaps (Fig 2).
- Slide out the stainless-steel plate filter C (Fig 3).
- If you find foreign objects (such as broken glass, porcelain, bones, fruit seeds, etc.), remove them carefully.
- Inspect the trap and remove any food residues. NEVER REMOVE the wash-cycle pump protection (black detail) (Fig 4).
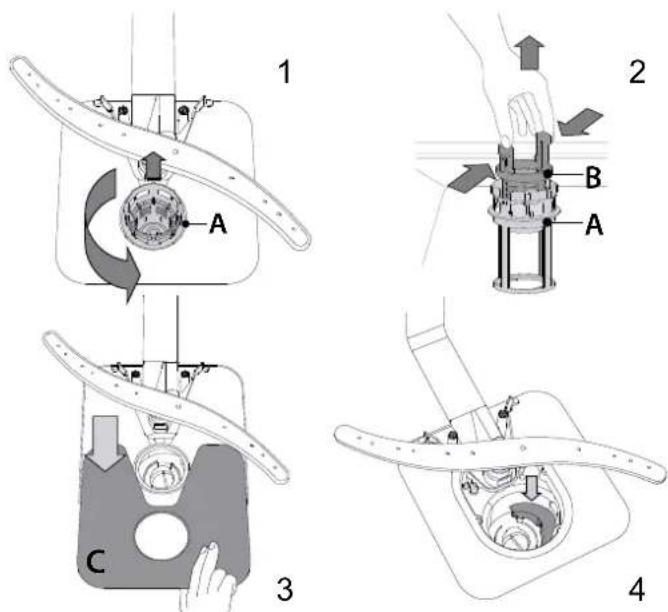
After cleaning the filters, reinstall the filter assembly and fix it in position correctly; this is essential for maintaining the efficient operation of the dishwasher.
CLEANING THE WATER INLET HOSE
If the water hoses are new or have not been used for an extended period, let the water run to ensure it is clear and free of impurities before making the necessary connections. If this precaution is not taken, the water inlet could become blocked and damage the dishwasher.
CLEANING THE SPRAY ARMS
Occasionally, food residue may become encrusted on the spray arms and block the holes used to spray water. Therefore, it is recommended to check the arms from time to time and clean them with a small non-metallic brush.
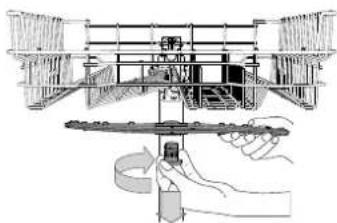
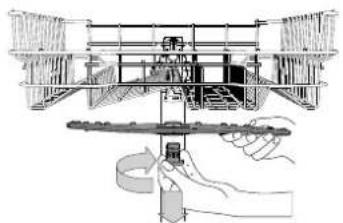
To remove the upper spray arm, turn the plastic locking ring clockwise. The upper spray arm should be replaced so that the side with the greater number of holes is facing upward.
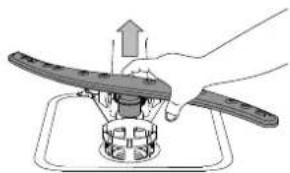
The lower spray arm may be removed by pulling it upwards.
WATER SOFTENING SYSTEM
The water softener automatically reduces water hardness, consequently preventing scale buildup on the heater, and also contributing to better cleaning efficiency.
This system regenerates itself with salt, therefore it is required to refill the salt container when empty.
The frequency of regeneration depends on the water hardness level setting - regeneration takes place once per 5 Eco cycles with the water hardness level set to 3.
The regeneration process starts in the final rinse and finishes in the drying phase, before the cycle ends.
- Single regeneration consumes: ~3.5 L of water;
- Takes up to 5 additional minutes for the cycle; consumes below 0.005 kWh of energy.
TROUBLESHOOTING
In case your dishwasher doesn't work properly, check if the problem can be solved by going through the following list. For other errors or issues, please contact the authorized After-sales Service, whose contact details can be found in the warranty booklet. Spare parts will be available for a period of either up to 7 or up to 10 years, according to the specific Regulation requirements.
| PROBLEMS POSSIBLE CAUSES SOLUTIONS | |
| Salt indicator is lit | Salt reservoir is empty. (After refill the salt indicator may remain lit for several wash cycles). | Refill reservoir with salt (for more information - see page 2). Adjust water hardness - see table, page 2. |
| Rinse aid indicator is lit | Rinse aid dispenser is empty (after refill the rinse aid indicator may remain lit for several wash cycles). | Refill dispenser with rinse aid (for more information - see page 2). |
| The dishwasher won't start or does not respond to commands. | The appliance has not been plugged in properly. | Insert the plug into the socket. |
| Power outage. | For safety reasons, dishwasher will not re-start automatically when power returns. Open dishwasher door, press START/Pause button and close the door within 4 seconds.. |
| The dishwasher door is not closed. Vigorous cycle is interrupted by door opening for more than 4 seconds. | press the door until you hear the "click". Press START/Pause and close the door within 4 seconds. |
| It does not respond to commands. | Switch off the appliance by pressing the ON/OFF button, switch it back on after approximately one minute and restart the program. If problem persists, unplug the appliance for 1 minute, then plug it back in. |
| The dishwasher won't drain. | The wash cycle has not finished yet. Wait until the drain is bent. Check that the drain is not bent. The sink drain pipe is blocked. Clean the sink. The filter is clogged up with food residues. | The wash cycle finishes. |
| The drain hose is bent. Check that the drain is bent. The sink drain pipe is blocked. Clean the sink. The filter is clogged up with food residues. | Hose is not bent (see INSTALLATION INSTRUCTION). drain pipe. clean the filter (see CLEANING THE FILTER ASSEMBLY). |
| The dishwasher makes excessive noise. | The dishes are rattling against each other. An excessive amount of foam has been produced. | Position the crockery correctly (see LOADING THE RACKS). |
| The detergent has not been measured out correctly or it is not suitable for use in dishwashers (see FILLING THE DETERGENT DISPENSER). Restart the current cycle by switching OFF the dishwasher, then switch it on again, select a new program, press START/Pause and close the door within 4 seconds. Please do not add any detergent. |
| The dishes are not clean. | The crockery has not been arranged properly. The spray arms cannot rotate freely, being hindered by the dishes. The wash cycle is too gentle. Select an appropriate wash cycle (see PROGRAMS TABLE). | Arrange the crockery correctly (see LOADING THE RACKS). Arrange the crockery correctly (see LOADING THE RACKS). |
| The cap on the rinse aid compartment has not been shut correctly. The filter is soiled or clogged. Clean the filter. There is no salt. Fill the salt reservoir (see FILLING THE SALT RESERVOIR). | After having carried out the verification and cleaning, turn off and turn on the dishwasher and restart a new program. Make sure the cap of the rinse aid dispenser is closed. assembly (see CARE AND MAINTENANCE). |
| The dishwasher does not fill the water. All LEDs are blinking rapidly | No water in the water supply or the tap is closed. The inlet hose is bent. The sieve in the water inlet hose is clogged; it is necessary to clean it | Make sure there is water in the water supply or the tap running. Make sure the inlet hose is not bent (see INSTALLATION) reprogram the dishwasher and reboot. After having carried out the verification and cleaning, turn off and turn on the dishwasher and restart a new program. Check if end of drain hose is placed at correct height (see INSTALLATION). Check for siphoning into home sewage system, install air admittance valve if necessary. |
| Dishwasher finishes the cycle prematurely. | Drain hose positioned too low or siphoning into home sewage system. Air in water supply. Check water supply for leaks | Check if end of drain hose is placed at correct height (see INSTALLATION). Check for siphoning into home sewage system, install air admittance valve if necessary. |

Policies, standard documentation, ordering of spare parts, and additional product information can be found by:
- Visiting our website: docs.hotpoint.eu and parts-selfservice.whirlpool.com, or using the QR Code.
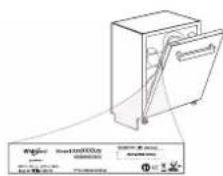
- Alternatively, contact our After-sales Service (see phone number in the warranty booklet). When contacting our After-sales Service, please state the codes provided on your product's identification plate.
The model information can be retrieved using the QR-Code reported in the energy label. The label also includes the model identifier that can be used to consult the portal of the registry at https://eprel.ec.europa.eu
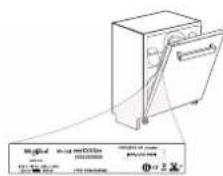
400011645847B

www.hotpoint.eu/register

WWW
Read the safety instructions carefully before using the appliance.
Follow the user manual, as well as the instructions given in the corresponding section of this book.
Visit docs.hotpoint.eu and follow the instructions provided.
For the corresponding section of this book.
Before using the appliance, read the safety instructions carefully.
SETTING THE WATER HARDNESS
For the water softener to work correctly, it is very important that the water hardness setting is based on the actual hardness of the water in your home. You can obtain this information from your local water supplier.
The default water hardness setting is factory-set.
Turn on the appliance by pressing the ON/OFF button. Turn off the appliance by pressing the ON/OFF button. Press and hold the P button for 5 seconds until you hear a sound signal. Turn on the appliance by pressing the ON/OFF button. The program indicator light for the current setting will flash. - Press the P button to select the desired water hardness level (see WATER HARDNESS TABLE).
| Таблиca Ha TBьрдостTa Ha BODaTa |
| НИВО | °dH
Германский
гравусn | °FH
Фересн
гравусn | °CClark
Англиский
гравусa |
| 1 | Мека | 0-6 | 0-10 | 0-7 |
| 2 | Умeperиа | 7-11 | 11-20 | 8-14 |
| 3 | Среда | 12-16 | 21-29 | 15-20 |
| 4 | Тьрда | 17-34 | 30-60 | 21-42 |
| 5 | Мною Тьрда | 35-50 | 61-90 | 43-62 |
- Turn on the appliance by pressing the ON/OFF button.
The setting is complete!
After completing the procedure, run the program without dishes.
Use only salt that is specifically designed for dishwashers.
When the salt container is empty, the salt indicator light will illuminate.
If the salt container is not filled, it is possible that the heating element may be damaged as a result of a malfunction.
The use of salt is recommended for all types of detergents.
FILLING THE RINSE AID DISPENSER
Rinse aid helps the dishes dry. The rinse aid dispenser should be filled when the rinse aid indicator light is on as a control light.
B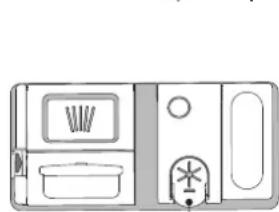
- Open the dispenser B by pressing the release button on the lid of the dispenser.
- CAREFULLY add rinse aid up to the maximum (110 ml) level indicated by the fill mark. Avoid spilling. If this happens, wipe up the spill immediately with a dry cloth.
- Press the lid down until you hear it click to close it. Never pour rinse aid directly into the tub.
ADJUSTING THE AMOUNT OF RINSE AID
If you are not satisfied with the drying results, you can adjust the amount of rinse aid used. Turn the dishwasher on with the ON/OFF button.
- Turn it on with the ON/OFF button.
- Press the P button three times – you will hear an acoustic signal. Turn on the ON/OFF button. The indicator light for the program of the current setting will flash. Press the P button to set the desired amount of rinse aid.
- Turn it off with the ON/OFF button.
HacTpoNkaTa e 3aBbPseHa!
Ako HIBOTO Ha NOMOUHOTOCpeCTBO 3a n3nlaKbaHe e 3aadaeHO Ha 1 (EKO), HMa Da CE NOdaBa NOMOuHO CpeCTBO 3a n3nlaKbaHe. CBeTINHHHHT INHnKATOp HNCKO HNBO HA NOMOHTHO CPECTBO 3A N3IJIAKBAHE Hnma Da CBETHe, AKO NOMOHTO CpeCTBO Ce N3eepnC.NopeD MoJena Ha cbDMnHaTa MaunHa Morat Da ce3aDaBt MaK-Cmym 5 HnBa. ΦaBpnuHATA NaCTpoKe e CneuPhNuHa 3a BceKnMoJe; CneBdAte NHCTpykUnTe no-rope, 3a da npOBepKe OTHcA nn Ce HAcToPka 3a BaWAta MaunHa. - AKO BUNITe CINHKAu NtHa No CbIOBeTe, 3aJaIte HnCbK HOMep (2-3). - Ako no cboBete nMa KaNk BOda nn CneiOn OT KOTneH KaMbK, 3aDaaiTe BnCOK Homep (4-5).
3APEKDAHE HA IO3ATOPA 3AMMRAJEN IPNAPAT
3a da OTBOpTe Do3atop3a npenapat, n3noJ3BaIte npncnoc6neHne C. Haneite npenapata camo B cyxna Do3atop D. NoctabeTe konueCTBO-TO npenapat 3a npedBaPntEnHO mMBAHe Hnapabo BB BaHnuKaTa.
- PnI 3MepBaHe Ha npenapata npaBeTe CnpaBka CbC ClomeHaTa UHOpMaJIN No-rope, 3a Da IO6abTe NDOXoJaTO KOINHECTBO.B Do3aTopa D Mma INHdkaTOpN, 3a Da NOMorHaT 3a Do3npaHeTo Ha MNIAHNIpyePnepaAT.
- OCTpaHete octaTbUnte ot npenapat OT p6oBeTe Ha 03aTopa N 3aTBopTe KaNaka,doKATO upaKHe.
- 3aTbOpTe KaNaka Ha Do3aTopa 3a npenapaT, KaTo ro DpbHHeTa Harope,
DOKaTO npncocO6neHHeTo 3a 3aTbapAHe Ce 3aKpeHn Ha MAcTo.
O3aTOpbT 3a npenapat ce OTBapra aBTOMaTuHOB ppaBnHmM oMeHT cnopei nporpamata.
N3no3BaHTo Ha Mmraen HnpaPat, KOto He e npedha3hueh 3a CbDOMnH MaunH, MoKe Da npuHn Hn3npaBHOCT Nn NOBpeHa Ha ypeHa.
3APEXDAHE HA KOWHnCnte
TOPHA KOWHNICA
3apeTe deNkKaTHnTe nIeKcBDOBe:CTbKJIeHn InpceHaOBu qaun, YHHNKn, HNCKN Kyn 3a cajTa.
(npumep 3a 3apekdahe Ha zophama kouhuua)
PERYJINPAHE HABUNCOOHATA HA TOPHATA KOWHNUCA
The height of the top copy can be adjusted: high position for placing the volume bodies in the lower copy and low position for full use of the attached supports, as more space is created above without needing to connect with the product in the lower copy.
The lower copy is equipped with a height adjuster and the lower copy (see figure), without pressing the supports, simply by holding the copy, the upper part is removed, and the copy becomes stable in the higher position.
To restore the lower position, press the supports of the copy and push the copy down.
We recommend not adjusting the height of the copy when it is loaded.
Never lift or lower the copy by the handle.
FOLDING CHANNELS WITH ADJUSTABLE POSITION
The side channels can be folded or unfolded to adjust the flow of the bodies in the copy. The units can be placed safely in the folded channels, as the foot of each unit is inserted into the corresponding slot. Depending on the model:
To unfold the channels, it is necessary to lift them up and turn them or release them from their locking and turn them down. To fold the channels, it is necessary to turn them and lift the channels down or push them up and lock them.
LOWER COPY
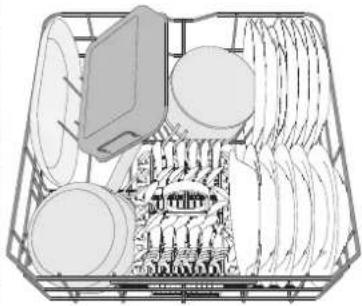
For thermos, channels, units, cups for salad, etc. The wide units and channels should be placed in the lower part, so as not to obstruct the unfolding of the frame.
(example of loading the lower copy)
COPY FOR FISHING
It is equipped with a top grid for better arrangement of the items. It should be positioned from the front side of the lower copy. The other items with sharp edges should be placed in the copy for items with the sharp side down or positioned horizontally in the attached upper copy compartments.
DAILY USE
1. CHECK THE WATER CONNECTION
Check that the washing machine is connected to the water supply and that the taps are open.
2. SWITCH ON THE WASHING MACHINE
Turn the knob and press the ON/OFF button.
3. LOAD THE LAUNDRY
(SEE LOADING THE LAUNDRY)
4. LOADING THE DETERGENT FOR THE WASHING PROGRAM
5. SELECT AND PERSONALIZE THE PROGRAM
Select the appropriate program according to the type of fabrics and the washing temperature (see PROGRAM DESCRIPTION) by pressing button P.
Select the options (see OPTIONS AND FUNCTIONS).
6. START
Start the washing cycle by pressing the START/PAUSE button (the indicator light) and close the door within 4 seconds. When the program starts, an audible signal is emitted. If the door is not closed within 4 seconds, an audible alarm will sound. In this case, open the door, press the START/PAUSE button again, and close the door within 4 seconds.
7. END OF THE PROGRAM
The end of the washing cycle is signaled by an audible signal and the indicator light of the selected program goes off. Open the door and switch off the appliance by pressing the ON/OFF button.
Remove the laundry immediately after the cycle to avoid creases. Remove the laundry by starting from the bottom of the drum.
The machine automatically determines the required duration of the wash cycle and minimizes energy consumption.
If the dishes are only slightly dirty or if the water is soft, reduce the amount of detergent used accordingly.
CHANGING THE PROGRAM
If you have selected the wrong program, you can change it, provided that the dishwasher has not started yet: open the door, press the ON/OFF button, the machine will turn off. Turn the machine back on with the ON/OFF button and select the new program for washing and drying; start the program by pressing the START/PAUSE button and close the door within 4 seconds.
ADDING DISHES
Without turning off the machine, open the door (the START/PAUSE indicator light will blink) (be careful with the hot steam!). Place the dishes in the machine. Press the START/PAUSE button and close the door within 4 seconds. The program will resume automatically.
INTERRUPTING THE PROGRAM
If the door is opened during the washing program or during the drying phase, the program stops. To resume the program, close the door, press the START/PAUSE button, and close the door within 4 seconds.
USEFUL TIPS
TIPS
Before loading the dishes, remove any leftover food from the dishes and empty the cups. It is not necessary to pre-rinse them with hot water.
Arrange the dishes so that they fit well in place and do not tip over; place the dishes with the opening facing down and arrange the cutlery/utensils so that the water can reach every surface and flow freely.
Warning: Knives, forks, spoons, and other sharp utensils should not protrude beyond the racks.
Place the appropriate items in the dishwasher. Very dirty dishes and pans should be placed in the lower rack, as in this sector the water jets are stronger and allow for better washing efficiency. After loading, check that the spray arms can rotate freely.
REQUIRED DISHES
-DbpBeHncbdoBne npnbopn.
-Decorative elements, artistic details, and original designs are developed. The decorations may not be stable. - Parts of synthetic materials that are not resistant to high temperatures. - Change and dripping of designs. Follow the instructions for use.
Color changes on the joints of the decorations and parts of aluminum/silver may occur over time and are not a defect. Some joints (e.g., metal parts) may become non-transparent after cleaning.
CARE AND CLEANING
-Use only the joints and accessories recommended by the manufacturer, for which the warranty is provided, as they are suitable for the dishwasher. - Use gentle cleaning agents suitable for your dishes. - Remove and clean the filters and the spray arms regularly.
ENERGY SAVING
When the dishwasher is used according to the manufacturer's instructions, washing dishes in the dishwasher usually consumes less energy and water compared to washing by hand. To maximize the efficiency of the dishwasher, it is recommended to start the washing cycle only after the machine is fully loaded. Pre-rinsing dishes under running water increases water and energy consumption, so it is not recommended. Information about proper loading of dishes can be found in the chapter LOADING THE DISHES. Pre-rinsing is recommended to use special programs (Half load/Zone Wash/Multi-zone, as well as the selected programs. Improper loading or pre-washing of the dishwasher may increase resource consumption (such as water, energy, and time), as well as increase the noise level, which may reduce the efficiency of washing and drying. Pre-rinsing dishes under running water increases water and energy consumption, so it is not recommended.
MAINTENANCE
To avoid unpleasant odors that may accumulate in the dishwasher, run a program at a high temperature at least once a month. Use a dishwasher cleaner and run it empty without loading dishes, to clean it.
MAINTENANCE AND CARE
CLEANING THE FILTER
Clean the filter regularly, so that the filter does not clog and the water drains properly.
Using the dishwasher with a clogged filter can damage the filter system and stop the pump, which may lead to longer working time and increased resource consumption, as well as noise during operation.
The filter system consists of three filters that trap food residues from the washing water and prevent them from re-entering the water.
The dishwasher should not be used without the filter if the filter is damaged.
Hai-manko BeHHbK MeecHo Hn Ha BCEKn 30 uKnBna npOBepraBaiTe ΦHtbpHn6Iok n npn Heo6xOIMocT ro NouNCTe CTapaTeNoC Teaua Boga, KaTo n3no3BaTe HEmetalHa Yetka n CneBbATE NCHtpkUInTe No-ONy:
1.3aBbPTe Te cunHnpnHnA o6paTHo Ha yacOBHKOBaTa CTpeKa n ro n3dbpnaTe (Ou2.1). 2. CbaIe TheaBpa B, KaTo npnIOKInTe Jek HATnCK Bbpxy CTpaHnHnTe Kanau (Duz.2). 3. Ππb3Hete HABh φπΠbpa-πλactnHa OT HεpbKdaema CTOMaHa C (Φu2.3). 4. B cnyuayaiye Hamepuite BbHsHn npedmetn (kato cyupeHn CTbkna, nopueJah, KocTn, CemeHa Ha nloDobe n dp.), BHMaTeJHo OTCTpaHete. 5.Поберете уноители npemaxheTe ocTaTbUte OT xpaHa. HNKORA HE MAXAITE npedna3ntela Ha nomnata 3a uKbla Ha n3MnBaHe (eepHn enemeT) (Oz4).
Cne noucTBaHe Ha hntpnte noctabe Tbpnna 6IOK OTHOBO ITO 3akpenete npabNtHO HA MCTO; TOBa e OT KIOUOBO 3HaueHne 3a NOBbpxKaHe Ha eekTubHata pa6ota Ha cbdomnHnTa MaunHa.
IOnHCTBAHE HA MAPKyua 3A IOnDABAHE HA BOJa
AkoMapkyuTe 3a BODa Ca HOBn IIN He Ca nIINON3BaHn npOdbNkUteHbOpeMe,OCTaBeTe BODaTa Da Teue,3a Da ce yBepTe,Ye e npO3paHa N6e3aMbpcBAHn,npEn Da nIINbHRAte HKHTe Bp3Kn.AKO Ta3n npEtna3Ha MApKa He 6bTe B3eTa,BXoTb 3a B0Da MoKe Da ce 6nOKnpa N da NobpeDcBDOMnHaTa MaHNHa.
ПОУNCТBAHE HA PA3ПРБСКВАЦNTE PAMEHE
POnHKora ocTaBcHte OXpHa e Bb3MOxHO da 3acbXHaT Bbpxy pa3npbckBaunTe pameHe n Da 3anyuat OTbOpnte 3pa3npbckBaHe Ha BOda. CnedeobatenHo ce npenopbUba da npOBepBaTe pameHeTe ot BpeMe Ha BpeMe n Da rN NouchTBate C MAnka HEmetanHa YetKa.
3a CBAJHe Ha TropHTo pAmo 3a npbckAe, 3abpTepe NtactMacOBn 3aKIOUbaaPbCTeH NO NOCKa HA YacOBHKnOBaTa CTpeJIka. TropHTo pa3npbckBaApo pAmo CneBda Da Ce Noctab TaKa, Ye CTpaHata C no-ronm 6pOi OTBOpN da e HAcOyeHa Harope.
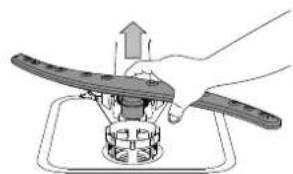
Moxete da cbaNTe DOJIHOTo pa3npbCKBaIO pAMO, KaTo IOnIbPnATE Haore.
CNCTEMA 3A OMEKOTBAHE HA BODATA
OmeKOTNTeIa BODa HaMaJIraBa ABTomATuH O TBbpDCTHa BOdTa, KaTO NO To3n HAuIN NpeoTbpaTBA HaTpynBaHeTo Ha BapOBNK No HarpeBaTeI INOBuAba eΦeKTHBHOCTTa npN NOvICTBaHe.
Cnctemata ce perenehpupa cama cbc coI, 3aTOba e Heo6xOIMO da OIObNbATE KOHTeHepa CbC coI, KORATO CE N3npa3Hn.
YecToTataHa perenepepuhe 3aBnCnOT HacTpokKaTa Ha HNBOTo Ha TBbpOCT Ha BOdaTa - perenepepuhaTe ce n3BbPwBa BeHbX Ha BCEK5 uKbIa ECO C HNBO Ha TBbpOCT Ha BOdaTa, 3aDaJeHO Ha 3.
Ipocecbt Ha pereheepnpaHe 3anOyBa BbB f3aTaHa NocneHOTOn3nPaKbaHe H3aBbPbBa BbB f3aTaHa CyWeHe, npEiN cIKbIbT da3aBbPbH.
- Edno pereheepnpahe n3non3Ba: 3,5 IuTpa B0da; Kbmyckbna ce do6abat 5 donbnHntenHH MNHyTu; Kohcymupaat ce no-Maiko ot 0,005 kWh eheprna.
TROUBLESHOOTING
In case of a malfunction, the machine may not work normally. Check if the problem can be solved by following the specific instructions. For other faults or malfunctions, contact the after-sales service. You can find the contact details in the warranty booklet. Spare parts will be available for a period of 7 to 10 years, in accordance with the specific requirements of the regulations.
| ПОНБЛЕМВВьзMOЖН ПИЧИNH PEШЕНИЗ! |
| Синданайатовл сол CBETN | Релервоггыт 3а сол e пазан. (След дочьага на сол 3a поочьага в сол 3a поочьага - Вж.ст. 2). Perулираите Тьрдоста на bodata - Вжпес таблцata,ст. 2. |
| Инданайатовл сол CBETN | Досотьгыт 3а пеларота 3блськ e пазан. (След дочьага на сол 3a поочьага в сол 3a поочьага - Вж.ст. 2). |
| Сыдомиянatable машина не салда римп и не peяр IPA на komан. | Уретгн He e bokolyeв n Bkontakta kakto trpба. | Наллгете ошюо розервога рсс сол (за пооче lnформача - Вж.ст. 2). |
| Спрахе на зхраханьанeto. | Оп сбобрахени 3a бezonaноct Std'm�длathа машина може на He CTAPТуа�.
Автуматчho сад лусякage на щектохахpenанeto. OТвогете вратчкatingа, напснс悔e
Бутуэ CTAP/Tayza 3a 3atboperte Brpatчкatinga в pamкite на 4 сухид. |
| Вразчкatingа на сьдомиянatable He e 3atboreн. | Насснete вратчкatinga сilлло, дokato чуete урakbahe. |
| Цьльгь e пекьсат ot otberapaine Ha
Вразчкatinga 3a повец ot 4 сухид. | Насснete CTAP/Tayza 3a 3atboperte Brpatчкatinga в pamкite на 4 сухид. |
| He pearsna ha komanid. | Исклгочete урета, като ratиснete bostha BКЛ./ИЗКЛ, Вькочete я OTНОВ слд okono
една минута и пеларite пограмета. Ако пблмьт He bde otстанen, Исклчочete
урета ot ilencelca 3a 1 Mchinu T and HOBO BkUOHTe sizcena. |
| Сыдомиянatable машина не салда римп. | Поррамета вce oше He e 3abpшиna. Ичakaite | поррамета вдazьрш. |
| Mapkytsb taz aiztovbahe e npertbnat. | Порретe ддуллары bzt aiztovbahe He npertbnat (Бж.ИНСТРУКAZHA 3A MOHТAZ). |
| Тьбаста 3a nizotvahe Ha mibKATA e zayusha. | Порс'te Trb6a 3a nizotvahe Ha mibKATA. |
| Флttрьгь e zayushen c octaTBZIOTxra | Почс'te Флttрьгь (Бж.ПОПСТВАЕ) HAФЛTTBPHYMAEXAH3BМ. |
| Сыдомиянatable Сьдава пекорно многошum. | Сыдовete Trpakat edin b dprу. | Пордeti Stbodote nprabilno (Бж. 3APEXDAHE H A KOLIHNUITE). |
| Сьдало сe epпекално rolлам колчесво
Ян. | Порларыт He e nizmepen nprabilno llin He e noxdoxiaa 3a nizolnlaBahe B
Сыдомиян машину (Бж.ДОЛТВАЕ) H A DOZATOPA 3A IOYCHCTBAUII PIPENAPAT). |
| Lizьльгьт Naizmuahe e TBbPpe lek. | Рсстррдітіпікійцілі, като nizkolyчite ng OTНОВ ВИКИЧТьсьдмьнata
Машина, Иберетe Нова пограма, напснс悔e CTAP/Tayza 3a 3atboperte Brpatчka差别
Вамкite Na 4 cekydn. He doobayiene HNKAKBb NIMMBAUmpenapat. |
| Сыдомиянatable салда римп. | Сыдовete He ca nopondeni KaKTTo trp6a. | Пордeti Stbodote nprabilno (Бж. 3APEXDAHE H A KOLIHNUITE). |
| Разлрьсвацпite pameme He moarat da se bvpTIT
СвобODин, Ть КATO сa Bb3прелNTCTBAHn OT
Сыдовete. | Пордeti Stbodote nprabilno (Бж. 3APEXDAHE H A KOLIHNUITE). |
| Lizьльгьт Naizmuahe e TBbPpe lek. | Иберетe nopondялц zuikbI Naizmuahe (Бж.TABILUCA C ПОPGAMN). |
| Сьдало сe epпекално rolлам колчесво
Ян. | Порларыт He e nizmepen nprabilno llin He e noxdoxiaa 3a nizolnlaBahe B
Сыдомиян машину (Бж.DОЛТВАЕ) H A DOZATOPA 3A IOYCHCTBAUII PIPENAPAT). |
| Калачата Na OTДелен�уTo 3a поочино ср徳стwo
3a nizlakBahe He e 3atborepaHa npabivlno. | Уретe сe, ча knayakata Na dozalotap a loodotap a loodotap copeintbo 3a nizlakBahe e
3atborepaHa. |
| Флttрьгь e zambyrcen He nizayushen. Почс'teФФьрьн МexанizbM (Бж.ПИЖА I NOДДРБЖА). | |
| Hama col. | Дорлhoe repezeroара 3a coln (Бж.ДОЛТВАВЕ) H APE3EPBOAPA 3A CONI. |
| Сыдомиянatable машина не салда римп. | He ce noada Bavda Или Краньт e zatboreph. | Уретe сe, чe no da boda boda Или Краньт e OTboreph. |
| Маркугь taz aiztovbahe Na boda e npertbnat. | Уретe сe, чe mapkyhzt 3a noadabane Ha boda He e npertbnat (Бжмte ИНСТАЛПАЕ),
ВКИLOЧETe HOBa ProrpaMa Na CBdommaHnata Na reçтстпау. |
| Мржесггь Флttр b Mapkyura 3a noindabane Ha
Вoda e 3ayushen; Heobxodimo e da ro nochntstte. | Сedly nizltlbngaba He nopebpckata Na noodetbuto HIKIQUHETe
Сыдомиян машина Машина Na reçтстпау. |
| Сыдомиянatable машина салда римп. | Маркугь taz aiztovbae e noctabev TbPdne
небх полл BDATA ce niztovba в Дамшата
КалаллazquonHnca Sttema. | Порретe ддул краит Ha mapkya 3a niztoubahe e noctabev Ha nachabee Na prapblnhaba в Всошин
(Bжмte ИНСТАЛПАЕ). Порретe 3a niztoubave B Дамшата КалаллazquonHnca Sttema Na ekо J neobxodimo, мостртпау. Вьдуш:
Вьдуш vьдуш. |
| Сыдомиянatable машина салда римп. | Маркугь taz aiztovbae e noctabev TbPdne
небх полл BDATA ce niztovba в Дамшата
КалаллazquonHnca Sttema. | Порретe систмата 3a noindabane Ha boda 3a teчobe Или Дуггп побем,在
do hablinahe Na blydux. |

Company policy, standard documentation, spare parts ordering, and additional product information can be found at: - Visit our websites docs.hotpoint.eu and parts-selfservice.whirlpool.com
- Use the QR code as an alternative to contact the after-sales service (see the telephone number in the warranty booklet). When contacting the after-sales service, please have the model and serial number of your appliance ready.
Information about the model can be obtained by scanning the QR code on the energy label. The label also includes the model identifier, which can be used for registration on the portal at https://eprel.ec.europa.eu
DAILY USE GUIDE
DAILY USE GUIDE

THANK YOU FOR CHOOSING A HOTPOINT PRODUCT
UNEXPECTED INTERRUPTIONS
To store it, start the program without dishes.
www.hotpoint.eu/register

WWW
Safety Instructions and User Manual can be downloaded from our website docs.hotpoint.eu and
by following the instructions on the back of this brochure.