
BCW201 - Sander BLACK & DECKER - Free user manual and instructions
Find the device manual for free BCW201 BLACK & DECKER in PDF.
| Product type | Hand sander |
| Brand | Black & Decker |
| Model | BCW201 |
| Rated voltage | 12 V DC |
| No-load speed | 0 - 550 rpm |
| Oscillation angle | 2.8° |
| Sanding base area | 5078 mm² |
| Weight (with battery) | 0.88 kg |
| Power supply | GoPak 2-in-1 rechargeable lithium-ion battery pack |
| Sandable materials | Wood, metal, plastics, painted surfaces |
| Intended use | Domestic only |
| Pivoting sanding base | Yes (to use unworn corners) |
| Built-in USB port | Yes (for charging mobile devices, up to 2.4 A) |
| Charger type | USB charger (micro USB, not included) |
| Battery charge indicator | 4 LED indicators |
| Maintenance and cleaning | Clean with a damp cloth and mild soap; do not use solvents |
| Safety | Double insulation; wear eye protection and a dust mask |
| Spare parts and repairability | Repair only by an authorized BLACK+DECKER service center; use identical replacement parts |
| Warranty | 24 months |
Frequently Asked Questions - BCW201 BLACK & DECKER
User questions about BCW201 BLACK & DECKER
0 question about this device. Answer the ones you know or ask your own.
Ask a new question about this device
Download the instructions for your Sander in PDF format for free! Find your manual BCW201 - BLACK & DECKER and take your electronic device back in hand. On this page are published all the documents necessary for the use of your device. BCW201 by BLACK & DECKER.
USER MANUAL BCW201 BLACK & DECKER
Your BLACK+DECKER™ BCW201 sander has been designed for sanding wood, metal, plastics and painted surfaces. This tool is intended for consumer use only.
DO NOT use under wet conditions or in presence of flammable liquids or gases.
DO NOT let children come into contact with the tool. Supervision is required when inexperienced operators use this tool.
General power tool safety warnings

Warning! Read all safety warnings and all instructions. Failure to follow the warnings and instructions may result in electric shock, fire and/or serious injury.
Save all warnings and instructions for future reference
The term "power tool" in the warnings refers to your mains-operated (corded) power tool or battery-operated (cordless) power tool.
1. Work area safety
a. Keep work area clean and well lit. Cluttered or dark areas invite accidents.
b. Do not operate power tools in explosive atmospheres, such as in the presence of flammable liquids, gases or dust. Power tools create sparks which may ignite the dust or fumes.
c. Keep children and bystanders away while operating a power tool. Distractions can cause you to lose control.
2. Electrical safety
a. Power tool plugs must match the outlet. Never modify the plug in any way. Do not use any adapter plugs with earthed (grounded) power tools. Unmodified plugs and matching outlets will reduce risk of electric shock.
b. Avoid body contact with earthed or grounded surfaces such as pipes, radiators, ranges and refrigerators. There is an increased risk of electric shock if your body is earthed or grounded.
3. Personal safety
c. Do not expose power tools to rain or wet conditions. Water entering a power tool will increase the risk of electric shock.
d. Do not abuse the cord. Never use the cord for carrying, pulling or unplugging the power tool. Keep cord away from heat, oil, sharp edges or moving parts. Damaged or entangled cords increase the risk of electric shock.
e. When operating a power tool outdoors, use an extension cord suitable for outdoor use. Use of a cord suitable for outdoor use reduces the risk of electric shock.
f. If operating a power tool in a damp location is unavoidable, use a ground fault circuit interrupter (GFCI) protected supply. Use of a GFCI reduces the risk of electric shock.
a. Stay alert, watch what you are doing and use common sense when operating a power tool. Do not use a power tool while you are tired or under the influence of drugs, alcohol or medication. A moment of inattention while operating power tools may result in serious personal injury.
b. Use personal protective equipment. Always wear eye protection. Protective equipment such as dust mask, non-skid safety shoes, hard hat, or hearing protection used for appropriate conditions will reduce personal injuries.
c. Prevent unintentional starting. Ensure the switch is in the off position before connecting to power source and/or battery pack, picking up or carrying the tool. Carrying power tools with your finger on the switch or energizing power tools that have the switch on invites accidents.
d. Remove any adjusting key or wrench before turning the power tool on. A wrench or a key left attached to a rotating part of the power tool may result in personal injury.
e. Do not overreach. Keep proper footing and balance at all times. This enables better control of the power tool in unexpected situations.
f. Dress properly. Do not wear loose clothing or jewelry. Keep your hair, clothing and gloves away from moving parts. Loose clothes, jewelry or long hair can be caught in moving parts.
g. If devices are provided for the connection of dust extraction and collection facilities, ensure these are connected and properly used. Use of dust collection can reduce dust-related hazards.
4. Power tool use and care
a. Do not force the power tool. Use the correct power tool for your application. The correct power tool will do the job better and safer at the rate for which it was designed.
b. Do not use the power tool if the switch does not turn it on and off. Any power tool that cannot be controlled with the switch is dangerous and must be repaired.
c. Disconnect the plug from the power source and/or the battery pack from the power tool before making any adjustments, changing accessories, or storing power tools. Such preventive safety measures reduce the risk of starting the power tool accidentally.
d. Store idle power tools out of the reach of children and do not allow persons unfamiliar with the power tool or these instructions to operate the power tool. Power tools are dangerous in the hands of untrained users.
e. Maintain power tools. Check for misalignment or binding of moving parts, breakage of parts and any other condition that may affect the power tool's operation. If damaged, have the power tool repaired before use. Many accidents are caused by poorly maintained power tools.
f. Keep cutting tools sharp and clean. Properly maintained cutting tools with sharp cutting edges are less likely to bind and are easier to control.
g. Use the power tool, accessories and tool bits, etc. in accordance with these instructions, taking into account the
working conditions and the work to be performed. Use of the power tool for operations different from those intended could result in a hazardous situation.
- Battery tool use and care
a. Recharge only with the charger specified by the manufacturer. A charger that is suitable for one type of battery pack may create a risk of fire when used with another battery pack.
b. Use power tools only with specifically designated battery packs. Use of any other battery packs may create a risk of injury and fire.
c. When battery pack is not in use, keep it away from other metal objects, like paper clips, coins, keys, nails, screws, or other small metal objects, that can make a connection from one terminal to another. Shorting the battery terminals together may cause burns or a fire.
d. Under abusive conditions, liquid may be ejected from the battery; avoid contact. If contact accidentally occurs, flush with water. If liquid contacts eyes, additionally seek medical help. Liquid ejected from the battery may cause irritation or burns.
- Service
a. Have your power tool serviced by a qualified repair person using only identical replacement parts. This will ensure that the safety of the power tool is maintained.
Specific safety rules for sanders
- Hold power tools by insulated gripping surfaces when performing an operation where the sanding pad may contact hidden wiring or its own cord. Contact with a "live" wire will make exposed metal parts of the tool "live" and shock the operator.
Additional safety rules for sanders Sanding Lead based paint
Sanding of lead based paint is not recommended due to the difficulty of
controlling the contaminated dust. The greatest danger of lead poisoning is to children and pregnant women.
Since it is difficult to identify whether or not a paint contains lead without a chemical analysis, we recommend the following precautions when sanding any paint:
Personal safety
- No children or pregnant women should enter the work area where the paint sanding is being done until all clean up is completed.
- A dust mask or respirator should be worn by all persons entering the work area. The filter should be replaced daily or whenever the wearer has difficulty breathing.
- Note: Only those dust masks suitable for working with lead paint dust and fumes should be used. Ordinary painting masks do not offer this protection. See your local hardware dealer for the proper (NIOSH approved) mask.
- No eating, drinking or smoking should be done in the work area to prevent ingesting contaminated paint particles. Workers should wash and clean up before eating, drinking or smoking. Articles of food, drink, or smoking should not be left in the work area where dust would settle on them.
Environmental safety
- Paint should be removed in such a manner as to minimize the amount of dust generated.
- Areas where paint removal is occurring should be sealed with plastic sheeting of 4 mils thickness.
- Sanding should be done in a manner to reduce tracking of paint dust outside the work area.
Cleaning and disposal
- All surfaces in the work area should be vacuumed and thoroughly cleaned daily for the duration of the sanding project.
Vacuum filter bags should be changed frequently.
- Plastic drop cloths should be gathered up and disposed of along with any dust chips or other removal debris. They should be placed in sealed refuse receptacles and disposed of through regular trash pick-up procedures. During clean up, children and pregnant women should be kept away from the immediate work area.
- All toys, washable furniture and utensils used by children should be washed thoroughly before being used again.
Additional safety information

Warning: always use safety glasses. Everyday eyeglasses are NOT safety glasses. Also use face or dust mask if cutting operation is dusty. Always wear certified safety equipment:
ANSI Z87.1 eye protection (CAN/CPA Z94.3),
ANSI S12.6 (S3.19) hearing protection
- NIOSH/OSHA/MSHA respiratory protection.

Warning: Some dust created by power sanding, sawing, grinding, drilling, and other construction activities contains chemicals known
to the State of California to cause cancer, birth defects or other reproductive harm. Some examples of these chemicals are:
- Lead from lead-based paints,
- Crystalline silica from bricks and cement and other masonry products, and
- Arsenic and chromium from chemically-treated lumber.
Your risk from these exposures varies, depending on how often you do this type of work. To reduce your exposure to these chemicals: work in a well ventilated area, and work with
approved safety equipment, such as those dust masks that are specially designed to filter out microscopic particles.
- Avoid prolonged contact with dust from power sanding, sawing, grinding, drilling, and other construction activities. Wear protective clothing and wash exposed areas with soap and water. Allowing dust to get into your mouth, eyes, or lay on the skin may promote absorption of harmful chemicals.

Warning: Use of this tool can generate and/or disperse dust, which may cause serious and
permanent respiratory or other injury. Always use NIOSH/OSHA approved respiratory protection appropriate for the dust exposure. Direct particles away from face and body.

Warning: Always wear proper personal hearing protection that conforms to ANSI S12.6 (S3.19)
during use. Under some conditions and duration of use, noise from this product may contribute to hearing loss.

Caution: When not in use, place tool on its side on a stable surface where it will not cause a tripping or falling
hazard. Some tools with large battery packs will stand upright on the battery pack but may be easily knocked over.
Air vents often cover moving parts and should be avoided. Loose clothes, jewelry or long hair can be caught in moving parts. If use of an extension cord is absolutely necessary outdoors, use an extension cord suitable for outdoor use.
Labels on tool
The label on your tool may include the following symbols:

Warning! To reduce the risk of injury, the user must read the instruction manual.

The charger is intended for indoor use only.

Read this entire manual carefully before using the appliance.
Position of date barcode
The Date Code, which also includes the year of manufacture, is printed into the housing. Example:
2017 XX JN
Year of manufacturing
Electrical safety

Your charger is double insulated; therefore no earth wire is required.
Always check that the mains voltage
corresponds to the voltage on the rating plate. Never attempt to replace the charger unit with a regular mains plug.
- If the supply cord is damaged, it must be replaced by the manufacturer or an authorised BLACK+DECKER Service Centre in order to avoid a hazard.
Batteries
The battery pack is not fully charged out of the carton. Before using the battery pack, read the safety instructions below and then follow charging procedures outlined. When ordering replacement battery packs, be sure to include the catalog number and voltage.
Read all instructions
Important safety instructions for all battery packs

Warning: Read all safety warnings and all instructions for the battery pack, and power tool. Failure to
follow the warnings and instructions may result in electric shock, fire and/or serious injury.
- Do not charge or use the battery pack in explosive atmospheres, such as in the presence of flammable liquids, gases or dust. Inserting or removing the charging cable from the battery pack may ignite the dust or fumes.
- Never force the battery pack into cable insertion or tool insertion. Do not modify the battery pack in any way as battery pack may rupture causing serious personal injury.
- Do not splash or immerse in water or other liquids.
- Do not store or use the tool and battery pack in locations where the temperature
may reach or exceed 104^ (40^) (such as outside sheds or metal buildings in summer). For best life store battery packs in a cool, dry location.
Note: Do not store the battery packs in a tool with the trigger switch locked on. Never tape the trigger switch in the on position.
- Do not incinerate the battery pack even if it is severely damaged or is completely worn out. The battery pack can explode in a fire. Toxic fumes and materials are created when lithium ion battery packs are burned.
- If battery contents come into contact with the skin, immediately wash area with mild soap and water. If battery liquid gets into the eye, rinse water over the open eye for 15 minutes or until irritation ceases. If medical attention is needed, the battery electrolyte is composed of a mixture of liquid organic carbonates and lithium salts.
- Contents of opened battery cells may cause respiratory irritation. Provide fresh air. If symptoms persist, seek medical attention.

Warning: Burn hazard. Battery liquid may be flammable if exposed to spark or flame.

Warning: Fire hazard. Never attempt to open the battery pack for any reason. If the battery pack cracked or damaged, do not attempt or charge. Do not crush, drop or use the battery pack. Do not use a pack or charger that has received a blow, been dropped, run over or used in any way (e.g., pierced with a hammer, stepped on).
Damaged battery packs should be returned to the service center for recycling
Storage recommendations
-
The best storage place is one that is cool and dry, away from direct sunlight and excess heat or cold.
-
For long storage, it is recommended to store a fully charged battery pack in a cool dry place out of the charger for optimal results.
Note: Battery packs should not be stored completely depleted of charge. The battery pack will need to be recharged before use.
The RBRC Seal
The RBRC (Rechargeable Battery Recycling Corporation) Seal on the nickel cadmium, nickel metal hydride or lithium-ion
batteries (or battery packs) indicates that the costs to recycle these batteries (or battery packs) at the end of their useful life have already been paid by BLACK+DECKER. In some areas, it is illegal to place spent nickel cadmium, nickel metal hydride or lithium-ion batteries in the trash or municipal solid waste stream and the Call 2 Recycle program provides an environmentally conscious alternative.
Call 2 Recycle, Inc., in cooperation with BLACK+DECKER and other battery users, has established the program in the United States and Canada to facilitate the collection of spent nickel cadmium, nickel metal hydride or lithium-ion batteries. Help protect our environment and conserve natural resources by returning the spent nickel cadmium, nickel metal hydride or lithium-ion batteries to an authorized BLACK+DECKER service center or to your local retailer for recycling. You may also contact your local recycling center for information on where to drop off the spent battery. RBRC is a registered trademark of Call 2 Recycle, Inc.
Important charging notes
-
Longest life and best performance can be obtained if the battery pack is charged when the air temperature is between 65^ - 75^ (18^ - 24^) . DO NOT charge the battery pack in an air temperature below 40^ (4.5^) , or above 104^ (40^) . This is important and will prevent serious damage to the battery pack.
-
If the battery pack does not charge properly:
a. Check operation of receptacle by plugging in a lamp or other appliance;
b. Check to see if receptacle is connected to a light switch which turns power off when you turn out the lights;
c. Move the power adapter and battery pack to a location where the surrounding air temperature is approximately 65^-75^(18^-24^) ;
d. If charging problems persist, take the tool, battery pack and USB cable to your local service center. - The battery pack should be recharged when it fails to produce sufficient power on jobs which were easily done previously. DO NOT CONTINUE to use under these conditions. Follow the charging procedure. You may also charge a partially used pack whenever you desire with no adverse effect on the battery pack.
Transportation

Warning: Fire hazard. Do not store or carry the battery pack so that metal objects can contact exposed
battery terminals. For example, do not place the battery pack in aprons, pockets, tool boxes, product kit boxes, drawers, etc., with loose nails, screws, keys, etc.
Transporting batteries can possibly cause fires if the battery terminals inadvertently come in contact with conductive materials such as keys, coins, hand tools and the like.
The US Department of Transportation Hazardous Material Regulations (HMR) actually prohibit transporting batteries in commerce or on airplanes in carry-on baggage unless they are properly protected from short circuits. So when transporting individual battery packs, make sure that the battery terminals are protected and well insulated from materials that could contact them and cause a short circuit.

Caution: GoPak battery terminal cap should be used when battery is not connected to a power tool. Terminal
cap is provided for use whenever the
battery is out of the tool. Remove cap before placing battery into tool.
FCC requirements for all digital devices
This device complies with Part 15 of the FCC Rules and Industry Canada License-exempt RSS standard(s). Operation is subject to the following two conditions:
- This device may not cause harmful interference, and
- This device must accept any interference received, including interference that may cause undesired operation.
Changes or modifications not expressly approved by the party responsible for compliance could void the user's authority to operate the equipment.
This equipment has been tested and found to comply with the limits for a Class B digital device, pursuant to Part 15 of the FCC Rules. These limits are designed to provide reasonable protection against harmful interference in a residential installation. This equipment generates, uses, and can radiate radio frequency energy and, if not installed and used in accordance with the instructions, may cause harmful interference to radio communications. However, there is no guarantee that interference will not occur in a particular installation. If this equipment does cause harmful interference to radio or television reception, which can be determined by turning the equipment off and on, the user is encouraged to try to correct the interference by one of the following measures:
- Reorient or relocate the receiving antenna.
- Increase the separation between the equipment and receiver.
- Connect the equipment into an outlet on a circuit different from that to which the receiver is connected.
- Consult the dealer or an experienced radio/TV technician for help.
CANICES-3(B)/NMB-3(B)
Getting started
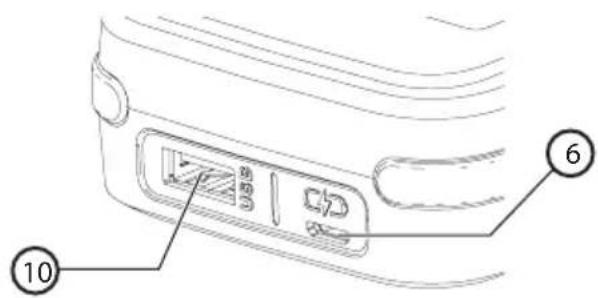
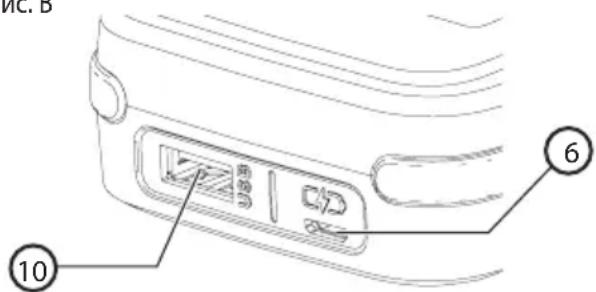
The Micro USB port (6) on the BLACK+DECKER GoPak 2 in 1 battery is only to be used for charging the GoPak.
- The USB A port (10) on the BLACK+DECKER GoPak 2 in 1 battery is only to be used for powering USB devices (Phone/Tablet/MP3/Wearable/Game Controller/etc.).
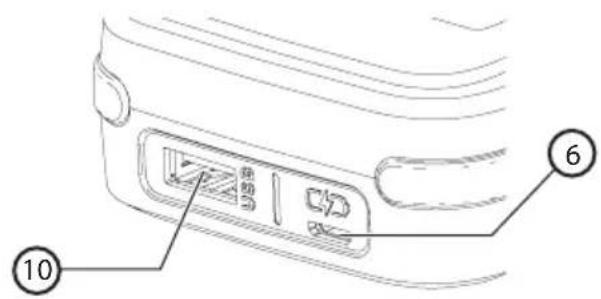
Fig. B
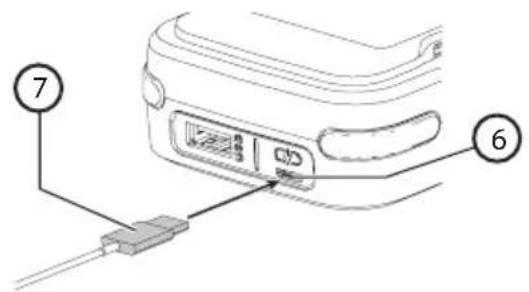
Charging the BLACK+DECKER GoPak 2 in 1 Battery (Fig. C, D)

Warning: Never attempt to charge the BLACK+DECKER GoPak 2 in 1 battery using the tool terminals on Pak.

Warning: You should only charge the BLACK+DECKER GoPak 2 in 1 battery using UL or CSA approved
USB ports rated for charging high performance devices. The GoPak can pull more current than acceptable with older USB ports. An error message may display on your computer if the computer is used to charge the GoPak.
- Plug the micro USB cable (included) (7) into a USB power supply (not included).
- Plug the micro USB plug of your charger cord into the GoPak micro USB port (6).
-
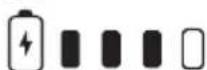
As the GoPak charges, the state of charge LEDs will illuminate. The illuminated LED(s) indicate the state of charge of the pack. The blinking LED indicates the next level of charge in progress. The state of charge button (8) is disabled during charging only.
-
The completion of charge is indicated by all four LEDs turning off. Pressing the state of charge indicator button (8) will illuminate all four LEDs. The battery is fully charged and may be used at this time or left on the charger.
- Recharge discharged batteries as soon as possible after use or battery life may be greatly diminished. For longest battery life, do not discharge batteries fully. It is recommended that the batteries be recharged after each use.
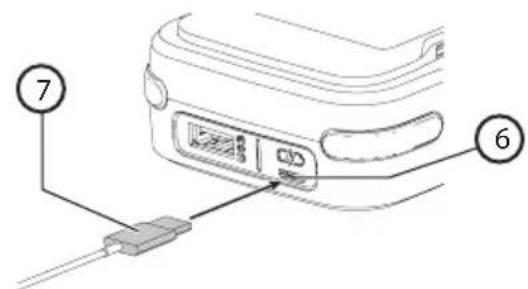
Fig. C
State of charge indicator (Fig. D)
The BLACK+DECKER GoPak 2 in 1 battery is equipped with a state of charge button (8) with a four LED display.
The state of charge is an indication of approximate levels of charge remaining in the battery according to the following indicators:
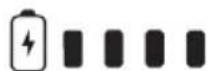
96-100% charged

76-95%

51-75%

26-50%

Pack needs to be charged
To actuate the state of charge, press the state of charge Indicator button. A combination of the four LEDs will illuminate designating the level of charge left. When the level of charge in the battery is below the usable limit, the state of charge LEDs will either not light or the bottom LED will blink.
Note: The LED state of charge will only display once the state of charge button is pressed.
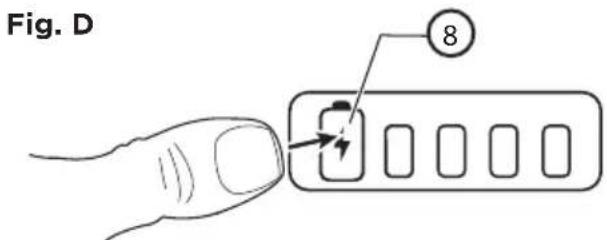
- Press state of charge button at anytime to display the remaining level of charge.
Note: The state of charge Indicator is only an indication of the charge left on the battery. It does not indicate tool functionality and is subject to variation based on product components, temperature and end-user application.
Note: GoPak battery terminal cap should be used when battery is not connected to a power tool. Terminal cap is provided for use whenever the battery is out of the tool. Remove cap before placing battery into tool.
Save these instructions for future use
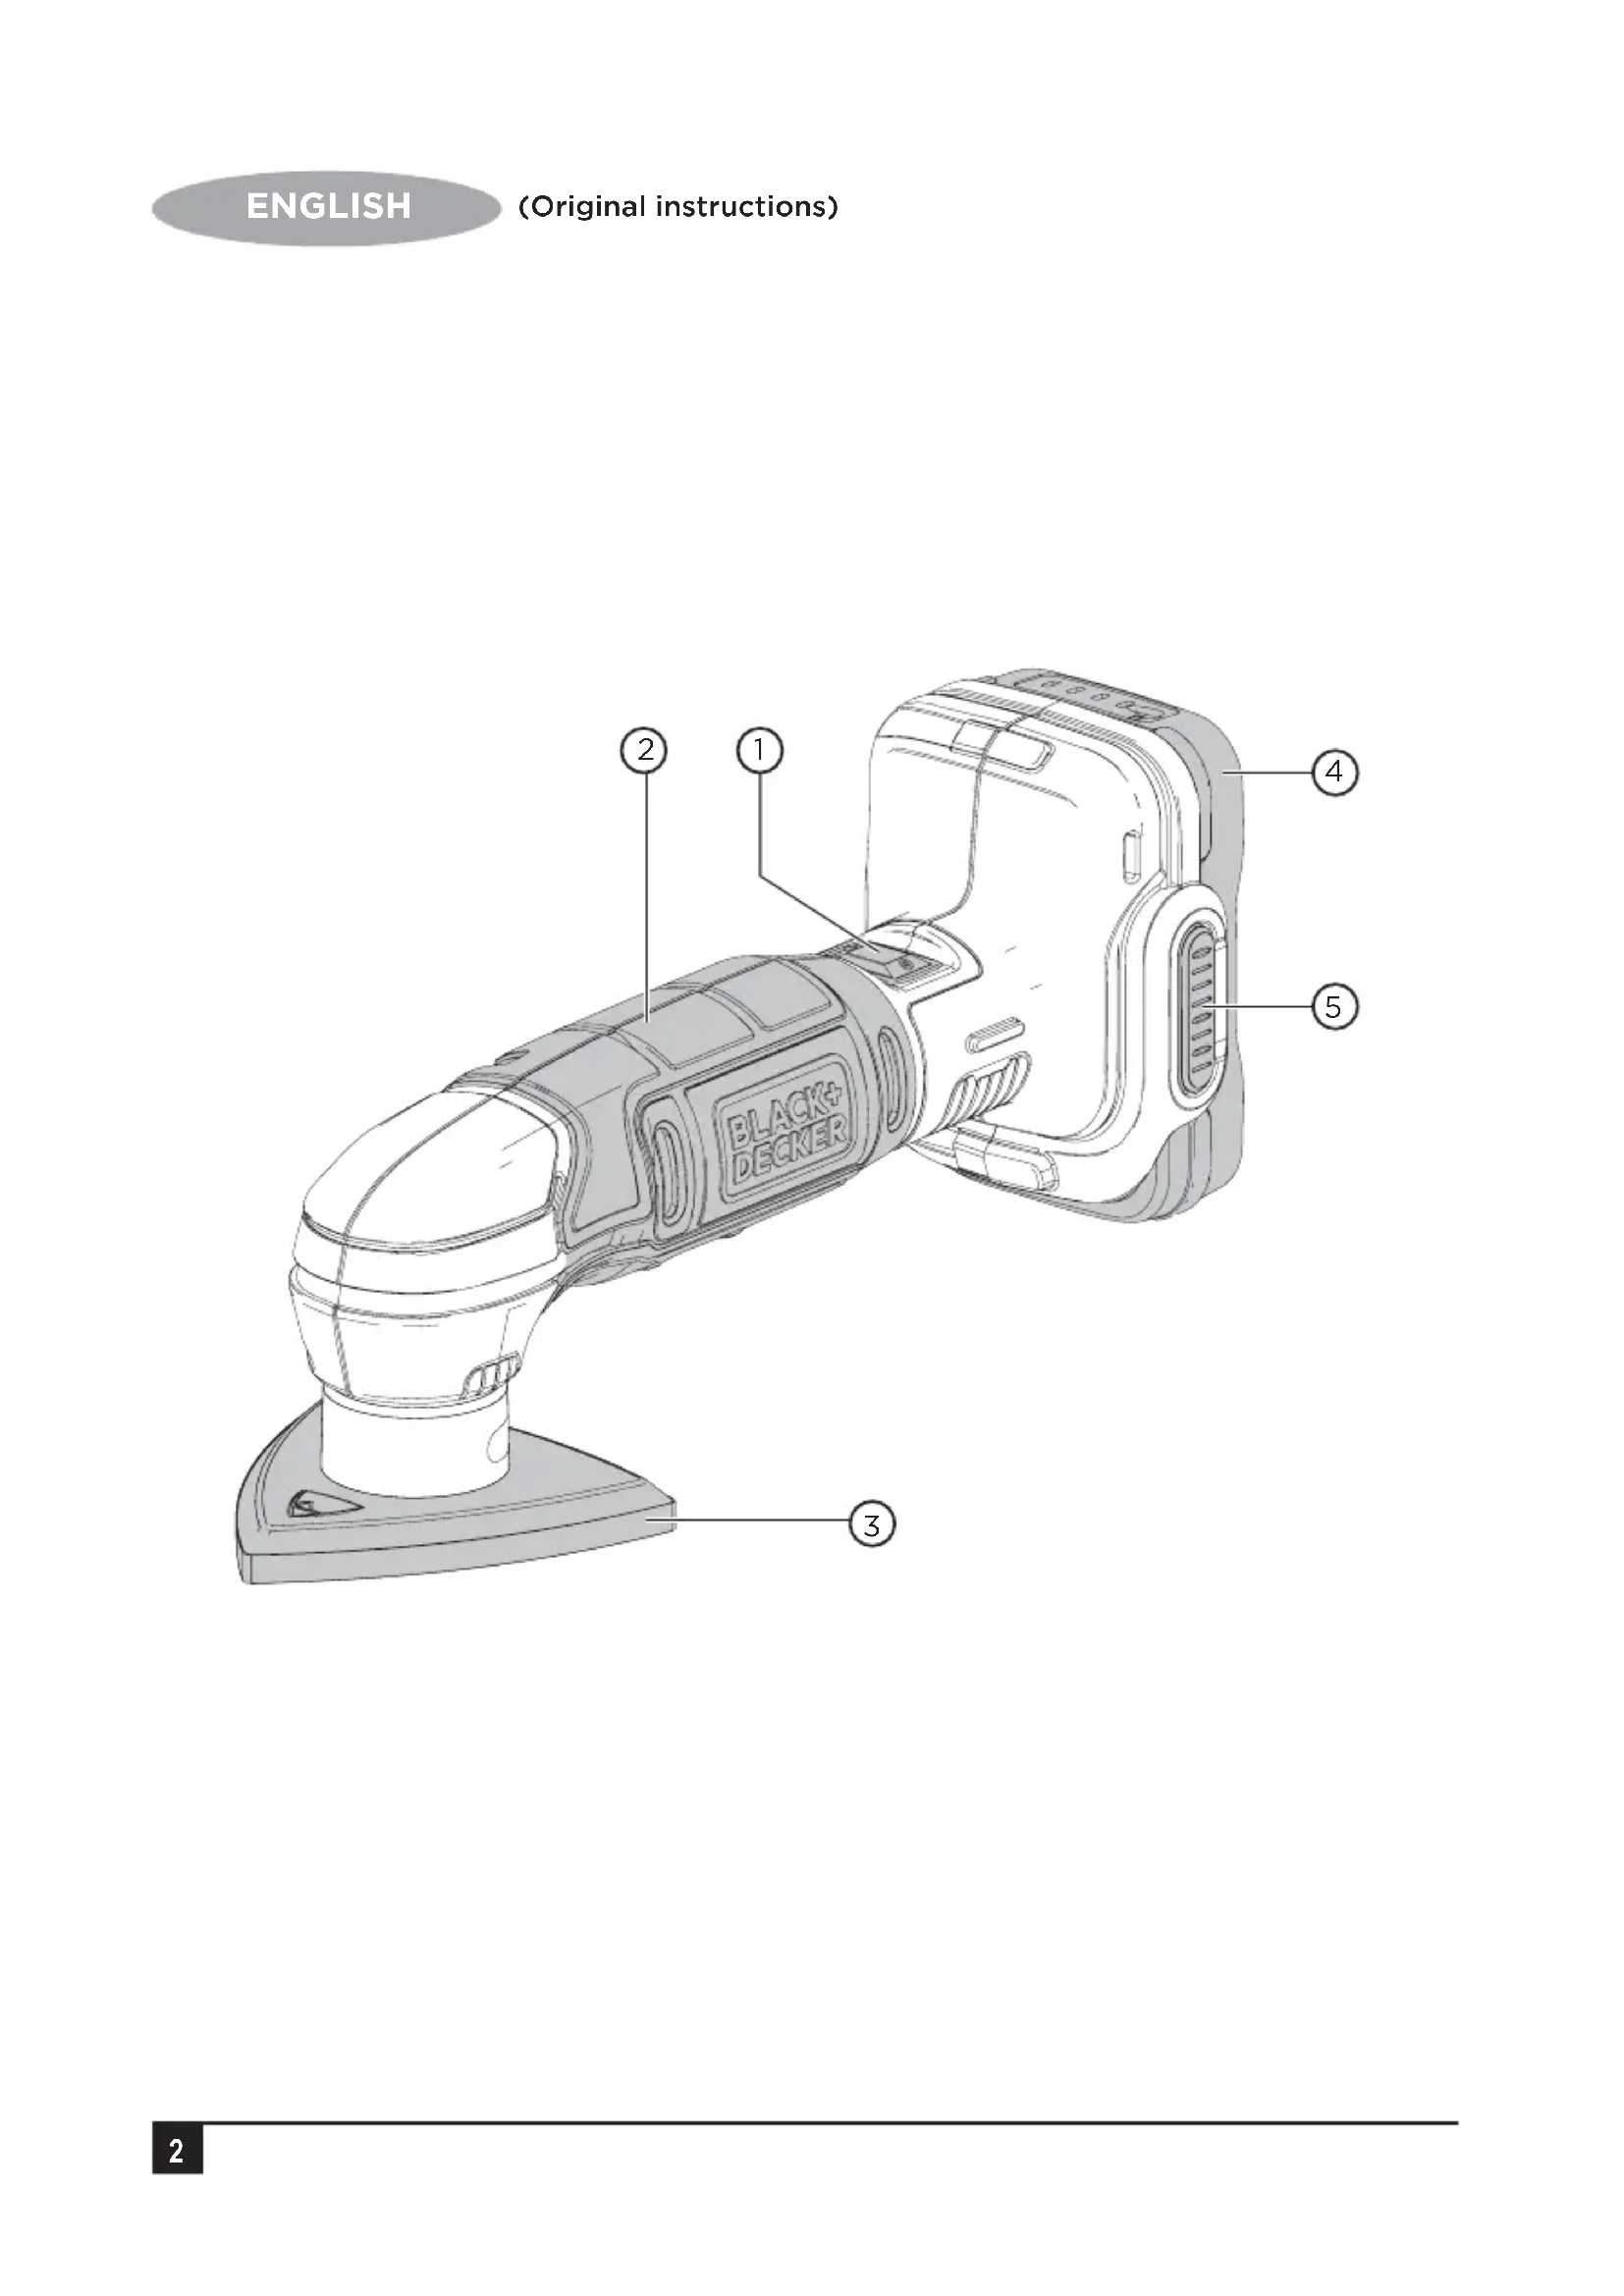
Components (fig. A)

Warning: Never modify the power tool or any part of it. Damage or personal injury could result.
Refer to Figure A at the beginning of this manual for a complete list of components.

Assembly and adjustments
Warning: To reduce the risk of
serious personal injury, azunit off and remove the battery pack before making any adjustments or removing/installing attachments or accessories. An accidental start-up can cause injury.
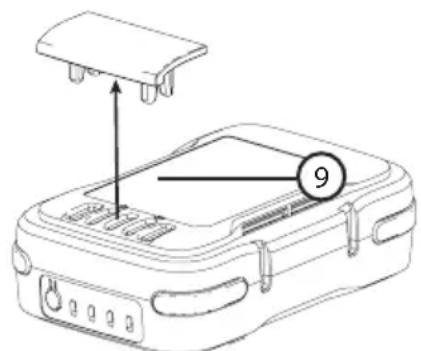
GoPak tool terminal cap
A battery storage and carrying cap (9) is provided for use whenever the battery is out of the tool. Remove the cap as shown in Figure E before placing battery onto tool.
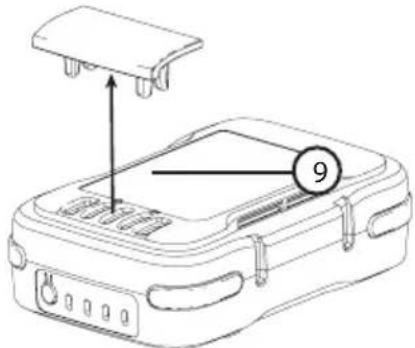
Fig. E
Operation

Warning: To reduce the risk of serious personal injury, turn unit off and remove the battery pack before making any adjustments or removing/installing attachments or accessories. An accidental start-up can cause injury.
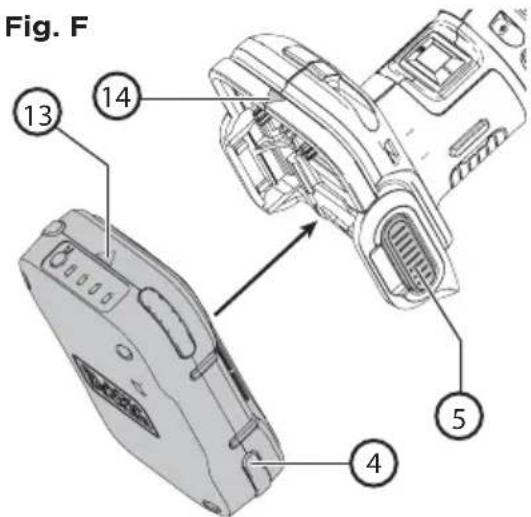
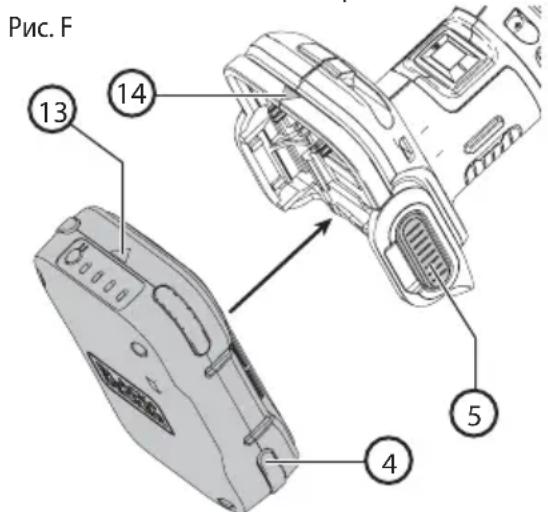
Installing and removing the GoPak 2 in 1 battery in a power tool (Fig. F)

Warning: Remove any connected USB cords from the BLACK+DECKER GoPak 2 in 1 battery before connecting the GoPak to the compatible tool.
-
Remove the tool terminal cap if installed on the BLACK+DECKER GoPak 2 in 1 battery.
-
To power a compatible GoPak 12V MAX* power tool, align the tool terminals on the foot of the tool with the terminal slots on the battery (4) as shown in Fig. E.
Note: The state of charge indicator will face the rear of the tool and the USB ports will face the front. The arrow on the battery will align with the arrow on the tool as shown in Fig. E.
- Snap the BLACK+DECKER GoPak 2 in 1 battery into the foot of the tool. The arrow (13) on the battery will align with the arrow (14) on the tool. Ensure the battery is fully seated and fully latched into position before using.
- To remove the BLACK+DECKER GoPak 2 in 1 battery from the tool, depress the two battery release buttons (5) located on the tool and pull the BLACK+DECKER GoPak 2 in 1 battery off the tool.
Note: The BLACK+DECKER GoPak 2 in 1 battery USB ports are disabled when the trigger is pulled.
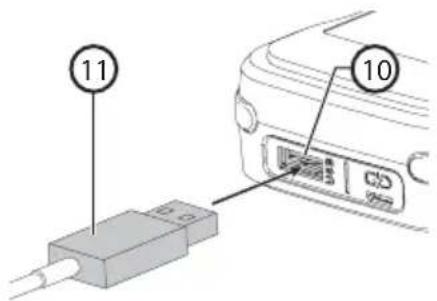
Using the GoPak 2 in 1 battery to charge your USB device (Fig. G)
- Plug the USB A end of your device specific cable (11) into the BLACK+DECKER GoPak 2 in 1 battery (10) and the other end of the cable into a UL or CSA listed compatible device (Phone/Tablet/MP3/Wearable/Game Controller/etc.). Charging will start automatically.

Fig. G
Functionality
The BLACK+DECKER GoPak 2 in 1 battery can power your compatible BLACK+DECKER 12 V GoPak MAX* tools or power/charge your mobile devices. The compact, slim battery housing is designed for portability.
- GoPak Charge Input: Up to 2.4A**
- GoPak Power Output: Up to 2.4A
* Actual input charge rate is dependant upon power adapter (not included).
*Actual output rate is dependant on the device.
USB power port
The BLACK+DECKER GoPak 2 in 1 battery is equipped with a USB Type A power port. It delivers up to 2.4 amp total current.
Note: The current delivered to device is dependent on user device and user's chosen cable.

Warning: Ensure the terminal cap is securely attached to the BLACK+DECKER GoPak 2 in 1
battery when using it to power/charge your device.
Install terminal cap on the tool terminals.
Device charging from USB will start automatically when device is connected.
- To turn OFF, disconnect USB device.
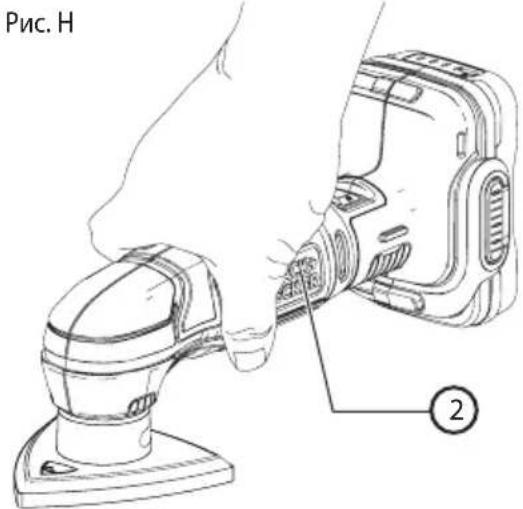
Proper hand position (Fig. H)

Warning: To reduce the risk of serious personal injury, ALWAYS use proper hand positionx as shown.

Warning: To reduce the risk of serious personal injury, always hold securely in anticipation of a sudden reaction.
Proper hand position requires one hand on the main handle (2).
Note: Do not rest fingers on sanding base during use. Move the sander in long sweeping strokes across the surface, letting the tool do the work. Light pressure is all that is required for sanding, polishing or scrubbing. Excessive pressure will slow the tool and produce inferior results. Check your work often, product is capable of removing material rapidly
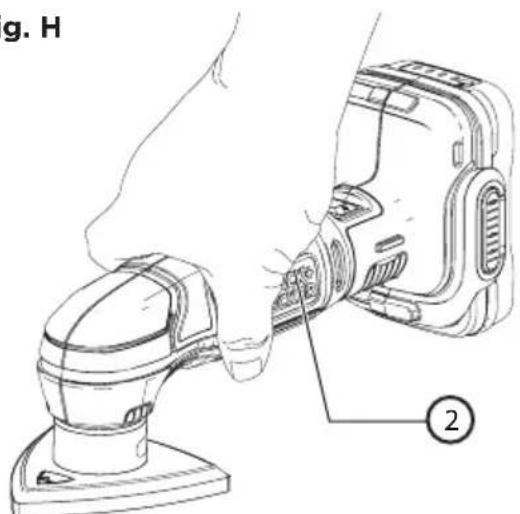
Fig. H
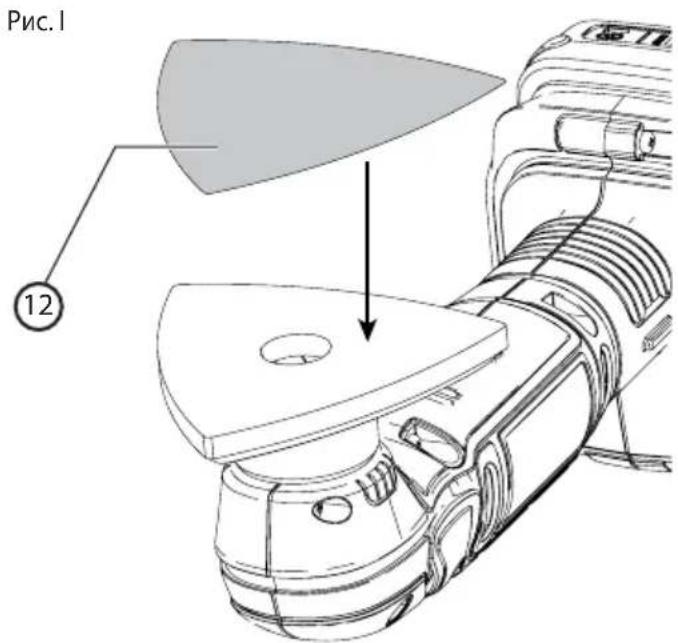
Fitting sanding sheet (Fig. 1)

Warning: Remove battery when removing or installing the sanding sheet.
-
Hold the tool with the sanding base facing upwards.
-
Place the sanding sheet (12) onto the sanding base with the grit facing up.

Fig.1

Warning: Shock hazard. Under no circumstances should this product be used near water.

Caution: To reduce the risk of injury, turn off and remove the battery from the tool before making any
adjustments or removing or installing attachments or accessories.
Switching on and off
- To switch the tool "ON", depress the on/off switch 1 at the side position 1.
- To switch the tool "OFF", depress the on/off switch 1 at the side position O.
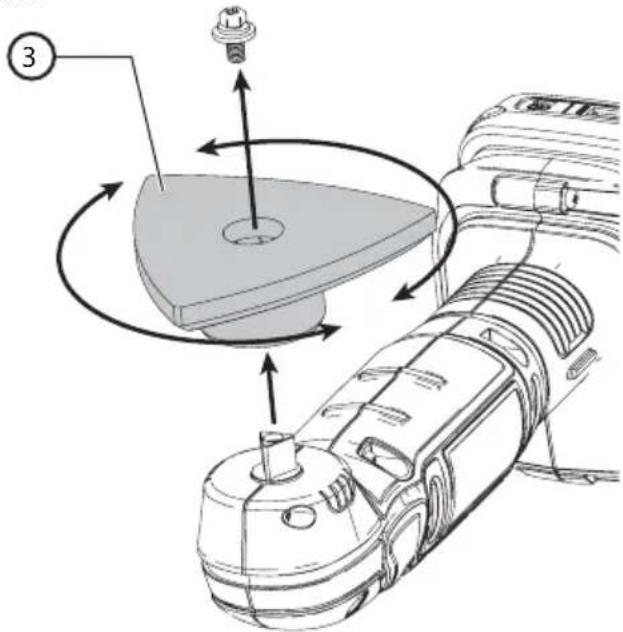
Rotating the sanding base (Fig. J)

Warning: Remove battery when removing or installing the sanding base.
The sanding base (3) can be rotated if a corner becomes worn.
- Hold the tool with the sanding base facing upwards.
- Unscrew the screw that holds the sanding base to the sander.
- Rotate the sanding base so that an unworn corner faces forward. Make sure the sanding base is properly seated.
- Secure the sanding base by inserting and tightening the screw.
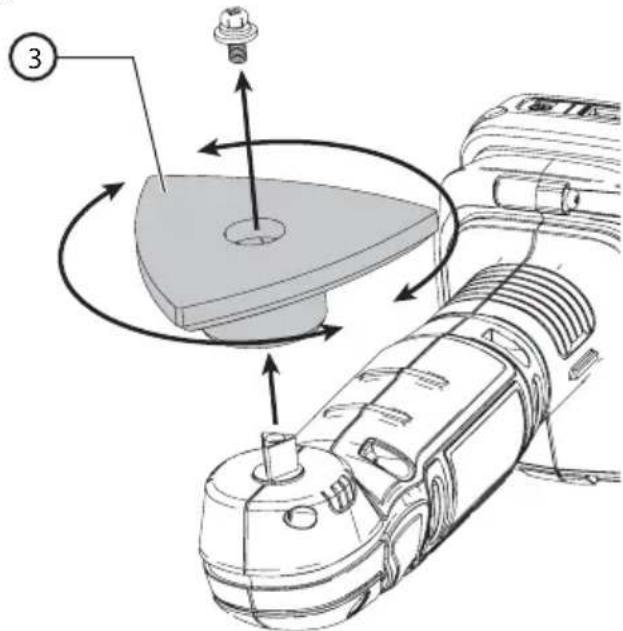
Fig.J
Hints for optimum use

Warning: Let the tool work at its own pace. Do not overload.
- Do not place your hands over the ventilation slots.
- Do not exert too much pressure on the tool.
Regularly check the condition of the sanding sheet. Replace when necessary.
Always sand with the grain of the wood. - When sanding new layers of paint before applying another layer, use extra fine grit.
- On very uneven surfaces, or when removing layers of paint, start with a coarse grit. On other surfaces, start with a medium grit. In both cases, gradually change to a fine grit for a smooth finish.
Maintenance

Warning: To reduce the risk of serious personal injury, turn unit off and remove the battery pack before
making any adjustments or removing/installing attachments or accessories. An accidental start-up can cause injury.
Important: To assure product SAFETY and RELIABILITY, repairs, maintenance and adjustment (other than those listed in this
manual) should be performed by authorized service centers or other qualified service personnel, always using identical replacement parts.
Protecting the environment
Separate collection. This product must not be disposed of with normal household waste.
Should you find one day that your BLACK+DECKER product needs replacement, or if it is of no further use to you, do not dispose of it with household waste. Make this product available for separate collection.

Separate collection of used products and packaging allows materials to be recycled and used again. Reuse of
recycled materials helps prevent environmental pollution and reduces the demand for raw materials.
Local regulations may provide for separate collection of electrical products from the household, at municipal waste sites or by the retailer when you purchase a new product.
BLACK+DECKER provides a facility for the collection and recycling of BLACK+DECKER products once they have reached the end of their working life. To take advantage of this service please return your product to any authorised repair agent who will collect them on our behalf.
You can check the location of your nearest authorised repair agent by contacting your local BLACK+DECKER office at the address indicated in this manual. Alternatively, a list of authorised BLACK+DECKER repair agents and full details of our after-sales service and contacts are available on the Internet at: www.2helpU.com.
Cleaning

Warning: Never use solvents or other harsh chemicals for cleaning the non-metallic parts of the tool or
power supply. These chemicals may weaken the plastic materials used in these parts. Use a cloth dampened only with water and mild soap. Never let any liquid get inside the tool or power supply; never immerse any part of the tool or power supply into a liquid.
Note: Remove tool and both USB cables from GoPak before cleaning.
Use only mild soap and a damp cloth to clean the tool or power supply. Many household cleaners contain chemicals which could seriously damage plastic. Also, do not use gasoline, turpentine, lacquer or paint thinner, dry cleaning fluids or similar products.
Troubleshooting
- The GoPak will not power your device or charge.
a. The LED closest to the state of charge button will blink red when attempting USB functionality. - The GoPak is too hot or too cold. Allow the GoPak to cool down or warm up.
- The GoPak will not power your compatible tool.
- Attempt to charge the battery. If the LED fails to come on refer to number 1 in Troubleshooting.
Repairs
The BLACK+DECKER GoPak 2 in 1 battery is not serviceable.
Warning: To assure product SAFETY and RELIABILITY, repairs, maintenance and adjustment (including brush inspection and replacement) should be performed by a BLACK+DECKER factory service center or a BLACK+DECKER authorized service center. Always use identical replacement parts.
Technical data
| BCW201 |
| Voltage V DC 12 |
| No-load speed Min -1 11000 OPM |
| Oscillating angle ° 2.8 |
| Sanding base surface Min² 5078 |
| Weight kg 0.63 (with battery 0.88) |
Level of sound pressure according to EN 60745:
Sound pressure (L_pA) 76,9 dB(A), uncertainty(K)3 dB(A)
Sound power (L_WA) 87,9 dB(A), uncertainty(K)3 dB(A)
Vibration total values (triax vector sum) according to EN 60745:
Vibration emission value(handle) (a_h)4,7 m/s2, uncertainty (K) 1.5 m/s2
The vibration emission level given in this information sheet has been measured in accordance with a standardised test given in EN 60745 and may be used to compare one tool with another. It may be used for a preliminary assessment of exposure.

Warning: The declared vibration emission level represents the main applications of the tool. However if the tool is used for different applications, with different accessories or poorly maintained, the vibration emission may differ. This may significantly increase the 1.5exposure level over the total working period.
An estimation of the level of exposure to vibration should also take into account the times when the tool is switched off or when it is running but not actually doing the job. This may significantly reduce the exposure level over the total working period.
Identify additional safety measures to protect the operator from the effects of vibration such as: maintain the tool and the accessories, keep the hands warm, organisation of work patterns.
Guarantee
BLACK+DECKER is confident of the quality of its products and offers an outstanding guarantee. This guarantee statement is in addition to and in no way prejudices your statutory rights.
If a BLACK+DECKER product becomes defective due to faulty materials, workmanship or lack of conformity, within 24 months from the date of purchase, BLACK+DECKER guarantees to replace defective parts, repair products subjected to fair wear and tear or replace such products to make sure of the minimum inconvenience to the customer unless:
- The product has been used for trade, professional or hire purposes.
- The product has been subjected to misuse or neglect.
- The product has sustained damage through foreign objects, substances or accidents.
- Repairs have been attempted by persons other than authorised repair agents or BLACK+DECKER service staff.
To claim on the guarantee, you will need to submit proof of purchase to the seller or an authorised repair agent. You can check the location of your nearest authorised repair agent by contacting your local BLACK+DECKER office at the address indicated in this manual. Alternatively, a list of authorised BLACK+DECKER repair agents and full details of our aftersales service and contacts are available on the Internet at: www.2helpU.com
Usage Prévu
Avertissement: Never modify the power tool or any part of it. Damage or personal injury could result.
Refer to Figure A at the beginning of this manual for a complete list of components.Intended Use
Fitting sanding sheet (Fig. 1)

3NeKTPoHnCTpyMeHT, NOKa OH He 6yJeT NOHOCtBuO OTPeMOHTnpOBaH. BoIbUnHCTBO HeCuaCTbIX CnyaEB ABLIOTCs CJIeCTBnEM HeIOCTaTOHORo TEXHueCKORO yXODa 3a 3NeKTPoHnCTpyMeHTOM.
f. Cneinte 3a octpoToH 3aTOUKN u N UCTOTOn pexyux npHaJIeXHOCTe. PpHaJIeXHOCTn C OCTpbIMN KpOMKaMn PO3BOJAIOT N36ExKaTb 3aKJIINHBaHnI N DeJaOT pa6O TY MeHee yTOmITeNbHOH.
g. IcnoIb3yIte 3JeKtpoHnCTpyMeHT, akceccyapbl n HacaKn B COOTBeTCTBmC daHHbIM PykoBoDCTBOM n O3KcIIyatau nn C yUeTOM pa6Ouyx ycIOBn n XapaKTepa 6dyuEe pa6Otbl. IcnoIb3OBaHne 3JeKtpoHnCTpyMeHTa He nO Ha3HaueHnIO MOKeT CO3DaTb ONaChyUo CNTyaUHO.
- IcnoIb3ObaHne aKKyMylrTophbx INHCTpyMeHTOB INTexHnueckn yXoJ
a. 3apjaKeTe aKKymyIaTOp 3apJHbIM yCTpoiCTBOM MapKn, yKa3aHHoN IpnO3BOdnteJeM. 3apJdHoe YCTPOIcTBO, KOTOPOE NOxODNT K ODNHOY Tnny aKKymyJIaTOPOB, MOKeT Co3daTb pNCK BO3rOpAHnB CnUyae erO nCpOJIb3OBaHNr CaKKymyJIaTOpaMn dpyrOTo Tnna.
b. Icnoj3yIte 3JIeKTPOnHCTpyMeHTbTOJbKO c pa3pa6OtaHHbIMn CneuJaNbHO dIa HIX aKKymJITopam. IcNoJb3OBaHHe aKKymJITopa KaKoI-NIO BO DpyrOm MapKn MoKeT npNBecT N K BO3HNKHOBeHnIO IOXapa n NOJyEHHIO TpaBMbl.
c. DepeKHTe He nCnOJb3yEmbl aKKymyIaTOp nOdaJIbWe OT MeTaJIINueCKNX npeDMeTOB, TaKnx KaK cKpeKNi, MOHeTbI, KIIouN, rBO3dN, wUpyNbI, N dpyrNx MeLKnX MeTaJIINueCKNX npeDMeTOB, KOToPbIe MoYr 3aMKHyTb KOHTaKTbI aKKymyIaTOpa. KopOTkoe 3aMbKaHne KOHTaKTOB aKKymyIaTOpa MoKet pInBeCTn K NOlyueHIO OXkOROB INI BO3HNKHOBeHIO NOxapa.
d. B KpnTnuecknx Cntyaunx n3 aKKymyIaTopa MoKet BbITEyb XnIDKOCTb (3neKTpOInr); n36eraTe KOtAKeTa C KOkei. Ecnn XnIDKOCTb nonaHa Koxy, cMOte eB Odoi. Ecnn XnIDKOCTb nonaBa rna3a, o6paaaiTeCb 3a MeINuHCKoN NOMOcbU. XnIDKOCTb, BbITEkwAra N3 aKKymyIaTopa, MoKet Bbl3BaTb pa3dpaxeHne nn OXkOrn.
- TexHnueckoe 06cnyxnbAHne
a. PemOH BaWero 3neKtpoHnCTpyMeHTa DOJKeH npOn3BOIDITbC8 TOIbKO KBaINΦNcIPoBaHHbIMn CneuAInCTAmC NcPONb3OBAHNEM NDeHTNuHBIX 3aNaChbix qacheT. 3To O6ecneHT 6e3OnaCHOCTb BaWero 3neKtpoHnCTpyMeHTa BdaJIbHeiWei EKcnNyataun.
CneuNbHbIe npaBnla 6e3oNaCHOCTn npnpa6ote wnnΦMaunhamn
-ДерхитЕэлктponHCTpyMeHT3aI3OJIupOBaHHbIe pyuKn npn BblONHeHmОnepaun,BOBpeM KOTopbIX WIIΦOBaJIbHЯ NOIOWBa MoKET 3aJeTb CkPbITyI npOBoJky nIIN c6ObCTBeHHbI KAb. KoTHaKT C
HaxoJIMCM NOHnPraJKeHnEM PPOBOOM DeJaET He NOKpbITbIe n3OJIaIeM MeTALINueCKNe yACTN INCTpyMeHTa TAKKe «KNBbIMN》,yTO CO3JaET ONaCHOCTb NOPaKeHnO npepaTopa 3JIeKTPnueCKm TOKOM.
DOnonHnTeIbHbIe npaBnla 6e3oNaCHOCTn npu pa6ote wnnΦmaunhamn
IlnfoBaHne KpacOK c codepkaHnem CBnHa
He pekomehnyetcI IINIOBAHne KpacOK c coepkaHnem CBnHa, TaK KaK 3TO npuBOiNt K o6pa3OBaHnIO BpeHoi dIy3DOpOBbY PbI.
Hn6oIbIyIO anachoctb OtpaBHeHne CBHcOm npedctabIeT nI dTei n 6epemHHbIX XeHUnH.
Tak KaK OnpedenITb Hauuue CBnHa a B KpaCke 6e3 npoBeHnXMMUeCKOrO aHaIIN3a DOCTaTOUHO CNOxHo, Mbl peKOMeHNyEM CO6NIOaTB CNeDyUOUIne MePbI npedocTopoXHOCTHn Pn BbINOnHeHH NInΦOBaHn OKpaWeHHbIX NOBepxHocTe:
JIuHna 6e3onacHOCTb
He donyckaIte deteH nn 6epemHHbIX XeHnB pa6ooyIO 3OHy, rIe BbINONHReTc IINΦOBaHne OkpaWeHHbIX NOBepxHOCTeI Do TEX nop, noka pa6oay 3OHa He 6yDet NOnHOCTbIO OUYIeHa.
BceIIOuN, BxOJaIaIe B pa6oUy 3Ony, OJONKbI NaIeBaTb NJIe3aIITbIe MaCKN IIN peCnnpaTopbl. ΦIbTp cIeNyET 3aMeHrTb exKeIHeBHO IIN NO Mepe erO 3arPra3HeHry.
- PnpmeuHne: Cnnyet nCNOB3OBAbToJbKO Te nbIe3aunTHbIe MaKn, KOTOpBie npedHa3HaueHbI dJa pa60tBc nbIbNo I napamKpcOK, coepkaux CBnHeU. ObiuHbIe MaKn IJIaKoKpaocuHbIX pa6Ot He o6ecneuBaOT DocTaouHoi 3auNTbI. Kyntte B CTpOnTeNBOM Mara3HNe peCnnpaTop, yTbePckdEHHoro HaunOHaNbHbIM INHCTHTyTom CLla NO oxpahe Tpyda n npomblJeHHo rurnene (NIOSH) Tnna.
He npHmMaTe NsUy, He neTe XnKoCTu H Kypnte B pa6Ouei 30He IJRA NCKIIOUeHn BEporTHOCTu IONaDaHnua CACTuq KpaACKn B JKeNyDOK. NepeI npEOMM NsU, NITbE M nn KypeHNEM pa6OTNk DOnJxH NOMbITbCn INOcHNTbCn. NIIeBle PpOdyKTbl, HAnNTKn IIN CNrapeTbI He DOJXHbI HaxODHTCBa Pa6Ouei 30He, TaK KaK Ha HNX MOKeT OCECTb Nblb.
3koJorMuecka 6e3onachOCTb
Kpacky cneJeT CHMaTb TaKIM o6pa3OM, YTo6bl CBECTN K MHNmMy KOJIYeCTBO 6pa3yUoIeCnY PbIIIN.
30HbI, Ie BbINONHReTc ydaJIeHHe KpaCKn,IOnJXHbI 6bITb repMeTu3NpuObaHbI INaCTNUKOBbIMn NaHeJIaMn TOIuHHo4 MM.
KoI DaTbI, KOTOpBt TaKxE BKnIOuAe T Cc6a RoI 3rOToBHeHn, OTUtaMnOBaH Ha NOBepXHOCTN KOpNyCa HNCTpyMeHTa.
Ppimep:
2017 XX JN
TOrn3rTOBneHn
3NeKtpo6e30nacHocTb

Bahe 3apraHoe yctpoCTBO 3aunueHO DBOHOn H30Jaunei, YTO NCKIIOUaeT NOTppe6HOCTb B 3a3emJIIOUeM npOBoe. BcerDa npOBepnTe, COOTBeTCTByET JIN HAprrKeHne, Yka3aHHoe Ha Ta6NIuKe C TexHNueckmN napaMeTpamN, HAprrKeHnIO 3JeKTPocetN. HnB Koem clyuae He nbTaIteCb 3aMeHHTb 3aprHbI 6LOK CTaHApTbIM CeTeBBIM WTeNCenEM.
Bo n36eJxHne HeCuaCTHO r Cnya 3aMeHa NOBpeXdEHHoro Ka6eI NITAHn DOJXHa npOn3BOOHTbCra TOnbKO Ha 3aBOe-N3ROTOBtene HnB aBTopn3OBaHHOM cepBnCHom ceHTpe BLACK+DECKER.
AkkymyIaTOPbI
N3BneeyHHb n3 ynaKOBKn aKKymyIaTOp 3apJxHe H neHIOCTbIO. Npeed hauanom kCnpyataun aKKymyIaTopa npOHTe HxkeCneDyUoIe INHCTpyKuIN NO 6e3OnacHOCTn i CNeDuTe yKa3aHmM No npOceDype 3apJxKn. Ppi 3ak3e aKKymyIaTOPOB dJa 3aMeHbI, He 3a6bBaIte yKa3bBaTb nx Homep no KaTALORY u HaPRAKeHHe.
BhImaTeIbHo npOuTtE BCE uHcTpkyKuIN BaxHbIe uHcTpkyKuIN no 6e3oNaChocTu dJa BCex aKKymyIaTOPOB

BHMaHHe: BHMaTeIbHO npoTuTE Bce
mHTpyKuIN IIO 6e3ONaCHOCTn IN pyKOBOcTBO IO
3KcPiNyatauIN aKKymyIaTopa IN
3JIeKTPoINHCTpyMeNTa. HecobIoJeHne Bcex
IpeueNCJIeHNbIX HNKe IpaBUN 6e3ONaCHOCTn IN
MHCTpyKUIM MoKET npUBeCTN K NopaxHeNIO
3JIeKTPuYeCKIM TOKOM, BO3HKnHOBeHIO NOxapa
IN/InI pOnyuHEnIO TjKJeIOI TpaBMbl.
He 3apjkaTe n He IcnoJb3yUte aKKymyIaTOp BO B3pbIOoNaChOn aTMocOpe, HApnMpE, B npCytCTBnJIeKo BOCpIaMeHraUxxCr KndKOCTe, ra3OB nII nbIIn. Pnp yCTaHOBKe nIN n3BneeyHn Ka6eJa 3apJdKn n3 aKKymyIaTOpa nbIb nIN ra3bl MOry T BOCpIaMeHHTbcra.
- HnKOrda He npImeHnTe CnIy npu yCTaHOBKe Ka6JIaB aKKymJrTOp NnN aKKymJrTOpa B INCTpymeHT. HnKOIM o6pa30m He BuOn3MeHnTe aKKymJrTOp - aKKymJrTOp MOKeT pACKoJrTcB, YTO npNBedET K NOJyuEHIO TjXeIoN TeJeCHOI TpaBMbl.
He 6pb3raIte n He norpykaTe B Body nn npyrne KNDKoCTn.
He xpaHnTe n He nCNoB3yIe TnHCTpyMeHT n aKKymJrTOp B MeCTax, B KOTOpbIX TeMnepaTypa MoKeT DoCTnUb IINI INpeBbICNTb 40^ (HaNPmEp, NOI HApYKbIMn HaBeCaMN IINI BVHTPN MeTaJIInuecknx KOHCTpyKcN BJeTHeE Bpem).ДЯ OecneueHnA DInTEbHO r Cpoka Cnyk6bl aKKymJrTOpOB XpaHnTe aKKymJrTOpBI B CyXOM pOxJaHOM McTe.
PpmeHHe: He y6npaTe Ha xpaHHe nHCTpyMeTbC YcTaHOBnEHbIMn aKKyMnyTAOpAMn, eCIN BbIKIOuATeNb INHCTpyMeHTa 3a6NOKnPOBaH BO BKIOUeHHOM NIOJOKeHN. Hn B Koem cIyae He nbTaIaTEcb 3a6NOKnPOBaTb KypKOBbl NyCKOBoB bIKIOuATeNB BaHaTOM COCTOHN!
He cKuraiTe aKKymyIaTOp, daXe ecIn OH cnIbHo noBpeKdEHN nnnoNHOCTbIO n3HOWeH. AKKymyIaTOp B orHe MoKeT B3OpBaTbCra. Ipn ropeHn IOHHo-NTneBbIX aKKymyIaTOpOB BblJeJIaOTcR TOKCNuHbIe napbl N acTnCbI.
- EcIn coIepKIMoe aKKyMylrTopa nonaLo Ha KOxy, HeMeIeHNO npOMoTe nopaxEHHbI yUacTOK BODo CMrKIMMbINOM. Ecnn aKKyMylrTopHa JNdkOCTb nonanaB rna3, nPOMbIAuTE OTKpblB Ira3 B TeueHne 15 mHyT, noka He nCye3Het pa3dpaxeHne. EcIn Heo6xOIMO 6paTITbcra 3a MediuHCKoN NOMoubIO, MeIKOB CNeDyET NOCTABUTb B IN3BeCTHOCTb, YTO aKKyMylrTopHbI 3JeKTPoJNT COCTOHT N3 Cmecn KNDKOrO opraHnueckoro KapboHata N CoJe NtTna.
CoepKIMoe OTKpbITbIX 3JIeMeHTOB aKKymyIaTOPa MoKeT BbIbIBaTb pa3dpaXeHne opraHOB DbIXaHn. O6ecneYbTe npTuTOK CBexero BO3dyxa.Ecnn CmNTombl coxpaHIOrTa, 6oPaTntEcB 3a MeiunHCKOJ NOMOsbIO.

BHHMaHHe:OnaChOcTbIOnyuYeHnOxOra. AkKymyIaTOPHaJXnIDKOCTbMOKeT BOCIIaMeHHTbcPnIPOJaAHnNCKpbI NnI IJIaMeHn.

BHMHHe:OnaCHOCTb BO3NKNHOBeHnnoKapA. Hn B KOem Cnyae He nbTaItecb pa3o6paTb aKKymyIATop.He nCNoB3yIe n He 3apJkaIte aKKymyIATop c TpeCHyBwIM nn NOBpeXdEHHbIM KOpynCOM.He pa36uBaIte,He 6pocaiTe n He IomaiTe aKKymyIATop.He nCNoB3yIe aKKymyIATopbl nn 3apJdHbIe yCTPOIcTBa,KOTOpblie NODBeprncb BO3deIcTBIO pe3kOro yDapa,yDapa npi naDeHN,nonaII IOd TjXkJIbI npedmet nn 6blIN NOBpeXdEhbl KaKIM-Im6O dpYfM 06pa3OM (HaNPmEp,npOTKHytbl rBO3dEm,
nonaIIIOJ yIap MOIOTka IIN IOI NOHOr).
IOBpeXdEHHbIE aKKyMMyJIaTOpBi DOJXHbI
BO3BpaAaTBcR B cepBnCHbI cEHTp Ha nepepa60TKy.
PekomeHdaunno xpaheHIO
- ONTMaJIbHbIM MeCTOM JIЯ XpaHeHЯ JBJIeTcXOJIOHoe IN cyXoe MeCTO, BdJIIN OT npRmblx CONHeYbIX Lyuei N ICTOUYHKOB IV36blTOUHOrTeIIJa IIIN XOJODa.
- Дя обесенья долтого срoka слжбы akymларов ри дintelbHOM xpaHeHn pekomehdyeTcay y6npaTb NOHocTbO 3apJxKeHHbIe akymларobbl Cxyoe npoxlaHoe MecTo BdaIIN OT 3apJHOrO yCTpoIcTBa.
PpmeaHne: He y6npaTe Ha xpaHHe nOJIHOCTbI pa3pJKeHHble aKKymyIaTOpbl. Ipepe nCnOJIb3OBAHne aKKymyIaTOp notpe6yeTc3apAINb.
3HaK RBRC
3HaR RBRC (Kopnpaun no nepepa60Tke nepe3apkaembix aKKymyTophix 6aTapei) Ha HKeJIb-KaDMNeBbIX, HKeJIb-MeTaII-ΓIepnDhIX INN

HNOHO-JNTueBbIX aKkyMnyIopax 6o3Haayet, YTO CTOnMOCTb nepepa60TKn daHHbIX aKKyMnyIaTOPOB NO OKOHaHN INx cpoKa cnJX6bl yKe OJIaueHa BLACK+DECKER. B HeKOToPbIX MeCTAX Bb6poc OTPa6OtaHHbIX HIKeJIb-KaDMneBbIX, HNIKeJIb-MeTaN-ΓnDprNDbIX ININ IOHO-JNTueBbIX aKKyMnyIaTOPOB B MycOpHbIe KOHTeHepbI ININ Ha MYHNiUNaNbHbIX MycOpHbIX CBaJIkax ABIIaTeCra HE3aKOHNbIM, nporpamma Call 2 Recycle ppeclTabIeT co6oJ eKOJOrnueckn 6e3onacHyu anbTePeHATnBy.
Call 2 Recycle, Inc., npn coTpudHnueCTBe c BLACK+DECKER
n dpyrmmn noIb30BaTeIaMn aKKymyIaTOPOB, pa3pa6oTana
B CIIA n KaHaJe nporpamMy no o6ecneueHIO c6opa
OTpa6OtaHHbIX HNKeJIb-KaDMnEBBIX,
HNKeJIb-MeTAJI-ΓIaPnIDhBX IIN NOHO-JIITNBEbbIX
aKKymyIaTOPOB. Bo3BpaUaJg OTPa6OtaHHbIe
HNKeJIb-KaDMnEBBie, HNKeJIb-MeTAJI-ΓIaPnIDhIE NIN
NOHHo-JIITNcEBbie aKKymyIaTOpbl B ABTOp3OBAHHbI
cepBncHBi YeHTP BLACK+DECKER nIN B 6JnxKaIshNI
MarazIn Ha nepepa6OtKy, Bbl nomoraete 3aunTntb NaSy
OKpykaIoYIO cpeNy i c6epey npnpOdHbIe pecypcbI.
NHopmauio no yTuINl3aunn OTPa6OtaHHbIX
aKKymyIaTOPOB Bbl TaKke MoXeTe nOlyuNTb B 6JnxKaIshEM
ZeHTpe No nepepa6OtKe. RBRC abJraTcra
3aperncptpnpoBaHHo ToproBoi MapKO Call 2 Recycle, Inc.
Baxkhble npmmeuHnK 3apAKe
- Прдлкпьнсрok сужби И ВсокаяnpoIN3BOДNTeBJHOCThb aKKyMnyIaTopa 6ydeTdoCTnHyTa,
ecn 3apjkaTb aKKymyIaTOp npu TempePaType BO3dyxa 18^ - 24^ .HE 3APJKAITe aKKymyIaTOp npu TempePaType Hnke +4,5^ nnn Bblse +40,5^ .BaxHo co6JIOnaTb daHHOe ycNoBne,3To npedotbpaTn cepbE3HbIe NOBpeXJeHna aKKymyIaTopa.
- EcIn aKKymyIaTOp He 3apJxJaTcD JOnJHbIM O6pa3OM:
a. Поверпу pa6оуee сoctянe wTeNCelbHoi po3eTKn, поКлючИВ K HeN LaMny NIn NIO6OДpyroI prn6op;
b. Y6eINTEcb, yTo po3eTka coeINHeHa C BbIKIOUaTeJIEM OCBeIeHnI N OTKIIIOuAeTc npN BbIKIOUeHN CBeTa;
c.Перенье 6лOK ппаньи nakkymулгОВ помшени, Гд Tempepa typa Bo3dya doctnraet 18°- 24°C;
d. Ecnn 3apraKa BcE Xe He npOnCxOAnT DoJXHbIM o6pa3OM, OTHeCnTe INHCTpyMeHT, aKKyMylAToP n USB-Ka6enb B aBtOpn30BaHHbI cepBnCHbI ueHTp. - AkkymyIaTOp CneJeTy eNo3apJxKaTb, ecn OH He oBeCneuBaet DoCTaTOUHyo MOUHocTb dJa pa6Ot, KOtOpbIe paHee BbINOnHJIncs bIerKo N 6bICTpo. HE ICPOJIb3YIte AkkymyIaTOp B daHNbIX ycNobIaX. CneIyIte npOeDype 3apJxKn. Bbl TaKke MoKeTe No3apJxKaTb qAcTuHNo IcNoIb3OBaHHbIe aKKymyIaTOpBb6e3 KaKnx-JIn60 HeraTNbHbIX PocIeDCTBn DnA AkkymyIaTOpOB.
Ipebo3ka

BHHMaHHe:OnaCHOCTb BO3HNKHOBeHnnoXapa.PnpnepeBO3Ke nIN XpaHeHnnaKKyMnyTOpOB CNeDInTe,HTo6bl
MeTaJIInueckne IpeDMeTbI He KacaJIncb KJIeMM
akymyITopa.Hanpimep,He nOmeuaTe aKymyITop B
KapMaHbI nepeDnHa KIN OJekDbI, B RAUNK DIA
HNCTpyMeHTOB,YemDaHbIC DOONHITbHBIMN
PnHaJIeXHOCTAMN,B BbIDBxHbIE Me6eNbHbIE RAUKN IN
dpyrue NOIO6hble MeCTa, rDe MOrYT HaxODNTCBcRABO3DN,
BNHTb,KIOUCh IN p.Bo BPemA nepeBO3Kn
aKymyITopoB cyuEcTByeT pNCK BO3RopAHNA npi
CnyauHOM KOHTAKTE KLeMM aKymyITopa C
TOKOpBO4aUMM MaTePnaIamn,TakIMN KaK
KNOCh,MOHeTbI,pyHbIE NHCTpyMeHTbI IN p.B
IPrabInax nepeBO3Kn OnacbIX rpy3OB (HMR) CIJA
faktnueckn 3anpeaIoTcK Kommepueckne nepeBO3Kn
aKymyITopoB IIN Ha CamOnetax B pyHOn KlaDi,ecNI
ONH He 3aunieHbI DoJXHbIM O6pa3OM OT KOPOTKINX
3AmkAHNI.PnPi nepeBO3Ke OTdeJIbHbIX aKymyITopoB
y6eINTecb, YTO KJIeMMbl aKymyITopa 3aunieHbI IN
HaJeXHO N3OJIPOBaHbI OT JIO6bIX MaTePnaIOB, KOHTAKT C
KOTOpBMn CNOCo6eH BbIBBaTb KOpOTKoe 3AmbiKaHne.

Ppeynpexdne: Ecnn aKKymyIaTOp He yCTaHOBHeB 3JeKTPoINHCTpyMeHT,doJXHa NCNoJIb3OBAtbcr KpbIka Ha Klemmbi aKKymyIaTopa GoPak.KpbIka Ha Klemmbi
akymyITopaOTnHCTpyMeHTa.ipeud yctaHOBkoI aKKymyITopa B nHCTpyMeHT cHmUte KpbIiKy.
IpaBnla AmePukaHcKoRocyapCTBeHHoN KOMnCCmNo KOMMyHnKaZmR (FCC) nA BCEx uΦpOBblx yCTpoiCTB
DaHHoe yCTpoiCtBO COOTBETCTBye Tpe6oBAHnM pa3dena 15 npaBn FCC, a TaKke Tpe6oBAHnM npomblJeHHbIX RSS-CTaHApTOB KaHaDbI dIra HeNlueH3npyEmoro o6OpyOBAHn. 3KcNpyaTauny yCTpoiCTBa 3abNCIT OT cNeDyUoXx DByx ycNoBn:
1.ДаHHoe yCtpoIcTBO He MOXeT RAJIaTBcR npUHHO BpeHbIX NOMEX;
2. KomnoheTbI yCTpoNCTBa DoJXHbI DoYCKaTb BCE npINHMaemble NOMEXn, BKNIOyAfram NOMEXn, KOTOpbIe MOrTy Bbl3BaTb HApUWeHne pa60Tb yCTpoNCTBa.
IIO6bIe N3MeHEnH NIN MoNΦNkauN, He ODo6peHHbIE CTOpOH, OTBeTCTBeHHoN 3a COOTBeTCTBnE, MOrY T aHHyInpOBAtB PpaBO NOnb3OBaTeJI Ha EKcPlyatauio daHHoro o6OpyDobAHn.
Данhoe obopydOBaHne ycneuNo npoShno npOBepKy Ha COOTBETCTBnE KlaCCy B uΦpObblx yctpoiCTB corNaCHO qactn 15 IpaBnFCC.3Tn orpaHnueHn paCCHTaHbHa o6ecneueHne 3auNTbI OT BpeDhblx NOMex npn 3KcPnyatauNn OBpyOBAHn B xNlblx NOMeUHnx.
DaHoe obopydOBaHne co3daet, nCNOb3yeT n MOxET N3NyAaTB paINOBOJNbI, n EcNn OHO yCTaHOBJeHO NN
3KcPnyATnpyETcA hapuSeHem IHCTpykui
IpOn3BOJntJIa, OHO MOKeT COzDABaTb NOMEx dJI
CpeCTB paINOcBraN. Ondako HEnb3ra rapaHTnpoBaTb, YTO He NOMEXn HE BO3HNKHyT B KaKdOM KOHKpeTHOM clyuae.
EcIn daHoe obopydOBaHne 6yDet COzDABaTb NOMEXn, BpeHbIe Ira paINO- NNI TeneBn3IOHOrO npieMa,
HaJIuYe KOTopblx MoXHo ONpeDeJIITb, BKIIouaY n
BbIKluay aYCTPOiCTBO, TO NOLb3OBAteJIIO CNEdyET npINrTaMepblIy UcTpaHeHn A TIX NOMex ODNIM I3 npIBeDEHHbIX Hnke cnOCoOB:
- I3MeHntb NOLOKeHne nnOpNEHTaCnIO npEeMHoAHTEHHbl.
- YBeJIuHTb paCCTOaHHe MeJy O6OpyIOBaHHeM I npHHMaIOUIM yCTPOIcTBOM.
- POnKlnOHTb O6OpUdoBaHne K po3eTke cenn, OTnUHOIOT Toi, K KOToPOI NpOKJIouEHO npIeMHOyeCTPOICTBO.
- 06patntbcra3a nomoobK CBOemy noctabunky nn K cnepuaJIncTAM B o6naTn paIIO n TeJeBndeHn.
CANICES-3(B)/NMB-3(B)
Haayano pa6oTbi
- Мнкpo-USB пот (6) на akкултоpe GoPak 2-B-1 BLACK+DECKER претиаизачен только зараздк GoPak.
PYCCKN
(IIepeboD c opuHnHaI uHcTpyKmU)
- USB A-nopT (10) Ha aKKymyItope GoPak 2-B-1 BLACK+DECKER npeHa3Hauen ToIbKO Inra NITaHINr USB-yCTpoiCTB (MO6NlBbIX TeIefoHOB / PnaHWeTOB/ MP3-nIeepOB /nepeHOChbIX 3JIeKtpueeCKHX yCTPOICTB /IrPOBbIX yCTPOICTB n np.).
Pnc.B
3apka aKKymyTopa GoPak 2-B-1 BLACK+DECKER (Pnc. C,D)

BHHMaHHe: HnKOrJa He nbItaTecb 3apKaTa bakymyIaTOp GoPak 2-B-1 BLACK+DECKER, nCnoJb3y KneMMbl dny nHcTpymeHa GoPak.

BHMaHne: BbI dONxHbI 3apJxKaTb aKKyMnyTOp GoPak 2-B-1 BLACK+DECKER TOnbKo c UcNoIb3ObaHnem Oo6peHHbIX UL nIu CSA USB-noptOB, paccuHaHHbx Ha 3apAky BbICOKonpOIN3BOAnTeJIbHbIX yCtpoiCTB. GoPak MOXET NOTpe6JIbTB 6OJIbWe TOka NO CpABHeHIO C 06bUHbIMN USB-noptAm. Ecnn DnIg 3apAdkn GoPak NcNoJIb3YeTC KOMNbIOTep, Ha KOMNbIbIepe MOXET OTObpaKaTbcra CoO6ueHne O6 Own6ke.
-
BctaBte Mnkpo-USB Ka6eJb (BXoNT B KOMnJIeKT NOCTaBKn) (7) B 6Iok NITaHn USB (He BXoNT B KOMnJIeKT NOCTaBKn).
-
BctaBbTe MmKpo-USB wTeKepe3apAnHoro Ka6eNBA MmKpo-USB npT (6) Ha GoPak.
-
B npoecce 3apnKn GoPak 6ydyr ropeb CBETOnNoHbIe INHdkaTOpbl ypOBn 3apnKn. Topnue CBETOnNoHbIe INHdkaTOpbl OTO6paKaOT COCTOHNHe 3apda aKKymnytopa.Miraouni CBETOnNoHbI INHdkaTOp o603Haayet npoecc 3apnKn KaJDo rCleDyUoJero ypOBn.KhONKa COCTOHNr 3apda (8) OTKlnOuaetc ToNbKO BO BpeM 3apnKn.
-
3aBepWeHHe 3apAKn O6O3HaayaeTcB bIKIOueHnEM Bcex YeTbIeX CBeToOnIOhBix INDnKATOpOB. Ppi Haxatm Ha KHOkY COCToHn3apra (8) 3aTOpTcB BCE YeTbIpe CBeToOnIOhBix INDnKaTopa. AkymyJrTO pOHOCbIO 3apAKeH, n ERO MOxHO INCNoIb3OBAtB c IHCTpyMeHTOM INN OCTaBtB B 3apAnHom yCTpOInCTBE.
-
N0 BO3MOXHOCTN 3apJxJaTe pa3pJxKeHHbIe aKKymyJIaTOpbI cpa3y nOcNe IcNoJIb3OBaHn. Cpok cnJx6bl aKKymyJIaTOpa, codepKxABWeROcB pa3pJxEHOM COCTOHN, 3HaHTeNbHO yMeHbJaeTcR.
UTo6bI npOaNtB cPoK CnyX6bI aKKMyJnTOpA, CneJeTe, UTo6bI aKKMyJnTOp He pa3pRJaCLr NOnHOCTbIO. PeKOMeHNyTeC NO3apRJaTb aKKMyJnTOp NocLe KaKDoTO NcNoJIb3OBAHn INHCTpyMeHTa.
Pnc.C

PnmeHne: INdkaTOp COCTOHN 3apraJa RBnETCn INdkaTOpOM TOIbKO IINbUpOBHr 3apraJa, OCTaBWeOcR B aKKymlaTope. DaHHbI INdkaTOp He ABnETCn INdkaTOpOM yHKUHOHaNbHbIX BO3MOxHOCTeN IHCTpyMeHTa, 3aBNCaUNX OT KOMNOHETOB, TEMpePaTypbl N DeiCTBNI KOHeHOro NOnb3OBaTeJI.
PpmeHne: Ecnn aKKymJrTop He yCTaHOBJeH B 3JIeKtPOINHCTpymEt, DOnJxHa NcIOb3ObaTbCk KpbIka Ha KJIeMMbl aKKymJrTopa GoPaK. KpbIka Ha KJIeMMbl dONJxHa INcIOJb3OBAbTCR pRn KaXdOM OTCoEINHeHH aKKymJrTopa OT INHCTpymEtA. IpeD yCTaHOBKO aKKymJrTopa B INHCTpymEt CHIMMtE KpbIkuy.
oxpaHnte daHHbIe nHCTpyKcun dIЯ nocJeDyUoJero o6paueHn
CocTAbHbIe yactn (Pnc. A)

BHMaHHe: Hn B Koem cnyae He MoNfNucpyuTe 3NeKTPoHCTpymeHT Nkayyo-Ni6o erO deTalb. 3To MOxET PnpBeCTN K nOlyeHIO TpaBMbl Nn NOBpeJKeHIO nHCTpymeHTa. C6opka n perynilpoBka

BHMaHne:IJIa CHNKeHn pIcKa IOnyueHn TJeIOI TpaBMbl, BbIKIOaJIe UHCTpymeHT N3BLeKaITe aKKyMylAToP nepe KaJdoI OepauepeperynipOBKn nn CHaTHeM/YcTaHOBKO pINHaJIeXKHOCTe Nn HacAdOK. HenpeHaMepeHHb 3aynck IHCTpyMeHTa MoKet PpIBecT K IOnyueHIO TpaBMbl.
Kpbiuka Ha KJIeMMbI INHCTpyMeHTa GoPak
KpbIkaHa KJIeMMbI (9)doJXHa NcNoJb3OBA TbCB npn KaKdOM OTCoEduHeHn AKKyMyJrTopa OT INCTpyMeHTa. Ipeep yctahOBKO aKKyMylrTopa B INCTpyMeHT CHMNITE KpbIky, kaN3o6paJxHo Ha Pucynke E.
Pnc.E
3Kcnnyataun
BhimaHne: nna CHnHexnna pncKa nonyeHnna TjXeNoi TpaMbbl, BbIKIOuayte NHCtpymEt N 3BLeKaIte aKkyMylTop nepeed kaoDoon onepaueNe peyInpOBKn nn ChrTHeM/yCTaHOBKO npHaadJeXHoTe nn
HacaioK. HenpeHaemepeHHb3 3aynck uHCTpyMeHTa MoKeT npBecTe K NOJyEHHIO TpaBMbl.
YcTaHOBKa N I3BLeueHne aKKymyIaTopa GoPak 2-B-1 B 3JIeKTpOuHCTpyment (Pnc. F)

BhimaHne: Peped yctaHObKO aKKymyIaTopa GoPak 2-B-1 BLACK+DECKER B COBMeCTnMbI nHCTpymENT n3BNeKInTe n3 aKKymyIaTopa BCE USB-Ka6e#.
- ChmmtcakkymnyTopa GoPak 2-B-1 BLACK+DECKER KpbikyHa KJIeMMblДЯИHCTpyMeHTa.
2.уTo6bI yCTaHOBt bakymyIaTOp Ha coBmecTUMOM 3JIeKtpoHnCTpyMeHTe GoPak 12B MAX*,coBmecTInTe KJIeMMb I OCHOBaHn INCTpyMeHTa C npope3aMn dJa KJIeMM Ha akKymyIaTope (4), kAk n3o6paJxeHo Ha Pnc.F.
PpmeHne: INdkaTOp COCTOHN3 3apra 6ydet paBepHyT B CTOPOHY 3aHHe yactn INcTpymeHTa, a USB-nopT 6ydet o6paueH B CTOPOHY nepeHne yactn INcTpymeHTa. CTePKa Ha aKKyMylTope COBMeCTNTc8 co cTePKoHa INcTpymeHTe, KaK n3o6paKeHo Ha Pnc.F.
- BdInbTe aKKymJrTop GoPak 2-B-1 BLACK+DECKER B OCHOBaHne nHCTpyMeHa. CTrpeNka (13) Ha aKKymJrTope COBmecTnTcR co CTrpeNkoi (14) Ha KOpnyce nHCTpyMeHa. Ipeep nCnoIb3ObaHnem INHCTpyMeHa y6eDnTEcb, yTO aKKymJrTop nONHOCTbIO BOwEIN B INHCTpyMeHTn 3aΦNKcnpoBaJncra Ha MeCTe.
4.ДЯи3BleueHnAkkymyIaTopaGoPak2-B-1 BLACK+DECKER n3 nHcTpymeHaJxMIte HaДbe OTnpaIoUne KhoNk (5),pacnoLoKeHHbIe Ha nHcTpymeTe, nNotHyB, n3BLeKeHTe aKKymyIaTOp GoPak 2-B-1BLACK+DECKER n3 nHcTpymeHTa.
PnmeaHne:USB-nOpTbAkkymyIaTopaGoPak 2-B-1 BLACK+DECKER He aKTHBbI npHaXaTOM BbIKIOuAtene.
IcnoIb3OBAHne akKymyJtopa GoPak 2-B-1 dЯЗapяdkn USB-устоь (Pnc. G)
BCTaBbTe OdUn H KOHeU USB A-Ka6eJa (11) B aKkymyIaTOp GoPaK 2-B-1 BLACK+DECKER (10), a pyroJ KoHeU Ka6eJa B Odo6peHoe UL nna CSA COBMeCTnMoe yctpoiCTBO (MOuNbHbI TelefoH /PiAnHsT/ MP3-nIeep /nepeHoCHO eJIeKtpnueckoe yctpoiCTBO /IrpoBoe yctpoiCTBO n np.). 3apJaKa NaHcTcA aBTOMaTnueckn.
Pnc.G
Pa6ota
AkkymyIaTOp GoPak 2-B-1 BLACK+DECKER npedHa3HaueH dI IITAHN COBMeCTmblx IHCTpyMeHTOB BLACK+DECKER 12 B GoPak MAX* nIIN pNTAHN/3aprKn Mo6nIbHbIX yCTpoiCTB. KOMNaKTbI, TOHKN KOPNyc aKKymyIaTOpa pa3pa6OtaH dI I NOPTaTHBOCTn.
GoPak 3apnHbTOK: Do2,4 A
GoPak BbIXoHaH MaOuHocTb: Do 2,4 A*
**ФakTnueckaCKOpocTbTOKa3apJkN3aBNCNTOT 6Ioka NITaHnR (HE BXoINT B KOMJIeKT IOCTaBKN).
**ФaKTnuecka BbIXoHna MOUHOCTb 3aBNCNT OT yCTPOIcTBa.
USB-nopt
Akkymytnop GoPak 2-B-1 BLACK+DECKER o60pydoan USB-nopTom Tnna A. OH o6ecneuBaet o6uTOK Do 2,4 amnp.
PpmeHHe: Tok, noCTynaIOuI Hn Ha yCTpoNCTBO, 3aBNCIT OT Camoro yCTPOINCTBa N BbIOpaHHORO nONb3OBaTeIeM Ka6eIra.

BHMaHHe:IpnNCNoJb3OBAHn aKKymyIaTopa GoPak 2-B-1 BLACK+DECKER nIHTAHN/3apAdkn BaWero yCTpoiCtBa y6eINTEcb,TO KpbIka Ha KJIeMMbl HaTea n HADEXHO 3aΦNKcnpoBaHa.
- YctaHOBnte Ha KJIemMbI INHCTpyMeHTa KpbliKy.
3apraKa yctpoiCtBa yepe3 USB haHetaCTa ABTOMaTnueckn npn noKnloeHnn yctpoiCTBa.
-ДЯOTKINUOeHnO rTOcEINHnTe USB-yCTpoIcTBO.
IpaBnIbHoe noIOxKeHne pyK BO BpeMa pa6Otbl (Pnc.H)

BHMaHne:IyMeHbWeHnPnCKaNoJyHeHn TjKeIOnTpaBmbl,BCERDA npabunbHo ydepXnBaIte 3JeKTponHCTpyMeHT,KaK nokaHOHa pncyHke.

BHMaHne:IyMeHbWeHnpyCKaNoJyHeHn TaKJIOIpaBMbBCERDAHaJeXHo yepKBAte HCTpyMeHT,peDynpExdA BHe3aHbIe c60N B pa6Ote.
PpabnIbHoe noLoXeHne pyK BO BpeMa pa6oTb: OHOpykoynepxnbAte oChOBHyO pyKoRTky (2).
IpimueaHne:BoBpeMaNCnObl30BaHnaNCHtpymeHa He KnaDInTe naIbciHa nnNofoBaIbHyIO NOoWBy.Bednte 1nnfMaunHy no 6pa6aTbIbAemoi NobepxHoctn DnHHbIMn WnPOKMm UTrpXAmn, No3BOJra eN DeNaTb CBOIO pa6ToY.JIa nnfoBaHna, NOnIpOBKn IIN 3aUnCTKN IOCTaTOHO JERKORO daBJeHnO, OKa3bIBaEMOrO Ha IHCTpyMeHT. Ype3MePHoe DaBJeHne 3aMeDNIT INHCTpyMeHT n PnBBeTe K yxydUHeHIO pe3yIbTaTOB. PeryIarpho npOBepaIte CBOIO pa6ToY - INHCTpyMeHT CNOCo6EH K 6bICTpOMy ydaJIeHNIO MaTePuaJa.

BHMaHHe:OnaCHOCTb nopaKeHHaJIeKTPnueckm TokOM.HI npi KaKnx ycNoBHX DaHHbI pOyKT He DoJKeH uCNoB3OBaTbcB6NJ3N BOdbl.

PpeynpeKdneH:Jnra CHNKeHn pncKa nOlyeHn TJeKJIoT PpaBmbl, BbIKIouaHTe INCTpymEn IINBLeKaITe aKKyMylrTop nepeK kAnOn Opeaue Ne peryuropOBKn nn Chrtnem/YcTaHOBko PrnHaDNeXHocTe Nn HaCaDoK.
BkIIOueHne N BbIKIOueHne
- YTo6bl BkJIIOHTb INHCTpyMeH, HaxMMTe Ha KHOKNy NycKOBOrO BbIKJIIOHaTeTl (1), CTOpOHa «I».
- YTo6bI BbIKIOUHTb IHCTpymeH, HaxMnte Ha KHONKy nyckoBOrO BbIKIOUaTeTn (1), CTopoHa «O».
Kpenenne Hne nnfoBaJbHOn 6ymn (Pnc.1)

BHMaHne: Pn KpePHeHn Nn ChTnN nnΦOBaIbHo6yMaRn n3BNeKaIte n3 nHCTpyMeHTa aKKymJrTOp.
1.ДерхиTe UNHCTpyMeHT WInΦOBaNbHOI NOOWBIOB BBePx.
2. YctaHOBnTe Ha IINFOBaIbHOH NOIOWBe IINFOBaIbHyIO 6yMaIy (12) 3epHnCToN CTOpHOH BBepx.
Pobopot wnnfoBaHno nooBbl (Pnc. J)

BhMaHHe: Pn yCTaHOBe nnn CHaTn nnfoBaIbHOI NOoWbI N3BNeKaIte n3 HcTpymeHTa aKKyMnyTop.
Ecn yroJOK n3Hocnnc, uNnObaIbHyIO noDowBy (3) MoXHO NOBepHyTb.
1.Деркnte INHCTpymEnT WInΦOBaJIbHOI NOIOUBOI BBepx.
2. OTBnHTnte BnHT, yepKnaBOuui nJINoBaIbHyIO NOOswBy Ha uinΦMaunHe.
3. IObepHnTe ⅢnΦOBaNbHyIO NOoWBy Heu3HOweHHbIM yronkOM BnepEi. Y6eIntecb, qTO WnΦOBaNbHaJ nooWBa npabInbHo yCTaHOBHeHa.
4.3aKcnpyTe ⅢnfoBaIbHyIO NOOswBy, BCTABNBHTN3aTAYBero.
Pnc.J
PekomeHdaunnoonTMmaJbHomy nCNoJb3OBAHnIO

Bo3MOxHbIe HencpapBHOCTn I cnoCobI INx yctpaHeHn
- GoPak He netaet nIe He 3apjkae TaWe yctpoCTBO.
a. Pn nonbItke nCnoB3OBAHna USB 6nXaMnK KHOJIKe COCToHn3 3apJa CBToDIOHbN HnIKaTOP NaHET MmRaTb KpaChbIM CBeTOM.
GoPak oueHb ropn nn OueHb xoIoNbI. DoKntecb HargpeBaHHn nn OCTbIBaHHn GoPak. - GoPak He NITaet BaI COBMeCTNMBI INHCTpyMeHT.
3apnnte akkymyIaTOp.Ecn n CBeToNDnHbIn HndkaTOp He 3arOpNTc,6paTnTeCb K n.1 pa3dena «Bo3MOxHbIe HncnPabHocTn n cnOco6bl nx yCTpaHeHnA
PemOH
AkkymyIaTOp GoPak 2-B-1 BLACK+DECKER He tpe6yeTe cepBnCHoro 06cnyKuBaHna.
BHMaHHe: B cIeJx o6ecneueHn BE3OPACHOCTn I OJIIOBEUHOCTN B nCnoJIb3OBaHn npOdyKta peMOHT, TexHnueckoe 6cIyXuBaHne n peryInpOBKa (BKIOUaY oCMOTp n 3aMeHy yToIbHbIX uTeTOK) DOJXHbI npON3BOINbcra TOnbKO B npON3BOIDCTBeHHbIX cepBnCHbIX ceHTpax BLACK+DECKER nnn ABTopn3OBaHHbIX cepBnCHbIX ceHTpax BLACK+DECKER. Bcerda nCnoJIb3yIte CmEHhbIe DeTaII, nIeHTNuHbIe opUNHaJIbHbIM.
TexHmuecknex XapaKTepeNCTnKN
He pekomeHdyctbca BNUKHOyBaTHu NlifyBaHHa fap6n,ka MiCTNTb CBNHeUbOCKINbKN CKNaHO KOHTPOIIOBAtu 3a6pydneHn CBNHcEm nII. Han6iNbuy He6e3Neky CBNHeCb CTAHOBtB dIa DItei I BarITHNX KIHOK.
Texhika 6e3neku
-Дитам i BarITHMЖИКAM3a6OpOHЯTebC3axOДNTu y 30Hy BnKoHaHHpo6iT3i3HHTaФap6n axdo 3akihueHH np6npaHH.
- Yci oc6n, kki 3axo7y b 30Hy BnuKoHaHH po6it, NOBHHI OJraTNI NINO3axuChi MaCKN upecnipapop. IjIbTp NINO3axuchoi MaCKN upecnipapota cnid 3amHrTI NODH, a TAKOX JkO Ni d cac KOpNCtYBaHHaMACKOIO BiDyBaETBCs yCKNaADHeHHdINXaHH.
-Приміка:Слід КористуВатпсгТыБКИ ПИLOЗАХСHМIM MackamN,прідАнмИ ДЯ ВИКОРИстань вуMOвax ПИNY I BИнapіВ Фар6,яki МICTЯТь CBИНЕц.3ВИЧАнI MaJIЯрHi MACKи He 3a6e3neuYIOb TaKOrO 3axNCTy. 3BepHITbCSdo MIcEBOrO pnoDauBzI ININBIduAynbHnx 3acO6iB 3axNCTy NO BIDNOBIDHy Mackу 3 ceptnФikatOM NIOSH.
B30HI npOBeHnHpo6IT 3a6OpOHcTBcI CTN,NTu Ta naHTu,6o CE MoKe Iprn3BecTNoOTpAnpHnH B opraHizM qactok nny.Ipeed TUM,AK NOUATn ICTN, NTu CH naHTu,npaCIBHK NOBHeH NOUCTHTu OJrTa yMNTsc.B p6Ooi 30Hi He peKOMeHdycBc4 3aIIuATn Iky,NTBO CH npEpmETN,NOB'3aHI 3 naIHHM,6o Ha HNX MoKe ocIdaTn Nl.
EkonoriuHa 6e3neKa
- Φap6y Heo6xioHO 3HIMaTH TaKIM YINOM, IO6 3MeHUNTIO MIHIMy KINbKiCTb PnIy, IO yTBOPIOCTbCra.
-Длянки,Haякnx6уde BnKOHyBaTncb ONEpaiz 3HRTIaP6n,NOBHHI 6yTN ⅢJIbHO 6OroPoJKeHiПlaCTMaOBIMN JIcTAmTOBUnHO4MM. - ⅢπiφyBaHnHeo6xIDHO BnKohyBaTn TaKIM YINOM, οo6 3meHUnTI nOpaHnR nIy φap6n 3a Mexi pO6ooyi dIyHKn.
YnueHHa yTuNlaiaia
- Yci nobepxhi B po6oii 30i noTpi6HNo 5OeHHO uCTHTN PnIOOCOM Ta MNTn npOTARom PpOBeEHn p6it 3i wIyBaHHa. MiKu nnococB Heo6XiHo peryraPHO mHrtn.
- Odnopazobi nnozoaxnchi KOCTOMn NOTpi6HO 36napTa yTuNl3yBaTN pa30m i3 NNoM Ta iHWM CMITAM. Ix NOTpi6HO yNakyBaTN B uJInbHi MiKuTa yTuNl3yBaTN pa30m 3 iHWM CMTTAM. Pd Yac np6npaHH JaTI Ta BarITHI KINHe NOBHHHa6nXkATNCa DO 3OHn npoBeHn po6IT.
- Yci irpaawkn, Me6ni ta cTOnoBi npnlaDu, kki BnKOpNCTOBcy dItbMn, Npep nOdaIbShm BnKOpNCtAHHm NOTpi6Ho peteNbHO NOuCTNTN.
IodatkoBi iHCTpykui 3 Texhikn 6e3neKn

06epexho:3aBxDn BdaTne 3axnChi OKyIpyn.
Y kOCTi 3axnCHnx OKyIparIB 3a6OpOHETbcra
BVKOpNCTOByBaTN 3BnuaHni OKyIparn.Kpim TOro,
BYMOBX 3aINHeHO p6oOro Micu
KOPNCTUYTEcA 3axnCHO MACKOIO a6o
pecnipapToPOM. 3aBxDN BVKOpNCTOBuyTe IInwe
cepTnphiKOBaHe 3axnCHe CnopJKeHHa:
- 3axnct ouen ANSI Z87.1 (CAN/CSA Z94.3),
- 3axnCT Byx ANSI S12.6 (S3.19),
- 3axnt opraHIB dnxhaHH NIOSH/OSHA/MSHA.

06epexho:Пи,шуTBOPIOeTbCn iid yac shiФyBaHHa,3aunuHHeNHa,OBpO6Kn,CbepdInHH Ta iHUnx 6yDlBeJIbHnxPo6i,aki BnKOHuytbcra eIeKtpoiHCTpyMeHTOM,MOKeMiCTNTu XIMiHi peOvBuHn,Aki,3rIdHO 3aKOHIB WtAty KaIiΦOpHia, 3dATHi BnKlnKaTu paK,BpoJxehi nopOKu Ta iHwi reHetnuHia aHOMaII.ДeRkMn npKnaJaamu TAKNX xIMiUHnx peOvBuH n HaCTynHi:
CBINHeBbYCBINHeBnXap6ax;
KpncTajHn DIOKcN KpemHiO y cERJI, cEmeHTi Ta iHx6yDIBbHnx MaTepiJax;
- MII'k Ta xpom y ximiuHO o6po6neHnx nnomatepianax.
He6e3neka BnInBy 3a3HaueHx ximiuHx peOuHN 3aJexNtB BiD qacTOTn BnKOHaHH TaNX BnIDb po6it. 0o6 3MeHUnTn BnINB TaNX ximiuHx peOuHN, Heo6XiHo BVkoHyBaTN pO6OTn B npMiuEHHI, 0o Do6pe npOBiTpIOETbcR, Ta BnKOpNCTOByBaTN CXbaneHi 3ac06n 3axNCTy, taikpocipatOpn, po3po6NeHi cneuiabHO dJa fIbTaqii MkPocckOniHnx qactOK.
- YHnKaIte TpNbAIORO KOHTaKTy 3 NlOM,Яkn CTBOpIOETbCn iD yac WJIiOyBaHNr,3aUuIeHHN, 6bpo6Kn,CbepdInHH Ta iHUnx 6yDiBeJbHNx po6IT,0o BnKOHyOTbcra eJeKTPOIHCTpyMeHToM. Heo6xIDHO HaIgATn 3axNCn OJr Ta MNTu 3a6pydHeHi dINHKn 1WKipn BOIOO 3 MNOM. IOTpaIIAHn HnNy Do pota, Ouei,OCiDaHHHa WKIPy MoKe Pn3BecTn DO HAKONuEHn WkIDINBvX XIMiChNX peOBOH.

06epexHo: BnKOpNCtAHH IHCpymeHTy MoKe npn3BecTn Do CTBopeHH a6o NiHrTTa y NOiTPra Nnly, 30 3dAteH BnKlNkATn cepio3Hi Ta xPOHHi pecnPipatOPhi 3axBopIOBaHH Ta iHsi TpaBM. 3abXn Dn BnKOpNCTOByTe 3ac6n 3axNCTy OpraHIB dnxAHH Dnra 3axNCTy BiD nIpy, Rki CxbaneHi BiIDNOBIDHMn OpraHAM 3 OxopoHN npaqi. 3anO6iraTe NotpanJHHU qactok MaTepiany, 3o 6bO6JIeTBcHa Ha 6bluY i tINO.
06epeKHo:ПiДчacВNKOpNCTaHnH3aBxJN 3aCTOCOByIte 3acO6n 3axNCTy opraHIB Cnyx,zo BIDNoBiaJIoTB BmOram ANSI S12.6 (S3.19).3a DeRkX yMOB Ta TpNBaNocTi BVKnOpNCTaHH, Wym, CNpUHHHeHn cIM BnPo6OM, MoKe npu3BeCTn Do BTPaTn Cnyx.
Ybara: Akuo Bnip6 He BnKOpNCObyETbcra, NOMictb NOrO Ha 6ik Ha CTiKy rOpN3OHTaIbHy NOBepxHIO, 06 3anobirN Myo nepeKnDaHHIO a6o NaHIO. Deaki BnpO6n 3 MacNBHOIO akymyTAPHO 6atapeeEO 3daTHi CTOrN Ha Hi, ane B TAKOMy PNOJKeHH iX DyXe JeKo nepeKNHyTN.
BeHTnJIaIHi OTbOpn MoKyTb 3HaXoDITncb HaBnpOTn pYxOMnx YactH, TOMy ix NOTpi6HO yHnKaTu. BInbHn OJr, npKpacn YN DORE BOLOccs MOKyTB 6ytN 3aTgHyTI pYxOMmN enEmeHTamN. B pa3i KpaHbOiT notpe6n B BVKnOpNCtAHHI UHpya-NODOBKyBaVa 3a MexAmn PnIMiueHb, NOTpi6HO BVKnOpNCtOByBaTu TINbKN NOOBKyBaC, CneuiabHo npn3HaueHn Dn TaKOro BVKnOpNCtAHH.
HaKneiKaHa iHcTpymenti
HaKneKa Ha BaWOMy iHCTpyMeHTi MOKe MiCTNTn HAcTynHi CUMBOJI:

06epexho!I3HnHexHHpN3NKy TpaBMyBaHH onepaTOp NOBHeH npOHTaTu 1IO IHCTpyKciIO 3 ekCnlyataii.

3apnnpctpi npn3haeHH TINbKn dNBAKOpNCtAHy npmIeHHI.

YBaXHo npOHTaTe BCIO IHCTpyKUIO nepei BnKOpNCtAHm eNeKTPNHOro IHCTpyMeHaTa.
PonoxeHHKaOy 3 daToIO
Ha Kopnyci HApkyoBaHn KO3 DaTOIO, AKn TaKoX MICTHTb pIK BnroTOBJeHH.
Ppukla:
2017 XX JN
Pik BnroTOBneHHr
EneKtpnHa 6e3neKa

Baw 3apdHn npucpii Mae noDbiny iOJauio, i TOMy dpit 3a3emneHHa My He notpi6eH. 3aBXnn nepebipTe, o6 MepekeBa Happyra BiNobiDana 3NaueHHIO, 3a3NaueHOMy B TabniCi 3 NaCnpTHMn daHmN. HikoN He HamaraTeca
3amHHTBnIKyB6loCi3apdHOro npunctpo 3BnuaHOIO MepeXeBOHO BnIKOIO.
- y paizi noiXkoJxHHe Hhypa XnBHeHH, uo6 yHnKHyTN BnHKHeHH He6e3neuHX cnTyaui, Ioro 3amHy IOBnHe BNKOHaTN BpuO6Hk O6laHaHH a60 ynoBHObaKeHH cepBicHH ueTp BLACK+DECKER.
AkymnyaTophi 6aTapei
AkymyIaTOPHi 6aTapei He 3apJxHeI B cTaHI NOCTabKN Do MaKcImaJIbHorO 3apJy. IpeEIO NaTkoM BnKOpNCTaHHa kMyIaTOPHO6aTapeI Heo6xIDHO O3HaJOMITnC3 3a3NaueHIMn HIXKye IHCTpyKzIaMn Ta BnKOHaTn IpOeDpy 3apJxKeHH. JnI 3aMOBHeHH aKmyIaTOPHO6aTapeI Heo6xIDHO Bka3aTn HOMep 3riIDHO KaTaNOry Ta HOMiHaJIbHy Hanpyry.
YBaXHo npOuHTaTe yci BKa3iBKn
Baxnbi Bka3iBkn 3 Texhikn 6e3neKn dlya ycix akymyIaTOPHnx 6aTapei

06epexho: yBaXHo npOuHTaTe Bci
nonepdxyBaIbHi HAniCn Ta BkAzIBKn 3 TexHIKN
6e3neK, 3a3NaeHi Ha aKyMnyTOpHi 6aTaapei Ta
eJeKtpnHOMy iHCTpyMeHt. NopyWeHH
nonepdxyBaIbHnx HAnicB i Bka3IBOK MoKe
npn3BeCTn Do ypaXeHH eJeKtpnHm CTPymOM,
noXeKi Ta/a6o cepNo3HNx TpaBM.
3a6opohertbca 3apjkaTn akymyIaTOpHy 6aTaapeo y Bn6yxOhe6e3neHomy cepedOBu,Ha npKlaD,B yMOBax hAraBHocTi Ierko3aMnCTnx pIDIN,Hra3IB nnny.PiE'ndHaHH a60 BiE'EnHaHH Ka6eIIO 3apJHO npicrpoIO MoKe cnpuHNHTn 3aMaHHaNpy a60 ra3ib.
3a60pOHaTc3aCTOCOBaTHnCnny nid yac nID'EDHaHH Ta BiD'EDHaHH Ka6eIIO a6o IHCTpyMeHTy Do 3apAHOrO npIcTpoI.3a60pOHaTc8bD-AKIM YHOM 3MiHOBaTI KOHCTpyKciO aKymyJIaTOpHOi 6aTaPeI, TOMy IIO CE MoKe Ipn3BeCTn Do BV6yXy Ta cepNo3HNx TpaBM.
- YHnKaIte notpapanJIHH 6pU3OK pIiINu a6o 3aHypeHH y 6yDb-ky pIiNHy.
3abopohrbc36epiratn iHctpymeHT taakmylantophy 6atapeo B micax, de temnepaotypa moxe caraTn 104°F (40^) a6o nepebnuybatn cei pibeh (hnapnknaid nId Habicamn a6o B metalebux cnopydax BnItky).3adny noobxehnctpoky cnyk6n akmylantopho6baapei Heo6xidHO 36epiratn II B cyxomy npoxonoHDomy micci.
PnmuTka:3a6oPoHReTBc8 36epiratn akyMnyTophi 6aTaPeiPiEeHaHMMdoIHCTpyMeHTy3HaTNCHeHM nyCKOBIM BmHKaayem.3a6oPoHReTBc8 fIKCyBatn nyCKOBIN BMNKayuy noLoKeHHYBIMKHEHO.
3abopohertc cnaiobatn akymyantophy 6atapeho Habitb nicra TORO, k ii 6yno cnilbHO nowkodxeHO a6o iI pecypc 6yno nobHCTIO BuhepnaHO. Pid BnlnBOM BiKpnTOro noyn'm'akymyantOPha 6atape MoKe Bn6yxHyTN. Pid yac cnaiuBaHH naHio
akymyIaTOPHOI 6aTapei yTBOPHOITbCra TOKCNHIdIMNa Ta peOBUHN.
B pa3i KOHTaKTu BMICTu aKymyIaTOPHoI 6aTapei 3i WkipoIO Heo6xIdHO MNTEBO Ipomntu ypaKeHy dIINHKy MNlNbHm Po3UnHom. RaIoo pIDnHa, 0o MicrTbCBAcepeDnHi aKymyIaTOPHoI 6aTapei, NOTpAnITb B OO, Heo6xIdHO IpomNBATn BiDunHe OOI BOIO IPOTAROM 15 XBNINH aOo DOKn He 3MeHNtbcB BIDUYYTA NOpA3HeHHra. RaIoo NotpIbHm MeNCHN DOrrd, BaxNIBO 3HATn, 0o eJeKTponit, 0o MicrTbCBAcepeDnHi aKymyIaTOPHoI 6aTapei, cKnadaCTbc3 pIKnx PO3UnHIB OpraHicHHX KapboHaTIB Ta coJe nItio.
Bmict BidkpuToi akymyIaTOpHoi 6aTapei MoKe BnKlnKaTu Noppa3HeHH OprAHIB DuxAHN. B pa3i ypaXeHH BnDITb Ha CbiXe NOBITp. RaKIO CmTTOMn He 3HNkaOTb, 3BepHITcbrdo Nikapra.

06epexho: He6e3neka OTPMaHHa onikib. PidnHa BcepeHni akymyIaTOpHOi 6aTaapei MoKe 3aHHTncB iD icKpn a6o BiKpntoro nOum'

06epexho:He6e3neka noxeki.3a 6ydb-koipnpuHHn HeHAMaraaiTecra po3i6paTHn akymylaropHy 6atapeo. kkuO akymylarotPha 6atapeer Tpichyta a6o nowkoJKeHa, 3abopohrebcra II BVKOPNCTOByBaTu a6o 3apdkaTu. 3abopohrebcra 6yd-b-ANKIM YHOM nowKOxyBaTu akymylarotHy 6atapeo. 3abopohrebcra BVKOPNCTOByBaTu akymylarotHy 6atapeo, kka 3a3Hana ydApy, naINHny, chepea ky nepeixano KOleco a6bno nowKOJeHo 6yd-ANKIM IHsHm YHOM (HaPnKlaad, npo6nto cB8xom, ydaheo MOlOTKom, Ha kky NaCTynu i T. iN.). POnkdokehi akymylarotHi 6atapei notpi6HO nobepHyTu do cepBicHoro ceHTpy Ha nepepo6ky.
Pekomehdaizii 3i 36epirahnna
- PekomeHdyEc36epirAtn B npoxoJOnHomy cyxomy Micci 6e3 BnIbBy npmIX COHryHnx IpomHeiB, a TaKoX 3aHaTO BnCOKNX Ta 3aHaTTo Hn3bKHX TemnepaTyp.
2.Bpa3iIOBROCTPOKOBORO 36epiraHnI DnI DOcRHeHH ONTmAmJIbHNxpe3yJbTaIIB pekOMeHnyETbcra 36epirATn NOBHICTO 3apArdKeHy aKymJrToPhy 6aTapeIO B cyXOMy pOxOJIoHOMy MiCi.
Pnmuitka:3a6opohreTbC36epiratN NOBHICTO pO3pRJKeHi akymyIaTOPHi 6atapei.Ipeq noatkom BnKOpNCtAHHeo6xIDHO NOBHCTIO 3apAHTn akymyIaTOPHy 6atapei.
3HaK RBRC
3nak RBRC (kopnpaui 3 nepepo6kn
akymytoptnix 6atapei) Ha
HIkeNb-KaDiBOMy,
HIkeNb-MeTaIriDpUHOMy a60
JIiTi-IoHHOMy akymytoTI pI (a60

akymyIaTnH 6aTaapei) o3Haue, 3o 3a noaIbuy
ytinl3aicu okyMnyAToPA (a6o akymyIaTOpHOi 6aTaapei) B
KInci ii cTpOy ekCnlyataui Bx e CnlaueHo KOMnaiEIO
BLACK+DECKER. B deaKnx periohax 3akoHOM
3a6opohaeBnKnDaTn HikeNb-KadmiEbi,
HikeNb-MeTaNfipnHi a6o nii-tio-nHHi akymyIaTOpN pa30m 3
no6yTOBnM CmTTam, 3a TaKnx O6CTaBNn nporpaMa Call 2
Recycle3a6e3neyu eKoIorigHNo 6e3neHy aIbTePHaTnBy.
Kopnpaia Call 2 Recycle cnInbHO 3 KOMnaiEIO
BLACK+DECKER ta iHsinm cnoXnBaUamn akymyIaTOpHOi
npOdykui opranH3yBana B CUSA Ta KaHadi nporpamy 3i
3bnpaHHn BnKOpNCtAnHX HikeNb-KadmiEbnx,
HikeNb-MeTaNfipnHi axo nii-tio-nHnNx akymyIaTOpIB.
PiOBePTaOnu-KadmiEbi, HikeNb-MeTaNfipnHi a6o
nii-tio-nHni akymyIaTOpN b OphiuiHn cepBicHn ceHTp
BLACK+DECKER a6o B MicceBy TouKy po3dpiro Horo
npOdaJy Ira nepepo6Kn, BN dONOMarAeTe 36epertn
HabKoNiShne cepedOBnue. TakoB BN MoKeTe 3BepHytncR
do BaWoRo MicCeBoro centpy 3 nepepo6Kn no iHΦopMaiciu
IoDo nOdaJIbwoi yTuNl3aui BnKOpNCtAnHOI akymyIaTOpHOi
6aTaapei. RBRC- 3apeecTpobHa ToproBebHa Mapka
kopnpaui Call 2 Recycle.
BaxnBi npmItkn 0do 3apxkaHH
1.Дяп поювжehн CTPOKу cnyk6Tu DAocrHHeHH ONTIMaJIbHnIX ekCnIyatauIHnx XapaKTePncTnK 3apJxJaIte akymyIaTOPhy 6aTaapeo 3a TempeaTyPi 65°F-75°F(18°-24°C).3a6OpOHeNo 3apJxKaTI aKymyIaTOPhy 6aTaapeo 3a TempeaTyPi NOBITpy HnXue 40°F(4,5°C) Ta BnIe 104°F(40°C).Le 3axNCTNb 6aTaapeo BiD cepno3Hnx NOxKOJKeHb.
2.ЯкpoakymyIaTOpHa6aTapeHHe3apJkaeTbCn HAnExKHMuHOM:
a. nepebipte ctpym B po3eTci, nID'EDHabwn do Hei lamny a6o iHn npuna;
b. nepebiTe, Yu He 3'EnHaHa po3eTka 3 BUMKaayem CBiTna, kNIM BUMKaE KINBJeHHa, KOJI N BI BUMKaeTe CBiTNO;
c. nomicti6nokxnbeneHHa akymyaTOpHy 6aTaapeo B Micue, de temepaypa nobitrpa cknadae BiD 65^ do 75 F (BiD 18^ do 24^
d.Якwo np6bemy 3Зарджснгнм He BnpiшeHo, nepedaite iHcTpymeHT,akymyIaTOpHy 6aTaapeIO,Ta Ka6eB USB micceBm cepBicHn ceHTp.
3. AkymyJIaTOPHy 6aTapeIO cnI3apJxKATN, KOIN BOHa He 3abe3neueYcIOCTaTHIO NOTyKHICTb IIN BUKOHaHHa PO6IT, HAI KI paHlE BnCTaUAno NotyXHoCTi. HE IPOIDOBKUYITE BnKOpNCTOBvBaTN aKymyJIaTOPHy 6aTapeIO B TAKNX yMOBX. 3apJITb 6aTapeIO. YactKOBO P03PjXKeHy akymyJIaTOPHy 6aTapeIO MOxHa 3apJxKATN B 6yd-b-akn qac 6e3 HeratNBHX HaCNIkIB DnI HeI.
TpaHcnpTyBaHHa
06epexho: He6e3neka noxeki. 3a6opohreTbCRA 36epiratn a6o nepehocntn akymyIaTophy 6aTapeo TAKM uHOM, uO6 ii BIDKpnti Klemu MoNt TopKaTncr MetaneBnx npedmetIB. HanpiKnaD, 3a6opohreTbcra CKlaadTu akymyIaTOpHi 6batapei B KniueHphiapTyXIB Ta OJ4Y, RNIKN Dn IHCptymeHTB, Kopo6Kn 3 Ha6opamn IHCTpyMeHTIB, WuxJaN Ta iHsi Micu, De MOxKyTB 3HAOXDTNCRA CBxN, WypuN, KIOUi T.i.
TpahcnopTyBaHnAkyMnyIaTOPHX 6aTaapei npa3 npedMeTAMn, 10 npoBOaTb eEektpuHn CTpym, TaKIMN kKnOci, MoHeTN, pyHi iNCTpymeHTNa ta IHsMM moKe np3BecTu do noXekx. IpaBnla po6oTu 3 He6e3neHmpeyOBnAmn (HMR) MInicTePcTa BA TpaHCnopty CUSA 3a6OpOHIOb nepeBe3eHHAkyMnyIaTOPHX 6aTaapei KomepuiHm TpaHCnoptom Ta IItakAMn BpyHi NOKlaxi, JaKIO He 3a6e3neyeHO HaneKHN 3axnCT BiD KOPOTKOro 3amKaNHr. To6To, B pa3i Heo6xIdHOCT nepeBe3eHHN OkpeMux aKymyIaTOPHX 6aTaapei Heo6xIDHO 3a6e3neHTn HadiHn 3axnCT BiDKpNTNX KEm BiD MoKJIbORO KOHTaKTy 3 MaTePianAMn, 10 MOKByt BKNJlnKaTI KOPOTKe 3AMKaHH.

Ybara:Kkuo akymylantopHi 6atapei GoPak BiD'EnHaHI BiD iHCTpyMeHTy,ixHI KneMn notpi6HO 3axuataN BiIDNOBIDHM NOBNAQkAMN.3axNCHI KObnaKn nOTpi6HO 3acTOcOByATn B 6yd-ekn Yac,KOJI akymyIaTOpHa 6atapei BiD'EDHaHa BiD iHCTpyMeHTy.Ipeed nID'EDHaHHaM akymyIaTOpHOi 6atapei DO iHCTpyMeHTy NOTPi6HO 3HrTn 3axNCHI KObNaQOK.
BmormΦeepaHoiKomicii 3 nHTaHb 3B'ayu CUA (FCC)do ycix uphiobux npucptoib
CenBupi6 Biinobiidae BmOram qactnH 15 npabun FCC Ta rany3eBoro cTanDapTy KaHAn RSS nI npicTroIB, 0o He notpe6yOblueh3yBaHH. EKcnnyataciBnpo6y Nob'ra3aHa 3 DBOMa HaCTynHMn yMObam:
- Bπi6 He NOBnHeN CTBOpHOBaTn HecnpnTnBux nepeuKoD, Ta
- He NOBUNHeH 6yTu NtINBmIM Do 6yDb-RAKnx 3OBHIuHIX nepeuKO, B TOMy uNcI TaKx, UO MOKyTb 3aBaJNTn HopMaJIbHi ekCnNyataU II Bnpo6y.
3mHa KOHCTpykui, He y3roJxKeHa 3 opraHizaiciu, uO BiIOBIAe 3a DoepXaHH BUMOr CTaHdaptIB, MoKe CTATn npuHIO aHylauPiPaba Opepota Ha BIKOpNCtAHH o6naHaHH.
LcienBupio npoiwoB Bu npo6yBaHH Ta aTeCTOBaHn Ha BiinobiHicb BmOram Do uΦpOBO rnpctpoK Knacy B 3riHNO YactnHi 15 npabn FCC. Lcien KnaC BiNObiDaep npncTporM, 30 3a6e3neuytB DOCTaTHi pIBeHb 3axncty dIra NObTOBOro BkOpNCtAHnR. Lcien Bpi6 rehepyE, BkOpNCTOBye Ta moKe BnnpomHOBaTu paIOaCTOTHi XBNI Ta 3a yMOBN UCTAHOBu Ta BkOpNCtAHn 3 nopUweHHaBMor IHCTpyKciMoKe CTBOPUBaHn HecnpiaTnBi paIOuACTOTHi nepeWKoDN. B 6ybJ-akOMy BnnaKky HEmOXJIbO rapaHTyBaTN BiCDyTHiCtB TaKnx
peewkoB KOHKpeTHI yctahOBci. JaKo ue Bnpi6 CTbopIOE HecnpraTnBi nepewKOu dJa paio- a60 TeJIeBI3iHnx npIMMaiv, 1O CnoCTepiraTObCBA MmEHT yBIMKHeHHa 60 BIMKHeHHa Bnp6y, KopNCtByaM oKe cnp6yBaTu BNpabNTn CnTyauIO ODNM 3 HabeDeHX NxKue IJXIB:
-3MiHHTn opiEHTaIIO a6O nONOKeHHaHTEHn npiMaHa;
-36inbunTn BiDCTaHb BiD Bnpo6y Do npimMa4a;
- πiδ'εHATN Bπiδ do pO3eTKn, ΣO HαNEJNTb do iHωOr o eIeKTPnUHOro IaHμOra, aHix Ta, do JKOi πiδ'εDHaHni npuMa;
- 3BepHyTncaNo DOONOMOry Do DInnepa a6o KBaJIiΦIKOBaHO r CneUaIiCTa 3 peMOHTy Ta HanaWtYBaHHr TeNeB3iHHOi Ta paDiOTexHikn.
CANICES-3(B)/NMB-3(B)
Noataokpo60Tu
- Iopr Micro USB (6) Ha akymylanTophi 6atapei GoPak 2 B 1 BLACK+DECKER npn3naeHm nIwe dny 3apdxkHaHa akymylanTopho 6atapei GoPak.
- IopT USB A (10) ha akymytaTophi 6aTaapei GoPak 2 B 1 BLACK+DECKER npn3haeHn Inwe dny JxNBHeHHA USB-npncTroivB (Telefohy, PnaHwety, MP3-npeepy, nopTaTHBnHex eJeKTPoHHnx npncTroivB, irpoBoro KOHTPOIepa a6o iH.).
Pnc.B
3apxkannn akymnyatopy GoPak 2 B 1 BLACK+DECKER (Pnc. C, D)

06epexho:3a6opohaeTbc3apdkaTu akymyTopHy 6aTapeo GoPak 2B1 BLACK+DECKER uee3 Klemn iD'edHaHnI hCTpyMeHTy.

06epexho:3apjkaTn akymyIaTOPHy 6aTaapeo GoPak 2B1BLACK+DECKER tIbkn uepe3 USB-noptn, cxbaneHi UL a6o CSA, 0o npznauehi dna 3apjkaHn noTyKHX npncTroib. AkymyIaTOPHa 6atapee GoPak 3daTha cnoxnbAtn 6JIbwn CTpym, anIX MOKytb 3a6e3neuHTn capi USB-noptn. Jkso dna 3apjkeHHa akymyIaTOPHO6atapei GoPak BHKOPNCOTBycTBcA KOMNIOTe, BIn MOKe BNuTaTI cnobiueHHn pno nomnky.
-
BctabTe ka6ebm micro USB (B KOMnJIeKti) (7) B 6Iok XnBJIeHHRA USB (He BXoJntb B KOMnJIeKT).
-
BCTABTe 7teKepe micro USB 3apAnHoro 7hypa B npT micro USB akymnyTopho6atapei GoPak (6).
- B npoeci 3apxkannn akymnytopho6batapei GoPak iHdkatopni cTaHy 3apy6dytb no cep3i BMkataNcC BtIOIOHi iHdkatopu, uO CbitTbC, noka3yIOtB cTah 3apyakymnytopho6batapei. CbitNOIOHN iHdkatop, uO 6IImae, noka3yE hactynnPi behb 3apy, koro ige He oocryHyto. KhONKa KOHTPOIO 3apy (8) ni d ac 3apxkannn He yHKioHyc.
- Koln npouec 3apjxkaHHaBepuHTbcra, yci YOTnpi iHdkatopn BmKHyTbCra. HATNCHeHH KHOKN KOHTPOJIIO 3apJy (8) BMKAe yci YOTnpi iHdkatopn. AkymyIaTOPHa 6aTapeir NOBHCtIO 3apJxkeHa Ta roTOBa DO BnKOpNCTaHH. MoXHa 3aJIuWHTu y 3apJHOMy npicTpoi.
- 3apjxknte po3pndkehi akymyIaTOpHi 6atapei
rkomora ckopiwe, iHakwe cTPOK cnJX6n 6atapei moKe cyTTeBO cKOPOTnCra. IIO6 noDobKHTn cTPOK
BVKOpNCaHHa kymyIaTOpHOi 6atapei
peKOMeHdyETbcra He doBoIHTn II DO NOBHOrO po3pady.
PekomeHdyETbcra Do3apJxKaTu aKymyIaTOpHi 6atapei
nicra KoxHOro BHKOpNCTAHHH.
Pnc.C
INdikatOp cTaHy 3apAyn (Pnc. D)
AkymyaTOpHa 6aTape GoPak 2 B 1 BLACK+DECKER 06naHaHa KHOKO KoHTpoJIo 3apJy (8) Ta YoTnpMa CBITIOIOHNMI INdKaTOpAMI 3apJy.
IINKaTOp cTaHy 3apAky NOKa3ye npi6n3Hi pIBHi 3apAky, 30 3aNNBcR B AkymyTApHn 6aTapei, To6To:

96-100% NOBHH 3apA
76-95%

51-75%

26-50%

Heo6xio 3apnnt akymnyTop
Ioo6 nepebipntu cTah 3apny akymnyTopy,HaTnCHiTB KhoNky KOHTponIO CTaHy 3apny.Picnla zboRo 3acBITnbCkOM6Haujia 3OTnpbox CBiTNOJIOIB,IO nokaye pBeHb 3apny.RKpoPiBHe 3apny B akymnyTopi 3aHaTO Hn3bkn Ipy noanbwoi po60Tu,To JKOeH 3 iHdkaTopiB He 3acBITnbcA 6o 6nMaTme NoOdnHOKn IHdkaTop.
Pnmitka: CbitnoiOdiH iHdkaTOpn nouHaOTb Cbitntncr Tibkn nicra HATNCHeHHa KHONK KOHTpOIO 3apAry.
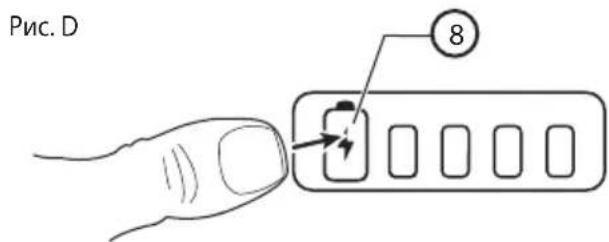
- 6B6yIb-8KIM MOMENT NOINBNTncb cTaH 3apAry, HATNCHTb KHONKY KOHTPOJIO CTaHy 3apAry.
PnmuItka: INdkaTOp cTaHy 3apAky NOKa3ye Nllee KInbKicTb 3apAky, lo 3aIIuIinaB B akymyTAOPHI 6atapei. BIn He NOKa3ye npaue3daTHICb IHCTpyMeHTy, a Ioro IHdkaIg MOKe 3MIHOBATNC 3aJeXHO BiD KOHigrypaui ciStem, TemepaTyra peKIMy po6OTn.
Ipnmitka:KksoakymyIaTOpHi 6aTaapei GoPak BID'eHaH i BiD IHCTpMeHTy,ixHI KIeMn NOTpi6HO 3axuatau BiNOBiHNMM KOBnaKam.3axNCHI KOBNaCkN NOTpi6HO 3ACTOCOByBaTu B 6yDb-RAKn Yac,KOJI aKymyIaTOpHa 6aTaper BiD'EDHaHa BID IHCTpMeHTy.Ipeed NiD'EDHaHHaM akymyIaTOpHOi 6aTaapei Do IHCTpMeHTy NOTpi6HO 3Hrtn 3axnCHNI KOBNaQOK.
36epekitb ci iHctpykuii Ira noaIbwoBnKOpncTahnHa
CknaObi(Pnc.A)
06epexho:3a6oPHeHO 3MiHOBaTH KOHCTpyKuio iHCTpyMeHTa a6o NOrO qactnH. Lc MoKe npN3BecTn Do TpaBMyBaHH.
Iobn npenik cknadOBx qactn 3a3haeHn Ha PncyKHa Na noatky iiei iHctpykii. Bnkopnstahn 3a npn3haeHHM
36ɪpaHЯ Ta HanaʊtYuBaHЯ

06epexho: 3ao63anobitnpaBmyBaHHIO, nepei noatkom peryIIOBAHH a6o 3HRTT Ta BCTaHOBJIeHH npuJaII Heo6xIDHO 3ABKn BmNKATn IHCTpymEt Ta BiD'ENHyBaTN akymJrTOpybataeIO. PAnTOBe BMKAHH MoKe npu3BcETn Do TpaBMyBaHH.
3axnchnn KOBnaQOK dny KIem akymyIaTOpHOi 6aTapei GoPak
3axnchi KOBNauch (9) notpi6Ho 3actocobyBAtu B 6yNb-ayn uac, KOiN akymnyaTopHa 6atapei Bi'EdHaHa B iD IHCTpymEnTy. NpeP nnEddHnHnM akymnyaTOpHOi 6atapei DIO INCTpymEnTy nOtpi6HO 3HrTu 3axnchni KOBnaouk 3riHNO PucyHKy E.
Pnc.E
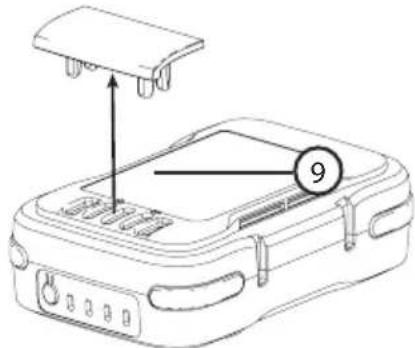
Po6ota
06epexho: 3a063anobirn TpaBMyBaHHIO, nepei noayakom peryunioBaHHa 6o 3HHT Ta BCTaHOBHeHH npuaIaII Heo6XiIO 3aBXdN BMNKaTI IHCTpymeHT Ta BiEynbAaN akyMnyTOpHy 6aTaapeIO. PAnTOBe BMKAHH MoKe npu3BecTu DO TpaBMyBaHH.
IiD'eHaHHaKymyTOpHoi6aTaapei GoPak 2B1B eNeKtpuHm iHcTpymEe Ta BiD'eHaHHaII BID HbOrO (Pnc.F)
06epexho: Ipeed n iEHaHHaM aKymyIaTOPHOi 6aTapei GoPak 2 B 1 BLACK+DECKER do BiNobHoro iHcTpymeHTy BuTARHITb 3 Hei 6yb-aki Ka6eni USB.
- RaKoHa KneMa akymyIaTOpHoi 6aTaapei BLACK+DECKER GoPak 2 B 1 BcTaHOBHeHn 3axnCHn KObnaqOK, 3HIMtB NOrO.
- Ⅲo6 nɪd'ɛnHaTn CymiChn 3 aKymyIaTOPHO 6aTaapee GoPak MAX* 12 B iHcTpymeHT, po3aWyIte KIeMn Ha HIXHI NOBepxHi iHcTpymeHTy 3 BiNobiDnIMu KOHTaKTamn Ha aKymyIaTOPHi 6bTaapei (4) 3riDHO Pnc.E.
PpMItka: INnKaTOp CTatcy 3apA dy 6ye po3aWobHn Ha 3aHbOmy 6oCi BiHocHO IHcTpMeHTy, a USB-noptn — Ha nepeHbOMy. CTrpIka Ha akymaTOpHi 6aTapei NOBHHa cnIBnadaTn 3i cTrpIKoIO Ha Kopnyci IHcTpMeHTa, RK NOKa3aHo Ha Pnc.E.
- BCTaBTe aKymyIaTOpHy 6aTapeH GoPak 2 B1 BLACK+DECKER B KpInJIeHHB HnXhN YaCTnHi IHcTpymEnTy.CtpiKa (13)Ha Kopnyci aKymyIaTOpHOi
6aTaapei NOBUNHa cnIBnadaTn 3i cTpIKoIO (14) Ha Kopnyci IHcTpymeHTa. Ipeep noatkom po6otn nepekoHaIteca, lo akymyIaTOPHa 6aTaapei NOBHiCTIO BCTaBHeHa Ta 3aΦikcoBaHa y npabunbHOMy NIoXeHHI.
- Ⅲo6 Bi'εДнAtn AkymyIaTOpHy 6aTapeu GoPak 2 B 1 BLACK+DECKER BiD akymyIaTOpa,HaTncHITb DBi KHOII KIcaii AkymyIaTOpHOI 6aTapei (5) po3taWobani Ha iHCTpyMeHti, Ta BHTaRHTb AkymyIaTOp GoPak 2 B 1 BLACK+DECKER 3 KpInneHb IHCTpyMeHtY.
PnmiKaPiHaacHaNTCKaHHNpyCKOBORoBVIMNKaCa USB-noptn akyMnyIaTOPHO6aTaPei GoPak 2 B1 BLACK+DECKER BVIMKaiOTbcra.
Pnc.F
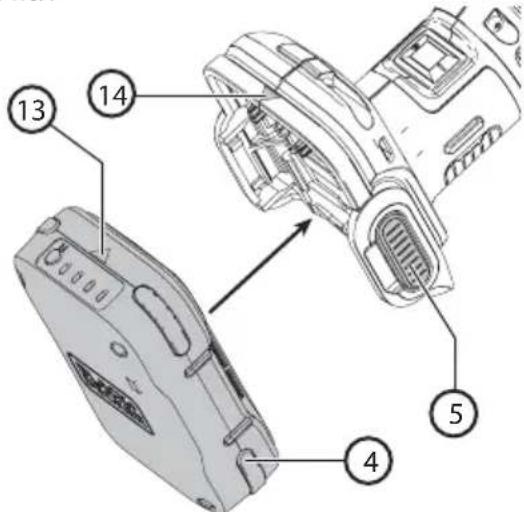
BukopncTaHHaKymyIaTopHO6aTaapei GoPak 2 B1 dna 3apJxKeHH USB-npncTpoB (Pnc.G)
- BCTaBTe 7teKepe Ka6eIIO USB A Baaworo npncTropo (11) B nopT akymyIaTOpHOi 6atapei GoPak 2 B 1 BLACK+DECKER (10) a iHnien Kineub - B nopT cymicHoro npncTropo, cxBaeneHoro UL a6o CSA (Telefohy, nnaHwety, MP3-nneepy, nopTaTNbHex eektpoHHnx npncTropoIB, irpOBO rKoHTpOlepa a6o IH.). Ppoec 3apAJeHHr po3noUHeTBcABTOMaTHNO.
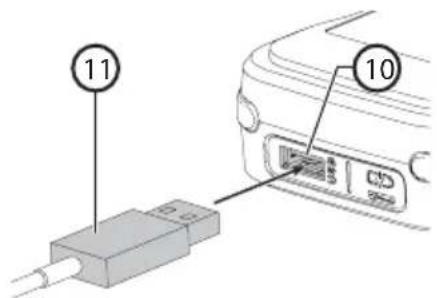
Функцii
AkymnyTopHa 6aTapei GoPak 2 B 1 BLACK+DECKER Moze 3a6e3neuHTn JnBHeHH iHCTpyMeHTIB BLACK+DECKER 12 B GoPak MAX* Ta 3apJkATn Mo6IbHi npCtpoi.ДЯ 3a6e3neuHn HopTaUBHOcTi AkymnyTopHOi 6aTapei 6yb po3pO6NeHn KOMNaKTHN TOHKn KOpNyc.
yKPAIHcbsKA
(IIpekeiaopurihalbHxinctpyKci)
BxipHn cTpym 3apJxehnGoPak:do2,4A**
BuxiHn Ctpym 3apJxehnGoPak:do2,4A***
**ФakTuHnpiBeHbBXiHOroCTpyMy3aIeKHTbBID 6JOKy KINBHeHHa (HE BXOJNTb B KOMnJIeKT).
**ФakTuHnPiBeH BnIXiHOrO CTpyMy 3aIeXuTb BiD nID'cHaHOro npICrpoIO.
IoprKmBneHnRA USB
Akymyntopha 6atape GoPak 2 B1 BLACK+DECKER
OblaadHaHa noptom kBHeHn USB Tnny A.BiH 3a6e3neye
3aIabHn pIbeH cTpyM y Do 2,4 A.
Ppumitka: OaKTHnPiBHeb Ctpymy, IIO npOTiKae uepe3 npCTpi, 3aJexNtB BiD xapaKTePncTnK npNCptpoTo Ta ka6enllo, 0o BnKOpNCTOByETbCra.

06epexho:PiJ qac BnKopncTaanHny
akymyIaTropHOi 6aTaPei GoPak 2B1
BLACK+DECKER IJIY KINBHeHHa6o 3apJxKaHHN
USB-mpcTpoIB Heo6xIdNo 3axCTHTN KLeMn 3a
DONOMORIO CneuaJIbHorO KObnaKa.
KlneMnIhctpyMeHTy TaKoN Notpi6HO 3aXnCTuTn 3a DonOMOrOIO CneuiabHoro KOBNaYka.
- Ppoec 3apJxKeHHn po3noHcA bTOMaTHHO nicna ndHaHH npncpto.
- 3yynHHTn 3apJxHaHH, Bi'EnHaHTe USB-npncpti.
PpaBnIbHe nOIOXeHHa pyK (Pnc.H)

06epexho: 3meHnTn pN3NK OTpMaHH cepno3HOI TpaBMn, 3ABKIN TpMaTe pyKn B nOLOKeHHi, NOKa3aHOMy Ha pncyHKy.

06epexho: 3meHnTn p3NK OTpMaHHcepno3HOI TpaBMN, 3aBXm MiO TpMaTe IHCTpymeHT Ta 6yDbTe roTOBm Do paTTOBoi peakii.
IpaBnJIbHe nOIOxKeHHpyK - OHa pyKa TpMaε Bnpi6 3a OCHOBHy pyKoRTky (2).
Pnmuitka:Piacpobotna3abopohertboctopkata
wni fybaHoi nntu. Pobitb doBri po3maunctip yux
B3doBx nobepxhi,do3boJIOUH MaunHi p6nTu CBOIO
po6Oy. Dnla wni fybaHnx, noIpyBaHnx po6it Ta
3HHTa ap6n notpi6he Inuwe Ierke HaTnCKaHH.
HaMipHe 3ucnnn npITnckaHH 3MeHwye WbNdkictb pyxy
IHCTpymeHTy ta noripuye pe3ynbTaT p6oTo. Yacto
nepeBipraTe pe3ynbTaT, 60 IHCTpymeT 3daTeH WbNko
3HIMATN BENKy KInbKiCtB MaTePIany.
Pnc.H
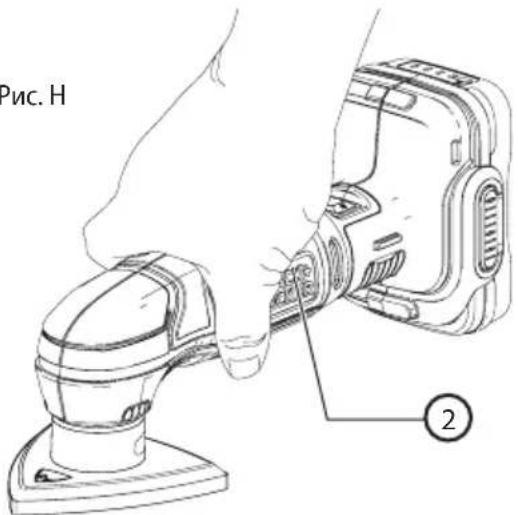

06epexHo:He6e3neKa ypaXeHH eJekTpnuHMM CTpyMOM.CyBopo 3a6oPoHReTbcra BnKOpNCTOByBaTu CEi Bnpi6 No6n3y BoHn.

Ybara: 3anobirn TpaBmyBaHHIO, nepe nOuaTkopeyIbAHHa 60 3HHT Ta BCTaHOBHeHH npuIadH Heo6xIDHO 3aBXn BmKAtn IHcTpMeHrTa BiD'EDHyBaTN BiD HbOrO aKymyIaTOpHy 6bataeIO.
BMUKaHH Ta BMMKahHr
1.ДяувIMKHeHHIHCtpymeHTaпepmKHiTbBIMnKaay 1 B6iK B NOJoxKeHHI.
2.ДЯВIMKHeHHIHCtpyMeHTaNEpeMKHiTbBUMKaay 1 B6iK R noIOKeHHQ
YctahOBka wliybanbHoro nanepy (Pnc. I)
06epexho:PiudacBid'edHaHnaa6o yCTaHOBNiΦyBaHOro napeHy Heo6xIaHbWiD'EDHyBaTuakymyTOpHy 6atapeio.
- BctaHObitiHCTpymEnT uNIOyBaJbHOIO pIITIOBROPY.
- Po3a7yIte 7JIΦyBaIbHn nanip (12) Ha 7JIΦyBaIbHn nIHTi, a6pa3NBOM BROP.
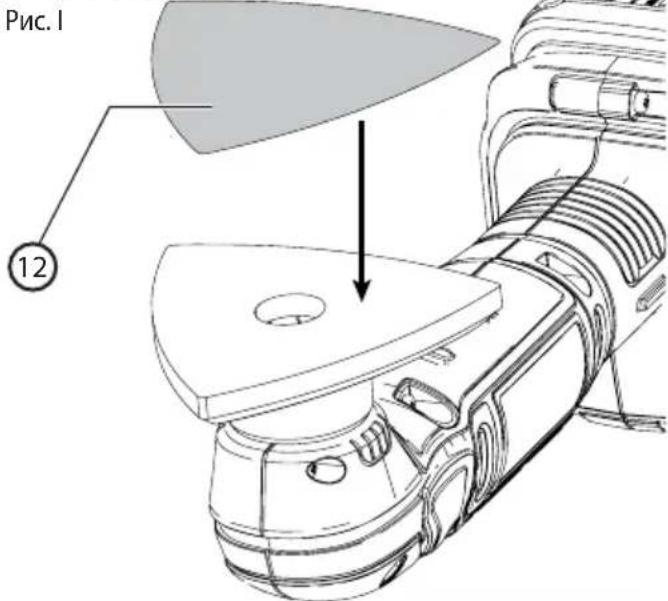
Nobopor wliyBaIbHOI nHTn (Pnc. J)
06epexho:PiacBid'cHaHHaOyCTAHOBKn 1iYBaJIbHOI PNTn Heo6xIDHO BID'cHyBaTn aKymyTAPOHy 6atapeo..
Bpa3iHaMpHoro 3Hocy oDHoro 3 KInCIB uNlOyBaIbHy nnTyr (3) MoXHa o6eptaTn.
- BctaHObitbIHTpyMeHT WnifyBaJbHOIO NnTIOB ROPY.
- BiKpyTb rBnHT, 0 Ko KpinTb uIiOyBaIbHy nIITy DO IHCTpyMeHTy.
3.ПоверпьшлфувалынчNTУТAKIMЧINOM,и6He 3ношенкин ecb 6yB cnpmaOBAHn BnepeД. Ipekeонайтecя,шлфувалын пNTa HadiHOBCTaHOBNeHa B NOcaDOUHOMY MICI. - 3aφikcynte wiliybaIbHy nIITy 3a donomorOIO TBnHTa.
Pnc.J
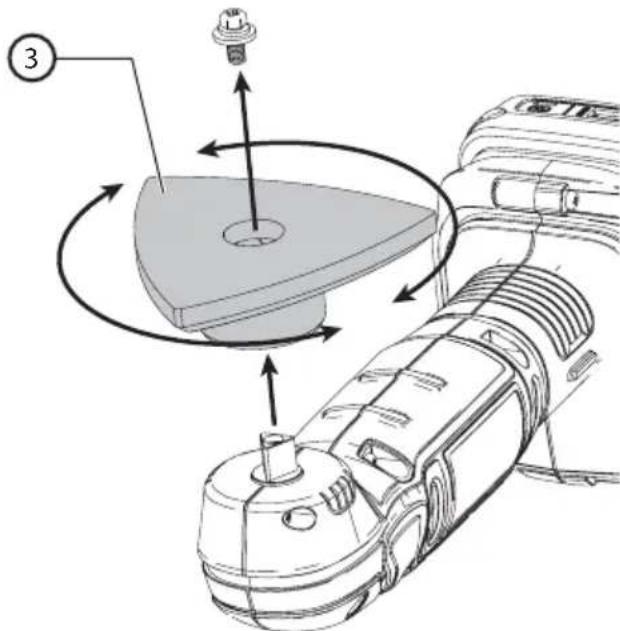
Iopadn zoioefoekTBHOROBuKOpuctaHHIhCTpymehTa

06epexho: IHCpymeHT MaE npaucobatn 3i WbNdkicTIO, kA BiINOBIAe NOro TEXHcHNM XapakTePncTnKam. He nepeBaHTaxyute NOro.
PyKMaIOb 3HaxOuNTnCnHa 6e3NeuHi BiDCTaHI BiD BEHTnIauiHnx uINH IHCTpyMeHTy.
He 3actocobyIte cuny do iHctpymehTa.
Perynepno nepebiprTe cTah uifybaHoro nanepy. BuKOHyTe Ioro 3amHy 3a notpe6u.
- UJIΦyBaHHaPeB'AnHx DeTaN 3aBKn BnKOHnyTe B3IOBx BOJOKOH.
Пидчacшлфуваньсбхшарibфap6n,пepdHaHeceHHaM HOBOI WAPy BUNKOpNCTOBuYTeHaDpi6HO3epHnCTn a6pa3NB.
Плд усшлфувань дуже.heринх nobepxoь a60 3Hrti wapib phapn nouhaite po6oty 3 rpy6o3epnuctm abpa3nBOM.Obpo6ky iHux nobepxoь nouHaite 3a donomorO o6pa3nBy
cepeHboi 3epnctocti. B 06ox BnnaKax nocTynoBO 3meHuyIte 3epnctictb a6pa3nBy i Inra fiHoiO 6oP6Kn BnKopncTobyTe dpio6HO3epnctn a6pa3nB.
Texhuihe 06cnyroByBaHHa

06epexho: 3ano6irtn TpaBMyaHHIO, nepeiNoaTkom perynIOBaHHa 6o 3HHTTA BCTaHOBHeHH npIaIHa Heo6xIDHO 3ABKIN BMNKATn IHCTpMEnT Ta BiD'EDHyBaTN aKymyIaTOpy H 6ataeIo. PAnTOBe BMkaHH MoKe npN3BecTu DO TpaBMYaHH.
Baxnbo: 06 rapaHTyBaTu 6E3IENKy Ta HAINHICTb IHCTpyMeHTy, peMOHT, 06cnyROByBaHHa Ta HanaSTyBaHHa (OKpim ONiCaHNX B cii INCTpyKcii) NOBHHI npOBoNTncB aBTOpN3OBaHNx CepBicHNx cHTpax a60 KbaniΦiKObaHmN npaICIBHKAMn, 3aBXdN 3 BnKOpNCtAHHm iDeHTNuHnx 3aNCACTNH.
3axnt HaBkoHnhbOro cepeobu
Iiud ytni3aui Heo6xio Hc0pTyBaTu KOMIOHENTN. 3a6opOHcTBcR yTNI3yBaTu ceBnpi6 pa3om 3i 3BnuAHmN nobYTOBmN BiXODAMN.
KIO BV BIPiWite, 0o BA W Bpi6 BLACK+DECKER Heo6xioHO 3amHHTn, a6o KIO BV He 6yTe NOro 6Inbwe BIKOPNCTOBYBaTN, He yTNI3yIe NOro pa3OM i3 no6yTOBIMn BiXODAMn. LcE Bpi6 NiJrae po3dInbHomy 36Opy BiXODIB.

Po3dInbHn 36ip BnKOpNCTaHnx npOdyKTIB Ta nakyBaIbHnx MaTePiaIIB Do3BOnJe 3diINCHOBaTn ix BTOpHHy nepepo6ky 3 noaJIbShM NOBToPHM BnKOpNCTaHHm. BnKOpNCTaHH MaTePiaIIB, 10 npoIshn BTOpHHy nepepo6ky, 3HNxKyE 3a6pydHeHHaHBkONuHbOrO cepeOBNuTa Ta 3MeHwye NOTpe6y B CnpOBHHNX MaTePiaIax.
Hopmatnbhi akTm Micuebux opraHIB BnaDN MOxytb nepeiaaTu 36ip BnKOpncTaHnx eNeKtpnuHnx Bnpo6iB OKpemO BiN NOyTOBUX BiXoJiB, B MyHicuNaIbHx nyHKTx 36opy BiXoJiB a6o B Mara3HHi NiD Yac NOKyn HOBOr O6laHaHHa.
KomnaHia BLACK+DECKER Hadae MoXnBicTb Dn36OpTy Ta nobTopHOi nepepo6Kn Bnpo6IB BLACK+DECKER nicra 3aikHeHH TepmiHy ix Cnyk6n. Uo6 ckopncTaTncr nepeBaRoO cboRo cepBicy, 6yNb NaCkA, HadiuNtB Baw Bnpi6 6yDy-akOMy yNOBHOBAJxHOMy npedCTABHnky 3 pEmOnTy, kN36npaTaki Bnp6u BiD haworo imHi. Bu moKeTe DiHaTnca aDpccy BaWOrO hai6nKUoro yNoBHOBaxeHOro npedCTABHnka 3 pEmOnTy, 3aTeNefoHyBaBnB PerioHaNBe npedCTABHnTBO BLACK+DECKER, Bka3aHe B ciinHCTpyKcii. Kpim ToR, CNICOK yNoBHOBAJx npedCTABHnKiB 3 pEmOnTy BLACK+DECKER i DetalbHy infOpmaIIO npo 06cnyroByBaHH nCnI npodaxy Ta KOHTAKTHi DaHI MOxHa 3HaHTn Ha caTI: www.2helpU.com.

06epexho:ДЯ OUYIeHHH HeMeTaJIeBHX qactnIHCTpymEnTy 3a6bOpOHReTbcr BKNOPcHcTOByBaTN po3yHHNk Ta arpeCnBHi xIMiHi peOuBHn. Li xiMiyi peOuBHn MOKytb NOWKoDHTn NlactMaCOBi MaTepiAn, 3 RaNX CKlaJIoTBCr Li DeTani. JIra OUYIeHHN noTpioHo BKNOPcHcTOByBaTN cyXy rAunipKy Ta M'KKn MInbHn POzHn. He Do3BOJAEtcbr npOHKeHH pIDHN BCEpeDnHy IHCTpymEnTy Ta 6LOKy XNBLeHH i 3aHypEHn IHCTpymEnTy Ta 6LOKy XNBLeHH 6yDb-RAKO uACTnHO B pIDHy.
Pnmitka: Ipeep uHsEHHaM BnmiTb 3 nopTb yci USB-ka6eni Ta BiD'EnHaTe BiD aKymyIaTOpHOi 6aTaapei IHCTpymeHT.
Дя Oчиш�нг iHcTpymeHa T a 6IOKy JxNBHeHH
do3BOJRAETBCa KOpNCTyBaTnCraTlbKIMAKM MUNBHM
po3uHOM I BOLOrO raHupkoIO. Barato no6ytobux
3ac06IB dЯ ChuSiEH NMCtABy xmUHy peOBoHN, rKi
MOKyTB cepNo3HO NowKOJNTn PnaCTmacOBI deTani
MaunHn. TaKoX He do3BOJRAETCBa NKOpNCTOByBaTu
6eH3InH, terPeHTnH, naK, po3uHHNK nIpyap6, 3ac06N
dЯ ximUHOrO yuSheHHaTa iHwi anAoRiHi npOdykTN.
Iouk ta ycyHenHa HecnpaBHOtei
- AkymyIaTOpHa 6aTapeR GoPak He XnBntb Ta He 3apJkae npucTpoi.
a. Han6JnxxuI Do KHONK KOHTPOIIO CTaHy 3apA dy iHdkatop 6JImaE cepBOHm NiJ qac cnpo6n BIKOpncTahHr USB-nopTy.
TemnepaTypa akymyIaTOpHoi 6aTapei GoPak 3aHaTTo Bucoka a6o 3aHaTTo Hn3bKa. Iepu Hix BIKOPNCOTByaTu akymyIaTOpHy 6aTapeio, daTe iO oxolohTu a6o HarpiTcra. - AkymyJIaTOpHa 6aTapeJ GoPak He XINBt b IHCTpyMeHT.
Cnpo6ynte 3apaHTn akymnyTOp. JaKIO nepuIN CBiTNOIOHN iHdkatOp He CbitNbca, nepeiITb DO npHKTy 1 po3dIny «Iooyk Ta ycHeHHa HecnpabHocteN
PemOH
AkymnyTopHa 6atape GoPak 2 B 1 BLACK+DECKER He notpe6ye texhiuHoro o6cnyroByaHHa.
06epexHo:Ioo6 rapaHTyBaTn 5E3NEKy Ta HADIIHICTb iHCTpyMeHTy,peMOHT,obcnyroBvBaHHa Ta HalaWtBuHHa (B TOMy uCNI 3amHy zitOK) NOBHHi npoBoNTu cepBicHi ceHTpn Ha BnO6HnUTBi KOMNaHHI BLACK+DECKER, a6o ABTopn3ObaHI cepBicHi CEHTPN BLACK+DECKER. Heo6xIDHO BVkOpNCTOBvBaTn BVKnIOUHO iJeHTNuHi 3anaChi qactuHn.
TexhiHdani
BLACK+DECKER JIaJiW Lo pJ 12
aLaJIg aio Jia Jia Jia Jia Jia Jia Jia Jia Jia Jia Jia Jia Jia Jia Jia Jia Jia Jia Jia Jia Jia Jia Jia Jia Jia Jia Jia Jia Jia Jia Jia Jia Jia Jia Jia Jia Jia Jia Jia Jia Jia Jia Jia Jia Jia Jia Jia Jia Jia Jia JIA
aaii i jaiil g aaii
. 100000000000000000000000000000000000000000000000000000000000000000000000000000000000000
BLACK+DECKER
BLACK+DECKER
BLACK+DECKER
BLACK+DECKER
BLACK+DECKER
BLACK+DECKER
BLACK+DECKER
BLACK+DECKER
BLACK+DECKER
BLACK+DECKER
BLACK+DECKER
BLACK+DECKER
BLACK+DECKER
BLACK+DECKER
BLACK+DECKER
BLACK+DECKER
BLACK+DECKER
BLACK+DECKER
BLACK+DEcker
BLACK+DEcker
BLACK+DEcker
BLACK+DEcker
BLACK+DEcker
BLACK+DEcker
BLACK+DEcker
BLACK+DEcker
BLACK+DEcker
BLACK+DEcker
BLACK+DEcker
BLACK+DEcker
BLACK+DEcker
BLACK+DEcker
BLACK+DEcker
BLACK+DEcker
BLACK+DEcker
BLACK+DEcker
BLACK+DEcker
BLACK+DEcker
BLACK+DEacker
BLACK+DEcker
BLACK+DEcker
BLACK+DEcker
BLACK+DEcker
BLACK+DEcker
BLACK+DEcker
BLACK+DEcker
BLACK+DEcker
BLACK+DEcker
BLACK+DEcker
BLACK+DEcker
BLACK+DEcker
BLACK+DEcker
BLACK+DEcker
BLACK+DEcker
BLACK+DEcker
BLACK+DEcker
BLACK+DEcker
BLACK+DEcker
BLACK+DEker
BLACK+DEker
BLACK+DEker
BLACK+DEker
BLACK+DEker
BLACK+DEker
BLACK+DEker
BLACK+DEker
BLACK+DEker
BLACK+DEker
BLACK+DEker
BLACK+DEker
BLACK+DEker
BLACK+DEker
BLACK+DEker
BLACK+DEker
BLACK+DEker
BLACK+DEker
BLACK+DEker
BLACK+DEker
BLACK+DEcer
BLACK+DEcer
BLACK+DEcer
BLACK+DEcer
BLACK+DEcer
BLACK+DEcer
BLACK+DEcer
BLACK+DEcer
BLACK+DEcer
BLACK+DEcer
BLACK+DEcer
BLACK+DEcer
BLACK+DEcer
BLACK+DEcer
BLACK+DEcer
BLACK+DEcer
BLACK+DEcer
BLACK+DEcer
BLACK+DEcer
BLACK+DEcer
BLACK+DEcer
BLACK+DEcer
BLACK+DEcer
BLACK+DEcer
BLACK+DEcer
BLACK+DEcer
BLACK+DEcer
BLACK+DEcer
BLACK+DEcer
BLACK+DEcer
BLACK+DEcer
BLACK+DEcer
BLACK+DEcer
BLACK+DEcer
BLACK+DEcer
BLACK+DEcer
BLACK+DEcer
BLACK+DEcer
BLACK= DECKER
i.
aaglaalglalgaiyldalalbho pssxw 8 yj
. alal y ge aaiiell sgs iayagall
alglal aie aaiiaai lllll llll n k
pdu w . gao aodn wll A Ls
gi jz . aiaaaan noo ylo gao aiaa aiae
raa Gao aalal gao gao laa Jlal gao
. JIwJ gao aalal gao gao JIa J
. . GoPak no USB golgolgolgolgolgolgolgolgolgolgolgolgolgolgolgolgolgolgolgolgolgolgolgolgolgolgolgolgolgolgolgolgolgolgolgolgolgolgolgolgolgolgolgolgolgolgolgolgolgolgol
(J)aaiiaolaoe
aaiiJI aieI 5jgaiJgai JbJI j

(3)
- LcU OJ 1001100110011001100110011001
.aaaiall aIy yaaiaaiiaaiae 12
SloLgI aIStio yagj gil yaaiaol oocj 3
aJw J 1
4
Jioi pssssx
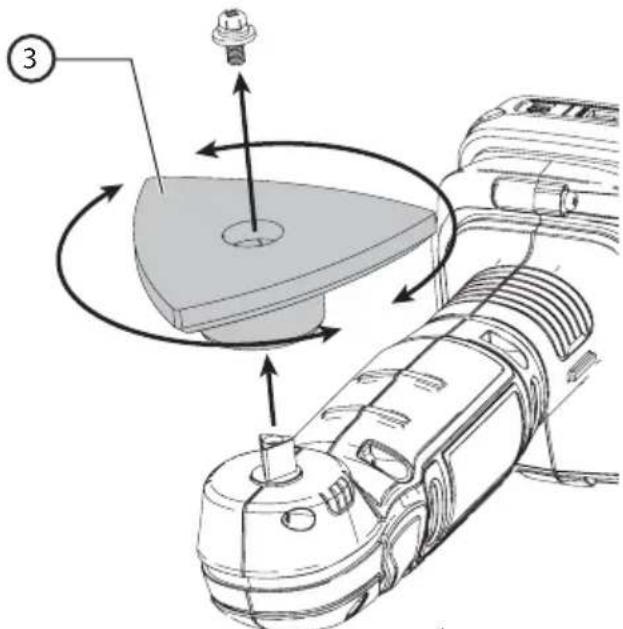
Jiofo
Joo21 8 oai 8.0iell 4j jooai 8j 3
.
.
pJ 15 LgJyWuL yjayw yjaiw JgJdJoo g3
S AOB = S AOB + S_ AOB
a 11111111
aocli aLo ayiao pwnl. yu b u laib ayiaic
a aabg Jaae
Lol aagwllg wla 1e aaiu cuii ciy
aee aee 1. y2y 1 1 1 1 1 1 1 1 1 1 1
Jll LjL Jaiil jlll 115 a h wio o
jol jol jol jol aclll
aJ.
a a a a a a a a a a a a a a a a a a a a a a a a a a a a a a a a a a a a a a a a a a a a aaa
L
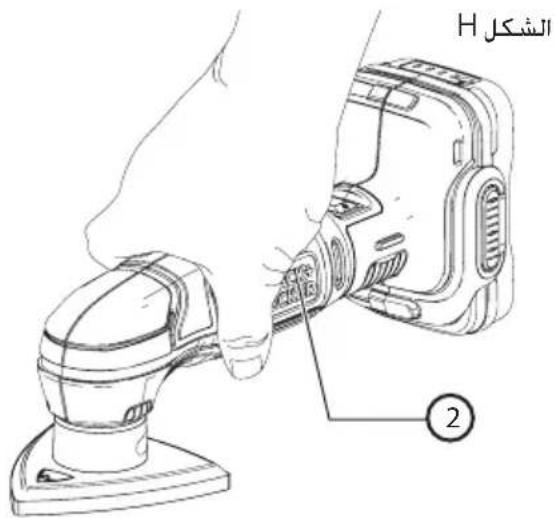
paaa aegbgl 2.aoaaljolino
sui no jywl ciill iio
Jjg JjwJlJLbUa aJLxJbUo JLaJ:
L 111 jg aJg g Lg
LJLg


-
-
-
-
-
-
-
-
- 10
-
-
-
-
-
-
-
1 1
1.1
1.2
O
(1≤)
aai 1
- LdU a aal oocg 2003
(12)
1.68 3
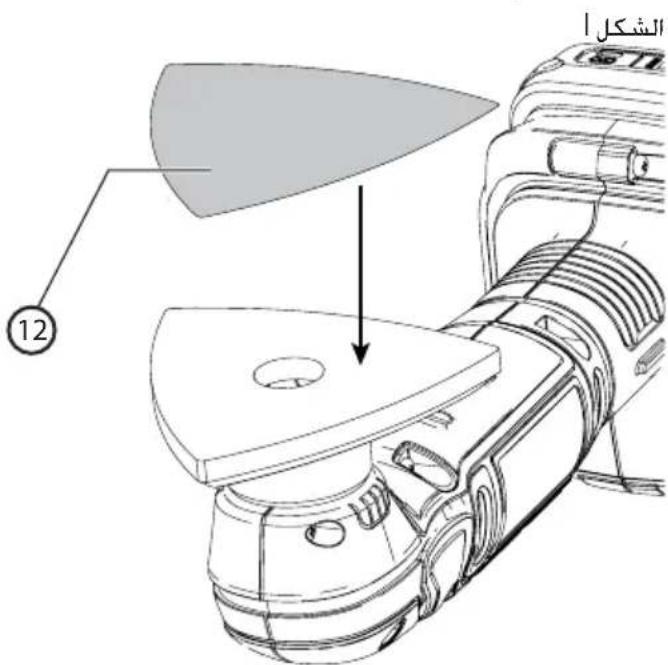
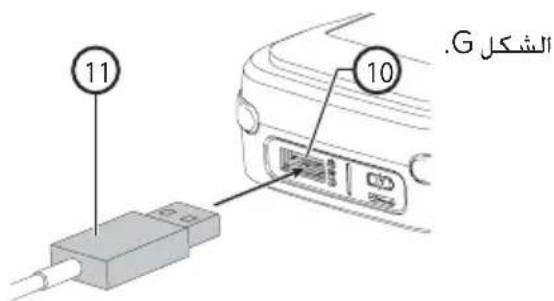
a.bg1c1281
1 BLACK+DECKER GoPak 2
BLACK+DECKER a aaljll jg jdaJl
12V GoPak MAX
JU LLe JU UgA. A gill USB
2.4
jglg jlggljoggljllao:
pssimuI J:0jL1 1 LJg pssimuI

.
LLaJooJI USB 0o oon
jLgJU
USBJgJg
(H)
pssuii. aaiii 1aiuXj joloo Jai:
.
iJyj
Lao 1aJg Lc
ailll lllsss! 20000000000000000000
(2)
sliyaiaiaiiaeicjglgaiyi
algcbccscls jaaaiil aJI Ljni pss
gao 1111111111111111111
gW .GwI gEclJI gOeaiJ jz:
g 1
acyy slal allj! lc jll jg.0Lc llac no
42
- BLACK+DECKER GoPak 2
GoPak 12V golgo yIgS JgJgJgJgJgJgJgJgJgJgJgJgJgJgJgJgJgJgJgJgJgJgJgJgJgJgJgJgJgJgJgJgJgJgJgJgJgJgJgJgJgJgJgJgJgJgJgJgJgJgJg
a b c d e f g h i j k l m n o p q r s t
EJ< 100000000000000000000000000000000000000000
1gj gwog 021 0yfo jwfo afo gwo
aJbJIg aJgJgJgJgJgJgJgJgJgJgJgJgJgJgJgJgJgJgJgJgJgJgJgJgJgJgJgJgJgJgJgJgJgJgJgJgJgJgJgJgJgJgJgJgJgJgJgJgJgJgJ
E JSS
1 BLACK+DECKER GoPak 2.3
(13)gw
aocog aaiiLi ayjIbJI jS1.0121 (14)
1a 2
1 BLACK+DECKER GoPak 2
(5)aIbIJI 10
BLACK+DECKER GoPak 2
.01281 1
aLbB aolUI USB joloo Jbej gw:ab>Lo
BLACK+DECKER GoPak 2
<.
FJ
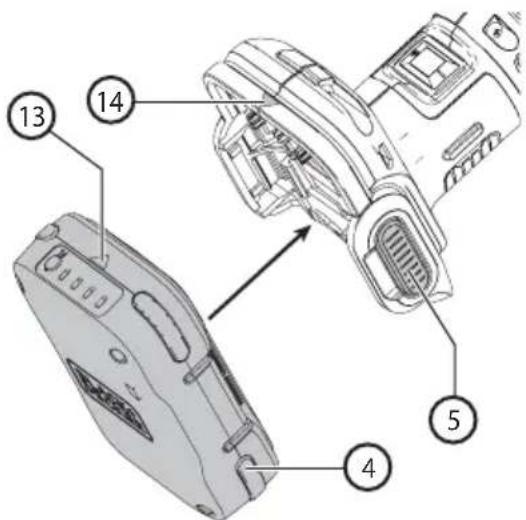
USB 1 gopak2
(Gj<
)
(11)USBA
(10) 1 BLACK+DECKER GoPak 2
CSA g UL aill jll
/1111111111111111111111
Lalai jaiy g.
J1
CJ<
a1111111111111111111111 111111111111111111
Jgill pssuill Jaoi w g jil Gligs
Gopak piai y
AaBn Bn Cag i. aIy5 01y Jlaip
Gog sic slbl Jj .01y Jlaibn 6; Lioic plsiu
.
Jauuuljus
(AJ<1)LiG<1
a.o.gjgglgJgSgS1021 Jz
aLw! gag y aai j
aLcJaijgJx. qRbIy
aIeIeIeIeIeIeIeIeIeIeIeIeIeIeIeIeIeIeIeIe I
JIiJI JIeW Wc. aq gKsIe I eae I eae I eae I eae I eae I eae I eae I eae I eae I eae I eae I eae I eae I eae I eae I eae I eae I eae I eae I eae I eae I eae I eae I eae I eae I eae I eae I eae I eae I eae I eae I eae I eae I eae 1
Jz
Jz
Jz
Jz
Jz
Jz
Jz
Jz
Jz
Jz
Jz
Jz
Jz
Jz
Jz
Jz
Jz
Jz
Jz
Jz
Jz
Jz
Jz
Jz
Jz
Jz
Jz
Jz
Jz
Jz
Jz
Jz
Jz
Jz

J 1234567890
(0.2)Uggs 1.2 gdsuagglg Jn Jn Jn Jn Jn Jn Jn Jn Jn Jn Jn Jn Jn Jn Jn Jn Jn Jn Jn Jn Jn Jn Jn Jn Jn Jn Jn Jn Jn Jn Jn Jn Jn Jn Jn Jn Jn Jn Jn Jn Jn Jn Jn Jn Jn Jn Jn Jn Jn Jn J nJ nJ nJ nJ nJ nJ nJ nJ nJ nJ nJ nJ nJ nJ nJ nJ nJ nJ nJ nJ nJ nJ nJ nJ nJ nJ nJ nJ nJ nJ nJ nJ nJ nJ nJ nJ nJ nJ nJ nJ nJ nJ nJ nJ nJ nJ nJ nJ nJ nJ n
13aJbIJI JILWJeBcLggl28aJbgs. 13aJbIJI JILWJeBcLggl28aJbgs. 13aJbIJI JILWJeBcLggl28aJbgs. 13aJbIJI JILWJeBcLggl28aJbgs. 13aJbIJI JILWJeBcLggl28aJbgs. 13aJIJI JILWJeBcLggl28aJbgs. 13aJIJI JILWJeBcLggl28aJbgs. 13aJIJI JILWJeBcLggl28aJbgs. 13aJIJI JILWJeBcLggl28aJbgs. 13aJIJI JILWJeBcLggl2

J 1
a 1
1
1
1
1
1
J 1

J 1 J 1 J 1 J 1 J 1 J 1 J 1 J 1 J 1 J 1 J 1 J 1 J 1 J 1 J 1 J 1 J 1 J 1 J 1 J 1 J 1 J 1 J 1 J 1 J 1 J 1 J 1 J 1 J 1 J 1 J 1 J 1 J 1 J 1 J
Lol81 Jol81 Joloe
aaiiaaii iil 1. aii JLoi oii j 1. iie iie iie iie iie iie iie iie iie iie iie iie iie iie iie iie iie iie iie iie iie iie iie iie iie iie iie iie iie iie iie iie
(CAN/CSA Z92,4) ANSI ZAV,1
(Sr.14)ANSISr.7
NIOSH/OSHA/MSHA
aJlcl Jc aI I 1
aegg aaiia 5 gao Lg sgs21 aaiu
aioi joo. gai 1jao ge gai aai 21 oai
:aiLgslgl0
JolaljIgclaoJIJIcLJIJcCLJIJolaljI
iWgBJIcLiJIaJGLKJLJ
5.2.15 1111111110
aell a. 1jgJcEeJJpSJJg
- 1,2,3,4
Lgolai gai jaii no al yai iia liy iayei Jai .Jaoegill lgs Lla Jsi
a aabio jLac21 sJ 4aJlaSllgol
JIO.0aolal aLol 1pssuWJLoJIg.0gJIL
Cuij J Lao aocnll Joo aegJl LoLoSJI .a.o.JI
JLJI JIJI JIJI JIJI JIJI JIJI JIJI JIJI JIJI JIJI JIJI JIJI JIJI JIJI JIJI JIJI JIJI JIJI JIJI JIJI JIJI JIJI JIJI JIJI JIJI JIJI JIJI JIJI JIJI JIJI JIJI JIJI JIJI JIJI JIWI
J 1 1 1 1 1 1 1 1 1 1 1 1 1 1 1 1 1 1 1 1 1 1 1 1 1 1 1 1 1 1 1 1
111111111111111111111111 1 1 1 1 1 1 1 1 1 1 1 1 1 1 1 1 1 1 1 1 1 1 1 1 1 1 1 1 1 1 1 1 1 1 1 1 1 1 1 1 1 1 1 1 1 1 1 1 1 1
gJ 1 1

(S19)ANSI S17.1 g afo y 20
LJU Lgll plo 20
y 20
a 20

g j 1021 g a 1021 pcc 1021
g j 1021 g a 1021 g c 1021
g j 1021 g c 1021 g c 1021
g j 1021 g c 1021 g c 1021
g j 1021 g c 1021 g c 1021
g j 1021 g c 1021 g c 1021
g j 1021 g c 1021 g c 102

g 5yio jol oL slggl cia hoe
aessll jzJ le J! 11w amolos gws
Jie 11 Juee Lg"g jb" jai 1
auiy
aaii 1 8 8 8 8 8 8 8 8 8 8 8 8
a
aolalglalal
aegaaJ 1jai jaoJI Jc paJI JdJI aJia:
Jolgslwgl Jla 1g. gll j
yololjL paowil
gJyLoJyLgssyIyIyIyIyIyIyIyIyIyIyIyIyIyIy
aic ailll lblx> y cuii lii jia s Jocn
sLsl 0j
aaii iaii
aohio JgJolgdl lssll gJlabe 1c
aLac pLi g sUbJ oai jaoJI
a + b = 11
Jaeil aiaio ngi yin jyolal s
Jilw gai. aolS g JgJ no gJgJI liJI
aaii1g aegao paxiuai 1 Looic g
Jell no aelg fiee 1nao pwn w: iia lo
jg2. a1s2g oLw jc g2f 1hJ LjE aWll
a>21 jLi J! e o. aLaol 10 iio aLol 11 LbJ tae
aoll no aol) wlll ellaal aeel
("NIOSH" aigll aalgl doolwJgJ
Joell aahio g jnnllg J52
JLoJI Jc JgUuUuUuUuUu
- jaiJI g i jaiJI g J521 Jj 1iJIg Jluic81
a hio g jnssuJg JrJg JpLehJ JrJr
LgJgJgJgJgJgJg
aill oolw
.
sLslb:lgio sllj jglblg l
4
JcLslll jie JLae aee aee aee
Jaeilliaabio
aillg bii
Jgcb 1og aie chwJ S aibig wis
jbs 1c ailgSll lglgSghii .
1 5
g g 23. auiy
J5gJ.4Sjll 1jXg jLg jIbLx J
j 1c jg j 5c g Jg.
aJJIaJJgSJIol2JI cL51JI aJJgSJI 1g2JI
puc s yuolgl uo auee jLooiui Jg Lg
15
cLwj. aikig oJg all jbi jlc Jr .f
aal aabla alg 1s gall aal
gJgW jS ggluJJU aJc JgLgJc
Lg : y = S f_1
JLogol21 aJg cLg LLg aLg<11ol21 p#
Lc21 g 20. Lc210 o.o g b
1211 1j .0. jJ J aJg J aJg
j≤Lgauoρgo aai
a
Lg: aiejgl aIbJl oI paxi .5
Joo oohjoo Lillipnuiu bao joo
10
20 pssw 116 gjrl jh s w g uu
S2 = 12S1 = 12 · 12 × 2 + 12 × 2 + 2
a aai 1i jie jie iie e o aijg sll ggsj pooi
2c 3c
gagj
c:1:1;g:1h:1. 1y:1b:1. a:c p:1w p:1c
Lai jg 1j g
aee aiee eel 1wgl oolg aed
J 1
Egag 10 aIbJI JbJb
jui ggi
JiLJI J 5c. aWLaI gJJI Jb
J 1
JooLi Lo 12. sUu JooStJI JLo aB bI .sga
oclll lio oIgIc 10bIe jieell zo JilwJ
aJblll Jwll jLWj yj k
g( x) = g^2( 1 - x) + xf^2
20231.6
a121 Cxax yassio gia dalei xla y
JJig Jia: aJill Jell ghe puiu: aJyS
a 11 11 11 11 11 11 11
yaiol 128 aol aoLw 1g
aowolgj Jai jloc iij ic Jgeo a
Lgili 1281 LwJ g a a 12w8 o a 12oLc
yJxL:ALlI1aJyRgS1cIgS1go aIgLo
jLjLjLjLjLjLjLjLjLjLjLjLjLjLjLjLjLjLjLjLjLjLjLjLjLjLjLjLjLjLjLjLjLjLjLjLjLjLjLjLjLjLjLjLjLjLjLjLjLjLj
.
aaij gai jao 20121 paa aaios
jssjj jssjj jssjjg jssjj g jssjj
gj 15 15
gws. a,b,g,gjgl jlaaLgclg21 2x .C
J 1
aLgSlllloaull
pssuiw x .aiibls aayb: cllwgo Jolai x .d
g|g:ww g aLgSJJ 1Joo
g jj g jj j j j j j j j j j j j j j j j j j j j j j j j j j j j j j j j j j j j j j j j
g aJLJI LwJ 1 j. aS-11 gj-21 gJdL31 gJ
aIySJIolovuJyjblsoJySL
llw pssiw. 1j
plssw! 1. gai31 plsswSL wLio AJLb
