
KG36NNLE0N - Fridge SIEMENS - Free user manual and instructions
Find the device manual for free KG36NNLE0N SIEMENS in PDF.
User questions about KG36NNLE0N SIEMENS
0 question about this device. Answer the ones you know or ask your own.
Ask a new question about this device
Download the instructions for your Fridge in PDF format for free! Find your manual KG36NNLE0N - SIEMENS and take your electronic device back in hand. On this page are published all the documents necessary for the use of your device. KG36NNLE0N by SIEMENS.
USER MANUAL KG36NNLE0N SIEMENS
4.2 CmHa Ha Dpbkkata Ha BpaTaTa 10
4.2.1 ⅢaBaxdahe Ha npbXkata Ha BpaTata 10
4.2.2 MoHTpaHe Ha dpbXkata Ha BpaTaTa 10
4.3 CmHa Ha ropHaTa nHa Ta Ha BpaTata 11
4.3.1 CbaHHe Ha rohpHa Ta nHa HbpaTaTa 11
4.3.2 MoHTnpaHe Ha rophata naHTa Ha BpaTata 12
4.4 CmHa Ha rohpata nHa Ta H BpaTata (BpTa c dncnne) 13
4.4.1 CbajrHe Ha rohpata naHTa Ha BpaTata 13
4.4.2 MoHTnpaHe Ha rophata naHTa Ha BpaTata 14
4.5 CmHa Ha cpeHaTa nHa HbPaTaTa 15
4.5.1 CbAJIHe Ha cpeHaTa NaHTa Ha BpaTaTa.. 15
4.5.2 MoHTpaHe Ha cpeHaTa NaHTa Ha BpaTata 15
4.6 CMHa Ha DoHaTa NaHTa Ha BpaTaTa 16
4.6.1 CbajnHe Ha donHaTa nHa Ta HbpaTata 16
4.6.2 MoHTpaHe Ha donHaTa nAHTa Ha BpaTaTa 16
4.7 CmHa Ha paTa 17
4.7.1 ⅡBaKaHa ha paTa 17
4.7.2 MoHTnpaHe Ha paTbTa 17
4.8 CmHa Ha Ta6nHkata 3a 6vtuKn 18
4.8.1 CbajrHe Ha Ta6nKata 3a 6yTnKn 18
4.8.2 MoNTnpaHe Ha Ta6nukata 3a 6yTuKu 18
4.9 CmHa Ha CTenaja Ha BpaTata 19
4.9.1 3BaJdaHe Ha CTeJaHa BpaTata 19
4.9.2 MoHTnpaHe Ha cTeNaKa Ha BpaTata 19
4.10 CmHa Ha perynpyemna CTenax Ha BpaTata 20
4.10.1 CbanyHe hapeynpemyCteNaXHaBpata 20
4.10.2 MoHTIpaHHe Ha peryInpyeMnE CTeJax Ha BpaTata 20
4.11 CmHa Ha KOHTeHepa 3a 3ampa3EH XpaHHTEN npOdyKtn 21
4.11.1 ⅢBaXdHa Ha KOHTeHepa 3a 3ampa3EH XpaHHTENn npOdyKTU 21
4.11.2 MoHTnpaHe Ha KOHTeHepa 3a 3ampa3EH XpaHHTeHN npOdykTN 21
4.12 CMHa Ha KOHTeHepa 22
4.12.1 ⅠЗваданHa KOHTeHepa... 22
4.12.2 MoHTpaHe Ha KOHTeHepa 22
4.13 CmHa Ha pa3TeaTeHnKoHTeHep 23
4.13.1 ⅠЗвадан ha pa3TeaTeHnKoHTeHep 23
4.13.2 MoHTnpaHe Ha pa3TeRaTeJIHHa KOHTeHep 23
4.14 CmHa Ha LED cnot narnata 24
4.14.1 CbAHe Ha LED cnot nAmnata 24
4.14.2 MoHTpaHe Ha LED cnot nAmnata 24
4.15 CMHa Ha LED oCBetJeHMeTo OTrope 25
4.15.1 CbAHe Ha LED ocBETneHnETo 25
4.15.2 MoHTpaHe Ha LED ocBETneHMeTo OTrope 26
4.16 CMHa HA LED cbetnHaTa Ha cTpaHnHaTa neHa 27
4.16.1 CbAJIHe Ha LED CBETINHATA Ha CTpaHnHATA JeHTa 27
4.16.2 MoHTnpaHe HA LED CBeTnHATA Ha CTpaHHATA NeHTA 28
4.17 CmHa Ha LED cnot narnata 29
4.17.1 CbAHe Ha LED cnot narnata 29
4.17.2 MoHTnpaHe Ha LED cnot nAmnata 30
OTHOCHO To3n DokyMeHT
1.1 Baxha nHΦopMaζη
1.1.1 Uen
TeHc cBbETn 3a pEmOH T NOMarat Ha Ntpe6nTEnla da pEmOHtnpa Cam ypeiB n BcOTBeTCTBnC pernameHTa 3a ekONOrOcb6p3No npoeKtnpaHe Ha ypeiNe (OT03.2021 r.).
Te cbIbpxkT INHΦopMaJN KAK Da CMeHrTe ONpeDeneHn pe3epBn YactN, BKIOH- TENHO pnpynpeKdEHN n PNCKOB.
Ako IMATE HRAKAKINBbnpoM,MOJIa CbPkeTe Ce c HAUNOOTDeN 3a OBCNYBAHe Ha KIMENTH. Hne HOCIM OTTOBOPHOCT 3a UETn, CAMO AKO CbBeNTe 3a peMOHT ca cna3eHN npabInHo.
1.2 06aCHeHne Ha cHMBOJInTe
1.2.1 HnBa Ha onaCHOCT
IpeynpeintenHnBaCe cBcTOrT OT CmBOJ nCnHaHa Dyma.CnrHaHaTa yMa noka3Ba cepno3HOCTTA Ha onaCHOCTTA.
CIMBOHTE3aONACHOCTCa CIMBOHNUH N3o6paXeHNA, KOHTO DaBaT INDINKAUHA 3a BnDa ONACHOCT.
BTo3n DOKyMeHCTe H3N013BaT CNEdHInTe CMBOIN 3a OnaCHOCT:
| Симboл за опасост за чужения | ОвноPre dedуриdentелно сбоб Shedи Опасост от[elektrovesко наразожения |
| Пuck ot[eckлосnia] | |
| Опасost от[nорязвania] |
OTHOCHO To3n DokyMeHT
| Симbol 3a onachoct 3начени | Опachoct ot пемарази Опachoct ot горец поьрхости |
| Опachoct ot симно магнисто пл; Опachoct ot неонисяцю лычени |
Ta5nuu2: CumbOnu 3a onachocm
1.2.3 CtpyKtpa Ha npéDynpeXkDeHnra
PepynpexdHnraT BTO3N DOKMeHT IMaT CTAHapTN3npaH BbHwEHN BID N CTAnDAPTN3npaH CTpykTypa.

ONACHOCT
BnHn3ToyHKn Ha onaCHOCTTla!
Bb3mOHHnocpeHnO tNfHopapaHeHa onaHocTt/npedynpckdHeHe
Mepkn 3a6paHn 3a npDoTbpaTbaHe Ha onaChocTta.
CneHnIaPnMep NOKaBA np6dynpEKeHHe, KoTo yBcOmRA 3a TOKOB Yap, npeHINBnKAn OH tAcTn NoD HanpeKeHHe. CnOmeHabe Ce MApkata 3a N36RbAe Ha onacHOCTA.

ONACHOCT
Pnck OT TokOB yap npaH nuactn noH anpekeHne!
CmbptOT TOKOB ynap
KJNkhOteyepeHtneOEENKTPNHECKKOT3aXpaHbAHe NOE 60 ceHynnpdE 3aONuBaHaNe hApMeOHTA.
1.2.4 06uCNMBOJI
BTO3NIOKYMENTceH3NON3BATcNEdHNTeO6UINCNMBONI:
| Оьш симвов Зачени | |
| I | Иденихицаре на спесиален сьвет (Tekst w/ллграфика) |
| I | Иденихицаре на постс сьвет (самоTekst) |
| I | Иденихицаре на врьзka Кьм Вideоурок |
| I | Иденихицаре на необхочимite ИСТрумени |
| I | Иденихицаре на необхочимiteпраздарителни устовия |
| I | Иденихицаре на устовie (ako ...,Тогава ... ) |
| I | Иденихицаре на рezупат |
| I KapT I Dechenixiцarpe Ha Klnoh nII pyToH | |
| [00123456] I dentei xhuiicpae Ha KaTaojexeH Homep | |
| Ctatac Ydenthixuipae Ha nokazamry Tekt/ I przozepce (Ha dincpney Ha ypeda) | |
Ta6nua3:06u cumeonu

Be3onachocT
2.1 06uHnHCTpyKu3a6e3onacHOCT
2.1.1 BcHKn DoMaunHn ypeiN
Puck OT TOKOB yap nopadn qactn noh HanpexeHne!
- PrguKPi pR eMOHTN, BKNIOHbAaN eNEKTPnEeCKN KOMHOHeHtN, MOrat Da doBedeAt Do TOKOB ydAp!
- Pankachate yepda oTe eneKtpueckaTa mpeka 3a nohe 60 cekyHdi, npeDi da 3a-noCHte pabOta.
Cnepe moHHTA TpRABa da ce HbPnpoBepeka 3a 6beonacOCT bcrnacho VDE 0701 nH B cTobETCTBn CbC neuHmHNTHe 3a cTpanahat panaOpE6b
Puck OT HapaHbAbe OTOCTPNp b6oBe!
Hocete npedn3n pkbauu
PCK OT pme3A8Na BO peme HA pMeOH, NOpIbJbKHa,OTcPraBaBA Ha HnE3PbABHOCTN andepBn3npaIe TkHn DBeWKeu CE KOMNoHEHTn
Hocete3aunTHn06yBKn.
3akpenete TeXKNTe KOMNOHEHTN, Taka Ye Da He naHaT.
He no3BONRABaTe KOHTaKT Ha YAcTn OT TAnOTo C DmXeUc Ce KOMNoHEHTN.
Pnck 3a 6e3oanacocTtA/foHKuHraTa h ypeDa!
- 13no3BaIte cmo opunHaJIH pe3epBHN qactN.
PnCK OT NOBpeHa eNEKtpocTaTmHc YbCTBNTENH KOMnoHeHTN (ESD)
HeDOKOcBaTeMoDyInTe,BKNIOHTeHnHO Bp3Kn IN PNOBODHNKOBN TbTnua.

INHcTpymEnTn NOMOuN CpeDCTBa
| посочане Роббости Избражения | |
| Зашатна Кьрпа [00342013] | 60 см x 50 см |
| Плесka OTberpта Врьх 2,4 ММ x 0,4 ММ x 60 ММ, В кOMПЕКТа [00341820] | ① |
| Спесален Ист- румент [00342180] | |
| Смужателна чаша [00342224] | Ø50 MM |
| Нakраимник Торх TX20 [00340865] | 6,3 MM (1/4") |
| Плесka OTberpта Врьх 10 ММ x 1,6 ММ x 200 MM | ① |
MoHTnpaIteB06paTeHpeI.

PemOH
4.4 CmHa Ha rohata naHTa Ha BpaTata (BpTa c dncnnei)
Cneunannn HNCTpyMeHTN:
HakpaHHK Torx TX20 6,3 MM (1/4") [00340865]

PDEUYPEKDEHNE
Teekn, o6emncTuypeu!
MoHTnpaIteB06paTeH peI.

PemOH
4.5 CmHa Ha cpeHata naHTa Ha Bpata
Cneunannn HNCTpyMeHTN:
HakpaHHK Torx TX20 6,3 MM (1/4") [00340865]

A PDEyPExkEHN
Texk, o6emnctuypei!
MoHTnpaIteB06paTeHpeI.

PemOH
4.6CMHaHa DonHaTa NaHtHa BpTaTa
Cneunannn HNCTpyMeHTN:
HakpaHHK Torx TX20 6,3 MM (1/4") [00340865]

PDEYIPKXDEHNE
Teekn, o6emncTuypeu!
MoHTnpaIteB06paTeHpeI.

PemOH
4.7CMHaHa paΦTa
N3nCKBaHe:
BpaTaTa e oTbopeHa.
4.7.1 N3BaXdAne Ha paΦTa
H3dbpnaTepaTa.
PaftbtecbaneH.
4.7.2 MoThIpaHepaPdTa
MOHTnpaTeB06paTeHpeI.

PemOH
4.8 CmHa Ha Ta6nukata 3a 6ytnkn
M3nCKBaHe:
BpaTaTa e oTbopeHa.
4.8.1 Cbanahe Ha Ta6nukata 3a 6ytnkn
H3dbpnaTe Ta5nHkata 3a 6ytnkn.
Ta5nukata3a6ytnknecbaneHa.
4.8.2 MoThiPaHe Ha Ta6JnUkata 3a 6yTnIkn
MOHTnpaTeB06paTeHpeI.

PemOH
4.9 CMraHa Ha cTeJaKa Ha BpaTaTa
M3nCKBaHe:
BpaTaTa e oTBopeHa.
4.9.1 N3Baxdahe Ha CTenaxa Ha BpaTata
NobHHeTcTeJaxHaBaPaTaHarope.

CTenakbTaHaBpaTaTaeCBaneH.
4.9.2 MoNTupaHc HcTeNaKa Ha BpaTaTa
MOHTnpaTBeBobpaTepeI.

PemOH
4.10 CmHa Ha peryInpyeMn cTeJax Ha BpaTaTa
N3nCKBaHe:
BpTaTa e TbopeHa.
4.10.1 CbAHa He perynpyemra TcEnaKa Ha BpaTaT
PpeMeCTePeYnIPyEMIaTNO BnCOuHbA CTENaK HA BpataTA HArOpe, DOKaTO CE OcbOboN ot DbXbaKa.
PernynpemyTCTeJaxHaBpataeCbaJeH.
4.10.2 MoThIpaHe Ha peryInpyemn cTeJax Ha BpataTa
MOHTnpaTBeB o6paTeH peI.

PemOH
4.11 CMHa Ha KOHTeHepa 3a 3ampa3eHN XpaHNTeHH npOdykTN
N3nCKBaHe:
BpaTaTa e oTBopeHa.
4.11.1 3BaXdaHe Ha KOHTeHepa 3a 3aMPa3eHN XpaHHTeHH npOdyKTH
- 13dbpnaTe DOKpaI KOHTeHepa 3a 3aMPa3EHx pHaHTeHIN npOdykTN (1). 2. N3BaTe KOHTeHepa 3a XpaHHTeHIN npOdykTN (2).
KoHTeHepb3a 3aMPa3EHn XpaHHTeHn npOpykTN e N3BaJeH.
4.11.2 MoHTnpaHe Ha KOHTeHepa 3a 3ampa3eHxpaHnTeHn npOdykTn
MOnTnpaTaeB06paTeHpeJ.
MOHTnpaTaTeB06paTeHpeI.

PemOH
4.14 CMRAHa HA LED cnot JAmnata
CneuaJIHHnHCTpymeHTn:

CneuaJIeHnHCTpyMeHT [00342180]

BauHrT ype d cah6d n CLED ocBteNHe, KoTo He n3nckBa noDpKka.
TOBA ocBtneHMe MOKe Da 6bDe pemOHtnaHO cAmO OT cNeuHaHCT
OT cNy6bata 3a 06cNoYkBaHe HA KIneHTn NnO Tc KaanmFncnPAnH Te Hn!


ONACHOCT
Pnck OT TokOB ydap npaH nuH anpeXeHne!
Onachoc3a KIBOTA OT TOKOB ynap B CnyaHa HEnpaBnnepeMOHT
Eeektpnckte Taee Tp86Ba da ce pemohnpat ot kbaanHnHnnpan HneektoxHn.
CnEi peMOHTA Tp6BaJa Ce n3BbpN npOBepKa 3a Be3ONaCHOT cbrIacHO VDE 0701 mN B cBtBETCTBHe CbC cneunHnHnTe 3a cTpaHATA paanopepe


ONACHOCT
PnCK OT TOKOB ydap npaH nuacn noH anpeXeHne!
CmbptOT TOKOB ydap
KnHIOyte ypeNTe O t ENEKTPUeCKTO 3axpaHbAbe NOhe 60 ceHyHNI pEINe 3aIOBAHE Na pEOHOTA.


SHMATEJIHO
Octpn pb6oBe!
HapaHaBaHmO Tnpa3BaHe
HocTe npedna3n pbKaBn.
N3nCKBaHe:
YpeIbTe EINKIOUeHOT3aXpaHbHaHeTo.
Bpaatae oTBopeHa.
4.14.1 CbānHa He LED cNOT JAmNaTa
- INON3BAIte cneunaneHnHCTpyMeHT, 3a da n3BaIte LED cnot lamnata (1).
2.ИЗкнчate eNeKtpMueckite Bpb3kn HA LED cnot namnata.
LED cnot namnata e cbanha.
4.14.2 MoHTnpaHc HA LED cNOT nAMnata
MoHTnpaIteB06paTeHpeI.

PemOH
4.15 CMraHa HA LED oCBetneHneTo otrope
CneuaJIHHHnCTpymeHTN:
NnockaOTBeptKaBpbx2,4MMX0,4MMX60MM,B KOMPnEeTa[00341820]

BaWnAT ype n cHa6dene C LED ocBtneHme, KoTe He H3NcKbNa oI- DpBkKa. Toba ocBtneHme MOKe Da 6bJe peMOHTnpaHO cAmO t CneuHaNCTU ot cnykbaTa 3a 06cnykBaHe Ha KIneHTn NIN O TBANFncPapnTexHnui!


ONACHOCT
Pmck ot TKOB yub npoprna tactn noanHanpexkHe!
OnAnOHCT 3a KWBOTA ot TKOB yub aB city nHenPBAP
EeKtPrnTeKteTneAactn TpRbBa da ce pEmOHnpat OT KBAIINPHUNPAHn EeKToTeXHn.
CnepemOHATApr6BaIaCne3bBpIINnpOBepKa3a6e3oNaCHOCTcRlachOVDVE0701nnBc0TBeTCTBHe CbCneunHHTNE3a cTpaHATApaanope6n


ONACHOCT
PnCK OT TOKOB ydap npaHn qactn noHanpeXeHHe!
CmbptOT TOKOB ydap
NtKIOHcTeYE pUdTE O t ENEKTPrueCKoTo 3aXpaHbAHe NOHE 60 CEYHNn PnpDl 3aONuBAHa nePMeHTa


BHIMATEJIHO
Octpn pb6oBe!
HapaHbHaMOnTnnp3BaHe
Hocete npedna3n pkaBn.
N3nCKBaHe:
YpeBt E N3KIOUeH OT 3axpaHbAHHeTO.
BpaTata e OTbopeha
TopHnTe BbTpewHnФmTNHn Ce OToCTpaHBAt.
4.15.1 CbajnHe Ha LED ocBtJeHneTo
- Ppemectete LED ocBETneHneto HnABO.
CbpbbaHTo Kb mEeKtpnueckaT Mpeka H LED oCBETneHHeTo e npekbcHATO.
2.Ocbo6oTe KyKte HaLEDocBeTneHMeTo.


PemOH
3.CBaIeTeLEDocBETHeHnETo,pNIMBKBaIKnroHanpei.

LEDOCBETHeHMeToeCBaneHo.
4.15.2 MoHTnpaHe Ha LED ocBETneHnTo oTrope
MoHTnpaIteB06paTeHpeI.

PemOH
4.16 CMHa Ha LED cBETnHaTa Ha cTpaHnHaTa JeHTa
CneuaJIHHHnCTpymeHTN:
CmykateHnHa yaa 05Mm [00342224]

Baunrtype e cah6dene CLED ocBteHne, KOeTo He n3nckba noDpKka.
Toba ocBtneHme moKe da 6bDe peMOHTnpaHO cAmO OT cNeuHaNCT
OT cnyk6ata 3a o6cnykBaHe HA KIneHTn NnO Tc KaanmPupaHnTe HnH!


ONACHOCT
Pnck OT TokOB yap npaH nuA HnpeXeHne!
Onachoc3a KIBOTA OT TOKOB ynap B CnyaHa HEnpaBnnepeMOHT
Eeektpnckte Taee Tp86Ba da ce pemohnpat ot kbaanHnHnnpan HneektoxHn.
CnEi pemOHa Tp6BaJa ce n3bPm npOBepKa 3a 6e3oNaHcOCT cbrIacHO VDE 0701 mN B cBtBeTcBHe Cbc CneuHnHnTe 3a cTpaHATA paanopeD6M


ONACHOCT
PCKOTOKOByapnapaHnactnnoHanpeXeHne!
CmbptOT TOKOB ynap
N3KHyote ypeDte O t eE9KTPUeCKTO 3aXpaHbAne H06 cKynHnnpEn 3aIHOBAHa NE pEmoHTA.


SHMATEJIHO
Octpnpb60Be!
HapaHaBaHmO Tnpa3BaHe
HocTe npedna3n pbKaBn.
N3nCKBaHe:
YpeBt E n3KIOueH OT 3aXpaHbAHeTO.
Bpatae o TBopeha.
PaptoBete Ha xnaDnHToO tDeHeHne ca n3BaHeH.
4.16.1 CBANHE HA LED CBETINHATA Ha cTpaHHTaJeHTA
- Noctabete CmykatenHATA qhaa Bbpxy ropHATA pTeA HA LED cBTnHATA ha CTPAHNHATA neHa.

PemOH
2.Иььрайе cmykateннata淘汰аспpeннata LED cbetnHa Ha CTpaHHTaJIeHTa CEDHO BbPTeINBO DmKeHne.
- 3nKIOeTe eNKeTpuNecKa Ta Bp3ka HA LED CBeTIHATA Ha cTaPAHHTA nEHTA. LED CBeTIHMA Ha cTaPAHHTA nEHTA eCBANEHa.
4.16.2 MoHTnpaHc Ha LED cBeTnHaTa Ha cTpaHnHaTa neHtA
1.Cbpxte enektpueckata Bpb3ka HA LED cbetnhata Ha ctpaHHata nehta.
2.ФИКСИРАТЕ LED CBETINHATA И CTРANHATA LAHNTA HENHOTO MRCTO HA CTENHATA HO TDENEHENTO (KYKITE UAPKABT).
LED cbETnHaTt ha CtpaHHTa TneHTa e MoHTnpaHa.

PemOH
4.17.1 CbānHa He LED cNOT JAmNaTa
1.Ocbo6oTeKaIbΦaHaLED cnot lamnata.

2.Издьрпайе калбфа Ha LED сnot lamnata habытpe n eДновремнс с haTин HeTe Hanpei.


PemOH
- OTeJeTeMoDyHa HLEDcNOTnAmnata.
- INKIOUeTe eNEKTPnHeckata Bpb3ka Ha LED cnot JAmnata.
LED cnot namnata e cbaneHa.
4.17.2 MoHTnpaHc Ha LED cNOT JAMnata
MoHTnpaTBeBoppaTeHpeJ.
4.17.1 Fjemelse at LED-spotlampe 116
4.17.2 Montering of LED-spotlampe 117
Sorg for at sikre apparater mod at glide.


PAS PAI
Fare for nedfaldende deleg pga. Iosnedeskruer!
ronskade pga. nedfaldende dele
Sorg for at sikre componenten mod at falde ned.

BEM/ERK!
Fare for nedfaldende dele pga. Iosnede skruer!
Sorg for at sikre componenten mod at falde ned.
Preindstilling:
Sorg for at sikre apparater mod at glide.


PAS PAI
Fare for nedfaldende deleg pga. Iosnedeskruer!
rsonskade pga. nedfaldende dele
Sorg for at sikre componenten mod at falde ned.

BEM/ERK!
Fare for nedfaldende dele pga. Iosnede skruer!
Sorg for at sikre componenten mod at falde ned.


FARE
Sorg for at sikre apparater mod at glide.

PAS PAI
Fare for nedfaldende dele pga. Iosnede skruer!
ronskade pga. nedfaldende dele
Sorg for at sikre componenten mod at falde ned.

BEMERKI
Fare for nedfaldende deleg pga. Iosnede skruer!
Sorg for at sikre componenten mod at falde ned.
Preindstilling:
Sorg for at sikre apparater mod at glide.


PAS PAI
Fare for nedfaldende dele pga. Iosnede skruer!
ronskade pga. nedfaldende dele
Sorg for at sikre componenten mod at falde ned.

BEM/ERK!
Fare for nedfaldende dele pga. Iosnedeskruer!
Sorg for at sikre componenten mod at falde ned.
Preindstilling:
4.14 Udskifting at LED-spotlampe
Nodvendig voektoj:
Specialvarkort0j [00342180]

4.14.2 Montering of LED-spotlampe
Montér i omvendr rakkefelge.

Reparation
4.15 Udskifting at LED-lampe foroven
Nodvendig voarktoj:
Kaervskruetraekker Blad 2,4 mm x 0.4 mm x 60 mm i saettet [00341820]


Preindstilling:
4.17 Udskifting at LED-spotlampe
Nodvendig voektoj:
Specialvarkort0j [00342180]
Kaervskruetraekker Blad 2,4 mm x 0,4 mm x 60 mm i saettet [00341820]

Apparaat is losgekoppeld is van de stroomvoorziening.
Deur is open.
Repair hints - Fridge-freezer
1 Concerning this document. 148
1.1 Important information 148
1.1.1 Purpose 148
1.2 Explanation of symbols 148
1.2.1 Danger levels.. 148
1.2.2 Hazard symbols 148
1.2.3 Structure of the warnings.. 149
1.2.4 General symbols 149
Safety. 150
2.1 General Safety instructions 150
2.1.1 All domestic appliances 150
Tools and aids. 151
Repair 152
4.4 Replacing door upper hinge (door with display) 158
4.7 Replacing shelf. 162
4.7.1 Removing shelf 162
4.7.2 Installing shelf 162
4.8 Replacing bottle tray 163
4.8.1 Removing bottle tray 163
4.8.2 Installing bottle tray. 163
4.9 Replacing door rack 164
4.14 Replacing LED spot light 169
4.14.1 Removing LED spot light 169
4.14.2 Installing LED spot light 169
4.15 Replacing LED top light 170
4.15.1 Removing LED light. 170
4.15.2 Installing top LED light 171
4.16 Replacing LED side bar light 172
4.16.1 Removing LED side bar light 172
4.16.2 Installing LED side bar light 173
4.17 Replacing LED spot light 174
4.17.1 Removing LED spot light 174
4.17.2 Installing LED spot light 175
Concerning this document
1.1 Important information
1.1.1 Purpose
These repair hints support consumer to repair appliances by himself according to the applicable eco-design regulation (as of 03/2021).
They contain information how to exchange defined spare parts including warnings and risks.
In case of questions, please contact our customer service. We will only be liable for damages if the repair hints have been followed properly.
1.2 Explanation of symbols
1.2.1 Danger levels
The warning levels consist of a symbol and a signal word. The signal word indicates the severity of the danger.
Table 1: Danger levels
| Warning level Meaning | |
| Danger | Non-observation of the warning message will result in death or serious injuries. |
| Warning | Non-observation of the warning message could result in death or serious injuries. |
| Caution | Non-observation of the warning message could result in minor injuries. |
| Notice | Non-observation of the warning message could result in damage to property. |
1.2.2 Hazard symbols
Hazard symbols are symbolic representations which give an indication of the kind of danger.
The following hazard symbols are used in this document:
| Hazard symbol Meaning | |
| ! | General warning message |
| Danger from electrical voltage | |
| Risk of explosion | |
| Danger of cuts | |
| Danger of crushing |
Concerning this document
| Hazard symbol Meaning | |
| Danger from hot surfaces | |
| Danger from strong magnetic field | |
| Danger from non-ionizing radiation |
Table 2: Hazard symbols
1.2.3 Structure of the warnings
Warnings in this document have a standardised appearance and a standardised structure.
Danger
Type and source of danger!
Possible consequences of ignoring the danger / warning.
Measures and prohibitions for preventing the danger.
The following example shows a warning that warns against electric shock due to live parts. The measure for avoiding the danger is mentioned.
Danger
Risk of electric shock due to live parts!
Death by electrocution
- Disconnect appliances from electrical supply at least 60 seconds before disconnecting repairs.
1.2.4 General symbols
The following general symbols are used in this document:
| Gen. symbol Meaning | |
| 1 | Identification of a special tip (text and/or graphic) |
| i | Identification of a simple tip (only text) |
| Identification of a link to a video tutorial |
| Gen. symbol Meaning | |
| Identification of required tools | |
| Identification of required preconditions | |
| Identification of a condition (if ..., then ...) | |
| Identification of a result | |
| [Start]Identification of a key or button | |
| [00123456] Identification of a material number | |
| Status Identification of displayed text / window(in the appliance's display) | |
Table 3: General symbols
Safety
2.1 General Safety instructions
2.1.1 All domestic appliances
Risk of electric shock due to live parts!
Errors by repairs involving electrical components can lead to electrical shock!
- Disconnect the appliance from the mains for at least 60 seconds before starting work.
After the repair have a safety test according VDE 0701 or country-specific regulations performed.
Risk of injury from sharp edges!
Wear protective gloves.
Risk of crushing during repair, maintenance, troubleshooting and service due to heavy and moving components
Wear protective shoes.
- Secure heavy components from falling down.
- Do not stick body parts into moving components.
Risk to the appliance's safety / function!
Only use original spare parts.
Risk of damage to electrostatically sensitive components (ESDs)!
- Do not touch the modules, including connections and conductor paths.

Tools and aids
| Designation Details Images | ||
| Protection cloth [00342013] | 60 cm x 50 cm |  |
| Slotted screwdriver | Blade 2.4 mm x 0.4 mm x 60 mm, in the kit [00341820] |  |
| Special tool [00342180] | ||
| Suction cup [00342224] | Ø50 mm | |
| Torx Bit TX20 [00340865] | 6,3 mm (1/4") |  |
| Slotted screwdriver | Blade 10 mm x 1.6 mm x 200 mm |  |
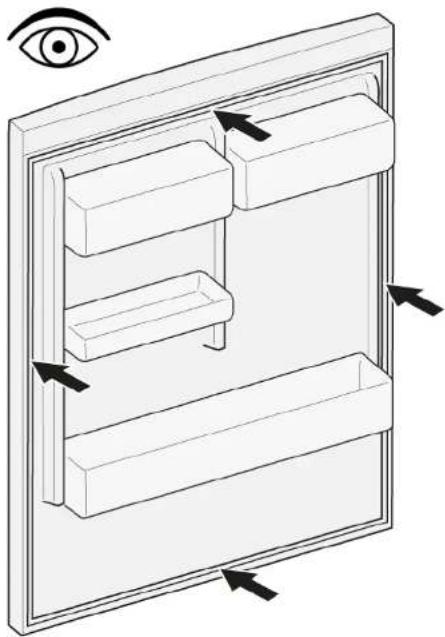
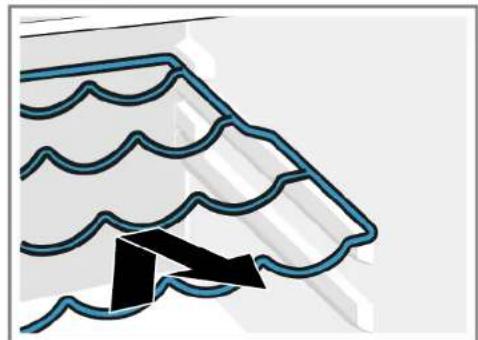
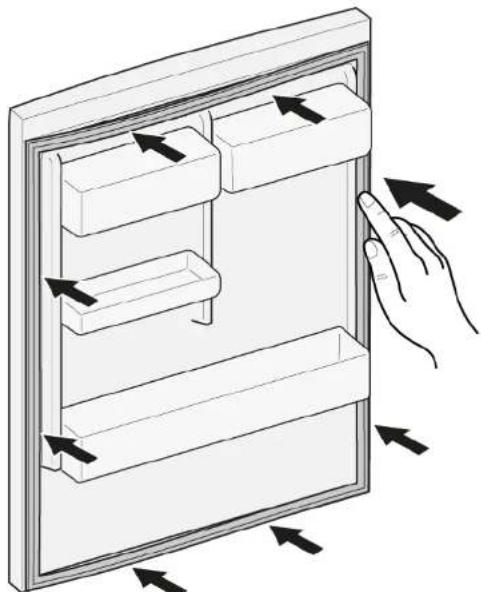
Prerequisite:
Door is open.
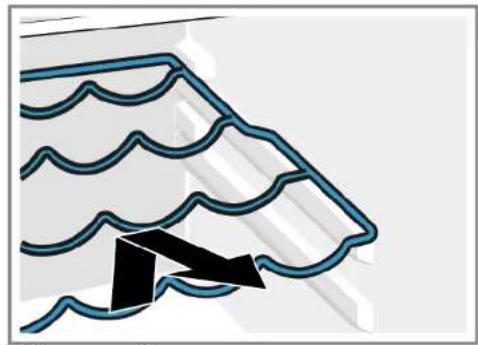
- Release door gasket from the groove on right and left corner.
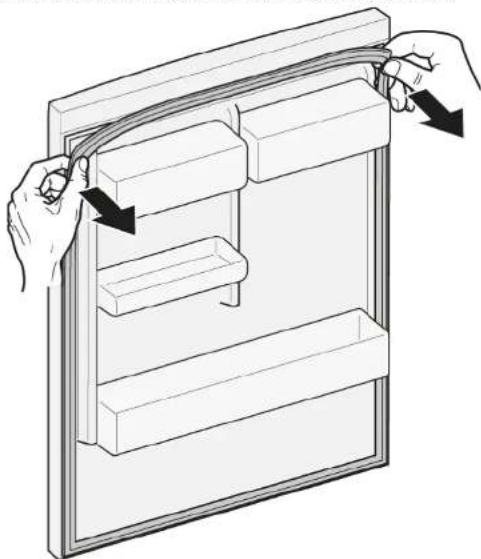
- Pull out door gasket from groove.

Door gasket is removed.
| Thickness of new door gasket may deviate slightly from thickness of old door gasket. This will not affect closing behavior and long-term function. | |
| If your appliance has adjustable hinges or hinge attachments, you can optimize the closing behavior subsequently. | |
| Small side holes in door gasket are functional (required for ventilation). These are not production faults. |

Repair
- Check groove for gasket for damage.
- If groove for gasket is it is damaged.
- Contact customer service.
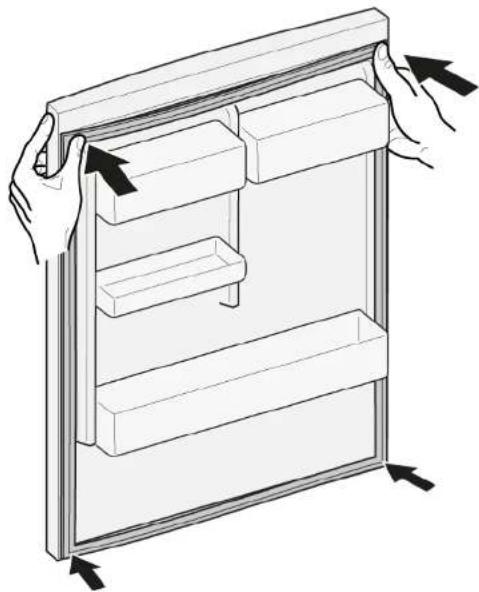
- Slight deformation of door gasket is normal and does not affect its function. It is recommended to straighten door gasket before inserting it into appliance.
Heat door gasket with a hair dryer or hot water and manually reshape it.
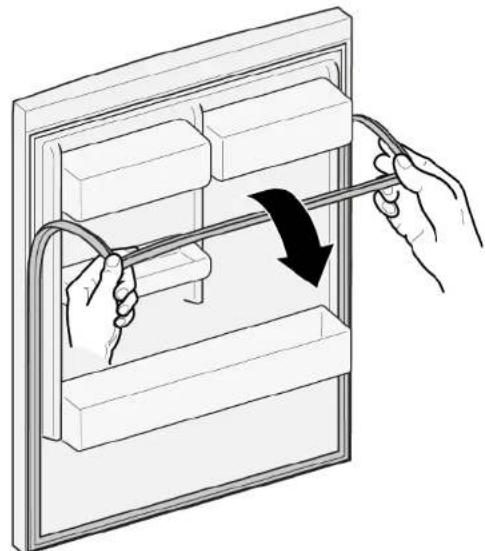
- Push corners of gasket at the top and bottom to the groove.

Repair
- Press whole gasket step by step into the groove.
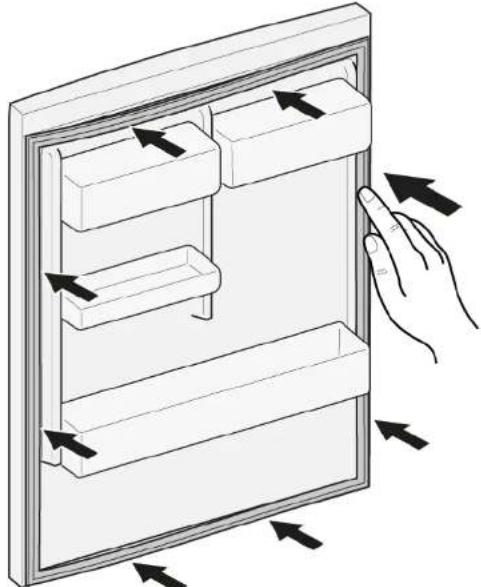

Door gasket is installed.
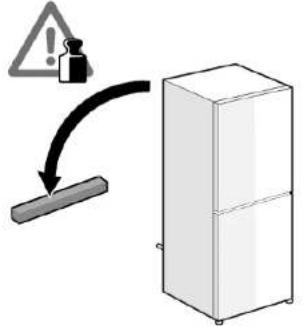
Slotted screwdriver Blade 10 mm x 1.6 mm x 200 mm
Prerequisite:
Appliance is disconnected from power supply.
Door is open.
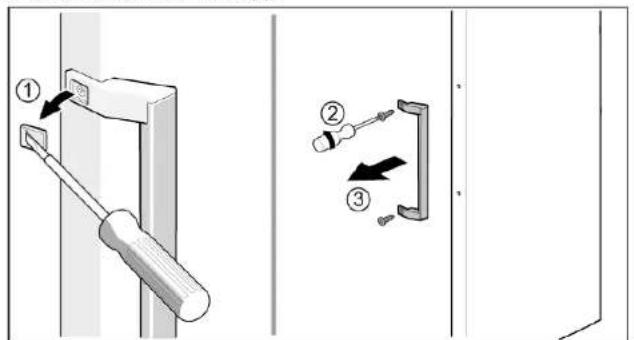
4.2.1 Removing door handle
-
Remove two screw caps (1).
-
Unscrew two screws (2).
- Remove door handle (3).


Door handle is removed.

Door handle for the second door can be removed in the same manner.
Install in reverse order.

Repair
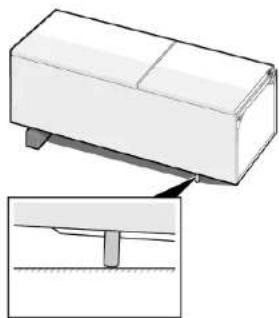
Appliance is disconnected from power supply.
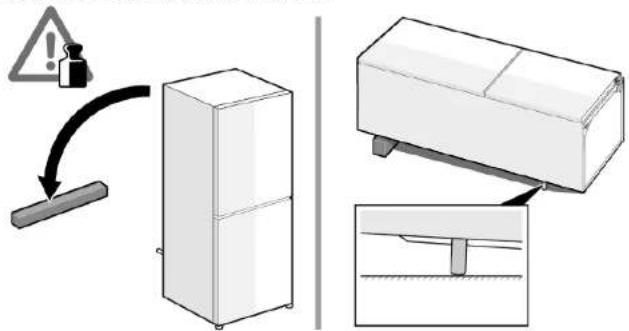
Appliance interior fittings are removed.
- Place appliance on the back side.


Repair
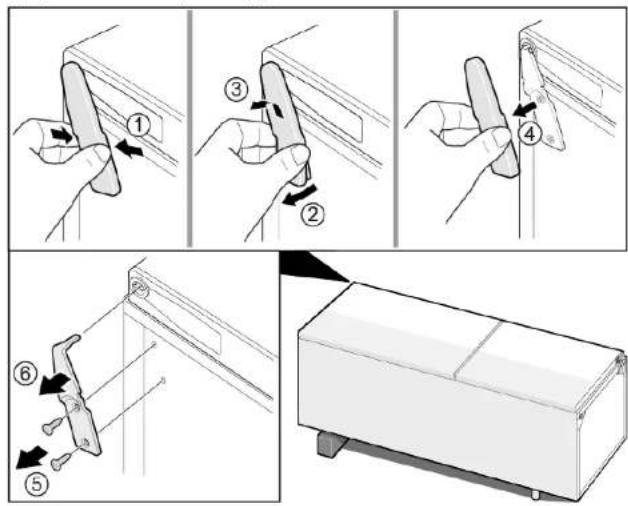
2.1. Press upper hinge cover on both sides (1).
- Move out upper hinge cover (2).
- Rotate hinge cover (3).
- Remove upper hinge cover (4).
- Unscrew two screws (5).
- Remove upper hinge (6)


Upper hinge is removed.
Install in reverse order.

Repair
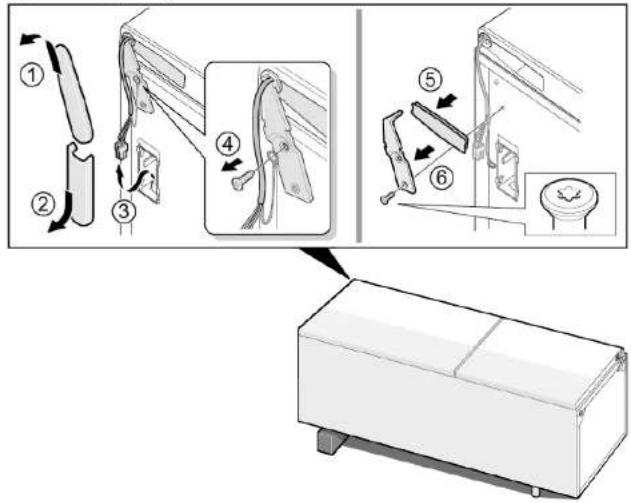
4.4 Replacing door upper hinge (door with display)
Required tools:
Torx Bit TX20 6,3 mm (1/4") [00340865]
Warning
Heavy, bulky appliances!
Back and muscle injuries
- Appliance door removal operation should only be carried out by trained specialists.
To move the appliance, two people are required.
Use only suitable tools and equipment.

Caution
Sharp edges!
Cut injuries
Wear protective gloves.
Warning
Slipping of tilted appliances!
Bone fractures / crush injuries
Secure appliances against slipping

Caution
Risk of falling parts due to released screws!
ury because of falling parts.
- Secure component from falling down.
Notice
Risk of falling parts due to released screws!
Damage to other parts of the appliance or at customers home e.g. bot
tom.
- Secure component from falling down.
Danger
Risk of electric shock due to live parts!
Danger to life through electric shock in case of improper repair
Electric parts should be repaired by a qualified electricians.
After the repair have a safety test according VDE 0701 or country-specific regulations performed.
Danger
Risk of electric shock due to live parts!
Death by electrocution
- Disconnect appliances from electrical supply at least 60 seconds before starting repairs.
Prerequisite:
Appliance is disconnected from power supply.
Appliance interior fittings are removed.
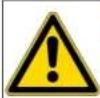
- Place appliance on the back side.

Repair
-
- Remove upper hinge cover (1).
-
Remove cable box cover (2).
- Disconnect electrical connection (3)
- Unscrew ground connection screw (4).
- Remove cable protection (5).
- Unscrew the screw (6)
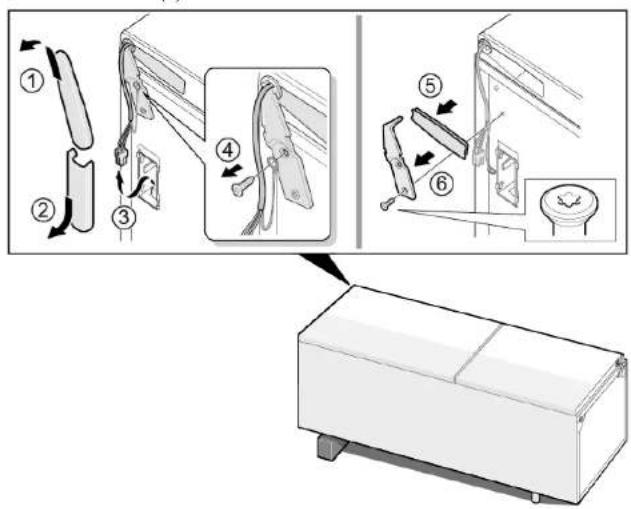

Upper hinge is removed.
Install in reverse order.

Repair
4.5 Replacing door middle hinge
Required tools:
Torx Bit TX20 6,3 mm (1/4") [00340865]


Heavy, bulky appliances!
Back and muscle injuries
Appliance door removal operation should only be carried out by
trained specialists.
To move the appliance, two people are required.
Use only suitable tools and equipment.

Sharp edges!
Cut injuries
Wear protective gloves.


Slipping of tilted appliances!
Bone fractures / crush injuries
- Secure appliances against slipping

Risk of falling parts due to released screws!
ury because of falling parts.
- Secure component from falling down.


Risk of falling parts due to released screws!
Damage to other parts of the appliance or at customers home e.g. bot
tom.
- Secure component from falling down.
Prerequisite:
Appliance is disconnected from power supply.
Appliance interior fittings are removed.
Door upper hinge is removed.
4.5.1 Removing door middle hinge
- Remove fridge compartment door (1).
- Unscrew two screws (2).
- Remove middle hinge (3).
Middle hinge is removed.
4.5.2 Installing door middle hinge
Install in reverse order.

Repair
4.6 Replacing door lower hinge
Required tools:
Torx Bit TX20 6,3 mm (1/4") [00340865]

Heavy, bulky appliances!
Back and muscle injuries
- Appliance door removal operation should only be carried out by trained specialists.
To move the appliance, two people are required.
Use only suitable tools and equipment.

Sharp edges!
Cut injuries
Wear protective gloves.

Slipping of tilted appliances!
Bone fractures / crush injuries
Secure appliances against slipping

Risk of falling parts due to released screws!
ury because of falling parts.
- Secure component from falling down.

Damage to other parts of the appliance or at customers home e.g. bottom.
- Secure component from falling down.
Prerequisite:
Appliance is disconnected from power supply.
Appliance interior fittings are removed.
Upper hinge is removed.

Middle hinge is removed.
4.6.1 Removing door lower hinge
- Remove freezer compartment door (1).
- Unscrew the screw (2).
- Turn lower hinge out (3).
- Remove lower hinge (4).
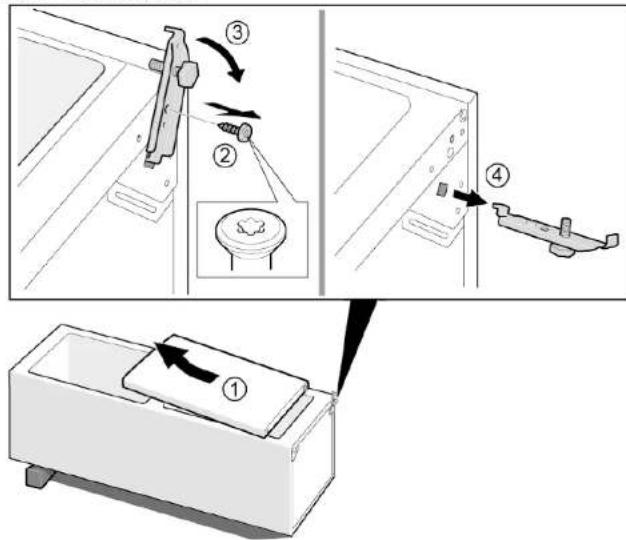

Door lower hinge is removed.
Install in reverse order.

Repair
4.7 Replacing shelf
Prerequisite:
Door is open.
4.7.1 Removing shelf
Pull out shelf.

Shelf is removed.
4.7.2 Installing shelf
Install in reverse order.

Repair
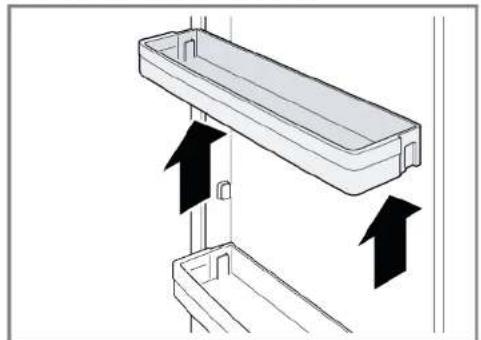
4.8 Replacing bottle tray
Prerequisite:
Door is open.
4.8.1 Removing bottle tray
Pull out bottle tray.
Bottle tray is removed.
4.8.2 Installing bottle tray
Install in reverse order.

Repair
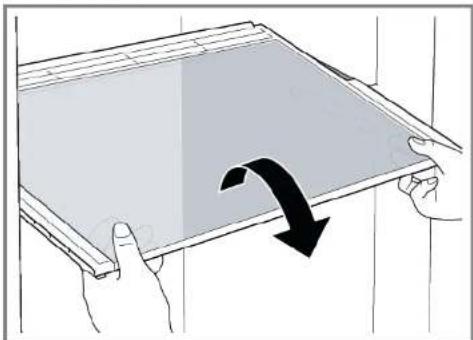
4.9 Replacing door rack
Prerequisite:
Door is open.
- Lift door rack upwards.
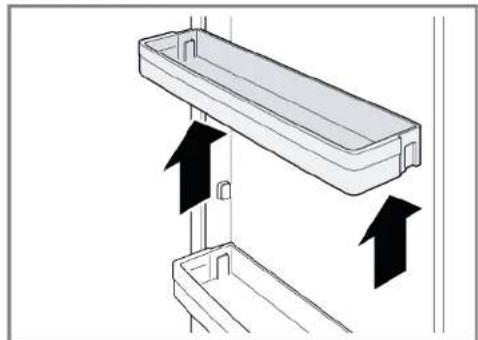
Door rack is removed.
Install in reverse order.

Repair
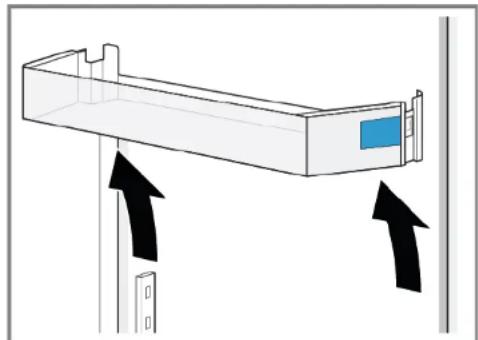
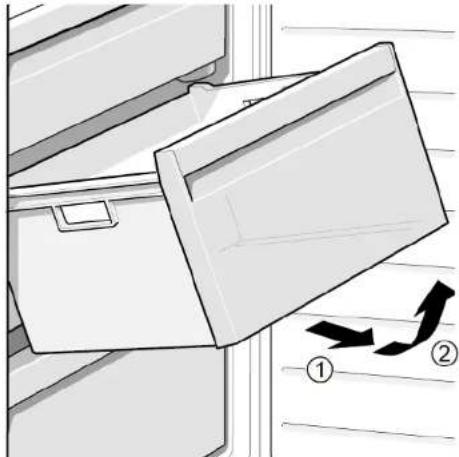
4.10 Replacing adjustable door rack
Prerequisite:
Door is open.
4.10.1 Removing adjustable door rack
- Move high-adjustable door rack upwards until the door rack is released from the holder.


Adjustable door rack is removed.
4.10.2 Installing adjustable door rack
Install in reverse order.

Repair
4.11 Replacing frozen food container
Prerequisite:
Door is open.
4.11.1 Removing frozen food container
- Pull out frozen food container all the way (1). 2. Remove food container (2).
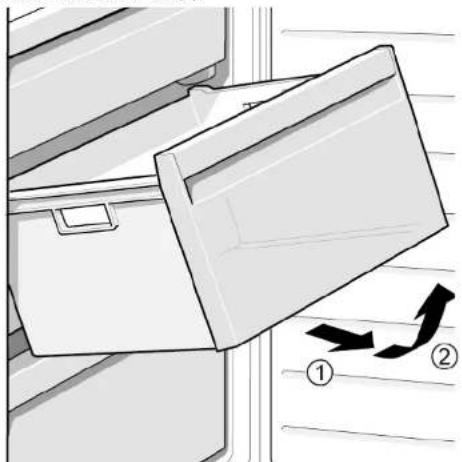
Frozen food container is removed.
4.11.2 Installing frozen food container
Install in reverse order.

Repair
4.12 Replacing container
Prerequisite:
Door is open.
4.12.1 Removing container
- Move out lower fridge container (1).
- Move out upper fridge container (2).
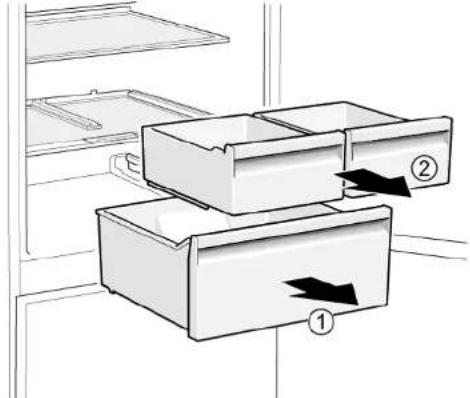

Containers are removed.
4.12.2 Installing container
Install in reverse order.

Repair
4.13 Replacing extendable container
Prerequisite:
Door is open.
4.13.1 Removing extendable container
1.Pull extendable container out all the way (1).
2. Remove extendable container (2).
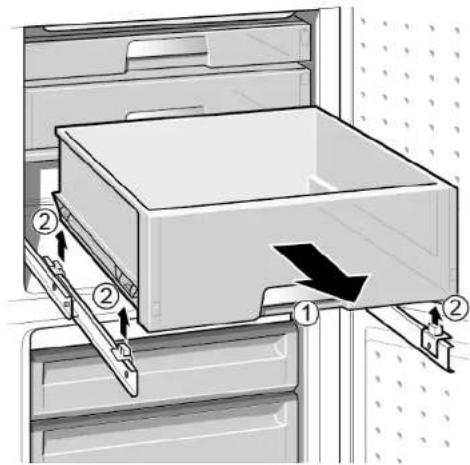

Extendable container is removed.
4.13.2 Installing extendable container
Install in reverse order.

Repair
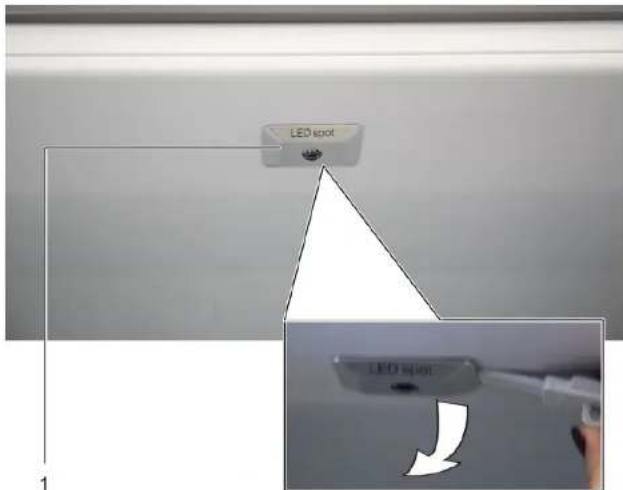
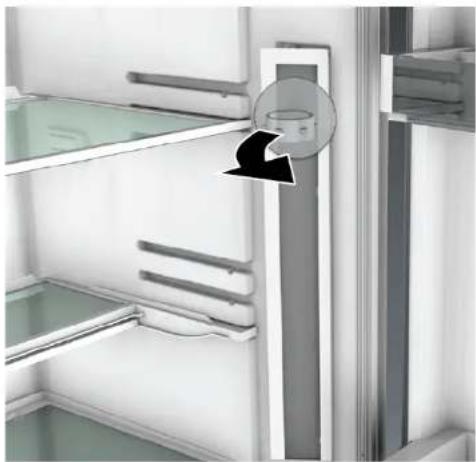
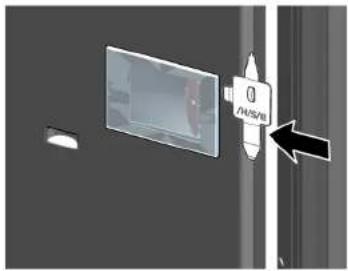
4.14 Replacing LED spot light
Required tools:
Special tool [00342180]

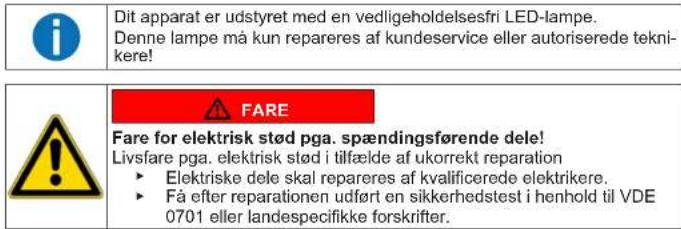
Your appliance features a maintenance-free LED light. These lights may be repaired by customer service or authorised technicians only!
Danger to life through electric shock in case of improper repair
Electric parts should be repaired by a qualified electricians.
After the repair have a safety test according VDE 0701 or country-specific regulations performed.
Prerequisite:
Appliance is disconnected from power supply.
Door is open.
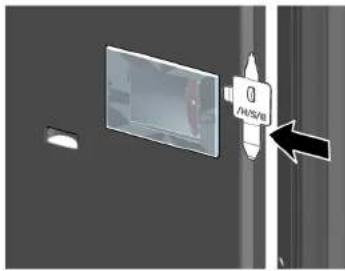
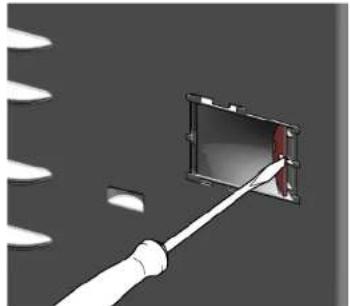
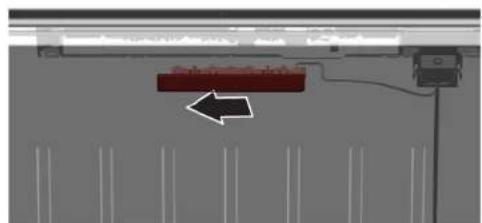
4.14.1 Removing LED spot light
- Use special tool to pull out LED spot light (1).
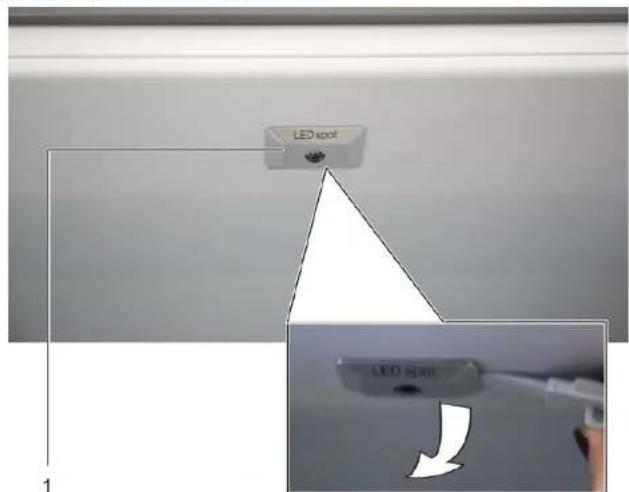
- Unplug electrical connections of LED spot light.
LED spot light is removed.
4.14.2 Installing LED spot light
Install in reverse order.

Repair
4.15 Replacing LED top light
Required tools:
Slotted screwdriver Blade 2.4 mm x 0.4 mm x 60 mm, in the kit [00341820]

Your appliance features a maintenance-free LED light.
These lights may be repaired by customer service or authorised technicians only!


Danger
Risk of electric shock due to live parts!
Danger to life through electric shock in case of improper repair
Electric parts should be repaired by a qualified electricians.
After the repair have a safety test according VDE 0701 or country-specific regulations performed.


Danger
Risk of electric shock due to live parts!
Death by electrocution
- Disconnect appliances from electrical supply at least 60 seconds before starting repairs.


Caution
Sharp edges!
Cut injuries
Wear protective gloves.
Prerequisite:
Appliance is disconnected from power supply.
Door is open.
Upper interior fittings are removed.
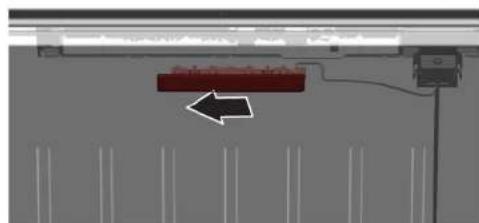
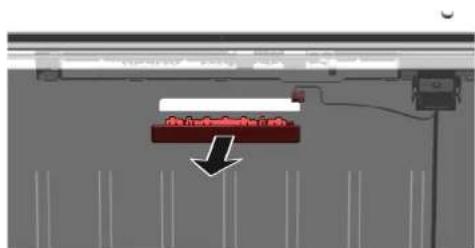
4.15.1 Removing LED light
- Move the LED light to the left side.
LED light electrical connection is disconnected.
- Release LED light hooks.

Repair
- Remove LED light moving it forward.
LED light is removed.
4.15.2 Installing top LED light
Install in reverse order.

Repair
4.16 Replacing LED side bar light
Required tools:
Suction cup 50mm [00342224]

Your appliance features a maintenance-free LED light. These lights may be repaired by customer service or authorised technicians only!


Prerequisite:
Appliance is disconnected from power supply.
Door is open.
Fridge compartment shelves are removed.
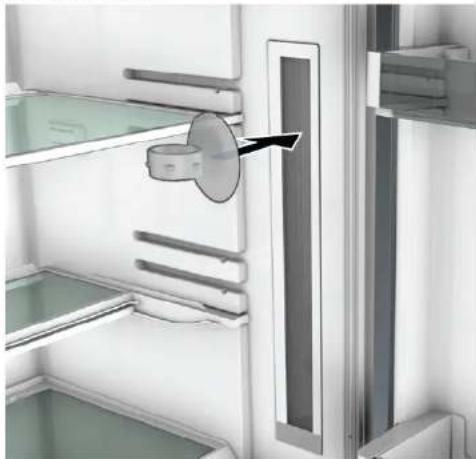
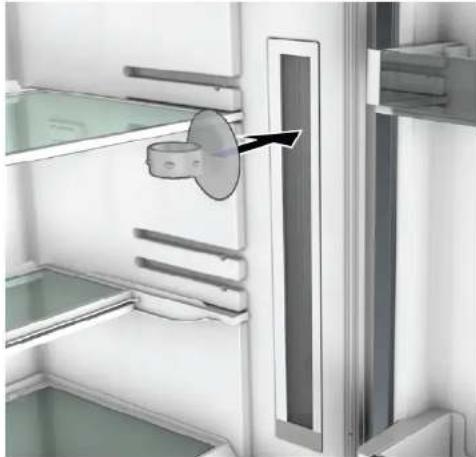
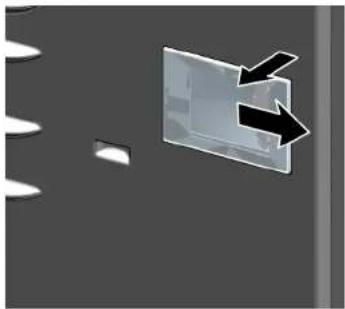
4.16.1 Removing LED side bar light
- Stick the suction cup on the upper third of LED side bar light.
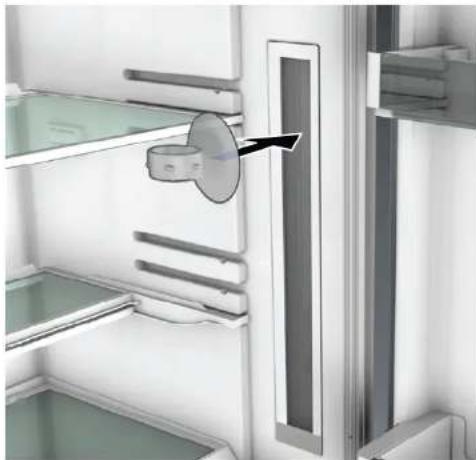

Repair
- Pull suction cup with forward LED side bar light in one rotary movement.
- Disconnect electrical connection of LED side bar light.
LED side bar light is removed.
4.16.2 Installing LED side bar light
- Connect electrical connection of LED side bar light.
- Fix LED side bar light into it's location on compartment wall (hooks click).
LED side bar light is installed.

Repair
4.17 Replacing LED spot light
Required tools:
Special tool [00342180]
Slotted screwdriver Blade 2.4 mm x 0.4 mm x 60 mm, in the kit [00341820]

Your appliance features a maintenance-free LED light. These lights may be repaired by customer service or authorised technicians only!

Danger
Risk of electric shock due to live parts!
Danger to life through electric shock in case of improper repair
Electric parts should be repaired by a qualified electricians.
After the repair have a safety test according VDE 0701 or country-specific regulations performed.
Danger
Risk of electric shock due to live parts!
Death by electrocution
- Disconnect appliances from electrical supply at least 60 seconds before starting repairs.
Caution
Sharp edges!
Cut injuries
Wear protective gloves.
Prerequisite:
Appliance is disconnected from power supply.
Door is open.
Fridge compartment shelves are removed.
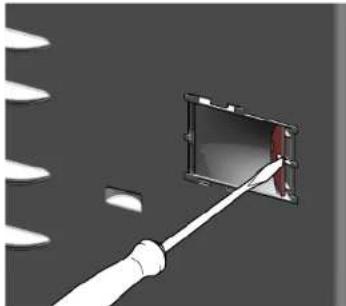
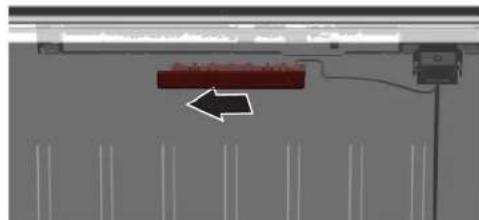
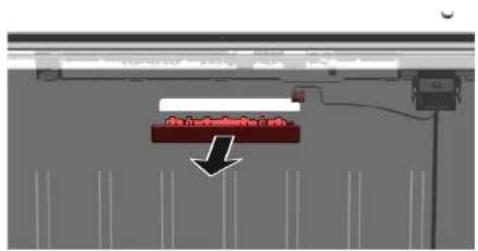
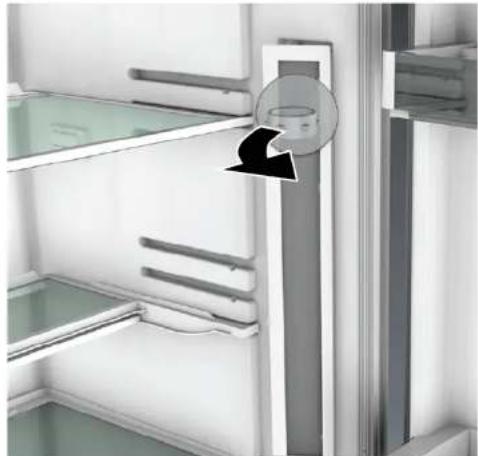
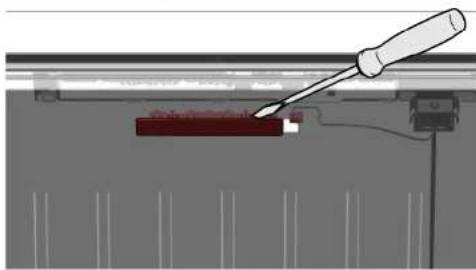
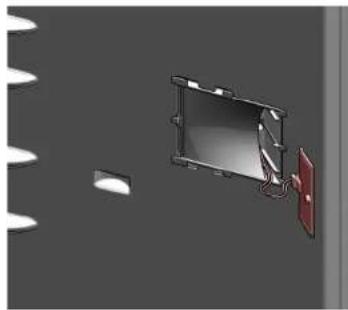
4.17.1 Removing LED spot light
- Release LED spot light cover.
- Pull LED spot light cover inwards and simultaneously push forwards.


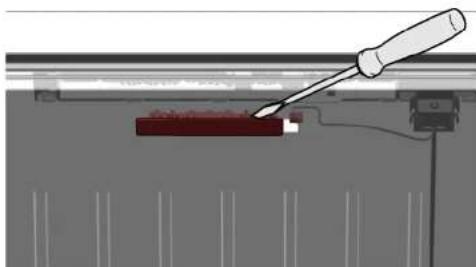
Repair
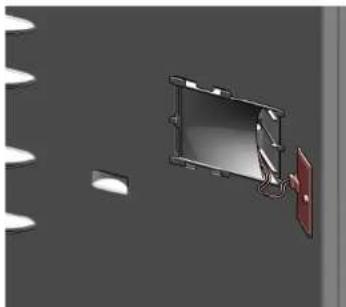
- Detach LED spot light module.
- Disconnect LED spot light electrical connection.

LED spot light is removed.
4.17.2 Installing LED spot light
Install in reverse order.
Remonditeave - Kombikülmik
Selle dokumendiga seoses 177
1.1 Tahtis teave 177
1.1.1 Eesmark 177
1.2 Sumbolite selgitus 177
1.2.1 Ohutasemed 177
1.2.2 Ohusumbolid 177
1.2.3 Hoiatuste struktuur 178
1.2.4 Üldised sumbolid 178
Ohutus 179
2.1 Uldised ohutusjuhised 179
2.1.1 Koki kodumasinad 179
Tabel 1: Ohutasedmed
1.2.2 Ohusumbolid
Eritorist [00342180]

Outil special [00342180]

m = 311
Mny avyicete TIOJovdc,ouMTpeiaqavopevwTov ouvdoewk KaT ovayuyuTw TAKETW.

EpyaIeia Kai BonOnmuata
Mun Torx TX20 6.3 mm (1/4") [00340865]
PλαkeKaασαβδi Λεπιδa 10 mm × 1,6 mm × 200 mm
PouTo6eOg:
HouokekunivataoosuvdeevnantnoTnympoxhTpofooofaac
H tripta elva aoivxtn.
4.2.1 Aqaipeoan aBnns tropras
- Apaipoe ta duu muata bioc (1).
- 3εβδωτε δύο βίδες (2).
3.ApaipoeTnAaBnTns npra3

HaaanTnTPOtaeExaapapeB

HaaBn npTc yia Tn 8eutepn npTa mtopei va apaiepeei eTov iio tpoTo.
4.2.2 ToTOrBcTeHnAaBnCns TOpRas
Eykaataotne 1y nV aVfTeN oipd.

EMIOKEUN
4.3 Avikataoan Eavw evtoe tropas
EiokaBonBntikαμεσα:
Mun Torx TX20 6,3 mm (1/4") [00340865]

IPOEIAOIOIHSH
Bapie,oykwdeis oukeuec
Tpaunpatiogoi eonkaipuwv
Hdiakiaqa apaipeoNt TnTropaTnOuKEunPepTei va
EKTAEITAI MVO aTTO ETTAIOEUEVOUc EIKOUs
Hetakivnon tsoukeun ts peTie va ekteiai aTO du aToa.
XpnoiopoioieTcmoVKaataaAaaepyaleiaKai eOanlao.

A IPOEOXH
Aixunpeaekes!
Tpaunatipoi afo kton
Opate Ippoataeutikayavtia.

IPOEIAOIOIHEN
Oia0nKekaipevovuokewvV
Katayupaata ootaw/tpaupatiaooi ouvBaiiug
Aoaiote tiooukeuec aoi oiaoan.

IPOEOXH
Kivduvoi ano mwn npw v faia c hao apw biov!
Tpaunpatiopoc eaiiaa mwns tmuatov.
Aoaiote ta eapntmuata ano Twnon.

NPOZOXHI
Kivuvwv ano Twnn eapntmuw vgaia xalapw biWvI
Znuae aaaa aepn ts ouokueu n otyn oikia tou Taeatn, x. datteo
AopaaioTe ta eapntmuataaTO TTOWn.
PountoEaŋ:
H ouokevi eivai aotouovdeepvntn tnpoxtnpoooiaac
Apaipouvta ta eowtepiKa eapntmuata ouokeun.
4.3.1 AqaipeoN eravw mevtetop
- TOnoBcHnTne n ouakeun otyn niow nIeupa.


EMIOKEUN
2.1. IIEOT To Eravw Kalaumu paevteke kai otic duo taeupes (1).
- Metakivnote kai apaipeote to kalumu eTavw uveTeo (2).
- NepiopéyTe To kαλuμμa eVTEOE (3).
4.ApaipoeToKaAumuaEπawμeVTεe(4).
5.3εβδωτεδuδβδε(5). - ApaipoeToV eAnv wveTe6

O eavw vteoeg exi aqapeoEi.
4.3.2 ToToBtToH eTavw meVTeo Tnptos
Eykaatnothe nTv avtibetn oipa.

EMIOKEUN
4.4 Avtikataaon enavw mevtote npotac (topto obov)
EiokaBonBntikαμεσα:
Mun Torx TX20 6,3 mm (1/4") [00340865]

IPOEIAOIOIHSH
Bapie,oykwdeis oukeuec
Tpaunpatiogoi eonkaipuwv
Hdiakiaqa apaipeoNt TnTropaTnOuKEunPepTei va
EKTAEITAI MVO aTTO ETTAIOEUEVOUc EIKOUs
Hetakivnon tsoukeun ts peTie va ekteiai ato du otoa.
XpnoiopoioieIe movo katalnnnaepyaleia kai eonliao.

A IPOEOXH
Aixnpes akeis!
Tpaunatipoi afo kton
Opate Iptoataeutika yavtnia.

IPOEIAOIOIHEN
Oia0nKekAipEvwovoukeuwv!
Karaypata ootaw/tpaupanpoi ouvthaiync
AopaaIATE Tc oukeuec aTIO aoIaIgnon.

IPOEOXH
Kivduvoi ano mwn npwv eaiiaxahapwv Bswv!
Tpaunpatioos eaiia mwns nmuatw.
Aoaiote ta eapntmuata ano Twnon.

NPOZOXHI
Kivuvwv ano Twnn eapntmuw vgaia xalapw biodvI
Znuae aaaa aepn ts ouokueu n otyn oikia tou Taeatn, x. datteo
AopaaioTe ta eapntmuataaTO TTOWn.

KINAYNO2
Kivduvoa nAeKtpanliaac Aoyw nAeKtpofoopwv eepov
Kivovc yia n Tcwnt aTn kEtpoAnjia e Tepittwn akataAAnAnC
Ta nKaTePka eepn TpeTTE va EITKeuaCovTAtIO EKTtAdeUeVOUC nKaTePOAOVOC.
Meta tvn etiokeun tpaayutotoinote eAyo aodaiac oupuva me to VDE 0701 n Kavoviaou ts Nsuykepiyejn xupaz.

KINΔYNO
Kivuvoc nAekptponnlag Aoyw nAektpooppw vepw!
Oavatoa antn aeKtpoanjia
ATTOOVOEETIE TIC OUKEUEC ATIO TIV TAPOXYI NAEKTPOKOU PEUATOCS TOAUXIAOTOV 60 DEUTEPAETTA ITPN EKVEIKOTEC ET ITHEKTEK
PouTnOeON:
Houakeunivai anoovudéevn atno tny npoxn 1popo0ooia
Apaipovtai ta eowtepiKa eapntmuata ooukeuC.
4.4.1 Aqaipoeon eTavw meVTeo Tropac
- TOnoBETnOte n oukeun otyn niaw nAeupa.

EMIOKEUN
2.1.ApaipoeToKaIaumuEeavwmeVTe(1).
- Aφαρεστε το καλμμα του koutiδιων (2).
3.AIOOUVoTe TnV nEeKpiKn ouvoeon (3).
4.3EpiOte n biOa ouvOeOnc yeiwnc (4).
5.ApaipoeTnV PpOaia Kaawwv (5).
6.3εβiδωστεηβiδα(6).

O eavw vteoeg exi aqapeoEi.
4.4.2 ToToBtToH eTavw uveTeo npToa
Eykaatnothe nTv avtibetn oipa.

EMIOKEUN
4.5 Avikataaon paouevoe trop
EiokaBonθntikαμεσα:
Mun Torx TX20 6,3 mm (1/4") [00340865]


IPOEIOONIH
Bapie,oykwdeis oukeuec
Tpaunpatiogoi eonkaipuwv
Hdiakiaqa apaipeoNt TnTropaTnOuKEunPepTeI va
EKTAEITAI MVO aTTO ETTAIOEUEVOUc EIKOUs
Hetakivnon tsoukeun ts peTie va ekteiai ato du otoa.
XpnoiopoieIe movo katalnnnaepyaleia kai eonlioa.

A PPOEOXH
Aixunpeaekes!
Tpaunatipoi afo kton
ΦopATE IppoatauteiKa yavTia.


NPOEIAOIOIHEN
Oia0nKeKaipevovoukeuov!
Katayupaata ootaw/tpaupatiaooi ouvBaiiug
AopaaIATE Tc oukeuec aTIO aoIaIgnon.

A PPOEQXH
Kivduvoi ano mwn npw v faia c hao apw biov!
auatipos eaias mwns tmuw
Aoaiote ta eapntmuata ano Twnon.

PPOZOXHI
Kivuvwv ano Twnn eapntmuw vgaia xalapw biodvI
Znmu e aaaaepn nns ouakeun ng otnv oikia tou telaatn, T.x. datteno
AopaaioTe ta eapntmuataaTO TTOWn.
PountoEaŋ:
H ouakeun eivai aonouvodepevn an to nT npoxn Tpofoooiac.
Apaipouviata Ta eowtepiKa eapntnata OoKEuNc.
O EπáwμeVTεoεç éxéαραpeθei.
4.5.1 Apaipoeon meaoiou evtote troptac
- ApaipéoTe Tny npóra xwpou yuyeiou (1).
- 三εβδωτε δuδβδε(2).
- ApaipoeToVmuoAo uveTe(3).

Oμeaoic μevteocé exiaopaeBef.
4.5.2 ToTOnTeIOn pEaiou EvTeOe TIOptAs
Eiokoεpyaλeio[00342180]

Houkeu diéetévaipcLEDtouevxpeiaetauvtnpqn. Auta ta pwta pttopouv va tneuaqotouov mvo ato nTv Eunptnne Taeatuv nto eouaoioohtmveovs TeVKov?

KINAYNOZ
Kivduo nAektponAniaos Aoyw nAektpopopowepow!
Kivvocva t in zwn atio nekrtipania o iepittwnakatdaannc
Ta naekpikae npiniptei va eithoeauovta ato ektaeouveog TaekpOAOyOc.
MetaTnEvETIOKEUnTTpayuatoTOIOInoteEeVyoAoPaeIacOuPuwA μEto VDE 0701 nKavoviooUc tsouykepiEvns xwpas.


KINAYNO
Kivouoc nAekptorAniaac Aoyw nAektpopov upeov! OAvotoc ato nAekptorAnia
ATOUVOEETIE TIG OUKEUEc ATOI TYAPOAnTJEKIOPOEULJATOACUAXIOTOV 60 DEUTEPAEOTAI TIPV EKIVIOTEE TIC ETIOKEUEc


PQOEXH
Aixunpec akues!
Tpaunaiouairo konn
ΦopáTE TPOOATEUKÁ yáVTIA.
Pouot6e0n:
Houkeun eivai aioouvduevn aTn Tnpox npofoaia
H npia eivai aoixtn.
4.15.1 Apaipen wroLED
- METAKIVNOTE TO LED OTNV apioTepn TAEUPa.
H nAekpiik ouvdeon qwiou LED eivai aiooovdoepevn.
- ATTELEUeBepwTe Ta dyKIOtpa QWIOOLED.

ETIOKEUN
3.ApaipoeTo 4wGLED,ETAKIVWvTAsTO TPOsTaEPTPOs.
To LED apaipéθηke.
4.15.2 ToToBtToN eTav wOwioLED
EvkataoThee eTnavthtnoepa

EMIOKEUN
4.16 Avikataaon Taeupikns paBou wioou LED
EiokaBonBntikαμεσα:
Bevouca 050 mm [00342224]

Houkeu diéetévaipcLEDtouevxpeiaetauvtnpqn. Auta ta pwta pttopouv va tneuaqotouov mvo ato nTv Eunptnne Taeatuv nto eouaoioohtmveovs TeVKov?

KINAYNOZ
Kivduo nAektponAniaos Aoyw nAektpopopowepow!
Kivvocva t in zwn atio nekrtipania oie pinnwn akataaanns
Ta naekpikae npn tipenei va eithoeauovta ato ektaeouveog Taekpokyoouc.
MetaTnEvETIOKEUnTTpayuatoTOIOInoteEeVyoAoPaeIacOuPuwA μEto VDE 0701 nKavoviooUc tsouykepiEvns xwpas.


KINΔYNO2
Kivouoc nAekptorAniaac Aoyw nAektpopov upewi! OAvotoc ato nAekptorAnia
ATOUVOEETIE TIG OUKEUEc ATOI TYAPOAnTJEKIOPOEULJATOACUAXIOTOV 60 DEUTEPAEITTIPIV EKIVIOTEE TIC ETIOKEUEs.


PPOEOXH
Aixunpces akues! Tpaanipoi aro korn
ΦopáTE TPOOATEUKÁ yáVTIA.
Pouot6e0n:
H oukeun eivai aotouuvdeepvntn aTnV npoxtnpoooiaac
H nóptα ενα ανοχή.
Ta paia xipou yuyiou exouv apapeBei.
4.16.1 Apaiepean nAeupikng paBou oWtiooLED
- Kaanote Tn 9evtouca oTo eTavw eva Tpito Tns pAepikn paBou quinou LED.

EMIOKEUN
- TpaBnE t n BevToUca TPOs TO ePOS OaS ME TYN TIAeupikn paBdo Qwnoou LED ME mia TEPiTPOpIK kivnon.

3.ATouovdeote nVnAektpkn ouvdoan Tns Paeupiknc paBDOU FOWIOPOLED. HnAeupiknpaBDOG pOiooU LED apapeEgke.
4.16.2 ToToeTnO nIaepiKns pabou wtooLED
- ATTEAEUeepwote TO kALUmuA spot wTIOuOLED
- TpaBnTe To kALuMa spot ownou LED npoc ta meo Kaia tautoxpova anpwicie TPOs Ta eptpoc.
EπIOKεUN
- Amaaiaite in movda spot wioiou LED.

- AIOOauvEoTe nV nAekptikn ouvEoan spot wioiou LED.
To spot LED aepiehke.
4.17.2 ToToTeTOn spot quToIou LED
Eykaataohtne tynavriBtneipa.
Cap torx TX20 6.3 mm (1/4") [00340865]
Surubelinita platá Lama de 10 mm x 1,6 mm x 200 mm
Cerintă:
Cap torx TX20 6.3 mm (1/4") [00340865]


AVERTISMENT
Aparate grele, masive!
Accidentarea spatelui si leziuni musculare
Cap torx TX20 6.3 mm (1/4") [00340865]

AVERTISMENT
Aparate grele, masive!
Accidentarea spatelui si leziuni musculare
Cap torx TX20 6.3 mm (1/4") [00340865]


A VERTISMENT
Aparate grele, masive!
Accidentarea spatelui si leziuni musculare
Cap torx TX20 6.3 mm (1/4") [00340865]

A VERTISMENT
Aparate grele, masive!
Accidentarea spatelui si leziuni musculare
Instrument special [00342180]

- Tryck in hela packningen i sparet bit for bit.

Torbits TX20 6.3 mm (1/4") [00340865]

Vassa kanter!
Skärskador
- Lossa LED-spotlightens elanslutning.

LED-spotlighten har tagits bort.
4.17.2 Montera LED-spotlight
