EDKV142WA+ - Fridge ZANUSSI - Free user manual and instructions
Find the device manual for free EDKV142WA+ ZANUSSI in PDF.
User questions about EDKV142WA+ ZANUSSI
0 question about this device. Answer the ones you know or ask your own.
Ask a new question about this device
Download the instructions for your Fridge in PDF format for free! Find your manual EDKV142WA+ - ZANUSSI and take your electronic device back in hand. On this page are published all the documents necessary for the use of your device. EDKV142WA+ by ZANUSSI.
USER MANUAL EDKV142WA+ ZANUSSI
Reversing the door openings page 4-7
- Safety instructions page 18
2.Appliance description page 21
3.Before the first use page 22 - Usage page 22
- Tips page 23
- Cleaning & maintenance page 23
- Troubleshooting page 24
8.Product fiche page 25
General terms and conditions of service and warranty page 44
Deutsch
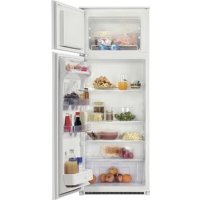
EN reversing the door openings
The doors of the appliance can be opened on the right or left side. In order to reverse the door openings, please observe the instructions below. It would be best to do this with two people.
Attention: switch off the thermostat and remove the plug from the socket. Remove all items from the refrigerator, including the shelves and drawers, before reversing the door opening.
- Remove the upper hinge cover (right) a, then remove the hinge b. Put the screws and the hinge b aside to use them later.
Remark: During this step, hold the upper door with your hand to prevent it from falling.
Remove the cover c (left).
- Remove the top door by carefully lifting it from the hinge in the middle. Put the door in a safe place.
Loosen the screws of the middle hinge d, and remove the hinge d. Remove the plastics caps e from the left side.
Carefully remove the bottom door by lifting it from the bottom hinge. Put the door in a safe place.
- Then tilt the refrigerator backwards by maximum 45^
Remove the front leg g and remove on the right side the bottom hinge h and the three bolts.
Attach the bottom hinge h on the other side with the bolts. Place the front leg g on the right side.
Carefully place the refrigerator upright. Remove from the bottom door, the sleeve pipe i and the stopper j. Place both parts at the other side of the door.
- Place the bottom door against the appliance and make sure the bottom side is properly placed on the bottom hinge.
Make sure the door is straight in relation to the exterior of the refrigerator.
Refit the middle hinge d with the bolts on the left side and place the plastic caps e on the right side.
Move the stopper k from the upper door to the other side.
- Place the upper door on the correct position against the appliance and then attach the upper hinge b with the screws. In order to cover the hinge, place the hinge cover a on the refrigerator. Place the cover c (right) to cover the holes.
Place the shelves and drawers back in the refrigerator.
Allow the appliance to rest for 2 to 3 hours before inserting the plug in the socket.
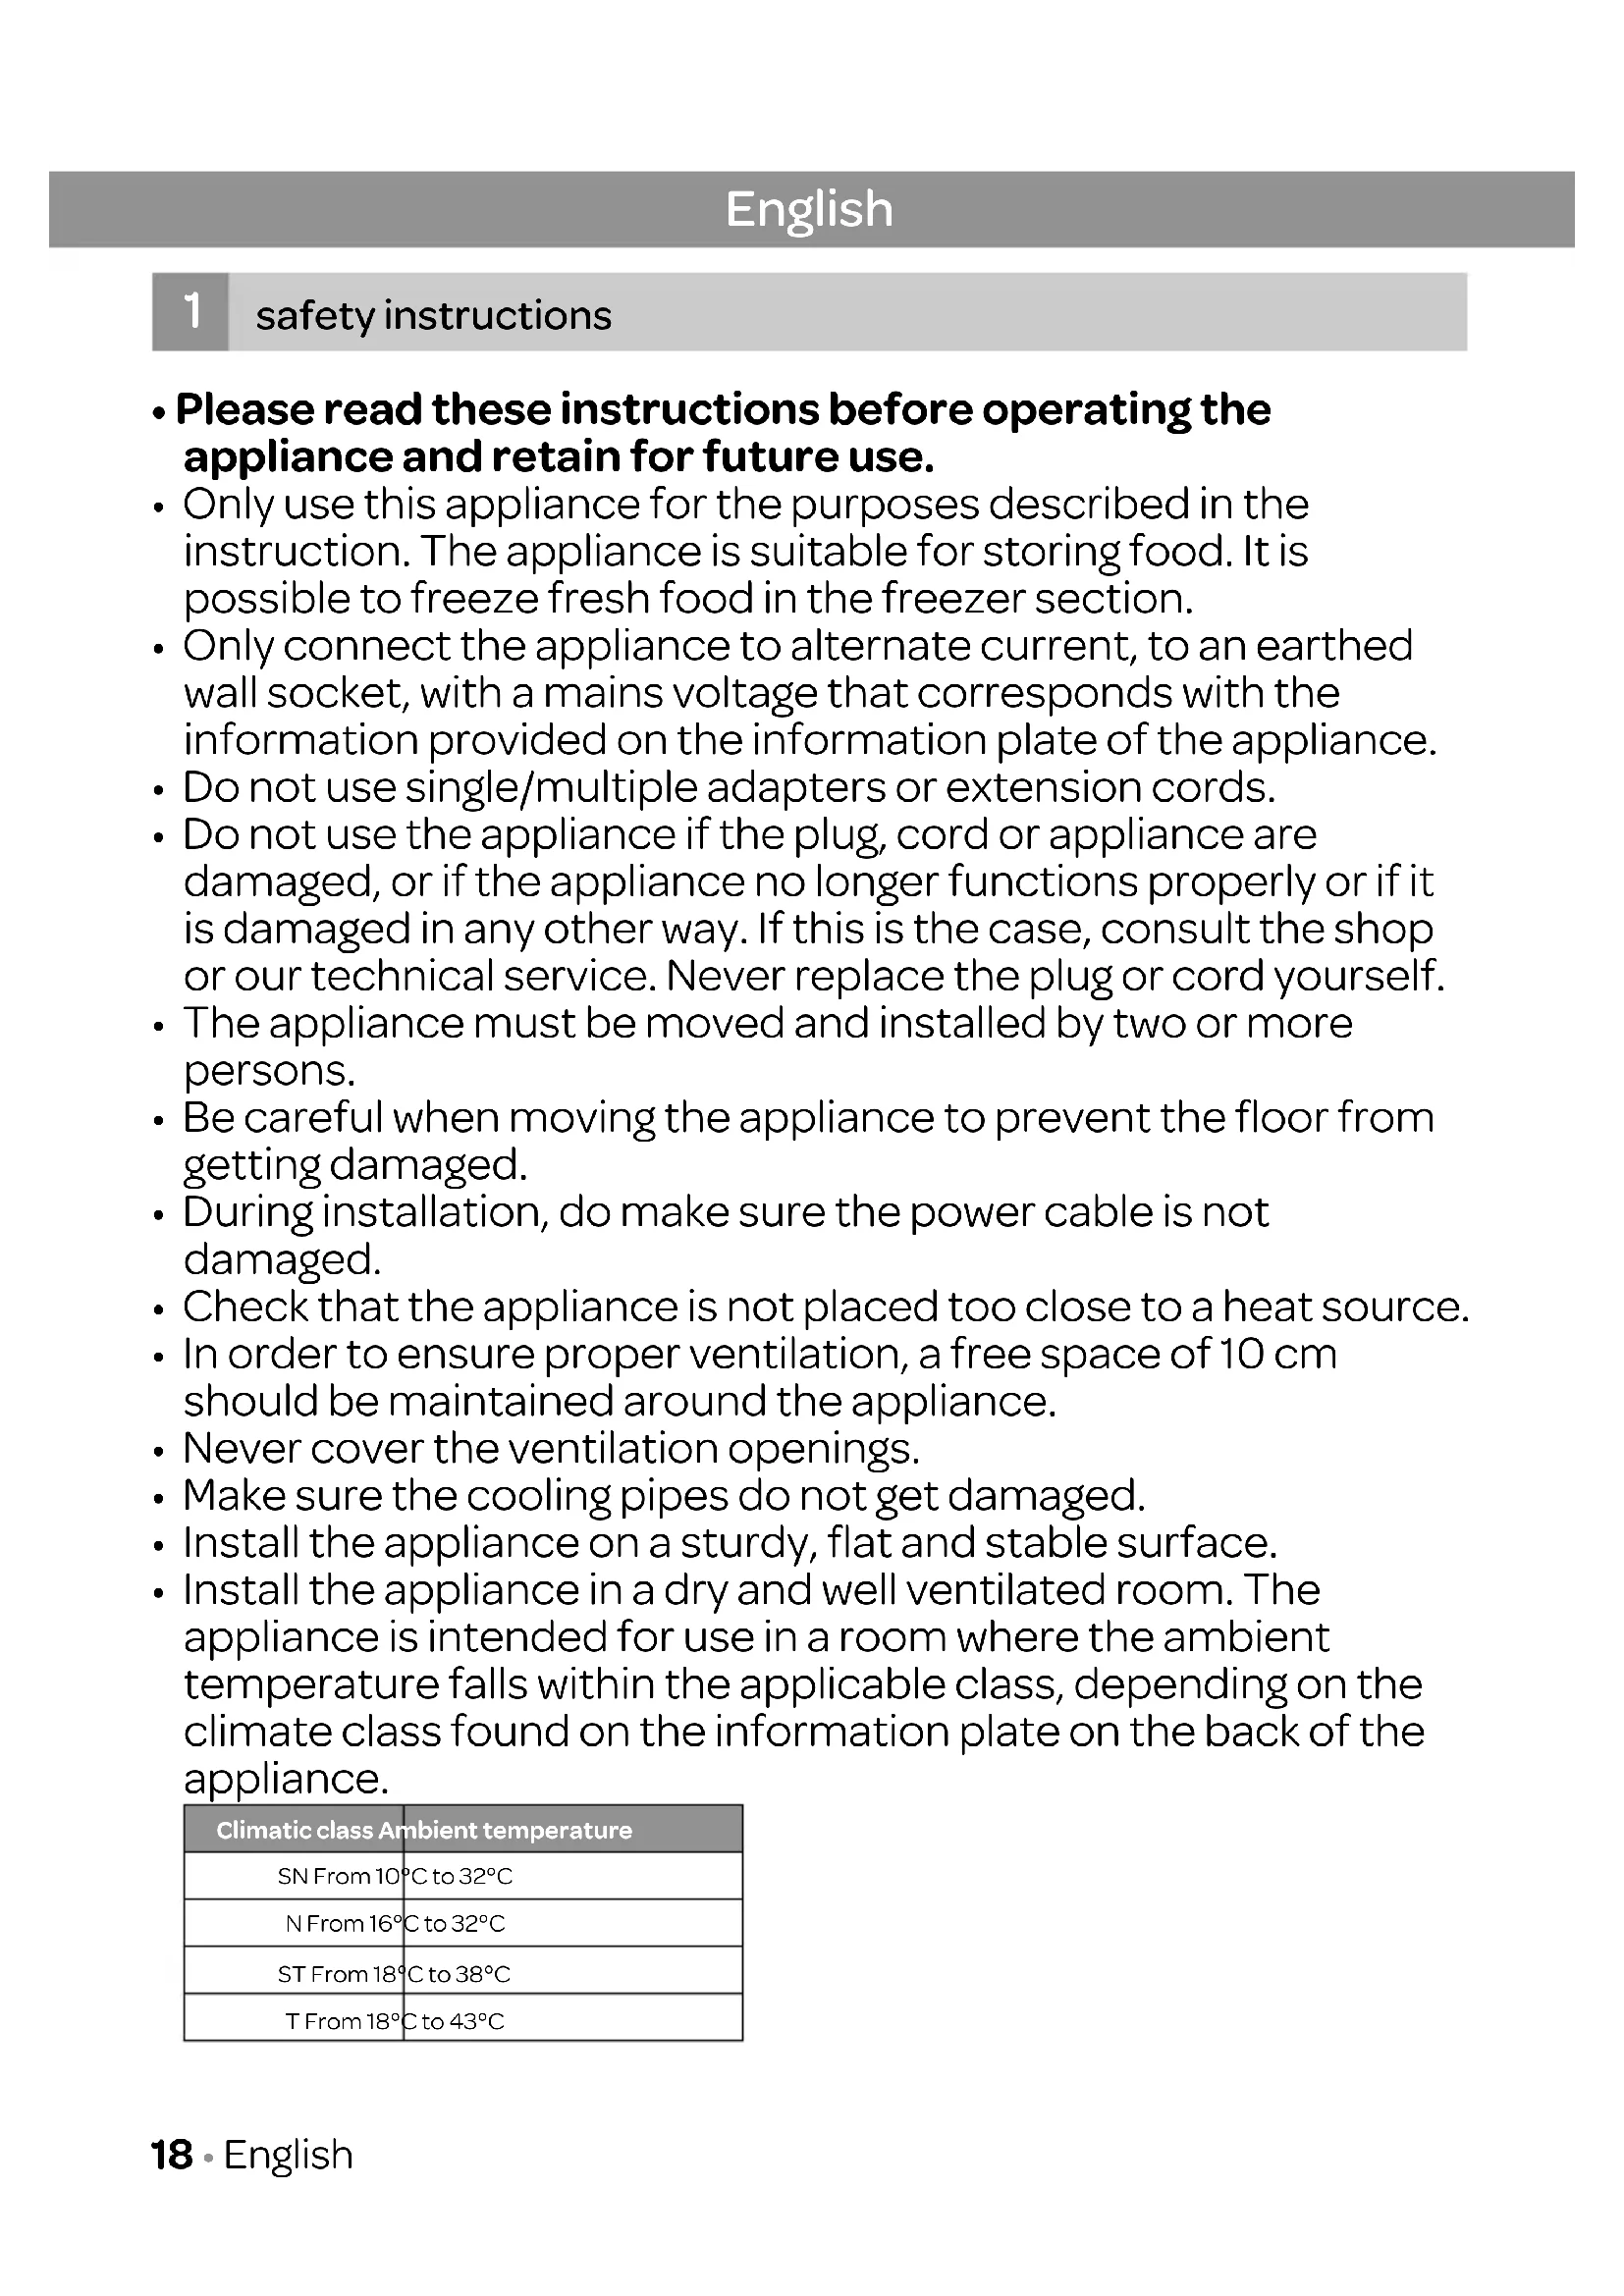
1 safety instructions
- Please read these instructions before operating the appliance and retain for future use.
- Only use this appliance for the purposes described in the instruction. The appliance is suitable for storing food. It is possible to freeze fresh food in the freezer section.
- Only connect the appliance to alternate current, to an earthed wall socket, with a mains voltage that corresponds with the information provided on the information plate of the appliance.
- Do not use single/multiple adapters or extension cords.
- Do not use the appliance if the plug, cord or appliance are damaged, or if the appliance no longer functions properly or if it is damaged in any other way. If this is the case, consult the shop or our technical service. Never replace the plug or cord yourself.
- The appliance must be moved and installed by two or more persons.
- Be careful when moving the appliance to prevent the floor from getting damaged.
- During installation, do make sure the power cable is not damaged.
- Check that the appliance is not placed too close to a heat source.
- In order to ensure proper ventilation, a free space of 10cm should be maintained around the appliance.
- Never cover the ventilation openings.
- Make sure the cooling pipes do not get damaged.
- Install the appliance on a sturdy, flat and stable surface.
- Install the appliance in a dry and well ventilated room. The appliance is intended for use in a room where the ambient temperature falls within the applicable class, depending on the climate class found on the information plate on the back of the appliance.
| Climatic class Ambient temperature |
| SN From 10°C to 32°C |
| N From 16°C to 32°C |
| ST From 18°C to 38°C |
| T From 18°C to 43°C |
- Do not store explosive or highly flammable substances in the appliance. The vapours could cause a fire hazard or an explosion.
- Do not store glass bottles or jars with liquids in the freezer, as they could break when frozen.
- Do not use mechanical, electrical or chemical agents to speed up the defrosting process.
- Make sure that children are unable to play with the appliance, such as hide in it. This is dangerous.
- Keep the appliance out of reach of children. Children do not see the dangers when handling electrical appliances. Therefore, never allow children to work with electrical appliances without supervision. Keep the appliance and cord out of reach of children younger than 8 years of age.
- The appliance can be used by children of 8 years and older and persons with a limited physical, sensory or mental capacity or lack of experience or knowledge, provided they use the appliance under supervision or have been instructed about its safe use and understand the hazards involved.
- The appliance may not be cleaned or maintained by children, unless this is done under supervision.
- Repairs to electrical appliances should only be performed by skilled persons. It is dangerous to perform a repair whereby the base unit of the appliance must be opened.
- Only use and store the appliance indoors.
- Never bend the power cord sharply or allow it to run across hot parts.
- Always remove the plug from the socket when the appliance must be cleaned or repaired.
- Never use the appliance with parts that are not recommended or supplied by the manufacturer.
- Do not pull the cord and/or appliance to remove the plug from the wall socket. Never touch the plug with wet or moist hands.
- Be careful with ice cubes and ice pops. If these are consumed directly out of the freezer, there is a risk of frostbite.
- Never submerge the appliance, cord or plug in water.
-
The appliance cannot be used with a timer or separate remote control.
-
This appliance is only suitable for household use. If the appliance is not used as intended, no compensation can be claimed in case of defects or accidents and the warranty will be invalidated.
- If you decide not to use the appliance any more due to a defect, we recommend cutting off the cord after removing the plug from the wall socket. Household appliances are not normal waste. Take the appliance to the waste processing department concerned of your municipality.
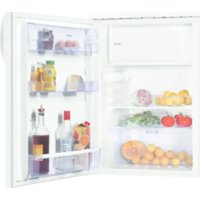
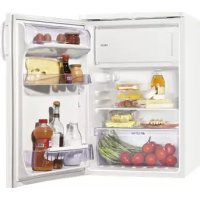
2 appliance description
- Internal lighting with thermostat
- Glass shelves
- Crisp drawer
- Small freezer drawer
- Freezer drawer
- Freezer compartment with lid
- Adjustable feet
- Door - freezer section
- Bottle compartment
- Door compartments
- Door - cooler section
- Egg tray
- Ice cube holder


1213

3 before the first use
Before using the appliance for the first time, you should proceed as follows: carefully unpack the appliance and remove all packaging material and any promotional stickers. Keep the packaging (plastic bags, polystyrene and cardboard) out of the reach of children. After unpacking the appliance, check it for external damage that may have occurred during transport. Place the appliance on a sturdy, flat surface and make sure there is enough space all around for sufficient ventilation. A minimum space of 10cm is required between the appliance and the surrounding walls. In this way the appliance is able to release heat properly, cool well and function in an energy efficient way. You can use the adjustable feet to level the appliance. Do not place the appliance near heat sources such as central heating or a stove. Do take note of the climate class of the appliance. When placed in a room that is too cold, the refrigerator will not function properly.
After placing the appliance, leave it for at least 3 hours before inserting the plug in the socket.
First clean the interior of the appliance. Use warm soapy water with, for instance, washing-up liquid, all-purpose cleaner or soda. Wipe the inside of the appliance after cleaning with clean water and properly wipe everything dry. Leave the appliance to dry for 1 to 2 hours.
4 usage
The appliance features internal controls. Check whether the thermostat is off. Check that the voltage in your home corresponds with the voltage printed on the back of the appliance and plug it in a socket.
Temperature settings
| Setting OFF = appliance is off |
| Setting MIN = minimum - low cooling temperature |
| Setting MED = medium - normal cooling temperature |
| Setting MAX = maximum - high cooling temperature |
Set the temperature with the thermostat knob and choose a setting between MIN and MAX. We advise to set the appliance on setting MED. The appliance now cools continuously until the set temperature has been reached. Do not place anything in the appliance until the set temperature is reached. This usually takes 2 or 3 hours. Then set the thermostat at the desired setting and place food into the refrigerator.
Set the appliance on a higher setting when the ambient air temperature rises to maintain the temperature inside the appliance.
To turn the appliance off, turn the thermostat to the [OFF] setting.
Note:
The ambient air temperature, how often the door is opened and the position of the appliance can affect the internal temperature. These factors must be taken into account when setting the thermostat.
- Do not put hot food into the refrigerator.
- Never introduce volatile, inflammable or explosive fluids such as alcohol, acetone or petrol because of the risk of explosion.
It is advisable to wrap meat and fish to avoid odours. - Leave sufficient space between the food to enable air to circulate correctly between them. Similarly, when storing them, avoid puttin food items in contact with each other.
- Do not place food items in contact with the cold wall at the back of the appliance. The shelves have a stop to avoid this.
- The door should not be left open any longer than necessary.
5 tips
- High ambient temperatures have a negative effect on energy use. Keep the appliance in a position away from direct sunlight or other sources of heat.
- Keep ventilation openings free. Clogged openings lead to higher use of energy.
- Try not to open the door too often, especially when the weather is wet and hot. Once you open the door, mind to close it as soon as possible.
- The space between the shelves and the rear wall of the refrigerator compartment must be unobstructed to allow the cool air to circulate. Therefore don't place any food items against the back.
- Turn the thermostat to a lower setting when the circumstances allow it.
- Before storing fresh cooked food, make sure the food has cooled at least to room temperature.
- Ice and frost layer increase energy consumption, so clean the appliance as soon as the layer is 3 to 5mm thick.
- If the gasket is damaged or if it turns out that the sealing is poor, the energy consumption is substantially higher. To restore efficiency, replace the gasket.
- Always consider the instructions, otherwise the energyconsumption is substantially higher.
6 cleaning & maintenance
Before cleaning the appliance set the thermostat to OFF and always unplug the appliance.
Clean the interior of the appliance. Use warm water and a neutral detergent to prevent any bad smells occurring. After cleaning, rinse the interior with clean water and rub dry. Leave the appliance to dry for 1 to 2 hours. Simply remove the shelves, drawer and door compartments to clean them by hand. Do not clean the interior accessories in the dishwasher.
Clean the outside of the appliance and the gasket with a soft moist cloth.
DEFROSTING THE REFRIGERATOR COMPARTMENT
The defrosting of the refrigerator compartment is completely automatic. Droplets of water on the rear wall of the refrigerator compartment indicate that the periodic automatic defrost cycle is in progress. The defrost water is automatically routed to a drain outlet and into a container from which it evaporates. The drain hole should be cleaned periodically with the defrost drain plug to prevent the water from collecting on the bottom of the refrigerator instead of flowing out.
DEFROSTING THE FREEZER COMPARTMENT
Defrost the freezer compartment when the layer of ice reaches a thickness of 3 to 5mm . Keep the contents of the freezer in a cool place and wrapped in blankets or newspapers. Switch the thermostat off. Defrost the freezer compartment.
You can speed up the defrosting process by placing a bowl of hot water in the freezer. Do not use sharp metal objects for this operation. They could puncture the refrigerator circuit and cause irreparable damage to the unit. Use a plastic scraper. Clean and dry the freezer. Turn the thermostat on to the right setting. When the freezer compartment reaches its correct temperature, replace the food items.
Warning: Never remove the ice with the aid of sharp objects, defrost sprays, a hair-drier, a heater, or similar items. This may lead to unsafe situations and may cause irreparable damage to the appliance
REPLACING THE LED LIGHTING
This appliance is equipped with a LED light bulb. It can be used for a long time. In case, the LED bulb is blown, it must be replaced by a qualified person to avoid any hazard. Contact the Inventum service department.
7 troubleshooting
| Problem Cause Solution | ||
| Appliance is not functioning; light does not work | Appliance is not plugged in Plug the appliance in the socket | |
| Temperature inside the larder is too high or too low | Thermostat has been set incorrectly Set the thermostat correctly | |
| Air circulation vents are blocked Clean the ventilation openings | ||
| Appliance is excessively noisy Has the appliance been installed correctly? Check the installation | ||
| Are the pipes at the back touching or vibrating? Check it and move the appliance forwards | ||
Note: gurgling and hissing noises due to expansion in the refrigerant circuit are normal.
8 product fiche
| INVENTUM | |
| Model number | EDKV142WA+ |
| Type of appliance | refrigerator/freezer |
| Category | 7 |
| Energy-efficiency class | A+ |
| Annual energy consumption [Aec] | 206 kWh |
| Nett capacity - total | 167 litres |
| Nett capacity - cooling compartment | 116 litres |
| Nett capacity - freezer compartment **** | 51 litres |
| Max. storage time in case of power failure | 15 hours |
| Freezing capacity (kg/24 hour) | 2 |
| Climate class | ST/N |
| Noise level dB(A) | 41 dB |
| Type of appliance | freestanding |
| Execution | |
| Color | white |
| Number of doors | 2 |
| Door opening reversible | ● |
| Eggholder included | 1 |
| Ice cube holder included | 1 |
| Number of glass shelves | 3 |
| Number of freezers drawers/ compartment | 2 |
| Number of freezer compartment with lid | 1 |
| Total amount of door compartments/bottle racks | 3 |
| Number of risper drawers | 1 |
| CFK/HFK free | free |
| Type of cooling agent | R600a |
| Number of compressors | 1 |
| Technical specifications | |
| Dimensions (wxdxh) in cm | 50 x 54 x 141,8 |
| Nett weight in kg 37,5 kg | |
| Gross weight in kg | 42 kg |
| Power consumption [W] | 70 w |
| Rated voltage [V] / frequency [Hz] | 220-240V/50Hz |
| Lenght of power cord [m] | 1,7 |
| Type of plug | VDE plug 90° |
Note: On the rating label - which you can find on the left inside the appliance - you can also find the technical specifications.
REEMPLACEMENT DE LA LAMPE LED
We do not need to remind you of the importance of service. After all, we develop our products to a standard so that you can enjoy them for many years, without any concerns. If, nevertheless, there is a problem, we believe you are entitled to a solution straight away. Hence our products come with an exchange service, on top of the rights and claims you are entitled to by law. By exchanging a product or part, we save you time, effort and costs.
2-year full manufacturer's warranty
- Customers enjoy a 2-year full manufacturer's warranty on all Inventum products. Within this period, a faulty product or part will always be exchanged for a new model, free of charge. In order to claim under the 2-year full manufacturer's warranty, you can either return the product to the shop you bought it from or contact the Inventum costumer service department via the form at www.inventum.eu/service-aanvraag.
- The 2-year warranty period starts from the date the product is bought.
- In order to claim under the warranty, you must produce a copy of the original receipt.
- The warranty applies only to normal domestic use of Inventum products within the Netherlands.
5-year Inventum warranty
- Inventum offers a 5-year warranty on most large domestic appliances and a selection of small domestic appliances. This 5-year Inventum warranty consists of a 2-year full manufacturer's warranty, extended by a further 3-year warranty. The only thing you need to do to qualify for the 3-year extended warranty is to register the product within 45 days of purchase. You can read more about registering the product in the following paragraph.
- In accordance with the 5-year Inventum warranty provisions, a faulty product or part will always be exchanged for a new model during the first 2 years under the warranty. During the 3rd to 5th year under the warranty, you will only pay the costs of exchange. The current costs of exchange are listed at www.inventum.eu/omruilkosten.
- In order to claim under the 5-year Inventum warranty, you can either return the product to the shop you bought it from or contact the Inventum costumer service department via the form at www.inventum.eu/service-aanvraag.
- The 5-year warranty period starts from the date the product is bought.
- In order to claim under the warranty, you must produce a copy of the original receipt.
- The warranty applies only to normal domestic use of Inventum products within the Netherlands.
Product registration
- The 3-year extended warranty is easy to obtain, free of charge, by registering the product within 45 days of purchase, via the website www.inventum.eu/garantie- registrarie. If you did not register the product within 45 days of purchase, you can still do so up to 2 years after the purchase date. However, there will be a charge. The one-off registration charge is € 89 for each separate product. Registration is possible only for products that are subject to the 5-year Inventum warranty. Whether the product qualifies for the 5-year Inventum warranty is stated in the product user manual and in the product information sheet, on Inventum's website.
- The warranty period always starts from the date the product is bought. If the product is registered for the extended warranty at a later date, the warranty period still starts from the original date of purchase.
- The 3-year extended warranty can only be applied for if you are in the possession of a copy of the original receipt and the Inventum 5-year warranty certificate.
Large domestic appliances
- Breakdowns or faults in large domestic appliances (separate and built-in white goods) can be registered via the form at www.inventum.eu/service-aanvraag, by calling the Inventum costumer service department or in the store where you bought the device. The telephone number of the costumer service department can be found at www.inventum.eu.
- In the event of breakdowns or faults in large domestic appliances, Inventum will have the option to have a service engineer inspect the faulty device onsite at the customer in the Netherlands and to carry out repairs, there and then. The Inventum customer service department can also decide to have the device exchanged.
- If you suffer a breakdown or fault in a large domestic appliance during the first 2 years from the date of purchase, Inventum will not charge any costs for the exchange, call-out or for parts and labour.
- If you registered the product as described before at www.inventum.eu/garantie-registry and you subsequently report a breakdown of a large domestic appliance in the 3rd to 5th year of the date of purchase, the 5-year Inventum warranty applies and the device will be repaired or exchanged, free of charge. In the event of a repair or exchange of the device, you only pay the costs of exchange. The current costs of exchange are listed at www.inventum.eu/omruilkosten. If you did not register the product, the 3-year extended warranty does not apply.
- When reporting a breakdown or fault, a service engineer will contact the customer within 1 working day in order to make an appointment. When the report is made in a weekend or during a public holiday, this will be the next working day.
- If you report a breakdown or fault via the form at www.inventum.eu/service-aanvraag, you will be kept informed of the progress via mobile messages and e-mail.
- The warranty period starts from the date the product is bought.
44·English
- In order to claim under the warranty, you must produce a copy of the original receipt and the Inventum 5-year warranty certificate.
- The warranty applies only to normal domestic use of Inventum products within the Netherlands.
Breakdowns or faults outside the warranty period
- Breakdowns or faults in small or large domestic appliances outside the warranty period, can be reported to the costumer services department via the form at www.inventum.eu/service-aanvraag or by calling the costumer services department.
- The costumer services department may ask you to send the product for inspection or repair. The costs of dispatch will be at your expense.
- The inspection to establish whether repair is possible involves a charge. You need to grant your permission for this, in advance.
- In the event of a large domestic appliance, Inventum, at your request, can send out a service engineer. In that case, you will be charged the call-out costs, as well as parts and labour.
- In the event of an instruction to repair, the repair costs must be paid in advance. In the event of a repair by a service engineer, the costs of the repair must be settled with the engineer onsite, preferably by means of PIN payment.
Warranty exclusions
- The following is excluded from the aforesaid warranties:
normal wear and tear;
- improper use or misuse;
insufficient maintenance;
- failure to comply with the operating and maintenance instructions;
- unprofessional installation or repairs by third parties or the customer himself;
non-originaiparts used by the customer
- use for commercial or business purposes;
- removal of the serial number and/or rating label.
-
In addition, the warranty does not apply to normal consumer goods, such as:
-
dough hooks, baking tins, (carbon) filters, etc.;
- batteries, bulbs, carbon filters, fat filters etc.;
external connection cables; - glass accessories and glass parts such as oven doors;
-
and similar items.
-
Transport damage not caused by Inventum is also excluded. Therefore, inspect your new device before starting to use it. If you detect any damage, you must report this to the store where you purchased the product within 5 working days, or to the Inventum customer service department via the form at www.inventum.eu/service-aanvraag. If transport damage is not reported within this period, Inventum does not accept any liability in this respect.
- The following are excluded from warranty and/or replacement: faults, loss of and damage to the device as a result of an event that is normally insured under the home contents insurance.
Important to know
- The replacement or repair of a faulty product, or a part thereof, does not lead to an extension of the original warranty period.
- Parts that have been replaced, packaging material and exchanged devices are taken back by the service engineer and become the property of Inventum.
- If a complaint is unfounded, all costs arising from it will be at the customer's expense.
- Following expiry of the warranty period, all costs of repair or replacement, including administration costs, dispatch and call-out charges, will be charged to the customer.
- Inventum cannot be held liable for damage as a result of devices built in incorrectly.
- Inventum cannot be held liable for damage caused by external events, unless this liability arises from mandatory statutory provisions.
- These warranty and service provisions are governed by Dutch law. Disputes will be settled exclusively by the competent Dutch court.
twitter.com/inventum1908
facebook.com/inventum1908
youtube.com/inventum1908


EDKVI42WA+010119V