SDRB 1000 C1 - Steam cleaner SILVERCREST - Free user manual and instructions
Find the device manual for free SDRB 1000 C1 SILVERCREST in PDF.
| Product type | Steam brush (steam iron) |
| Brand | SilverCrest |
| Model | SDRB 1000 C1 |
| Power supply | 220-240 V ~ 50/60 Hz |
| Power | 800-1000 W |
| Protection class | I (with earth connection) |
| Water tank | Removable, with MAX level mark |
| Temperature control | Yes, 3 settings (●, ●●, ●●●) |
| Steam burst function | Yes, by impulse |
| Included accessories | Brush attachment, lint brush, garment brush, measuring cup |
| Soleplate | Non-stick (type not specified) |
| Usage | Household, indoor |
| Warranty | 3 years |
| Care | Clean with damp cloth, descaling with citric acid |
| Safety | Rest stand, recommended to turn off when not in use, do not immerse |
| Weight (estimated) | Approx. 1 kg |
| Dimensions (estimated) | 30 x 10 x 15 cm (L x W x H) |
Frequently Asked Questions - SDRB 1000 C1 SILVERCREST
User questions about SDRB 1000 C1 SILVERCREST
0 question about this device. Answer the ones you know or ask your own.
Ask a new question about this device
Download the instructions for your Steam cleaner in PDF format for free! Find your manual SDRB 1000 C1 - SILVERCREST and take your electronic device back in hand. On this page are published all the documents necessary for the use of your device. SDRB 1000 C1 by SILVERCREST.
USER MANUAL SDRB 1000 C1 SILVERCREST
Operating instructions
IAN 270057
DE AT CH
FR IT GB

Deutsch 2
Francais 14
Italiano 28
English 42
Se先进技术, in particular, are used to reduce the amount of water that is used for the operation of the equipment.
- Overview 42
- Intended purpose 43
- Safety information 43
- Items supplied 46
5.Before using for the first time 47 - Operation 47
6.1 Care instructions 47
6.2 Filling the water tank 47
6.3 Set iron temperature 48
6.4 Steam jet function 48
6.5 Ironing with the brush attachment 49
6.6 Ironing 50
-
Cleaning 50
-
Storage 51
-
Troubleshooting 51
-
Disposal 51
-
Technical specifications 52
- Warranty of the HOYER Handel GmbH 52
1. Overview
Water tank
2 Cover
3 Filler opening
4 Temperature controller
5 MAX Marking of the maximum filling level of the water tank
6 Unlocking the water tank
7 Control lamp: lights up as soon as the operating temperature is reached
8 Handle
9 Eyelet (for hanging up the iron)
10 Mains power cable with mains plug (not visible)
11 Steam jet button
12 Stand
13 Side lugs on the water tank
14 Sole plate
15 Measuring beaker
16 Unlocking the brush attachment
17 Brush attachment
18 Lint brush
19 Clothes brush
42 GB


Thank you for your trust!
Congratulations on your new steam brush.
For a safe handling of the device and in order to get to know the entire scope of features:
- Thoroughly read these operating instructions prior to initial commissioning.
- Above all, observe the safety instructions!
The device should only be used as described in these operating instructions. - Keep these operating instructions for reference.
If you pass the device on to someone else, please include these operating instructions. The operating instructions are a part of the product.
We hope you enjoy using your new steam brush!
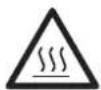
Symbols on your device

DANGER! Hot surfaces
In order to avoid injury as a result of burns, the surfaces of the device must not be touched during operation. Only use the handle and control elements.
2. Intended purpose
The steam brush is suitable for smoothing and removing creases, lint and hairs from laundry items.
The device must only be used indoors.
This device must not be used for commercial purposes. The device is designed for private, domestic use.
Foreseeable misuse

FIRE HAZARD!
Always place the steam brush back on its stand and not on the sole plate, even if you interrupt your ironing for only a very short time. It must be placed on a level, stable, dry and heat-resistant surface. Pull out the mains plug during longer interruptions or if you leave the room.

DANGER! Risk of injury through burning!
- Never iron or remove creases from clothes while they are being worn.
3. Safety information
Warnings
If necessary, the following warnings will be used in these operating instructions:

DANGER! High risk: failure to observe this warning may result in injury to life and limb.
WARNING! Moderate risk: failure to observe this warning may result in injury or serious material damage.
CAUTION: low risk: failure to observe this warning may result in minor injury or material damage.
NOTE: circumstances and specifics that must be observed when handling the device.

-
The sole plate becomes very hot during operation. Only touch the handle and control elements of the device during operation.
-
Never put the device into operation if there are visible damages to the device or the mains power cable, if the device has been dropped before or is leaking.
- If the mains power cable of this device should become damaged, it must be replaced by the manufacturer, the manufacturer's customer service department or a similarly qualified specialist, in order to avoid any hazards.

DANGER for children
- Packing materials are not children's toys. Children should not be allowed to play with the plastic bags: There is a risk of suffocation!
Keep the device out of the reach of children.

DANGER to and from pets and livestock
- Electrical devices can represent a hazard to pets and livestock. In addition, animals can also cause damage to the device. For this reason you should keep animals away from electrical devices at all times.

DANGER! Risk of electric shock due to moisture
Do not use this device under any circumstances in the vicinity of water in bath-tubs, showers, washbasins or other vessels. The proximity of water represents a hazard even when the device is switched off.
The device, the mains power cable and the mains plug must not be immersed in water or any other liquids.
Protect the device from moisture, water drops and water splashes: Failure to observe this instruction may result in an electrical shock hazard.
If liquid gets into the device, remove the mains plug immediately. Have the device checked before reusing.
If the device has fallen into water, pull out the mains plug immediately, and only then remove the device from the water. Do not use the device again, and have it checked by a specialist.
- Never touch the device with wet hands.

DANGER! Risk of electric shock
Lay the mains power cable such that no one can step on it, get caught on it, or trip over it.
- Never put the device into operation if there are visible damages to the device or the mains power cable, if the device has been dropped before or is leaking.
Only connect the mains plug to a properly installed and easily accessible grounded power socket whose voltage corresponds to the specifications on the rating plate. The wall socket must continue to be easily accessible after the device is plugged in.
- Ensure that the mains power cable cannot be damaged by sharp edges or hot points.
- When using the device, ensure that the mains power cable cannot be trapped or crushed.


The device is not fully disconnected from the power supply, even after it is switched off. In order to fully disconnect it, pull out the mains plug.
- When removing the mains plug from the wall socket, always pull the plug and never the cable.
Disconnect the mains plug from the wall socket ... if there is a fault, .. when you are not using the device, .. before you clean the device and .. during thunderstorms.
To avoid any risk, do not make modifications to the product.

FIRE HAZARD
Always place the steam brush back on its stand and not on the sole plate, even if you interrupt your ironing for only a very short time. It must be placed on a level, stable, dry and heat-resistant surface. Pull out the mains plug during longer interruptions or if you leave the room.

DANGER! Risk of injury through burning!
Do not touch the hot surfaces of the device.
-Allow the device to cool down completely before you clean it or put it away.
Warning: risk of burns from steam and sprayed hot water when using the steam jet button. When using the steam jet, always point the sole plate towards the item of laundry or ironing board.
The sole plate becomes very hot during operation. Only touch the handle and control elements of the device during operation.
- Never iron or remove creases from clothes while they are being worn.
Only transport the device when it has cooled down.
Wait for the device to cool down before cleaning.
Please wait until the device has cooled down before you attach and remove the brush attachment.
Allow the item of clothing to cool down on a hanger before you wear it.
WARNING! Risk of material damage
Only use the original accessories.
Do not use any astringent or abrasive cleaning agents.
Do not iron over e.g. zips, metal buttons or applications that could damage the sole plate.
- Never fill the water tank with chemical substances, cleaning agents - with the exception of limescale removers - or other liquids. Do not use any chemically descaled water. This may result in irreparable damage to the device.
4. Items supplied
1 steam brush
1 brush attachment 17 with protective cover
1 measuring beaker 15
1 operating instructions
Please observe the illustrations on the fold-out page.
Unpacking
- Remove all parts from the packaging.
- Check that all parts are present and intact.
- Remove any stickers or films from the device.
- Remove the protective cover from the brush attachment 17.

5. Before using for the first time
NOTE: you may notice an odour when using for the first time. This is a result of the manufacturing process and is not a defect with the device. Ensure adequate ventilation.
- Ensure that you have pulled out the mains plug 10.
- Figure A: push the unlocking mechanism 6 of the water tank 1 towards the rear.
- Hold the water tank 1 by the side lugs 13.
- Figure A: lift the water tank 1 up vertically. The temperature controller 4 remains on the device.
- Open the cover 2 over the filler opening 3.
- Fill the water tank 1 to about halfway and then close the cover 2.
- Place the water tank 1 onto the device. The water tank must be heard to engage with the unlocking mechanism 6.
- Insert the mains plug 10 into a grounded power socket corresponding to the technical data.
- Set the temperature controller 4 to MAX. The temperature control lamp 7 lights up.
- As soon as the device has reached the set temperature, the control lamp 7 goes off. Iron an old cotton cloth with repeat jets of steam until the water tank 1 is empty.
6. Operation
6.1 Care instructions
- If the care instructions in the item of clothing state that it must not be ironed (symbol), you must not use the steam brush on the item of clothing. Otherwise the garment might be damaged.
- Do not treat any leather, velvet, impregnated furniture or materials which are sensitive to steam. Otherwise the textile/ piece of furniture might be damaged.
- The steam brush can be used for many types of garment. Caution is required in the case of materials which are sensitive to heat, such as synthetic materials (e.g. polyamide or rayon). With these materials you should test beforehand in a spot which is not visible (e.g. the inside of a seam) whether the hot steam damages the material. Do not touch these materials directly with the hot sole plate 14. You should only use the steam jet function.
6.2 Filling the water tank

DANGER! Risk of electric shock due to moisture!
Pull the mains plug 10 out of the socket before you fill up the water tank 1.

DANGER! Risk of injury through burning!
The filler opening of the water tank must not be opened while the iron is being used.
- Use clean tap water without any additives (e.g. vinegar, limescale remover, starch, perfume, softener).


If your tap water is of medium hardness or higher, please mix in some distilled water:
| Hardness of the tap water | Distilled water : tap water |
| very soft/soft 0 | |
| medium 1:1 | |
| hard 2:1 | |
| very hard 3:1 |
-
Your local waterworks will inform you of the hardness of your water.
-
Disconnect the mains plug 10 from the wall socket.
- Turn the temperature controller 4 to MIN.
- Figure A: push the unlocking mechanism 6 of the water tank 1 towards the rear.
- Hold the water tank 1 by the side lugs 13.
- Figure A: lift the water tank 1 up vertically. The temperature controller 4 remains on the device.
- Open the cover 2 over the filler opening 3.
- Fill in the water with the measuring beaker 15 up to the MAX mark on the water tank 1.
- Close the cover 2 over the filler opening 3.
- Place the water tank 1 onto the device. The water tank must be heard to engage with the unlocking mechanism 6.
6.3 Set iron temperature
| Maiinte-nance symbol | Type of tissue | Tempera-ture controller |
| Man-made fi-bre, e.g. vis-cose, polyester | ● | |
| Silk, wool | ●● | |
| Cotton, linen | ●●● |
- Set the desired temperature using the temperature controller 4.
- The control lamp 7 is lit for as long as the device is heating. It goes out when the set temperature has been reached. You can then begin ironing.
6.4 Steam jet function

DANGER! Risk of injury through burning!
Warning: risk of burns from steam and sprayed hot water when using the steam jet button 11. When using the steam jet, always point the sole plate 14 towards the item of laundry or ironing board.
NOTES:
The steam jet function requires a high temperature.
The steam jet function can be used with or without the brush attachment 17.
- Select a setting for the temperature controller 4 between and MAX. The control lamp 7 goes on.
- Start ironing as soon as the temperature has been reached and the control lamp 7 goes off.
- Press the steam jet button 11 while the steam brush slides over the item of laundry. It may be necessary to press repeatedly to trigger the first jet of steam.
- After triggering the first jet of steam, please wait a few seconds before pressing the steam jet button 11 again. You should only press the steam jet button 11 repeatedly until the control lamp 7 lights up or water drips out of the sole plate 14. Please wait for the control lamp 7 to go off before triggering another jet of steam.
6.5 Ironing with the brush attachment

DANGER! Risk of injury through burning!
-Please wait until the device has cooled down before you attach and remove the brush attachment 17.
- Never iron or remove creases from clothes while they are being worn.
Allow the item of clothing to cool down on a hanger before you wear it.
Attaching the brush attachment
Figure B: push the brush attachment 17 along the guide groove on the sole plate 14 until it reaches the stop position on the device. The unlocking mechanism 16 of the brush attachment 17 must be heard to lock into place.
Removing the brush attachment
Figure B: press down the unlocking mechanism 16 of the brush attachment 17 and pull the brush attachment 17 off towards the front at the same time.
Caring for your garments
- Hang the creased garment up on a hanger.
- Pull the garment flat with one hand, applying the steam from top to bottom. Apply slight pressure with the clothes brush 19 and move the device from top to bottom across the garment. At the same time you can press the steam jet button 11 at short intervals. The combination of steam and clothes brush 19 gently removes all of the creases.
Caring for curtains and upholstery
- Remove creases and wrinkles from drapery by hanging them over a rail.
- Follow the instructions under "Caring for your garments".
- Always carry out a test beforehand on a spot which is not visible.
- If you use the device horizontally, hold it vertically from time to time in order to obtain the maximum steam power.
Removing lint
- Threads, lint and hairs can be easily removed with the lint brush 18 by brushing slowly from right to left across the garment.
- You can clean the lint brush 18 by brushing in the opposite direction (from left to right), e.g. across remnants of material.

6.6 Ironing

FIRE HAZARD!
Before turning the device on, place it on a level, stable, dry, heat-resistant surface.

DANGER! Risk of injury through burning!
The sole plate 14 becomes very hot. Only touch the handle 8 and control elements of the device during operation.
NOTES:
The sole plate 14 cools down slightly while you are ironing and therefore has to be repeatedly heated back up to the set temperature. During the heating process the control lamp 7 lights up. You can continue ironing at the same time.
- Sensitive fabrics are ironed at lower temperatures and without steam.
- Set the temperature controller 4 to MIN.
- Connect the mains plug 10 with the wall socket.
- Set the desired temperature using the temperature controller 4. The control lamp 7 lights up.
- Start ironing as soon as the ironing temperature has been reached and the control lamp 7 goes out.
- Finish ironing, set the temperature controller 4 to MIN and pull out the mains plug 10.
- Allow the device to cool down.
- Open the cover 2 over the filler opening 3.
- Pour any remaining water out of the water tank 1 through the filler opening 3.
7. Cleaning

DANGER! Risk of electric shock!
Pull the mains plug 10 out of the wall socket before you clean the device.

DANGER! Risk of through burning!
Allow the device to cool down before cleaning.
CAUTION:
Do not use any astringent or abrasive cleaning agents.
Cleaning the device
- For cleaning the device, use a soft, moistened cloth.
- Dirt can be removed from the sole plate 14 using commercially available cleaning agents for chrome, silver or stainless steel.
- Residues that have melted on the sole plate 14 can be removed by heating the device up to the MAX setting and then ironing on an old cotton cloth.
Dscaling
If the steam power is reduced after a certain time, please descale the device.
- You should use a commercially available limescale remover that is based on citric acid to descale the iron. Please follow the instructions for the limescale remover.

8. Storage
- Set the temperature controller 4 to MIN.
2.Pull out the mains plug 10. - Allow the device to cool down.
- Open the cover 2 over the filler opening 3.
- Pour any remaining water out of the water tank 1 through the filler opening 3.
- Store the steam brush by hanging it up on the eyelet 9.
9. Troubleshooting
If your device fails to function as required, please try this checklist first. Perhaps there is only a minor problem, and you can solve it yourself.

DANGER! Risk of electric shock!
Do not attempt to repair the device yourself under any circumstances.
| Fault | Possible causes / Action |
| No function | • Connect the device to the mains power supply. • Use the temperature controller 4 to turn up the temperature. |
| Little or no steam | • Fill the water tank 1. • Select a setting for the temperature controller 4 between • • and MAX. The control lamp goes on. • Descale the device. |
| Fault | Possible causes / Action |
| Steam jet is not working. | • Fill the water tank 1. • Select a setting for the temperature controller 4 between 2-3 and MAX. • It may be necessary to press repeatedly to trigger the first jet of steam. • Leave a pause of a few seconds between steam jets. |
10. Disposal
The symbol showing a wheelie bin crossed through indicates that the product requires separate refuse collection in the European Union. This applies to the
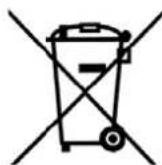
product and all accessories marked with this symbol. Products identified with this symbol may not be discarded with normal household waste, but must be taken to a collection point for recycling electric and electronic appliances. Recycling helps to reduce the consumption of raw materials and protect the environment.
Packaging
When disposing of the packaging, make sure you comply with the environmental regulations applicable in your country.

11. Technical specifications
| Model: SDRB 1000 C1 |
| Mains voltage: 220 - 240 V~ 50/60 Hz |
| Protection class: I |
| Power rating: 800 - 1000 W |
C
Subject to technical modification.
12. Warranty of the HOYER Handel GmbH
Dear Customer,
your device is provided with a 3 year warranty starting with the purchase date. In the event of product defects, you are entitled to statutory rights against the vendor. These statutory rights are not restricted by our warranty presented in the following.
Warranty conditions
The warranty period starts with the purchase date. Please keep the original purchase receipt in a safe place. This document is required to verify the purchase.
If within three years from the purchase date of this product a material or factory defect occurs, the product will be repaired or replaced by us - at our discretion - free of charge to you. This warranty implies that within the period of three years the defective device and the purchase receipt are presented, including a brief written description of the defect and the time it occurred.
If the defect is covered by our warranty, the repaired or a new product will be returned to you. No new warranty period starts with a repair or replacement of the product.
Warranty period and statutory claims for defects
The warranty period is not extended when the warranty has been claimed. This also applies to replaced and repaired parts. Any damages and defects already existing at the time of purchase must be reported immediately upon unpacking. Repairs arising after the expiration of the warranty period are subject to a charge.
Warranty coverage
The device was produced carefully according to strict quality guidelines and tested diligently prior to delivery.
The warranty applies to material or factory defects. This warranty does not include product parts that are subject to standard wear and therefore can be considered wear parts; the same applies to damages at fragile parts, e.g. switches, rechargeable batteries or parts made of glass.
This warranty expires if the product is damaged, not used as intended or not serviced. For the proper operation of the product, all instructions listed in the operating instructions must be observed carefully. Any form of use and handling that is advised against in the operating instructions or warned against must always be avoided.
The product is only intended for private and not for commercial use. In the case of incorrect and improper treatment, use of force and interventions not performed by our authorised Service Centre, the warranty shall cease.
Handling in case of a warranty claim
In order to ensure prompt processing of your matter, please observe the following notes:
Please keep the article number IAN:270057 and the purchase receipt as a purchase verification for all inquiries.
-
If faulty operation or other defects occur, first contact the Service Centre listed in the following by telephone or email.
-
Then, you are able to send a product reported as defective free of charge to the service address specified to you, including the purchase receipt and the information on the defect and when it occurred.

Please visit www.lidl-service.com to download this and many other manuals, product videos and software.

Service Centre
GB Service Great Britain
Tel.: 0871 5000 720 (£ 0.10/Min.)
E-Mail: hoyer@lidl.co.uk
IE Service Ireland
Tel.: 1890 930 034
(0,08 EUR/Min., (peak))
(0,06 EUR/Min., (off peak))
E-Mail: hoyer@lidl.ie
IAN: 270057

Supplier
Please note that the following address is no
service address. First contact the afore
mentioned Service Centre.
HOYER Handel GmbH
Kühnhöfe 5
22761 Hamburg
Germany


HOYER HANDEL GMBH
Kühnhöfe 5
22761 Hamburg
Germany