
XF32G111S - TV TELEFUNKEN - Free user manual and instructions
Find the device manual for free XF32G111S TELEFUNKEN in PDF.

User questions about XF32G111S TELEFUNKEN
0 question about this device. Answer the ones you know or ask your own.
Ask a new question about this device
Download the instructions for your TV in PDF format for free! Find your manual XF32G111S - TELEFUNKEN and take your electronic device back in hand. On this page are published all the documents necessary for the use of your device. XF32G111S by TELEFUNKEN.
USER MANUAL XF32G111S TELEFUNKEN
Safety Information 2
Markings on the Product 2
Environmental Information. 3
Features 4
Accessories Included. 4
Standby Notifications. 4
TV Control Switch & Operation 4
Inserting the Batteries into the Remote 5
Connect Power 5
Antenna Connection 5
Notification. 5
Specification 5
Remote Control 6
Connections 7
Switching On/Off. 8
First Time Installation 8
MediaPlayback via USB Input 9
Media Browser Menu. 9
CEC and CEC RC Passthrough 9
TV Menu Contents. 10
General TV Operation 14
Using the Channel List 14
Configuring Parental Settings 14
ElectronicProgramme Guide (EPG) 14
Teletext Services 15
Software Upgrade. 15
Troubleshooting & Tips. 15
PC Input Typical Display Modes. 16
AV and HDMI Signal Compatibility 16
Supported File Formats for USB Mode 17
Supported DVI Resolutions 18
Safety Information

CAUTION
RISK OF ELECTRIC SHOCK DO NOT OPEN

CAUTION: TO REDUCE THE RISK OF ELECTRIC SHOCK DO NOT REMOVE COVER (OR BACK). NO USER-SERVICEABLE PARTS INSIDE. REFER SERVICING TO QUALIFIED SERVICE PERSONNEL
In extreme weather (storms, lightning) and long inactivity periods (going on holiday) disconnect the TV set from the mains.
The mains plug is used to disconnect TV set from the mains and therefore it must remain readily operable. If the TV set is not disconnected electrically from the mains, the device will still draw power for all situations even if the TV is in standby mode or switched off.
Note: Follow the on screen instructions for operating the related features.
IMPORTANT - Please read these instructions fully before installing or operating
WARNING: Never let people (including children) with reduced physical, sensory or mental capabilities or lack of experience and / or knowledge use electrical devices unsupervised.
- Use this TV set at an altitude of less than 2000 meters above the sea level, in dry locations and in regions with moderate or tropical climates.
- The TV set is intended for household and similar general use but may also be used in public places.
- For ventilation purposes, leave at least 5cm of free space around the TV.
- The ventilation should not be impeded by covering or blocking the ventilation openings with items, such as newspapers, table-cloths, curtains, etc.
- The power cord plug should be easily accessible. Do not place the TV, furniture, etc. on the power cord. A damaged power cord/plug can cause fire or give you an electric shock. Handle the power cord by the plug, do not unplug the TV by pulling the power cord. Never touch the power cord/plug with wet hands as this could cause a short circuit or electric shock. Never make a knot in the power cord or tie it with other cords. When damaged it must be replaced, this should only be done by qualified personnel.
- Do not expose the TV to dripping or splashing of liquids and do not place objects filled with liquids, such as vases, cups, etc. on or over the TV (e.g., on shelves above the unit).
-
Do not expose the TV to direct sunlight or do not place open flames such as lit candles on the top of or near the TV.
-
Do not place any heat sources such as electric heaters, radiators, etc. near the TV set.
- Do not place the TV on the floor and inclined surfaces.
- To avoid danger of suffocation, keep plastic bags out of the reach of the babies, children and domestic animals.
- Carefully attach the stand to the TV. If the stand is provided with screws, tighten the screws firmly to prevent the TV from tilting. Do not over-tighten the screws and mount the stand rubbers properly.
- Do not dispose of the batteries in fire or with hazardous or flammable materials.
Warning: Batteries must not be exposed to excessive heat such as sunshine, fire or the like.
| Caution | Serious injury or death risk |
| Risk of electric shock | Dangerous voltage risk |
| Maintenance | Important maintenance component |
Markings on the Product
The following symbols are used on the product as a marker for restrictions and precautions and safety instructions. Each explanation shall be considered where the product bears related marking only. Note such information for security reasons.

Class II Equipment: This appliance is designed in such a way that it does not require a safety connection to electrical earth.

Class II Equipment With Functional Earthing: This appliance is designed in such a way that it does not require a safety connection to electrical earth, the earth connection is used for functional purposes.

Protective Earth Connection: The marked terminal is intended for connection of the protective earthing conductor associated with the supply wiring.

Hazardous Live Terminal: The marked terminal(s) is/are hazardous live under normal operating conditions.

Caution, See Operating Instructions: The marked area(s) contain(s) user replaceable coin or button cell batteries.

Class 1 Laser Product: This product contains Class 1 laser source that is safe under reasonably foreseeable conditions of operation.
WARNING
Do not ingest the battery, Chemical Burn Hazard This product or the accessories supplied with the product may contain a coin/button cell battery. If the coin/button cell battery is swallowed, it can cause severe internal burns in just 2 hours and can lead to death.
Keep new and used batteries away from children. If the battery compartment does not close securely, stop using the product and keep it away from children.
If you think batteries might have been swallowed or placed inside any part of the body, seek immediate medical attention.
WARNING
Never place a television set in unstable or inclined locations. A television set may fall, causing serious personal injury or death. Many injuries, particularly to children, can be avoided by taking simple precautions such as;
- Using cabinets or stands recommended by the manufacturer of the television set.
- Only using furniture that can safely support the television set.
- Ensuring the television set is not overhanging the edge of the supporting furniture.
- Not placing the television set on tall furniture (for example, cupboards or bookcases) without anchoring both the furniture and the television set to a suitable support.
- Not standing the television set on cloth or other materials placed between the television and supporting furniture.
- Educating children about the dangers of climbing on furniture to reach the television set or its controls. If your existing television set is being retained and relocated, the same considerations as above should be applied.
WALL MOUNTING WARNINGS
- Read the instructions before mounting your TV on the wall.
- The wall mount kit is optional. You can obtain from your local dealer, if not supplied with your TV.
- Do not install the TV on a ceiling or on an inclined wall.
- Use the specified wall mounting screws and other accessories.
- Tighten the wall mounting screws firmly to prevent the TV from fall. Do not over-tighten the screws.
WARNING
Apparatus connected to the protective earthing of the building installation through the MAINS connection or through other apparatus with a connection to protective earthing - and to a television distribution system using coaxial cable, may in some circumstances create a fire hazard.
Connection to a television distribution system has therefore to be provided through a device providing electrical isolation below a certain frequency range (galvanic isolator, see EN 60728-11)
Environmental Information
This television is designed to be environment friendly. To reduce energy consumption, you can follow these steps:
If you set the Energy Saving to Minimum, Medium, Maximum or Auto the TV will reduce the energy consumption accordingly. If you like to set the Backlight to a fixed value set as Custom and adjust the Backlight (located under the Energy Saving setting) manually using Left or Right buttons on the remote. Set as Off to turn this setting off.
Note: Available Energy Saving options may differ depending on the selected Mode in the System>Picture menu.
The Energy Saving settings can be found in the System>Picture menu. Note that some picture settings will be unavailable to be changed.
If pressed Right button while Auto option is selected or Left button while Custom option is selected, "Screen will be off in 15 seconds." message will be displayed on the screen. Select Proceed and press OK to turn the screen off immediately. If you don't press any button, the screen will be off in 15 seconds. Press any button on the remote or on the TV to turn the screen on again.
Note: Screen Off option is not available if the Mode is set to Game.
When the TV is not in use, please switch off or disconnect the TV from the mains plug. This will also reduce energy consumption.
Features
- Remote controlled colour TV
- Fully integrated digital terrestrial/cable/satellite TV (DVB-T2/C/S2)
- HDMI inputs to connect other devices with HDMI sockets
- USB input
- OSD menu system
- Scart socket for external devices (such as DVD Players, PVR, video games, etc.)
- Stereo sound system
- Teletext
- Headphone connection
Automatic programming system - Manual tuning
Automatic power down after up to eight hours. - Sleep timer
Child lock
Automatic sound mute when no transmission. - NTSC playback
AVL (Automatic Volume Limiting) - PLL (Frequency Search)
PC input
Game Mode (Optional) - Picture off function
Accessories Included
Remote Control
- Batteries: 2 x AAA
- Instruction Book
Standby Notifications
If the TV does not receive any input signal (e.g. from an aerial or HDMI source) for 3 minutes, it will go into standby. When you next switch-on, the following message will be displayed: "TV switched to stand-by mode automatically because there was no signal for a long time." Press OK to continue.
If the TV is on and it isn't being operated for a while it will go into standby. When you next switch-on, the following message will be displayed. "TV switched to stand-by mode automatically because no operation was made for a long time." Press OK to continue.
TV Control Switch & Operation
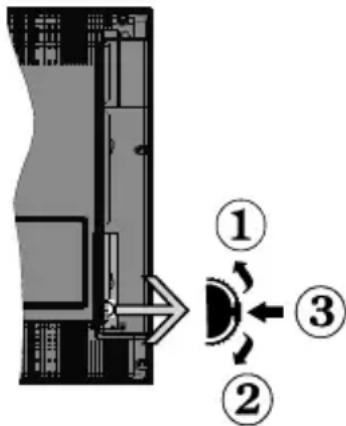
- Up direction
- Down direction
- Volume / Info / Sources List selection and Standby-On switch
The Control button allows you to control the Volume/Programme/Source and Standby-On functions of the TV.
To change volume: Increase the volume by pushing the button up. Decrease the volume by pushing the button down.
To change channel: Press the middle of the button in, the information banner will appear on the screen. Scroll through the stored channels by pushing the button up or down.
To change source: Press the middle of the button in twice(for the second time in total), the source list will appear on the screen. Scroll through the available sources by pushing the button up or down.
To turn the TV off: Press the middle of the button in and hold it down for a few seconds, the TV will turn into standby mode.
To turn on the TV: Press the middle of the button in, the TV will turn on.
Notes:
- If you turn the TV off, this circle starts again beginning with the volume setting.
- Main menu OSD cannot be displayed via control buttons.
Operation with the Remote Control
Press Menu button on your remote control to display main menu screen. Use the directional buttons to select a menu tab and press OK to enter. Use the directional buttons again to select or set an item. Press Return/Back button or Menu button to quit a menu screen.
Input Selection
Once you have connected external systems to your TV, you can switch to different input sources. Press Source button on your remote control consecutively to select the different sources.
Changing Channels and Volume
You can change the channel and adjust the volume by using the Volume +/- and Programme +/- buttons on the remote.
Inserting the Batteries into the Remote
Remove the back cover to reveal the battery compartment. Insert two size AAA batteries. Make sure the (+) and (-) signs match (observe correct polarity). Do not mix old and new batteries. Replace only with same or equivalent type. Place the cover back on.
A message will be displayed on the screen when the batteries are low and must be replaced. Note that when the batteries are low, the performance of the remote control may be impaired.
Batteries should not be exposed to excessive heat such as sunshine, fire or the like.
Connect Power
IMPORTANT: The TV set is designed to operate on 220-240V AC, 50Hz socket. After unpacking, allow the TV set to reach the ambient room temperature before you connect the set to the mains. Plug the power cable to the mains socket outlet.
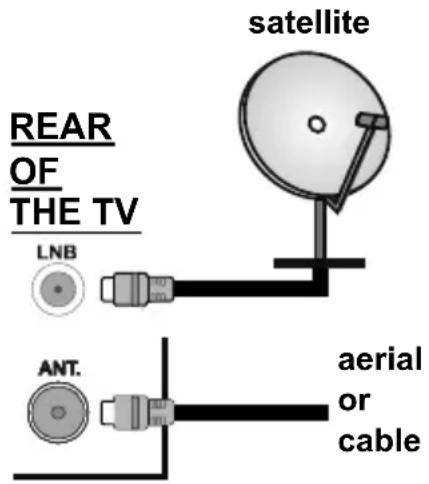
Antenna Connection
Connect the aerial or cable TV plug to the AERIAL INPUT (ANT) socket or satellite plug to the SATELLITE INPUT (LNB) socket located on the back of the TV.
Notification
TRADEMARK ACKNOWLEDGMENT
The terms HDMI and High-Definition Multimedia Interface, and the HDMI Logo are trademarks or registered trademarks of HDMI Licensing Administrator, Inc. in the United States and other countries.

Manufactured under license from Dolby Laboratories. Dolby, Dolby Audio and the double-D symbol are trademarks of Dolby Laboratories.
Information for Users on Disposal of Old Equipment and Batteries
[European Union only]
Equipment bearing these symbols should not be disposed as general household waste.
You should look for appropriate recycling facilities and systems for the disposal of these products.
Notice: The sign Pb below the symbol for batteries indicates that this battery contains lead.
![TELEFUNKEN XF32G111S - [European Union only] - 1](/content/2026/03/504945/images/74c512a92b40995baeefce67901dcfe271dc06ef8cc22a4b97990e960b8b541a.jpg)
![TELEFUNKEN XF32G111S - [European Union only] - 2](/content/2026/03/504945/images/f59e9c40e1b1552ae2728362d4520dd67f5017ae700db1784527aa624dfa5acf.jpg)
Products
Specification
| TV Broadcasting PAL B/G | D/K K I/I' |
| Receiving Channels | VHF (BAND I/III) - UHF (BAND U) - HYPERBAND |
| Digital Reception | Fully integrated digital terrestrial-cable-satellite TV(DVB-T-C-S) (DVB-T2, DVB-S2 compliant) |
| Number of Preset Channels | 10 000 |
| Channel Indicator On Screen Display | |
| RF Aerial Input 75 Ohm (ur balanced) | |
| Operating Voltage 220-240V AC, 50Hz. | |
| Audio German+Nicam Stereo | |
| Audio Output Power (WRMS.) (10% THD) | 2 x 6 W |
| Power Consumption (W) 65 W | |
| TV Dimensions DxLxH (with foot) (mm) | 185 x 735 x 494 mm |
| TV Dimensions DxLxH (without foot) (mm) | 78/90 x 735 x 438 mm |
| Display 32" | |
| Operation temperature and operation humidity | 0°C up to 40°C, 85% humidity max |
![TELEFUNKEN XF32G111S - [European Union only] - 3](/content/2026/03/504945/images/b3b6205923d7d2d897862e9e28b3864266ca052626147c1c6c9bb611f0b89d5d.jpg)
- Standby: Switches On / Off the TV
- Numeric buttons: Switches the channel, enters a number or a letter in the text box on the screen.
- Language: Switches among sound modes (analogue TV), displays and changes audio/subtitle language and turns subtitles on or off (digital TV, where available)
- Menu: Displays TV menu
- Volume +/-
- Mute: Completely turns off the volume of the TV
- Guide: Displays the electronic programme guide
- Directional buttons: Helps navigate menus, content etc. and displays the subpages in TXT mode when pressed Right or Left
- OK: Confirms user selections, holds the page (in TXT mode), views Channels menu (DTV mode)
- Back/Return: Returns to previous screen, previous menu, opens index page (in TXT mode)
- Rewind: Moves frames backwards in media such as movies
- No function
- Coloured Buttons: Follow the on-screen instructions for coloured button functions
- Play: Starts to play selected media
- Stop: Stops the media being played
- Fast Forward: Moves frames forward in media such as movies
- Pause: Pauses the media being played
- Exit: Closes and exits from displayed menus or returns to previous screen
- Info: Displays information about on-screen content, shows hidden information (reveal - in TXT mode)
- Programme +/-
- Text: Displays teletext (where available), press again to superimpose the teletext over a normal broadcast picture (mix)
- Source: Shows available broadcast and content sources
Connections
| Connector Type | Cables Device | ||
| Scart Connection (back) | |||
| VGA Connection (back) | |||
| SIDE AV | PC/YPbPr Audio Connection (side) | YPbPr/PC Audio Cable | |
| HDMI Connection (back) | |||
| SPDIF | SPDIF (Coaxial Out) Connection (back) | ||
| SIDE AV | Side AV (Audio/Video) Connection (side) | AV Cable | |
| HEADPHONE | Headphone Connection (side) | ||
| PC to YPBPR | YPbPr Video Connection (back) | PC to YPbPr Connection Cable | |
| USB Connection (side) | |||
| CI Connection (side) |
You can use YPbPr to VGA cable to enable YPbPr signal via VGA input. You cannot use VGA and YPbPr at the same time. To enable PC/YPbPr audio, you will need to use the side audio inputs with a YPbPr/PC audio cable for audio connection. If an external device is connected via the SCART socket, the TV will automatically switch to AV mode. When receiving DTV channels (Mpeg4 H.264) or while in Media Browser mode, output will not be available via the scart socket. When using the wall mounting kit (available from third party in the market, if not supplied), we recommend that you plug all your cables into the back of the TV before mounting on the wall. Insert or remove the CI module only when the TV is SWITCHED OFF. You should refer to the module instruction manual for details of the settings. The/Each USB input of your TV supports devices up to 500mA. Connecting devices that have current value above 500mA may damage your TV. By connecting an HDMI cable to your TV, you have to use only a shielded HDMI cable to guarantee a sufficient immunity against parasitic frequency radiation.
![TELEFUNKEN XF32G111S - [European Union only] - 4](/content/2026/03/504945/images/21b09c3fe6c9c8226d9609ce1a3208ba8e5be16f9dd37c6c3b325c744c0cfc08.jpg)
If you want to connect a device to the TV, make sure that both the TV and the device are turned off before making any connection. After the connection is done, you can turn on the units and use them.
Switching On/Off
To Switch the TV On
Connect the power cord to a power source such as a wall socket (220-240V AC, 50 Hz).
To switch on the TV from standby mode either:
- Press the Standby button, Programme +/- or a numeric button on the remote control.
- Press the side function switch on the TV until the TV comes on from standby.
To Switch the TV Off
Press the Standby button on the remote control or press the side function switch on the TV until the TV switches into standby mode.
To power down the TV completely, unplug the power cord from the mains socket.
Note: When the TV is switched into standby mode, the standby LED can blink to indicate that features such as Standby Search, Over Air Download or Timer is active. The LED can also blink when you switch on the TV from standby mode.
First Time Installation
When turned on for the first time, the language selection screen is displayed. Select the desired language and press OK.
On the next screen, set your preferences using the directional buttons.
Note: Depending on the Country selection you may be asked to set and confirm a PIN at this point. The selected PIN cannot be 0000. You have to enter it if you are asked to enter a PIN for any menu operation later.
About Selecting Broadcast Type
Digital Aerial: If Digital Aerial broadcast search option is turned on, the TV will search for digital terrestrial broadcasts after other initial settings are completed.
Digital Cable: If Digital Cable broadcast search option is turned on, the TV will search for digital cable broadcasts after other initial settings are completed.
According to your other preferences a confirmation message may be displayed before starting to search. Select YES and press OK to proceed. To cancel operation, select NO and press OK. You can select
Network or set values such as Frequency, Network ID and Search Step. When finished, press OK button.
Note: Searching duration will change depending on the selected Search Step.
Satellite: If Satellite broadcast search option is turned on, the TV will search for digital satellite broadcasts after other initial settings are completed. Before satellite search is performed some settings should be made. Antenna Type menu will be displayed first. You can select Antenna Type as Direct, Single Satellite Cable or DiSEqC switch by using " 一 ^ or " buttons.
- Direct: If you have a single receiver and a direct satellite dish, select this antenna type. Press OK to continue. Select an available satellite on the next screen and press OK to scan for services.
- Single Satellite Cable: If you have multiple receivers and a single satellite cable system, select this antenna type. Press OK to continue. Configure settings by following instructions on the next screen. Press OK to scan for services.
- DiSEqC switch: If you have multiple satellite dishes and a DiSEqC switch, select this antenna type. Press OK to continue. You can set four DiSEqC options (if available) on the next screen. Press OK button to scan the first satellite in the list.
Analogue: If Analogue broadcast search option is turned on, the TV will search for analogue broadcasts after other initial settings are completed.
Additionally you can set a broadcast type as your favourite one. Priority will be given to the selected broadcast type during the search process and the channels of it will be listed on the top of the Channel List. When finished, press OK to continue.
You can activate Store Mode option at this point. This option will configure your TV's settings for store environment and depending on the TV model being used, the supported features of it may be displayed on the top of the screen as an info banner. This option is intended only for store use. It is recommended to select Home Mode for home use. This option will be available in System>Settings>More menu and can be turned off/on later.
Press OK button on the remote control to continue. After the initial settings are completed TV will start to search for available broadcasts of the selected broadcast types.
After all the available stations are stored, scan results will be displayed. Press OK to continue. The Edit Channel List menu will be displayed next. You can edit the channel list according to your preferences or press the Menu button to quit and watch TV.
While the search continues a message may appear, asking whether you want to sort channels according to the LCN^(*) . Select Yes and press OK to confirm.
(*) LCN is the Logical Channel Number system that organizes available broadcasts in accordance with a recognizable channel number sequence (if available).
Note: Do not turn off the TV while initializing first time installation. Note that, some options may not be available depending on the country selection.
Using SatcoDX Feature
You can perform SatcoDX operations using the Installation>Satelite Settings menu. In the SatcoDX menu, there are two options regarding to the SatcoDx.
You can download or upload SatcoDX data. In order to perform these functions a USB device must be connected to the TV.
You can upload current services and related satellites & transponders in TV, to a USB device.
Additionally you can download one of the SatcoDx files stored in USB device, to the TV.
When you select one of these files, all services and related satellites and transponders in the selected file will be stored in the TV. If there are any installed terrestrial, cable and/or analog services, they will be kept and only satellite services will be removed.
Afterwards, check your antenna settings and make changes if necessary. An error message stating "No Signal" may be displayed if the antenna settings are not configured properly.
MediaPlayback viaUSB Input
You can connect 2.5" and 3.5" inch (hdd with external power supply) external hard disk drives or USB memory stick to your TV by using the USB inputs of the TV.
IMPORTANT! Back up the files on your storage devices before connecting them to the TV. Manufacturer will not be responsible for any file damage or data loss.
Certain types of USB devices (e.g. MP3 Players) or USB hard disk drives/memory sticks may not be compatible with this TV. The TV supports FAT32 and NTFS disk formatting.
Wait a little while before each plugging and unplugging as the player may still be reading files. Failure to do so may cause physical damage to the USB player and the USB device itself. Do not pull out your drive while playing a file.
You can use USB hubs with your TV's USB inputs. External power supplied USB hubs are recommended in such a case.
It is recommended to use the TV's USB input(s) directly, if you are going to connect a USB hard disk.
Note: When viewing image files the Media Browser menu can only display 1000 image files stored on the connected USB device.
Media Browser Menu
You can play photo, music, and movie files stored on a USB disk by connecting it to your TV. Connect a USB disk to one of the USB inputs located on the side of the TV. Pressing the Menu button while in the Media Browser mode will access the Picture, Sound and Settings menu options. Pressing the Menu button again will exit from this screen. You can set your Media Browser preferences by using the Settings Menu.
| Loop/Shuffle Mode Operation | |
| Start playback with the Play button and activate | All files in the list will be continuously played in original order |
| Start playback with the OK button and activate | The same file will be played continuously (repeat) |
| Start playback with the Play button and activate | All files in the list will be played once in random order |
| Start playback with the Play button and activate | All files in the list will be continuously played in the same random order. |
CEC and CEC RC Passthrough
This function allows to control the CEC-enabled devices, that are connected through HDMI ports by using the remote control of the TV.
The CEC option in the System>Settings>More menu should be set as Enabled at first. Press the Source button and select the HDMI input of the connected CEC device from the Sources List menu. When new CEC source device is connected, it will be listed in source menu with its own name instead of the connected HDMI ports name(such as DVD Player, Recorder 1 etc.).
The TV remote is automatically able to perform the main functions after the connected HDMI source has been selected.
To terminate this operation and control the TV via the remote again, press Quick Menu button on the remote, highlight the CEC RC Passthrough and set as Off by pressing Left or Right button. This feature can also be enabled or disabled under the System>Settings>More menu.
The TV supports also ARC(Audio Return Channel) feature. This feature is an audio link meant to replace other cables between the TV and the audio system (A/V receiver or speaker system).
When ARC is active, TV does not mute its other audio outputs automatically. So you need to decrease TV volume to zero manually, if you want to hear audio from connected audio device only (same as other optical or co-axial digital audio outputs). If you want to change connected device's volume level, you should select that device from the source list. In that case volume control keys are directed to connected audio device.
Note: ARC is supported only via the HDMI11 input.
System Audio Control
Allows an Audio Amplifier/Receiver to be used with the TV. The volume can be controlled using the remote control of the TV. To activate this feature set the Speakers option in the System>Settings>More menu as Amplifier. The TV speakers will be muted and the sound of the watched source will be provided from the connected sound system.
Note: The audio device should support System Audio Control feature and CEC option should be set as Enabled.
| TV Menu Contents | |
| System - Picture Menu Contents | |
| Mode | You can change the picture mode to suit your preference or requirements. Picture mode can be set to one of these options: Cinema, Game(optional), Sports, Dynamic and Natural. |
| Contrast Adjusts the light and dark values on the screen. | |
| Brightness Adjusts the brightness values on the screen. | |
| Sharpness Sets the sharpness value for the objects displayed on the screen. | |
| Colour Sets the colour value, adjusting the colors. | |
| Energy Saving | For setting the Energy Saving to Custom, Minimum, Medium, Maximum, Auto, Screen Off or Off. Note: Available options may differ depending on the selected Mode. |
| Backlight | This setting controls the backlight level. The backlight function will be inactive if the Energy Saving is set to an option other than Custom. |
| Advanced Settings | |
| Dynamic Contrast You can change the dynamic contrast ratio to desired value. | |
| Noise Reduction | If the signal is weak and the picture is noisy, use the Noise Reduction setting to reduce the amount of noise. |
| Colour Temp | Sets the desired colour temperature value. Cool, Normal, Warm and Custom options are available. |
| White Point | If the Colour Temp option is set as Custom, this setting will be available. Increase the 'warmth' or 'coolness' of the picture by pressing Left or Right buttons. |
| Picture Zoom Sets the desired image size format. | |
| Film Mode | Films are recorded at a different number of frames per second to normal television programmes. Turn this feature on when you are watching films to see the fast motion scenes clearly. |
| Skin Tone Skin tone can be changed between -5 and 5. | |
| Colour Shift Adjust the desired colour tone. | |
| RGB Gain (Optional) | You can configure the colour temperature values using the RGB Gain feature. |
| HDMI Full Range | While watching from a HDMI source, this feature will be visible. You can use this feature to enhance blackness in the picture. |
| PC Position | Appears only when the input source is set to VGA/PC. |
| Autoposition Automatically optimizes the display. Press OK to optimize. | |
| H Position | This item shifts the image horizontally to the right hand side or left hand side of the screen. |
| V Position This item shifts the image vertically towards the top or bottom of the screen. | |
| Dot Clock | Dot Clock adjustments correct the interference that appear as vertical banding in dot intensive presentations like spreadsheets or paragraphs or text in smaller fonts. |
| Phase | Depending on the input source(computer etc.) you may see a hazy or noisy picture on the screen. You can use phase to get a clearer picture by trial and error. |
| Reset | Reset the picture settings to factory default settings (except Game Mode). |
| While in VGA (PC) mode, some items in Picture menu will be unavailable. Instead, VGA mode settings will be added to the Picture Settings while in PC mode. | |
| System - Sound Menu Contents | |
| Volume Adjusts the volume | level. |
| Equalizer | Selects the equalizer mode. Custom settings can be made only when in User mode. |
| Balance Adjusts whether the | sound comes from the left or right speaker. |
| Headphone | Sets headphone volume.Pleasesure ensure before using headphones that the headphone volume is set to a low level, to prevent damage to your hearing. |
| Sound Mode You can select | a sound mode (If the viewed channel supports). |
| AVL (Automatic Volume Limiting) | Sets the sound to obtain fixed output level between programmes. |
| Headphone/Lineout | When you connect an external amplifier to your TV using the headphone jack, you can select this option as Lineout. If you have connected headphones to the TV, set this option as Headphone.Please ensure before using headphones that this menu item is set to Headphone. If it is set to Lineout, the output from the headphone socket will be set to maximum which could damage your hearing. |
| Dynamic Bass Enables or disables the Dynamic Bass. | |
| Surround sound | Surround sound mode can be changed as On or Off. |
| Digital Out Sets digital out audio type. | |
| System - Settings Menu Contents | |
| Conditional Access Controls | conditional access modules when available. |
| Language You may set a different language depending on the broadcaster and the country. | |
| Parental | Enter correct password to change parental settings. You can easily adjust Menu Lock, Maturity Lock, Child Lock or Guidance in this menu. You can also set a new PIN or change the Default CICAM PIN using the related options. Note: Some menu options may not be available depending on the country selection in the First Time Installation. Default PIN can be set to 0000 or 1234. If you have defined the PIN (is requested depending on the country selection) during the First Time Installation use the PIN that you have defined. |
| Timers | Sets sleep timer to turn off the TV after a certain time. Sets timers for selected programmes. |
| Date/Time Sets date and time. | |
| Sources Enables or disables selected source options. | |
| Accessibility Displays accessibility options of the TV. | |
| Hard of Hearing Enables any special feature sent from the broadcaster. | |
| Audio Description | A norration track will be played for the blind or visually impaired audience. Press OK to see all available Audio Description menu options. This feature is available only if the broadcaster supports it. |
| More Displays other setting options of the TV. | |
| Menu Timeout Changes timeout duration for menu screens. | |
| Standby LED If set as Off, the standby LED will not light up when the TV is in standby mode. | |
| Software Upgrade | Ensures that your TV has the latest firmware. Press OK to see the menu options. |
| Application Version Displays current software version. | |
| Subtitle Mode | This option is used to select which subtitle mode will be on the screen (DVB subtitle / Teletext subtitle) if both is available. Default value is DVB subtitle. This feature is available only for the country option of Norway. |
| Auto TV OFF | Sets the desired time for the TV to automatically go into standby mode when not being operated. |
| Biss Key | Biss is a satellite signal scrambling system that is used for some broadcasts. If you need to enter Biss key on a broadcast, you can use this setting. Highlight Biss Key and press OK to enter keys on the desired broadcast. |
| Store Mode | Select this mode for store display purposes. Whilst Store Mode is enabled, some items in the TV menu may not be available. |
| Power Up Mode | This setting configures the power up mode preference. Last State and Standby options are available. |
| CEC | With this setting you can enable and disable CEC functionality completely. Press Left or Right button to enable or disable the feature. |
| CEC Auto Power On | This function allows the connected HDMI-PEC compatible device to turn on the TV and switch to its input source automatically. Press Left or Right button to enable or disable the feature. |
| Speakers | To hear the TV audio from the connected compatible audio device set as Amplifier. You can use the remote control of the TV to control the volume of the audio device. |
| OSS | Displays Open Source Software license information. |
| Installation Menu Contents | |
| Automatic channel scan (Retune) | Displays automatic tuning options. Digital Aerial: Searches and stores aerial DVB stations. Digital Cable: Searches and stores cable DVB stations. Analogue: Searches and stores analogue stations. Satellite: Searches and stores satellite stations. |
| Manual Channel Scan | This feature can be used for direct broadcast entry. |
| Network Channel Scan | Searches for the linked channels in the broadcast system. Digital Aerial: Searches for aerial network channels. Digital Cable: Searches for cable network channels. |
| Analogue Fine Tune | You can use this setting for fine tuning analogue channels. This feature is not available if no analogues channels are stored. |
| Satellite Settings | Displays satellite settings. Satellite list: Displays available satellites. You can Add, Delete satellites or Edit satellite settings on the list. Antenna installation: You can change satellite antenna settings and/or start a satellite scan. SatcoDX: You can upload or download SatcoDX data using the related options. |
| Installation Settings (Optional) | Displays installation settings menu. Standby Search(*) : Your TV will search for new or missing channels while in standby. Any new found broadcasts will be shown. Dynamic Channel Update(*) : If this option is set as Enabled, the changes on the broadcasts such as frequency, channel name, subtitle language etc., will be applied automatically while watching. (*) Availability depends on model. |
| Clear Service List | Use this setting to clear channels stored. This setting is visible only when the Country option is set to Denmark, Sweden, Norway or Finland. |
| Select Active Network | This setting allows you to select only the broadcasts within the selected network to be listed in the channel list. This feature is available only for the country option of Norway. |
| First Time Installation | Deletes all stored channels and settings, resets TV to factory settings. |
General TV Operation
Using the Channel List
The TV sorts all stored stations in the Channel List. You can edit this channel list, set favourites or set active stations to be listed by using the Channel List options. Press the OK button to open the Channel List. You can filter the listed channels by pressing the Blue button or open the Edit Channel List menu by pressing the Green button in order to make advanced changes in the current list.
Managing the Favourite Lists
You can create four different lists of your favourite channels. Enter the Channel List in the main menu or press the Green button while the Channel List is displayed on the screen in order to open the Edit Channel List menu. Select the desired channel on the list. You can make multiple choices by pressing the Yellow button. Then press the OK button to open the Channel Edit Options menu and select Add/Remove Favourites option. Press the OK button again. Set the desired list option to On. The selected channel/s will be added to the list. In order to remove a channel or channels from a favourite list follow the same steps and set the desired list option to Off.
You can use the Filter function in the Edit Channel List menu to filter the channels in the Channel list permanently according to your preferences. Using this Filter option, you can set one of your four favourite lists to be displayed every time the Channel list is opened. The filtering function in the Channel list menu will only filter the currently displayed Channel list in order to find a channel and tune in to it. These changes will not remain the next time the Channel list is opened if you don't save them. To save the changes on the list press the Red button after filtering while the Channel list is displayed on the screen.
Configuring Parental Settings
The Parental Settings menu options can be used to prohibit users from viewing of certain programmes, channels and using of menus. These settings are located in the System>Settings>Parental menu.
To display parental lock menu options, a PIN number should be entered. After coding the correct PIN number, Parental Settings menu will be displayed.
Menu Lock: This setting enables or disables access to all menus or installation menus of the TV.
Maturity Lock: If this option is set, TV gets the maturity information from the broadcast and if this maturity level is disabled, disables access to the broadcast.
Note: If the country option in the First Time Installation is set as France, Italy or Austria, Maturity Lock's value will be set to 18 as default.
Child Lock: If this option is set to ON, the TV can only be controlled by the remote control. In this case the control buttons on the TV will not work.
Set PIN: Defines a new PIN number.
Default CICAM PIN: This option will appear as greyed out if no CI module is inserted into the CI slot of the TV. You can change the default PIN of the CI CAM using this option.
Note: Default PIN can be set to 0000 or 1234. If you have defined the PIN(is requested depending on the country selection) during the First Time Installation use the PIN that you have defined.
Some options may not be available depending on the country selection in the First Time Installation.
Electronic Programme Guide (EPG)
Some channels send information about their broadcast schedules. Press the Epg button to view the Programme Guide menu.
There are 3 different types of schedule layouts available, Timeline Schedule, List Schedule and Now/Next Schedule. To switch between them follow the instructions on the bottom of the screen.
Timeline Schedule
Zoom (Yellow button): Press the Yellow button to see events in a wider time interval.
Filter (Blue button): Views filtering options.
Highlight Genre (Subtitles button): Displays Highlight Genre menu. Using this feature, you can search the programme guide database in accordance with the genre. Info available in the programme guide will be searched and results matching your criteria will be highlighted.
Options (OK button): Displays event options.
Event Details (Info button): Displays detailed information about selected events.
Next/Prev Day (Programme +/- buttons): Displays the events of previous or next day.
Search (Text button): Displays Guide Search menu. Now (Source button): Displays current event of the highlighted channel.
List Schedule\*
(*) In this layout option, only the events of the highlighted channel will be listed.
Prev. Time Slice (Red button): Displays the events of previous time slice.
Next/Prev Day (Programme +/- buttons): Displays the events of previous or next day.
Event Details (Info button): Displays detailed information about selected events.
Filter (Text button): Views filtering options.
Next Time Slice (Green button): Displays the events of next time slice.
Options (OK button): Displays event options.
Now/Next Schedule
Options (OK button): Displays event options.
Event Details (Info button): Displays detailed information about selected events.
Filter (Blue button): Views filtering options.
Event Options
Use the directional buttons to highlight an event and press OK button to display Event Options menu. The following options are available.
Select Channel: Using this option, you can switch to the selected channel.
Set Timer on Event / Delete Timer on Event: After you have selected an event in the EPG menu, press the
OK button. Select Set Timer on Event option and press the OK button. You can set a timer for future events.
To cancel an already set timer, highlight that event and press the OK button. Then select Delete Timer on Event option. The timer will be cancelled.
Notes: You cannot switch to any other channel or source while there is an active timer on the current channel. It is not possible to set timer for two or more individual events at the same time interval.
Teletext Services
Press the Text button to enter. Press again to activate mix mode, which allows you to see the teletext page and the TV broadcast at the same time. Press once more to exit. If available, sections in the teletext pages will become colour-coded and can be selected by pressing the coloured buttons. Follow the instructions displayed on the screen.
Software Upgrade
Your TV is capable of finding and updating the firmware automatically via the broadcast signal.
Software upgrade search via user interface
On the main menu select System>Settings and then More. Navigate to Software upgrade and press the OK button. In Upgrade options menu select Scan for upgrade and press OK button to check for a new software upgrade.
If a new upgrade is found, it starts to download the upgrade. After the download is completed confirm the question asking about rebooting the TV by pressing the OK to continue with the reboot operation.
3 AM search and upgrade mode
Your TV will search for new upgrades at 3:00 o'clock if Automatic scanning option in the Upgrade options menu is set to Enabled and if the TV is connected to an aerial signal. If a new software is found and downloaded successfully, it will be installed at the next power on.
Note: Do not unplug the power cord while led is blinking during the reboot process. If the TV fails to come on after the upgrade, unplug, wait for two minutes then plug it back in.
Troubleshooting & Tips
Tv will not turn on
Make sure the power cord is plugged in securely to wall outlet. Check if batteries are exhausted. Press the Power button on the TV.
Poor picture
- Check if you have selected the correct TV system.
- Low signal level can cause picture distortion. Please check antenna access.
- Check if you have entered the correct channel frequency if you have done manual tuning.
- The picture quality may degrade when two devices are connected to the TV at the same time. In such a case, disconnect one of the devices.
No picture
- This means your TV is not receiving any transmission.
Make sure the correct source has been selected. - Is the antenna connected properly?
- Is the antenna cable damaged?
- Are suitable plugs used to connect the antenna?
- If you are in doubt, consult your dealer.
No sound
- Check if the TV is muted. Press the Mute button or increase the volume to check.
Sound may be coming from only one speaker. Check the balance settings from Sound menu.
Remote control - no operation
- The batteries may be exhausted. Replace the batteries.
Input sources - can not be selected
- If you cannot select an input source, it is possible that no device is connected. If not;
- Check the AV cables and connections if you are trying to switch to the input source dedicated to the connected device.
PC Input Typical Display Modes
The following table is an illustration of some of the typical video display modes. Your TV may not support all resolutions. Your TV supports up to 1920x1080.
| Index Resolution Frequency | ||
| 1 | 480 60 Hz | |
| 2 | 600 56 Hz | |
| 3 | 600 60 Hz | |
| 4 | x768 60 Hz | |
| 5 | 24x768 66 Hz | |
| 6 | x768 60 Hz | |
| 7 | x960 60 Hz | |
| 8 | x1024 60 Hz | |
| 9 | x768 60 Hz | |
| 10 | 0x1050 60 Hz | |
| 11 | 0x1200 60 Hz | |
| 12 | 0x1080 60 Hz | |
AV and HDMI Signal Compatibility
| Source Supported Signals Available | |||
| EXT(SCART) | PAL 50/60 O | ||
| NTSC 60 O | |||
| RGB 50 | O | ||
| RGB 60 | O | ||
| Side AV | PAL 50/60 O | ||
| NTSC 60 O | |||
| PC/YPbPr | 480I, 480P | 60Hz O | |
| 576I, 576P | 50Hz O | ||
| 720P | 50Hz,60Hz | O | |
| 1080I | 50Hz,60Hz | O | |
| 1080P 50Hz,60Hz O | |||
| HDMI | 480I 60Hz | O | |
| 480P | 60Hz O | ||
| 576I, 576P | 50Hz O | ||
| 720P | 50Hz,60Hz | O | |
| 1080I | 50Hz,60Hz | O | |
| 1080P | 24Hz, 25Hz30Hz, 50Hz,60Hz | O | |
(X: Not Available, O: Available)
In some cases a signal on the TV may not be displayed properly. The problem may be an inconsistency with standards from the source equipment (DVD, Set-top box, etc.). If you do experience such a problem please contact your dealer and also the manufacturer of the source equipment.
| Supported File Formats for USB Mode | |||
| Media Extension Format Notes | |||
| Video | g, .mpeg | MPEG1-2 MPEG1: | 768x576 @ 30P, MPEG2:1920x1080 @ 30P |
| .vob MPEG2 | 1920x1080 @ 30P | ||
| .mp4 MPEG4, Xvid, H.264 | |||
| .mkv H.264, MPEG4,VC-1 | |||
| .avi MPEG2 | MPEG4, Xvid, H.264 | ||
| .flv H.264/VP6/ Sorenson | H.264/VP6: 1920x1080 @ 30P Sorenson: 352x288 @ 30P | ||
| .mp4, .mov, .3gpp, .3gp, MPEG transport stream, .ts, .trp, .tp, .mkv | HEVC/H.265 1080P | @60fps - 50Mbps | |
| .3gp MPEG4, H.264 1920x1080 @ 30P | |||
| Audio | 3 MPEG1 Layer | 2/3 | Layer2: 32Kbps ~ 448Kbps (Bit rate) / 32kHz, 44.1kHz, 48kHz, 16kHz, 22.05kHz, 24kHz (Sampling rate) Layer3: 32Kbps ~ 320Kbps (Bit rate) / 32kHz, 44.1kHz, 48kHz, 16kHz, 22.05kHz, 24kHz, 8kHz, 11.025kHz, 12kHz (Sampling rate) |
| works only with video files) | AC3 32Kbps ~ 640 | Kbps (Bit rate) / 32kHz, 44.1kHz, 48kHz (Sampling rate) | |
| AAC | 16Kbps ~ 576Kbps (Bit rate) / 48kHz, 44.1kHz, 32kHz, 24kHz, 22.05kHz, 16kHz, 12kHz, 11.025kHz, 8kHz (Sampling rate) | ||
| EAC3 | 32Kbps ~ 6Kbps (Bit rate) / 32kHz, 44.1kHz, 48kHz (Sampling rate) | ||
| LPCM | Unsigned 8bit PCM, Signed/Unsigned 16bit PCM (big / little endian), 24bit PCM (big endian), DVD LPCM 16/20/24bit (Bit rate) / 6kHz, 8kHz, 11.025kHz, 12kHz, 16kHz, 16kHz, 22.05kHz, 24kHz, 32kHz, 44.1kHz, 48kHz, 88.2kHz, 96kHz, 176.4kHz, 192kHz (Sampling rate) | ||
| IMA-ADPCM/MS-ADPCM | 384Kbps (Bit rate) / 8KHz ~ 48Khz (Sampling rate) | ||
| LBR 32Kbps ~ 96k | Kbps (Bit rate) / 32kHz, 44.1kHz, 48kHz (Sampling rate) | ||
| Picture | .jpeg | Baseline | Resolution(WxH): 17000x10000 |
| Progressive | Resolution(WxH): 4000x4000 | ||
| .bmp | - | Resolution(WxH): 5760x4096 | |
| Subtitle | .sub, .srt | - | - |
Supported DVI Resolutions
When connecting devices to your TV's connectors by using DVI converter cable(DVI to HDMI cable - not supplied), you can refer to the following resolution information.
| 56Hz | 60Hz | 66Hz | 70Hz | 72Hz | 75Hz | |
| 640x400 | ☑ | |||||
| 640x480 | ☑ ☑ | ☑ ☑ | ||||
| 800x600 | ☑ ☑ | ☑ ☑ ☑ | ||||
| 832x624 | ☑ | |||||
| 1024x768 | ☑ ☑ | ☑ ☑ ☑ | ||||
| 1152x864 | ☑ ☑ | ☑ | ||||
| 1152x870 | ☑ | |||||
| 1280x768 | ☑ | ☑ | ||||
| 1360x768 | ☑ | |||||
| 1280x960 | ☑ | ☑ | ||||
| 1280x1024 | ☑ | ☑ | ||||
| 1400x1050 | ☑ | ☑ | ||||
| 1440x900 | ☑ | ☑ | ||||
| 1600x1200 | ☑ | |||||
| 1680x1050 | ☑ | |||||
| 1920x1080 | ☑ |
Table des matieres
CEC and CEC RC Passthrough
| A | Product Fiche | ||
| B | Commercial Brand:TELEFUNKEN | ||
| C | Product No. | 10120587 | |
| D | Model No. | XF32G111-S | |
| E | Energy efficiency class | A+ | |
| F | Visible screen size (diagonal,approx.) (inch/cm) | 32 inches | 81 cm |
| G | On mode average power consumption (Watt) | 31,0 | |
| H | Annual energy consumption (kWh/annum) (*) | 45 | |
| I | Standby power consumption (Watt) | 0,50 | |
| J | Off mode power consumption (Watt) | N/A | |
| K | Display resolution (px) | 1920x1080 | |
| A | B | C | D | E | F | ||
| English Product | Fiche Commercial Brand | Product No. Model No. | Energy efficiency class | Visible screen | size | (diagonal, aprox.) (inch/cm) | |
| Deutsch | Produkt-Datenblatt Markenzehen Produkt-Nr. Model-Nr. | Nen Produkt-Nr. | Ner. Energieeffizienzklasse | Sichbare Bilanzschirmgroße | Schirmgroße | diag onalca) (Zoll /cm) | |
| Булгарский | Бларочen Лост сTekнескite дддд | Тьровская мarksa | П Brockт № | Мodel № | Клас на eнергийсяфektivноct | Видим разимр на ekрANA Дамоганл по indи./ finда /см | |
| Čeština | Produktovy list | Zнackа vyrobce | Cislo produktu | Model c. | Energetická frida | Viditelna velikost obrazovky Uhlco fickao fibl.lvo alcu /cm | |
| Dansk | Produktoplysningskema | Varemaerkle | Produktnr. | Model nr. | Energieffektivitetsklasse | Synig skærmsternelse (diagonl,ca.) | |
| Suomi | Tuote fiche | Kaufallenin merkki | Tuole nro. | Malli nro. | Virran tehokkusluokka | NKvyan kuvarudun koko diaoonaalinne / tuumaa/cm | |
| Frankaïs | Fiche du produit | Marque commerciale | Produit N° | Modèle N° | Classe d'efficacité énergétique | Taille d'écran visible (diagonale,approx.) | |
| puces/cm | |||||||
| Hrvatski | SAZETAK PROIZVDOTA | Trgovačka marka | Br. proizvoda | Br. modela | Klasa energetske užinkovitosti | Vidljiva veličina ekrana diaoona lona,criliznoi (inca/cm | |
| Nederlands | Productfiche | Commercieel merck. | Productnr. | Modelnr. | Energie efficientie klasse | Zichtbare schermgrotte diaoona lona, y (inches/cm | |
| Espanol | Ficha del Producto | Marca Comercial | N° de Producto | N° de Modelo | Clasificacion Energética | famaño de pantalla visible diaoona lona rox, Rp uladas/cm | |
| Svenska | Produktspecifikation | Varumärke | Produktnr. | Modelnrl. | Energiklass | Synig skästmorcek (diagonalung efärlig) (tum/cm) | |
| Italienano | Scheda prodotto | Marchio commerciale | Numero prodotto | Numero modello | Classe di efficienza energetica | Dimensioni visibili dello schemo diag onalecircia) (p olicic/cm) | |
| Polski | KARTA PRODUKTU | Marka produktu | Nr produktu | Nr modelu | Klasa efektwywnosci energetycznje | Widoczny obraz ekrani przek na okolo (cali/cm) | |
| Magyar | Termékismertő adatlap | Kereskedelmi marka | Termékszám | Modellszám | Energiahátekonsagy osztály | Lathato keptartomány (diagonalis,kb.) | |
| inches/cm | |||||||
| Norsk | Produktinformasjon | Kommersiell merkevare | Produkt nr. | Model nr. | Energlefektivitet klasse | Synig skjermstørrelse (diagonai, ca.) | |
| tommer/cm | |||||||
| Portugues | Ficha do produits | Marca Comercial | Produto N° | Modelo N° | Classificacao efficiência energetica | Tamanho ecra visível (diagonai, aprox.) | |
| Româna | Fişà produs | Marca Comercialä | Nr. Produs | Nr. Model | Clase de eficientă energetica | Dimensiunea ecranului vizibil diag onala ap rox. (inch/cm) | |
| Pусккій | Спразочький писток Текнескix ддддддддддддддддддддддддддддддддддддддддддддддддддддддддддддддддддддддддддддддддддддддддддддддддддддд徳 | Iproobray MAPKA | Homep Идения | Homep Мodelу | Knacc anepronotpebneia | Bdimbim pazarmé ekrana (no dianarohani, Okono) (dkimmoi/cm) | |
| Беларczak | Спразочький писток Текнескix ддддддддддддддддддддддддддддддддддддддддддддддддддддддддддддддддддддддддддддддддд徳 | Iproobray MAPKA | Homep Идения | Homep Modelу | Knacc anepronotpebneia | Bdimbim pazarmé ekrana (no dianarohani, Okono) (dkimmoi/cm) | |
| Мakdeонскій | Тechинник podatoцni | Коршун�а мarkа | Iproibzbdsp. | Model sp. | Knaca ha ehepretska epikhacost | Оемина на видлв ekран dianarohani, okony) ( finch/cm) | |
| ураіньскій | Тechинник ддд | Коршун�а мarkа | Aprykuyl | Madel ly | Knac eheprostochkoшьань | Вdimbim pozmir ekrana (diaryonab, Tp boyncho (doy milia/cm) | |
| Srpski | Technicke odlike | Komerçialna marka | Proizvod br. | Model br. | Klasa energetske etikasnostvi | Velicina vidjiyov ekrana (dijagona, tokom) (inca/cm) | |
| Slovenscina | Produktovy list | Znacka vyrobu | Cislo produktu | Model c. | Energeticka trieda | Videtela velkost obrazovky uhlo riecka zhruba) (dalcov/cm | |
| Slovenscina | Opis Izdelka | Komerçialna znamka | St. Izdelka | St. Modela | Razred energetske učinkovitosti | Videtela volkost zastona (diagona, prilb.) (dalcev/cm) | |
| Ельник | Демпюпюитц | Ельорбо олч. | Ap. Iproiovtroc | Ap. Movielou | Katryyopika evepeyekoiçns atroobooŋc | Odofo lybeboz obodovn (diaywovoc, trup) (livroc/cm) | |
| Bosanski | Technicki podaci | Komerçialna marka | Produkt br. | Model br. | Klasa energetske etikasnostvi | Vidjiva veličina ekrana (diagonai, prilbizno. X inca/cm) | |
| Льзь | Сынокун | Чьнокун | Chngorovn | Bng | Bng | (Ф�ух) (Ф�ух), (Ф�ух), (Ф�ух), (Ф�ух), (Ф�ух), (Ф�ух), (Ф�ух), (Ф�ух), (Ф�ух), (Ф�ух), (Ф�ух), (Ф�ух), (Ф�ух), (Ф�ух), (Ф�ух), (Ф�ух), (Ф�ух), (Ф��), (Ф�ух), (Ф�ух), (Ф�ух), (Ф�ух), (Ф�ух), (Ф�ух), (Ф�ух), (Ф�ух), (Ф�ух), (Ф�ух), (Ф�ух), (Ф�ух), (Ф�ух), (Ф�ух), (Ф�ух), (Ф�ух), (Фalvoc), (davata) | |
| Тurке | Urun fişi | Ticari Marka | Urun No. | Model No. | Enerji verimiligi smfi | Gorlen ekran boyutu (capraz, yaksik.) (ing/cm) | |
| Shqip | Te chénat e produktit | Marka treglare | Nr. i produktit. | Nr. i modelit. | Klasa e eficiencés se energjisè | Madhesia e ekranit te dukhshem diag onal afersish) (ing/cm | |
| Lietuvlú | Gamino otietelé | Gamintojas | Gamino Nr. | Modello Nr. | Energetinio efektyvumo klasé | Matomas ekran dydis (jstrzainé, approx) (col / cm) | |
| Latviešu | Produkta apraksts | Marka | Produktna nr. | Modela nr. | Energoefektivitates klase | Ekranza izmiers (pa diognali,aprcam) | |
| Eesti | TOOTEKIRJELDUS | Rootja firma | Toote nr. | Mudell nr. | Energiaklass | Vaadatava ekraani suurus (diagonaal, umbes) (tolli/cm) |
| G | H | I | J | K | ||
| English On mode | average | Annual energy consumption(KWh/annum) | Standby power consumption(Watt) | Off mode power consumption(Watt) | Display resolution(px) | |
| power consumption (Watt) | ||||||
| Deutsch | Durchschnittlicher Stromverbrauch imelingescheltem Zustand (Watt) | Jährlicher Energieverbrauch(kWh/Jahr) | Standby-Stromverbrauch (Watt) Stromverbrauch im ausgescheltem Zustand (Watt) | Stromverbrauch im ausgescheltem Zustand (Watt) | Display-Auflösung (px) | |
| Bjørnaprak | Cérdia konsymaemia na henelektopeenerbnae bveknocheno chtotnne (Watt) | Todimba konsymaemia naenelektopeenerbnae (kWh/Todimna) | Konsymaemia naenelektopeenerbnae bpekmh na rotobnct (Watt) | Konsymaemia naenelektopeenerbnae bpekmh na chtotnne (Watt) | Paadelenentha cnoocboctn ha dncnner(nkxcena) | |
| cestina | Prunema spoletbe elektrickene energie v zapnutem rezimu (Watt) | Rotni spoletbe enerigge (kWh/Rocn) | Spoltebe elektrickene energie v pohotovostm rezimu (Watt) | Spoltebe elektrickene energie ve ypvutnem rezimu (Watt) | Rozileni dispieje (px) | |
| Dansk | Gennensmittel stramforbrug i teandt tilstand (Watt) | Arligt energiforbrug (kWh/Arligt) | Stramforbrug (standby)(Watt) | Stramforbrug i slukket tilstand (Watt) | Skaermoplesning (px) | |
| Suomi | Paillà-tilan keskimaäräinen virrankulatus (Watta) | Vusittainen sähkönkulutu (kWh/Vusitainen) | Vakivirran kulutus (Watta) Poi-slan | Virrankulatus (Watta) Näytön erotteluky | (pikselia) | |
| Français | Consommation énergétique moyenne en mode "marche"(Watt) | Consommation énergétique annuelle (kWh/annuel) | Consommation d'énergie en veille (Watt) | Consommation d'énergie en mode 'arré" (Watt) | Resolution de l'écran (px) | |
| Hrvatski | Prosječna potrošnja el. enerjke kada je goizvod ukl'učeni (Watt) | Godsinja n potrošnja el. Energije (kWh/Godisnai) | Potrosnjα el. energije u modu orbravnosti (Watt) | Potrosnjα el. energije kada je proizvod skl'ucen(Watt) | Rezolucija zaslona (piksela) | |
| Nederlands | Aan-modus gemiddekt stroomverbruik (Watt) | Jaarliks energierbruk (kWh/Jaarliks) | Stand-by stroomverbruk (Watt) Ult-modus | Stand-by stroomverbruk (Watt) Ult-modus | ux stroomverbruk (Watt) Schermresolutie (px) | |
| Espanol | Consumo electrico medio, en functonamento (Vatio) | Consumo elecrico anual (kWh/anaal) | Consumo en modo en espera (Vatio) | Consumo elecrico medio apagado (Vato) | Resolução de pantaila (px) | |
| Svenska | Strömkomsumption i PA-lage (Watt) Energiaconsumption per ar (kWh/Arg) | Consumption per ar (kWh/Arg) | Strömkomsumption i viloiåge (Watt) Strömkomsumption i AV-lage (Watt) Strömkomsumption i AV-lage (Watt) Strömkomsumption i AV-lage (Watt) Strömkomsumption i AV-lage (Watt) Strömkomsumption i AV-lage (Watt) Strömkomsumption i AV-lage (Watt) Strömkomsumption i AV-lage (Watt) Strömkomsumption i AV-lage (Watt) Strömkomsumptions in modul pormit (Watt) | Consumo di corrente in modalità standby (Watt) | soluzione del display (px) | |
| Italienano | Consumo di corrente medio da acquesa (Watt) | Consumo annuale di energia (kWh/annua) | Consumo di corrente in modalitystandby (Watt) | Consumo di corrente da spenta (Watt) | ||
| Polski | Srednie zuzycie enerji w trybie wólczony (Watu) | Rocznze zuzycie enerji (kWh/Roczn) | Srednie zuzycie enerji w trybie oczekiwania (Watu) | Zuzycie enerji w trybie wólczony (Watu) | Rozdzieloczosc obrazu (pikseii) | |
| Magyar | Energiafogasyasztás bekapsolva hagyott lizemmodban (Watt) | Eves energiafogasyasztás (kWh/Eves) | Energiafogasyasztás standby lizemmodban (Watt) | Energiafogasyasztás kikapsolt lizemmodban (Watt) | Képernyófelbontás (px) | |
| Norsk | Pamodus gjennomsnittig stramforbruk (Watt) | Arlig stremforbruk (kWh/Arlig) Hvllem | Xus stremforbruk (Watt) Av-modus stromforbruk (Watt) Skjermoppleshing (piksel) | Xus stremforbruk (Watt) Skjermoppleshing (piksel) | ||
| Portugues | Consumo energia em modo medio (Watt) | Consumo annual energy (kWh/annual) | Consumo energia em stand-by (Watt) | Consumo energia em modo alimentação (Watt) | Resolução do visor (pixel) | |
| România | Consum electric mediu ln modul poin (Watt) | Consum annual de energia (kWh/annua) | Consum electric ln stare de repaus (Watt) | Consum electric ln modul oprit (Watt) | Rezolutija ecranului (pixell) | |
| Puckskii | Cpeşná potrošdne enerji w trybie wólczony (Watu) | Exeşónbý potrošdne enerji (kBrTuTog) | Exeşónbý potrošdne enerji w trybie oczekiwania (Watu) | Exeşónbý potrošdne wtrybie wólczony (Watu) | Paapeşnéme ekpana (ninkcelen) | |
| Bénpárcyack | Cpeşná potrošdne enerji w trybie wólczony (Watu) | Exeşónbý potrošdne enerji (kBrTuTog) | Exeşónbý potrošdne enerji w trybie oczekiwania (Watu) | Exeşónbý potrošdne wtrybie wólczony (Watu) | Paapeşné me ekpana (ninkcelen) | |
| Makdońskii | Iproce na potrošučka kora e bnučen | Todinna potrošučka na enel rna (kWh/To Muzha) | Todinna potrošučka bo mrypuhanee (batn) | Todinna potrošučka kora e nckluyen (batn) | Pezonycnja na ekpan (ninkcelen) | |
| Ukrainbuk | Cepedna coхибANA potrozhničb y robuomnu v evkimi (Baf) | Cepedna coхибANA potrozhničb na enel rna (kWh/To Muzha) | Cepedna coхибANA potrozhničb y pekrimi ochivannu (Baf) | Cepedna coхибANA potrozhničb y bnučhenomy trani (Baf) | Pozadniha zadthictb ekpana (ninkcelen) | |
| Srpski | Prosečna potrošnja kada je ukljucičn (Vaf) | Godsinja potrošnja enerjce (kWh/Godisnai) | Potrosnjα tokom minovanja (Vati) | Potrosnjα kada je islkijuceni (Vati) | Rezolucija displeja (pixl.) | |
| Slovenčina | Piremela spoleta elektrické enerjce v zanunotnem rezime (Wattov) | Rotna spoletbe enerjce (kWh/Rocn) | Spotreba elektrické enerjce v pohotovostnem rezime (Wattov) | Spotreba elektrické enerjce vo vvnutnem rezime (Wattov) | Rozilisenie displeja (pixl.) | |
| Slovensčina | Poraba elektréne enerjce v pvrp rechnem naciho (Wattov) | Letna poraba enerjce (kWh/Letna) | Poraba enerjce v stanju pravljenosti (Wattov) | Poraba enerjce naciu izklopa (Wattov) | Resolucija zaslona (pixl.) | |
| EMLynek | Meón katayduwán pojúatroc laskouy (Watt) | Erjónda katayduwán evépyiac (kWh/En ād) | Katoydowán pojúatroc σуν avapovn (Watt) | Katoydowán pojúatroc σуν avapovn (Watt) | Aváluon odovn (Flézá) | |
| Bosanski | Proseječna potrošnja kada je ukljucičen (Watt) | Godsinja potrošnja enerjce (kWh/Godisnai) | Potrosnjα tokom minovanja (Watt) | Potrosnjα kada je islkijuceni (Watt) | Rezolucija ekrana (pixl.) | |
| nch | (Anch) nch nch nch nch nch nch nch nch nch nch nch nch nch nch nch nch nch nch nch nch nch nch nch nch nch nch nch nch nch nch nch nch nch nch nch nch nch nch nch nch nch nch nch nch nch nch nch nch nch nch nCH | (Anch) nch nch nch nch nch nch nch nch nch nch nch nch nch nch nch nch nch nch nch nch nch nch nch nch nch nch nch nch nch nch nch nch nch nch nch nch nch nch nch nch nch nch nch nch nch nch nchnch nch nch nch nch nch nch nch nch nch nch nch nch nch nch nch nch nch nch nch nch nch nch nch nch nch nch nch nch nch nch nch nch nch nch nch nch nch nch nch nch nch nch nch nch nch nch nch nch nchnch nch nCH | (Anch) nch nch nch nch nch nch nch nch nch nch nch nch nch nch nch nch nch nch nch nch nch nch nch nch nch nch nch nch nch nch nch nch nch nch nch nch nch nch nch nch nch nch nch nch nCH | (Anch) nch nchnch nch nchnch nch nchnch nch nchnch nch nchnch nch nchnch nch nchnch nch nchnch nch nchnch nch nchnch nch nchnch nch nchnch nch nchnch nch nchnch nch nchnch nch nchnch nch nchnch nch nCH | (Anch) nchnch nchnch nchnch nchnch nchnch nchnch nchnch nchnch nchnch nchnch nchnch nchnch nchnch nchnch nchnch nchnch nchnch nchnch nchnch nchnch nchnch nchnch nchnch nchnch nchnch nchnclnch nchnclnch nchnclnch nchnclnch nchnclnch nchnclnch nchnclnch nchnclnch nchnclnch nchnclnch nchnclnch nchnclnch nchnclnch nchnclnch nchnclnch nchnclnch nchnclnch nCH | (Anch) nchnch nchnch nchnch nchnch nchnch nchnch nchnch nchnch nchnch nchnch nchnch nchnch nchnch nCH |
| Turkce | Açık moddaki ortalama guç tuketimi (Watt) | Yilikik erjüt tuketimi (kWh/Yilikik) | Bekleme durumunda enerj tuketimi (Watt) | Kapali moddaki脘ı tuketimi (Watt) | Çozünurlugu (pixl.) | |
| Shqip | Konsumi mesatar i enerjise si ndezur (Watt) | Konsumi vjetör i enerjise (kWh/Yetor) | Konsumi i enerjise si ne gatifshmeni (Watt) | Konsumi i enerjise si fikur (Watt) | ucioni i ekrant (pixl.) | |
| Lietuviu | Vidutiniés enerjios sāngauados jungus (Vatah) | Motinés enerjios sāngados budęjimo režimu (kWh/Motinés) | Energios sāngados budęjimo režimu (Vatah) | Energios sāngados júngus (Vatah) | Ekraño skiriamoji goba (pikseli) | |
| Latvlešu | Enerjias palerijns aktivi'rezimi (Watt) | Gada enerjias palerijns (kWh/nad) | Enerjias palerijns gaidífasanas režim (Vati) | Enerjias palerijns izslégta slavoklif (Vati) | Displeja rezolucija (pikseliem) | |
| Eesti | Keskmine energiakulu tõreziimil (Watt) | Aastane energiakulu (kWh/aastane) | Eneriakulu ootereziimil (Watt) | Eneriakulu valjalututud olekus (Vati) | Erikaani resolutioon (pikseli) | |
Energy consumption kWh per year, based on the power consumption of the television operating 4 hours per day for 365 days. The actual energy consumption will depend on how the television is used.
() Deutsch Energieverbrauch kWh/Jahr, auf der Grundlage eines tager viorstündigen Betriebs des Fermsehgerätes an 365 Tagen. Der tatsächliche Energieverbrauch hängt von der Art der Nutzung des Fermsehgerätes ab.
(1) 6043 365 365 4 4 4 4 4 4 4 4 4 4 4 4 4 4 4 4 4 4 4 4 4 4 4 4 4 4 4 4 4 4 4 4 4 4 4 4 4 4 4 4 4 4 4 4 4 4 4 4 4 4
(°) cestina Spitebela elektricke energie kWh za rok vychacejci ze spoteby elektricke energie televznilho pijlimeac, kler y je provozu 4 hodiny donne po dobu 365 dni. Skuteña spoiteba elektricke energie zavi na zpušobu pruziti televizhiho p fimace.
() Dansk Enerigforbrug: kWh om aret, beregren som fjernsnyts effektforbrug, hvis det er taend 4 timer om denen 365 dage. Det faktiske energiforbrug vil bero pa, hyvordan fjernsnyset bruges.
() Suomi Energlankulutus kWh: a vucdessa, kun oletetaan, etta televisiota kaytetaan 4 tuntia palvassa 365 palvan ajan. Todellinen energlankulutus rippuu television kayttotavasta.
Gans Commation d'energe de kwh par an, sur la base de la consommation eletrique d'un televiseur fonctionnant quatre heures par jour pendant trois cent soixte cinq jours. La consommation reelle depend des conditions dutilisation du televiseur,
(+) Hrvatski Urošak enerigija iznosi kWh godisnej na lamalu utroška enerigije televizora koj radičetiri sala dnevno 365 dana u godini. Slvami utrošak enerigije ovisil o tama kak se upotreblava televizor.
() Nederlands Energieverbruik kWh per Jaar, gebaseerd op het elektricteitsverbruik van de televisie wannier die gesturende 365 dagen 4 uur per dag aanstaat. Het feiliteit energieverbruik is afhankelijk van de manier waarop de televisie worden gebruikt.
() Espanol Consumo de energia: kWh al afo, suponiendo quatre horas de functiOnamento diario durante 365 cias. El consumo efectivo dependera de las condidiones reales de uso de la television.
() Svenska Energiförbrukning kWh per ar, baraknd utfrän effektforbrukningen for on tv-molltagare som används fyrar timmar per dygn under 385 dygn. Den faktiska energiförbrukningenkommen all berø pa hur tv-molltagar används.
(1) Italiano Consumo di energia kWh'anno calcolo sulla base del consumo di un teilevisore in funzione per 4 ore al giorno per 365 giorni. Il consumo effettivo di energia dipende dall'tutilizzo reale del teilevisore.
() Polski Zuzycye enerigii kWh/rok na podstawie zuzycia enerigii przyez telewizor dzialajacy 4 godziny Dziennie przyez 365 dni. Rzeczwyiste zuzycie enerigii zalezy od spoosobu uzykowania telewizora.
*Magyar A televizlózkészluk napi 4 rós Ünmelitt aev 26 hcs napjra veitte vente kWh mnyiseg ü energi olngayztsa. T a neylenges energalozaytsa k zes kedlizk ümeltetisi modjat figg. *Nors Eneriforbrukk hpv der aikr, stamforbrukert er basert auf tv EN per 4 timier deq for 36 dager. Det faktiske enerifolbrukt viare va anhovir ay hyvordan TE nn brukes.
Portuques Consumo de energia de kWh por ano, baseado no consumo, em termos de potencia, do teletor a funcionar 4 horas por dia durante 365 dias. O consumo de energia real dependera do modo como o teletor e
Conumul de enerie de kWh pe an, pe baza pueri consumate de aparatul TV atunci c and est in funcjne 4 ore pe zi timp de 365 de zile; consumul real de enerie depinde de conditijle de utilizare a aparatul
()PcKn 3T-10pOeHnE K37B.0rnpoDHTa Hpaetaa npTepehna 3heprn TerebeHOpom npapoe 4aca aB hA npotKeHn 365 dHe .KaTHNecKOne npTepeHnene 3eKtPOeHepn 6dyert ABscetb TorO, KaKIOJIbIyTeAe TBeHApOo
(6) 6napcck HpHt y 10 npbioaia 3 pahny cnaabnnae hepri taneiapaam npb npa 4 raanhu y da hna pauriy 365 dH. Aakltbnae cnaabnne ankprapaepri 5y2e zaneekaa, ad taie, x
()MaeOcknK 1000000000000000000000000000000000000000000000000000000
(+) kyaepncknnn nneepnncnneepnneepnneepnneepnneepnneepnneepnneepnneepnneepnneepnneepnneepnneepnneepnneepnneepnneepnneepnneepnneepnneepnneepnneepnneepnneepnneepnneepnneepnneepnneepnneepnneepnneep
() Srpski Potrajsn je od kWh na goildnem nivou zasnovana je na potrosnji televizora koji je ukjucen 4 sata dnevno 365 dana godisne. Svama potrosnja struje zavisic o nacin koriarenja televizora.
() Slovenica Spotreba enerig kWh za rk na zaklade spoTreby elektrickej enerigtelevizora, ktor y je v cinnosti 4 hodyn danne poacas 365 dni. Skutocna spoTreba enerigia zavi si od loho, ak o sa televior pouziva.
() Slovenscina Poraba enerigije je kWh na leto, glede na napajalno enerigije televizorja, ki deluje 4 ure na dan v sveh 365 dneh. Dejanska poraba enerigije je odvisna od nacina uporabe televizorja.
() EALnyika KATAVAUXEevyepiaeKWh oVaEtoc. 10 Baon TnV KATAVAUXON AYIOc aTn TmNepaon ia Tetpawon Aenoupyla ov npoe aTl 365 npeC. H poypaikn Katavwauw eEvpeiae cApotora otro tv pto
() Bosanski Energetska potrosnja je XYZ kWh na godijsnem nivou, na osnovu potrosnje TV-a koj radi 4h dnevno, 365 dana. Stvarna energetska potrosnja zavisi od toga kolko e TV koristi.
n 1
1) 1
() Shqip Konsumi energjise Kyn ne vti, dazuar ne konsumin e energjise se tevizont kur punon per 4 ore ne are per 305 are. Konsumi aktua i energjise varet nga menyra e pereommitte teevizont.
() Lietuviu knaudojima tevizorii 365 iles. Fakti energios sunaudojima lems tai, kiek laiko bus
(*) Latviesu Enerjias patarngkWh gada, nemot vare televizora elektroenerjias patarigu, darbojloties 365 dienas, cetras stundas diena. Faktskals energijes patarng bus atkarig no ta, ka televizors tiks Izmantots.
(Eest Energiarimn kWh aas, ealdusel televisor totab neli tundi pava ja 365 pava aastas. Tegalik energiarimine oleneb televisior kasutusviist
y 4 kWh
(1) y = 1 - x^2
| A | VESA WALL MOUNT MEASUREMENTS | ||
| B | Hole Pattern Sizes (mm) | W | H |
| 200 | 100 | ||
| C | Screw Sizes | ||
| D | Length (X) | min. (mm) | 5 |
| max. (mm) | 8 | ||
| E | Thread (Y) | M4 | |
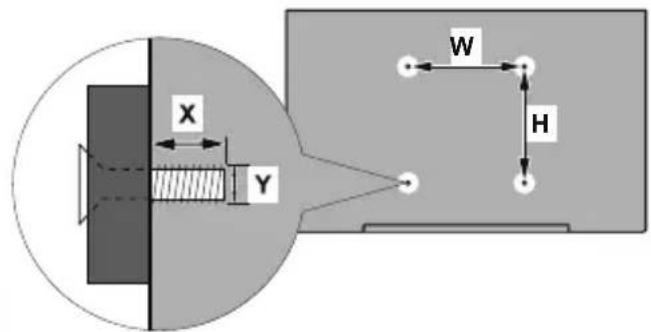
| ABCDE | ||||
| English | VESA WALL MOUNT MEASUREMENTS | Hole Pattern Sizes (mm) Screw Sizes Length (X) Thread (Y) | ||
| Deutsch | MASSANGABEN FÜR VESA-WANDMONTAGE | Lochmustergroßen (mm) | Schraubengrößen | Länge (X) Gewinde (Y) |
| Français | DIMENSIONS DU SUPPORT DE FIXATION MURALE VESA | Dimensions des modèles de trous de montage (mm) | Dimensions des vis | Longueur (X) Filetage (Y) |
| Italieno | Misurazioni installazione a parete VESA | Dimensioni schema foro (mm) | Dimensioni vite | Lunghezza (X) Filettatura (Y) |
| Portugués | MEDICÔES DE MONTAGEM MURAL VESA | Dimensões do molde de furação (mm) | Tamanhos do parafuso | Comprimento (X) Rosca (Y) |
| Espanol | MEDIDAS DEL MONTAJE DE PARED VESA | Tamaños de patrón para agujero (mm) | Tamaños de tornillo | Longitud (X) Rosca (Y) |
| Türkce | VESA DUVARA MONTAJ APARATI ÖLÇULERİ | Açilacak Delik Ölcüleri (mm) | Vida Ölcüleri | Uzunluk (X) Yüsey (Y) |
| Ελλυκ | ΔIAETAΕΙ ΒΑΗ ΜΟΥ ΜΕΣ | Meyêŋ αχήματος onów (mm) | Meyêŋ βúδύv | Mηκός (X) Ανερμία (Y) |
| Polski | WYMIARY DO MONTAZU NÁCIENNEGO VESA | Rozmiary szablonu otworów (mm) | Rozmiary wkrećów | Dlugość (X) Gwint (Y) |
| čěstina | ROZΜÉRY DRŽAKU NA ZED VESA | Rozmýr velikosti dér (mm) | Rozmýr sroubú | Délka (X) Závit (Y) |
| Magyar | VESA FALI TARTÜ MÉRETEK | Lyukak mérétények nagyságárm (mm) | Csavar mérét | Hossz (X) Menet (Y) |
| Română | MÁSURÁTORI SUPORT PERETE VESA | Dimensión tipar gaurá (mm) | Dimensión süruburi | Lungime (X) Filet (Y) |
| Svenska | VESA VAGGMONTERINGSMÄTT | Hålmönsterstorlear (mm) | Skruvstorlekar | Längd (X) Trám (Y) |
| Nederlands | VESA WANDMONTAGE METTINGEN | Groote booropening (mm) | Schroefgloote | Lengte (X) Draa (Y) |
| Suomi | VESA-SEINÄASENNUKEN MITAT | Reikakuviion koot (mm) | Ruuvinkoot | Pituus (x) Kierre (Y) |
| Norsk | VESA VEGGMONTERINGSMÄL | Hullmønster størrelser (mm) | Skruvstorlelor | Lengde (x) Trám (Y) |
| Dansk | VESA VEGGMONTERINGSMÄL | Hullmønster-størrelser (mm) | Skruvstorrelser | Lengde(x) Trám (Y) |
| Pyckskii | PA3MEPBi HACTEHNO KPEΠΠΕΝΙΑ VESA | Разм套房 сстеньоть OТВЕСТЛ | Разм套房 ВИТов | Длима(X)Рezьб(a) |
| Беларczak | ПАМБЛ BИСЕНHA MAЦАВANHA VESA | Памерь сіст Committeesцдітун | Памерь ВИТов | Далжын (X)Разьб(a) |
| Maşédonckii | МЕКи 3A MOHTIPANBE HA SMD 3A „BECA" | Шема на говетимп на дулкову (mm) | Говетимп на урафот | Долимп(H)Наво(j) |
| Украïnhсьka | PO3МIPи NACTIHNO KPIΠΠΕΝΙΑ VESA | Вidостань мік кріпльникі міТВОВАМі, MM | Розм套房 виитг | Довожи(H)Дiametр різб(H) |
| Srpski | DIMENZIJE VESA ZIDNOG NOSAÇA | Dimenzije šablona za buşenje | Dimenzije zavtrnjeva | DžINA (X) Navoj (Y) |
| Slovenčina | ROZMERY DRŽIAKA NA STENU VESA | Rozmery vefkosti dier (mm) | Rozmery skrutiek | Džka (X) Zavit (Y) |
| Slovenšćina | MERE STENSKEGA NOSILCA VESA | Velikosti vžorca lukenj (mm) | Velikosti vijakov | DžINA (X) Navoj (Y) |
| Hrvatski | VESA MIJE RE ZIDNOG DRŽAÇA | Veličine uzorka otvora (mm) | Veličine vijka | DžINA (X) Navoj (Y) |
| Bosanskis | DIMENZIJE VESA ZIDNOG NOSAÇA | Dimenzije šablona za buşenje | Dimenzije vijaka | DžINA (X) Navoj (Y) |
| Блугарский | PA3MEPBi 3A KOMPILEKT 3A MOHTAIKH HA CTEHA VESA | Разм套房 на овъру (mm) | Разм套房 Болта | Дылочи(H)Рezьб(a) |
| Lietuviç | VESA TVIRTINIMO PRI ESIENOS MATAVIMAI | Angos šablono dydis (mm) | Varžtu dydis | Iglis (X) Srigis (Y) |
| Latvišeu | VESA SIENAS STIPRINAJUMA IZMÈRi | Caurumu šablona izmërs (mm) | Skruvju izmëri | Garums (X) Vitne (Y) |
| Eesti | VESA SEINALE KINNITAMISE MÖÖDUD | Kruvi suuruse mõdt (mm) | Kruvi suurus | Körgus(x) Keere (Y) |
| Shqlp | PERMASAT E NJÉSISE SÉ MONTIMIT NÉ MUR VESA | Machēsitte modele tě vrimave (mm) | Madhēsitte evidhave | Gjatësia (X) Filetimi (Y) |
| Бл�я | Ф�г��е LIVELI YELI YELI YELI YELI YELI YELI YELI YELI YELI YELI YELI YELI YELI YELI YELI YELI YELI YELI YELI YELI YELI YELI YELI YELI YELI YELI YELI YELI YELI YELI YELI YELI YELI Y ELI YELI YELI YELI YELI YELI YELI YELI YELI YELI YELI YELI YELI YELI YELI YELI YELI YELI YELI YELI YELI YELI YELI YELI YELI YELI YELI YELI YELI YELI YELI YELI YELI YELII YELI YELI YELI YELI YELI YELI YELI YELI YELI YELI YELI YELI YELI YELI YELI YELI YELI YELI YELI YELI YELI YELI YELI YELI YELI YELI YELI YELI YELI YELI YELI YELI YELIYELI YELI YELI YELI YELI YELI YELI YELI YELI YELI YELI YELI YELI YELI YELI YELI YELI YELI YELI YELI YELI YELI YELI YELI YELI YELI YELI YELI YELI YELI YELI YELI YELI YOL | (,) | (,) | (,) |
| Náduy | VESA JIOO IOO IOO IOO IOO IOO IOO IOO IOO IOO IOO IOO IOO IOO IOO IOO IOO IOO IOO IOO IOO IOO IOO IOO IOO IOO IOO IOO IOO IOO IOO IOO IOO IOO IOO IOO IOO IOO IOO IOO IOO IOO IOO IOO IOO IOO IOO IOO IOO IOO IOO ILO | (,) | (,) | (,) |
| Фагшу | VESA JIOO IOO IOO IOO IOO IOO IOO IOO IOO IOO IOO IOO IOO IOO IOO IOO IOO IOO IOO IOO IOO IOO IOO IOO IOO IOO IOO IOO IOO IOO IOO IOO IOO IOO IOO IOO IOO IOO IOO IOO IOO IOO IOO IOO IOO IOO IOO IO0 | (,) | (,) | (,) |
TR: Isbu belgede; VESTEL Elektronik Sanayi ve Ticaret A.Ş., telsiz ekipmani tipi TFT IDTV 'nin 2014/53/AB sayil direktife uygün olduğunu bylan eder. AB uygünlik bayanın tam metni internet adresinde mevcuttur: doc.vosshub.com
EN: Hereby, VESTEL Elektronik Sanayi ve Ticaret A.Ş., declares that the radio equipment type TFT IDTV is in compliance with Directive 2014/53/EU. The full text of the EU declaration of conformity is available at the following internet address: doc.vosshub.com
BG: C Hactoio To VESTEL Elektronik Sanayi ve Ticaret A.S. DeKnappa, Ye To3n Tn pAnocbOpxKeHne TFT IDTV e B CbotBcTCTBne C DnpeKtNa 2014/53/EC. LJIIOCTHnT TeKT Ha EC DeKnapaunra 3a CbotBcTCTBne MOKe da Ce Hamepn Ha CneHNr INHTepHet aDpec: doc.vosshub.com
CZ: Timto VESTEL Elektronik Sanayi ve Ticaret A.Ş., prohlăşuje,Že typ rádoviho zařizení TFT IDTV je v souladu se směrnici 2014/53/EU. Üplné zněné EU prohlášeni o shodě je k dispozici na teto internetové adrese: doc.vosshub.com
DA: Hermed erklærer VESTEL Elektronik Sanayi ve Ticaret A.S., at radioudstyristypen TFT IDTV er i overensstemmelse med direktiv 2014/53/EU. EU-overensstemmelseserklæringens fulde tekst kan findes på følgende internetadresse: doc.vosshub.com
DE: Hiermit erklart VESTEL Elektronik Sanayi ve Ticaret A.Ş., dass der Funkanlagentyp TFT IDTV der Richtlinie 2014/53/EU entspricht. Der vollständige Text der EU-Konformitätserklärung ist unter der folgenden Internetadresse verfügbar: doc.vosshub.com
EL: Me tvapouo a/o VESTEL Elektronik Sanayi ve Ticaret A.S., 8nawei oti o paioeotiaoTFT IDTV nnpoi tv odnyia 2014/53/EE. To npeskeiEvO ts gn dwnos osmuoppwongc EE diatietai otnv akolouon iotoeia oTo diaiktuoc.doc.vosshub.com
ES: Por la presente, VESTEL Elektronik Sanayi ve Ticaret A.S., declar que el tipo de equipo radioeléctrico TFT IDTV es conforme con la Directiva 2014/53/UE. El textoplete do la declaración UE de conformidad está disponible en la dirección Internet信箱: doc.vosshub.com
ET: Käesolevaga deklareerib VESTEL Elektronik Sanayi ve Ticaret A.S., et käesolev raadoseadme tuup TFT IDTV vastab direktivi 2014/53/EL nouetele. ELi vastavusdeklaratsiooni täielik tekst on kattesaadam järgmisel internetiaaddressil: doc.vosshub.com
FI: VESTEL Elektronik Sanayi ve Ticaret A.S., vakuuttaa, etta radiolaitetyppi TFT IDTV on direktiivin 2014/53/EU mukainen. EU-vaatimustemmukaisuusvakuutuksen tāysimittainen teksti on staativla seuraavassa internetosoitteessa: doc.vosshub.com
FR: Le soussigné, VESTEL Elektronik Sanayi ve Ticaret A.Ş., déclare que l'équipement radioélectrique du type TFT IDTV est conforme à la directive 2014/53/UE. Le texte complet de la déclaration UE de conformité est disponible à l'adresse internet suivante: doc.vosshub.com
HR: VESTEL Elektronik Sanayi ve Ticaret A.S., ovime izjavljube da je radijska oprema tipa TFT IDTV u skladu s Direktivom 2014/53/EU. Cjeloviti tekst EU izjave o sukladnosti dostupan je na sljedećoj internetskoj adresi: doc.vosshub.com
HU: VESTEL Elektronik Sanayi ve Ticaret A.S., igazolja, hogy a TFT IDTV tipusu radioberendezes megfelel a 2014/53/EU iranyelvnek. Az EU-megfeleloségı nyilatkozat teljes szövege elerheto a kovetkezo internetes cimen: doc.vosshub.com
IT: Il fabbricante, VESTEL Elektronik Sanayi ve Ticaret A.S., dichiara che il tipo di apparecchiatura radio TFT IDTV è conforme alla direttiva 2014/53/UE. Il testo Completo della dichiarazione di conformità UE è disponibile al segmente indirizzo Internet: doc.vosshub.com
LT: A§, VESTEL Elektronik Sanayi ve Ticaret A.§, patvirtinu, kad radijo jrenginiu tipas TFT IDTV atitinka Direktyva 2014/53/ES. Visas ES atitikties deklaracijos tekstas prieinamas šiuo interneto adresu: doc.vosshub.com
LV: Ar šo VESTEL Elektronik Sanayi ve Ticaret A.Ş., deklare, ka radioiekârta TFT IDTV atbilst Direktivai 2014/53/ES. Pilns ES atbilstibas deklarácijas teksts ir pieejams šādā interneta vietne: doc.vosshub.com
MT: B'dan, VESTEL Elektronik Sanayi ve Ticaret A.Ş., niddikjara li dan it-tip ta' taghmir tar-radju TFT IDTV huwa konformi mad-Direttiva 2014/53/UE. It-test kollu tad-dikjarazzjoni ta' konformita tal-UE huwa disponibbli f'dan I-indirizz tal-Internet li gej: doc.vosshub.com
NL: Hierbij verklaar ik, VESTEL Elektronik Sanayi ve Ticaret A.S., dat het type radioapparatuur TFT IDTV conform is met Richtlijn 2014/53/EU. De volledige tekst van de EU-conformiteitsverklaring kan worden geraadpleegd op het volgende internetadres: doc.vosshub.com
PL: VESTEL Elektronik Sanayi ve Ticaret A.S., niniejszym oswiadzca, ze typ urzadzenia radiowego TFT IDTV jest zgodny z dyrektywa 2014/53/UE. Pelny tekst deklaracja zgodnosci UE jest dostepny pod nastepujacym adresem internetwym: doc.vosshub.com
PT: O(a) abaixo assinado(a) VESTEL Elektronik Sanayi ve Ticaret A.S., declara que o presente tipo de equipoamento de radio TFT IDTV está em conformidade com a Diretiva 2014/53/UE. O texto integral da declaração de conformidade está disponible no segunte endereço de Internet: doc.vosshub.com
RO: Prin preventa, VESTEL Elektronik Sanayi ve Ticaret A.S., declară că tipul de echipamente radio TFT IDTV este în conformitate cu Direcita 2014/53/UE. Textul integral al declarației UE de conformitate este disponibil la urmâtoarea adresă internet: doc.vosshub.com
SK: VESTEL Elektronik Sanayi ve Ticaret A.Ş., tymto vyhlasuje,Že radióve zariadenie typu TFT IDTV je v súlade so smernicou 2014/53/EU. Uplné EU vyhlasenie o zhode je k dispozicii na tejto internetovej adrese: doc.vosshub.com
SL: VESTEL Elektronik Sanayi ve Ticaret A.Ş., potruje, da je tip radijske opreme TFT IDTV skladen z Direktivo 2014/53/EU. Celotno besedilo izjave EU o skladnosti je na voljo na naslednjem spletnem naslovu: doc.vosshub.com
SV: Harmed forsakrar VESTEL Elektronik Sanayi ve Ticaret A.Ş., attenna typ av radioutrustning TFT IDTV overensstämmer med direktiv 2014/53/EU. Den fullständiga texten till EU-forsakran om overensstammelse finns på foljande webbadress: doc.vosshub.com
CE

TELEFUNKEN Licensed by:
TELEFUNKEN Licenses GmbH
Imported by: Vestel Germany GmbH,
D-85748 Garching/Munich