MC60 - Speaker POLK - Free user manual and instructions
Find the device manual for free MC60 POLK in PDF.

User questions about MC60 POLK
0 question about this device. Answer the ones you know or ask your own.
Ask a new question about this device
Download the instructions for your Speaker in PDF format for free! Find your manual MC60 - POLK and take your electronic device back in hand. On this page are published all the documents necessary for the use of your device. MC60 by POLK.
USER MANUAL MC60 POLK
Pikl Audio specifies the recommended amplification range for each of its passive (non-amplified) loudspeakers. Typically that specification will be expressed as a range of power such as 20-200 Watts (per channel). It is important to understand what those numbers mean when choosing a receiver or amplifier for your Pikl loudspeakers. The lower number indicates the lowest continuous rated power that will yield acceptable performance in a typical listening environment. The higher number indicates the highest per channel power that should be used with your Pikl speakers. That number should not be confused with a "Power Handling" specification and it does not imply that the speaker will safely handle that full amount of power on a long-lorn basis. We specify a wide range of power ratings because not all electronics manufacturers use the same method for rating power. In fact, high quality lower rated amplifiers sound better and play louder than low quality units with higher power rating.
We recommend using amplifiers and receivers with rated power above the Power Handling limits of our speakers, because having extra power available for short turn peaks is conducive to better sound quality, maximum dynamic range and effortless high volume output. But we strongly urge you not to use the full power of your amplifier or receiver for daily listening.
loudspeakers can be damaged when an amplifier, regard less of its wattage, is made to play at higher listening levels than its power can clearly produce. Operation at this level can result in very high levels of audible distortion originating in the amplifier, which can add a harsh, gritty sound to your listening material. If you hear distortion—turn the volume down or risk damaging your speakers. You can damage just about any speaker, regardless of power rating, if you drive an amplifier to or beyond the point of distortion.
For a complete list of performance specifications, including recommended amplification, go to: www.polkaudio.com
PRODUCT DISPOSAL
Corrin international, national and/or local laws and/or regulations may apply regarding the disposal of this product. For further detailed information, please contact the retailer where you purchase this product or the Polk Audio Importer/Distributor in your country. A listing of Polk Audio Importer/Distributors can be found on the Polk Audio website www.polkaudio.com or by contacting Polk Audio at: 5301 Metro Drive, Belmont Maryland 21215, USA—Phone: +1 4103
TECHNICAL ASSISTANCE OR SERVICE
If, after following the hookup directions, you experience difficulty, please double check all wire connections. Should you isolate the problem to the speaker, contact the authorized Polk Audio dealer where you made your purchase, or contact Polk Audio Customer Service 800-377-7655 (MF, 3-6 EST, US & Canada only) or via email polkcs@polkaudio.com. Outside the US & Canada, call 410-358-3600. More detailed information—including audio how-to articles, FAQs, and online manuals are available on our award-winning websites www.polkaudio.com/home
PLACEMENTOPTIONS
Polk Audio MC Series Loudspeakers give you nearly endless placement options. But remember, where you locate in-wall speakers bears careful consideration, as installation requires that you cut a hole in your wall!
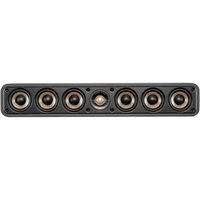
Fill a room with sound by installing speakers in nearly any wall or ceiling location (figure 1). Polk MC Series Loudspeakers have a wide dispersion pattern and aimable tweeters that allow you to focus their sound.
ADJUSTING THE TWEETERS
Aiming the tweeters toward your listening position improves imaging and detail. When using MC Series Loudspeakers as front/main home theater speakers (figure 2), aim the tweeters toward your listening position. For rear/surround speakers installed in walls or ceilings (figure 3), aim the tweeter toward the nearest reflecting surface (an adjacent wall or ceiling) for a more diffuse sound field. For a more direct sound, aim the tweeters at your listening position. (See figures 4 & 5 for aiming the tweezer.)
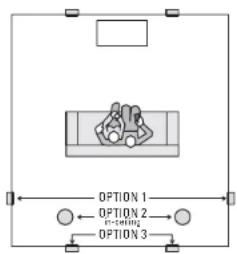
Figure 1—MIC Series audio and AV placement options, in wall or ceiling.
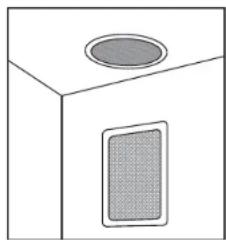
Figure 3-Examples of in wall and in ceiling placement. When used as near/surfaces, a mirror is taken toward the nearest reflecting surface (an adjacent wall or ceiling) for a more diffuse sound field.
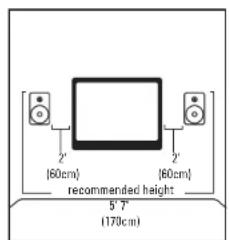
Figure 2 - Recommended measurements for home theater front stage placement.
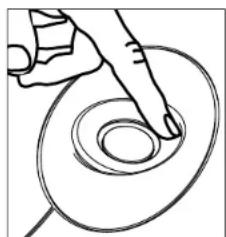
Figure 4 MCBS, MCBS Mounds. Curiously use your index fingers to align the tweets.
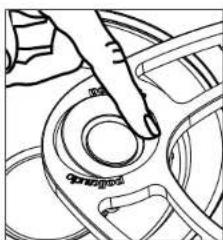
Figure 5-MC60, MC80 Mode: While supporting the Tweter bridge, carefully use your index finger to aim the tweet.
Important Note: MC Series In-Wall Loudspeakers are not magnetically shielded and should not be placed closer than 1' (30cm) from a television or video monitor. If you experience discoloration or distortion, immediately move the speakers away from your TV.
PAINTING YOUR MC SERIES IN-WALL LOUDSPEAKERS
You will need:
- Paint of your choice. (To make the job easier, we recommend spray painting the grille.)
- A paperclip or corkscrew. (For removing the paintable grille, corkscrew can also be used to open the wine when you relax with your newly painted MC speakers.)
- Masking tape.
- Paint mask. {To cover unpaintable parts, supplied!}
PREPARING TO PAINT:
- If the speaker is not yet installed, the grille can be removed simply by pushing the clamp screws forward to push the grille off the speaker from the inside. If the speaker is already in the wall, carefully hook the grille with a bent paper clip and pull it gently away from the frame (figure 6).
- When painting the frame of the speaker, use the supplied paint masks to carefully mask off the front of the speakers to protect the drivers and baffles while painting. You can do this while the speaker is already installed in the wall (if, for instance, you're repainting the room). If you do not have the paint masks carefully mask the speaker components using paper and masking tape.
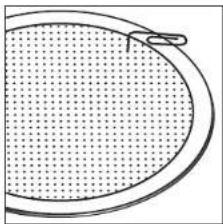
Figure 6—Use a paperclip to remove grille.
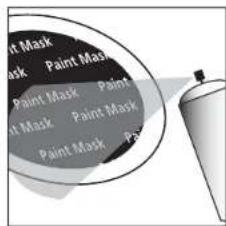
Figure 7- Mask the drivers and barriers, then spray paint in thin coats.
PAINTING THE FRAME:
- Apply paint to exposed (unmasked parts). Use two or more thin coats. Spray painting is recommended (figure 7).
- When the paint is completely dry, remove the masking material.
PAINTING THE GRILLE:
- The grille of the MC Series speaker features an even, protective powder coating. This powder coating is an ideal primer.
- Grilles must be spray painted. Do not use a brush and paint. Thick, brushed paint may clog the grille holes.
- Remove the grille by carefully hooking it with a bent paper clip and pulling it gently away from the frame.
- Before spray painting the grille, carefully remove the grille's fabric scrim by peeling it away from the inside of the grille (figure 8). Place this on a clean, flat surface where it will not get wrinkled.
-
Spray on two thin coats of finish color. If you're using a compressor and spray gun, use the finest, most diffuse setting. Be careful not to fill the holes in the grille with paint (figure 9).
-
When the grille is dry, carefully press the fabric scrim back into place on the inside of the grille. The special fabric scrim hides the speaker's drivers from view, and will not interfere with the sound.
- First install the speaker (see next page). Then carefully reinstall the grille by fitting it into its recess so that it is just resting on the frame. Starting with one corner, go around the speaker and push the grille into the grille notch a little bit at a time. Be gentle; the grille may be easily bent out of shape by rough handling. You will feel a positive "snap" when it is fully in place.
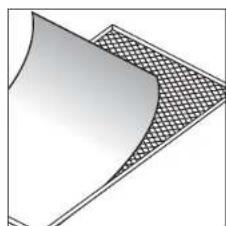
Figure 8—Panel away fabric grille skim before painting grille.
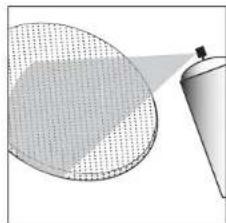
Figure 9 Paint the grill. Use thin coats of spray paint. Do not black grill holes with paint.
INSTALLATION
If you intend to do the installation yourself, we recommend that you possess some skill in the proper use of hand and power tools. You should have a thorough understanding of local building and fire codes and a familiarity with the area behind the wall or ceiling into which you plan to install your speakers. Install speaker wires before installing speakers. Wire meeting appropriate building and fire codes must be used. Use at least 18 gauge wire or heavier for the utmost in sound quality. Wiring is best performed by an experienced professional. If you are in doubt that you possess the necessary skills or tools, consult your Polk Audio dealer, or a professional installer.
You Will Need:
- Pencil for marking the location of installation.
Keyhole saw, utility knife or material-appropriate cutting tool for drywall or other wall material. - Level.
- Screwdriver, preferably powered, with Phillips head bit.
- Power drill with appropriate bit (optional, for starting wall cut).
Follow These Easy Steps:
- Prior to installation, hold the speaker in your chosen location to make sure it safely clears obstacles such as studs, corners, beams, lighting fixtures and door/window frames. Your cutout must be at least 1^ (25mm) from adjoining walls or ceiling, internal studs or plumbing.
- Using the template, trace the installation location with a pencil. Use a level to make certain the template is straight and plumb. This is the exact cutout size (figures 10a & 10b).
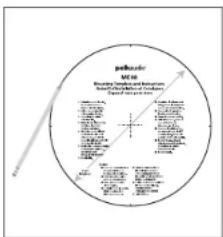
Figure 10a—Round Torque/Trade within the pop-out area
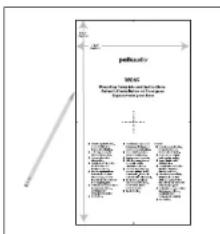
Figure 10b—Rectangular Template: Traco around the template.
- Carefully cut a hole with the appropriate cutting tool for your wall or ceiling material. Start the hole by drilling on the inside of the tracing (with the drill bit touching the line). Use this hole to insert the saw or knife and begin cutting (figure 11).
- Once you have cut the hole, fish your previously positioned wiring out of the hole and connect the speaker. Follow the hookup directions included with your receiver. Strip 3/8'' (9.5 mm) of insulation from each of the two conductors of the wire to expose the bare metal and twist each of the conductors into a single unfrayed strand (so you have two unfrayed strands). Connect the wire from the red terminal (+) of your amplifier or receiver to the red terminal (+) on your speaker and the wire from the black terminal (-) of your amplifier or receiver to the black terminal (-) on your speaker. Most wire has some indicator (such as color-coding, ribbing or writing) on one of the two conductors to help you maintain consistency (figure 12).
- To install the speaker, first carefully remove the grille using a straightened paperclip or other pointed metal tool. Insert the point into one of the grille perforations near a corner and lift the grille free. Never use a knife or screwdriver to pry between the grille and the speaker frame. This will damage your speaker.
- Loosen the rotating wall clamps by unscrewing them. Make sure that the rotating wall clamps are flipped inward so that your speaker fits into your cutout without nicking your wall. Then place the speaker carefully into the cutout (figure 13).
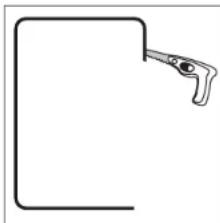
Figure 11—Cut the hole with the appropriate tool.
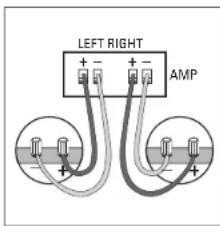
Figure 12—Hook up the speaker wires
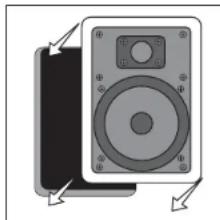
Figure 13. Place the speaker carefully into the cutout.
- If you have a level, use it to help you correctly align the speaker. Tighten the wall clamp screws with a screwdriver. This will rotate the wall clamps and secure the speaker to the wall. Hint on the MC65 and MC85 models, tighten the center screws before tightening the corners for the most flush fit to your wall. Do not over tighten the wall clamp screws (figure 14).
- Carefully reinstall the grille by fitting it into its recess so that it is just resting on the frame. Starting with one corner, go around the speaker and push the grille into the grille notch a little bit at a time. Be gentle; the grille may be easily bent out of shape by rough handling. You will feel a positive "snap" when it is fully in place.
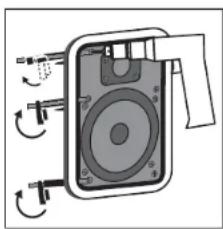
Figure 14—Tighten retaining wall clamps to engage wall. Use a # 2 Phillips head screwdriver or a powered screwdriver.
FRANCAIS
LIMITES D'OPÉRATION
OPTIONS D'INSTALLATION
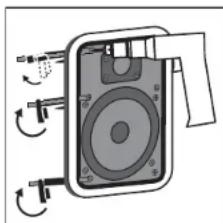
Figure 14—Tighten retaining wall clamps to engage wall. Use a 2 Phillips head screwdriver or a powered screwdriver.
Punk Audio, Inc., warrants to the original retail purchaser only. This warranty will not assume automation or print in its stated expiration if the original retail purchaser acts or transforms the product to any other society. Punk Audio, Inc., warrants, to the original retail purchaser only that the LOUDSKEKSHAI, PASSIVE ODSSGEHCTC/COMMERCE[10] and the "Punk Audio, Inc." are responsible for the products of the original retail purchaser. The products sold in material and ownership for a period of five years from the date of original retail purchase from a Punk Audio Authorized Dealer Furthermore, Punk Audio, Inc., warrants to the original retail purchaser only, that any AMPLIFIER OH OTHERWISE ELECTRONIC COMPONENT ever may be included in this Punk Audio Loudspeaker Product call to first use of the original retail purchaser and workmanship for a period of three (3) years from the date of the original retail purchaser from a Punk Audio Authorized Dealer.
To allow Paul Austin to offer his best possible warranty service, please register your new product online at www.pokAudio.com/registration or call Pok customer service 800-377-7555 in the USA and Canada (outside the USA: 410-338-3500 within 10th days of the date of original purchase). The same in loop your original purchase receipt.
Defective Products must be checked, together with proof of purchase, prepaid from to the Pok Audio Authorized Driver from whom you purchased the Product, or to the Facility at 2553 this Service Boulevard, Suite A, San Diego, California 92104. Products must be shipped in the original shipping conditions or its equivalent, in any case that the loss or damage is consis it to be borne by you. If upon examination at the Facility or Pok Audio Authorized Driver it is determined that the unit was defective or material or workmanship at any time during this Warranty period. Pok Audio or the Pok Audio Authorized Dealer will, at its option, repair or replace this Product at no additional charge, except as set forth below. All replacement parts are Products become the property of Pok Audio. Products replaced in revised under this warranty will be returned to you, within a reasonable time, freight prepaid.
This warranty does not include service in parts in repair damage caused by accident, disaster, misuse, abuse, negligence, defects, packing or shipping procedures, commercial loss, village inputs in centres of the fixed maximum of the unit, cosmetic appearance of calmsity and third passable to exceed in material in terms of uniformity or quality or as a result of any defect or fault which has not been authorised or approved by Polk Audio. This warranty shall terminate if the Serial Number on the Product has been removed, tampered with or defaced. This warranty is in lieu of all other expressed warranties. If this Product is defective in materials or workmanship ascertained above, your so remedy shall be repair or replacement as provided above. In no event will Polk Audio, Inc. be liable to you for any vicarious or consequential damages arising from any use of the product. The warranty shall be extended for one year, and for a Polk Audio Authorized User has been advised of the possibility of such damages, or for any claim by any other party. Some states do not allow the exclusion or limitation of consequential damages, so the ultimate limitation and exclusion may not apply in law.
All implied warranties on this Product are limited to the duration of the expired Warranty. Same sales do not allow familiarization having an implied Warranty basis, so the above limitations may not apply to you. This Warranty gives you specific legal rights, and you also may have other rights which vary from state to state. This Warranty applies only to Products purchased in Canada. The United States of America, its possessions and U.S. and NATO armed forces, exchanges and audio clubs. The Warranty terms and conditions applicable to Products purchased in other countries are available from the Pok Audio Authorized Distributors in such countries.