 — Television — Mode d'emploi PDF")
LIFE P15026 (MD 31326) - Television MEDION - Free user manual and instructions
Find the device manual for free LIFE P15026 (MD 31326) MEDION in PDF.

| Product Type | Smart TV Full HD LED Television |
| Brand | MEDION |
| Model | LIFE P15026 (MD 31326) |
| Screen Size (diagonal) | 125.7 cm (50 inches) |
| Screen Resolution | 1920 x 1080 pixels (Full HD) |
| Energy Efficiency Class | A++ |
| Power Consumption (on) | 45 W |
| Power Consumption (standby) | 0.48 W |
| Power Consumption (off) | 0.01 W |
| Power Supply | 220-240 V ~ 50 Hz |
| Reception Types | DVB-T2/T, DVB-C, DVB-S2, analog |
| Connectivity | WiFi, LAN Ethernet, Bluetooth (optional) |
| HDMI Inputs | 3 (including HDMI 2 with ARC) |
| USB Inputs | 2 (500 mA max.) |
| Other Inputs | VGA, SCART (via adapter), Antenna, LNB |
| Outputs | SPDIF optical, 3.5 mm headphone |
| Smart Functions | Netflix, MEDION Life Portal, HbbTV, PVR recording |
| Wall Mount (VESA) | 200 x 200 mm |
| Remote Control Batteries | 2 x LR03 (AAA) 1.5 V |
| Cleaning | Dust with a soft, dry cloth; do not use abrasive products |
| Operating Temperature | 0 °C to 40 °C |
| Operating Humidity | 20% to 80% (non-condensing) |
Frequently Asked Questions - LIFE P15026 (MD 31326) MEDION
User questions about LIFE P15026 (MD 31326) MEDION
0 question about this device. Answer the ones you know or ask your own.
Ask a new question about this device
Download the instructions for your Television in PDF format for free! Find your manual LIFE P15026 (MD 31326) - MEDION and take your electronic device back in hand. On this page are published all the documents necessary for the use of your device. LIFE P15026 (MD 31326) by MEDION.
USER MANUAL LIFE P15026 (MD 31326) MEDION
natural_image
Two black rectangular TVs, one on a stand and one on a flat screen, displayed against a white background (no text or symbols visible)Full HD Smart-TV
MEDION® LIFE®
P14325 (MD 31325) / P15026 (MD 31326) / P13936 (MD 31336) / P14337 (MD 31337) / P15038 (MD 31338)
1. Inhalt
natural_image
Technical line drawing of a mechanical component with mounting holes and internal features (no text or symbols)4×1
②

natural_image
Technical line drawing of a mechanical lever assembly (no text or symbols)③

natural_image
Architectural floor plan showing room layouts and equipment placement (no text or labels)4
natural_image
Architectural floor plan showing room layouts and structural elements (no text or labels)4×1
MD31325 / MD31326:
①

natural_image
Diagram of a mechanical assembly with a downward arrow and three supporting legs (no text or symbols)
natural_image
Diagram showing a mechanical assembly with a downward arrow and three supporting components (no text or symbols)②
natural_image
Technical line drawing of a mechanical component with mounting holes and internal structural elements (no text or symbols)4×1
②

natural_image
Technical line drawing of a mechanical lever assembly (no text or symbols)③

natural_image
Architectural floor plan showing room layouts and equipment placement (no text or labels)4
natural_image
Architectural floor plan showing room layouts and structural elements (no text or labels)4×
MD31325 / MD31326 :
①

natural_image
Diagram of a mechanical assembly with a downward arrow and three supporting legs (no text or symbols)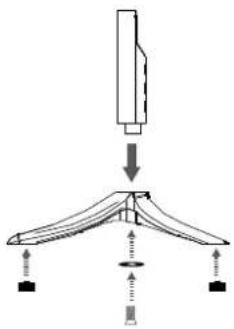
natural_image
Diagram showing a mechanical assembly with a downward arrow and three hanging weights (no text or symbols)FR
②

natural_image
Technical line drawing of a mechanical component with mounting holes and a housing (no text or symbols)4×1
②

natural_image
Technical line drawing of a mechanical lever assembly (no text or symbols)③
natural_image
Architectural floor plan showing room layouts and equipment placement (no text or labels)4

natural_image
Architectural floor plan showing room layouts and equipment layout (no text or labels)4×1
MD31325 / MD31326:
①

natural_image
Diagram of a mechanical assembly with a downward arrow and three supporting legs (no text or symbols)
②
natural_image
Technical line drawing of a mechanical component with mounting holes and internal features (no text or symbols)4×1
②
natural_image
Technical line drawing of a mechanical lever assembly (no text or symbols)③
natural_image
Architectural floor plan showing room layout and equipment placement (no text or labels)4
natural_image
Architectural floor plan showing room layouts and furniture layout (no text or labels)4×
MD31325 / MD31326:
①
natural_image
Diagram of a mechanical assembly with a downward arrow and three supporting components (no text or labels)
NL
②

2.1. Front 4
2.2. Rear and right-hand side....5
2.3. Remote control....6
- Using the device for the first time 8
3.1. Unpacking....8
3.2. Mounting....8
3.3. Inserting batteries in the remote control....9
3.4. Connecting the antenna....9
3.5. Connecting the power supply 10
3.6. Switching the smart TV on and off 10
3.7. Channel search when switching on for the first time....10
- Troubleshooting 15
4.1. Do you need more help? 16 - Service information.... 17
- Legal notice & operating instructions download 17
- Product data sheet 18
EN
1. Package contents
Please check your purchase to ensure that all the items are included and contact us within 14 days of purchase if any parts are missing.
The following items are supplied with your product:
- Full HD Smart TV
- Remote control (RC4995) incl. 2 x 1.5 V batteries (type LR03/AAA)
- Stand including fastening screws
- Documentation

DANGER!
Risk of suffocation!
Packaging film can be swallowed or used improperly. Therefore, there is a risk of suffocation!
- Keep packaging material such as plastic film or plastic bags away from children.
2. Overview of the device
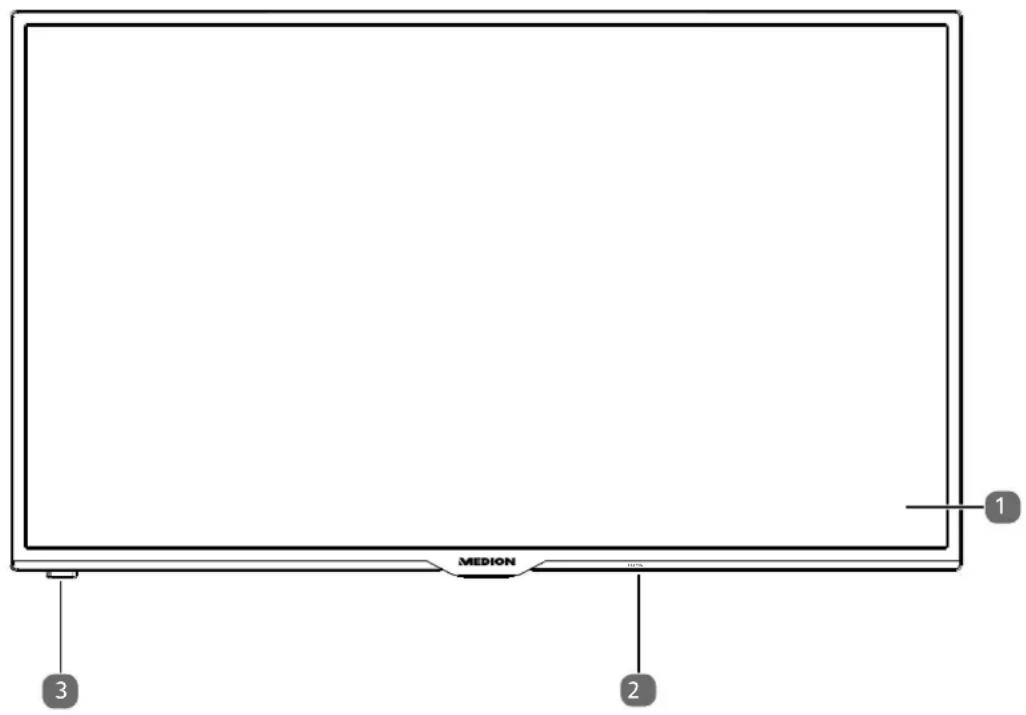
2.1. Front
MD31336 / MD31338 / MD31326:
(picture similar)
MD31337 / MD31325:
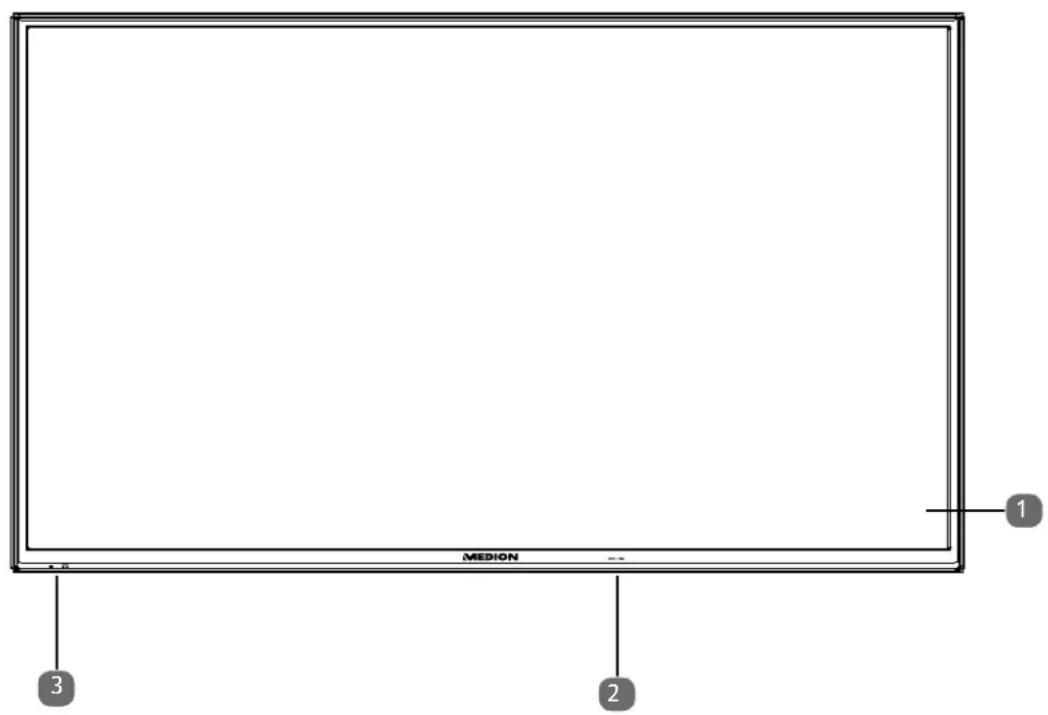
1) LCD screen
2) Mains switch (bottom of the device on the left or right)
3) Infrared sensor: Reception field for the infrared TV signals.
Operating light: Lights up when the device is in standby mode.
2.2. Rear and right-hand side
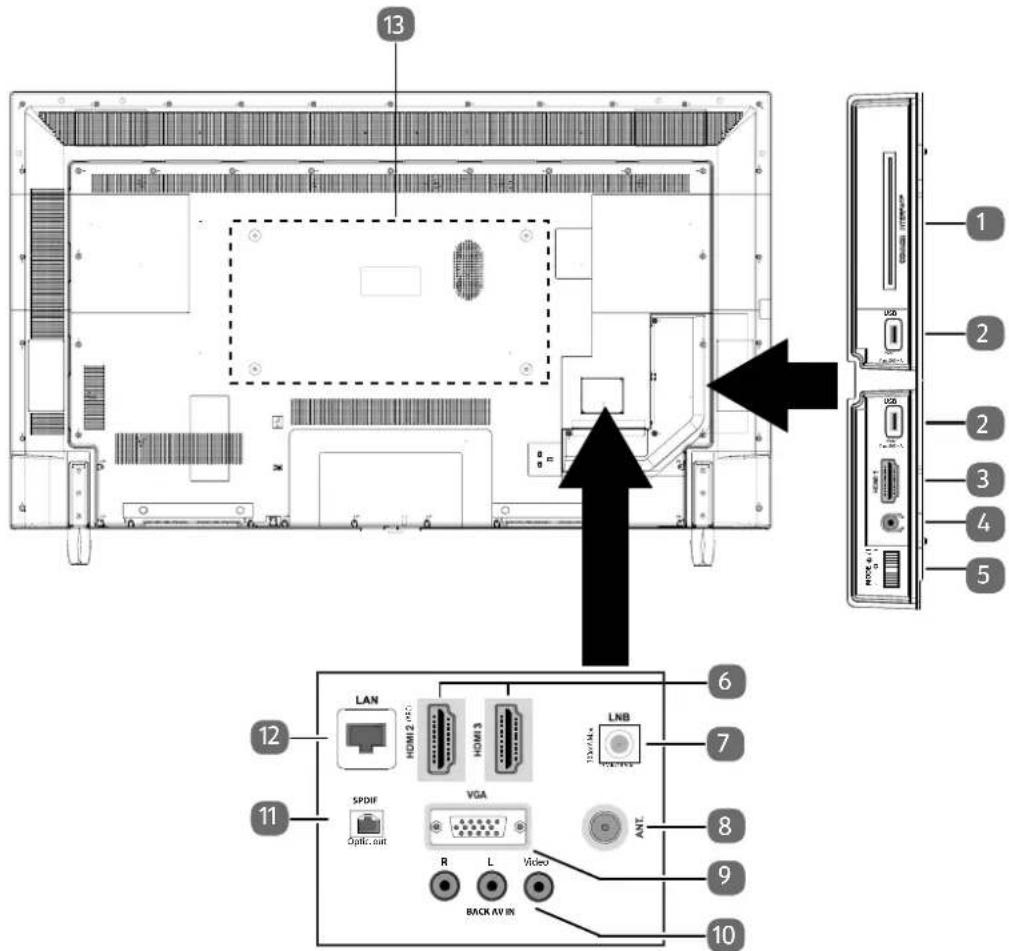
1) COMMON INTERFACE (CI+): Card slot for connecting pay TV cards
2) USB (5V, 500 mA max.): USB connection for media playback/recording (PVR)
3) HDMI 1: HDMI connection for devices with a HDMI output
4) For connecting headphones with 3.5 mm jack
5) MODE: Multifunction button for channel switching, input source selection or volume adjustment. Settings are made by tilting upwards (+) or downwards (-). Pressing the button briefly switches between functions. A long press switches the device into standby mode or operating mode.
6) HDMI 2-3: HDMI connection for devices with a HDMI output (HDMI 2 can be used for CEC/ARC)
7) LNB (13 V/18 V ——, 300 mA max.): For connecting the antenna (satellite)
8) ANT.: For connecting an aerial (analogue, DVB-T or DVB-C)
9) VGA: VGA port for connecting a PC or a YUV adapter (optional)
10) BACK AV IN: Audio/video input (cinch)
11) SPDIF Optic. OUT: Digital audio output (optical)
12) LAN: Network connection to connect to the Internet
Fixing holes for a wall mount ^1
P14325 (MD 31325): Vesa standard, hole spacing 200 x 200 mm
P15026 (MD 31326): Vesa standard, hole spacing 200 x 200 mm
P13936 (MD 31336): Vesa standard, hole spacing 200 x 200 mm
P14337 (MD 31337): Vesa standard, hole spacing 200 x 200 mm
P15038 (MD 31338): Vesa standard, hole spacing 200 x 200 mm
2.3. Remotecontrol
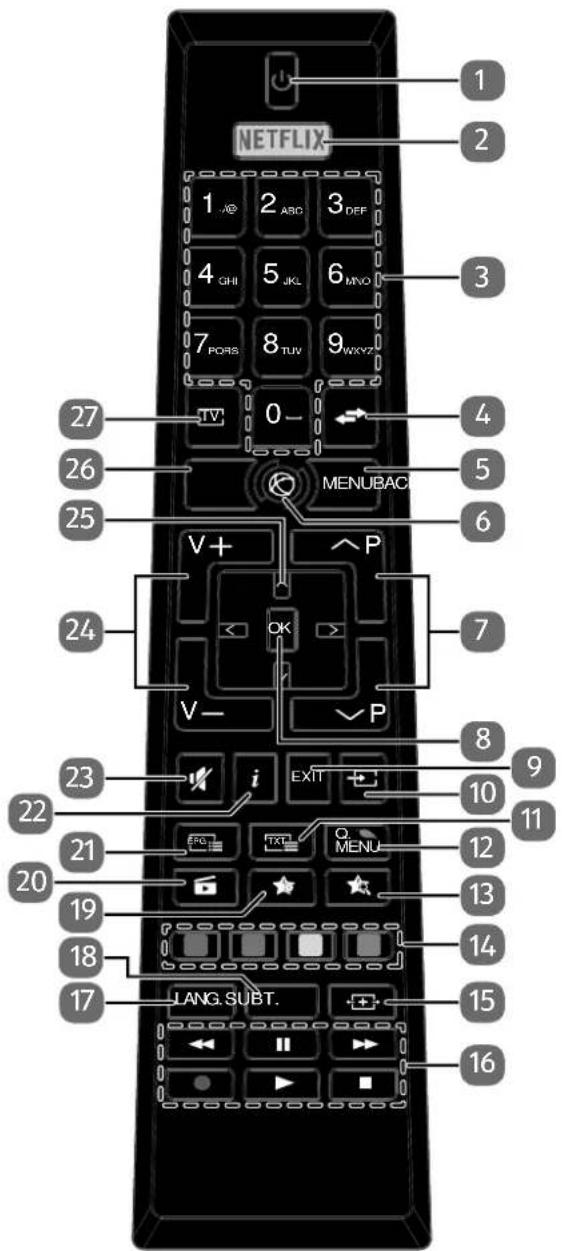
1) ⏻: Switch smart TV on/off (switch standby mode on/off)
2) NETFLIX: Call up Netflix site
3) Number buttons:
TV: programme selection, teletext: page selection
4) ⇌ (SWAP): Set previous TV programme
5) MENU: Open and close menu
6) Ⓞ : Internet button
7) P-/+: Programme selection buttons
TV: select next (+) / previous (−) programme;
teletext: select next (+) / previous (−) page
8) OK: Confirm selection in certain menus
9) EXIT: Exiting the menu
10) (SOURCE): Select input signal of connected devices
11) : Activate teletext
Press 2 x = set transparent;
Press 3 x = close
12) Q. MENU: Access the quick menu (OPTION MENU) to quickly call up basic options
13) ★: Switching between DVB-S, DVB-T and DVB-C channels / multifunction button for programme channel or input source
14) Red button: For teletext or menus
Green button: For teletext or menus
Yellow button: For teletext or menus
Blue button: For teletext or menus
15) (SIZE): Select picture format
16) Media buttons
◀: Fast rewind;
▶: Fast forward;
● : Start recording (PVR);
■: Stop playback;
▶ : Start playback;
II : Pause playback
17) LANG.: Analogue TV: stereo/mono ;
Digital TV: select audio language (if available)
18) SUBT.: Subtitles on/off (if available)
19) ★ : Open the MEDION® portal /multifunction button for channel position or input source
20) (MEDIA): Call up the media browser
21) (EPG): Digital TV: call up the electronic programme guide
22) i (INFO): Digital TV: show information (e.g. current channel number)
23) : Mute
24) V-/+ : Increase (+) or decrease (−) volume.
25) Direction button ▲: Move up in menu
Digital TV: Select info bar for the current programme, teletext: select next page;
Direction button ▼ : Move down in menu
Digital TV: Select info bar for the current programme, teletext: select previous page;
Direction button ◀ : Move left in menu
Teletext: Call up subpages;
Direction button ▶ : Move right in menu
Teletext: Call up subpages
26) BACK: Go one level back in menus
27) TV: Switch to TV operation/call up information on channel-specific button functions.
2.3.1. Programming the multifunction buttons


The 🔊 button can be programmed to any channel position or a particular input source
▶ Start by selecting the function you require and then hold down the corresponding button for 5 seconds until MY BUTTON IS SET appears on the screen. This confirms the new programming.

After each INITIAL INSTALLATION your customised button programming is deleted and reset to the factory defaults
3. Using the device for the first time

Before using for the first time, be sure to read the section "Safety instructions".
3.1. Unpacking
- Select a suitable place for setting up the device before unpacking.
- Open the box very carefully to avoid damaging the device. The device could be damaged if you use a knife with a long blade to open the box.
- The box contains a number of small items (including batteries). Keep these out of the reach of children as they represent a choking hazard.
- Store the packaging material in a safe place; only use this box to transport the TV.

DANGER!
Risk of suffocation!
Packaging film can be swallowed or used improperly. Therefore, there is a risk of suffocation!
▶ Keep packaging material such as plastic film or plastic bags away from children.
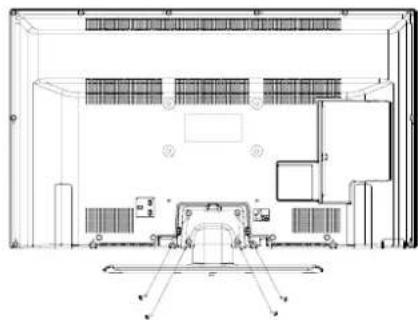
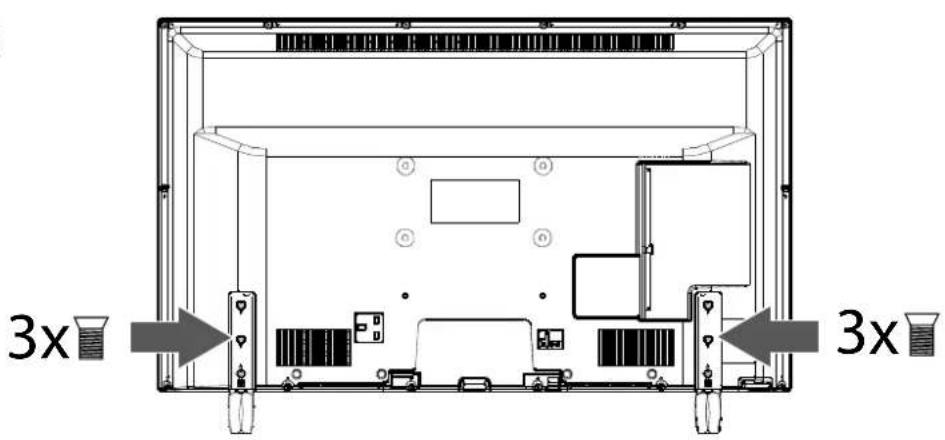
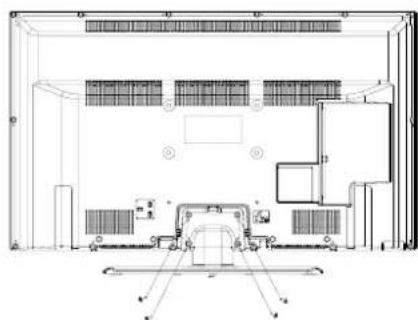
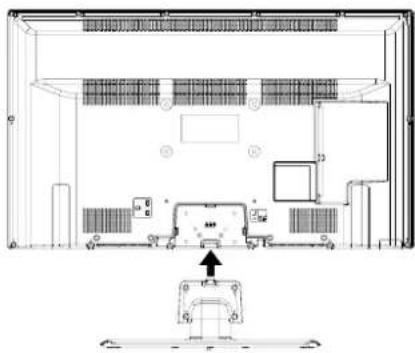
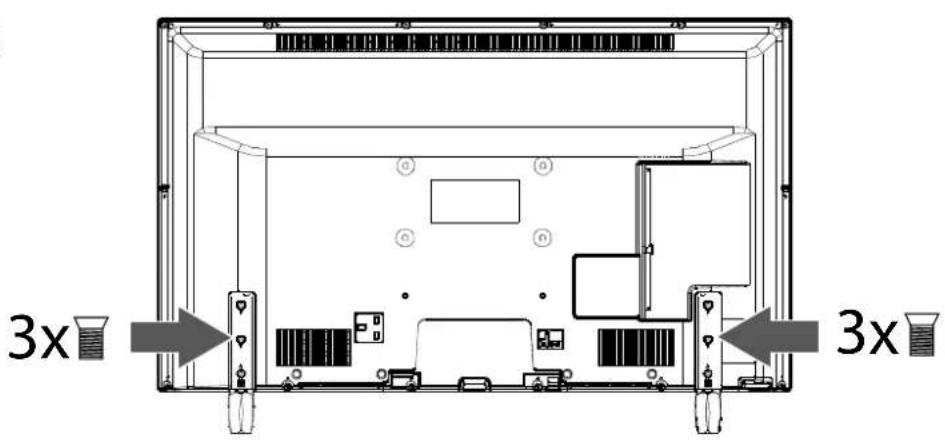
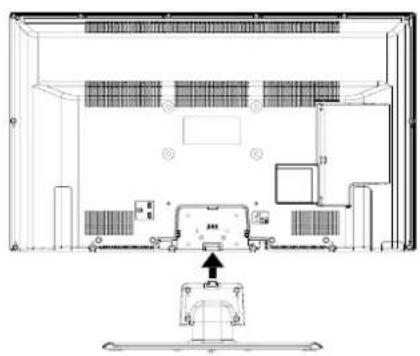
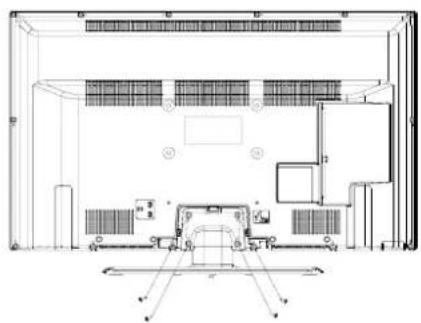
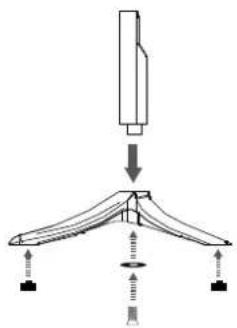
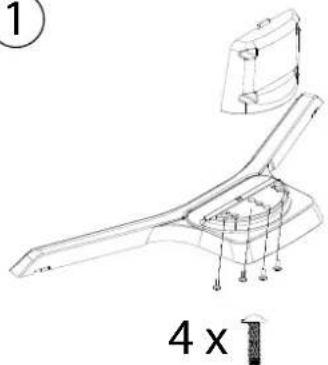
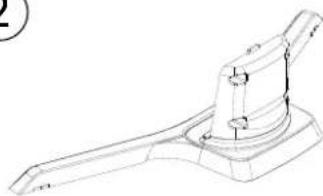
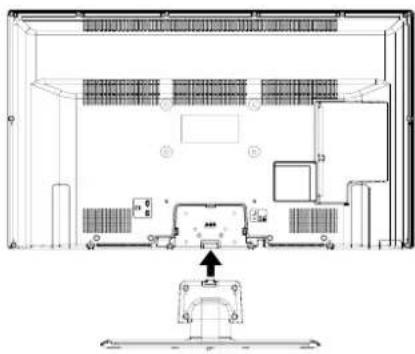
3.2. Mounting
Attach the stand as shown in the illustration. Carry out this step before connecting the smart TV.
MD31336 / MD31337 / MD31338:
①
natural_image
Technical line drawing of a mechanical component with mounting holes and a 4x scale indicator (no text or symbols on the diagram itself)②
natural_image
Technical line drawing of a mechanical lever assembly (no text or symbols)③
natural_image
Architectural floor plan showing room layouts and equipment placement (no text or labels)4
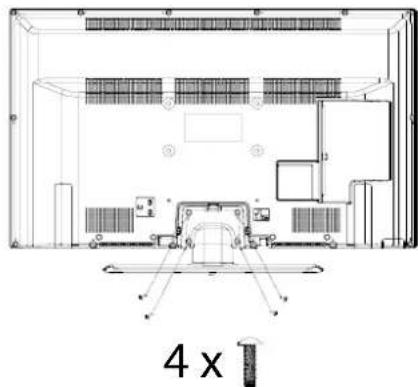
MD31325 / MD31326:
①

natural_image
Diagram of a mechanical assembly with a downward arrow and three supporting components (no text or symbols)
natural_image
Diagram showing a mechanical assembly with a downward arrow and three hanging weights (no text or symbols)EN
②

3.3. Inserting batteries in the remote control
- Loose the screw of the battery compartment cover on the back of the remote control and remove the cover.
Insert two LR03 (AAA) 1.5 V batteries in the battery compartment of the remote control. Check the battery polarity (inscribed on the bottom of the battery compartment).
▶ Close the battery compartment by fixing the cover with the screw.

NOTICE!
Risk of damage!
The remote control can be damaged by leaking batteries if not used for a long period of time!
Remove the batteries from the remote control if the device is not going to be used for a long period.
3.4. Connecting the antenna
Your smart TV supports different antenna signals.
You can feed the following picture signals via the connection labelled ANT.:
• via analogue cable/an analogue house antenna,
• via a DVB-T/ DVB-T 2 ^2 antenna or
• via a DVB-C ^2 connector (digital cable)
Connect the antenna cable from either the house aerial/the analogue cable connection, the DVB-T antenna or the DVB-C connection to the antenna connection on the smart TV
You also have the option of connecting a digital satellite system to the connection labelled LNB.
▶ Screw the F connector of a coaxial antenna cable onto the connection on the smart TV.

To receive encrypted/subscription channels you will need to use a CI module and an appropriate card. Insert a CI module (available in specialist shops) into the slot provided for this purpose on the left-hand side of the device (Common Interface). You can then insert the card from your provider into the CI module.
3.5. Connecting the power supply
Connect the mains plug on the device to an easily accessible 220 - 240 V \~ 50 Hz mains socket.
3.6. Switching the smart TV on and off
▶ Set the power switch on the bottom of the device to ON. The device switches to standby mode and the display on the front will light up.
▶ To switch on the device, press
-on the remote control: the Standby/On button, one of the number buttons or one of the P-/+ buttons; -on the device: the multifunction button.
▶ Use the Standby/On button on the remote control to switch the device back into standby mode. Although the device has been switched off, it will continue to consume electricity.
▶ Use the mains switch to turn off the device (OFF position). The device will continue to consume power as long as it is connected to the mains network.

If the device is not receiving an input signal, it will automatically switch to standby mode after five minutes. A countdown timer will appear on the screen until this time. This function is not available for all sources.
3.7. Channel search when switching on for the first time
When you switch the device on for the first time, you will be guided through the FIRST TIME INSTALLATION menu. You can call up and carry out the first-time installation again at any time via the menu INSTALLATION > FIRST TIME INSTALLATION.
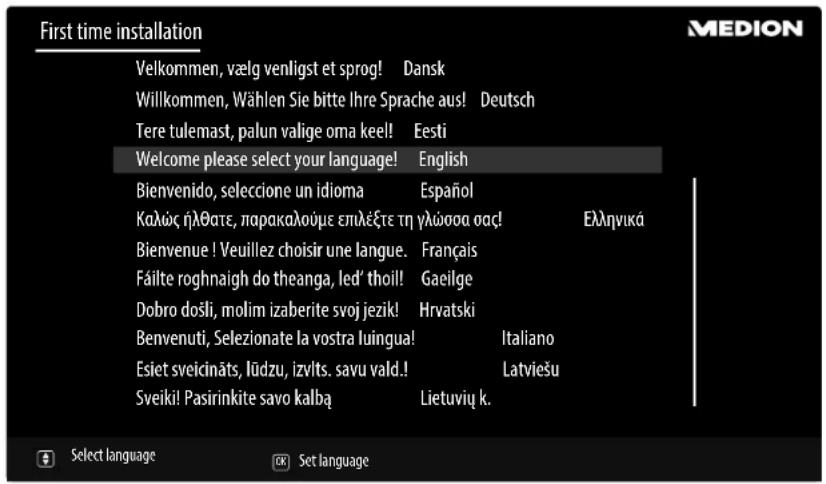
▶ You can move up or down in the menu and select the required language using the direction buttons ▼▲.
After confirming the selected language with OK the initial installation will begin
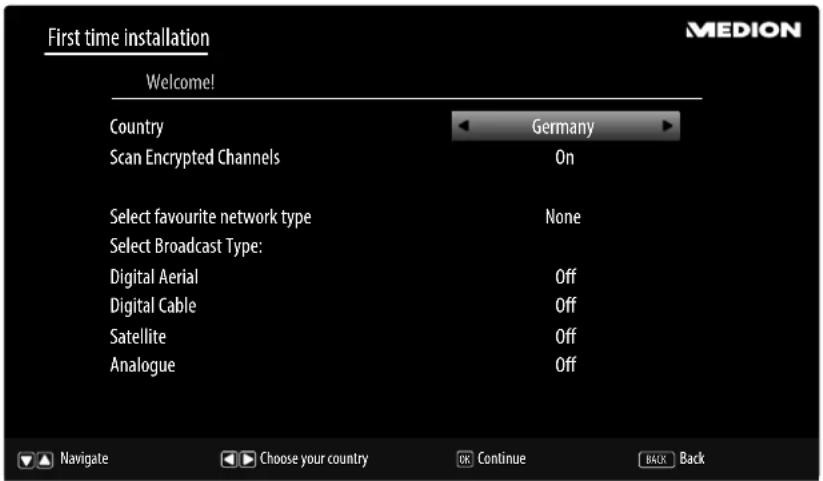
▶ Use ◀ ▶ to select the desired country. The country setting will influence the order in which the channels are stored. Also, there are a number of options preset for the individual countries.
▶ If Siyou would also like to search for encrypted channels, set the option to ON.
Now use the direction buttons ◀ to select the preferred reception type: DIGITAL AERIAL, DIGITAL CABLE, SATELLITE or ANALOGUE. This reception mode will set to ON in the corresponding options. After the channel scan, the preferred reception type will be activated.
▶ If you want to activate other reception types, use the direction buttons ▼ ▲ to select the reception type DIGITAL AERIAL, DIGITAL CABLE, SATELLITE or ANALOGUE and then use ◀ ▶ to select ON for the desired reception type.
▶ Afterwards, preOK to continue.
▶ Depending on the model of your TV and the country selection PRIVACY SETTINGS menu may appear at this point. Using this menu you can set your privacy privileges. Highlight a feature and use ◀ and ▶ directional buttons to enable or disable. Read the related explanations displayed on the screen for each highlighted feature before making any changes. You can use P +/- buttons to scroll up and down to read the entire text. You will be able to change your preferences at any time later from the SETTINGS > PRIVACY SETTINGS menu. If the INTERNET CONNECTION option is disabled NETWORK/INTERNET SETTINGS screen will be skipped and not displayed. If you have any questions, complaints or comments regarding this privacy policy or its enforcement, please contact by email at smarttvsecurityvosshub.com.
Now a query appears asking whether you want to make network/Internet settings. Select NO if you want to skip this step. If you have selected NO here, you cannot subsequently use any network/Internet/HbbTV services.
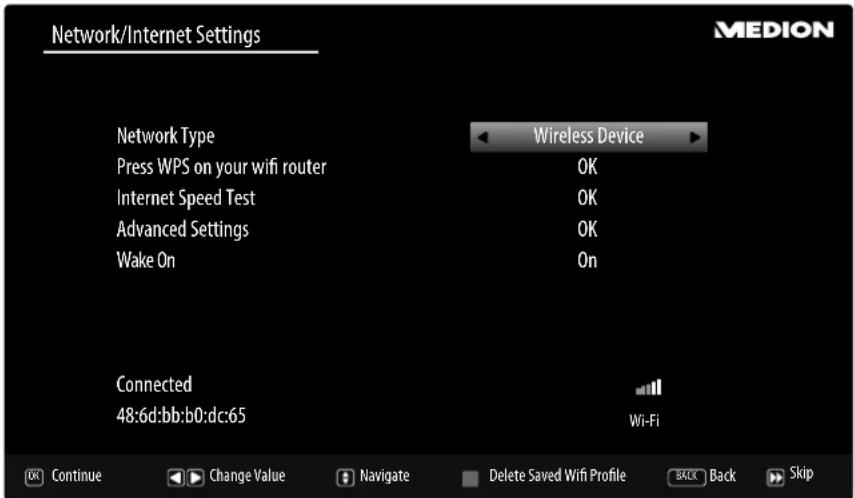
3.7.1. Network/Internet settings
| Network settings | ||
| NETWORK TYPE | Here you select the network type: WIRELESS DEVICE or WIRED DEVICE. After making a selection with the direction buttons ◀ ▶ and confirming with the OK button, an overview of all available networks appears. Make a selection and confirm with the OK button. If a password is required for a network, a virtual keyboard appears which you can use to enter this with the help of the direction buttons ◀ ▶ ▲ ▼ and the OK button. After entering the password, select OK on the keyboard and confirm with the OK button. | |
| PRESS WPS ON YOUR WI-FI ROUTER (only for WLAN) | This option enables you to quickly establish a WPS connection via a wireless network (Wi-Fi). Hold down the WPS button on your router and confirm this option OK using the OK button. Then the WPS connection will be made. | |
| INTERNET SPEED TEST | Press the OK button in order to test the Internet speed. | |
| ADVANCED SETTINGS | Press the OK button to call up further network configuration options. | |
| CONFIGURATION | Choose the setting AUTOMATIC IP or MANUAL IP. If you select MANUAL IP, three additional lines appear in which you can manually enter the data for the IP ADRESS, SUBNET MASK and DEFAULT GATEWAY using the direction buttons ◀ ▶ and the number buttons. | |
| CONFIGURATION | Select here between AUTOMATIC DNS or MANUAL DNS. If you select MANUAL DNS, two additional lines appear in which you can manually enter the data for the DNS SERVER 1 and DNS SERVER 2 using the direction buttons ◀ ▶ and the number buttons. | |
 An existing network connection can be terminated by pressing the red button. An existing network connection can be terminated by pressing the red button. | ||
| WAKE ON | Activate/deactivate the Wake-On LAN/Wake-On Wireless LAN function (WoL/ WoWLAN). This enables you to switch on the smart TV via a different device (e.g. a smartphone with the MEDION® Life Remote App). Both devices must be connected to the same network via LAN or Wi-Fi for this purpose. Select the ON setting to activate this function. The device being used as a remote control needs to be connected to the TV once when it is switched on. The control function only works when the TV is in standby mode. If the TV is turned off and on again at the mains switch, the connection between the two devices will be automatically restored. | |
▶ Exit the network settings by pressing OK.
▶ After exiting the network settings, the channel search will start for your previously selected preferred reception type. Also pay attention to any other information that is displayed on the screen depending on your selection.
3.7.2. Cable digital
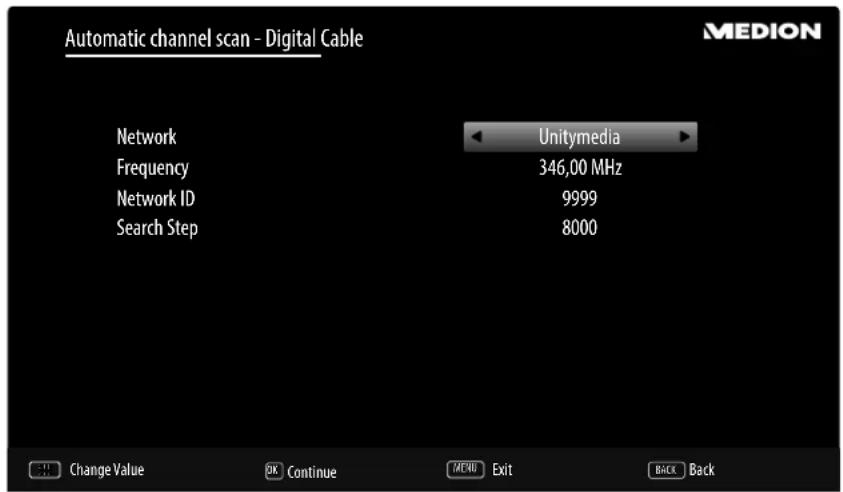
If you have previously activated the reception type DIGITAL CABLE, you can now make settings for the network search. If it should be necessary, you can adjust the NETWORK, FREQUENCY, the NETWORK ID and the SEARCH STEP correspondingly.
3.7.3. Satellite
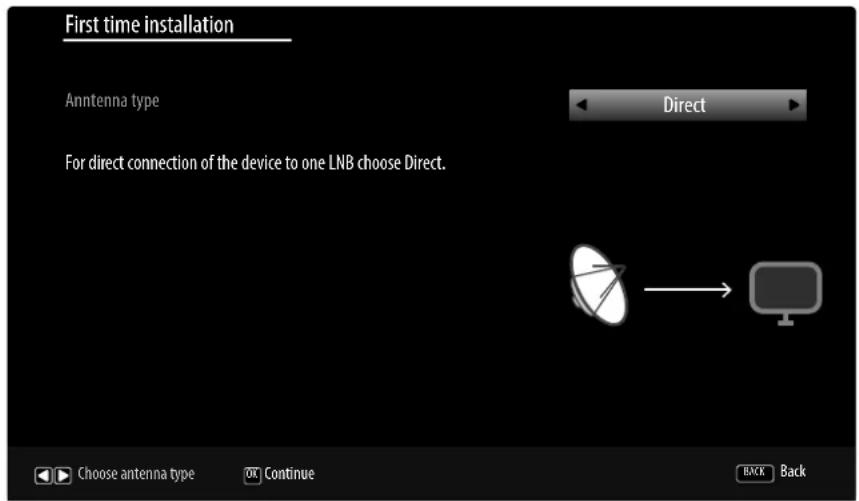
If you have previously activated the reception type SATELLITE, you can now make settings for the antenna type.
▶ To set the antenna type, select one of the following antenna types:
-DIRECT: Select this antenna type if you have a single receiver and a satellite antenna. Press the OK button and then choose the desired satellite (you can also call up the transponder list using the blue button). Afterwards, press the OK button again to start the search. After that, decide whether or not the channel list should be loaded.
-UNICABLE: Select this antenna type if you have multiple receivers and a single-cable system. Press the OK button and make all the necessary settings regarding SATELLITE POSITION 1/2, USER BAND and BAND FREQUENCY (here you can also call up the transponder list using the blue button). Afterwards, press the OK button again to start the search. After that, decide whether or not the channel list should be loaded.
-DISEQC SWITCH: Select this antenna type if you have multiple satellite antennas and a DiSEqC switch. Press the OK button and activate the desired DISEQC switch 1 - 4 (here you can also call up the corresponding transponder list using the blue button). Afterwards, press the OK button again to start the search. After that, decide whether or not the channel list should be loaded.
▶ Afterwards, preOK to continue.
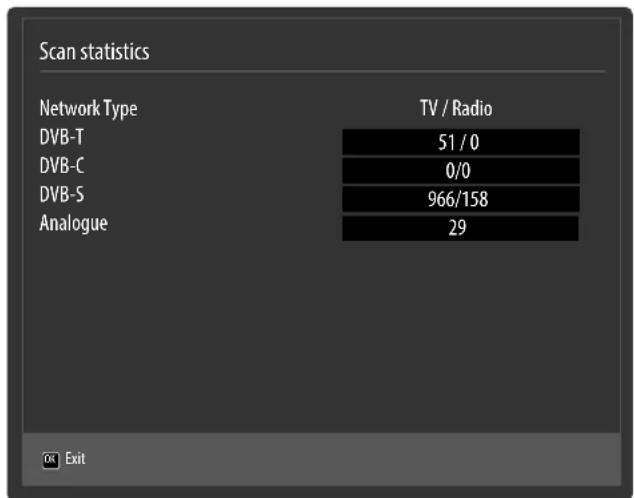
After the end of the automatic channel storage, an overview of the number of found channels appears for the corresponding reception types.
▶ Press the K button to close the list and complete the search. The device now switches to the channel of the previously selected preferred reception type. At the same time, the channel list is displayed. If the list is not processed further, it closes after a few minutes.
▶ If the channel list does not close automatically, press the MENU button to exit the function.

The initial installation described here corresponds to the FIRST TIME INSTALLATION option in the INSTALLATION menu.
4. Troubleshooting
Malfunctions can sometimes have quite trivial causes, but they may also be the result of defective components. We have included a brief troubleshooting guide below which may help to solve any problems. If these tips don't solve the problem then we'll be more than pleased to help you out. Just give us a call!
| Error Measures | |
| There is no picture and no sound. | · Check if the power cable is inserted properly into the socket.· Check if signal reception is set to TV.· Check whether the power switch on the bottom of the device is turned on. |
| There is no AV picture. | · Check to ensure that the contrast and brightness settings are correct.· Check to ensure that all external devices have been connected properly.· Check to ensure that you have selected the correct AV source.· Any input source that you want to select with ⏻ or ➕ (SOURCE) must be marked in the SOURCES menu. |
| There is no sound. · Ensure that the volume has not been set to the minimum level.· Ensure the mute setting is not active. Do this by pressing the button in the top left of the remote control with the crossed out loudspeaker symbol. | |
| There is no picture and no sound. I can hear noise, though. | · The reception might be poor. Check if the antenna is connected properly. |
| The picture is not clear. · The reception might be poor.· Check if the antenna is connected properly. | |
| The picture is too bright or too dark. | · Check the settings for contrast and brightness. |
| The picture is not sharp. · The reception might be poor.· Check if the antenna is connected properly.· Check the settings for sharpness and noise reduction in the PICTURE menu. | |
| There is a double/triple picture. | · Check if the antenna is aligned properly.· Waves might be reflected off buildings or mountains. |
| The picture is pixellated. · There might be interference from cars, trains, power lines, neon lights, etc.· There might be interference between the antenna and power cables. Position the cables further apart. | |
| There are stripes on the screen or the colours are faded. | · Is there interference from another device?· Transmission antennae on radio stations, ham radios and portable phones can also cause interference.· Operate the device as far away as possible from the device that might be causing the interference. |
| The MODE multifunction button on the device is not working. | · The child lock might be on. |
| TV switches off · Check whether the automatic TV switch off function is activated under MORE... | |
| No reception/poor reception via a wireless network connection (WLAN). | · Ensure that all necessary settings have been made. |
| WIRELESS DISPLAY cannot be established. | · Check that all necessary settings have been made. Read the section "Wireless Display". |
| The remote control is not working. | · Check whether the batteries in the remote control are functional and have been inserted the right way round.· Ensure the sensor field is not exposed to strong light.· Turn the device off and on again using the power switch on the bottom of the device. |
| Menu cannot be opened. · Check whether CEC is enabled. In this case, the menu cannot be opened. This is not a defect. In some cases, the menu of the device connected via HDMI2 opens. This is dependent on the source device and must be supported accordingly.· Change the input source. | |
| Filter function of the channel list does not work permanently. | · To set a "permanent" filter, you need to call up the channel list with the OK button and then the expanded channel list with the green button.· Call up the expanded channel list via MENU > CHANNEL LIST and then use the FILTER function. If, however, you call up the channel list during operation via the OK button and then use the FILTER option, this option acts more like a search function. This means that the complete channel list is displayed the next time you press the OK button after closing the channel list. The previously filtered results are not retained. If, however, you call up the channel list during operation via the OK button and then use the FILTER option, this option acts more like a search function. This means that the complete channel list is displayed the next time you press the OK button after closing the channel list. The previously filtered results are not retained. |
| No Bluetooth® connection | · Make sure that all settings have been correctly specified on the device and that the Bluetooth® function is enabled.· Check whether the device to be connected is switched on and is in discoverable mode.· Make sure that all settings have been correctly specified on the device to be connected and that the Bluetooth® function is enabled. Consult the operating instructions of the corresponding device, if necessary. |

For further information on troubleshooting, read where applicable the comprehensive operating instructions available online because certain measures and procedures are described there in more detail.
4.1. Do you need more help?
If the suggestions in the previous section did not solve your problem, please contact us. To make it easier for us to help you, please have the following information to hand:
• What external devices are connected?
• What messages appear on the screen?
- When operating the device, at which step did the problem occur?
- If you have a PC connected to the device:
– How is your computer configured?
– What software were you using when the problem occurred?
- What steps have you already taken to try and rectify the problem?
- Please provide us with your customer number if you have one.
5. Service information
Please contact our Customer Service team if your device ever stops working the way you want or expect it to. There are several ways for you to contact us:
- In our Service Community, you can meet other users, as well as our staff, and you can exchange your experiences and pass on your knowledge there.
You will find our Service Community at http://community.medion.com.
• Alternatively, use our contact form at www.medion.com/contact.
- You can also contact our Service team via our hotline or by post.
| Opening times Hotline number UK | |
| Mon – Fri: 08.00 –20.00Sat – Sun: 10.00 –16.00 | 1 0333 3213106 |
| Hotline number Ireland | |
| 1 1 800 992508 | |
| Service address | |
| MEDION Electronics Ltd.120 Faraday Park, Faraday Road, DorcanSwindon SN3 5JF, WiltshireUnited Kingdom | |
6. Legal notice & operating instructions download
Copyright © 2018
Date: 08.08.2018
All rights reserved.
These operating instructions are protected by copyright.
Mechanical, electronic and any other forms of reproduction are prohibited without the written permission of the manufacturer.
Copyright is owned by the company:
Medion AG
Am Zehnthof 77
45307 Essen
Germany
Subject to technical and optical changes as well as printing errors.
The operating instructions can be downloaded from the service portal.

On the service portal, use the device's MSN device to look for the associated instructions.
You will find the MSN on the device's type plate or in the "Product Data Sheet" section.
You can also scan the QR code below to download the instructions onto your mobile device from the service portal.
| URL QR code | ||
| GB www.medion.com/gb/service/start/ |  | |
| AUS www.medion.com/au/contact.php. |  | |
| US www.medion.com/us/ |  | |
7. Product data sheet
According to Directive 1062/2010
| Trademarks | MEDION* | ||||
| MSN no. | 30025266 300 | 25265 300253 | 86 30025385 3 | 0025367 | |
| Model no. (MD) | 31325 31326 | 31336 31337 3 | 1338 | ||
| Energy efficiency class | A++ A++ A+ | A++ A++ | |||
| Visible screen size (diagonal, approx.) | 108 cm (43") | 125,7 cm (50") | 98 cm (39") | 108 cm (43") | 125,7 cm (50") |
| Average power consumption when switched on (Watt) | 33 45 44 34 44 | ||||
| Annual power consumption (kWh/year) | 48 66 64 50 65 | ||||
| Power consumption in standby (Watt) | 0,48 0,48 0,48 | 0,48 0,48 | |||
| Power consumption when switched off (Watt) | 0,01 0,01 0,01 | 0,01 0,01 | |||
| Display resolution (px) | 1920 x 1080 | 1920 x 1080 1920 | x 1080 1920 | x 1080 1920 x 1080 | |
EN
MEDION®

- Full HD Smart-TV
- Inhalt
- MD31325 / MD31326:
- Package contents
- DANGER!
- Risk of suffocation!
- Overview of the device
- Front
- Rear and right-hand side
- Remotecontrol
- Programming the multifunction buttons
- Using the device for the first time
- Unpacking
- Mounting
- MD31336 / MD31337 / MD31338:
- Inserting batteries in the remote control
- NOTICE!
- Risk of damage!
- Connecting the antenna
- Connecting the power supply
- Switching the smart TV on and off
- Channel search when switching on for the first time
- Network/Internet settings
- Cable digital
- Satellite
- Troubleshooting
- Do you need more help?
- Service information
- Legal notice & operating instructions download
- Product data sheet
- MEDION®
Brand : MEDION
Model : LIFE P15026 (MD 31326)
Category : Television