DAVHDX275 - Home Theater System SONY - Free user manual and instructions
Find the device manual for free DAVHDX275 SONY in PDF.

| Product type | Home cinema system with DIGITAL MEDIA PORT interface |
| Brand | Sony |
| Model | DAV-HDX275 |
| Power supply | DC IN: 5 V, 600 mA (via DIGITAL MEDIA PORT) |
| Weight (TDM-iP10 unit) | Approx. 174 g (cable included) |
| Dimensions (TDM-iP10 unit) | Approx. 80 × 22 mm (h) |
| iPod compatibility | iPod nano (1st and 2nd generations), iPod (4th and 5th generations) |
| Main features | iPod audio playback, battery charger, connection via DIGITAL MEDIA PORT |
| Maintenance and cleaning | Clean with a soft cloth lightly dampened with a mild detergent solution. Do not use solvents. |
| Safety | Do not install in a confined space. Disconnect the power cord if a problem occurs. |
| Cable length | 1 m (3.3 feet) |
Frequently Asked Questions - DAVHDX275 SONY
User questions about DAVHDX275 SONY
0 question about this device. Answer the ones you know or ask your own.
Ask a new question about this device
Download the instructions for your Home Theater System in PDF format for free! Find your manual DAVHDX275 - SONY and take your electronic device back in hand. On this page are published all the documents necessary for the use of your device. DAVHDX275 by SONY.
USER MANUAL DAVHDX275 SONY
DIGITAL MEDIA PORT Adapter
Operating Instructions
Mode d'emploi
Do not install the appliance in a confined space, such as a bookcase or built-in cabinet.
The nameplate is located on the bottom exterior.
Install this system so that the power cord can be unplugged from the wall socket immediately in the event of trouble.
Notice for the customers in the U.S.A.
WARNING
This equipment has been tested and found to comply with the limits for a Class B digital device, pursuant to Part 15 of the FCC Rules. These limits are designed to provide reasonable protection against harmful interference in a residential installation. This equipment generates, uses, and can radiate radio frequency energy and, if not installed and used in accordance with the instructions, may cause harmful interference to radio communications. However, there is no guarantee that interference will not occur in a particular installation. If this equipment does cause harmful interference to radio or television reception, which can be determined by turning the equipment off and on, the user is encouraged to try to correct the interference by one or more of the following measures:
– Reorient or relocate the receiving antenna.
- Increase the separation between the equipment and receiver.
- Connect the equipment into an outlet on a circuit different from that to which the receiver is connected.
- Consult the dealer or an experienced radio/TV technician for help.
CAUTION
You are cautioned that any changes or modifications not expressly approved in this manual could void your authority to operate this equipment.
THIS DEVICE COMPLIES WITH PART 15 OF THE FCC RULES. OPERATION IS SUBJECT TO THE FOLLOWING TWO CONDITIONS: (1) THIS DEVICE MAY NOT CAUSE HARMFUL INTERFERENCE, AND (2) THIS DEVICE MUST ACCEPT ANY INTERFERENCE RECEIVED, INCLUDING INTERFERENCE THAT MAY CAUSE UNDESIRED OPERATION.
Notice for the customers in Canada
This class B digital apparatus complies with Canadian ICES-003.
On copyrights
- iPod is a trademark of Apple Inc., registered in the U.S. and other countries.
- All other trademarks and registered trademarks are of their respective holders. In this manual, ^TM and ^® marks are not specified.
Compatible iPod models
The compatible iPod models are as follows. Update your iPod to use the latest software before you use it.

iPod nano 2nd generation (aluminum)

natural_image
Two gray icons: a plant with leaves above a circular ring below, no text or symbols present.iPod 5th generation (video)

iPod nano 1st generation

natural_image
Icon showing a flower above a circular button, no text or symbols presentiPod 4th generation (color display)

natural_image
Simple icon of a CD or DVD device with no text or symbolsiPod 4th generation

natural_image
Simple line drawing of a CD or DVD device with no text or symbolsiPod mini
Notes
- This unit is designed for iPod only. You can not connect any other portable audio players.
- Sony cannot accept responsibility in the event that data recorded to iPod is lost or damaged when using an iPod connected to this unit.
- Supplied iPod Dock Adapters are for iPod 5th and iPod nano 2nd generations. When you use other iPod models, a compatible Dock Adapter from Apple Inc. will need to be purchased separately.
- This product has been designed specifically to work with iPod and has been certified to meet Apple performance standards.
Table of Contents
Overview......5
Getting Started
1: Checking supplied items...6
2: List of parts locations......6
3: Installing the TDM-iP10 ...7
Controlling the iPod
Performing
basic operations......10
Additional Information
Troubleshooting .....11
Precautions ......12
Specifications......13
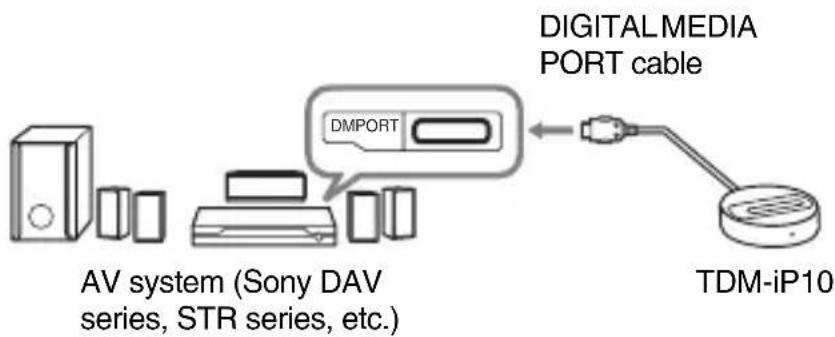
Overview
You can enjoy iPod audio contents by connecting this unit to an AV system with DIGITAL MEDIA PORT interface (Sony DAV series, etc.).
- You can operate your iPod by its control buttons, the control buttons of the AV system and the remote supplied with the AV system (page 10).
- You can also use this unit as a battery charger (page 9).
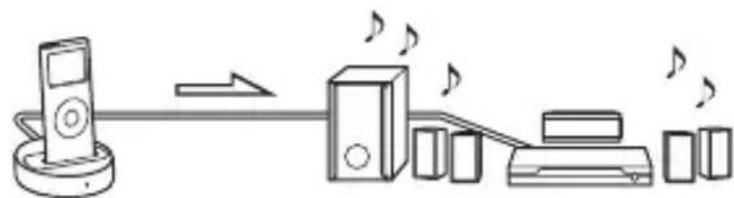
natural_image
Diagram of a music streaming setup with a CD player, speaker, and multiple devices (no text or labels)iPod and TDM-iP10 AV system (Sony DAV series, STR series, etc.)
Notes
• DIGITAL MEDIA PORT is occasionally abbreviated as DMPORT.
- TDM-iP10 does not support video output. Even if your iPod has video/photo capability, you cannot view video or photo contents on the TV or other video devices. However, audio content in video files can be played back with a connected AV system.
Getting Started
1: Checking supplied items
Unit (1)
Operating Instructions (1)
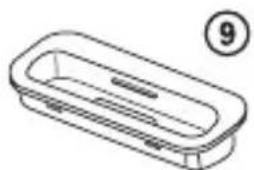
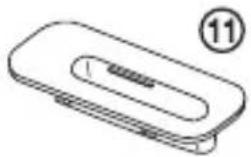
iPod Dock Adapters (3)
Dock Adapter for iPod nano 2nd generation (aluminum) (2 GB/4 GB/8 GB)
Dock Adapter for iPod 5th generation (video) (60 GB/80 GB)
Dock Adapter for iPod 5th generation (video) (30 GB)
natural_image
Simple line drawing of a rectangular object with a slot and a numbered circle (11) in the top right corner, no text or symbols present.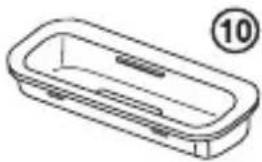
natural_image
Line drawing of a rectangular basin with internal channels and a numbered circle (10) in the top right corner.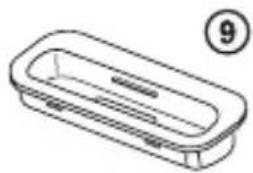
natural_image
Simple line drawing of a rectangular tray or container with a numbered label (9) in the top right corner.The adapter number ⑪, ⑩ or ⑨ is shown on bottom-rear of each Dock Adapter. When you use other iPod models, a compatible Dock Adapter from Apple Inc. will need to be purchased separately.
2: List of parts locations
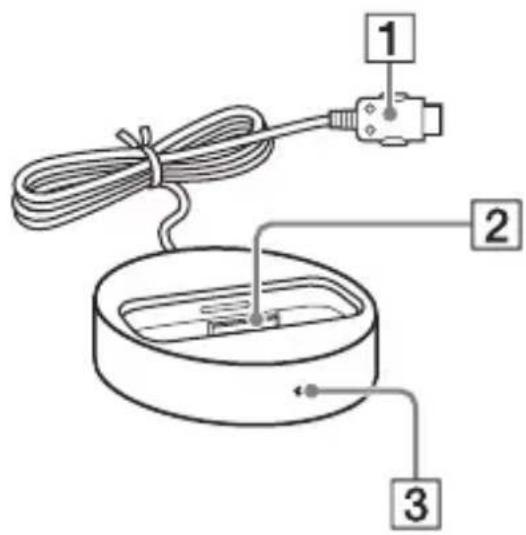
① DIGITAL MEDIA PORT cable (page 7)
2 iPod connector (page 8)
③ Power indicator: Lights up in green while the power is supplied (page 9).
3: Installing the TDM-iP10
Connect and position the TDM-iP10 as illustrated below.
flowchart
graph LR
    A["AV system (Sony DAV series, STR series, etc.)"] --> B["Digital Media Port cable"]
    B --> C["TDM-iP10"]
Note
This unit turns on/off automatically whenever the connected AV system (DAV series, etc.) turns on/off.
To connect/disconnect the unit
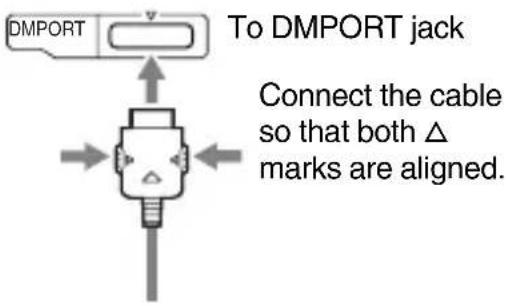
To remove the DIGITAL MEDIA PORT cable from the DMPORT jack, press both side buttons.
Connecting
1 Connect the DIGITAL MEDIA PORT cable of this unit to the DIGITAL MEDIA PORT jack of an AV system (DAV series, etc.). Make sure the AV system is turned off before connecting.
2 Turn on the AV system with a DIGITAL MEDIA PORT jack connected to this unit, and select the DIGITAL MEDIA PORT function.
Disconnecting
Before disconnecting, turn off the AV system.
To put the iPod into the unit's connector
1 Choose the iPod Dock Adapter that fits your iPod (page 6).
2 Insert the Dock Adapter into the unit.
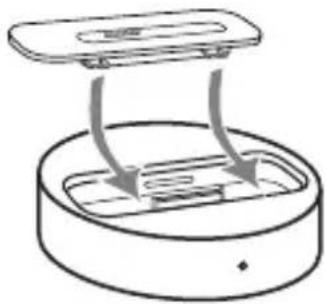
natural_image
Simple line drawing of a device with a lid and internal components, no text or symbols present.3 Put the iPod into the unit's connector.
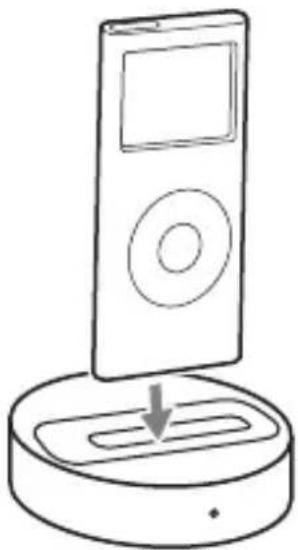
natural_image
Simple line drawing of a vintage remote control device with an open lid and a circular base (no text or symbols)Notes
- When placing or removing the iPod, handle the iPod in the same angle as that of the iPod connector on this unit and do not twist or sway the iPod to prevent connector damage.
- Do not carry the unit with an iPod set on the connector. Doing so may cause a malfunction.
- When placing or removing the iPod, brace the unit with one hand and take care not to press the controls of the iPod by mistake.
To use the unit as a battery charger
You can use the unit as a battery charger. While the POWER indicator lights up, the battery is charging. The charging status appears in the iPod display. For details, see the user's guide of your iPod.
To remove the iPod Dock Adapter
To remove the iPod Dock Adapter, pull it up with your fingernail or a flat object using the slot inside the adapter.

Controlling the iPod
Performing basic operations
You can operate your iPod by its control buttons, the control buttons of a connected AV system with a DIGITAL MEDIA PORT interface (Sony DAV series, etc.), and the remote supplied with the AV system.
Notes
- To use an iPod, refer to the user's guide of your iPod.
- Before disconnecting the iPod, pause playback.
Basic Operations
The following operations are available with the AV system or the remote.
Press To
| Start play. | |
| ■/■Pause play. | |
| ↑/↓Works much likerunning your thumbaround the ClickWheel on the iPodcounterclockwise(clockwise). | |
| →/⊕/ENTER | Works much like thecenter button on theiPod. |
Press To
| Press and release to skip to the next (previous) song/video or chapter of audiobook/podcast. Hold down to fast-rewind (fast-forward). | |
| Fast-forward (fast-rewind) play. | |
| ←/MENU/DISPLAY/RETURN | Works much like the Menu button on the iPod. |
| VOLUME+/- | Adjusts the volume level. |
Notes
- Point the remote at the AV system.
- Depending on the connected AV system, the operation or buttons may differ. Refer to the AV system's operating instructions.
- While playing video, you cannot use ◀◀/▶▶. You can fast-rewind (fast-forward) by holding down ◀◀/▶▶.
- To change the volume level, use the volume controls on the connected AV system or the remote. The volume level does not change even if adjusted on the iPod.
- It may take time to start playback depending on the contents.
Additional Information
Troubleshooting
Should you encounter a problem with your unit, find your problem in the troubleshooting checklist below and take the indicated corrective action. If the problem persists, contact your Sony dealer. Note that if service personnel changes some parts during repair, these parts may be retained. When bringing the system in for repairs, be sure to bring in the entire system. This product is a system product, and the entire system is needed to determine the location requiring repair.
The remote does not function.
- Remove any obstacles.
- Point the remote at the AV system (DAV series, etc.)'s sensor.
- The distance between the remote and the AV system is too far.
- Replace the battery.
- Make sure the iPod* is securely connected.
- Select the DMPORT function on the AV system.
- Turn on and off the AV system.
Video/photo image from the iPod does not appear on the TV screen.
- The unit does not support video output. Even if your iPod has video/photo capability, you cannot view video or photo content on the TV or other video devices.
There is no sound.
- Check the connections.
- Make sure the unit is securely connected.
- Make sure the iPod* is securely connected.
- Make sure the iPod* is playing music.
- It may take time to start playback depending on the contents.
There is severe hum or noise.
- Move the unit away from the source of noise.
The sound is distorted.
- Reduce the volume of the connected AV system.
- Set the “EQ” setting of the iPod to “Off” or “Flat”.
Precautions
On safety
Should any solid object or liquid fall into the system, unplug the system and have it checked by qualified personnel before operating it any further.
On placement
- Do not place the unit in an inclined position.
- Do not place the unit in locations where it is;
- Extremely hot or cold
- Dusty or dirty
- Very humid
- Subject to vibrations
- Subject to direct sunlight.
- Use caution when placing the unit on surfaces that have been specially treated (with wax, oil, polish, etc.) as staining or discoloration of the surface may result.
On heat buildup
- Although the unit heats up during operation, this is not a malfunction.
- Place the unit in a location with adequate ventilation to prevent heat buildup in the unit.
If you have any questions or problems concerning your unit, please consult your nearest Sony dealer.
Cleaning the unit
Clean the unit with a soft cloth slightly moistened with mild detergent solution. Do not use any type of abrasive pad, scouring powder or solvent such as thinner, benzine or alcohol.
Specifications
General
Power requirements:
DC IN: 5 V,
600 mA (via
DIGITAL MEDIA
PORT)
Dimensions: Approx. 80×
22(h) mm ( 3^1/4
× 7/8(h) inch)
Mass: Approx. 174 g
(6.14 oz) (includes
cable)
Cable length: 1 m (3.3 ft)
Design and specifications are subject to change without notice.
AVERTISSEMENT
natural_image
Two gray icons: a plant sprout above a circular ring below, both without any text or symbols.natural_image
Icon of a music instrument with a pop and leaf symbol (no text or labels)natural_image
Simple icon of a CD or DVD device with no text or symbolsnatural_image
Simple line drawing of a rectangular box and a circular button (no text or symbols)iPod mini
Remarques
natural_image
Simple line drawing of a rectangular object with a slot and a numbered circle (11) in the top right corner, no text or symbols present.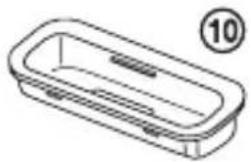
natural_image
Isometric line drawing of a rectangular container with internal slots and a circled number 10 (no text or symbols)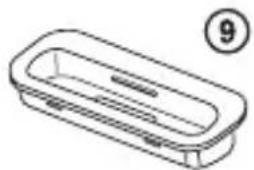
natural_image
Simple line drawing of a rectangular tray or container with a numbered label (9) in the top right corner.natural_image
Diagram of a device with a lid and internal components, showing directional arrows (no text or symbols)natural_image
Line drawing of a vintage electronic device with a screen and circular button, showing a download arrow (no text or symbols)Remarques
natural_image
Diagram of a device with an arrow pointing to a component, showing top and bottom views (no text or symbols)Commande de l'iPod
Opérations de base
natural_image
Simple icon showing a flower above a circular button, no text or symbols presentnatural_image
Generic icon showing a flower above a circular button, no text or symbols presentnatural_image
Simple icon of a music player with a blank screen and a circular button (no text or symbols)natural_image
Simple line drawing of a CD or DVD icon with no text or symbolsiPod mini
Notas
natural_image
Simple line drawing of a rectangular electronic device with a slot and label (11), no text or symbols present.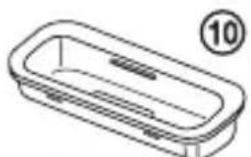
natural_image
Line drawing of a rectangular basin with internal channels and a numbered circle (10) in the top right corner.