
HT-RT40 - Home Theater System SONY - Free user manual and instructions
Find the device manual for free HT-RT40 SONY in PDF.


| Product Type | Home Theater System |
| Brand | Sony |
| Model | HT-RT40 |
| Channels | 5.1 |
| Total Power Output | 1000 W (approx.) |
| Main Unit Dimensions (W x H x D) | 430 mm x 50 mm x 300 mm |
| Main Unit Weight | 3.5 kg |
| Wireless Subwoofer Dimensions (W x H x D) | 200 mm x 400 mm x 300 mm |
| Wireless Subwoofer Weight | 5.0 kg |
| Satellite Speaker Dimensions (each, W x H x D) | 100 mm x 150 mm x 100 mm |
| Satellite Speaker Weight (each) | 0.8 kg |
| Power Consumption | 45 W |
| Power Supply | AC 120 V / 60 Hz (US model) |
| Connectivity | HDMI (in/out), USB, Bluetooth, NFC, Optical, Coaxial, AUX |
| Supported Audio Formats | Dolby Digital, DTS, PCM |
| Radio Tuner | FM |
| Remote Control | Yes |
| Wall Mountable | Yes (main unit) |
| Cleaning | Wipe with a soft, dry cloth |
| Safety | Do not expose to water, heat, or moisture |
| Repair | Contact Sony authorized service center |
Frequently Asked Questions - HT-RT40 SONY
User questions about HT-RT40 SONY
0 question about this device. Answer the ones you know or ask your own.
Ask a new question about this device
Download the instructions for your Home Theater System in PDF format for free! Find your manual HT-RT40 - SONY and take your electronic device back in hand. On this page are published all the documents necessary for the use of your device. HT-RT40 by SONY.
USER MANUAL HT-RT40 SONY
Operating Instructions
WARNING
To reduce the risk of fire, do not cover the ventilation opening of the appliance with newspapers, tablecloths, curtains, etc.
Do not expose the appliance to naked flame sources (for example, lighted candles).
To reduce the risk of fire or electric shock, do not expose this appliance to dripping or splashing, and do not place objects filled with liquids, such as vases, on the appliance.
Do not install the appliance in a confined space, such as a bookcase or built-in cabinet.
Do not expose batteries or appliances with battery-installed to excessive heat, such as sunshine and fire.
To prevent injury, this apparatus must be securely placed on the cabinet or attached to the floor/wall in accordance with the installation instructions.
Indoor use only.
On power sources
- The unit is not disconnected from the mains as long as it is connected to the AC outlet, even if the unit itself has been turned off.
- As the main plug is used to disconnect the unit from the mains, connect the unit to an easily accessible AC outlet. Should you notice an abnormality in the unit, disconnect the main plug from the AC outlet immediately.
Recommended cables
Properly shielded and grounded cables and connectors must be used for connection to host computers and/or peripherals.
For product with CE marking
The validity of the CE marking is restricted to only those countries where it is legally enforced, mainly in the countries of the EEA (European Economic Area).
REGISTERED No: ER42715/15
DEALER No: DA0063360/11
Copyrights and Trademarks
- (HT-RT4 only)
This system incorporates Dolby* Digital and the DTS** Digital Surround System.
(HT-RT40 only)
This system incorporates Dolby* Digital.
* Manufactured under license from Dolby Laboratories. Dolby and the double-D symbol are trademarks of Dolby Laboratories.
**For DTS patents, see http://patents.dts.com. Manufactured under license from DTS Licensing Limited. DTS, the Symbol, & DTS and the Symbol together are registered trademarks, and DTS Digital Surround is a trademark of DTS, Inc. © DTS, Inc. All Rights Reserved.
- The BLUETOOTH® word mark and logos are registered trademarks owned by Bluetooth SIG, Inc. and any use of such marks by Sony Corporation is under license. Other trademarks and trade names are those of their respective owners.
- The terms HDMI and HDMI High-Definition Multimedia Interface, and the HDMI Logo are trademarks or registered trademarks of HDMI Licensing Administrator, Inc. in the United States and other countries.
- The N-Mark is a trademark or registered trademark of NFC Forum, Inc. in the United States and in other countries.
- Android™ is a trademark of Google LLC.
- Google Play is a trademark of Google LLC.
- MPEG Layer-3 audio coding technology and patents licensed from Fraunhofer IIS and Thomson.
- Windows Media is either a registered trademark or trademark of Microsoft Corporation in the United States and/or other countries.
- This product is protected by certain intellectual property rights of Microsoft Corporation. Use or distribution of such technology outside of this product is prohibited without a license from Microsoft or an authorized Microsoft subsidiary.
- "BRAVIA" is a trademark of Sony Corporation.
- "ClearAudio+" is a trademark of Sony Corporation.
- "PlayStation" is a registered trademark of Sony Computer Entertainment Inc.
- Apple, iPhone, iPod, and iPod touch are trademarks of Apple Inc., registered in the U.S. and other countries.
Use of the Made for Apple badge means that an accessory has been designed to connect specifically to the Apple product(s) identified in the badge, and has been certified by the developer to meet Apple performance standards. Apple is not responsible for the operation of this device or its compliance with safety and regulatory standards.
Compatible iPhone/iPod models
The compatible iPhone/iPod models are as follows. Update your iPhone/iPod with the latest software before using with the system.
Made for:
- iPhone 7
- iPhone 7 Plus
- iPhone SE
- iPhone 6s
- iPhone 6s Plus
- iPhone 6
- iPhone 6 Plus
- iPhone 5s
- iPhone 5c
- iPhone 5
- iPod touch (6th generation)
- iPod touch (5th generation)
•(HT-RT40 only)
THIS PRODUCT IS LICENSED UNDER THE MPEG-4 VISUAL PATENT PORTFOLIO LICENSE FOR THE PERSONAL AND NON-COMMERCIAL USE OF A CONSUMER FOR
(i) ENCODING VIDEO IN COMPLIANCE WITH THE MPEG-4 VISUAL STANDARD ("MPEG-4 VIDEO")
AND/OR
(ii) DECODING MPEG-4 VIDEO THAT WAS ENCODED BY A CONSUMER ENGAGED IN A PERSONAL AND NON-COMMERCIAL ACTIVITY AND/OR WAS OBTAINED FROM A VIDEO PROVIDER LICENSED TO PROVIDE MPEG-4 VIDEO.
NO LICENSE IS GRANTED OR SHALL BE IMPLIED FOR ANY OTHER USE. ADDITIONAL INFORMATION INCLUDING THAT RELATING TO PROMOTIONAL, INTERNAL AND COMMERCIAL USES AND LICENSING MAY BE OBTAINED FROM MPEG LA, L.L.C. HTTP://WWW.MPEGLA.COM
- All other trademarks are trademarks of their respective owners.
- Other system and product names are generally trademarks or registered trademarks of the manufacturers. TM and ® marks are not indicated in this document.
About these operating instructions
- The instructions in these Operating Instructions describe the controls on the remote control. You can also use the controls on the Subwoofer if they have the same or similar names as those on the remote control.
- Some illustrations are presented as conceptual drawings, and may be different from the actual products.
- The default setting is underlined.
- The text enclosed in double quotation marks ("--") appears in the front panel display.
Table of Contents
About these operating instructions .... 4
Guide to parts and controls ..... 6
Installing the system
| Basic connections and preparation | → | Startup Guide (separate document) |
Mounting the Bar Speaker and the Surround Speakers on a wall 9
Operating the system using the remote control .....11
Listening to the sound
Listening to sound from the connected devices ....11
Listening to music from a USB device ....11
Sound Adjustment
Enjoying sound effects ...... 13
Adjusting the Subwoofer volume 13
BLUETOOTH Functions
Listening to music from a BLUETOOTH device ....14
Controlling the system using a smartphone or tablet (Sony | Music Center) ......16
Settings and Adjustments
Using the setup display ..... 17
Other Functions
Using the Control for HDMI function 20
Using the "BRAVIA" Sync function 21
Saving power in standby mode ....22
Additional Information
Precautions ......22
Troubleshooting 23
playable types of files 28
Supported audio formats ..... 28
Specifications 28
On BLUETOOTH communication 29
Guide to parts and controls
For more information, refer to the pages indicated in parentheses.
Subwoofer
Top panel![graph TD A["1"] --> B["○"] C["2"] --> D["INPUT"] E["3"] --> F["● PAIRING"] G["4"] --> H["VOL - VOL +"] I["5"] --> J["∅"] K["6"] --> L["7"] M["8"] --> N["9"] O["Front panel"]](/content/2026/06/1370939/images/59ba79c05cf584ce121da0f2ac453f45421667d49326059f6e1f1449088ceaa6.jpg)
1 ⏻ (power) touch key
Turns on the system or sets it to standby mode.
2 INPUT touch key
Selects the device you want to use.
3 PAIRING touch key (page 14)
4 VOL (volume) +/- touch key
5 N (N-Mark) (page 15)
When using the NFC function, place your NFC-compatible mobile device near the mark.
6 Remote control sensor (page 11)
7 Front panel display (page 11)
8 ⬤(USB) port (page 12)
9 BLUETOOTH indicator (blue)
• Flashes quickly: During BLUETOOTH pairing • Flashes: BLUETOOTH connection is being attempted • Lights up: BLUETOOTH connection is established
About touch keys
The touch keys work when you touch them lightly. Do not touch them with excessive force.
Rear panel
1 AC power cord (mains lead) 2 SPEAKERS jacks 3 HDMI OUT (ARC) jack
4 TV IN (OPTICAL) jack 5 ANALOG IN jack
Remote control

1 INPUT (page 11) 2 ⏻ (power)
Turns on the system or sets it to standby mode.
3 DIMMER
Adjusts the brightness of the front panel display.
"BRIGHT" → "DARK" → "OFF"
- The front panel display is turned off when "OFF" is selected. It turns on automatically when you operate the system, then turns off again if you do not operate the system for several seconds. However, in some cases, the front panel display may not turn off. In this case, the brightness of the front panel display is the same as "DARK".
4 MENU
Turns on/off the menu in the front panel display.

Selects the menu items.
ENTER
Enters the selection.
BACK
Returns to the previous display. Stops USB playback.
5 ∠ (volume) +*/-
Adjusts the volume.
6 SW △ (Subwoofer volume) +/- (page 13) 7 ☐ (muting) Turns off the sound temporarily. 8 CLEARAUDIO+ (page 13)
Automatically selects the suitable sound setting for the sound source.
9 SOUND FIELD (page 13) 10 VOICE (page 13) 11 ▶ II* (play/pause)
Plays, pauses, or resumes playback.
12 NIGHT (page 13)
13 ◀◀/▶▶I (previous/next/rewind/fast forward)
Press to select the previous or next track or file.
Hold down to search backward or forward.
* The △ + and ▶■ buttons have a tactile dot. Use it as a guide during operation.
Installing the system
Basic connections and preparation
Refer to the Startup Guide (separate document).
Mounting the Bar Speaker and the Surround Speakers on a wall
You can mount the Bar Speaker and the Surround Speakers on a wall.
Note
- Prepare screws (not supplied) that are suitable for the wall material and strength. As a plasterboard wall is especially fragile, attach the screws securely in the wall beam. Install the speakers on a vertical and flat wall where reinforcement is applied.
- Be sure to subcontract the installation to Sony dealers or licensed contractors and pay special attention to safety during the installation.
- Sony shall not be held responsible for accidents or damage caused by improper installation, insufficient wall strength, improper screw installation, or natural calamity, etc.
1 Prepare screws (not supplied) that are suitable for the holes at the rear of the Bar Speaker or Surround Speakers.


Hole at the rear of the speakers
2 Fasten the screws in the wall.
The screw should protrude as illustrated.
For the Bar Speaker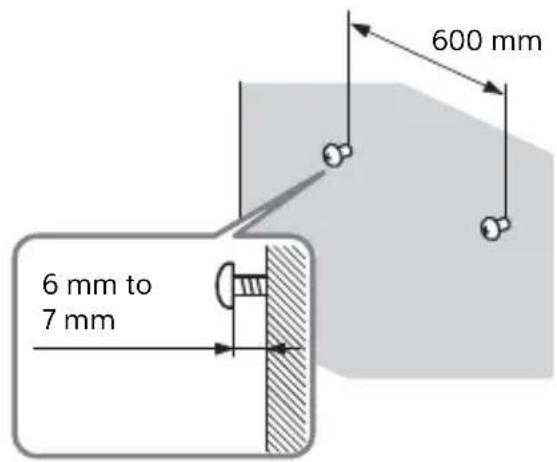
For the Surround Speakers
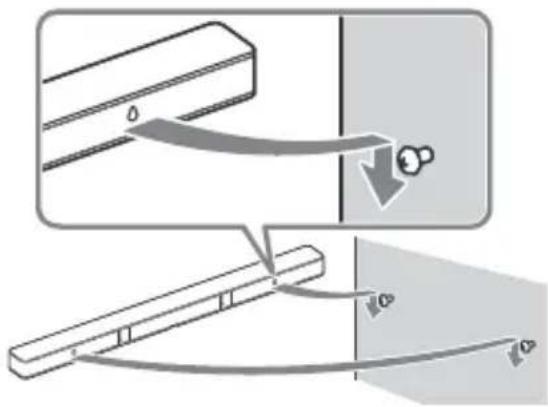
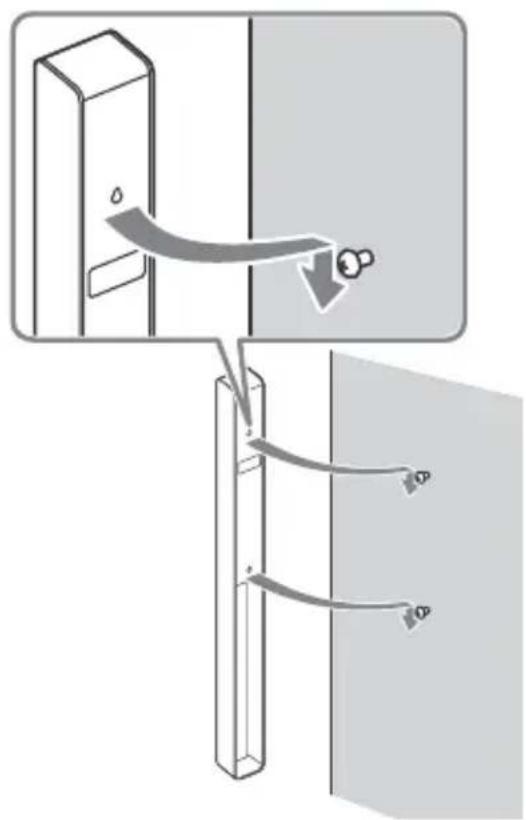
3 Hang the Bar Speaker or Surround Speakers on the screws.
Align the holes at the rear of the speakers with the screws.
For the Bar Speaker
Hang the Bar Speaker on the two screws.
For the Surround Speakers
Hang the Surround Speaker on the two screws.
Operating the system using the remote control
Point the remote control at the Subwoofer's remote control sensor.

Listening to the sound
Listening to sound from the connected devices
Press INPUT repeatedly.
When you press INPUT once, the current device appears in the front panel display. Each time you press INPUT, the device changes cyclically as follows.
"TV" → "ANALOG" → "BT" → "USB"
"TV"
• TV that is connected to the TV IN (OPTICAL) jack • TV compatible with the Audio Return Channel (ARC) function that is connected to the HDMI OUT (ARC) jack
"ANALOG"
Device (Digital media player, etc.) that is connected to the ANALOG IN jack
"BT"
BLUETOOTH device that supports A2DP (page 14)
"USB"
USB device that is connected to the (USB) port (page 12)
Listening to music from a USB device
Note
- To view the USB content list on the TV screen, make sure you connect the system to the TV using an HDMI cable.
- Change the TV input to the one to which the Subwoofer is connected.
You can play music/video* files stored on a connected USB device.
For playable types of files, see "Playable types of files" (page 28).
* HT - RT40 only.
1 Connect the USB device to the (USB) port.
Refer to the operating instructions of the USB device before connecting.

2 Press INPUT repeatedly to select "USB".
The USB content list appears on the TV screen.
3 Press / to select the content you want, then press ENTER.
The selected content starts playing.
4 Set "REPT" in "USB >" (page 19) to select the play mode you want.
5 Adjust the volume.
- Press + / - to adjust the system volume.
- Press SW +/- to adjust the Subwoofer volume.
Other operations
| To Do this | |
| Stop playback Press BACK | |
| Pause or resume playback | Press ▶|| |
| Select the previous or next track | Press ◀◀/▶▶I |
| Search backward or forward (rewind/fast forward) | Hold down ◀◀/▶▶I |
Note
Do not remove the USB device during operation. To avoid data corruption or damage to the USB device, turn off the system before connecting or removing the USB device.
Information of USB device on the TV screen
① Playing time ② Total playing time ③ Bit rate ④ Playback status ⑤ Rewind/fast forward speed ⑥ Repeat play status ⑦ Selected file index/Total files in the folder
Note
- Depending on the playback source, some information may not be displayed.
- Depending on the play mode, the information displayed may be different.
Sound Adjustment
Enjoying sound effects
You can easily enjoy pre-programmed sound effects that are tailored to different kinds of sound sources.
Selecting the sound field (SOUND FIELD)
Press SOUND FIELD repeatedly until the sound field you want appears in the front panel display.
"CLEARAUDIO+"
You can enjoy the sound with Sony-recommended sound field. Sound field is automatically optimized according to playback content and function.
"MOVIE"
Sound effects are optimized for movies. This mode replicates the density and rich expanse of sound.
"MUSIC"
Sound effects are optimized for music.
"SPORTS"
Commentary is clear, cheers are heard as surround-sound, and sounds are realistic.
"GAME"
Sounds are powerful and realistic, suitable for game play.
"STANDARD"
Sound that corresponds to every source.
Tip
You can also press CLEARAUDIO+ to select "CLEARAUDIO+".
Using the Night Mode function (NIGHT)
This function is useful when watching movies late at night. You will be able to hear the dialog clearly even at a low volume level.
Press NIGHT to select "N.ON".
To deactivate the Night Mode function, press NIGHT to select "N.OFF".
Using the Clear Voice function (VOICE)
This function helps make dialogs clearer.
Press VOICE repeatedly.
- "UP OFF": The Clear Voice function is turned off.
- "UP 1": Speech is enhanced.
- "UP 2": Speech is enhanced to ease the elderly to listen to it.
Adjusting the Subwoofer volume
The Subwoofer is designed for playback of bass or low frequency sound.
Press SW △+/- to adjust the Subwoofer volume.
Note
When the input source does not contain much of bass sound, such as in TV programs, the sound from the Subwoofer may be difficult to hear.
BLUETOOTH Functions
Listening to music from a BLUETOOTH device

Pairing this system with a BLUETOOTH device
Pairing is an operation where BLUETOOTH devices register with each other beforehand. Once a pairing operation is performed, it does not need to be performed again. If your device is an NFC-compatible mobile device, the manual pairing procedure is not necessary. (see "Connecting to a mobile device by One-touch function (NFC)" page 15)
1 Place the BLUETOOTH device within 1 meter from the Subwoofer. 2 Touch PAIRING on the Subwoofer.
The system enters the pairing mode. The BLUETOOTH indicator (blue) on the Subwoofer flashes quickly.
3 Turn on the BLUETOOTH function on the BLUETOOTH device, search for devices and select "HT-RT4" or "HT-RT40".
If a Passkey is required, enter "0000".
Perform this step within 5 minutes, otherwise pairing mode may be canceled.
4 Make sure that the BLUETOOTH indicator (blue) on the Subwoofer lights up.
Connection is established.
Note
- Passkey may be called "Passcode", "PIN code", "PIN number" or "Password".
- You can pair up to 10 BLUETOOTH devices. If the 11th BLUETOOTH device is paired, the least recently connected device will be replaced by the new one.
Listening to music from the paired device
1 Turn on the BLUETOOTH function of the paired BLUETOOTH device. 2 Press INPUT repeatedly to select "BT".
The system automatically reconnects to the BLUETOOTH device it was most recently connected to. When the BLUETOOTH connection is established, the BLUETOOTH indicator (blue) on the Subwoofer lights up.
3 Start playback on the BLUETOOTH device. 4 Adjust the volume.
- Adjust the BLUETOOTH device volume. - Press △ + / - to adjust the system volume. - Press SW △ + / - to adjust the Subwoofer volume.
Note
- Once the system and the BLUETOOTH device are connected, you can control playback by pressing ▶II and I◀◀/▶▶I.
- You can connect to the system from a paired BLUETOOTH device even when the system is in standby mode, if you set the "BTSTB" to "ON" (page 18).
- The audio playback on this system may be delayed from that on the BLUETOOTH device because of the characteristics of the BLUETOOTH wireless technology.
Tip
You can enable or disable codec AAC from BLUETOOTH device (page 18).
To disconnect the BLUETOOTH device
Perform any of the following items.
- Touch PAIRING on the Subwoofer again.
- Disable the BLUETOOTH function on the BLUETOOTH device.
- Turn off the system or the BLUETOOTH device.
Connecting to a mobile device by One-touch function (NFC)
NFC (Near Field Communication) is a technology enabling short-range wireless communication between various devices.
By holding an NFC-compatible mobile device such as a smartphone or tablet near the N-Mark on the Subwoofer, the system is turned on automatically, then pairing and BLUETOOTH connection are performed automatically.
Compatible mobile devices
Mobile devices with a built-in NFC function
(OS: Android 2.3.3 or later, excluding Android 3.x)
Note
- The system can only recognize and connect to one NFC-compatible mobile device at a time. If you try to connect another NFC-compatible mobile device to the system, the currently connected NFC-compatible mobile device will be disconnected.
- Depending on your mobile device, you may need to perform the following items on your mobile device in advance.
- Turn on the NFC function. For details, refer to the operating instructions of the mobile device.
- If your mobile device is having an older OS version than Android 4.1.x, download and start the "NFC Easy Connect" application. "NFC Easy Connect" is a free application for Android mobile devices that can be obtained from Google Play™. (The application may not be available in some countries/regions.)
1 Hold the mobile device near to the N-Mark on the Subwoofer until the mobile device vibrates.

Follow the on-screen instructions displayed on the mobile device, and complete the procedure for BLUETOOTH connection.
When the BLUETOOTH connection is established, the BLUETOOTH indicator (blue) on the Subwoofer lights up.
2 Start playback of audio source on the mobile device.
For details on playback operations, refer to the operating instructions of your mobile device.
3 Adjust the volume.
- Adjust the BLUETOOTH device volume.
- Press △ +/- to adjust the system volume.
- Press SW △+/- to adjust the Subwoofer volume.
Tip
If pairing and the BLUETOOTH connection fail, do the following.
- Hold the mobile device near to the N-Mark on the Subwoofer again.
- Remove the case from the mobile device if using a commercially available mobile device case.
- Relaunch "NFC Easy Connect" application.
To stop playback by One-touch function
Hold the mobile device near to the N-Mark on the Subwoofer again.

Controlling the system using a smartphone or tablet (Sony | Music Center)
Sony | Music Center is an application for controlling compatible Sony audio devices using the mobile device such as a smartphone or tablet.
For details about Sony | Music Center, refer to the following URL. http://www.sony.net/smcqa/
Sony | Music Center allows you to:
- enjoy music at home seamlessly.
- change commonly used settings, select the input of the system, and adjust the volume.
- Enjoy music content stored on a smartphone with the system.
- Enjoy music visually with your smartphone display.
Note
- Sony | Music Center uses the BLUETOOTH function of the system.
- What you can control with Sony | Music Center varies depending on the connected device. The specification and design of the application may change without notice.
Using Sony | Music Center
1. Download the free Sony | Music Center app on the mobile device. 2. Connect the system and mobile device with the BLUETOOTH connection (page 14). 3. Start Sony | Music Center. 4. Operate by following the Sony | Music Center screen.
Note
Use the latest version of Sony | Music Center.
Using the setup display
You can set the following items with the menu.
Your settings are retained even if you disconnect the AC power cord (mains lead).
1. Press MENU to turn on the menu in the front panel display. 2. Press BACK/ / 4 ENTER repeatedly to select the item and press ENTER to select the setting you want. 3. Press MENU to turn off the menu.
Menu list
The default settings are underlined. They may differ depending on the area.
| Menu items Function | ||
| "LVL >"(Level) | "SUR.L"/"SUR.R"(Surround left/right speaker level) | "0.0": Adjusts the sound level of the Surround Speakers from -6.0 dB to +6.0 dB (0.5 dB interval).NoteBe sure to set "TTONE" to "ON" for easy adjustment. |
| "ATT"(Attenuation settings – Analog) | Distortion may occur when you listen to a device connected to the ANALOG IN jack. You can prevent distortion by attenuating the input level on the system."ON": Attenuates the input level. The output level will decrease at this setting."OFF": Normal input level. | |
| "DRC"(Dynamic range control) | Useful for enjoying movies at low sound volume. DRC applies to Dolby Digital sources."ON": Compresses sound according to the information in the content."OFF": Sound is not compressed. | |
| "TTONE"(Test tone) | "ON": The test tone is output from each speaker in sequence."OFF": Turns off the test tone. | |
| "SPK >"(Speaker) | "PLACE"(Speaker placement) | "STDRD": Select this setting if you install the Bar Speaker and the Surround Speakers in standard position."FRONT": Select this setting if you install the Bar Speaker and the Surround Speakers in front. |
| "SUR.L"/"SUR.R"(Surround left/right speaker distance) | "3.0M": Adjusts the distance from the seating position to the Surround Speakers from 1.0 meter to 6.0 meters. | |
| "AUD >"(Audio) | "DUAL"(Dual mono) | You can enjoy multiplex broadcast sound when the system receives a Dolby Digital multiplex broadcast signal."M/S": Mixed sound of both the main and sub languages will be output."MAIN": Sound of the main language will be output."SUB": Sound of the sub language will be output. |
| "TV AU"(TV audio) | "AUTO": Select this setting when the system is connected to an HDMI (ARC) jack of a TV with an HDMI cable."OPT": Select this setting when the system is connected to a TV with the optical digital cable. | |
| "EFCT"(Sound effect) | "ON": The sound of the selected sound field is played. It is recommended to use this setting."OFF": The input source is down-mixed for 2 channels. | |
| "STRM"(Stream) | Shows the current audio stream information.See page 28 on the supported audio formats. | |
| "HDMI>" "CTRL"(Control for HDMI) | "ON": The Control for HDMI function is enabled. Devices connected with an HDMI cable can control each other."OFF": Off. | |
| "USB >" "REPT"(Play mode) | “NONE”: Plays back all tracks.“ONE”: Repeats one track.“FLDER”: Repeats all tracks in a folder.“RANDM”: Repeats all tracks in a folder in random order.“ALL”: Repeats all tracks. | |
| "SYS >"(System) | "ASTBY"(Auto standby) | “ON”: Turns on the auto standby function. When you do not operate the system for about 20 minutes, the system enters standby mode automatically.“OFF”: Off. |
| "VER"(Version) | The current firmware version information appears in the front panel display. | |
Other Functions
Using the Control for HDMI function
Connecting a device such as a TV or Blu-ray Disc player compatible with the Control for HDMI function* by HDMI cable (High Speed HDMI Cable, supplied only for certain areas) enables you to easily operate the device by a TV remote control.
The following functions can be used with the Control for HDMI function.
• System Power Off function • System Audio Control function • Audio Return Channel (ARC) • One-Touch Play function
* Control for HDMI is a standard used by CEC (Consumer Electronics Control) for allowing HDMI (High-Definition Multimedia Interface) devices to control each other.
Note
These functions may work with devices other than those manufactured by Sony, but operation is not guaranteed.
Preparing to use the Control for HDMI function
Set "HDMI>" - "CTRL" on the system to "ON" (page 18). The default setting is "ON".
Enable the Control for HDMI function settings for the TV and other device connected to the system.
Tip
If you enable the Control for HDMI ("BRAVIA" sync) function when using a TV manufactured by Sony, the Control for HDMI function of the system is also enabled automatically. When settings are completed, "DONE" appears in the front panel display.
System Power Off function
When you turn off the TV, the system will turn off automatically.
Set "HDMI>" - "TVSTB" on the system to "ON" or "AUTO" (page 18). The default setting is "AUTO".
System Audio Control function
If you turn on the system while you are watching the TV, the TV sound will be output from the speakers of the system. The volume of the system can be adjusted using the TV's remote control. If the TV sound was output from the speakers of the system the previous time you watched the TV, the system will be turned on automatically when you turn on the TV again.
Operations can also be made by the TV's menu. For details, refer to the operating instructions of your TV.
Note
- Sound is only output from the TV if other than "TV" input is selected when using the Twin Picture function on the TV. When you disable the Twin Picture function, the sound is output from the system.
- The number for the system's volume level is displayed on the TV screen depending on the TV. The volume number displayed on the TV may differ from the number on the front panel display of the system.
- Depending on the settings of the TV, the System Audio Control function may not be available. For details, refer to the operating instructions of your TV.
Audio Return Channel (ARC)
If the system is connected to a TV's HDMI IN jack compatible with Audio Return Channel, you can listen to TV sound from the speakers of the system without connecting an optical digital cable.
On the system, set "AUD >" – "TV AU" to "AUTO" (page 18). The default setting is "AUTO".
Note
If the TV is not compatible with Audio Return Channel, an optical digital cable needs to be connected (Refer to the supplied Startup Guide).
One-Touch Play function
When you play content on a device (Blu-ray Disc player, "PlayStation®4", etc.) connected to the TV, the system and TV are turned on automatically, the input of the system is switched to the input for the TV, and sound is output from the speakers of the system.
Note
- If the TV sound was output from the speakers of the TV the previous time you watched the TV, the system does not turn on and the sound and picture are output from the TV even if device content is played.
- Depending on the TV, the beginning part of content being played may not play correctly.
Using the "BRAVIA" Sync function
In addition to the Control for HDMI function, you can also use the following function on devices compatible with the "BRAVIA" sync function.
- Scene Select function
Note
This function is proprietary function of Sony. This function cannot operate with products other than those manufactured by Sony.
Scene Select function
The sound field of the system is automatically switched according to the TV's Scene Select or Sound Mode function settings. For details, refer to the operating instructions of your TV. Set the sound field to "CLEARAUDIO+" (page 13).
Notes on HDMI connections
- Use a High Speed HDMI cable. If you use a Standard HDMI cable, 1080p content may not be displayed properly.
- Use an HDMI-authorized cable.
- Use a Sony High Speed HDMI cable with the Cable Type Logo. • We do not recommend using an HDMI-DVI conversion cable.
- Check the setup of the connected device if an image is poor or the sound does not come out of the device connected via the HDMI cable.
- Audio signals (sampling frequency, bit length, etc.) transmitted from an HDMI jack may be suppressed by the connected device.
- Sound may be interrupted when the sampling frequency or the number of channels of audio output signals from the playback device is switched.
- If the connected device is not compatible with copyright-protection technology (HDCP), the image and/or the sound from the HDMI OUT jack of this system may be distorted or may not be output. In such a case, check the specifications of the connected device.
Saving power in standby mode
Check that you have made the following settings:
- "CTRL" in "HDMI>" is set to "OFF" (page 18).
- "BTSTB" in "BT >" is set to "OFF" (page 18).
Additional Information
Precautions
On safety
- Should any solid object or liquid fall into the system, unplug the system and have it checked by qualified personnel before operating it any further.
- Do not touch the AC power cord (mains lead) with wet hands. Doing so may cause an electric shock.
- Do not climb on the Bar Speaker, Subwoofer and Surround Speakers as you may fall down and injure yourself, or system damage may result.
On power sources
- Before operating the system, check that the operating voltage is identical to your local power supply. The operating voltage is indicated on the nameplate at the rear of the Subwoofer.
- If you are not going to use the system for a long time, be sure to disconnect the system from the wall outlet (mains). To disconnect the AC power cord (mains lead), grasp the plug itself; never pull the cord.
- The AC power cord (mains lead) must be changed only at a qualified service shop.
On heat buildup
Although the system heats up during operation, this is not a malfunction. If you continuously use this system at high volume, the system temperature rises considerably. To avoid burning yourself, do not touch the system.
On placement
- Place the system in a location with adequate ventilation to prevent heat buildup and prolong the life of the system.
- Do not place the system near heat sources or in a place subject to direct sunlight, excessive dust, or mechanical shock.
- Do not place the Bar Speaker, Subwoofer and Surround Speakers on a soft surface (rugs, blankets, etc.) or place anything at the rear of the Bar Speaker, Subwoofer and Surround Speakers that might block the ventilation holes and cause malfunctions.
- If the system is being used in combination with a TV, VCR, or tape deck, noise may result and picture quality may be affected. In this case, place the system away from the TV, VCR, or tape deck.
- Use caution when placing the system on a surface that has been specially treated (with wax, oil, polish, etc.), as staining or discoloration of the surface may result. • Take care to avoid any possible injury from the corners of the Bar Speaker, Subwoofer and Surround Speakers.
- Keep 3 cm or more space under the Bar Speaker and Surround Speakers when you hang it on a wall.
On operation
Before connecting other devices, be sure to turn off and unplug the system.
If you encounter color irregularity on a nearby TV screen
Color irregularities may be observed on certain types of TV.
• If color irregularity is observed... Turn off the TV, then turn it on again after 15 to 30 minutes. - If color irregularity is observed again... Place the system further away from the TV.
On cleaning
Clean the system with a soft, dry cloth. Do not use any type of abrasive pad, scouring powder, or solvent such as alcohol or benzine.
If you have any question or problem concerning your system, please consult your nearest Sony dealer.
On handling the Subwoofer
Do not place your hand into the slit of the Subwoofer when lifting it. The speaker driver may be damaged. When lifting it, hold the bottom of the Subwoofer.
Troubleshooting
If you experience any of the following difficulties while using the system, use this troubleshooting guide to help remedy the problem before requesting repairs. Should any problem persist, consult your nearest Sony dealer.
General
The power does not turn on.
→ Make sure the AC power cord (mains lead) is connected securely.
The system does not work normally.
→ Disconnect the AC power cord (mains lead) from the wall outlet (mains), then reconnect after several minutes.
The system is turned off automatically.
→ The auto standby function is working. Set "ASTBY" in "SYS >" to "OFF" (page 19).
The system does not turn on even when the TV is turned on.
→ Set "HDMI>" – "CTRL" to "ON" (page 18). The TV must support the Control for HDMI function (page 20). For details, refer to the operating instructions of your TV. → Check the speaker settings of the TV. The system power syncs with the speaker settings of the TV. For details, refer to the operating instructions of your TV.
→ If the sound was output from the speakers of the TV the previous time, the system does not turn on even when the TV is turned on. Turn on the system and switch the input of the system to "TV" (page 11).
The system turns off when the TV is turned off.
→ Check the setting of "HDMI>" – "TVSTB" (page 18). When "TVSTB" is set to "ON", the system turns off automatically when you turn off the TV regardless of the input.
The system does not turn off even when the TV is turned off.
→ Check the setting of "HDMI>" – "TVSTB" (page 18). To turn off the system automatically regardless of the input when you turn off the TV, set "TVSTB" to "ON". The TV must support the Control for HDMI function (page 20). For details, refer to the operating instructions of your TV.
Sound
No TV sound is output from the system.
→ Check the type and connection of the HDMI cable, optical digital cable, or analog audio cable that is connected to the system and the TV (refer to the supplied Startup Guide). → When the system is connected with a TV compatible with Audio Return Channel, make sure the system is connected to an HDMI (ARC) jack of a TV (refer to the supplied Startup Guide). If sound is still not output or if sound is interrupted, connect the optical digital cable (supplied only for certain areas) and set "AUD >" – "TV AU" to "OPT" (page 18).
→ If your TV is not compatible with Audio Return Channel, TV sound will not be output from the system even if the system is connected to the TV's HDMI input jack. To output TV sound from the system, connect the optical digital cable (supplied only for certain areas) (refer to the supplied Startup Guide). → If sound is not output from the system even if the system and TV are connected by optical digital cable or if the TV does not have an optical digital sound output jack, connect an analog audio cable (not supplied) and switch input of the system to "ANALOG" (page 11). → Switch input of the system to "TV" (page 11). → Increase the volume on the system or cancel muting. → Depending on the order in which you connect the TV and the system, the system may be muted and "MUTING" is displayed in the front panel display of the system. If this happens, turn on the TV first, then the system. → Set the speakers setting of the TV (BRAVIA) to Audio System. Refer to the operating instructions of your TV on how to set the TV. → Depending on the TV and the playback sources, sound may not be output from the system. Set the audio format setting of the TV to "PCM". For details, refer to the operating instructions of your TV.
The sound is output from both the system and the TV.
→ Mute the sound of the system or the TV.
No sound or only a very low-level sound is heard from the Subwoofer.
→ Make sure the AC power cord (mains lead) of the Subwoofer is connected properly (refer to the supplied Startup Guide). → Press SW △ + to increase the Subwoofer volume (pages 8, 13). → A Subwoofer is for reproducing bass sound. If the input sources contain very little bass sound components (i.e., a TV broadcast), the sound from the Subwoofer may be difficult to hear. → When you play content compatible with copyright protection technology (HDCP), it is not output from the Subwoofer.
No sound or only a very low-level sound of the device connected to the system is heard.
→ Press △ + to increase the volume level (page 8). → Press ※ or + to cancel the muting function (page 8). → Make sure the input source is selected correctly. You should try other input sources by pressing INPUT repeatedly (page 11). → Check that all the cables and cords of the system and the connected device are firmly inserted. → Depending on the audio format, sound may not be output. Make sure that the audio format is compatible with the system (page 28).
No sound or only very low-level sound is heard from the Surround Speakers.
→ Make sure cable of the Surround Speakers is connected properly to the Subwoofer (refer to the supplied Startup Guide).
→ Multi-channel sound which has not been recorded as surround sound is not output from the Surround Speakers. → If you want to output 2-channel sound from the Surround Speakers, press the CLEARAUDIO+ and set the sound field setting to "CLEARAUDIO+". → Depending on the sound source, the sound from the Surround Speakers may have been recorded with a soft sound effect.
The surround effect cannot be obtained.
Depending on the input signal and the sound field setting, surround sound processing may not work effectively. The surround effect may be subtle, depending on the program or disc. To play multi-channel audio, check the digital audio output setting on the device connected to the system. For details, refer to the operating instructions supplied with the connected device.
USB device
The USB device is not recognized.
Try the following: 1. Turn off the system. 2. Remove and reconnect the USB device. 3. Turn on the system.
Make sure that the USB device is securely connected to the USB port.
Check if the USB device or a cable is damaged.
Check if the USB device is on.
If the USB device is connected via a USB hub, disconnect it and connect the USB device directly to the Subwoofer.
BLUETOOTH device
BLUETOOTH connection cannot be established.
Check that the BLUETOOTH indicator (blue) on the Subwoofer lights up (page 7). Make sure the BLUETOOTH device to be connected is turned on and the BLUETOOTH function is enabled. Move the BLUETOOTH device closer to the Subwoofer. Pair this system and the BLUETOOTH device again. You may need to cancel the pairing with this system using your BLUETOOTH device first.
Pairing cannot be done.
Move the BLUETOOTH device closer to the Subwoofer. Make sure this system is not receiving interference from a wireless LAN device, other 2.4 GHz wireless devices, or a microwave oven. If a device that generates electromagnetic radiation is nearby, move the device away from this system. Pairing may not be possible if other BLUETOOTH devices are present around the system. In this case, turn off the other BLUETOOTH devices.
No sound is output from the connected BLUETOOTH device.
→ Check that the BLUETOOTH indicator (blue) on the Subwoofer lights up (page 7). → Move the BLUETOOTH device closer to the Subwoofer. → If a device that generates electromagnetic radiation, such as a wireless LAN device, other BLUETOOTH devices, or a microwave oven is nearby, move the device away from this system.
→ Remove any obstacle between this system and the BLUETOOTH device or move this system away from the obstacle. → Reposition the connected BLUETOOTH device. → Switch the wireless LAN frequency of any nearby Wi-Fi router or PC to 5 GHz range. → Increase the volume on the connected BLUETOOTH device.
The sound is not in sync with the image.
→ When you are watching movies, you may hear the sound with a slight delay from the image.
Remote control
The remote control does not function.
→ Point the remote control to the remote control sensor on the Subwoofer (pages 6, 11). → Remove any obstacles in the path between the remote control and the Subwoofer. → Replace both batteries in the remote control with new ones, if they are weak. → Make sure you are pressing the correct button on the remote control.
The TV remote control does not work.
→ Install the system so that it does not obstruct the remote control sensor of the TV.
Others
The Control for HDMI function does not work properly.
→ Check the connection with the system (refer to the supplied Startup Guide).
→ Enable the Control for HDMI function on the TV. For details, refer to the operating instructions of your TV. → Wait a while, and then try again. If you unplug the system, it will take a while before operations can be made. Wait for 15 seconds or longer, and then try again. → Make sure the devices connected to the system support the Control for HDMI function. → Enable the Control for HDMI function on the devices connected to the system. For details, refer to the operating instructions of your device. → The type and number of devices that can be controlled by the Control for HDMI function is restricted by the HDMI CEC standard as follows:
- Recording devices (Blu-ray Disc recorder, DVD recorder, etc.): up to 3 devices
- Playback devices (Blu-ray Disc Player, DVD player, etc.): up to 3 devices
- Tuner-related devices: up to 4 devices • Audio system (receiver/headphone): up to 1 device (used by this system)
If "PRTCT" appears in the front panel display of the Subwoofer.
→ Press ⏻ to turn off the system. After the display turns off, disconnect the AC power cord (mains lead) then check that nothing is blocking the ventilation holes of the Subwoofer.
The front panel display of the Subwoofer is not lit.
→ Press DIMMER to set the brightness to "BRIGHT" or "DARK", if set to "OFF" (page 8).
Sensors of the TV do not work properly.
→ The system may block some sensors (such as the brightness sensor), the remote control receiver of your TV, or the emitter for 3D glasses (infrared transmission) of a 3D TV that supports the infrared 3D glass system or the wireless communication. Move the system away from the TV within a range that allow those parts to operate properly. For the locations of the sensors and remote control receiver, refer to the operating instructions supplied with the TV.
The system does not work properly.
→ The system may be in demo mode. To cancel demo mode, reset the system (page 27).
Reset
If the system still does not operate properly, reset the system as follows. Be sure to use the touch keys on the Subwoofer to perform this operation.
1 Hold down INPUT, touch VOL - and ⏻ simultaneously for 5 seconds.
"RESET" appears in the front panel display, and the settings of the menu and sound fields, etc. return to their initial status.
2 Disconnect the AC power cord (mains lead). 3 Reconnect the AC power cord (mains lead), then touch ⏻ to turn on the system.
playable types of files
Music
| Codec Extension | |
| MP3 (MPEG-1 Audio Layer III) | .mp3 |
| AAC .m4a, .mp4, .3gp | |
| WMA9 Standard .wma | |
| LPCM .wav |
Video*
| Codec Extension | |
| Xvid | .avi |
| MPEG4 .avi, .mp4, .3gp |
*HT-RT40 only
Note
- Some files may not play depending on the file format, the file encoding, or the recording condition. • Some files edited on a PC may not play.
- The system does not play coded files such as DRM and Lossless.
- The system can recognize the following files or folders in USB devices:
- up to 200 folders (including root folder) – folder paths up to 128 characters long
- up to 200 files/folders in a single layer
- Some USB devices may not work with this system.
- The system can recognize Mass Storage Class (MSC) devices.
Supported audio formats
Audio formats supported by this system are as follows.
- Dolby Digital • DTS*
- LPCM 2ch
- AAC
* HT-RT4 only
Specifications
Subwoofer (SA-WRT4/SA-WRT40)
Amplifier section
POWER OUTPUT (rated) Front L + Front R: 35 W + 35 W (at 2.5 ohms, 1 kHz, 1% THD)
POWER OUTPUT (reference) Front L/Front R/Surround L/ Surround R: 65 W (per channel at 2.5 ohms, 1 kHz) Center: 170 W (at 4 ohms, 1 kHz) Subwoofer: 170 W (at 4 ohms, 1 kHz)
Inputs USB ANALOG IN TV IN (OPTICAL)
Output HDMI OUT (ARC)
HDMI section
Connector Type A (19pin)
USB section
ψ (USB) port Type A
BLUETOOTH section
Communication system BLUETOOTH Specification version 4.2
Output BLUETOOTH Specification Power Class 1
Maximum communication range Line of sight approx. 25 m 1)
Frequency band 2.4 GHz band (2.4000 GHz - 2.4835 GHz)
Modulation method FHSS (Frequency Hopping Spread Spectrum)
Compatible BLUETOOTH profiles 2) A2DP 1.2 (Advanced Audio Distribution Profile) AVRCP 1.6 (Audio Video Remote Control Profile)
Supported Codecs 3) SBC 4), AAC 5)
Transmission range (A2DP) 20 Hz – 20,000 Hz (Sampling frequency 32 kHz, 44.1 kHz, 48 kHz)
1) The actual range will vary depending on factors such as obstacles between devices, magnetic fields around a microwave oven, static electricity, cordless phone, reception sensitivity, antenna's performance, operating system, software application, etc. 2) BLUETOOTH standard profiles indicate the purpose of BLUETOOTH communication between devices. 3) Codec: Audio signal compression and conversion format 4) Subband Codec 5) Advanced Audio Coding
Speaker section
Speaker system Subwoofer system, Bass reflex
Speaker 160 mm cone type
General
Power requirements 127 V – 240 V AC, 50/60 Hz
Power consumption On: 85 W Standby: 0.5 W or less (Power saving mode) (When "CTRL" in "HDMI>" and "BTSTB" in "BT >" are set to "OFF") Standby: 2.8 W or less 6) (When "CTRL" in "HDMI>" or "BTSTB" in "BT >" is set to "ON")
Dimensions (w/h/d) (approx.) 190 mm × 392 mm × 315 mm
Mass (approx.) 7.8 kg
6) The system will automatically enter Power saving mode when there is no HDMI connection and no BLUETOOTH pairing history, regardless of the settings you have made for "CTRL" in "HDMI>" and "BTSTB" in "BT >".
Bar Speaker (SS-RT4)
Front L/Front R/Center speaker section
Speaker system Full range speaker system, Bass reflex Speaker 40 mm × 100 mm cone type × 3 Dimensions (w/h/d) (approx.) 900 mm × 52 mm × 70 mm Mass (approx.) 2.1 kg
Surround Speakers (SS-SRT4)
Speaker system Full range speaker system, Bass reflex Speaker 65 mm cone type Dimensions (w/h/d) (approx.) 80 mm × 1,070 mm × 70 mm (projecting parts not included) Mass (approx.) 2.7 kg
Design and specifications are subject to change without notice.
On BLUETOOTH communication
Supported BLUETOOTH version and profiles
Profile refers to a standard set of functions for various BLUETOOTH product features. See "BLUETOOTH section" in "Specifications" (page 28) for the BLUETOOTH version and profiles supported by this system.
Effective communication range
BLUETOOTH devices should be used within approximately 10 meters (unobstructed distance) of each other. The effective communication range may become shorter under the following conditions.
- When a person, metal object, wall, or other obstruction is between the devices with a BLUETOOTH connection.
- Locations where a wireless LAN is installed.
- Around microwave ovens that are in use.
- Locations where other electromagnetic waves are generated.
Effects of other devices
BLUETOOTH devices and wireless LAN (IEEE 802.11b/g/n) use the same frequency band (2.4 GHz). When you use a BLUETOOTH device near a device with wireless LAN capability, electromagnetic interference may occur. This could result in lower data transfer rates, noise, or inability to connect. If this happens, try the following remedies:
- Use this system at least 10 meters away from the wireless LAN device.
- Turn off the power to the wireless LAN device when you use a BLUETOOTH device within 10 meters. • Install this system and the BLUETOOTH device as close to each other as possible.
Effects on other devices
The radio waves broadcast by this system may interfere with the operation of some medical devices. Since this interference may result in malfunction, always turn off the power on this system and the BLUETOOTH device in the following locations:
- In hospitals, on trains, in airplanes, at gas stations, and any place where flammable gases may be present. • Near automatic doors or fire alarms.
Note
- This system supports security functions that comply with the BLUETOOTH specification to ensure secure connection during communication using BLUETOOTH technology. However, this security may be insufficient depending on the setting contents and other factors, so always be careful when performing communication using BLUETOOTH technology.
- Sony cannot be held liable in any way for damages or other loss resulting from information leaks during communication using BLUETOOTH technology.
- BLUETOOTH communication is not necessarily guaranteed with all BLUETOOTH devices that have the same profile as this system.
- BLUETOOTH devices connected with this system must comply with the BLUETOOTH specification prescribed by the Bluetooth SIG, Inc., and must be certified to comply. However, even when a device complies with the BLUETOOTH specification, there may be cases where the characteristics or specifications of the BLUETOOTH device make it impossible to connect, or may result in different control methods, display or operation.
- Noise may occur or the audio may cut off depending on the BLUETOOTH device connected with this system, the communications environment, or surrounding conditions.
Press INPUT to select "USB".
Press to select.
"USB" ← "BT" ← "ANALOG" ← "TV"

- WARNING
- ON POWER SOURCES
- RECOMMENDED CABLES
- FOR PRODUCT WITH CE MARKING
- COPYRIGHTS AND TRADEMARKS
- COMPATIBLE IPHONE/IPOD MODELS
- ABOUT THESE OPERATING INSTRUCTIONS
- TABLE OF CONTENTS
- INSTALLING THE SYSTEM
- LISTENING TO THE SOUND
- SOUND ADJUSTMENT
- BLUETOOTH FUNCTIONS
- SETTINGS AND ADJUSTMENTS
- OTHER FUNCTIONS
- ADDITIONAL INFORMATION
- GUIDE TO PARTS AND CONTROLS
- SUBWOOFER
- BLUETOOTH INDICATOR (BLUE)
- ABOUT TOUCH KEYS
- REMOTE CONTROL
- DIMMER
- MENU
- ENTER
- BACK
- ◀◀/▶▶I (PREVIOUS/NEXT/REWIND/FAST FORWARD)
- BASIC CONNECTIONS AND PREPARATION
- MOUNTING THE BAR SPEAKER AND THE SURROUND SPEAKERS ON A WALL
- NOTE
- OPERATING THE SYSTEM USING THE REMOTE CONTROL
- LISTENING TO SOUND FROM THE CONNECTED DEVICES
- PRESS INPUT REPEATEDLY
- TV
- ANALOG
- BT
- USB
- LISTENING TO MUSIC FROM A USB DEVICE
- CONNECT THE USB DEVICE TO THE (USB) PORT
- PRESS INPUT REPEATEDLY TO SELECT "USB
- PRESS / TO SELECT THE CONTENT YOU WANT, THEN PRESS ENTER
- SET "REPT" IN "USB >" (PAGE 19) TO SELECT THE PLAY MODE YOU WANT
- ADJUST THE VOLUME
- ENJOYING SOUND EFFECTS
- SELECTING THE SOUND FIELD (SOUND FIELD)
- CLEARAUDIO
- MOVIE
- MUSIC
- SPORTS
- GAME
- STANDARD
- TIP
- USING THE NIGHT MODE FUNCTION (NIGHT)
- PRESS NIGHT TO SELECT "N.ON
- USING THE CLEAR VOICE FUNCTION (VOICE)
- PRESS VOICE REPEATEDLY
- ADJUSTING THE SUBWOOFER VOLUME
- LISTENING TO MUSIC FROM A BLUETOOTH DEVICE
- PAIRING THIS SYSTEM WITH A BLUETOOTH DEVICE
- LISTENING TO MUSIC FROM THE PAIRED DEVICE
- TO DISCONNECT THE BLUETOOTH DEVICE
- CONNECTING TO A MOBILE DEVICE BY ONE-TOUCH FUNCTION (NFC)
- COMPATIBLE MOBILE DEVICES
- HOLD THE MOBILE DEVICE NEAR TO THE N-MARK ON THE SUBWOOFER UNTIL THE MOBILE DEVICE VIBRATES
- START PLAYBACK OF AUDIO SOURCE ON THE MOBILE DEVICE
- TO STOP PLAYBACK BY ONE-TOUCH FUNCTION
- CONTROLLING THE SYSTEM USING A SMARTPHONE OR TABLET (SONY | MUSIC CENTER)
- USING SONY | MUSIC CENTER
- USING THE SETUP DISPLAY
- MENU LIST
- USING THE CONTROL FOR HDMI FUNCTION
- PREPARING TO USE THE CONTROL FOR HDMI FUNCTION
- SYSTEM POWER OFF FUNCTION
- SYSTEM AUDIO CONTROL FUNCTION
- AUDIO RETURN CHANNEL (ARC)
- ONE-TOUCH PLAY FUNCTION
- USING THE "BRAVIA" SYNC FUNCTION
- SCENE SELECT FUNCTION
- NOTES ON HDMI CONNECTIONS
- SAVING POWER IN STANDBY MODE
- PRECAUTIONS
- ON SAFETY
- ON HEAT BUILDUP
- ON PLACEMENT
- ON OPERATION
- IF YOU ENCOUNTER COLOR IRREGULARITY ON A NEARBY TV SCREEN
- ON CLEANING
- ON HANDLING THE SUBWOOFER
- TROUBLESHOOTING
- GENERAL
- THE SYSTEM TURNS OFF WHEN THE TV IS TURNED OFF
- THE SYSTEM DOES NOT TURN OFF EVEN WHEN THE TV IS TURNED OFF
- SOUND
- NO TV SOUND IS OUTPUT FROM THE SYSTEM
- THE SOUND IS OUTPUT FROM BOTH THE SYSTEM AND THE TV
- NO SOUND OR ONLY A VERY LOW-LEVEL SOUND IS HEARD FROM THE SUBWOOFER
- NO SOUND OR ONLY A VERY LOW-LEVEL SOUND OF THE DEVICE CONNECTED TO THE SYSTEM IS HEARD
- NO SOUND OR ONLY VERY LOW-LEVEL SOUND IS HEARD FROM THE SURROUND SPEAKERS
- THE SURROUND EFFECT CANNOT BE OBTAINED
- USB DEVICE
- THE USB DEVICE IS NOT RECOGNIZED
- BLUETOOTH DEVICE
- BLUETOOTH CONNECTION CANNOT BE ESTABLISHED
- PAIRING CANNOT BE DONE
- NO SOUND IS OUTPUT FROM THE CONNECTED BLUETOOTH DEVICE
- THE SOUND IS NOT IN SYNC WITH THE IMAGE
- THE REMOTE CONTROL DOES NOT FUNCTION
- THE TV REMOTE CONTROL DOES NOT WORK
- OTHERS
- THE CONTROL FOR HDMI FUNCTION DOES NOT WORK PROPERLY
- IF "PRTCT" APPEARS IN THE FRONT PANEL DISPLAY OF THE SUBWOOFER
- THE FRONT PANEL DISPLAY OF THE SUBWOOFER IS NOT LIT
- SENSORS OF THE TV DO NOT WORK PROPERLY
- THE SYSTEM DOES NOT WORK PROPERLY
- RESET
- PLAYABLE TYPES OF FILES
- SUPPORTED AUDIO FORMATS
- SPECIFICATIONS
- SUBWOOFER (SA-WRT4/SA-WRT40)
- AMPLIFIER SECTION
- HDMI SECTION
- USB SECTION
- BLUETOOTH SECTION
- SPEAKER SECTION
- BAR SPEAKER (SS-RT4)
- FRONT L/FRONT R/CENTER SPEAKER SECTION
- SURROUND SPEAKERS (SS-SRT4)
- ON BLUETOOTH COMMUNICATION
- SUPPORTED BLUETOOTH VERSION AND PROFILES
- EFFECTIVE COMMUNICATION RANGE
- EFFECTS OF OTHER DEVICES
- EFFECTS ON OTHER DEVICES
Brand : SONY
Model : HT-RT40
Category : Home Theater System