
STRZA3000ES - AV receiver SONY - Free user manual and instructions
Find the device manual for free STRZA3000ES SONY in PDF.
| Product type | Audio-video receiver |
| Brand | Sony |
| Model | STRZA3000ES |
| Channels | 7.2 channels (front, center, surround, surround back, subwoofer) |
| Output power (RMS) | 100 W per channel (6 ohms, 20 Hz - 20 kHz, 0.09% THD) |
| HDMI connectivity | 6 inputs (1 front) / 2 outputs |
| HDMI compatibility | 4K, HDCP 2.2, Deep Color, x.v.Color, 3D, ARC |
| Supported audio formats | Dolby TrueHD, DTS-HD Master Audio, DSD, Multi-channel Linear PCM |
| Audio functions | D.C.A.C., In-Ceiling Speaker Mode, Sound Optimizer, multiple sound fields |
| Multi-zone | Zone 2 and Zone 3 with dedicated audio and HDMI output |
| Pass-through function | Transmits HDMI signals in standby |
| Ethernet hub | 8 Gigabit ports, 2 PoE ports |
| Automatic calibration | Digital Cinema Auto Calibration (D.C.A.C.) with supplied microphone |
| Dimensions (W × H × D) | 430 × 174 × 410 mm |
| Weight | 13.4 kg |
| Power supply | 120 V AC, 60 Hz |
| Power consumption | 290 W (standby: 0.3 W) |
| Safety | Thermal protection (PROTECTOR message) |
| Maintenance | Clean with a soft dry cloth; do not use solvents |
| Supplied accessories | Remote control RM-AAU210, optimization microphone ECM-AC2, FM/AM antennas, power cord, front cover |
Frequently Asked Questions - STRZA3000ES SONY
User questions about STRZA3000ES SONY
0 question about this device. Answer the ones you know or ask your own.
Ask a new question about this device
Download the instructions for your AV receiver in PDF format for free! Find your manual STRZA3000ES - SONY and take your electronic device back in hand. On this page are published all the documents necessary for the use of your device. STRZA3000ES by SONY.
USER MANUAL STRZA3000ES SONY
©2014 Sony Corporation - Printed in Malaysia
4-537-101-13(1)
STR ZA3000ES/STR ZA2000ES/STR ZA1000ES
Main features of the receiver
Refer to the Help Guide for details of each function.
http://rd1.sony.net/help/ha/strza321/h_uc2/
Compatible with a variety of connections and formats
| Feature Description | |
| 7.2 channels The receiver can output up to 7.2 channels.The receiver supports bi-amplifier connections for front speakers. | |
| Compatible with various standards | The receiver is compatible with various audio formats, such as Dolby TrueHD, DTS-HD Master Audio, DSD, and multi-channel Linear PCM. |
| HDMI (6 input (1 in front), 2 output)(for STR-ZA3000ES/STR-ZA2000ES only)HDMI (5 input, 2 output)(for STR-ZA1000ES only) | You can connect a variety of equipment to the many available HDMI input jacks.One HDMI output jack supports the multi-zone feature, which allows you to output content other than that of the main room.The receiver is compatible with various HDMI standards, such as Deep Color, “x.v.Color,” 4K and 3D transmission, and Audio Return Channel (ARC). |
| 4KAll HDMI jacks can input or output 4K signals. Some HDMI jacks support High-bandwidth Digital Content Protection System Revision 2.2 (HDCP 2.2). Refer to “Specifications” (page 15) for details.You can convert analog audio input signals and tuner audio signals to digital signals and then output them from the HDMI OUT B jack. | |
| Switching hub (for STR-ZA3000ES only) | The receiver is equipped with a switching hub (8 ports) that supports gigabit-speed transfer. Two of the ports support PoE (Power over Ether). |
| Multi-zone You can enjoy in another room music and video content different from the content being played in the main room. | |
| You can enjoy all audio input on a TV or other device connected in zone 2.Digital audio signals input from HDMI IN, OPTICAL IN or COAXIAL IN jack can be output to zone 2 speakers, the ZONE 2 AUDIO OUT jack and the HDMI OUT B jack. | |
Better image and sound quality
| Feature Description | |
| In-Ceiling Speaker Mode | The receiver has a speaker mode to match sound with the screen position even when you use speakers set up at ceiling level. |
| Sound Optimizer | The Sound Optimizer function optimizes audio output in accordance with the volume level. |
| Sound fields You can select from a variety of sound field modes according to speaker connections or input sources. (2CH Stereo, 2ch Analog Direct, A.F.D., etc.) | |
| Digital Cinema Auto Calibration (D.C.A.C.) function | The receiver is equipped with the Digital Cinema Auto Calibration (D.C.A.C.) function. This function allows you to perform automatic calibration and settings of audio parameters to produce optimum sound. |
Useful functions
| Feature Description | |
| Easy and accessible operations | The receiver can display 16 digits on 2 lines, allowing you to make settings without a monitor. |
| The Custom Preset button allows you to call up various settings all at once. | |
| Flexible functions | The Pass Through function outputs HDMI signals to the TV, even when the receiver is in standby mode. |
| The function allows you to play back video and audio mixed from different inputs. | |
Table of contents
Connecting → Quick Setup Guide (separate document)
Main parts and controls 4
Preparation 1: Preparing the receiver and the remote control....8
Preparation 2: Performing Easy Setup....9
Enjoying video/sound from the connected device.....10
Using the menu on the TV screen 11
Changing the settings 12
Troubleshooting.... 13
Specifications 15
To find out how to use the receiver

Quick Setup Guide (separate document)
This manual describes connections for the receiver.
Startup Guide (this manual)
This manual introduces features, default settings, and basic functions of the receiver. Visit the Help Guide for complete instructions.

Help Guide (online manual)
The Help Guide provides the following information and instructions online. Visit the Help Guide using a computer or mobile device.
http://rd1.sony.net/help/ha/strza321/h_uc2/


Reference Guide (separate document)
This manual covers safety regulations and precautions.
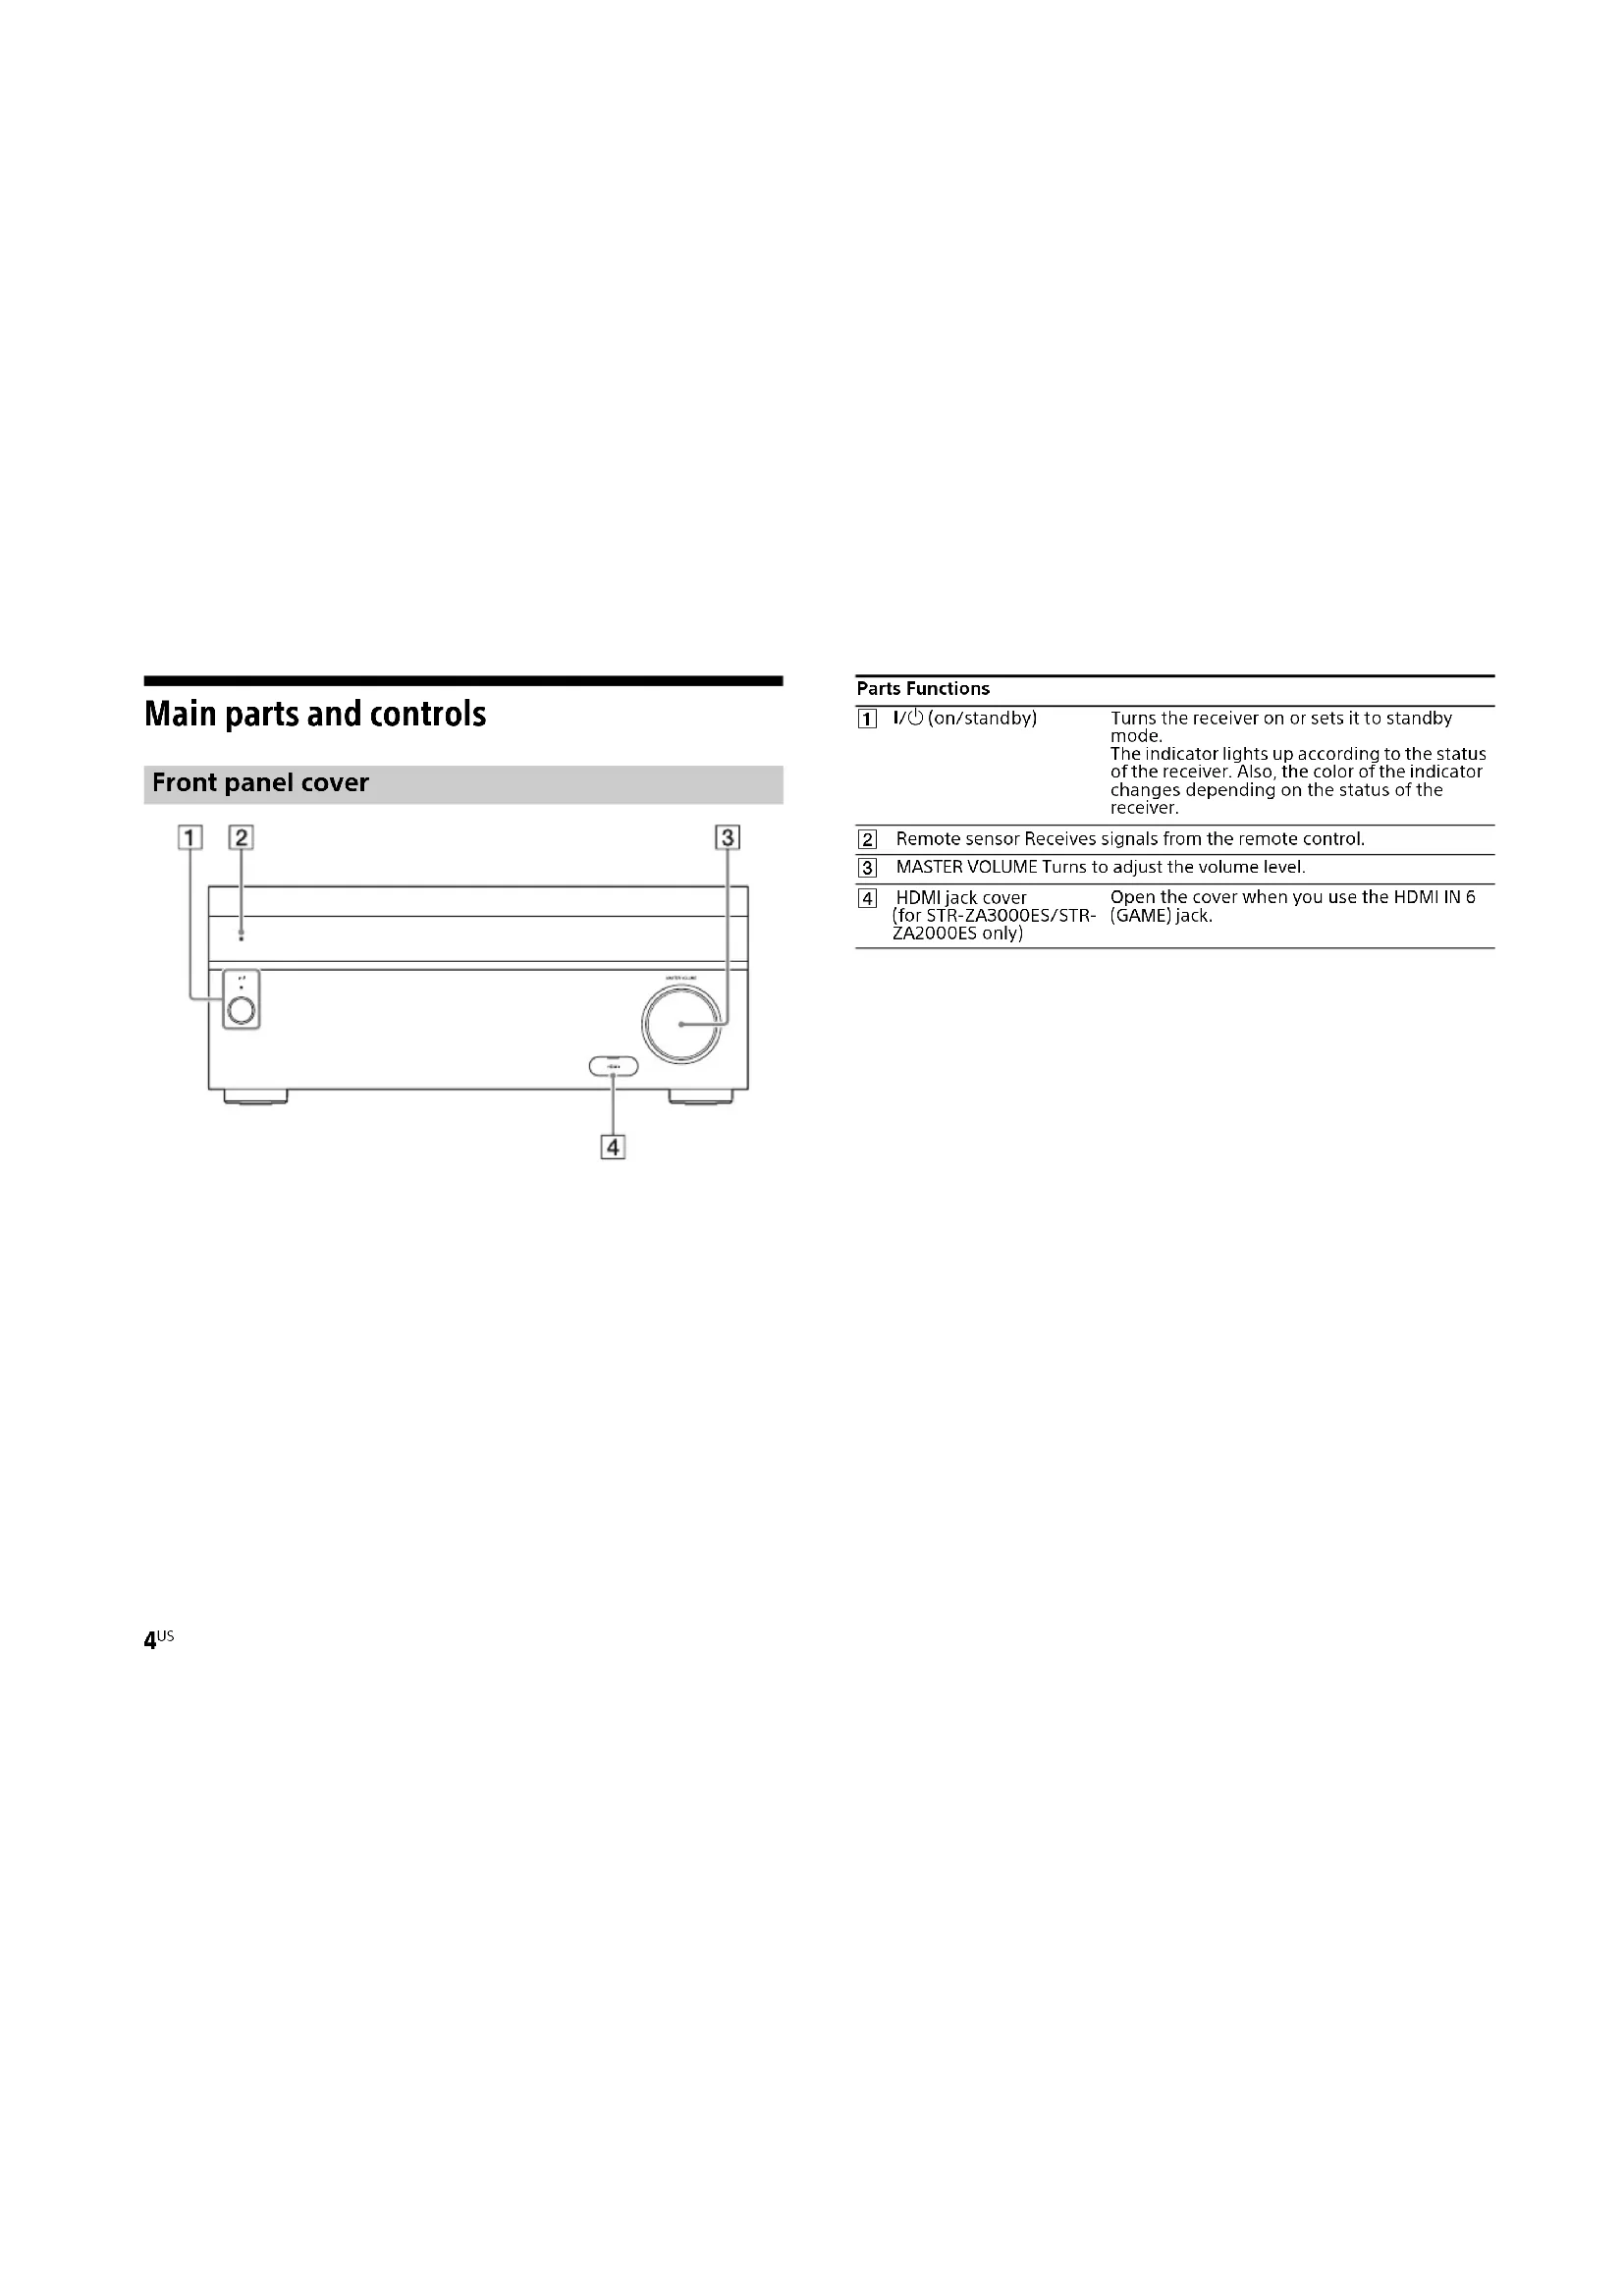
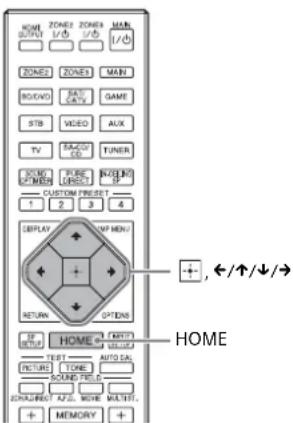
Main parts and controls
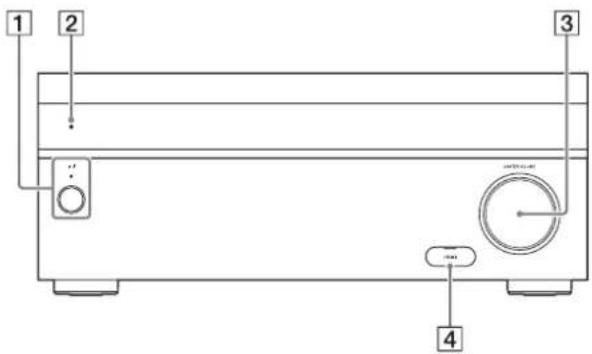
Front panel cover
Parts Functions
| 1 | I/⏻(on/standby) | Turns the receiver on or sets it to standby mode.The indicator lights up according to the status of the receiver. Also, the color of the indicator changes depending on the status of the receiver. |
| 2 | Remote sensor Receives signals from the remote control. | |
| 3 | MASTER VOLUME Turns to adjust the volume level. | |
| 4 | HDMI jack cover (for STR-ZA3000ES/STR-ZA2000ES only) | Open the cover when you use the HDMI IN 6 (GAME) jack. |
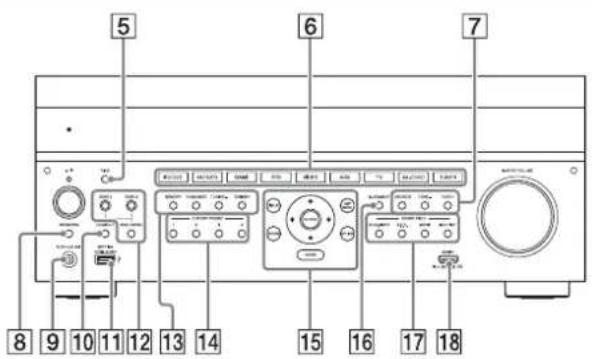
Front panel
Parts Functions
| 5 | PING Displays the IP address and MAC address on the display panel. |
| 6 | Input buttons Selects the device you want to use. |
| 7 | TONE MODE, TONE+/- Press to adjust the bass/treble level of the speaker. |
| 8 | SPEAKERS Switches the front speakers to OFF, A, B or A+B. |
| 9 | AUTO CAL MIC jack Connect the supplied optimizer microphone for "Auto Calibration" to this jack. |
| 10 | HDMI OUT Switches the output for two monitors connected to the HDMI OUT A and HDMI OUT B jacks. |
| 11 | SETTING (USB) port) Used for maintenance and service. |
| 12 | ZONE CONTROL (ZONE2, ZONE3) Selects the location to be controlled. |
| 13 | Tuner control buttons Used for tuner operations. |
| 14 | CUSTOM PRESET (1, 2, 3, 4) Saves and recalls various settings for the receiver. |
| 15 | Menu operation buttons Used for menu operations displayed on the TV screen and the display panel of the receiver.HOMEDisplays the home menu on the TV screen.AMP MENUDisplays the menu on the display panel of the receiver to operate the receiver. |
| 16 | IN-CEILING SP Activates the In-Ceiling Speaker Mode. |
| 17 | SOUND FIELD (2CH/ A.DIRECT, A.F.D., MOVIE, MULTI ST.) Selects the sound field you want. |
| 18 | HDMI IN 6 (GAME) jack (for STR-ZA3000ES/STR- ZA2000ES only) Connect to a video game console. The video and sound from your video game console is input. |
continued
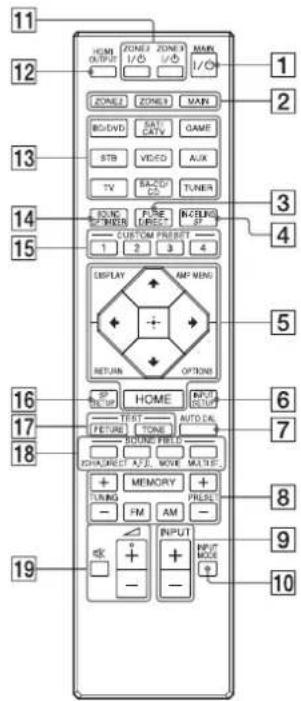
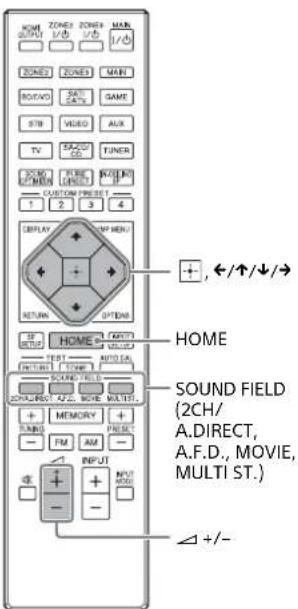
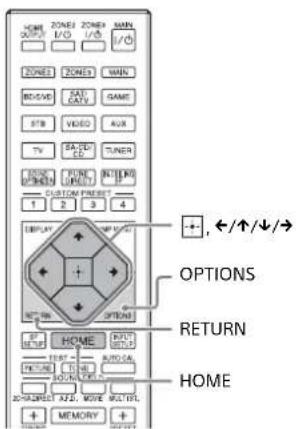
Remote Control
Parts Functions
| 1 | MAIN I/○(on/standby) | Turns the receiver on or sets it to standby mode. |
| 2 | ZONE2, ZONE3, MAIN Selects the location to be controlled. | |
| 3 | PURE DIRECT Press to use the Pure Direct function. | |
| 4 | IN-CEILING SP Activates the In-Ceiling Speaker Mode. | |
| 5 | Menu operation buttons Used for menu operations displayed on the TV screen and the display panel of the receiver.HOMEDisplays the home menu on the TV screen.AMP MENUDisplays the menu on the display panel of the receiver to operate the receiver. | |
| 6 | INPUT SETUP Displays the Input Setup menu. | |
| 7 | AUTO CAL Press to perform Auto Calibration. | |
| 8 | Tuner control buttons Used for tuner operations. | |
| 9 | INPUT +/- Press + or - to select the input source. | |
| 10 | INPUT MODE Press to select the input mode. | |
| 11 | ZONE2 I/○, ZONE3 I/○ | Turns the receiver in zone 2 or zone 3 on or sets it to standby mode. |
| 12 | HDMI OUTPUT Switches the output for two monitors connected to the HDMI OUT A and HDMI OUT B jacks. | |
| 13 | Input buttons Select the device you want to use.When you press any of the input buttons, the receiver turns on. | |
| 14 | SOUND OPTIMIZER Press to use the Sound Optimizer to enjoy clear and dynamic sound at low volume levels. | |
| 15 | CUSTOM PRESET (1, 2, 3, 4) | Saves and recalls various settings for the receiver. |
| 16 | SP SETUP | Displays the Speaker Setup menu. |
| 17 | TEST (PICTURE, TONE) | Press to output the test picture or test tone. |
Parts Functions
| 18 | SOUND FIELD (2CH/A.DIRECT, A.F.D., MOVIE,MULTI ST.) | Selects the sound field you want. |
| 19 | + () / - , ※ | Adjusts the volume level. |
* The △ + button has a tactile dot. Use the tactile dot as a reference when operating the receiver.
Preparation 1: Preparing the receiver and the remote control
1 Insert batteries into the remote control.
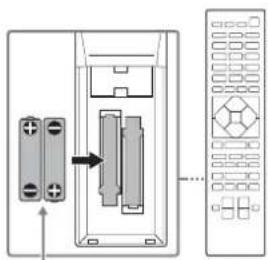
natural_image
Diagram showing a device with two connectors and a control panel (no text or symbols)Batteries
2 Connect the supplied AC power cord (mains lead) to the AC IN terminal on the receiver firmly, then connect the AC power cord (mains lead) to a wall outlet.
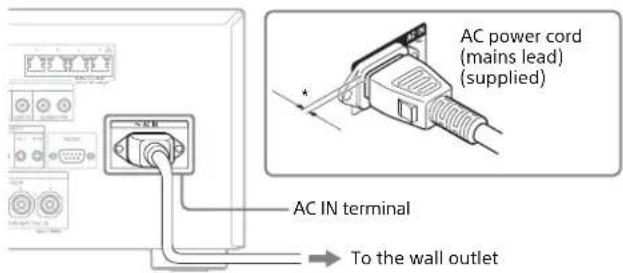
* Space remains between the plug and the rear panel even when the power cord (mains lead) is inserted firmly. The cord is supposed be connected this way. This is not malfunction.
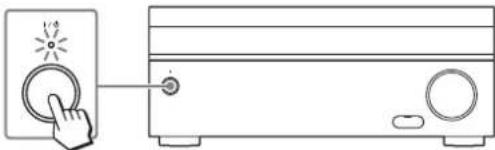
3 Press I/ + to turn the AV receiver on.
natural_image
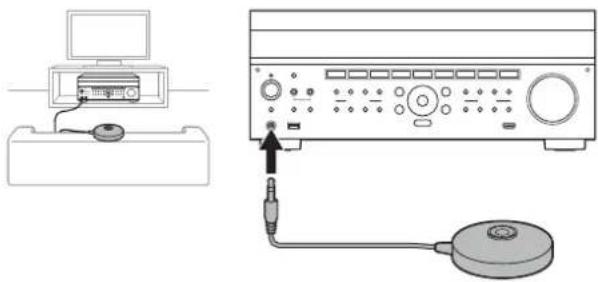
Line drawing of a hand pressing a button on a device, next to a front panel with buttons and a circular knob (no text or symbols)4 Place the supplied optimizer microphone at ear level about where you would normally sit.
The optimizer microphone is used for setting the speakers (Auto Calibration) in step 2 (Easy Setup).
Perform this step after removing the front cover.
natural_image
Diagram showing a computer setup with an attached device and connected to a power supply unit (no text or symbols visible)Note
Fully insert the plug of the optimizer microphone into the AUTO CAL MIC jack.
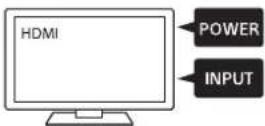
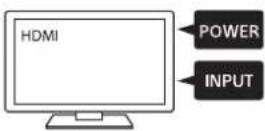
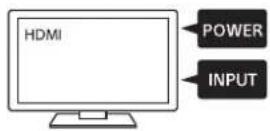
5 Turn the TV on, and then switch the input of the TV to that which the receiver is connected.
Preparation 2: Performing Easy Setup
The Easy Setup screen appears on the TV screen when you turn on the receiver for the first time or after the receiver is initialized.
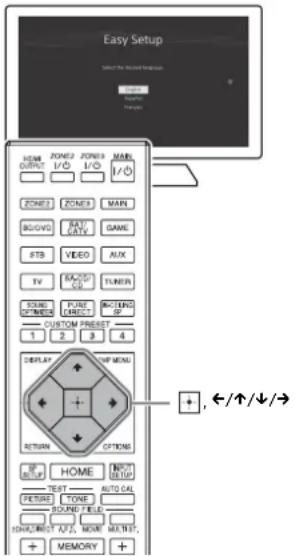
1 Press ←/↑/↓/→ to select the language for the messages on the screen, and then press
2 Set up the receiver in accordance with the instructions on the Easy Setup screen.
Note
If the Easy Setup screen does not appear or you want to display the Easy Setup screen manually, you can display it by selecting [Setup] - [Easy Setup] from the home menu.
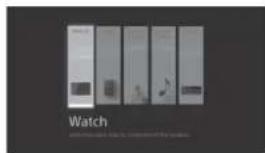
Enjoying video/sound from the connected device
1 Turn the TV on, and then switch the input of the TV to that which the receiver is connected.
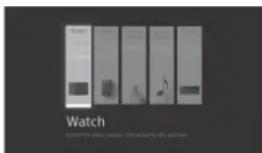
2 Press HOME. The home menu is displayed on the TV screen.
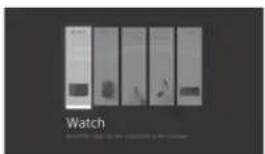
3 Press ←/↑/↓/→ repeatedly to select [Watch] or [Listen], and then press 📄 The menu item list appears on the TV screen.
4 Select the device you want to use.
5 Turn on the device and start playback.
6 Press +/ - to adjust the volume. You can also use MASTER VOLUME on the receiver.
7 Press 2CH/A.DIRECT, A.F.D., MOVIE or MULTI ST. to enjoy the surround sound. You can also use 2CH/A.DIRECT, A.F.D., MOVIE or MULTI ST. on the receiver.
Using the menu on the TV screen
You can display the menu of the receiver on the TV screen.
1 Turn the TV on, and then switch the input of the TV to that which the receiver is connected.
2 Press HOME.
The home menu is displayed on the TV screen.
3 Press ←/↑/↓/→ repeatedly to select the menu you want to use, and then press to enter the menu.
Home menu items
Watch:
Select to display video from the connected device.
Listen:
Select to listen to sound from the connected device.
Custom Preset:
Select to save various settings for the receiver and recall those settings.
Sound Effects:
Select to enjoy sound effects.
Setup:
Select to adjust the various settings for the receiver.
Hints
- When [OPTIONS] appears in the lower right portion of the TV screen, you can display the function list by pressing OPTIONS and selecting a related function.
•To return to the previous screen, press RETURN.
• To exit the menu, press HOME to display the home menu, and then press HOME again.
Changing the settings
1 Turn the TV on, and then switch the input of the TV to that which the receiver is connected.
2 Press HOME.
The home menu is displayed on the TV screen.
3 Press ←/↑/↓/→ repeatedly to select [Setup], and then press ☐.
4 Select the settings you want to configure.
Example:
To select a sound field
You can select from a variety of sound field modes according to speaker connections or input sources. Select [Setup] - [Audio Setup] - [Sound Field].
- 2CH Stereo
- 2ch Analog Direct
A.F.D. - HD-D.C.S.
- Pro Logic II
- Pro Logic IIx
- Neo:6
- Multi Stereo
For Details on each mode, visit the Help Guide. http://rd1.sony.net/help/ha/strza321/h_uc2/
Troubleshooting
The following troubleshooting page covers frequently asked questions.
Visit the Help Guide for detailed examples.
http://rd1.sony.net/help/ha/strza321/h_uc2/
You can search by a keyword using the online troubleshooting guide.
If you still cannot find a solution, consult your nearest Sony dealer.
General
The top of the receiver is hot.
Phenomenon is specific to this amplifier. This is not a malfunction. If "Control for HDMI" or "Network Standby" is set to "On," or "Pass Through" is set to "On" or "Auto," the power for zone 2 is turned on, the top of the receiver may become hot even while the receiver is in standby mode. This condition occurs because current is flowing in the internal circuits of the receiver, and this is normal.
Video
There is no picture or an unclear picture appears on the TV screen or monitor, regardless of type of picture.
→ Select the appropriate input on the receiver (pages 5, 6).
→ Set your TV to the appropriate input mode.
→ Make sure that cables are correctly and securely connected to equipment.
→ Depending on the playback equipment, equipment may need to be set up. Refer to the operating instructions supplied with the equipment.
Specific type of image is not output or corrupted.
HDMI output
The output of the HDMI video signals of the receiver may be set to "OFF." In this case, select "HDMI OUT A" or "HDMI OUT B" using the HDMI OUT button on the receiver (page 5) or HDMI OUTPUT button on the remote control (page 6).
→ The GUI display will not be output from the HDMI OUT B jack.
4K image
→ Depending on the TV or video equipment, 4K images may not be displayed. Check the video capability and setting of your TV or video device. Also, make sure to connect to the receiver to an HDMI input jack of a TV or video equipment supporting 4K. You have to connect an HDMI cable to an HDMI jack that supports HDCP 2.2 when you use a playback device for 4K resolution video content, etc.
Audio
There is no sound, no matter which equipment is selected, or only a very low-level sound is heard.
→ Check that the speakers and equipment are connected correctly.
→ Check that both the receiver and all equipment are turned on.
→ Check that MASTER VOLUME control is not set at - dB. Try to set it at about -40 dB.
→ Check that SPEAKERS is not set to OFF (page 5).
→ Try pressing the input button on the remote control to select the equipment of your choice.
HDMI input
→ When "2ch Analog Direct" is being used, the sound is not output. Use other sound field (page 12).
→ Depending on the playback equipment, equipment may need to be set up. Refer to the operating instructions supplied with the equipment.
Coaxial/optical input
→ When "2ch Analog Direct" is being used, the sound is not output. Use other sound field (page 12).
Error messages
You can check the status of the receiver by the message. See the following to solve the problem. If any problem persists, consult your nearest Sony dealer.
PROTECTOR
→ The receiver is covered and ventilation holes are blocked. The receiver will automatically turn off after a few seconds. Remove the object covering the upper panel of the receiver and turn on the power again.
continued
UPDATE FAILED
→ Insert a USB flash drive on which the package file for updating the receiver is saved, and then turn the receiver off and turn it on again.
List of messages after Auto Calibration measurements
| Display Explanation | |
| Code 31 Front speakers are not selected properly. Select the front speakers using SPEAKERS and perform the Auto Calibration again (page 5). | |
| Code 32, Code 33 | Speakers were not detected or not connected properly.None of the front speakers are connected or only one front speaker is connected.Either the surround left or surround right speaker is not connected.A surround back speaker is connected only to the SPEAKERS SURROUND BACK (FRONT HIGH/FRONT B/BI-AMP/ZONE 2) R terminal. If connecting only one surround back speaker, connect it to the SPEAKERS SURROUND BACK (FRONT HIGH/FRONT B/BI-AMP/ZONE 2) L terminal.Either the front high left or front high right speaker is not connected.The optimizer microphone is not connected. Make sure that the optimizer microphone is connected properly and perform the Auto Calibration again.If the optimizer microphone is connected properly but the error code still appears, the optimizer microphone cable may be damaged. |
| Warning 40 The measurement process has been completed and a high noise level has been detected. You may be able to achieve better results if you try the process again in a quiet environment. | |
| Warning 41, Warning 42 | The input from the microphone is too large.The distance between the speaker and the microphone may be too small. Set them further apart and perform the measurement again. |
| Warning 43 The distance and position of a subwoofer cannot be detected. This may be caused by noise. Try performing the measurement in a quiet environment. | |
| NO WARNING There is no warning information. | |
Specifications
AUDIO POWER SPECIFICATIONS
POWER OUTPUT AND TOTAL HARMONIC DISTORTION:
STR-ZA3000ES
With 6 ohm loads, both channels driven, from 20 – 20,000 Hz; rated 100 watts per channel minimum RMS power, with no more than 0.09% total harmonic distortion from 250 milliwatts to rated output.
STR-ZA2000ES
With 6 ohm loads, both channels driven, from 20 – 20,000 Hz; rated 95 watts per channel minimum RMS power, with no more than 0.09% total harmonic distortion from 250 milliwatts to rated output.
STR-ZA1000ES
With 6 ohm loads, both channels driven, from 20 – 20,000 Hz; rated 90 watts per channel minimum RMS power, with no more than 0.09% total harmonic distortion from 250 milliwatts to rated output.
Amplifier section
STR-ZA3000ES
Rated Power Output at Stereo Mode (6 ohms 20 Hz – 20 kHz, THD 0.09%): 100 W + 100 W
Reference Power Output at Stereo Mode (8 ohms 20 Hz - 20 kHz, THD 0.09%): 80 W + 80 W
Reference Power Output
(6 ohms 1 kHz, THD 0.9%)
FRONT: 120 W + 120 W
CENTER: 120 W
SURROUND: 120 W + 120 W
(8 ohms 1 kHz, THD 0.9%)
FRONT: 110 W + 110 W
CENTER: 110 W
SURROUND: 110 W + 110 W
Reference Power Output at Surround Mode ^3)
(6 ohms, 1 kHz, THD 0.9%)
150 W per channel
STR-ZA2000ES
Rated Power Output at Stereo Mode (6 ohms 20 Hz - 20 kHz, THD 0.09%): 95 W + 95 W
Reference Power Output at Stereo Mode (8 ohms 20 Hz - 20 kHz, THD 0.09%): 75 W + 75 W
Reference Power Output
(6 ohms 1 kHz, THD 0.9%)
FRONT: 120 W + 120 W
CENTER: 120 W
SURROUND: 120 W + 120 W
(8 ohms 1 kHz, THD 0.9%)
FRONT: 100 W + 100 W
CENTER: 100 W
SURROUND: 100 W + 100 W
Reference Power Output at Surround Mode ^3)
(6 ohms, 1 kHz, THD 0.9%)
150 W per channel
STR-ZA1000ES
POWER OUTPUT1) 2)
Rated Power Output at Stereo Mode (6 ohms 20 Hz – 20 kHz, THD 0.09%): 90 W + 90 W
Reference Power Output at Stereo Mode (8 ohms 20 Hz - 20 kHz, THD 0.09%): 70 W + 70 W
Reference Power Output
(6 ohms 1 kHz, THD 0.9%)
FRONT: 120 W + 120 W
CENTER: 120 W
SURROUND: 120 W + 120 W
(8 ohms 1 kHz, THD 0.9%)
FRONT: 90 W + 90 W
CENTER: 90 W
SURROUND: 90 W + 90 W
Reference Power Output at Surround Mode ^3)
(6 ohms, 1 kHz, THD 0.9%)
150 W per channel
1) Measured under the following conditions: Power requirements: 120 V AC, 60 Hz
2) Depending on the sound field settings and the source, there may be no sound output.
3) Reference power output for front, center, surround, surround back speakers.
Frequency response ^4)
| SA-CD/CD, TV, AUX, VIDEO 10 Hz – 100 kHz ± 3 dB |
Inputs (Analog)
| SA-CD/CD, TV, AUX, VIDEO Sensitivity: 150 mV |
| Impedance: 50 kohms |
| S/N ^4 : 105 dB (A, 20 kHz LPF, 500 mV) |
4) When "2ch Analog Direct" is being used.
Inputs (Digital)
| IN (BD/DVD) (Coaxial) Impedance: 75 ohmsS/N: 96 dB (A, 20 kHz LPF) |
| IN 1 (AUX), IN 2 (TV) (Optical) S/N: 96 dB(A, 20 kHz LPF) |
Outputs
| ZONE2, ZONE 3 (AUDIO OUT) Voltage: 2 V | |
| Impedance: 1 kohm | |
| STR-ZA3000ES | |
| FRONT L/R, CENTER, SURROUND L/R, SURROUND BACK L/R, SUBWOOFER | Voltage: 2 V |
| Impedance: 1 kohm | |
| STR-ZA2000ES/STR-ZA1000ES | |
| SUBWOOFER Voltage: 2 V | |
| Impedance: 1 kohm | |
FM tuner section
Tuning range
87.5 MHz - 108.0 MHz
Antenna (aerial)
FM wire antenna (aerial)
Antenna (aerial) terminals
75 ohms, unbalanced
AM tuner section
| Tuning scale Tuning range |
| 10 kHz step 530 kHz – 1,710 kHz |
| 9 kHz step 531 kHz – 1,710 kHz |
Antenna (aerial)
Loop antenna (aerial)
Video section
Inputs/Outputs
Video: 1 Vp-p, 75 ohms
COMPONENT VIDEO:
Y: 1 Vp-p, 75 ohms
P_B : 0.7 Vp-p, 75 ohms
P_R : 0.7 Vp-p, 75 ohms
80 MHz HD Pass Through
HDMI Video
Input/Output (HDMI Repeater block)
All HDMI IN/OUT jacks support 4K resolution.
The following HDMI jacks support High-bandwidth Digital Content
Protection System Revision 2.2 (HDCP 2.2)
STR-ZA3000ES
HDMI IN 2/IN 3, HDMI OUT A/OUT B
STR-ZA2000ES/STR-ZA1000ES
HDMI IN 2, HDMI OUT A
| Format 2D | 3D | |||
| Frame packing | Side-by-Side (Half) | Over-Under (Top-and-Bottom) | ||
| 4096 × 2160p @ 59.94/60 Hz ^-1 | ○ | - | - | - |
| 4096 × 2160p @ 50 Hz ^-1 | ○ | - | - | - |
| 4096 × 2160p @ 23.98/24 Hz ^-2 | ○ | - | - | - |
| 3840 × 2160p @ 59.94/60 Hz ^-1 | ○ | - | - | - |
| 3840 × 2160p @ 50 Hz ^-1 | ○ | - | - | - |
| 3840 × 2160p @ 29.97/30 Hz ^-2 | ○ | - | - | - |
| 3840 × 2160p @ 25 Hz ^-2 | ○ | - | - | - |
| 3840 × 2160p @ 23.98/24 Hz ^-2 | ○ | - | - | - |
| 1920 × 1080p @ 59.94/60 Hz | ○ | - | ○ | ○ |
| 1920 × 1080p @ 50 Hz | - | ○ | ○ | |
| 1920 × 1080p @ 29.97/30 Hz | ○ | ○ | ○ | |
| 1920 × 1080p @ 25 Hz | ○ | ○ | ○ | |
| 1920 × 1080p @ 23.98/24 Hz | ○ | ○ | ○ | |
| 1920 × 1080i @ 59.94/60 Hz | ○ | ○ | ○ | |
| 1920 × 1080i @ 50 Hz | ○ | ○ | ○ | |
| 1280 × 720p @ 59.94/60 Hz | ○ | ○ | ○ | |
| 1280 × 720p @ 50 Hz | ○ | ○ | ○ | |
| 1280 × 720p @ 29.97/30 Hz | ○ | ○ | ○ | |
| 1280 × 720p @ 23.98/24 Hz | ○ | ○ | ○ | |
| 720 × 480p @ 59.94/60 Hz | ○ | - | - | - |
| 720 × 576p @ 50 Hz | ○ | - | - | |
| 640 × 480p @ 59.94/60 Hz | ○ | - | - | - |
*1 YCbCr 4:2:0/Supported 8-bit only
^2 Supported 8-bit only
General
Power requirements
120 V AC, 60 Hz
Power consumption
290 W
Power consumption (during standby mode)
0.3 W (When "Control for HDMI," "Pass Through," "Network
Standby," and "External Control" are set to "Off," and the power for zone 2/zone 3 is turned off.)
Dimensions
430 mm × 174 mm × 410 mm (17 in × 6 18 in × 16 14 in) (width/height/depth) including projecting parts and controls
Mass (including the front cover) (Approx.)
STR-ZA3000ES
13.4 kg (29 lb 9 oz)
STR-ZA2000ES
13.0 kg (28 lb 11 oz)
STR-ZA1000ES
12.3 kg (27 lb 2 oz)
Supplied accessories
Startup Guide (this manual)
Quick Setup Guide (1)
Reference Guide (1)
Optimizer microphone (ECM-AC2) (1)
FM wire antenna (aerial) (1)
AM loop antenna (aerial) (1)
AC power cord (mains lead) (1)
Remote control (RM-AAU210) (1)
R03 (size-AAA) batteries (2)
Front cover (1)
Design and specifications are subject to change without notice.
natural_image
Diagram showing a device panel with two connectors and an external control panel (no text or symbols)Piles
natural_image
Line drawing of a hand pressing a button on an air conditioner unit (no text or symbols)natural_image
Diagram showing a computer setup with an attached device and connected to a power supply unit (no text or symbols visible)Remarque
87,5 MHz - 108,0 MHz
Antenne
Antenne fil FM
Bornes d'antenne
13,0 kg (28 lb 11 oz)
STR-ZA1000ES
12,3 kg (27 lb 2 oz)
Accessoires fournis
natural_image
Diagram showing a device with two connectors and an external control panel (no text or symbols)Baterías
natural_image
Line drawing of a hand pressing a button on a device, next to a front panel with buttons and a circular knob (no text or symbols)natural_image
Diagram showing a computer setup with an attached device and connected to a power supply unit (no text or symbols visible)Nota
87,5 MHz - 108,0 MHz
Antena
Antena FM de cable
Terminales de antena
75 ohms, no equilibrado
80 MHz HD Pass Through
Video HDMI
Entrada/Salida (bloque repetidor HDMI)
13,0 kg (28 lb 11 oz)
STR-ZA1000ES
12,3 kg (27 lb 2 oz)
- Main features of the receiver
- Table of contents
- To find out how to use the receiver
- Quick Setup Guide (separate document)
- Startup Guide (this manual)
- Help Guide (online manual)
- Reference Guide (separate document)
- Main parts and controls
- Remote Control
- Preparation 1: Preparing the receiver and the remote control
- Preparation 2: Performing Easy Setup
- Note
- Enjoying video/sound from the connected device
- Using the menu on the TV screen
- Press HOME.
- Home menu items
- Watch:
- Custom Preset:
- Sound Effects:
- Hints
- Changing the settings
- Example:
- To select a sound field
- Troubleshooting
- General
- Video
- HDMI output
- 4K image
- Audio
- HDMI input
- Coaxial/optical input
- Error messages
- PROTECTOR
- UPDATE FAILED
- Specifications
- AUDIO POWER SPECIFICATIONS
- POWER OUTPUT AND TOTAL HARMONIC DISTORTION:
- STR-ZA3000ES
- STR-ZA2000ES
- STR-ZA1000ES
- Amplifier section
- FM tuner section
- Video section
- HDMI Video
- Input/Output (HDMI Repeater block)
- Supplied accessories
- Accessoires fournis
- Video HDMI
- Entrada/Salida (bloque repetidor HDMI)
Brand : SONY
Model : STRZA3000ES
Category : AV receiver