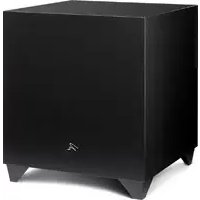
Dynamo 800X - Subwoofer Martin Logan - Free user manual and instructions
Find the device manual for free Dynamo 800X Martin Logan in PDF.



| Product Type | Active subwoofer |
| Brand | Martin Logan |
| Model | Dynamo 800X |
| Frequency Response | 24-200 Hz ± 3 dB (anechoic, LFE mode) |
| Woofer | 10-inch (25.4 cm) polypropylene, high excursion, anti-resonant mount |
| Amplifier | 300 watts RMS (600 watts peak) |
| Dimensions (H x W x D) - Forward orientation | 37.1 x 31.5 x 32.4 cm (14.6 x 12.4 x 12.7 inches) |
| Dimensions (H x W x D) - Downward orientation | 34.8 x 31.5 x 33.3 cm (13.7 x 12.4 x 13.1 inches) |
| Weight | 13.4 kg (29.5 lb) |
| Power Consumption | Typical: 70 W, Max: 360 W, Standby: 0.5 W, Idle: 10 W |
| Power Supply | AC, according to country of purchase (IEC plug) |
| Built-in Controls | Level (min-max), Local/App setting, Power Mode (On/Trigger/Auto) |
| Bluetooth App Controls | Volume (-40 to +2 dB), low-pass filter (35-120 Hz, 3rd/4th order), phase (0-180°), polarity, listening modes (Music/Night/Movie), 20-30 Hz level (±10 dB), ARC enable, tone sweep (20-120 Hz) |
| Audio Inputs | RCA line (left, right and LFE), speaker level (banana jacks left/right) |
| Additional Inputs | USB Micro-B (firmware update/ARC), 12V trigger (3.5 mm, 5-24 V DC), SwT-X wireless module (optional) |
| Room Correction | Anthem Room Correction (ARC) built-in, via mobile app or computer |
| Feet | Rubber with removable ETCM (Energy Transfer Couplers) spikes |
| Break-in | Approximately 50 hours at average listening level for optimal performance |
| Cleaning | Clean cloth or soft brush; do not use any liquids |
| Warranty | Automatic 90-day limited warranty, extendable to 3 years upon registration |
| General Information | Designed for 2-channel and multichannel system integration; compatible with ARC and control app |
Frequently Asked Questions - Dynamo 800X Martin Logan
User questions about Dynamo 800X Martin Logan
0 question about this device. Answer the ones you know or ask your own.
Ask a new question about this device
Download the instructions for your Subwoofer in PDF format for free! Find your manual Dynamo 800X - Martin Logan and take your electronic device back in hand. On this page are published all the documents necessary for the use of your device. Dynamo 800X by Martin Logan.
USER MANUAL Dynamo 800X Martin Logan
Serial Numbers: Record your serial numbers here for easy reference. You will need this information when filling out your warranty registration. Your serial number is located near the bottom of the backplate and on the shipping container.
Settings:
Volume [level]:
Low Pass Filter:
Phase:
20-30Hz Level:
A/V Processor Bass Management Settings:
Main Speaker Size: (large recommended for full range speakers)
Center Speaker Size: (small recommended)
Surround Speaker Size: (small recommended)
Level:
HighPass:
LowPass:
Numéro de série
Thank you—to you the MartinLogan owner,
for loving what we do,
and making it possible for us to do what we love.
Overview of Controls and Connections 2
Controls 2
Audio Signal Connections 3
Wireless Audio Signal Connection 4
AC Power Connection 4
Break-In. 4
Overview of the Subwoofer Control App 5
The Logo Button 5
The Menu Bar 5
Settings: Volume 6
Settings: Low Pass Filter 6
Settings: Phase 7
Settings: Listening Modes 8
Settings: 20-30Hz Level 8
Settings: Room Correction. 8
Settings: Passcode. 8
Settings: Rename. 8
Settings: Reset 8
Connecting the Subwoofer and Setting Controls . . 9
Before Connecting the DYNAMO 9
2-Channel Mode 9
Multi-Channel Mode 10
Simultaneous 2-Channel/Multi-Channel Mode 12
Using Speaker Level Inputs 14
SWT-X Wireless Systems 15
SWT-X Status LEDs and Power 15
Placement 16
Subwoofer Position 16
www.martinlogan.com/subsetup 16
Ask Your Dealer 16
Enjoy Yourself. 16
Installing in a Cabinet 16
Changing Woofer Orientation. 17
Room Acoustics 18
Your Room. 18
Terminology 18
Solid Footing 18
Home Theater 19
Anthem Room Correction (ARC™) Setup 20
About ARC 20
Before You Begin 20
ARC Connection (Mobile Device). 20
Running ARC (Mobile Device) 20
ARC Connection (Computer) 21
Running ARC (Computer) 21
Frequently Asked Questions and Troubleshooting 22
Frequently Asked Questions. 22
Troubleshooting 22
Control App Troubleshooting. 23
ARC Troubleshooting 23
General Information 24
Warranty and Registration 24
Service 24
Specifications. 26
www.martinlogan.com/subsetup 44
Foires aux questions. 50
Dépannage 51
Congratulations! You have invested in one of the world's premier subwoofoers.
MartinLogan DYNAMO subwoofores represent the extension of an intensive, dedicated team research program directed toward establishing a world class line of reference subwoofores using leading-edge technology, without compromising durability, reliability, craftsmanship or aesthetics.
DYNAMO subwoofoers feature a high-excursion driver to achieve deep, tight, well-defined bass and a powerful amplifier to drive the output stage with precision and extremely high efficiency. Low-pass filtering and phase control have been designed to make integrating the DYNAMO subwoofer with MartinLogan and non-MartinLogan products both seamless and simple.
DYNAMO subwoofoers are designed with a Bluetooth control system to simplify the setup process. Additionally, DYNAMO subwoofoers features the ability to connect to Anthem Room Correction™ technology (sold separately). ARC measures acoustic output within your room and optimizes the subwoofer's performance within your unique listening environment.
The materials in your new subwoofer are of the highest quality and will provide years of enduring enjoyment and deepening respect. The cabinet is constructed from the finest composite material for acoustical integrity and is finished with an attractive custom coating.
This User's Manual will explain in detail the operation of your subwoofer and the philosophy applied to its design. A clear understanding will insure that you obtain maximum performance and pleasure from this most exacting subwoofer.
Hereby, SVI Holdings (US), Inc.'s declares that this DYAMMO 600X, DYAMMO 800X, DYAMMO 1100X, or DYAMMO 1600X ments and other relevant provisions of the following EU Compliance Directive Information.
- Conforms to European Union Low Voltage Directive 2014/35/EU;
European Union EMC Directive 2014/30/EU
European Union Radio Equipment Directive (RED) 2014/53/EU.
European Union Eco-Design Directive 2009/125/EC
European Union WEEE Directive 2012/19/EU
European Union Restriction of Hazardous Substances Recast (RoHS2) Directive 2011/65/EU
European Union Registration, Evaluation, Authorization and Restriction of Chemicals (REACH) Directive 2006/121/EC;
You may obtain a free copy of the Declaration of Conformity by contacting your dealer, distributor, or SVI Holdings (US), Inc.'s worldwide headquarters. Contact information can be found here: http://www.martinlogan.com
INFORMATION SUR LA CONFORMITE POUR L'UE
This device complies with Industry Canada's licence-exempt RSSs. Operation is subject to the following two conditions:
[1] This device may not cause interference; and
This device must accept any interference, including interference that may cause undesired operation of the device.
Any changes or modifications not expressly approved by the party responsible for compliance could void the user's authority to operate the equipment.
This equipment complies with IC radiation exposure limits set forth for an uncontrolled environment.
In accordance with the European Union WEEE (Waste Electrical and Electronic Equipment) directive effective August 13, 2005, we would like to notify you that this product may contain regulated materials which upon
disposal, according to the WEEE directive, require special reuse and recycling processing.
For this reason MartinLogan has arranged with our distributors in European Union member nations to collect and recycle this product at no cost to you. To find your local distributor please contact the dealer from whom you purchased this product, email info@martinlogan.com or visit the distributor locator at www.martinlogan.com.
Please note, only this product itself falls under the WEEE directive. When disposing of packaging and other related shipping materials we encourage you to recycle these items through the normal channels.

Tested to Comply with FCC Standards FOR HOME OR OFFICE USE

DYNAMO 600X, DYNAMO 800X, DYNAMO 1100X, DYNAMO 1600X
This device complies with part 15 of the FCC Rules. Operation is subject to the following two conditions: (1) This device may not cause harmful interference, and (2) this device must accept any interference received, including interference that may cause undesired operation.
NOTE: This equipment has been tested and found to comply with the limits for a Class B digital device, pursuant to part 15 of the FCC Rules. These limits are designed to provide reasonable protection against harmful interference in a residential installation. This equipment generates uses and can radiate radio frequency energy and, if not installed and used in accordance with the instructions, may cause harmful interference to radio communications. However, there is no guarantee that interference will not occur in a particular installation. If this equipment does cause harmful interference to radio or television reception, which can be determined by turning the equipment off and on, the user is encouraged to try to correct the interference by one or more of the following measures:
Reorient or relocate the receiving antenna.
Increase the separation between the equipment and receiver.
- Connect the equipment into an outlet on a circuit different from that to which the receiver is connected.
Consult the dealer or an experienced radio/TV technician for help.
SafetyWarnings and Installation in Brief (English)
Important Safety Instructions

1 Read these instructions.
2 Keep these instructions.
3 Heed all warnings.
4 Follow all instructions.
5 Do not use this apparatus near water.
Clean only with dry cloth.
7 Do not block any ventilation openings. Install in accordance with the manufacturer's instructions.
8. Do not install near any heat sources such as radiators, heat registers, stoves, or other apparatus (including amplifiers) that produce heat.
9 Do not defeat the safely purpose of the polarized or grounding-type plug. A polarized plug has two blades with one wider than the other. A grounding type plug has two blades and a third grounding prong. The wide blade or the third prong are provided for your safety. If the provided plug does not fit into your outlet, consult an electrician for replacement of the obsolete outlet.
10 Protect the power cord from being walked on or pinched, particularly at plugs, convenience receptacles, and the point where they exit from the apparatus.
11 Only use attachments/accessories specified by the manufacturer.
12 Use only with the cart, stand, tripod, bracket, or table specified by the manufacturer, or sold with the apparatus. When a cart is used, use caution when moving the cart/apparatus combination to avoid injury from lipover.
13 Unplug this apparatus during lightning storms or when unused for long periods of time.
14 Refer all servicing to qualified service personnel. Servicing is required when the apparatus has been damaged in any way, such as power-supply cord or plug is damaged, liquid has been spilled or objects have fallen into the apparatus, the apparatus has been exposed to rain or moisture, does not operate normally, or has been dropped.
1.5 The apparatus shall not be exposed to dripping or splashing and that objects filled with liquids, such as vases, shall not be placed on apparatus.
16 Maintain a minimum of 20-30cm distance around the apparatus for sufficient ventilation;
17 The ventilation should not be impeded by covering the ventilation openings with items, such as newspapers, tablecloths, curtains, etc.
18 No naked flame sources, such as candles, should be placed on the apparatus;
19 The use of apparatus in tropical climates
20 This equipment is a Class II or double insulated electrical appliance
21 Mains plug or an appliance coupler is used as the disconnect device, the disconnect device shall remain readily operable.

The exclamation point within an equilateral triangle is intended to alert the user to the presence of important operating and maintenance (servicing) instructions in the literature accompanying the appliance.

The lightning bolt flash with arrowhead symbol, within an equilateral triangle, is intended to alert the user to the presence of uninsulated "dangerous voltage" within the product's enclosure that may be of sufficient magnitude to constitute a risk of electric shock.

WARNING! Do not use this product outside of the country of original sale—voltage requirements vary by country. Improper voltage can cause damage that will be potentially expensive to repair. The subwoofer is shipped to MartinLogan authorized distributors with the correct power supply for use in the country of intended sale. A list of authorized distributors can be accessed at www.martinlogan.com or by emailing info@martinlogan.com.

WARNING!
- Hazardous voltages exist inside—do not remove cover.
Refer servicing to a qualified technician.
To prevent fire or shock hazard, do not expose this module to moisture. - Turn amplifier off and unplug subwoofer should any abnormal conditions occur.
The power cord should not be installed, removed, or left detached from the speaker while the other end is connected to an AC power source.
No candles or other sources of open flame should be placed on the speaker.
No liquids either in glasses or vases should be placed on speaker. - Speaker should not be exposed to dripping or splashing liquids.
The power cord should remain readily operable should any abnormal conditions occur.
We know you are eager to hear your new MartinLogan subwoofer, so this section is provided to allow fast and easy set up. Once you have your subwoofer operational, please take the time to read, in depth, the rest of the information in the enclosed manual. It will give you perspective on how to attain the greatest possible performance from this most exacting woofer system.
If you should experience any difficulties in the setup or operation of your MartinLogan subwoofer, please refer to the Room Acoustics, Placement or Operation sections of the enclosed owner's manual. Should you encounter a persistent problem that cannot be resolved, please contact your authorized MartinLogan dealer. They will provide you with the appropriate technical analysis to alleviate the situation.
Step 1: Unpacking
Remove your new subwoofer from its packing. Please retain the original packing materials for future use—replacement packaging may be expensive.
Step 2: Placement
You may choose to begin by placing the subwoofer in a corner near the
front of the room. Before deciding on a permanent corner placement, experiment with other positions. Locations away from corners often prove more effective in providing ideal low-frequency performance and blend with the main speakers. Please see the Placement section for details.
Step 3: Signal Connection
Use the best cables you can. High quality cables, available from your specialty dealer, are recommended and will give you superior performance.
Attach your preamplifier/processor outputs to the signal input connectors located on the subwoofer's rear panel. Please see the Controls and Connections section for details.
If you plan to connect your subwoofer using Speaker Level (high level) inputs, refer to the Speaker Level Inputs section for details.
Step 4: Power Connection (AC) (see warning)
Make sure the level knob is set at O. Plug the subwoofer into a wall outlet. Review the AC Power Connection section of this manual for details.
Step 5a: Setting the Controls (Using LFE Input)
- Setting Control: Set the switch to 'Local'.
Power Mode: Set the switch to 'Auto'
Level: Set at one-o'clock (just right of straight up). - Use your processor/receiver's bass management system to adjust subwoofer integration.
Step 5b: Setting the Controls (Using Left/Right Inputs)
- Setting Control: Set the switch to 'App'
Power Mode: Set the switch to 'Auto'. - Download the MartinLogan Sub Control app (from Google Play or the Apple App Store).
- Using the app, adjust the following settings:
Volume level): Set at -10dB and increase until sound has deep, extended bass.
o Phase: Start with 90° (with Inverted polarity turned on).
20-30Hz Level: Start with OdB.
a Low Pass Filter: Set lower than the low-end frequency response of your main speakers. If you are uncertain of your main speaker low-frequency response, start with 35Hz
Step 6: Listen and Enjoy.
Step 5b: Setting the Controls (Using Left/Right Inputs)
9 awwuwwwaaanwaaanwaaanwaaanwaaanwau nn wuuwauuuaaunuauu uauuauuauuauuauu uuuuuuuuuuuuuuuuuuuuuuuuuuuuuuuuuuuuuuuuuuuuuuuuuuuuuuuuuuuuuuuuuuuuuuuuuuuuuuuuuuuuuuuuuuuuuuuuuuuuuuuuuuuuuuuuuuuuuuuuuuuuuuuuuuuuuuuuuuuuuuuuuuuuuuuuuuuuuuuuuuuuuuuuuuuuuuuuuuuuuuuuuuuuuuuuuuuuuUU
10 1
11 2aJnntai / aJnntaiaeVtTaaeau
nau! nuuunannanunusnuuunnnna uuuuauu uuuuauuauuuuuuuuuuuuuuuuuuuuuuuuuuuuuuuuuuuuuuuuuuuuuuuuuuuuuuuuuuuuuuuuuuuuuuuuuuuuuuuuuuuuuuuuuuuuuuuuuuuuuuuuuuuuuuuuuuuuuuuuuuuuuuuuuuuuuuuuuuuuuuuuuuuuuuuuuuuuuuuuuuuuuuuuuuuuuuuuuuuuuuuuuuuuuuuuuuuuuuuuuUU

annou!
-
WaiJnauanwnlwnnnanrwnwnnnaa anu
wnnnaannnnnna nnaaannnnnnaan an
- 1
W
W
-
aannnnnnae
wnnnnnaaannnnnnaanennnnnnnnnnnnnnnnnnnnnnnnnnnnnnnnnnnnnnnnnnnnnnnnnnnnnnnnnnnnnnnnnnnnnnnnnnnnnnnnnnnnnnnnnnnnnnnnnnnnnnnnnnnnnnnnnnnnnnnnnnnnnnnnnnnnnnnnnnnnnnnnnnnnnnnnn nn
wnnnnwwuoywnrnnnnaaunwuwos MartinLogan 1suee nnne nnnnnnnae anen nnnnnnnae ennnnne nnnnnnne nnnnnnne nnnnnnne nnnnnnne nnnnnnne nnnnnnne nnnnnnne nnnnnnne nnnnnnne nnnnnnne nnnnnnne nnnnnnne nnnnnnne nnnnnnne nnnnnnne nnnnnnne nnnnnnne nnnnnnne nnnnnnne nnnnnnne nannnne nannnne nannnne nannnne nannnne nannnne nannnne nannnne nannnne nannnne nannnne nannnne nannnne nannnne nannnne nannnne nannnne nannnne nannnne nannnne nannnne nannnne nannnne nannnne nannnne nennnee
Juaau 1: unana
wnwawwaaananaa aunnnaaannnnnnaa
Zuaaun 2:
nnaananaananaananaananaananaananaananaananaananaananaananaananaananaananaananaananaananaananaananaananaananaananaananaananaananaananaananaananaananaananaananaananaananaananaananaananaananaananaananaananaananaananaananaananaananaananaananaananaananaananaan anaannnnnnnnnnnnnnnnnnnnnnnnnnnnnnnnnnnnnnnnnnnnnnnnnnnnnnnnnnnnnnnnnnnnnnnnnnnnnnnnnnnnnnnnnnnnnnnnnnnnnnnnnnnnnnnn
Jnaua 3: miaiaaynu
nannnnnnaaennnnn nnnnnnnnnnnnnnnnnnnnnnnnnnnnnnnnnnnnnnnnnnnnnnnnnnnnnnnnnnnnnnnnnnnnnnnnnnnnnnnnnnnnnnnnnnnnnnnnnnnnnnnnnnnnnnnnnnnnnnnnnnnn nn
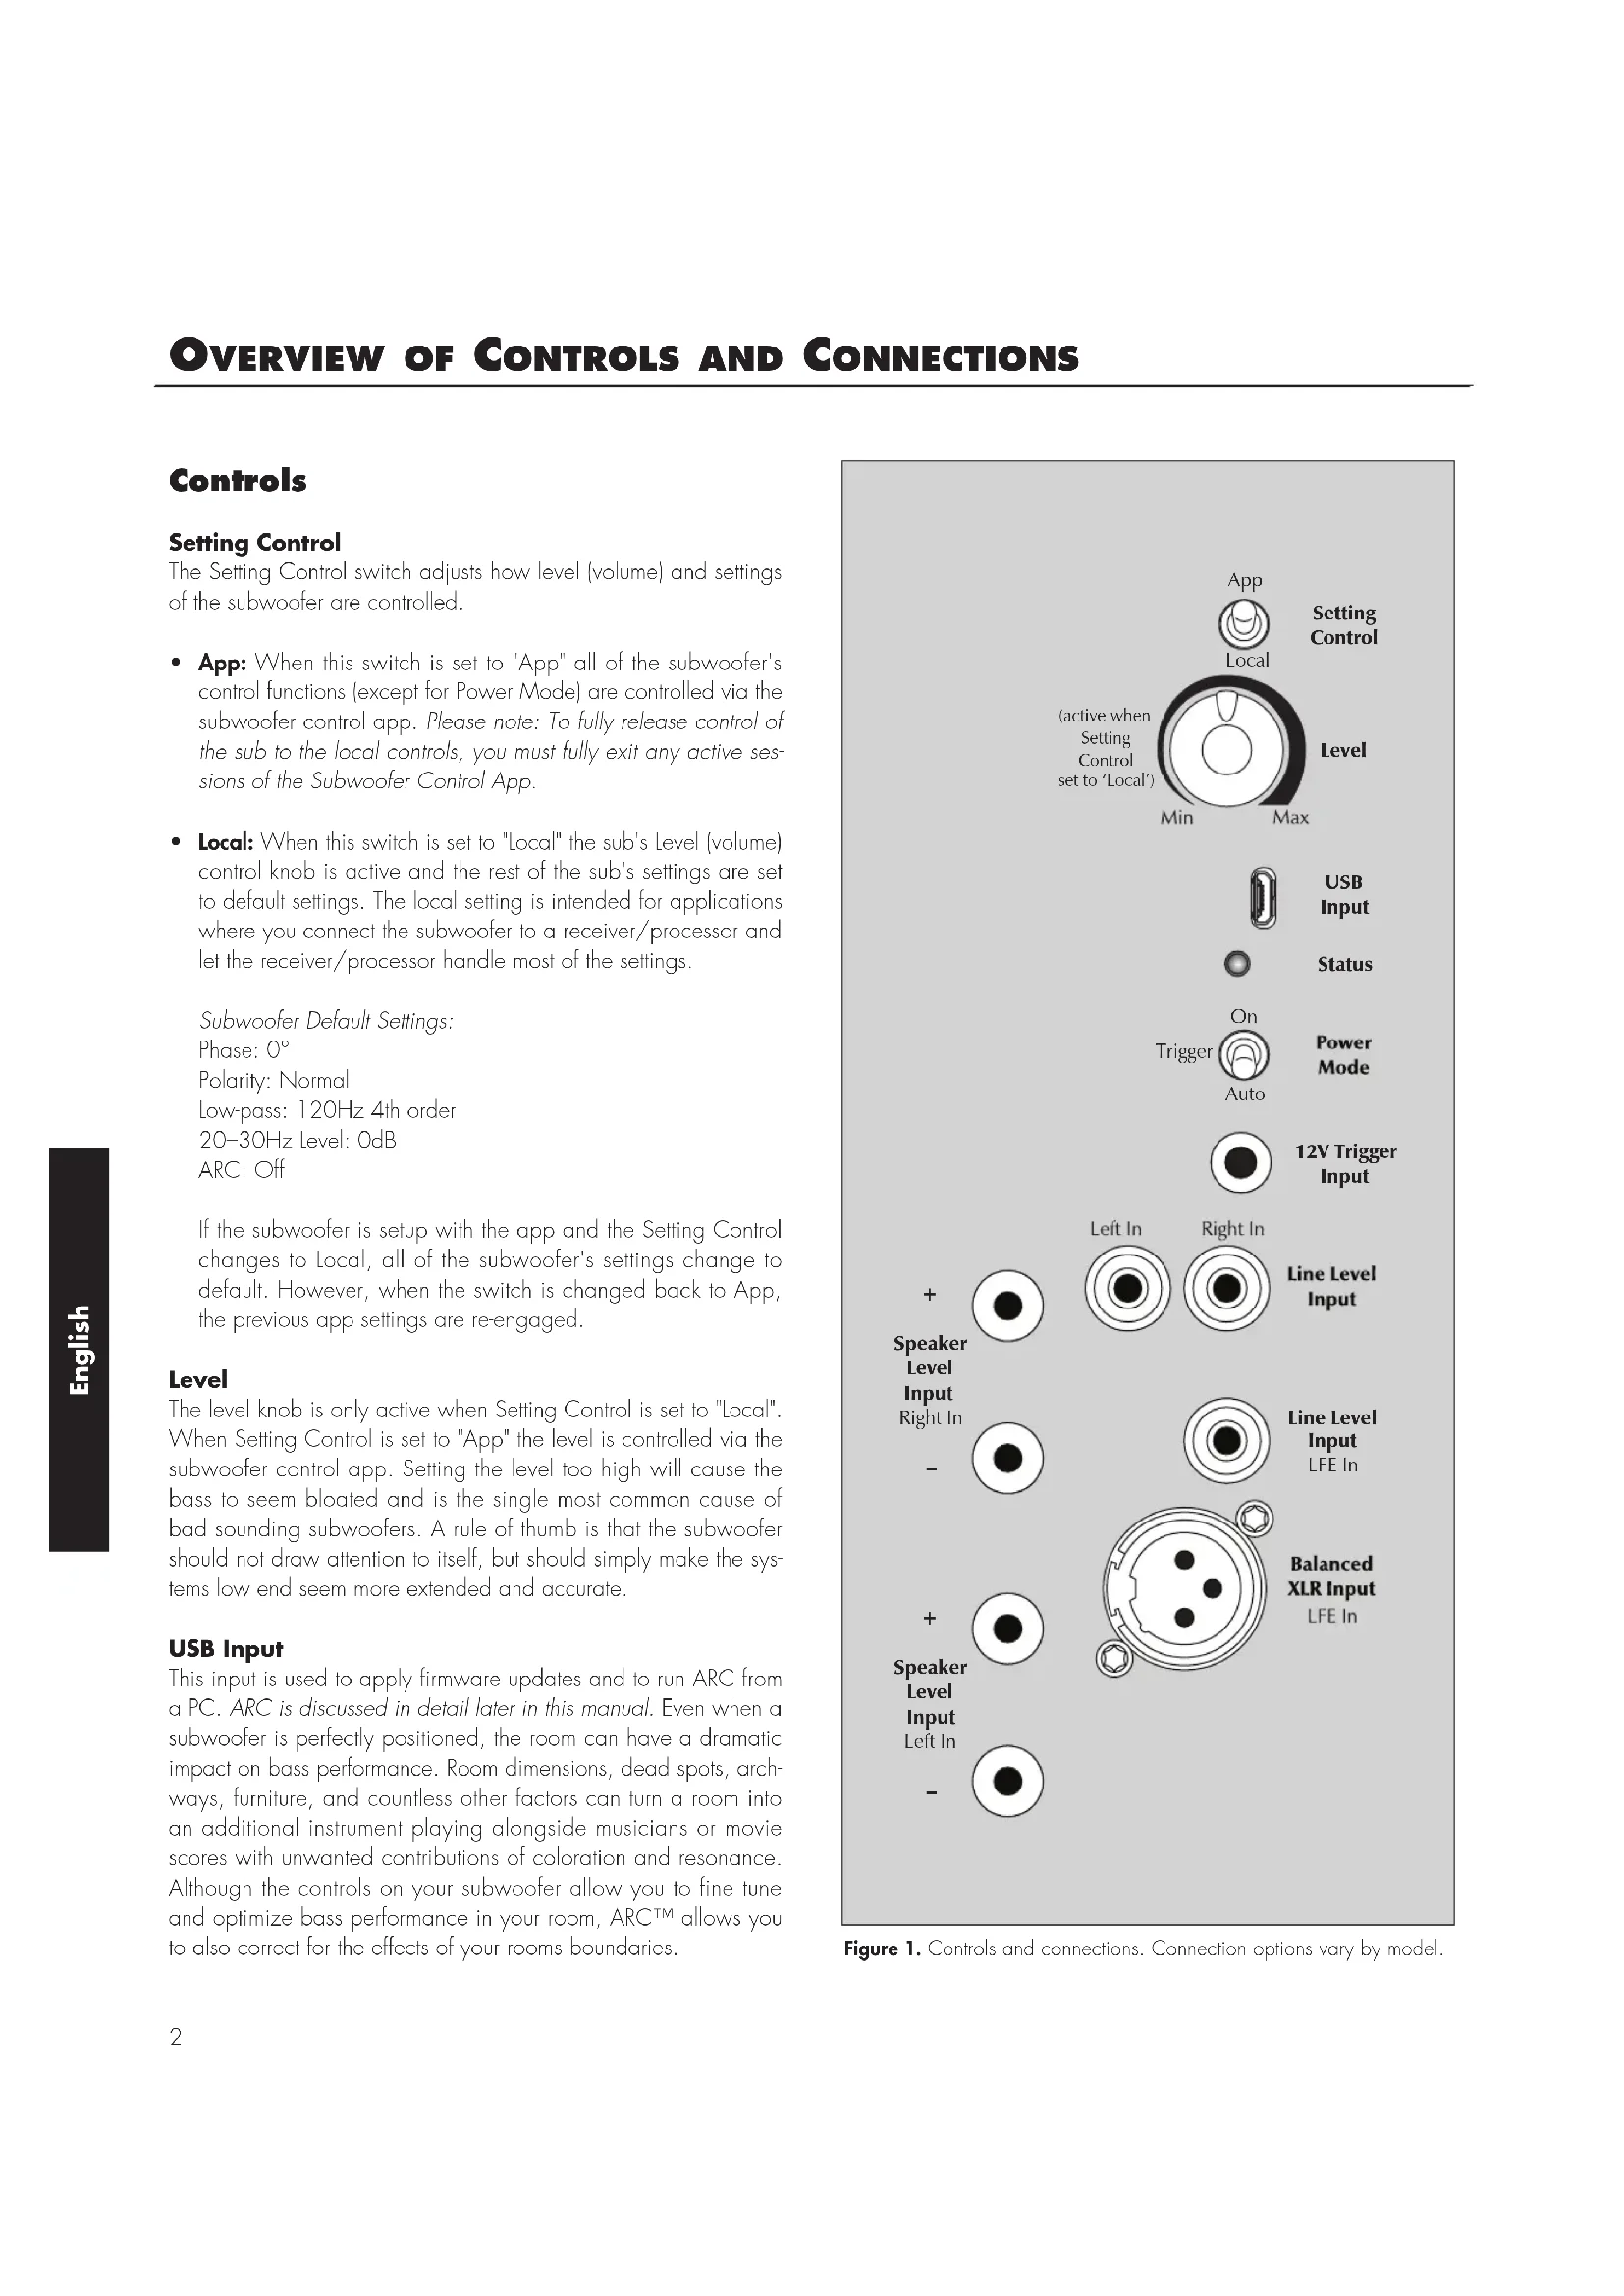
The Setting Control switch adjusts how level (volume) and settings of the subwoofer are controlled.
- App: When this switch is set to "App" all of the subwoofer's control functions (except for Power Mode) are controlled via the subwoofer control app. Please note: To fully release control of the sub to the local controls, you must fully exit any active sessions of the Subwoofer Control App.
- Local: When this switch is set to "Local" the sub's Level (volume) control knob is active and the rest of the sub's settings are set to default settings. The local setting is intended for applications where you connect the subwoofer to a receiver/processor and let the receiver/processor handle most of the settings.
Subwoofer Default Settings:
Phase: 0°
Polarity: Normal
Lowpass: 120Hz 4th order
20-30Hz Level: OdB
ARC: Off
If the subwoofer is setup with the app and the Setting Control changes to Local, all of the subwoofer's settings change to default. However, when the switch is changed back to App, the previous app settings are re-engaged.
Level
The level knob is only active when Setting Control is set to "Local". When Setting Control is set to "App" the level is controlled via the subwoofer control app. Setting the level too high will cause the bass to seem bloated and is the single most common cause of bad sounding subwoofer. A rule of thumb is that the subwoofer should not draw attention to itself, but should simply make the systems low end seem more extended and accurate.
USB Input
This input is used to apply firmware updates and to run ARC from a PC. ARC is discussed in detail later in this manual. Even when a subwoofer is perfectly positioned, the room can have a dramatic impact on bass performance. Room dimensions, dead spots, archways, furniture, and countless other factors can turn a room into an additional instrument playing alongside musicians or movie scores with unwanted contributions of coloration and resonance. Although the controls on your subwoofer allow you to fine tune and optimize bass performance in your room, ARCTM allows you to also correct for the effects of your rooms boundaries.
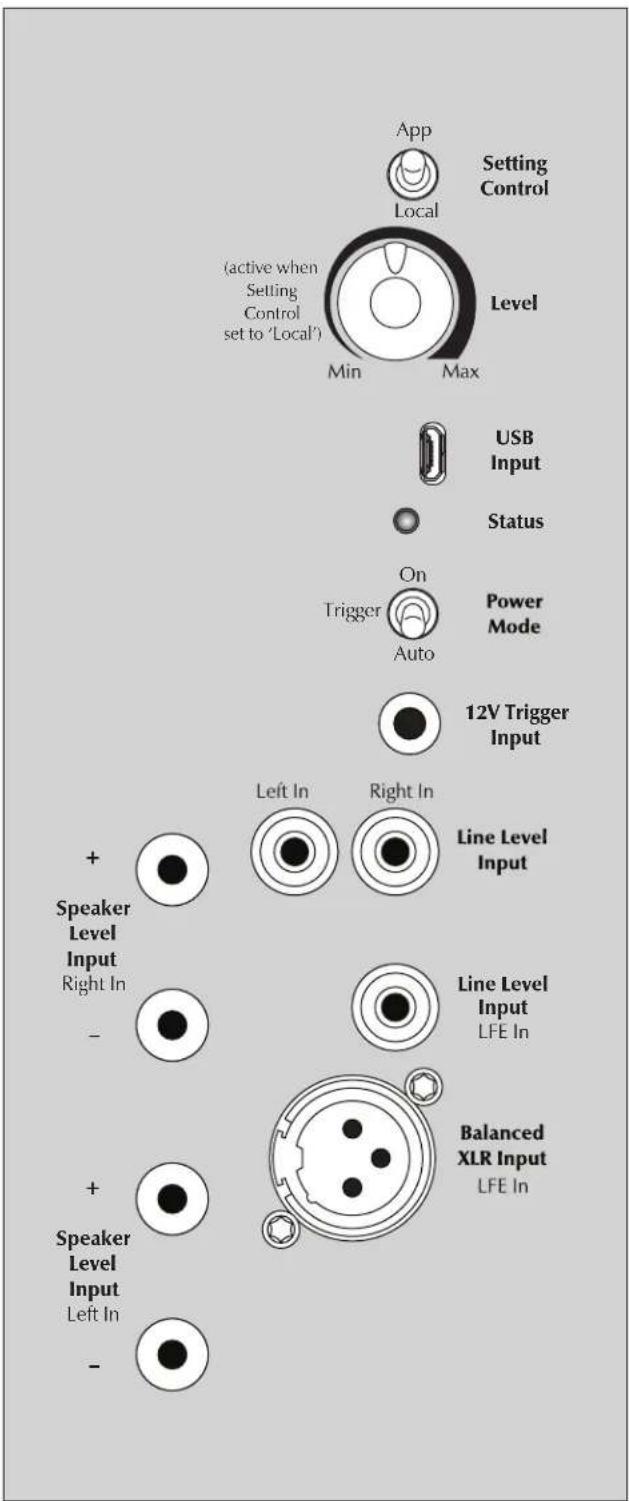
Figure 1. Controls and connections. Connection options vary by model.
| Figure 2. Controls and inputs. | Setting Control (Switch) | Level (Knob) | USB Input (Micro-B USB) | Status (LED) | Power Mode | 12V Trigger Input |
| App / Local Min - Max - On / Auto | ||||||
| DYNAMO 600X | ✓ ✓ ✓ | ✓ ✓ | - | |||
| DYNAMO 800X | ✓ ✓ ✓ | ✓ ✓ (+ Trigger) ✓ | ||||
| DYNAMO 1100X | ✓ ✓ ✓ | ✓ ✓ (+ Trigger) ✓ | ||||
| DYNAMO 1600X | ✓ ✓ ✓ | ✓ ✓ (+ Trigger) ✓ | ||||
| Figure 3. Audio signal inputs. | Line Level (RCA) | Balanced (XLR) | Speaker Level (Banana Jacks) | Wireless Audio (sold separately) | |
| Left In & Right In | LFE In LFE In | Left In & Right In | Left In & Right In (LFE In) | ||
| DYNAMO 600X | ✓ (Right In doubles as LFE In)) | - | ✓ | ✓ | |
| DYNAMO 800X | ✓ | ✓ | - | ✓ | ✓ |
| DYNAMO 1100X | ✓ ✓ ✓ | ✓ ✓ | |||
| DYNAMO 1600X | ✓ ✓ ✓ | ✓ ✓ | |||
The ARC Mobile app can use a Bluetooth connection to the subwoofer. Use of your subwoofer's built-in USB Input is not required to run Anthem Room Correction.
For those who desire to run ARC using a computer, the USB Input allows connection of your subwoofer to a computer via a Micro USB connection. Depending on the version of your ARC kit (sold separately) you may need a USB (Type A) to Micro-B USB cable or a Mini-B USB (Female) to Micro-B USB (Male) adapter.
The USB Input can also be used to apply firmware updates to your subwoofer.
Status
Your subwoofer is equipped with a multi-color LED to indicate the current status of the subwoofer.
- No color: No power. The subwoofer is not plugged in or has shutdown due to an overload condition. Unplug the subwoofer and plug it back in to correct.
- White: Play mode. This indicates the subwoofer detects an audio signal and has automatically switched into play mode.
- Red: Standby. The sub has switched into power saving mode.
- Flashing: Error. The sub is displaying an error code.
Power Mode and Trigger Input
The Power Mode switch allows control of when the subwoofer turns on and off.
- Auto: When set to 'Auto' the subwoofer will turn itself on when detecting an audio signal. After several minutes of inactivity the subwoofer will put itself in standby mode.
- On: When set to 'On' the subwoofer will always be on.
- Trigger: DYNAMO 800X, 1100X, and 1600X are equipped with a trigger input. If you have an external source component (such as a receiver) with built in trigger controls, you may wish to turn the subwoofer on and off using this source. Connect a cable from the control component to your subwoofer's Trigger Input and set the Power Mode switch to 'Trigger'. Although this technology is commonly referred to as a 12V trigger, the subwoofer will respond to any signal between 5-24V DC.
Audio Signal Connections
Line Level Input (Left In / Right In)
Found on DYNAMO 600X, 800X, 1100X, and 1600X. Please note, on the 600X the Right In also serves as the LFE In. Connect from the Main Out or Pre Out on your receiver/pre-amp. The setting for the Low-Pass Filter control is applied to the signal received through these inputs.
Line Level Input (LFE In)
Found on DYNAMO 800X, 1100X, and 1600X. Please note, on the 600X, Right In also serves as LFE In. Connect from the Sub Out on your A/V processor. Crossover settings for LFE In are controlled through your A/V processor. The subwoofer's setting for the Low-Pass Filter is not applied to this connection, except in the DYNAMO 600X (if using the 600X for LFE In, set the Low Pass Filter to Bypass).
Balanced XLR Input (LFE In)
Found on DYNAMO 1100X and 1600X. Connect from the Sub Out on your A/V processor. The setting for the Low-Pass Filter control is not applied to this connection. Crossover settings for LFE In are controlled through your A/V processor. Please note, do not make connections using both the XLR and RCA LFE inputs at the same time.
Speaker Level Input (Left In / Right In)
Found on DYNAMO 600X, 800X, 1100X, and 1600X. This set of inputs provides a place to connect the subwoofer using standard speaker cable. To use these connections the speaker cable should be terminated using banana style plugs. The setting for the Low-Pass Filter control is applied to the signal received through these inputs. Please note, do not make connections using both the RCA and Speaker Level Left/Right inputs at the same time.
Wireless Audio Signal Connection
Found on DYNAMO 600X, 800X, 1100X, and 1600X. The SwT-X Subwoofer Wireless Transmitter/Receiver system is sold separately and available from your local dealer. Detail on using an SwT-X system are found later in this manual.
AC Power Connection

WARNING!
The power cord should not be installed, removed, or left detached from the subwoofer while the other end is connected to an AC power source.
The IEC power cord should be firmly inserted into the AC power receptacle on the rear connection panel of the subwoofer, then to any convenient AC wall outlet. The sub also integrates a signal sensing power supply that automatically switches off after sensing no music signal for several minutes (this will occur when the power switch is set to 'Auto').
Your subwoofer is wired for the power service supplied in the country of original consumer sale. The AC power rating applicable to
a particular unit is specified both on the packing carton and on the serial number plate attached to the subwoofer. If you remove your subwoofer from the country of original sale, be certain that AC power supplied in any subsequent location is suitable before connecting and operating the subwoofer. Substantially impaired performance or severe damage may occur to the subwoofer if operation is attempted from an incorrect AC power source.
Break-In
Our custom made woofers require approximately 50 hours of break-in at moderate listening levels before their optimal performance occurs. This will factor in on any critical listening and judgment.
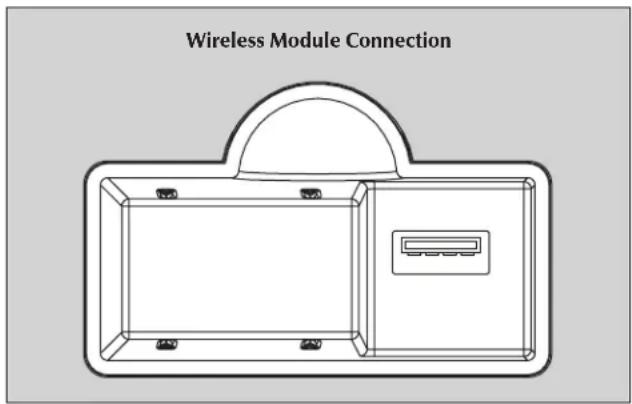
Figure 4. Wireless module receptacle
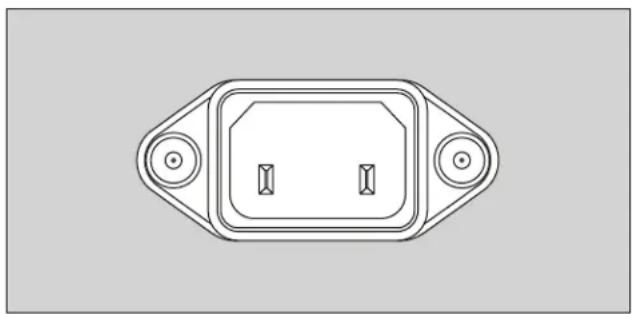
Figure 5. AC Power receptacle

Figure 6. MartinLogan Subwoofer Control App
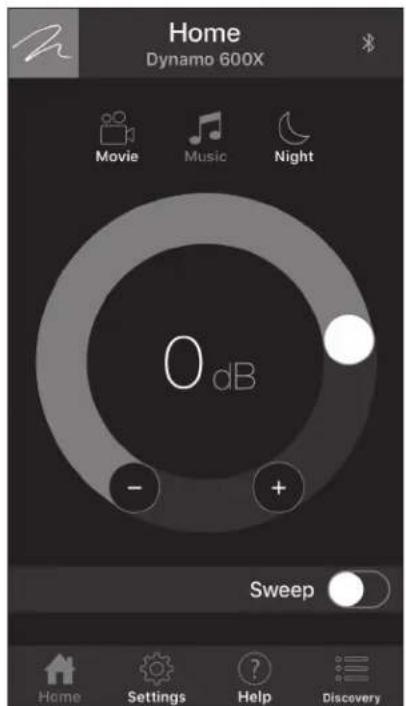
Figure 7. Home screen
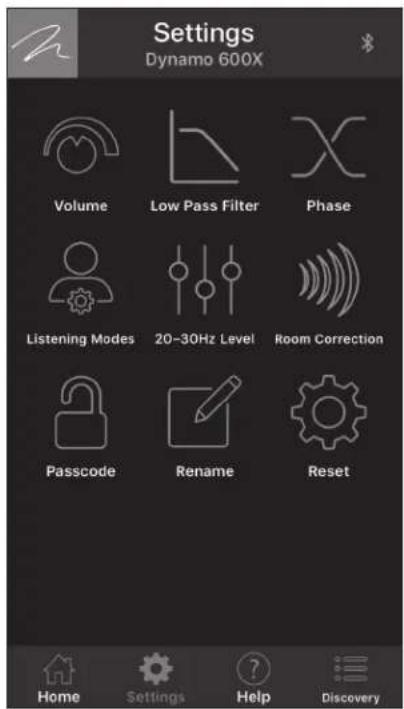
Figure 8. Settings screen
DYNAMO 600X, 800X, 1100X, and 1600X feature on advanced app based control system (available for iOS and Android) that connects to your subwoofer using a mobile device and Bluetooth connection. Visit MartinLogan.com for details on downloading MartinLogan's free Subwoofer Control App from iOS or Android app stores.
NOTE: The MartinLogan Subwoofer Control App is subject to change and, depending on future updates, functions may differ from what is outlined here.
NOTE: The MartinLogan Subwoofer Control App and the ARC Mobile app may interfere with each other's ability to discover your subwoofer. If you're having trouble getting either app to run or your subwoofer is not being discovered, check to make sure the other app isn't open and running in the background.
The Logo Button
Located in the upper left corner of the app, the button with the MartinLogan logo will bring up a screen that display's basic subwoofer information, such as model and firmware build version.
The Menu Bar
The menu bar, located at the bottom of the app, lets you select the four main functions of the app.
- Home: This screen lets you quickly adjust your subwoofer's volume, select a listening mode, and run a tone sweep.
- Settings: This screen lets you select the subwoofer's control functions.
- Help: This button will display a pop-up window with a description of the control currently displayed on the screen.
- Discovery: This screen displays a list from which you can select the subwoofer you want to control. If your subwoofer does not show in this list, check to make sure the subwoofer Setting Control is set to "App" and that ARC Mobile isn't running on your device. Additionally, check that it isn't being controlled by another mobile device running ARC or the Subwoofer Control App.

Figure 9. Settings: Low Pass Filter screen
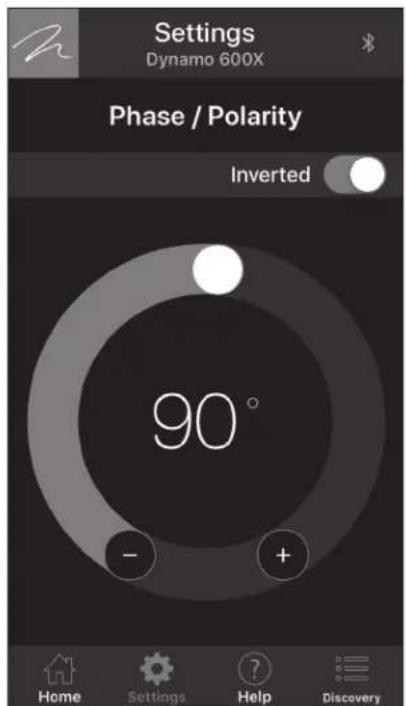
Figure 10. Settings: Phase / Polarity screen
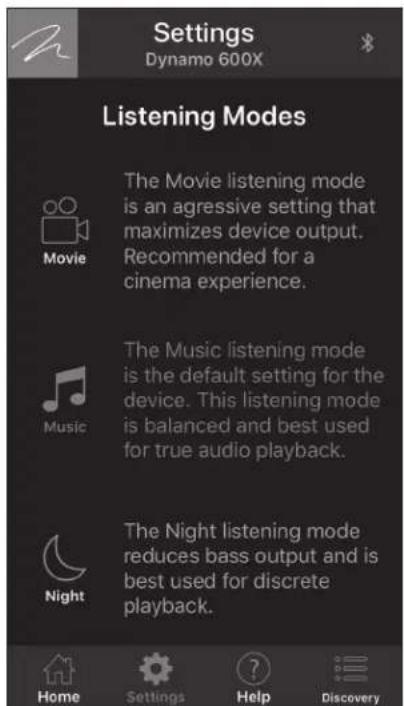
Figure 11. Settings: Listening Modes screen
Settings: Volume
Volume: The volume (level) control allows you to adjust the loudness of your subwoofer from -40dB to 12dB. For most applications a setting between -14dB and 0dB is adequate. Setting the level too high will cause the bass to seem bloated and is the most common cause of bad sounding subwoofer. A rule of thumb is that the subwoofer's bass should not draw attention to itself. Instead it should simply make the system's low end seem more extended and accurate.
- Sweep: The Sweep feature is useful for locating areas in your listening room where troublesome rattles or resonances may occur. The tone sweep feature may also prove useful when setting phase, crossover, and volume on the subwoofer. Pressing the Sweep toggle initiates a repeating tone sweep from 20-120Hz. Volume can be adjust while the tone sweep is playing. Pressing the pause button pauses the subwoofer at a specific tone frequency and also allows you to set a specific tone frequency. While a tone frequency is paused, you can select 'Continue' to adjust the level of the subwoofer. The tone sweep will continue until the Sweep toggle is set to off.
Settings: Low Pass Filter
The Low Pass Filter screen lets you to adjust the low-pass frequency for the left and right (RCA or speaker level) inputs. This setting is not applied to the LFE (RCA or XLR) inputs, instead leaving the task of bass management to your audio/video processor.
DYNAMO subwoofoers offer exceptional performance in both 2-channel (Left In/Right In) systems and multi-channel (LFE In) home theater systems. DYNAMO 800X, 1100X, and 1600X offer the ability to connect both Left In/Right In and LFE In, allowing you to achieve an optimum setup for 2-channel listening while still allowing for multi-channel (movie) mode listening. When listening to stereo source material the system achieves optimum music integration with the subwoofer playing below the front speaker's lowest response frequency. While watching a movie the LFE track and the bass from the surrounds can be fed to the subwoofer using (low pass) crossover settings from the processor's bass management system.
As a general rule, the Low-Pass Filter should be set at a value approximately equal to [or below] 70% of your main speaker's lowest frequency response. For example, your speaker's frequency response goes down to 43Hz . 70% of 43Hz equals 30.1, so you should set the subwoofer's low pass filter to 30Hz . We advise that once you
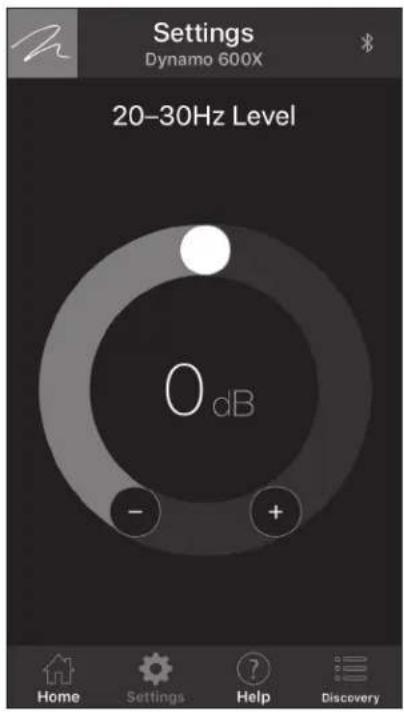
Figure 12. Settings: 20-30Hz Level screen
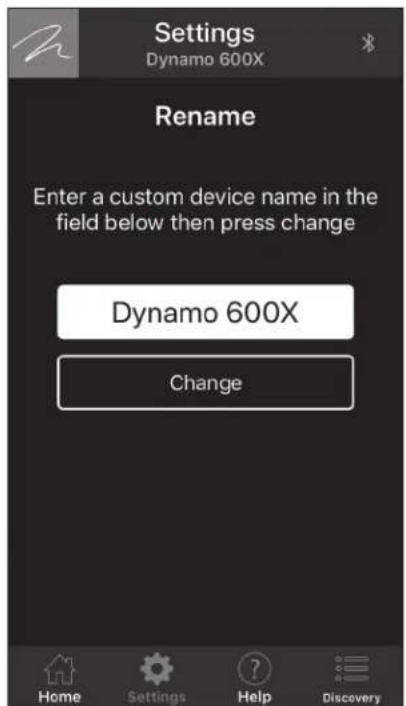
Figure 13. Settings: Rename screen
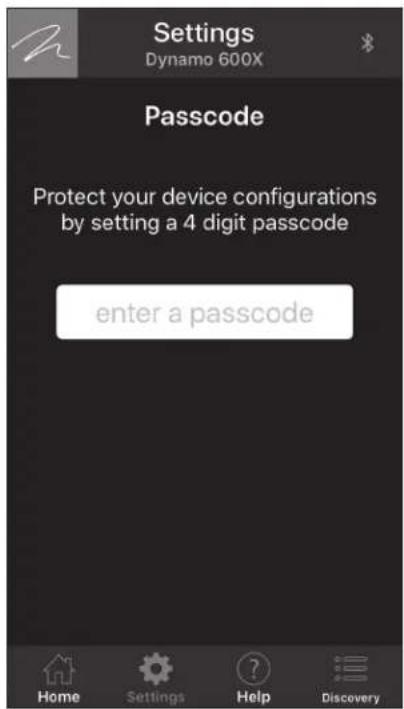
Figure 14. Settings: Passcode screen
try the recommended setting using the formula above, you should try the surrounding settings as well. If you are uncertain of your main speaker low-frequency response, start with a setting of 35Hz. You will not harm anything by experimenting with different settings.
Remember, because this setting only applies to Left/Right inputs. This setting is not used if your subwoofer is only connected via a LFE input. However, if you're using a SVT-X wireless system to connect an LFE channel or using the DYNAMO 600X as an LFE channel (connected via the Right In/LFE In), you will need to set the Low Pass Filter to Bypass.
- Bypass: Select this option if you plan to use your receiver/processor's bass management to set a low pass filter.
- Third Order: If you are using the subwoofer Left/Right inputs, select this option to use a third order crossover to adjust the roll off characteristics of your subwoofer's upper frequencies as they approach the low-pass filter frequency setting. A third order filter has a slope of 18dB per octave—a slower roll off than a fourth order. For most applications a third order crossover is ideal.
Fourth Order: If you are using the subwoofoers Left/Right inputs, select this option to use a fourth order crossover to adjust the
roll off characteristics of your subwoofer's upper frequencies as they approach the low-pass filter frequency setting. A fourth order filter has a slope of 24dB per octave—a faster roll off than a third order.
Settings: Phase
The Phase screen allows you to adjust the phase of the subwoofer from 0 - 180° in increments of 1° and also allows you to invert the polarity of the phase.
The Phase control is entirely dependent on numerous factors including the size and configuration of your listening environment, the placement of the unit, and seating arrangement. Due to the way bass sound waves develop in different rooms there is no rule of thumb for setting phase. For instance, if your room has a peak at the subwoofer crossover area, you may wish to set the phase so the actual acoustic outputs of the subwoofer and main speakers are out of phase. Experiment and try different settings and be patient.
If you are using the subwoofer to augment other MartinLogan products, we suggest starting with the phase set at 90° (with Inverted polarity turned on).
In a system where phase and polarity are properly set, the main speakers and subwoofer should work together and sound as if there is more total bass in the system. If your main speakers and subwoofer are out of phase their sound waves will cancel each other and total bass output in the system will sound decreased. Again, experiment and listen for the smoothest bass without any prominent or absent notes.
Settings: Listening Modes
The Listening Modes screen lets you apply preset listening modes to the subwoofer's output. Listening modes are also accessible from the app's Home screen.
- Movie: The Movie listening mode is an aggressive setting that maximizes device output for an especially explosive experience.
Music: The Music listening mode is the default setting for the DYNAMO subwoofoers. This mode is balanced and best used for an accurate musical presentation. - Night: The Night listening mode reduces bass output and is best used for discrete playback.
Settings: 20-30Hz Level
The 20-30Hz Level screen allows you to adjust subwoofer output from -10dB to +10dB in the 20-30Hz range. This control and Anthem Room Correction (ARC) serve similar purposes. Where this control is limited to the 20-30Hz frequency range, ARC adjusts your subwoofer's output across its entire frequency range.
If not using ARC, this control can be used to modify your subwoofer's response to compensate for the room anomalies or to modify the subwoofer's sound to your personal taste. The frequencies adjusted are between 20 - 30Hz a range where peaks (room gain) and dips of different amplitudes often develop in listening rooms. The ideal setting is dependent on room size and construction, system configuration, and personal preference. As a rule of thumb, if your low-bass sounds weak, increase this control. If your low-bass sounds bloated, decrease this control.
If using ARC, this control can be used to match your personal taste by further changing the way the subwoofer sounds.
Note: The 20-30Hz Level setting will not affect the ARC measurements or compensation filters. If you have an ARC correction uploaded to your subwoofer, we recommend first listening with this
control set to O. Remember, this setting will adjust the subwoofer output in addition to ARC's adjustments.
Settings: Room Correction
The Room Correction screen provides information on Anthem Room Correction (ARC). The ARC toggle allows you to turn ARC correction on and off (only available if ARC software has been used to upload a correction curve to your sub). This is an effective tool for hearing the difference that Anthem Room Correction makes!
Settings: Passcode
The Passcode screen lets you protect your subwoofer's settings with a custom 4-digit passcode. Once a passcode is set it can also be cleared on this screen.
Settings: Rename
The Rename screen lets you assign a custom name to your subwoofer. This is useful if you have multiple subwoofer's in your system. A custom subwoofer name must be between 3-13 characters long.
Settings: Reset
The Reset screen lets you perform a factory reset on your subwoofer. A factory reset will restore all settings to their defaults. It will also erase any ARC corrections that have been uploaded to the subwoofer.
Before Connecting the DYNAMO
MartinLogan developed the DYNAMO subwoofer for easy setup and system integration. Before beginning to connect your subwoofer, please review the controls discussed in the last section. An understanding of these will help speed you along. All signal connections are done on the rear connections panel of the subwoofer. Make certain that all of your connections are tight.

WARNING!
Unplug your subwoofer before making or breaking any signal connections!
2-Channel Mode
This setup is recommended if your subwoofer will be used in a 2-channel only system. When a signal is connected to the subwooers Left In/Right In, the Low Pass Filter control is active.
Signal Connection:
1 Connect the left out/right out from your preamp/receiver to the Left In/Right In of the subwoofer. Use RCA interconnects or speaker level connections, but choose only one connection method—do not use multiple methods of connection at the same time. Speaker level connections are discussed in detail later in this manual.
Recommended Control Settings:
IMPORTANT! If you intend to use Anthem Room Correction (ARC) room correction we recommend running ARC and optimizing placement of your subwoofer prior to adjusting the subwoofer's controls. When engaged, ARC will alter the acoustic output of your subwoofer and influence the settings described below.
1 Set the subwoofer's Control Setting to App.
2 Calculate the number equal to 70% of your main loudspeaker's lowest frequency rating. Set the Low Pass Filter to a setting equal to the resulting number. If the resulting number is lower than 30Hz , set this to 30Hz .
3 Play familiar music with bass content. Increase the Volume (level) until the music has deep extended bass. Be careful to avoid levels that become overwhelming.
4 Try the Phase and Polarity (Inverted) in different settings until the best blending is obtained. Play familiar music with deep, repetitive bass. Adjust the Phase and Polarity (Inverted) setting
so the bass notes seem their loudest and without blur when heard from your typical listening position. If you are augmenting MartinLogan loudspeakers, we suggest you start with Phase set at 90° (with Inverted polarity turned on) when experimenting.
5 If you have completed steps 1-4 and still have weak or booming bass consider adjusting the 20 - 30Hz Level to compensate for these anomalies. Experiment by changing the Volume (level) setting while adjusting the 20 - 30Hz Level and try to find a position that gives you deep extended bass and good blending with your main speakers. If you still have weak or booming bass you may want to consider moving your subwoofer and go through these setup steps again (especially if it is located in or near a room corner). Remember, room position has a major impact on overall bass performance.
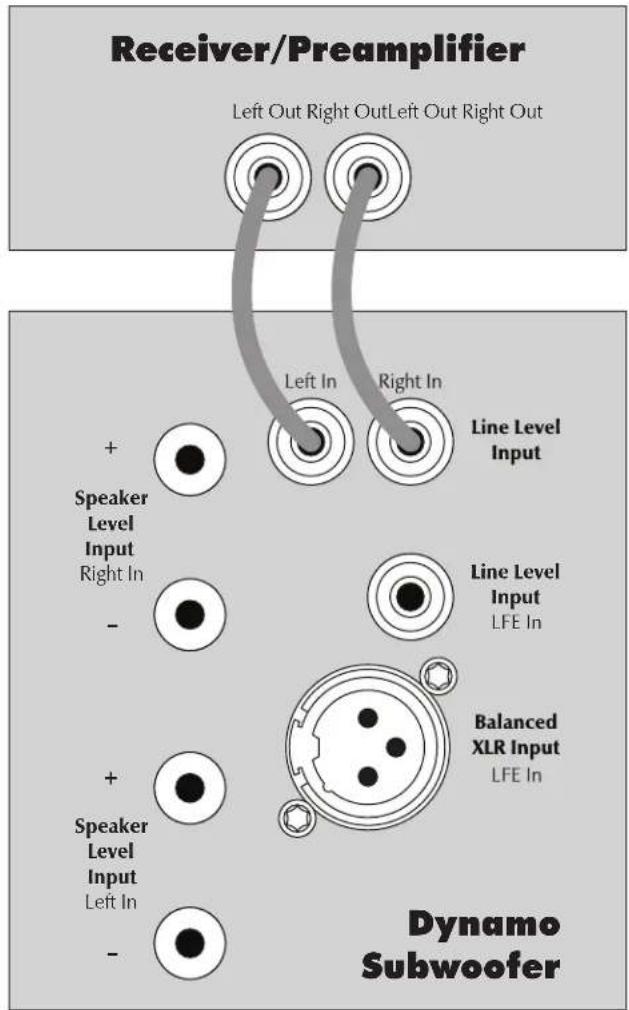
Figure 15. Signal connection for 2-channel mode.
Multi-Channel Mode
This setup is recommended if you will use your subwoofer in a dedicated home theater or other multi-channel system. When a signal is connected to the subwoofer's LFE In, the setting for the Low-Pass Filter control is not used. Your processor handles most of the bass management.
DYNAMO 600X and 800X: These subwoofoers do not offer the XLR LIFE connections discussed here.
DYNAMO 600X: If connecting a DYNAMO 600X using this method, please note that the Right In doubles as the LFE In and you should set the subwoofer's Low Pass Filter to Bypass using the Subwoofer Control App.
- SWT-X Wireless System used with any subwoofer: If connecting the sub using a SwT-X wireless system, please note that the SwT-X receiver's Right In doubles as the LFE in and you should set the sub's Low Pass Filter to Bypass using the Subwoofer Control App.
Signal Connection:
1 Connect the Sub output of the processor to the subwoofer's LFE In. Use either an RCA or an XLR interconnect—do not use both at the same time.
Recommended Control Settings:
IMPORTANT! If you intend to use Anthem Room Correction (ARC) room correction we recommend running ARC and optimizing placement of your subwoofer prior to adjusting the subwoofer's controls. When engaged, ARC will affect the acoustic output of your subwoofer and influence the settings described below.
1 Set the subwoofer's Control Setting to App.
2 If your front speakers are large (e.g. full-range floorstanding type speakers) set your processor controls for front speakers to wide, large, or full mode. If your front speakers are small (e.g. bookshelf type speakers) set your processor control for front speakers to narrow, small, or limited mode. Set processor controls for center and effects type speakers to narrow, small, or limited mode. Remember, few center and effects type speakers are designed to go much lower than 70Hz, which means that any bass information in a soundtrack lower than this frequency will normally be lost. When you set your center and effects type speakers to narrow, small, or limited mode, all of the bass lower than the assigned crossover point will be redirected to
the subwoofer along with the LFE output—guaranteeing that no bass information from these channels is lost.
Please note: some processors allow the changing of speaker configuration based on source material type. Under these conditions the user may want to run the fronts in narrow, small, or limited mode for multi-channel source material and run the fronts in wide, large, or full mode for 2-channel stereo source material.

WARNING! Based on the performance of most receivers/processors it is recommended that MartinLogan center and effects type speakers not be run in large, wide, or full range mode. Doing so may potentially damage the speaker if the processor attempts to drive the speaker beyond its rated frequency range. This warning also applies to products from other manufacturers.
3 With multi-channel source material playing, use the Subwoofer Control App to adjust the Volume (level) control to your preferred level. Be careful to avoid levels that become overwhelming.
4 DYNAMO 600X and SWT-X Wireless System used with any subwoofer: Use the Subwoofer Control App to set the Low Pass Filter to Bypass.
DYNAMO 800X, 1100X, and 1600X: When using a cable to connect your receiver/processor to the LFE Input changing the Low Pass Filter will have no effect on the sub's output. Their LFE input internally bypasses the sub's Low Pass Filter.
5 Use the Subwoofer Control App and Try the Phase and Polarity (Inverted) in different settings until the best blending is obtained. Play familiar music with deep, repetitive bass. Adjust the Phase and Polarity (Inverted) so the bass notes seem their loudest and without blur when heard from your typical listening position. If you are augmenting MartinLogan loudspeakers, we suggest you start with Phase set at 0° (although we suggest 90° elsewhere, in this specific connection method we suggest 0° since your processor will be doing most of the bass management).
6 If you have completed steps 1-5 and still have weak or booming bass consider using the Subwoofer Control App to adjust 20 - 30Hz Level to compensate for these anomalies. Experiment with the settings and listen to the result. Try to find a position that sounds correct to you. Experiment by changing the Volume (level) setting while adjusting the 20 - 30Hz Level. Find a position that gives you deep extended bass and good blending with your main speakers.
7 Use the bass management section of your receiver/processor's speaker setup to set the subwoofer level at an appropriate level. Follow the instructions in your processor's manual to fine-tune the subwoofer level.
8 If you have completed steps 1-7 and still have weak or booming bass consider using the Subwoofer Control App to further adjust the 20 - 30Hz Level to compensate for these anomalies (yes, you're tweaking the 20 - 30Hz Level again). Experiment
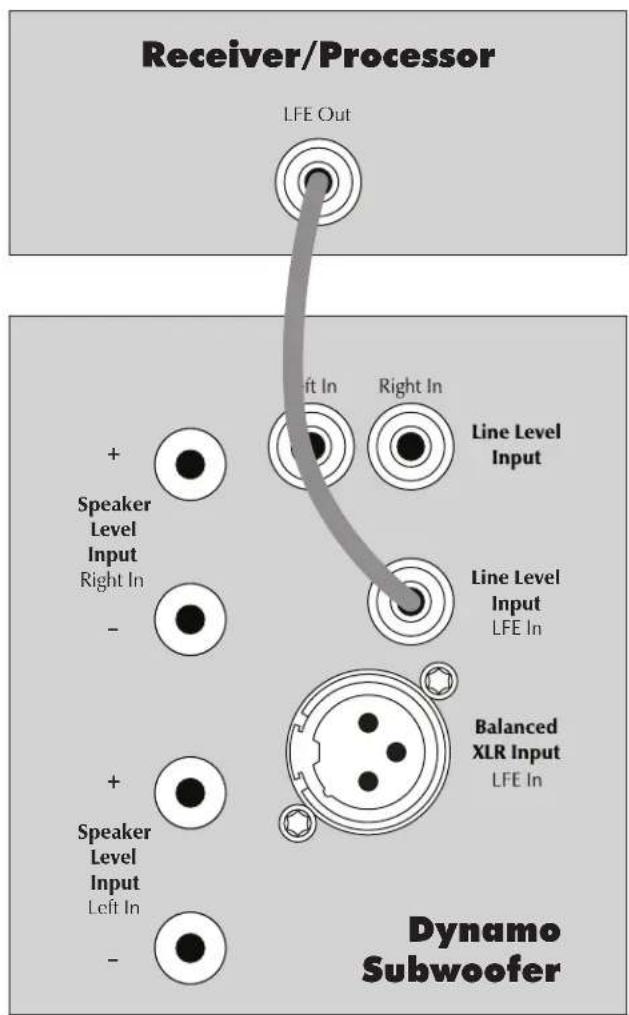
Figure 16. Signal connection for multi-channel mode.
with the settings and listen to the result. Try to find a position that sounds correct to you. Experiment by changing the Volume (level) setting while adjusting the 20-30Hz Level. Find a position that gives you deep extended bass and good blending with your main speakers. If you still have weak or booming bass you may want to consider moving your subwoofer and go through these setup steps again (especially if it is located in or near a room corner). Remember, room position has a major impact on overall bass performance.
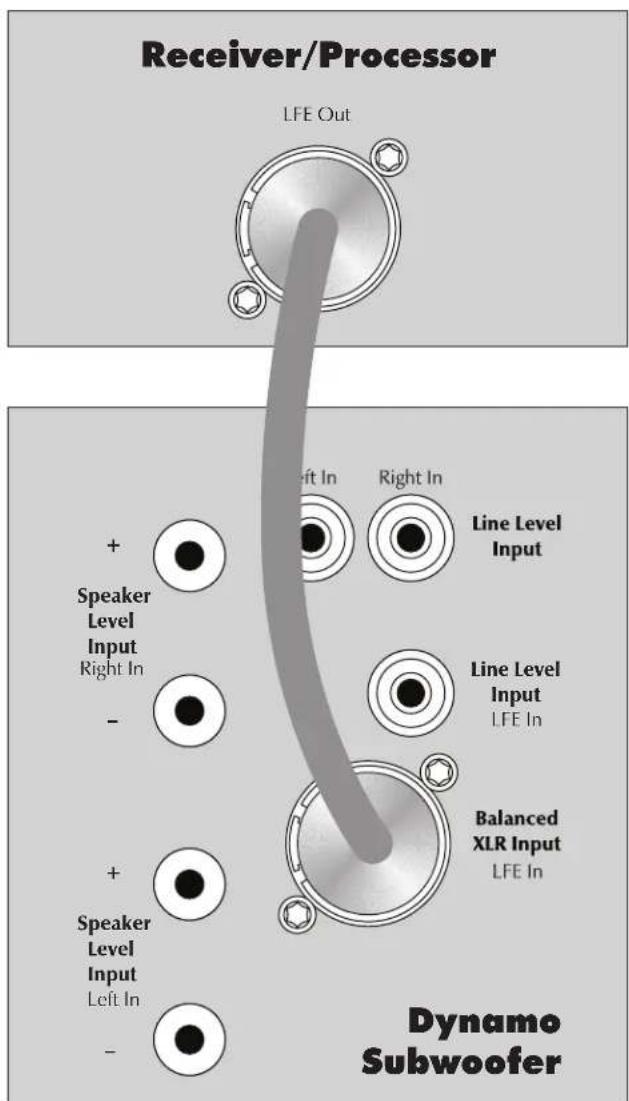
Figure 17. Signal connection for multi-channel mode.
Simultaneous 2-Channel/Multi
Channel Mode
The advantage of this dual mode is that you are able to achieve an optimum setup for stereo listening and still allow for multi-channel (movie) mode listening. When listening to stereo source material the system achieves optimum music integration. In this mode the subwoofer plays only below the front main speaker's lowest response frequency. While in movie mode the LFE track and the bass from the surrounds can be fed to the subwoofer using crossover settings from the processor's bass management system.
DYNAMO 600X: This connection method is not compatible with the DYNAMO 600X.
- SWT-X Wireless System: This connection method is not compatible with the SWT-X wireless receiver/Transmitter system.
DYNAMO 600X and 800X: These subwoofoers do not offer the XLR LIFE connections discussed here.
Signal Connection:
1 Connect the left out/right out from your processor to the Left In/Right In of the subwoofer. Use either RCA or speaker level connections, but choose only one connection method—do not use both at the same time for left/right inputs. Use quality RCA interconnects or speaker cable. Speaker level connections are discussed in detail later in this manual.
2 Connect the Sub output of the processor to the subwoofer's LFE In. Use quality RCA or XLR interconnects. Please note, the connection method for the LFE In does not need to match Left In/Right In. If you used RCA interconnects or speaker level connections for Left In/Right In it is acceptable to use XLR for the LFE Input. Be flexible, experiment, and listen to determine what sounds best in your unique installation. Do not use multiple methods of connection at the same time for the LFE input (i.e. connecting both XLR LFE In and Line Level LFE In).
Recommended Control Settings:
IMPORTANT! If you intend to use Anthem Room Correction (ARC) room correction we recommend running ARC and optimizing placement of your subwoofer prior to adjusting the subwoofer's controls. When engaged, ARC will affect the acoustic output of your subwoofer and influence the settings described below.
1 Set the subwoofer's Control Setting to App.
2 Set your processor controls for front speakers to wide, large, or full mode. If your front speakers are small (e.g. bookshelf type speakers) we recommend that you not use this method for connecting your subwoofer and instead refer to the "Multi-Channel Mode" section. Set processor controls for center and effects type speakers to narrow, small, or limited mode. Remember, few center and effects type speakers are designed to go much lower than 70Hz, which means that any bass information in a soundtrack lower than this frequency will be lost. When you set your center and effects type speakers to narrow, small, or limited mode, all of the bass lower than the assigned crossover point will be redirected to the subwoofer along with the LFE output—guaranteeing that no bass information from these channels is lost.
Please note: Some processors allow the changing of speaker configuration based on source material type. Under these conditions the user may want to run the fronts in narrow, small, or limited mode for multi-channel source material and run the fronts in wide, large, or full mode for 2-channel stereo source material.

WARNING! Based on the performance of most processors it is recommended that MartinLogan center and effects type speakers not be run in large, wide, or full range mode. Doing so may potentially damage the speaker if the processor attempts to drive the speaker beyond its rated frequency range. This warning also applies to products from other manufacturers.
3 Calculate the number equal to 70% of your main loudspeaker's lowest frequency rating. Us the Subwoofer Contrl App to set the Low Pass Filter to a setting equal to the resulting number. If the resulting number is lower than 30Hz , set this to 30Hz .
4 Play familiar music with bass content. Use the Subwoofer Control App to increase the Volume (level) until the music has deep extended bass. Be careful to avoid levels that become overwhelming.
5 Using the Subwoofer Control App, try Phase and Polarity (Inverted) in different settings until the best blending is obtained. Play familiar music with deep, repetitive bass. Adjust the Phase and Polarity (Inverted) so the bass notes seem their loudest and without blur when heard from your typical listening position. If you are augmenting MartinLogan loudspeakers, we suggest you start with Phase set at 90° (with Inverted polarity turned on) when experimenting.
6 With multi-channel source material playing, use the bass management section of your receiver/processor's speaker setup
to set the sub volume level at an appropriate level. Follow the instructions in your processor's manual to fine-tune the sub level.
7 If your processor offers the option to setup crossovers for a subwoofer, we recommend that you start with the following settings—Crossover: 70Hz, High Pass: 12dB, and Low Pass: 24dB. The optimal setting for these options may vary depending on your room and listening preferences. Experiment and listen for what sounds best to you.
8 If you have completed steps 1-7 and still have weak or booming bass consider using the Suwoofer Control App to further
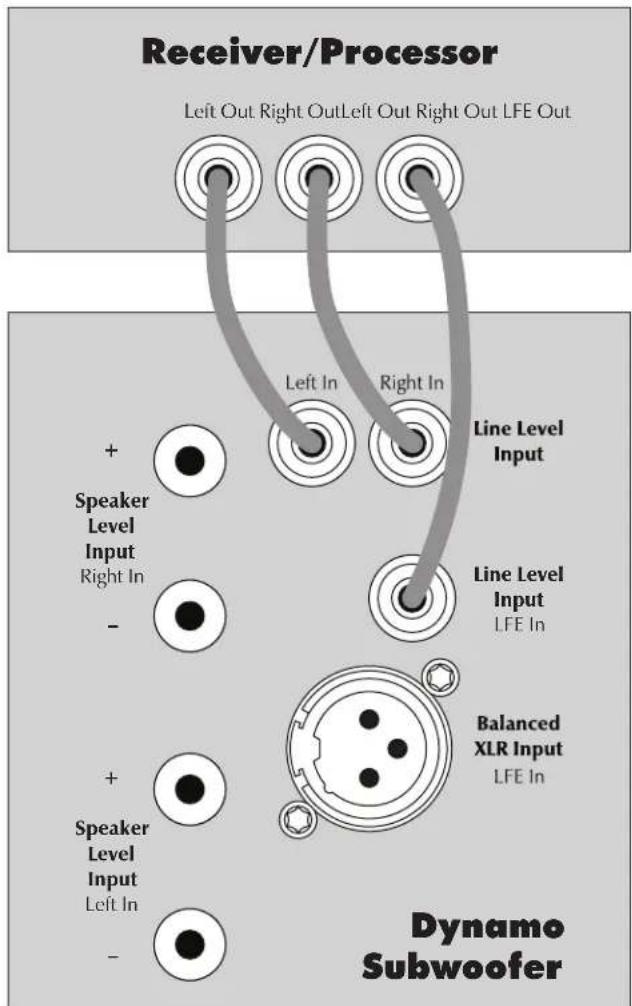
Figure 18. Signal connection for 2-channel/multi-channel mode.
adjust 20-30Hz Level to compensate for these anomalies (yes, you're tweaking the 20-30Hz Level again). Experiment with the settings and listen to the result. Try to find a position that sounds correct to you. Experiment by changing the Volume (level) setting while adjusting the 20-30Hz Level. Find a position that gives you deep extended bass and good blending with your main speakers. If you still have weak or booming bass you may want to consider moving your subwoofer and go through these setup steps again (especially if it is located in or near a room corner). Remember, room position has a major impact on overall bass performance.
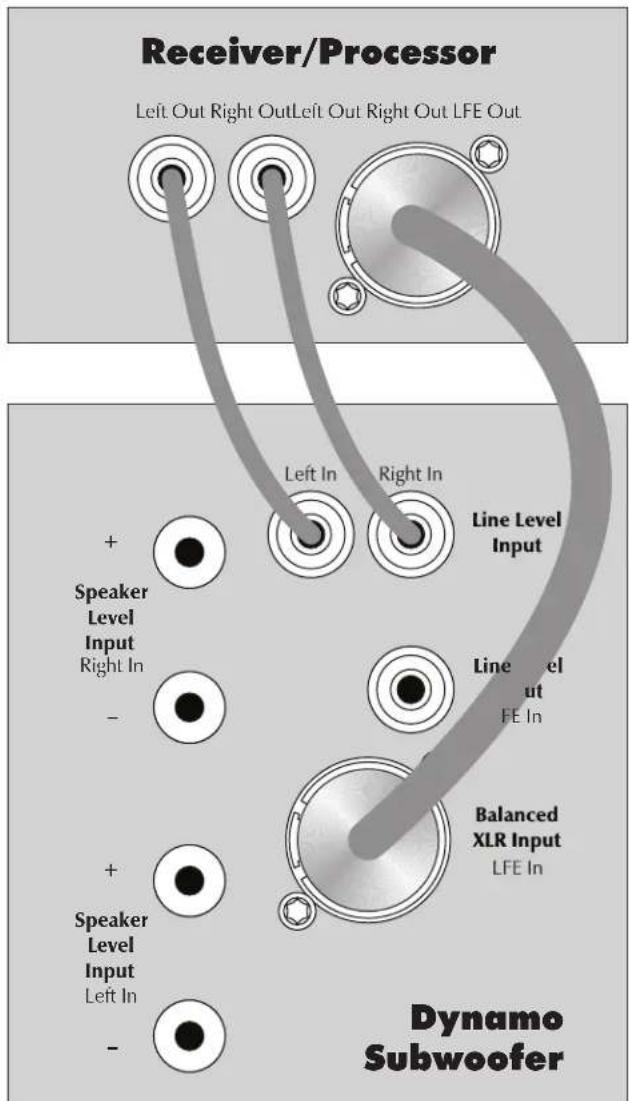
Figure 19. Signal connection for 2-channel/multi-channel mode.
Using Speaker Level Inputs
This connection method is recommended if your subwoofer will be used in a 2-channel only system with full-range front loudspeakers. To connect using Speaker Level Inputs the speaker cable sshould be terminated using banana style plugs. The Low-Pass Filter is applied to the signal received through these inputs.
SWT-X Wireless System: This connection method is not compatible with the SWT-X wireless receiver/transmitter system.
Speaker Level Inputs are an alternative to using RCA or XLR interconnects. If you use the Speaker Level Inputs do not use RCA or XLR at the same time for Left In/Right In connections. If you use the Speaker Level Inputs it is okay to still use RCA or XLR for the LIFE connection.
Connect the left and right outputs of your amplifier to the sub's Speaker Level Inputs (Left In/Right In). Use quality speaker cable and banana plugs. Be consistent and make sure the positive (+) and negative (-) terminals from your amplifier are attached to the matching positive (+) and negative (-) terminals on the subwoofer.
If your amplifier only has one set of outputs you may connect your amplifier to your speakers as normal and run an additional set of cables from your speakers to the subwoofer's Speaker Level Inputs.
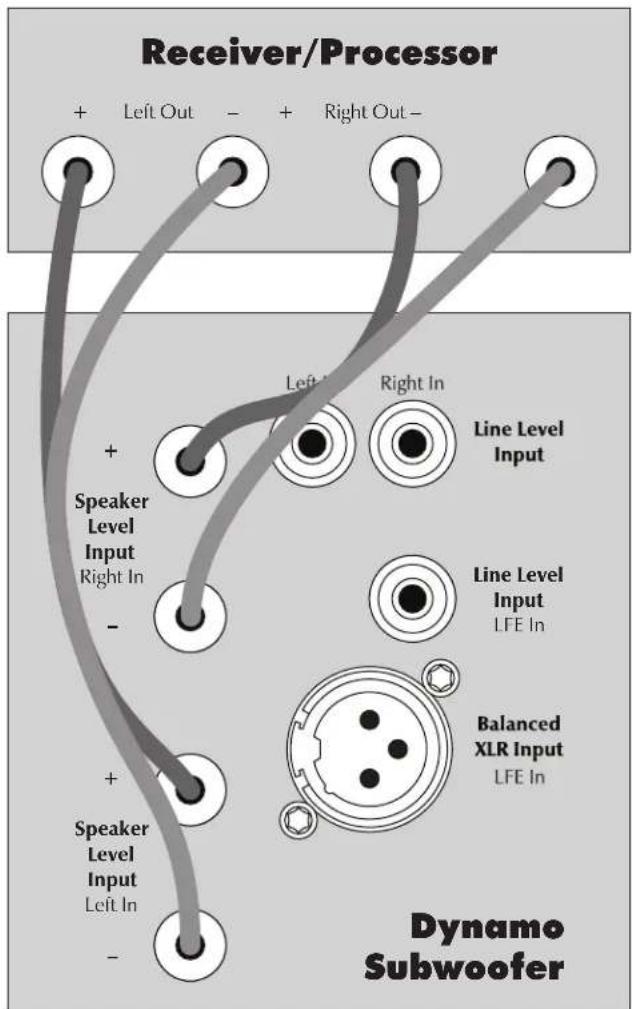
Figure 20. Signal connection for speaker level inputs.
SWT-X Wireless System
Found on DYNAMO 600X, 800X, 1100X, and 1600X. The SWVT-X Subwoofer Wireless transmitter/receiver system is sold separately and available from your local dealer.
The SwT-X wireless system can be used to establish either a left/right line level connection or a LFE line level connection.
To install the SwT-X wireless receiver, slide it into the Wireless Module Connection port on the back of the subwoofer.
SWT-X receivers and transmitters are shipped already paired.
Signal Connection:
1 Follow the instructions outlined in "2-Channel Mode" or "Multi-Channel Mode", only instead of connecting your receiver/processor to the subwoofer, connect it to the SwT-X transmitter. Please note, "Simultaneous 2-Channel/Multi-Channel Mode" and "Speaker Level Input" connection methods are not compatible with the wireless system.
Recommended Control Settings:
1 Follow the instructions outlined above in "2-Channel Mode" or "Multi-Channel Mode".
SWT-X Status LEDs and Power
The SwT-X transmitter shuts down to save power after about 20 minutes. When the transmitter shuts down the receiver will also shutdown shortly thereafter.
SWT-X Transmitter LED (front) Status:
- No light: Standby
Solid light: Transmitting wireless signals - Flashing slowly: Waiting to be synchronized
- Flashing fast: Searching for receiver (after sync button has been pressed)
SWT-X Transmitter LED (back) Status:
- Off: No power
On: Receiving power
SWT-X Receiver LED (front) Status:
- Off: Standby or subwoofer is unpowered
- On: Wireless audio being received
- Flashing slowly: Waiting to be synchronized
- Flashing fast: Searching for transmitter (after sync button has been pressed)
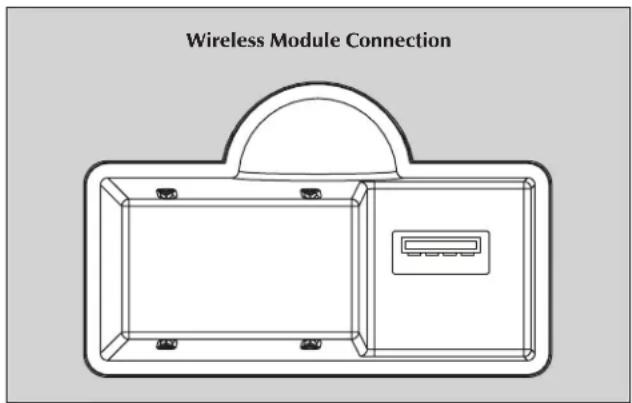
Figure 21. Wireless module receptacle
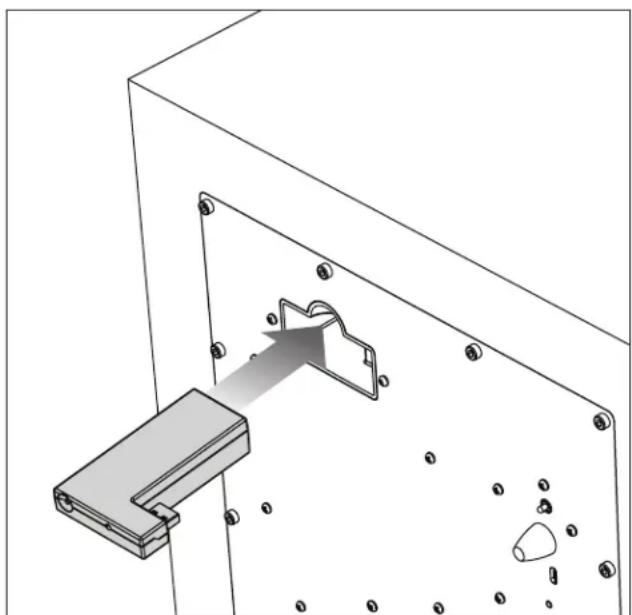
Figure 22. Wireless module installation
Subwoofer Position
Generally, subwoofoers have the most output when placed in the corner of a room. However, this can also exaggerate the subwoofoers output making blending difficult. We recommend starting by placing the subwoofer in a corner. If, after the full range of tuning techniques have been employed, the subwoofer sounds like it has too much upper bass energy try pulling it away from the wall, toward the listening position. This will lessen the reinforcement of these problematic frequencies from the wall and likely smooth out the response. Repeat the tuning techniques with the woofer controls after you move it.
www.martinlogan.com/subsetup
Setting up a subwoofer can be a daunting process. However, equipped with the right knowledge, exceptional results are attainable. To assist in the process of setting up your subwoofer, we've created an online resource to walk you through the process. Here you will find tips and tricks to aid with placement, connection, and setting the controls. Please visit www.martinlogan.com/subsetup.
Ask Your Dealer
Your MartinLogan dealer can suggest many options for optimal subwoofer placement. They also have many tools at their disposal, such as experience, familiarity with the associated equipment, and even sound analysis equipment which may make the task of determining optimal subwoofer placement easier.
Enjoy Yourself
MartinLogan subwooers are very refined subwoofer and will benefit from care in setup. With the above placement tips in mind you will find, over months of listening, that small changes can result in measurable differences. As you live with your subwoofer, do not be afraid to experiment with positioning until you find the optimal relationship between your room, settings and subwoofer that gives you the best results. Your efforts will be rewarded.
Installing in a Cabinet
When placing the subwoofer inside of a cabinet it is recommended that you use a front-firing configuration and that there be a minimum of three inches of open space between the cabinet and the front and back sides.
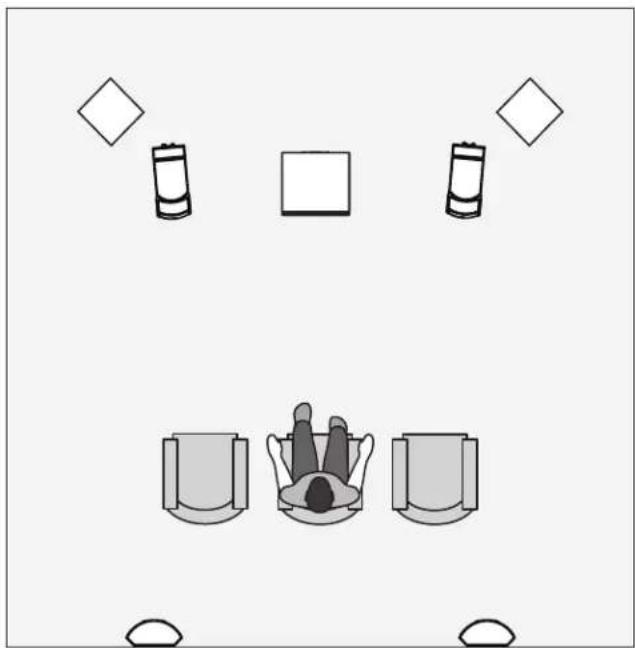
Figure 23. MartinLogan subwooers as the LFE channels, MartinLogan speakers as front, center, and surround (effects) channels. Note the corner placement of the subwooers at the front of the listening room.
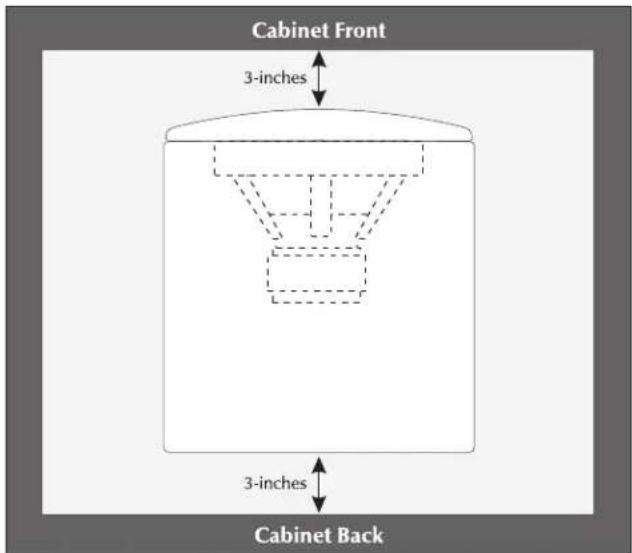
Figure 24. Placing the subwoofer in a cabinet requires a minimum of three inches of open space on the front and back.
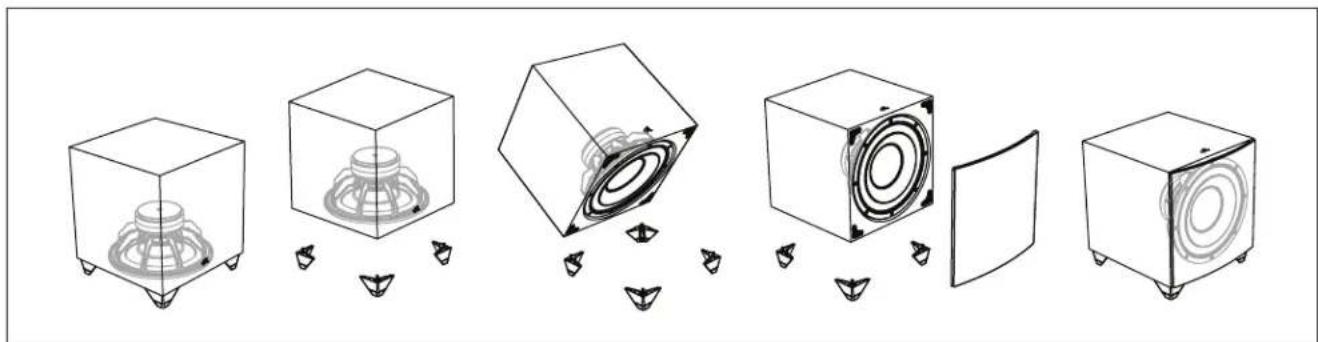
Figure 25. DYNAMO 800X, 1100X, and 1600X are capable of both frontfiring and down-firing woofer orientations.
Changing Woofer Orientation
DYNAMO 800X, 1100X, and 1600X
Please note: When configured in the front-firing orientation a right angle adaptor is required if using an XLR connection.
When installing the subwoofer in a cabinet it is recommended that the subwoofer be converted to a frontfiring configuration.
1 Prepare a flat surface with a blanket to protect the finish. Unplug signal and power connections. Remove the grill cloth, if installed.
2 Carefully lay the subwoofer on its side. Remove the rubber cap, unscrew the attached spike, and remove the foot.
3 Change the location of the four feet.
4 Reinstall the foot, spike, and, if desired, the rubber cap.
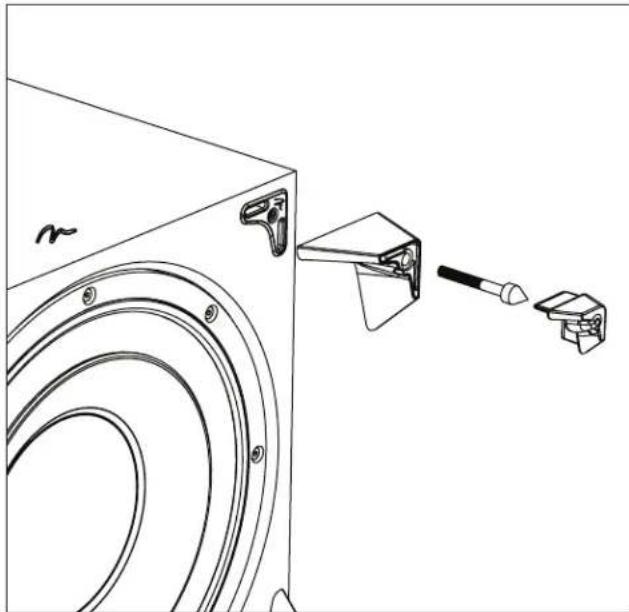
Figure 26. To change woofer orientation, remove the rubber cap, spike, and foot, change location, and reinstall.
Your Room
This is an area that requires both a little background to understand and some time and experimentation to attain the best performance from your system. Your room is actually a component and an important part of your system. This component is a large variable and can dramatically add to or subtract from a great sonic experience.
All sound is composed of waves. Each frequency has its own wave size, with the lower, or bass frequencies literally encompassing from 10 feet to as much as 40 feet. Your room participates in this wave experience like a swimming pool with waves reflecting and becoming enhanced depending on the size and shape of the room and the types of surfaces in the room.
Remember that your audio system can actually generate all of the information required to recreate a sonic event in time, space, and Ional balance. Acoustically, the role of an ideal room would be to neither delete nor contribute to that information. However, nearly every room does to some degree.
Terminology
Standing Waves
Sound coming from a speaker bounces around in a room until a pattern emerges—this is called a standing wave. Typically, this is only a problem with frequencies below 100Hz. When this happens different parts of your room experience either an excess or a lack of bass.
Some people believe that having a room without parallel walls will eliminate this effect. The truth is that non-parallel walls only generate different standing wave patterns than those that occur in rectangular rooms.
Usually, you can excite most of the standing waves in a room by putting the subwoofer in a corner. Listening position determines which standing waves you will experience. For instance, if you sit in a corner you will hear most of the standing waves. This can be an overpowering experience. Sitting next to a wall can also intensify the levels of the standing waves that are experienced.
Resonant Surfaces and Objects
All of the surfaces and objects in your room are subject to the frequencies generated by your system. Much like an instrument, they will vibrate and "carry on" in syncopation with the music, and may contribute in a negative way to the sound. Ringing, boominess, and even brightness can occur simply because surfaces and objects are "singing along" with your speakers.
Resonant Cavities
Small alcoves or closet type areas in your room can be chambers that create their own "standing waves" and can drum their own "one note" sounds.
Solid Footing
After living and experimenting with your subwoofer, you may want to use ETC™ (Energy Transfer Coupler) spikes. With the use of these spikes, the subwoofer will become more firmly planted on the floor and, consequently, bass will tighten. It is best not to implement the spikes, however, until you are secure in the positioning, as the spikes can damage the floor if the subwoofer is moved.
Spike Installation Instructions:
1 Carefully lay the subwoofer on its side to gain access to the bottom of the feet.
2 Remove the rubber cap from the foot to reveal the spike.
Caution: Make sure your hands and any cabling are clear of the spikes. Do not slide the subwoofer as spikes are sharp and can damage your floor or carpet.

Figure 27. To access the spikes, remove the rubber cap..
It had long been the practice of stereo buffers to connect their television to a stereo system. The advantage was the use of the larger speakers and more powerful amplifier of the stereo system. Even though the sound was greatly improved, it was still mono and limited by the broadcast signal.
In the late 1970's and early 1980's two new home movie formats became widely available to the public: VCR and laser disc.
By 1985, both formats had developed into very high quality audio/video sources. In fact, the sonic performance of some video formats exceeded audio-only formats. Now, with theater-quality sound available at home, the only element missing was the "surround sound" presentation found in movie houses.
Fortunately, Dolby and DTS encoded DVD's emerged with the same surround sound information encoded on home releases as the theatrical release. Additionally, new high-resolution home-viewing formats such as Blu-ray as well as high-definition content provided via cable or satellite have evolved which include multichannel encoded audio that is virtually master tape quality. All that is required to retrieve this information is a decoder and additional speakers and amps to reproduce it.
Home theater is a complex purchase and we recommend that you consult your local MartinLogan dealer, as they are well versed in this subject.
Each piece of a surround system can be purchased separately. Take your time and buy quality. No one has ever complained that the movie was too real. The following list and descriptions will give you only a brief outline of the responsibilities and demands placed on each speaker.
Front Left and Front Right
If these speakers will be the same two used for your stereo playback, they should be of very high quality and able to play loudly (over 102 dB) and reproduce bass below 80Hz .
Center Channel
This is the most important speaker in a home theater system, as almost all of the dialogue and a large portion of the front speaker information is reproduced by the center channel. It is important that the center speaker be extremely accurate and mate well with the front speaker, and that it is recommended for use as a center speaker. This is not the place to cut corners.
Surround Speakers
We recommend (along with the film industry) that the surround speakers play down to at least 80Hz . Surround speakers contain
the information that makes it appear that planes are flying over your head. Some may suggest that this is the place to save money and purchase small, inexpensive speakers. If you choose to do so, be prepared to upgrade in the future as discrete multi-channel digital encoding is proliferating rapidly and the demands on surround speakers have increased.
Subwoofer
With any good surround system you will need one or more high-quality subwoofoers (the .1 in a 5.1, 6.1, or 7.1 channel surround system). Most movie soundtracks contain large amounts of bass information as part of the special effects. Good subwoofoers will provide a foundation for the rest of the system.
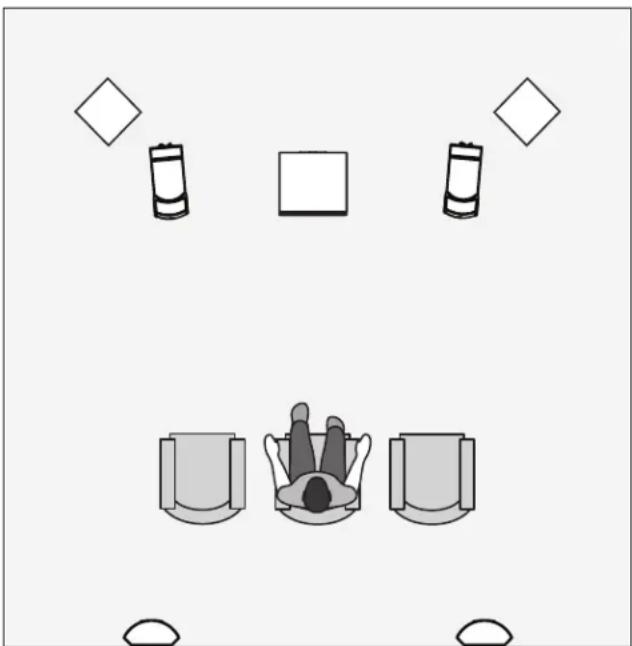
Figure 28. DYNAMO subwoofoers as the LFE [effects] channels, MartinLogan speakers as front, center, and surround [effects] channels.
About ARC
Your subwoofer includes Anthem Room Correction technology for optimizing low-frequency output within your room. Your subwoofer's ARC system employs a mobile device connected via Bluetooth or computer and a microphone connected via USB cables.
ARC utilizes multiple measurement points, at least five—but up to ten—individual data positions, allowing ARC to analyze the unique characteristics of your room. ARC software calculates correction curves for each measurement point, substantially minimizing the rounding errors of less sophisticated "calculators", like those used in standard on-board room equalization systems. Additionally, ARC computer software is capable of calibrating itself to individual microphones, eliminating potential interference that would otherwise skew the data.
Although ARC is designed to adjust the subwoofer's output to minimize sonic anomalies caused by room interactions, it is always recommended to use traditional methods to achieve a flat response before implementing digitally based room correction. Remember, subwoofer placement is one of the most influential parameters when dealing with anomalous low-frequency room interactions. Listening position is equally important to bass response but is often dictated by other factors that are more difficult to change.
The ARC in your subwoofer is not a replacement for room correction systems designed to optimize multi-channel audio systems across the entire frequency range. When beginning the task of optimizing a multi-channel audio system's performance, the first step should always be proper setup of the subwoofer and front, center, and surround speakers. The next step should be running ARC to adjust the individual subwoofer's output to account for room interactions. Only after proper setup of speakers and subwoofoers, including running ARC on the subwoofer[s], is it time to run your processor's full room correction system to help balance overall system performance within the room.
Before You Begin
Anthem Room Correction does not always require an external microphone. ARC Mobile can use the microphone built into some mobile devices (especially those found in Apple® iOS devices). It should be noted that external microphones, designed especially for ARC, may offer superior results. For users who desire a calibrated ARC microphone, ARC kits are sold separately and are available in several different versions. Check AnthemAV.com/ARC for compatibility of ARC Mobile with your mobile device or compatibility of ARC software with your computer's operating system.
NOTE: Use of your subwoofer's built-in USB Input is not required to run Anthem Room Correction. The ARC Mobile app can use a direct Bluetooth connection to the subwoofer.
ARC Connection (Mobile Device)
To run ARC Mobile your sub's Setting Control must be set to "App". If you plan to use the "Local" setting for your final installation you must temporarily set this switch to "App" for the duration of the ARC measurement and upload process.
ARC Mobile connects to your subwoofer using Bluetooth. Before running ARC you will need to turn on Bluetooth in your mobile device. When you run ARC Mobile it will discover all available devices. Select your subwoofer from this list.
Running ARC (Mobile Device)
To run ARC on a mobile device you will need to download the latest ARC Mobile app. ARC Mobile will walk you through the measurement process with step-by-step on screen instructions.
A calibrated ARC microphone, designed especially for use with mobile devices, is also available from your MartinLogan dealer. Depending on your mobile device you may be able to use the device's built-in microphone. Apple iOS devices tend to have microphones with very predictable responses. Android devices, however, prove to have less predictable microphone responses and benefit from a calibrated ARC microphone. Remember, to provide an accurate room correction curve, ARC need not only understand the sound of your subwoofer within your room, but also what coloration the microphone itself might be contributing to the measurements. Visit AnthemAV.com/ARC for details.
NOTE: The MartinLogan Subwoofer Control app and the ARC Mobile app may interfere with each other's ability to discover your subwoofer. If you're having trouble getting either app to run or your subwoofer is not being discovered, check to make sure the other app isn't open and running in the background.
- Before running ARC Mobile, set up your subwoofer by adjusting placement.
- During measurement ARC Mobile overrides the settings of the Volume (level), Phase, Low-Pass Filter, and 20-30Hz Level controls. These controls do not effect measurements. After the correction curve has been uploaded to the speaker these controls can be used to fine tune the subwoofer's performance.
If you are using an external ARC microphone, follow ARC
Mobile's queues for microphone connection instructions.
- When taking ARC measurements the microphone should be at locations approximately where your ears will be.
- If using an external microphone when taking ARC measurements, the microphone should point up, towards the ceiling.
- If using a mobile devices built-in microphone, the microphone should point in the direction of the device being measured.
- When taking ARC measurements the room should be silent. Please turn off or remove potential sources of noise.
- If using a mobile devices built-in microphone, it is recommended that you remove the mobile device from its case, as a case may interfere with measurement accuracy.
- ARC Mobile will require you to measure five listening positions. The first position should be located at the primary listening position. Subsequent measurements should be taken at other listening positions and should never be closer than 2-feet from one another.
- Although it might seem logical to do so, you do not need to take measurements throughout the room (i.e. in the front corners, far off to the side, etc.). Measurement locations should focus only on positions where people will be listening to the subwoofer.
ARC Connection (Computer)
To run ARC on a computer you will need an ARC compatible microphone (available from your MartinLogan dealer). Visit AnthemAV.com/ARC for details.
NOTE: If you own a MartinLogan PBK (Perfect Bass Kit) or Anthem ARC kit, the microphone included with either kit will work with the ARC computer software used to measure your subwoofer(s).
Before running ARC on a computer, connect your subwoofer to the computer. Use a USB cable to connect the subwoofer's USB Input (Micro-B USB) to a USB (Type A)-input on your computer. Depending on the version of your ARC kit (sold separately) you may need an additional USB (Type A) to Micro-B USB cable or a Mini-B USB (Female) to Micro-B USB (Male) adapter.
Before running ARC on a computer, Connect the ARC microphone to your computer using a Mini-B USB to USB (Type A) cable.
Running ARC (Computer)
To run ARC on a computer you will need to download the latest ARC software from AnthemAV.com/ARC. You will also need an ARC compatible microphone (available from your MartinLogan dealer).
When running ARC software we recommend Automatic/Wizard Mode for most users. This mode will walk you through the measurement process with step-by-step on screen instructions. The ARC software's Manual Mode is recommended for advanced users. For more information, please visit AnthemAV.com/ARC.
Before running ARC, set up your subwoofoers by adjusting placement.
- During measurement ARC overrides the settings of the Volume (level), Phase, Low-Pass Filter, and 20-30Hz Level controls. These controls do not effect measurements. After the correction curve has been uploaded to the speaker these controls can be used to fine tune the subwoofer's performance.
- When taking ARC measurements the microphone should be approximately at the locations where your ears will be.
- When taking ARC measurements, the microphone should point up, towards the ceiling.
- When taking ARC measurements the room should be silent. Please turn off or remove potential sources of noise.
- ARC will require you to measure five (or more) listening positions. The first position should be located at the primary listening position. Subsequent measurements should be taken at other listening positions and should be no closer than 2-fee to each other.
- Although it might seem logical to do so, you do not need to take measurements throughout the room (i.e. in the front corners, far off to the side, etc.). Measurement locations should focus only on positions where people will be listening to the subwoofer.
Frequently Asked Questions
How do I clean my subwoofer? Use a dust free cloth or a soft brush to clean your subwoofer.
Is it safe to set things on my subwoofer? While your subwoofer is designed with a durable, stain-resistant surface, we advise you not to set anything on your subwoofer—especially containers holding liquids.
Is there likely to be any interaction between my sub and the television in my Audio/ Video system?
No. Although your sub doesn't use a shielded driver, modern plasma, LCD, and LED television are not susceptible to magnetic interference. We recommend 3 feet between the sub and video components that are susceptible to magnetic fields.
Will my electric bill go 'sky high' by leaving my subwoofer plugged in all the time? No. When the power switch is set to 'Auto' the subwoofer will draw very few watts when idle or in standby mode.
Should I unplug my sub during a thunderstorm? Yes, or before. It's a good idea to disconnect all of your audio/video components during stormy weather.
Is the Control App available for PC or Mac? No. The Subwoofer Control App is only available for iOS and Android devices.
Is the Control App avialble for Windows Phone? No. The Subwoofer Control App is only available for iOS and Android devices.
How do I install a firmware update? Use a USB cable to connect the subwoofer's USB Input (Micro-B USB) to a USB (Type A) input on your computer. Using ARC software (available from AnthemAV.com/ARC), choose your subwoofer when asked to select a device. The ARC software should automatically ask if you would like to install an update if one is available. ARC software will download and install the firmware update from MartinLogan servers. You may also manually initiate a firmware update by choosing the option from the software's menu. ARC also offer's the ability to manually select a firmware file if you have one saved on your computer.
How do I connect my subwoofer to a receiver with two subwoofer outputs? Receivers and processors with multiple subwoofer outputs usually output the same signal on both outputs. You can connect your subwoofer to either output. If your
processor/receiver offers independent control of the inputs, connect your subwoofer to one output and use the receiver/processor's menu to configure the outputs.
How do I connect my sub to a 2-channel system?
Your subwoofer is designed to connect to either 2-channel or multi-channel systems (or both) and offers connections and controls for either scenario. Please review the "Connecting the Subwoofer and Setting Controls" section of this manual for details.
Why does my subwoofer have so few controls?
These subwoofoers have moved controls to a Subwoofer Control App (available for iOS or Android).
My receiver has one sub output jack, but my sub has two (or three) inputs. Which input should I use?
In most installations you will connect the receiver/processor's sub output to the susbwoofer's LFE In (or Right In/LFE In in the case of the DYNAMO 600X).DYNAMO subs offer flexible connection options to accommodate other scenarios. These are all outlined in the "Connecting the Subwoofer and Setting Controls" section of this manual.
Where should I place the subwoofer in my room?
We recommend starting by placing the subwoofer in a corner. Generally, subs have the most output when placed in the corner of a room. However, this can also exaggerate the sub output making it difficult to blend with the main speakers. Additional adjustments may be necessary. Please refer to the "Placement" section of this manual or www.martinlogan.com/subsetup for more details.
My receiver has a room correction system. Should I still use the subwoofer's built-in room correction?
The ARC (Anthem Room Correction) system in your sub is not a replacement for room correction systems designed to optimize multi-channel audio systems across the entire frequency range. When beginning the task of optimizing a multi-channel audio system's performance, the first step should always be proper setup of the sub and front, center, and surround speakers. The next step should be running ARC to adjust the individual sub's output to account for room interactions. Only after proper setup of speakers and subwoofer, including running ARC on the sub(s), is it time to run your processor's full room correction system to help balance overall system performance within the room."
Troubleshooting
No Output
-
Check that all components are plugged in and turned on.
-
Check all interconnecting cables.
- Check that the subwoofer is connected to the sub out (or other appropriate output) on the receiver/processor/amplifier.
- Check that subwoofer output is enabled in the receiver/processor's setup menu.
Make sure the sub's level control is not turned down.
If the problem persists, contact your dealer.
Muddy Bass
- Check placement. Try moving the subwoofer closer to the front and side walls.
- Check the type of feet that are being used. Try installing the ETC spikes.
Decrease the volume level. - Check your processor setup.
If the problem persists, contact your dealer.
Hums or Unusual Sounds
- Turn the subwoofer off, unplug all signal inputs, turn the subwoofer back on and turn up the level. If the problem disappears, the hum is originating elsewhere in your system.
- Connect the sub to the same AC circuit as the receiver/processor.
- If operating in wireless mode, move the sub away from microwave ovens and/or any devices that use wireless technology.
If the problem persists, contact your dealer.
Control App Troubleshooting
Multiple subwoofoers all have same name in the Control App or ARC (app or computer software)
- Unplug all subwoofoers. Plug the subs in one at a time and use the Subwoofer Control App to rename to each sub. Once you've given each subwoofer a custom name, plug them all back in.
- Use the Subwoofer Control App's tone sweep feature to generate a tone in each sub and rename each sub accordingly.
Control App not discovering subwoofer
Make sure sub's Setting Control is set to "App"
Make sure nothing is connected to the sub's USB Input.
- Make sure ARC Mobile is not connected to the sub on your current device or any other devices (completely close the app so that it is not running, even in the background).
- Unplug the subwoofer for 20 minutes and plug it back in. This will cause any connected devices to lose their connection.
- Use ARC (for computer) to check for any available firmware updates and install if necessary.
Custom passcode not working
- Use the code "0133" to bypass a custom passcode.
ARC Troubleshooting
ARC Mobile not discovering subwoofer
- Make sure sub's Setting Control is set to "App". The is necessary for the duration of the ARC process, even if you intend to use the "Local" setting.
Make sure nothing is connected to the sub's USB Input. - Make sure the Subwoofer Control App is not connected to the sub on your current device or any other devices (completely close the app so that it is not running, even in the background).
- Unplug the subwoofer for 20 minutes and plug it back in. This will cause any connected devices to lose their connection.
- Use ARC (for computer) to check for any available firmware updates and install if necessary.
ARC (for computer) not recognizing the ARC microphone
- Unplug the microphone's USB cable from your computer and plug it back into your computer. If your computer has more than one USB port try using a different USB port.
- While the microphone is plugged in to your computer allow one minute for the computer to install the microphone drivers.
- If driver installation fails, try connecting your subwoofer and microphone to an external USB hub and the hub to your computer.
- Try to re-trigger installation of the microphone drivers. On your Windows PC, go the Device Manager (right click "Computer" in the Start menu and select "Properties"). In the list of devices locate "Sound, video, and game controllers" and expand the list of available devices. Right click on the defective microphone and select uninstall. With the microphone's USB cable attached to your computer, right click any item in the Device Manager and select "Scan for hardware change".
ARC (for computer) software Installation
- Make sure your subwoofer and ARC microphone are not connected to the computer when installing the ARC software.
If you are having trouble installing the software, go to AnthemAV.com/ARC and download the installation file to make sure you are using the newest version. - If you are still having trouble installing the software or the software gets stuck repeatedly on the first measurement it may be best to try another computer.
Warranty and Registration
Your subwoofer is provided with an automatic Limited 90 Day Warranty coverage. You have the option, at no additional charge, to receive Limited 3-Year Warranty coverage. To obtain the Limited 3-Year Warranty coverage you need to register your product with MartinLogan. For your convenience MartinLogan offers online warranty registration at www.martinlogan.com. Please retain your original sales receipt from an authorized MartinLogan dealer or distributor for proof of warranty terms and proof of purchase.
MartinLogan may not honor warranty service claims unless we have a completed warranty registration on file!
Service
Should you be using your MartinLogan product in a country other than the one in which it was originally purchased, we ask that you note the following:
- The appointed MartinLogan distributor for any given country is responsible for warranty servicing only on units distributed by or through it in that country in accordance with its applicable warranty.
- Should a MartinLogan product require servicing in a country other than the one in which it was originally purchased, the end user may seek to have repairs performed by the nearest MartinLogan distributor, subject to that distributor's local servicing policies, but all cost of repairs (parts, labor, transportation) must be born by the owner of the MartinLogan product.
- If, after owning your subwoofer for six months, you relocate to a country other than the one in which you purchased your subwoofer, your warranty may be transferable. Contact MartinLogan for details.
| DYNAMO 600X* | DYNAMO 800X* | |
| System Frequency Response... | 27-200 Hz ± 3 dB. Anechoic in LFE mode. | 24-200 Hz ± 3 dB. Anechoic in LFE mode. |
| Woofer | 10" (25.4cm) high-excursion, inverted sur- round, polypropylene cone in a stamped steel basket with extended throw driver assembly. Ported. | 10" (25.4cm) high-excursion, inverted sur- round, polypropylene cone in a stamped steel basket with extended throw driver assembly; sealed non-resonant cabinet design. |
| Amplifier | 120 watts (240 watts peak) | 300 watts (600 watts peak) |
| Controls (backplate)... | Located on subwoofer backplate | Located on subwoofer backplate |
| Level... | Min-Max | Min-Max |
| Setting Control | Local, App | Local, App |
| Power Mode | On, Auto | On, Trigger, Auto |
| Controls (via Bluetooth) | App available for iOS and Android | App available for iOS and Android |
| Level... | -40 to 12dB | -40 to 12dB |
| Low-Pass Filter (Frequency) | 35-120Hz | 35-120Hz |
| Low-Pass Filter (Order) | Bypass, Third, Fourth | Bypass, Third, Fourth |
| Phase... | 0-180° (1° Increments) | 0-180° (1° Increments) |
| Phase (Polarity) | Normal, Inverted | Normal, Inverted |
| Preset Listening Modes... | Music, Night, Movie | Music, Night, Movie |
| 20-30Hz Level... | ±10dB | ±10dB |
| Anthem Room Correction (ARC) | On, Off | On, Off |
| Tone Sweep (20-120Hz) | On, Off, Pause (Frequency) | On, Off, Pause (Frequency) |
| Inputs (Line Level RCA) | Left and Right/LFE | Left, Right, and LFE |
| Inputs (Balanced XLR) | N/A | N/A |
| Inputs (Speaker Level) | Left and Right via banana jacks | Left and Right via banana jacks |
| Inputs (12V Trigger) | N/A | 3.5mm (5-24V DC) |
| Inputs (USB) | Micro USB (for ARCTM/firmware update) | Micro USB (for ARCTM/firmware update) |
| Input (Wireless) | SWTX Wireless Receiver (sold separately) | SWTX Wireless Receiver (sold separately) |
| Input Impedance... | RCA: 8300 Ohms | RCA: 8300 Ohms |
| XIR: N/A | XIR: N/A | |
| Speaker Level: 2000 Ohms [red to black] | Speaker Level: 2000 Ohms [red to black] | |
| Room Correction... | Anthem Room Correction (ARCTM) ready | Anthem Room Correction (ARCTM) ready |
| Power Draw... | Typical: 30W, Max: 150W, Idle: 4W, Standby: 0.5W | Typical: 70W, Max: 360W, Idle: 10W, Standby: 0.5W |
| Feet... | Rubber | Rubber, ETCTM (Energy Transfer Coupler) spikes |
| Weight... | 35.5 lbs. each (16.1 kg) | 30 lbs. each (13.6 kg) |
| Size (HxWxD, Front-Firing Orientation) | N/A | 14.6 x 12.4 x 12.7 inches (37.1 x 31.5 x 32.4 cm) |
| Size (HxWxD, Down-Firing Orientation) | 16.3 x 14.5 x 14.9 inches (41.5 x 36.7 x 37.8 cm) | 13.7 x 12.4 x 13.1 inches (34.8 x 31.5 x 33.3 cm) |
System Frequency Response. . . .
Woofer
Amplifier
Controls (backplate). 1
Level
Setting Control
Power Mode
DYNAMO 1100X*
22-200 Hz ± 3 dB. Anechoic in LFE mode.
12" [30.5cm] high-excursion, inverted surround, polypropylene cone in a cast aluminum basket with extended throw driver assembly; sealed nonresonant cabinet design.
650 watts (1300 watts peak)
Located on subwoofer backplate
Min-Max
Local, App
On, Trigger, Auto
Controls (via Bluetooth) .
Level
LowPass Filter (Frequency)
LowPass Filter [Order]
Phase
Phase (Polarity)
Preset Listening Modes
20-30Hz Level
Anthem Room Correction (ARC)
Tone Sweep [20-120Hz]
App available for iOS and Android
-40 to 12dB
35-120Hz
Bypass, Third, Fourth
0-180° (1° Increments)
Normal, Inverted
Music, Night, Movie
±10dB
On, Off
On, Off, Pause (Frequency)
Left, Right, and LFE
LFE
Inputs (Line Level RCA)
Inputs (Balanced XLR)
Inputs (Speaker Level).
Inputs (5-24V DC Trigger).
Inputs (USB)
Input (Wireless).
Input (Impedance).
Room Correction.
Power Draw.
Feet
Weight.
Size (HxWxD, Front-Firing Orientation) ..
Size (HxWxD, Down-Firing Orientation)..
DYNAMO 1600X*
20-200 Hz ± 3 dB. Anechoic in LFE mode.
15 [38.1cm] high-excursion, inverted surround, polypropylene cone in a cast aluminum basket with extended throw driver assembly; sealed non-resonant cabinet design.
900 watts [1,800 watts peak]
Located on subwoofer backplate
Min-Max
Local, App
On, Trigger, Auto
App available for iOS and Android
-40 to 12dB
35-120Hz
Bypass, Third, Fourth
0-180°(1'Increment)
Normal, Inverted
Music, Night, Movie
±10dB
On, Off
On, Off, Pause (Frequency)
Left, Right, and LFE
LFE
Left and Right via banana jacks
3.5mm [5-24V DC]
Micro USB (for ARCTM /firmware update)
SWT-X Wireless Receiver (sold separately)
RCA:8300 Ohms
XLR: 28000 Ohms [pin 2 to 3]
Speaker Level: 2000 Ohms [red to black]
Anthem Room Correction (ARC™) ready
Typical: 125W, Max: 800W
Idle: 1.5W, Standby: 0.5W
Rubber, ETC™ (Energy Transfer Coupler) spikes
57 lbs. each [25.9kg]
20.1 x 17.9 x 19.1 inches (51 x 45.4 x 48.6 cm)
20× 17.9× 18.5 inches (50.9× 45.4× 47cm)
DYNAMO 600X
DYNAMO 800X
DYNAMO 1100X
DYNAMO 1600X
Balanced XLR Input (LFE In) (Entree XLR equilibree) (LFE In)
Recommended Control Settings:
www.martinlogan.com/subsetup
WARNING! Do not use your DYNAMO subwoofer outside of the country of original sale—voltage requirements vary by country. Improper voltage can cause damage that will be potentially expensive to repair. The DYNAMO subwoofer is shipped to authorized MartinLogan distributors with the correct power supply for use in the country of intended sale. A list of authorized distributors can be accessed at www.martinlogan.com or by emailing info@martinlogan.martinlogan.com.

2101 Delaware Street, Lawrence, Kansas, USA tel/eli.785.749.0133 fax/telc.785.749.5320 www.martinlogan.com
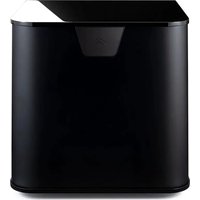
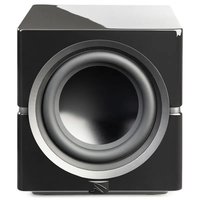
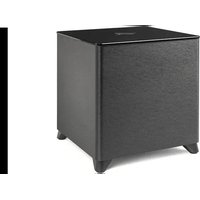
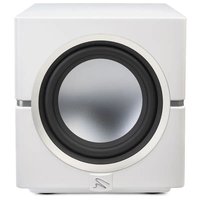
- Settings:
- A/V Processor Bass Management Settings:
- Overview of Controls and Connections 2
- Overview of the Subwoofer Control App 5
- Connecting the Subwoofer and Setting Controls . . 9
- Placement 16
- Room Acoustics 18
- Home Theater 19
- Anthem Room Correction (ARC™) Setup 20
- Frequently Asked Questions and Troubleshooting 22
- General Information 24
- Specifications. 26
- INFORMATION SUR LA CONFORMITE POUR L'UE
- DYNAMO 600X, DYNAMO 800X, DYNAMO 1100X, DYNAMO 1600X
- SafetyWarnings and Installation in Brief (English)
- Important Safety Instructions
- WARNING!
- Step 1: Unpacking
- Step 2: Placement
- Step 3: Signal Connection
- Step 4: Power Connection (AC) (see warning)
- Step 5a: Setting the Controls (Using LFE Input)
- Step 5b: Setting the Controls (Using Left/Right Inputs)
- Step 6: Listen and Enjoy.
- annou!
- -
- Juaau 1: unana
- Zuaaun 2:
- Jnaua 3: miaiaaynu
- Level
- USB Input
- Status
- Power Mode and Trigger Input
- Audio Signal Connections
- Line Level Input (Left In / Right In)
- Line Level Input (LFE In)
- Balanced XLR Input (LFE In)
- Speaker Level Input (Left In / Right In)
- Wireless Audio Signal Connection
- AC Power Connection
- Break-In
- The Logo Button
- The Menu Bar
- Settings: Volume
- Settings: Low Pass Filter
- Settings: Phase
- Settings: Listening Modes
- Settings: 20-30Hz Level
- Settings: Room Correction
- Settings: Passcode
- Settings: Rename
- Settings: Reset
- Before Connecting the DYNAMO
- 2-Channel Mode
- Signal Connection:
- Recommended Control Settings:
- Multi-Channel Mode
- Simultaneous 2-Channel/Multi
- Channel Mode
- Using Speaker Level Inputs
- SWT-X Wireless System
- SWT-X Status LEDs and Power
- SWT-X Transmitter LED (front) Status:
- SWT-X Transmitter LED (back) Status:
- SWT-X Receiver LED (front) Status:
- Subwoofer Position
- www.martinlogan.com/subsetup
- Ask Your Dealer
- Enjoy Yourself
- Installing in a Cabinet
- Changing Woofer Orientation
- Your Room
- Terminology
- Standing Waves
- Resonant Surfaces and Objects
- Resonant Cavities
- Solid Footing
- Spike Installation Instructions:
- Front Left and Front Right
- Center Channel
- Surround Speakers
- Subwoofer
- About ARC
- Before You Begin
- ARC Connection (Mobile Device)
- Running ARC (Mobile Device)
- ARC Connection (Computer)
- Running ARC (Computer)
- Frequently Asked Questions
- Is there likely to be any interaction between my sub and the television in my Audio/ Video system?
- How do I connect my sub to a 2-channel system?
- Why does my subwoofer have so few controls?
- My receiver has one sub output jack, but my sub has two (or three) inputs. Which input should I use?
- Where should I place the subwoofer in my room?
- My receiver has a room correction system. Should I still use the subwoofer's built-in room correction?
- Troubleshooting
- No Output
- Muddy Bass
- Hums or Unusual Sounds
- Control App Troubleshooting
- Multiple subwoofoers all have same name in the Control App or ARC (app or computer software)
- Control App not discovering subwoofer
- Custom passcode not working
- ARC Troubleshooting
- ARC Mobile not discovering subwoofer
- ARC (for computer) not recognizing the ARC microphone
- ARC (for computer) software Installation
- Warranty and Registration
- Service
- System Frequency Response. . . .
- Woofer
- Amplifier
- Controls (backplate). 1
- DYNAMO 1100X*
- Controls (via Bluetooth) .
- Inputs (Line Level RCA)
- Inputs (Balanced XLR)
- Inputs (Speaker Level).
- Inputs (5-24V DC Trigger).
- Inputs (USB)
- Input (Wireless).
- Input (Impedance).
- Room Correction.
- Power Draw.
- Feet
- Weight.
- Size (HxWxD, Front-Firing Orientation) ..
- Size (HxWxD, Down-Firing Orientation)..
- DYNAMO 1600X*
- Balanced XLR Input (LFE In) (Entree XLR equilibree) (LFE In)
Brand : Martin Logan
Model : Dynamo 800X
Category : Subwoofer