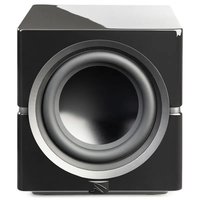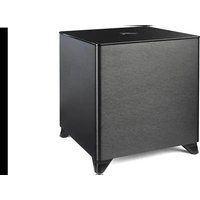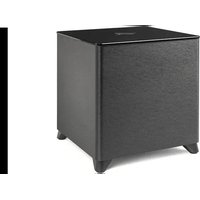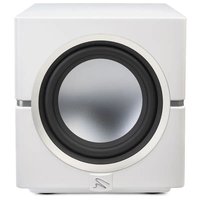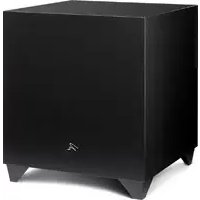
Depth 215 - Subwoofer Martin Logan - Free user manual and instructions
Find the device manual for free Depth 215 Martin Logan in PDF.


User questions about Depth 215 Martin Logan
0 question about this device. Answer the ones you know or ask your own.
Ask a new question about this device
Download the instructions for your Subwoofer in PDF format for free! Find your manual Depth 215 - Martin Logan and take your electronic device back in hand. On this page are published all the documents necessary for the use of your device. Depth 215 by Martin Logan.
USER MANUAL Depth 215 Martin Logan
natural_image
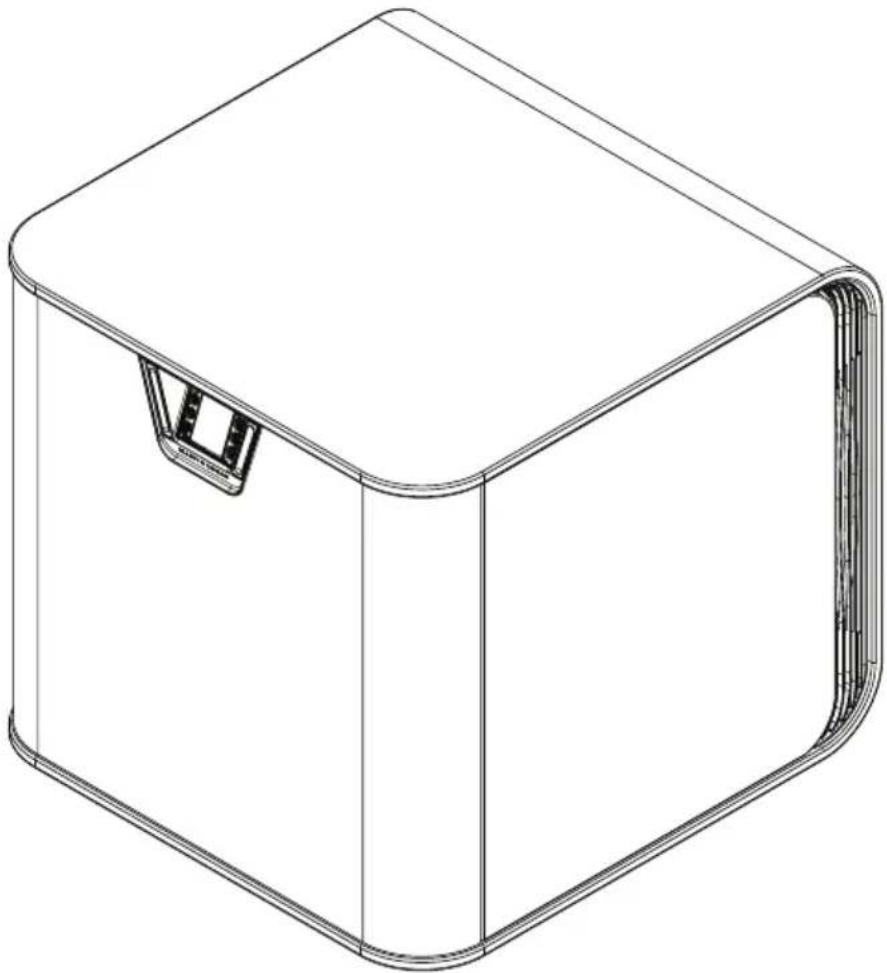
Line drawing of a 3D rectangular box with a recessed top and side panel, no text or symbols presentUSER'S MANUAL
WARNING! Heavy Subwoofer
Caution: Subwoofers are very heavy.
Always use a team lift or appropriate
lifting equipment when moving.
Dragging on the floor can damage the
rubber feet and compromise the unit.


WARNING! Use Sliders When Moving
Note: To prevent damage, always use
sliders or dollies instead of dragging the subwoofer across the floor.
This helps protect both the unit and your flooring.


Ratings
Rated Input Voltage: 100-240 Vac
Rated Frequency: 50-60 Hz
Rated Input Power:
Model Depth 215: 500VA
Model Depth 212: 250VA


The lightning bolt flash with arrowhead symbol, within an equilateral triangle, is intended to alert the user to the presence of potentially “dangerous voltage” within the product’s enclosure that may be sufficient to constitute a risk of electric shock.

The exclamation point within an equilateral triangle is intended to alert the user to the presence of important operating and maintenance (servicing) instructions in the literature accompanying the appliance.
WARNING!
• Refer servicing to a qualified technician.
- To prevent fire or shock hazard, do not expose this module to moisture.
- Turn subwoofer off should any abnormal conditions occur.

WARNING!
Changes or modification to this unit not expressly approved by the party responsible for compliance could void the user authority to operate the equipment

Notes:
This equipment has been tested and found to comply with the limits for a Class B digital device, pursuant to part 15 of the FCC Rules. These limits are designed to provide reasonable protection against harmful interference in a residential installation. This equipment generates, uses and can radiate radio frequency energy and, if not installed and used in accordance with the instructions, may cause harmful interference to radio communications. However, there is no guarantee that interference will not occur in a particular installation. If this equipment does cause harmful interference to radio or television reception, which can be determined by turning the equipment off and on, the user is encouraged to try to correct the interference by one or more of the following measures:
- Increase the separation between the equipment and receiver.
- Connect the equipment into an outlet on a circuit different from that to which the receiver is connected.
- Consult the dealer or an experienced radio/TV technician for help.
This device complies with part 15 of the FCC Rules. Operation is subject to the following two conditions:
(1) This device may not cause harmful interference, and
(2) This device must accept any interference received, including interference that may cause undesired operation.
Where the mains plug or an appliance coupler is used as the disconnect device, the disconnect device shall remain readily operable.

In accordance with the European Union WEEE (Waste Electrical and Electronic Equipment) directive effective August 13, 2005, we would like to notify you that this product may contain regulated materials which upon disposal, according to the WEEE directive, require special reuse and recycling processing. For this reason Martin Logan has arranged with our distributors in European Union member nations to collect and recycle this product at no cost to you.
To find your local distributor please contact the dealer from whom you purchased this product, email info@martinlogan.com or visit the distributor locator at www.martinlogan.com.
Please note, only this product itself falls under the WEEE directive. When disposing of packaging and other related shipping materials we encourage you to recycle these items through the normal channels.
EU COMPLIANCE INFORMATION
Hereby, PML Sound International declares that the Grotto® Series Subwoofer is in compliance with the essential requirements and other relevant provisions of the following EU Compliance Directive Information.
- Conforms to European Union Low Voltage Directive 2014/35/EU;
• European Union EMC Directive 2014/30/EU;
• European Union Eco-Design Directive 2009/125/EC;
• European Union WEEE Directive 2012/19/EU;
• European Union Restriction of Hazardous Substances Recast (RoHS2) Directive 2011/65/EU; - European Union Registration, Evaluation, Authorization and Restriction of Chemicals (REACH) Directive 2006/121/EC; You may obtain a free copy of the Declaration of Conformity by contacting your dealer, distributor, or PML Sound International's worldwide headquarters. Contact information can be found here: http://www.martinlogan.com
PROTECTIVE EARTHING TERMINAL (if applicable)
The apparatus should be connected to a mains socket outlet with protective earthing connection.

Max temperature: 40C
Min temperature: -33C
Max altitude: 2000m
Max humidity: 95% non-condensing

Audio Signal Connections 8
LFE Input (RCA or XLR) 8
RCA Line Level Input (Left In / Right In)....8
XLR Line Level Input (Left In / Right In) ..... 9
Subwoofer Out 9
Speaker Level Input 10
Wireless Connection 10
Simultaneous Connections ..... 11
Controls 12
Rear Panel Controls 12
Power Mode 12
Wireless Audio "Pair"....12
Subwoofer Setting Overview: 12
Power Mode 12
Wireless Audio Pairing 12
Level....13
Exit 13
Sweep....13
Low Pass Filter 13
Phase/Polarity 14
Listening Mode 14
20-30Hz Level....14
ARC 14
Manual QR....14
App QR Code 14
Wireless 15
Passcode....15
Logo Color 15
Information 15
Reset....15
Language 15
ARC (Calibration Kit Included) ..... 17
Running ARC Genesis....18
Placement 18
Solid Footing....19
Benefits of Multiple Subwoofers ..... 20
General Information 21
Warranty Information 21
Service 21
Serial Number....21
Ask Your Dealer....21
Troubleshooting....22
Contacting Customer Service 22
Specifications 23, 25
Product Dimensions....24, 26
Serial Number: ____
Record your serial number here for easy reference. You will need this information when filling out your warranty registration. The serial number is located near the binding posts and on the product carton.
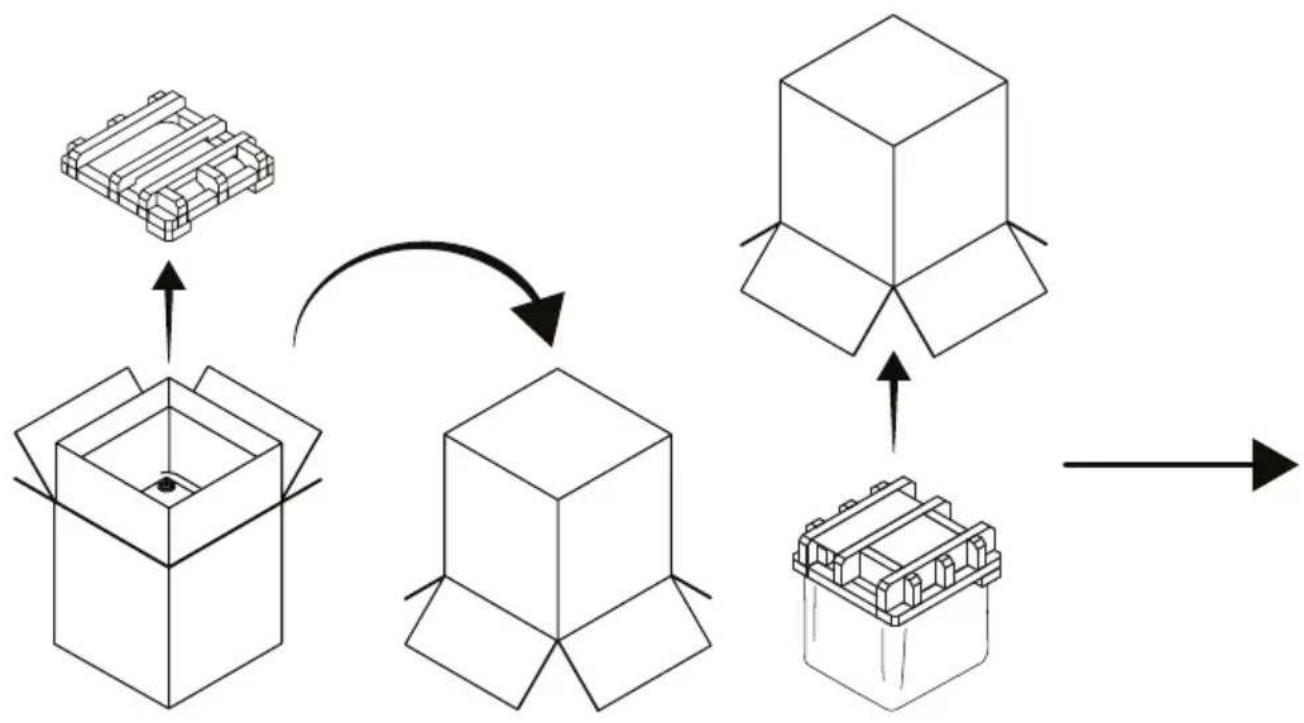
UNBOXING & CONTENTS
flowchart
graph TD
    A["3D Object"] --> B["3D Box"]
    B --> C["2D Object"]
    C --> D["3D Box"]
    D --> E["2D Box"]
    E --> F["3D Box"]
    F --> G["2D Box"]
    G --> H["3D Box"]
    H --> I["2D Box"]
    I --> J["3D Box"]
    J --> K["2D Box"]
    K --> L["3D Box"]
    L --> M["2D Box"]
    M --> N["3D Box"]
    N --> O["2D Box"]
    O --> P["3D Box"]
    P --> Q["2D Box"]
    Q --> R["3D Box"]
    R --> S["2D Box"]
    S --> T["3D Box"]
    T --> U["2D Box"]
    U --> V["3D Box"]
    V --> W["2D Box"]
    W --> X["3D Box"]
    X --> Y["2D Box"]
    Y --> Z["3D Box"]
DEPTH™
High-Resolution Subwoofer System
text_image
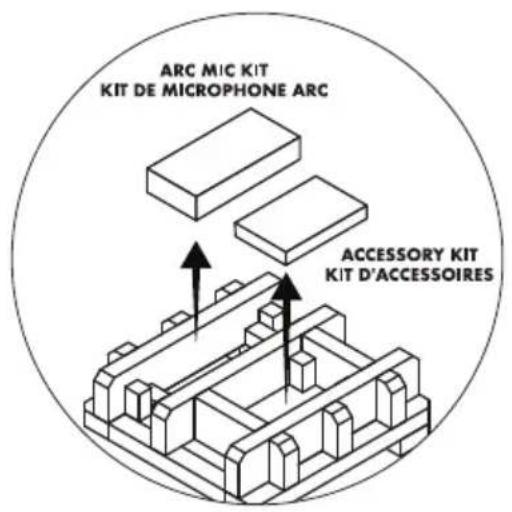
ARC MIC KIT KIT DE MICROPHONE ARC ACCESSORY KIT KIT D'ACCESSOIRES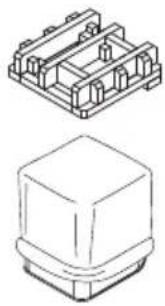
natural_image
Technical line drawing of two electronic component assemblies (no text or symbols)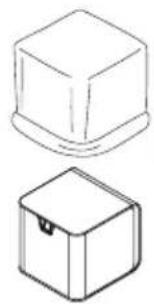
natural_image
Two technical line drawings of a mechanical component, one with a rounded top and the other with a rectangular base (no text or symbols)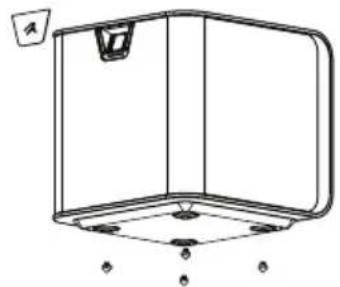
natural_image
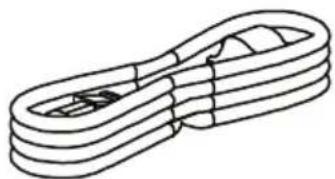
Technical line drawing of a 3D rectangular frame with mounting holes and a small inset view (no text or symbols)- Power Cord
- Subwoofer
*Subwoofer cable not included
natural_image
Line drawing of a coiled spring or rope structure (no text or symbols)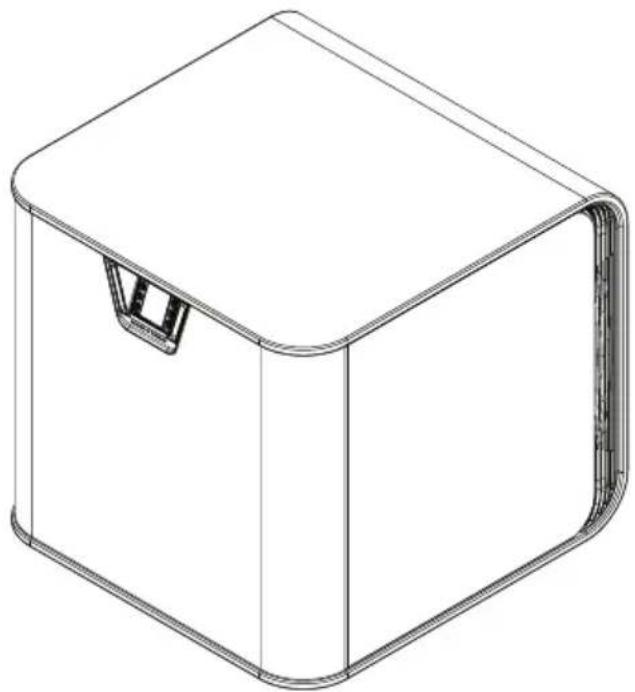
natural_image
Line drawing of a 3D rectangular box with a recessed top and side panel, no text or symbols presentAUDIO SIGNAL CONNECTIONS
LFE Input (RCA or XLR)
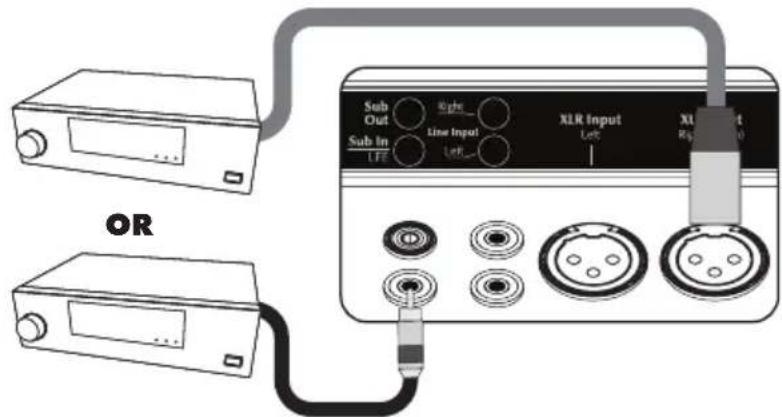
This is the most common connection for a subwoofer, and uses a single RCA or XLR style cable. If you have the option to use XLR, it is recommended to do so. The LFE connection is designed to be used with any device that has its own built in bass management settings. The subwoofer will not apply additional Low-Pass filtering to the signal received through the LFE Input. Through the LFE Input, the Low-Pass filtering is handled by the connected device. The most common devices that use the LFE input on the subwoofer are AV Receivers and Processors, but other devices like powered speakers or integrated amplifiers may also have their own bass management. If you aren't sure if you should use the LFE connection or not, please consult your products owner's manual, your dealer, or MartinLogan. Please Note: When using XLR for LFE, the Right XLR Input on the subwoofer is used. When using this input for LFE, the Low Pass Filter on Depth should be set to "Bypass" (the default option). The built in Low Pass Filter is a "global" option, meaning every input on the subwoofer will use the same Low Pass Filter settings. The exception to this is the RCA LFE input, which is permanently and independently set to "bypass" no matter what setting is chosen for the Low Pass Filter. Because of this, we recommend using RCA for LFE if the XLR inputs are also being used for Stereo playback. This method guarantees no additional filtering is ever applied to the LFE signal.
text_image
OR Sub Out Sub In LINE Input Line Input XLR Input Left XLR Input RightRCA Line Level Input (Left In / Right In)
Connect from the Main Out/Pre Out/Sub Out on your receiver/pre-amp/electronic device. The setting for the Low-Pass Filter control is applied to the signal received through these inputs unless the Low-Pass filter control is set to Bypass. This subwoofer's Low-Pass filter can be adjusted through the Touch Control Interface or via the MartinLogan Subwoofer Control App. See the "Low Pass Filter" section under the "Controls" portion of the manual for additional details. The Left and Right inputs will be summed internally, so the subwoofer will play content from the Left input, Right input or both simultaneously. Either of the inputs can be used if your device only has a single output.
text_image
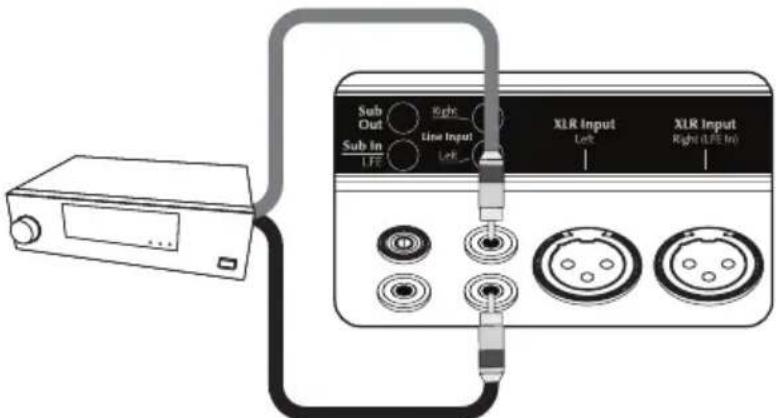
Sub Out Sub In LFE Right Line Input Left XLR Input Left XLR Input Right (LFE In)XLR Line Level Input (Left In / Right In)
Connect from the XLR Main Out/Pre Out/Sub Out on your receiver/pre-amp/electronic device. The setting for the Low-Pass Filter control is applied to the signal received through these inputs unless the Low-Pass filter control is set to Bypass. This subwoofer's Low-Pass filter can be adjusted through the Touch Control Interface or via the MartinLogan Subwoofer Control App. See the "Low Pass Filter" section under the "Controls" portion of the manual for additional details. The Left and Right inputs will be summed internally, so the subwoofer will play content from the Left input, Right input or both simultaneously. Either of the inputs can be used if your device only has a single output. Please Note: When using XLR for LFE, the Right XLR Input on the subwoofer is used. When using this input for LFE, the Low Pass Filter on Depth should be set to "Bypass" (the default option). The built in Low Pass Filter is a "global" option, meaning every input on the subwoofer will use the same Low Pass Filter settings. The exception to this is the RCA LFE input, which is permanently and independently set to "bypass" no matter what setting is chosen for the Low Pass Filter. Because of this, we recommend using RCA for LFE if the XLR inputs are also being used for Stereo playback. This method guarantees no additional filtering is ever applied to the LFE signal.

text_image
Sub Out Right Line Input Left Sub In Left XLR Input Left XLR Input Right (Left In)Subwoofer Out
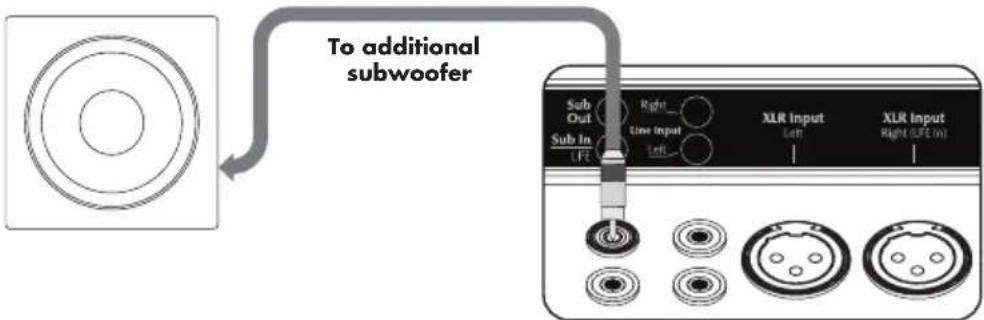
Not all devices have multiple outputs for subwoofers. To make it easy to add additional subwoofers to a system, this subwoofer is equipped with a Subwoofer Out connection. The Subwoofer Out uses a single RCA connection that can be run to an additional subwoofer. This process can be repeated multiple times in order to create a "chain" of subwoofers if desired. The Subwoofer Out signal is a combination of all active incoming signals. In other words, whatever signals are actively connected to the various Subwoofer Inputs is what will come out of the Subwoofer Out connection.
text_image
To additional subwoofer Sub Out Right_ Line Input Left XLR Input Left XLR Input Right (LFE In)Speaker Level Input
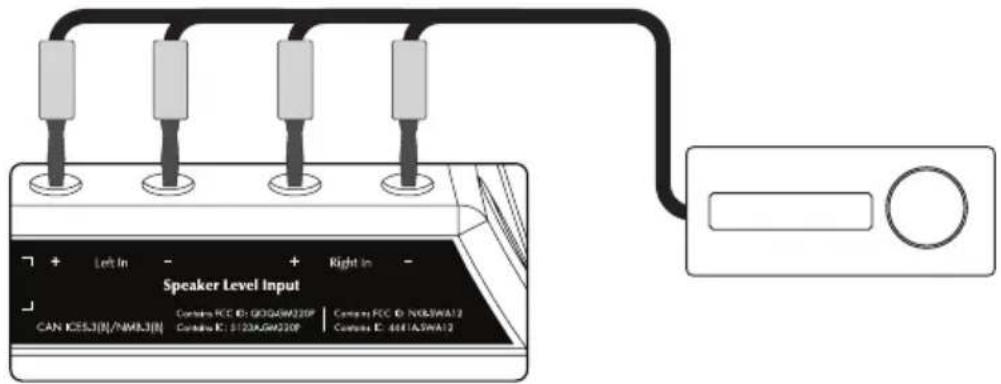
Some electronics do not have dedicated subwoofer outputs, and some enthusiasts like to connect their subwoofers with a speaker level connection so that the subwoofer picks up the sonic signature of their chosen amplifier. To that end, this subwoofer is also equipped with speaker level inputs, ready to accept a direct connection to your amplifier using your preferred speaker cable. Banana plugs are required (not included) to use this input, as they provide for a clean installation free from stray wires. This connection method presents no load to your amplifier, and is safe for use even with balanced amplifiers.
text_image
Speaker Level Input Can KESJ8/NM8J8 Left In - + Right In - Controls FCC ID: G0G40W230F | Controls FCC ID: NK85WA12 Controls E: S120A0W230F | Controls E: 4611A5WA12Wireless Connection
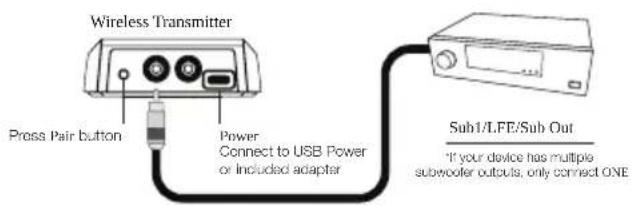
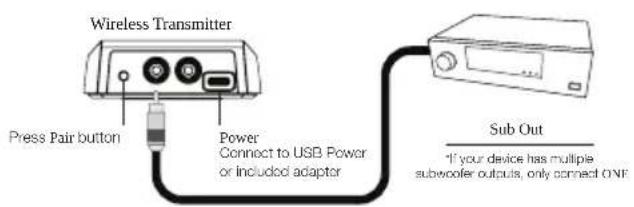
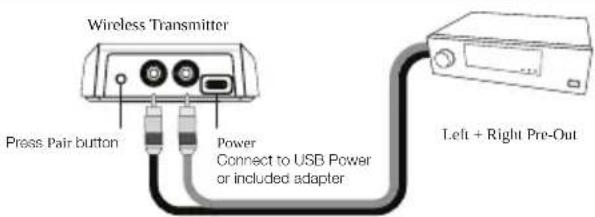
Your subwoofer includes a wireless transmitter that pairs with the wireless receiver built into the electronics of the subwoofer. This wireless transmitter is completely optional, but offers a convenient way to send a signal to your subwoofer when running a subwoofer cable is not a desirable option. The included transmitter can be powered via an available USB port or with the included power adapter. The wireless receiver is unpaired and turned off by default. See the controls section of the manual for instructions on how to enable the wireless feature.
LFE (or for devices with built-in bass management)
text_image
Wireless Transmitter Prosa Pair button Power Connect to USB Power or Included adapter Sub1/LFE/Sub Out "If your device has multiple subwoofer outputs, only connect ONESingle Wire Connection (or for devices without built-in bass management)
text_image
Wireless Transmitter Press Pair button Power Connect to USB Power or included adapter Sub Out "If your device has multiple subwoofer outputs, only connect ONEStereo Connection
text_image
Wireless Transmitter Press Pair button Power Connect to USB Power or included adapter Left + Right Pre-OutSimultaneous Connections
MartinLogan subwoofers can utilize multiple input methods simultaneously. This can be helpful in certain installations, but the need to use simultaneous connections is rare, so this likely will not apply to your system. It is not recommended to use both wireless and wired connections simultaneously. Please Note: When using XLR for LFE, the Right XLR Input on the subwoofer is used. When using this input for LFE, the Low Pass Filter on Depth should be set to "Bypass" (the default option). The built in Low Pass Filter is a "global" option, meaning every input on the subwoofer will use the same Low Pass Filter settings. The exception to this is the RCA LFE input, which is permanently and independently set to "bypass" no matter what setting is chosen for the Low Pass Filter. Because of this, we recommend using RCA for LFE if the XLR inputs are also being used for Stereo playback. This method guarantees no additional filtering is ever applied to the LFE signal.
CONTROLS
Rear Panel Controls:
The only controls accessed exclusively through the rear control panel of the subwoofer are "Power Mode" and Wireless Audio "Pair."
Power Mode:
This subwoofer features a signal-sensing power supply that when set to "AUTO" will automatically turn the subwoofer on when a signal is detected on any input. It will also power off the subwoofer after sensing no signal for several minutes. The "ON" power mode leaves the subwoofer powered on and ready to play all the time with no delay, but will draw more power while not actively in use. "Trigger" mode is the correct setting when using a 12v trigger cable (3.5mm) from an external device to control the subwoofer power status.
Wireless Audio "Pair":
This button is only needed to pair the included wireless transmitter to the subwoofer. Instructions on how to configure the wireless option are found later in this section of the manual.
Subwoofer Setting Overview:
This subwoofer can be controlled via the Touch Control Interface (TCI) or the MartinLogan Subwoofer Control App. While most settings are adjustable via both methods, some are exclusive to one method. We have labeled these settings accordingly in this section.
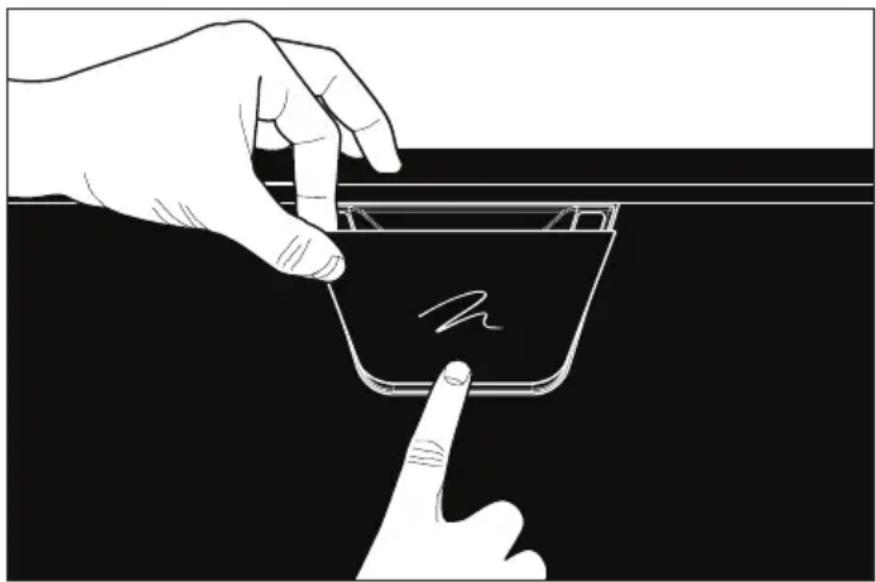
The Touch Control Interface (TCI) is located on the front of the subwoofer, underneath the magnetic cover. Simply press the bottom of the cover, underneath the MartinLogan "zig" logo, and the cover will come off. When removing the cover, a presence sensor tells the subwoofer to turn off the logo backlight and display the menu options instead. When exiting the main menu via the "Exit" option or exiting the Level menu via the "Done" option, a 15 second countdown displays on the screen. During this time the presence sensor is disabled and the front cover can be reattached without unintentionally reentering the menu.
natural_image
Illustration of a hand interacting with a transparent container labeled 'n' (no text or symbols on the container itself)To use the TCI, navigate the available menus and adjust the settings using the illuminated buttons. Only the buttons that perform an action will be illuminated. The placement of the buttons corresponds to the on-screen commands.
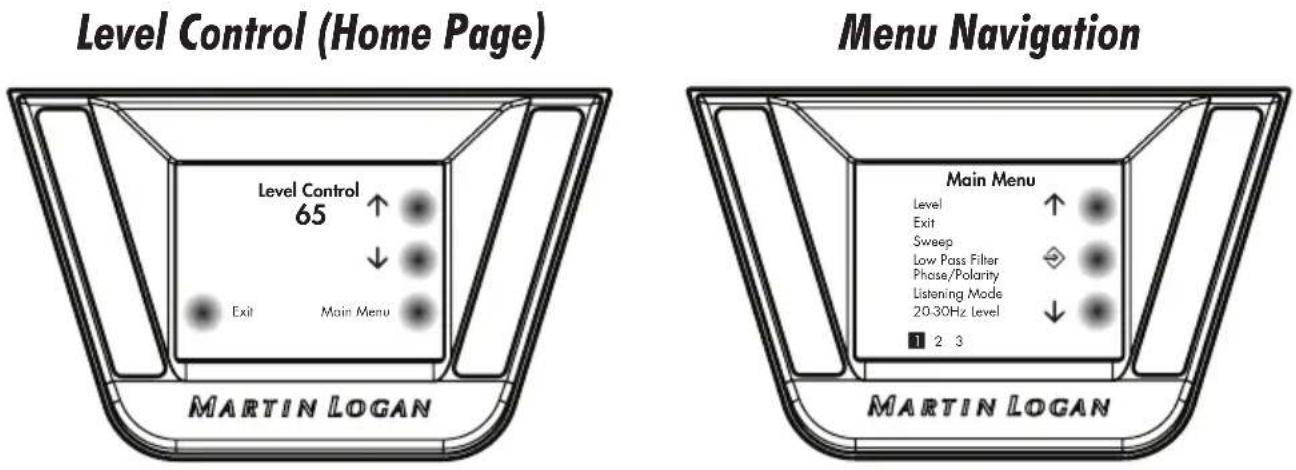
Level: 0-100 (TCI and Control App)
The default menu screen when removing the front control cover. Adjusts the volume of the subwoofer using the up and down arrow buttons. "Done" exits all menus and activates the illuminated logo screen. This option triggers an automatic 15 second countdown sequence where the front cover can be reattached without reentering the menu. The "Main Menu" button returns to the list of main list of menu options.
Exit:
Exits the main menu and activates the 15 second sensor lockout timer so the front cover can be reattached without accidentally reentering the menu.
Sweep: (TCI and Control App)
The tone sweep feature is a useful tool for identifying rattles in your room. Initiating the sweep and pausing it at frequencies that cause things in your room to rattle (like artwork, picture frames, furniture etc.) will help you identify these rattles and address them as you feel appropriate. Please note this is just a tool, and not representative of the subwoofer's maximum output. Unless cancelled, the sweep will continue for several minutes until it times out. During the sweep you can pause at a specific frequency and while paused you can manually increase or decrease the frequency as desired).
Low Pass Filter: 30-120Hz (1° increments) (TCI and Control App)
This setting applies to all Left/Right inputs on the subwoofer (does not apply to the RCA LFE Input). Set to your desired low pass filter value. As a starting point, we recommend setting this to a value of 70% of your main speaker's lowest frequency using the up and down buttons. We recommend experimenting with higher and lower values to find what is best to your ears. Keep in mind just because a speaker is rated to a certain low frequency number does not mean it will achieve that in your unique room and system. Use the "3rd, 4th, Bypass" button on the bottom right to toggle between a 3rd order filter (18dB per octave / slower roll off than 4th order), a 4th order filter (24dB per octave (faster roll off than 3rd order), or Bypass (select if using LFE and plan to use your electronic devices bass management).
Phase/Polarity: 0-180° (1° increments) (TCI and Control App)
This setting adjusts the phase and/or polarity of the subwoofer. There are some systems with bass management that will set this for you within the electronic device itself, and this setting can be left set to the default values. If you wish to manually adjust the phase or polarity of the subwoofer you can use the +1^ and -1^ buttons to adjust the value by 1^ , or the +10^ and -10^ buttons to adjust the value by 10^ . The invert toggle button applies 180^ of phase without adding additional delay. It can be used in conjunction with the phase setting to essentially achieve 360^ of phase adjustment. If setting manually, experiment with different settings. When properly set, the system should sound as if there is more total bass. If out of phase, total bass output will be reduced. As a baseline, we recommend starting with phase set at 90^ and inverted polarity, then compare against 0^ and normal polarity.
Listening Mode: Movie, Music, Night (TCI and Control App)
This sets the DSP mode of the subwoofer. Movie mode has the highest output, with slightly higher distortion allowed. Music mode has the lowest distortion, but slightly lower output potential than Movie mode. Night mode has dramatically reduced output levels to help avoid noise complaints.
20-30Hz Level: ±10dB (TCI and Control App)
20-30Hz Level and Anthem Room Correction (ARC) serve similar purposes. This control will not affect ARC measurements or correction. If you have an ARC correction uploaded to the subwoofer, listen first with this control set to 0. If not using ARC, this control helps compensate for room anomalies or modifies the sound to personal taste. 20-30Hz is a range where peaks and dips often develop in listening rooms. If low-bass sounds weak, increase this control. If low-bass sounds bloated, decrease this control. If using ARC to adjust the subwoofer's entire frequency range, this setting can be used in addition to ARC to further adjust the way the subwoofer sounds. Use the up and down buttons to adjust the value anywhere from -10dB up to +10dB. The default value of 0dB is always used during ARC measurements made when connected directly to the subwoofer.
ARC: (TCI and Control App)
Via the TCI, this menu option displays a QR code that will take you to the Anthem Room Correction (ARC) website. Here you can read the theory behind ARC, read the instructions, find the download links for both PC and Mac computers and other helpful resources. Use the included microphone kit and follow the instructions on the ARC site to optimize your subwoofer's performance to your unique room.
Via the Control App, the ARC toggle button allows you to quickly toggle ARC On and Off to hear the difference in real time (requires ARC calibration first).
Manual QR:
This menu option displays a QR code that will take you to the Depth subwoofer online manual, which you are reading now. Thank you for reading!
App QR Code:
This menu options displays a QR code that will take you directly to your devices app store download page for the MartinLogan Subwoofer Control App. The control app allows you to adjust all audible settings from the comfort of your seat, ensuring the most accurate and convenient results.
Wireless: (On/Off) (TCI Only)
This setting turns the built in wireless receiver (for use with the included wireless subwoofer transmitter) on or off. To pair the wireless transmitter to the subwoofer, power up the wireless transmitter and hold the pair button for 5 seconds and the LED will flash green/red/green, then turn on the Wireless setting on the subwoofer. Lastly, hold the Wireless Audio "Pair" button on the back of the subwoofer (farthest right button when viewing the back of the subwoofer) for 5 seconds until the LED indicator flashes green/red/green. Once paired, the LED's should turn green. If not, repeat the process and press the "pair" button on the transmitter while the LED on the subwoofer flashes green/red/green.
Passcode: (Set independently for the TCI or Control App)
This allows you to set a passcode on the subwoofers touch control to prevent unwanted changes to your settings. When a passcode is set in the TCI or Control App, no setting can be adjusted via that method without the passcode. If you forget your passcode please contact us directly. Use the "5-9" button to access numbers 5-9, and the "0-4" button to access numbers 0-4. The buttons next to each number select that digit. A different passcode can be set within the TCI and the Control App if you wish, or none at all, the option is yours if you need it.
Logo Color: (Blue (default), Cyan, Purple, Yellow, OFF, White, Red, Green) (TCI Only)
Adjusts the display color of the screen when the TCI is in standby mode. When the TCI is in standby the screen backlights the MartinLogan logo laser cut into the front control cover.
Information: (TCI and Control App)
Displays subwoofer Model, Firmware version, and Serial Number.
Reset: (TCI Only)
Resets all settings to their factory default value and erases the ARC calibration, resetting the sub to its default state.
Language: (TCI Only)
Allows you to change the display language of the TCI Menus.
Break-In ☑ 50 hrs
Our custom made woofers require approximately 50 hours of break-in at moderate listening levels before their optimal performance occurs. This will factor in on any critical listening and judgment.
AC Power Connection △WARNING△
The power cord should not be installed, removed, or left detached from the subwoofer while the other end is connected to an AC power source. The IEC power cord should be firmly inserted into the AC power receptacle on the rear connection panel of the subwoofer, then to any convenient AC wall outlet. The sub also integrates a signal-sensing power supply that automatically switches off after sensing no music signal for several minutes (this will occur when the power switch is set to 'Auto'). Your subwoofer is wired for the power service supplied in the country of original consumer sale. The AC power rating applicable to a particular unit is specified both on the packing carton and on the serial number plate attached to the subwoofer. If you remove your subwoofer from the country of original sale, be certain that AC power supplied in any subsequent location is suitable before connecting and operating the subwoofer. Substantially impaired performance or severe damage may occur to the subwoofer if operation is attempted from an incorrect AC power source.
ANTHEM ROOM CORRECTION (CALIBRATION KIT INCLUDED)
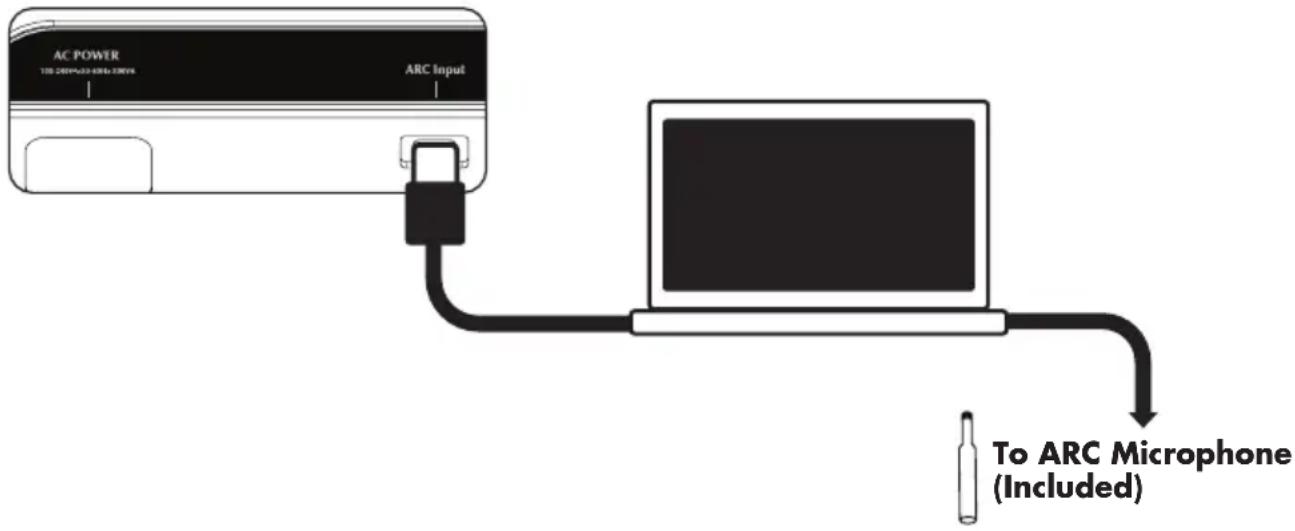
Your subwoofer includes Anthem Room Correction technology for optimizing low-frequency output within your room. Your subwoofer's ARC system employs a computer and a microphone connected via USB cables.
ARC Genesis utilizes multiple measurement points, at least five—but up to ten—individual data positions, allowing ARC Genesis to analyze the unique characteristics of your room. ARC Genesis software calculates correction curves for each measurement point, substantially minimizing the rounding errors of less sophisticated “calculators”, like those used in standard on-board room equalization systems. Additionally, ARC Genesis computer software is capable of calibrating itself to individual microphones, eliminating potential interference that would otherwise skew the data.
Although ARC Genesis is designed to adjust the subwoofer's output to minimize sonic anomalies caused by room interactions, it is always recommended to use traditional methods to achieve a flat response before implementing digitally based room correction. Remember, subwoofer placement is one of the most influential parameters when dealing with anomalous low-frequency room interactions. Listening position is equally important to bass response but is often dictated by other factors that are more difficult to change.
ARC Genesis in your subwoofer is not a replacement for room correction systems designed to optimize multi-channel audio systems across the entire frequency range. When beginning the task of optimizing a multi-channel audio system's performance, the first step should always be proper setup of the subwoofer and front, center, and surround speakers. The next step should be running ARC Genesis to adjust the individual subwoofer's output to account for room interactions. Only after proper setup of speakers and subwoofers, including running ARC Genesis on the subwoofer(s), is it time to run your processor's full room correction system to help balance overall system performance within the room.
Before You Begin
To run ARC Genesis on a computer you will need an ARC Genesis compatible microphone like the one included with this subwoofer. Visit anthemarc.com for details.
NOTE: Before running ARC Genesis on a computer, connect your subwoofer to the computer. A USB Type C to Type A cable is included with the ARC Kit that came with your subwoofer. The microphone included with this subwoofer also uses a Type C connection, and a Type C to Type A cable is included for the microphone as well. Depending on the type of USB ports on your computer, you may need a different cable or adapter (not included).
text_image
AC POWER TO ARC POWER ARC Input To ARC Microphone (Included)Running ARC Genesis
Before running ARC Genesis on a computer, connect the ARC microphone to your computer using the USB cable it was supplied with, or another USB cable with the appropriate connections to connect the mic to your computer.
To run ARC Genesis on a computer you will need to download the latest ARC Genesis software from anthemarc.com. You will also need an ARC Genesis compatible microphone (included with this subwoofer). When running ARC Genesis software we recommend Automatic Mode for most users. This mode will walk you through the measurement process with step-by-step on screen instructions. The ARC Genesis software's Manual Mode is recommended for advanced users. For more information, please visit anthemarc.com.
- Before running ARC Genesis, set up your subwoofers by adjusting placement.
- During measurement, ARC Genesis overrides the settings of the Volume (level), Phase, Low-Pass Filter, and 20–30Hz Level controls. These controls do not impact the measurements. After the correction curve has been uploaded to the subwoofer these controls can be used to fine tune the subwoofer's performance.
- When taking ARC Genesis measurements the microphone should be approximately at the locations where your ears will be.
- When taking ARC Genesis measurements, the microphone should point up, towards the ceiling.
- When taking ARC Genesis measurements the room should be silent. Please turn off or remove potential sources of noise.
- ARC Genesis will require you to measure five (or more) listening positions. The first position should be located at the primary listening position. Subsequent measurements should be taken at other listening positions and should be no closer than 2-feet from each other.
- Although it might seem logical to do so, you do not need to take measurements throughout the room (i.e. in the front corners, far off to the side, etc.). Measurement locations should focus only on positions where people will be listening to the subwoofer.
PLACEMENT
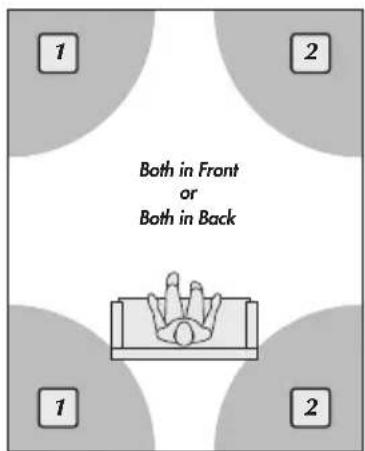
As a starting point, we recommend placing the subwoofer in one of the shaded areas below. The corners will typically yield the highest output, while the front wall near the speakers typically provides the most seamless blend with the main speakers.
When using multiple subwoofers try to place them in opposite corners or opposite walls in order to help spread the bass into the room more evenly. For even better results, try and place the subwoofers at opposite ends of the room as illustrated in the below diagrams.
text_image
1 2 Both in Front or Both in Back 1 2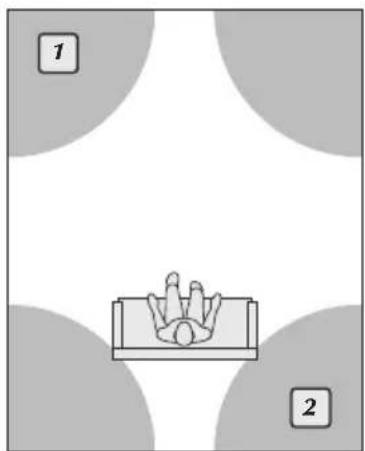
natural_image
Diagram showing a central figure with a crown and two labeled circular regions (1 and 2), no text or symbols present.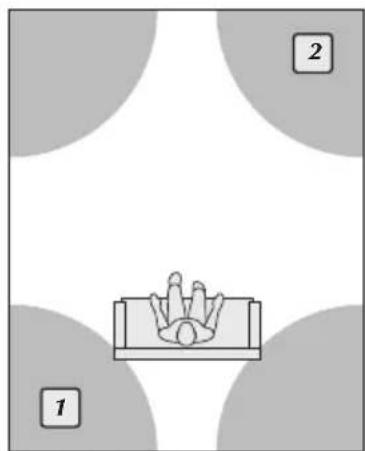
natural_image
Simple diagram with a central figure and two labeled circles (1 and 2), no text or symbols present.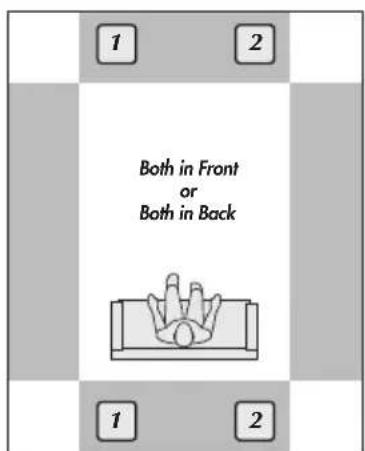
text_image
1 2 Both in Front or Both in Back 1 2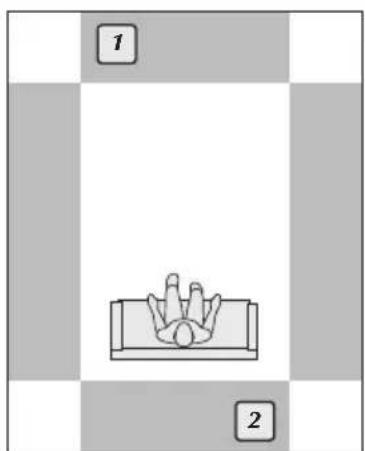
text_image
1 2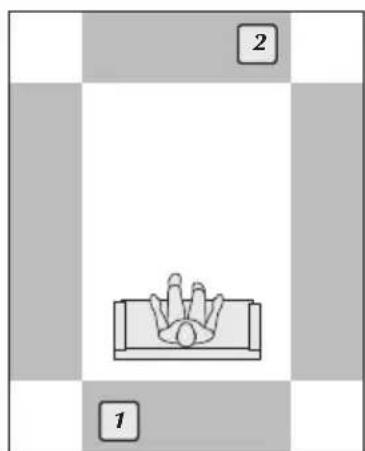
natural_image
Chessboard with a central trophy icon and numbered buttons (no text or symbols on the diagram itself)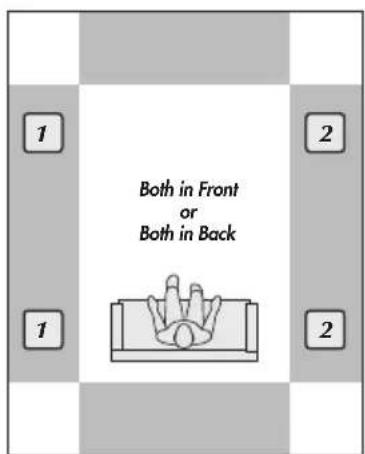
text_image
Both in Front or Both in Back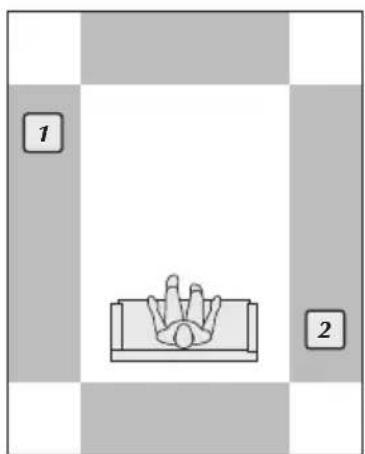
text_image
1 2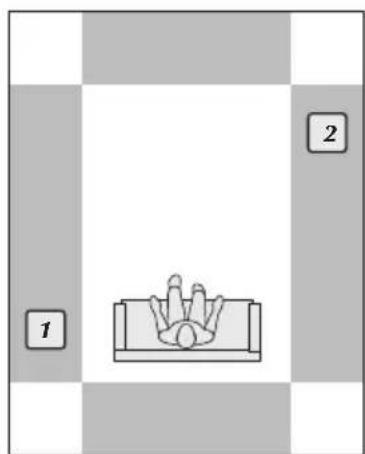
natural_image
Chessboard diagram showing a central ball resting on the table with numbered moves (no text or symbols)Solid Footing
After living and experimenting with your subwoofer, you may want to use the included carpet spikes. Once installed and leveled, the subwoofer will become more firmly planted on the floor and, consequently, bass will tighten. It is best not to implement the spikes, however, until you are secure in the positioning, as the spikes can damage the floor if the subwoofer is moved. MartinLogan does not recommend using carpet spikes on hard surface flooring
BENEFITS OF MULTIPLE SUBWOOFERS
The benefits of using multiple subwoofers are well known. Having two (or more) subwoofers in a system can reduce distortion by sharing the load across multiple woofers, allowing each subwoofer to do less work in order for the system to achieve the same volume. Multiple subs can also be used to smooth out the frequency response in your room as bass energy will now enter the room at multiple positions, instead of only one. This technique allows each subwoofer to help fill in gaps in bass output caused by room size, construction, and placement that may otherwise be unavoidable when using only a single subwoofer. The most obvious benefit for those interested in maximum impact, is the increase in maximum potential volume as your woofer count goes up. Last but not least, a more visually symmetrical look can be achieved when an equal number of subwoofers are placed in a room. This is an upgrade path that can always be followed at a later date for those looking to further improve performance.
GENERAL INFORMATION
WARRANTY INFORMATION
MartinLogan, Ltd. warrants this subwoofer to be free of manufacturing defects in material and workmanship, subject for a period of 3 years. This warranty expires on the anniversary of the product's date of delivery.
The warranty is only valid if purchase of this product was made through an authorized MartinLogan dealer or distributor. A copy of the original receipt of sale from an authorized MartinLogan dealer or distributor is required for any warranty work.
SERVICE
Should you use your MartinLogan product in a country other than the one in which it was originally purchased, we ask that you note the following:
- The appointed MartinLogan distributor for any given country is responsible for warranty servicing only on units distributed by or through it in that country in accordance with its applicable warranty.
- Should a MartinLogan product require servicing in a country other than the one in which it was originally purchased, the end user may seek to have repairs performed by the nearest MartinLogan distributor, subject to that distributor's local servicing policies, but all cost of repairs (parts, labor, transportation) must be borne by the owner of the MartinLogan product.
- If, after owning your speaker for six months, you relocate to a country other than the one in which you purchased your speaker, your warranty may be transferable. Contact MartinLogan for details.
SERIAL NUMBER
The serial number is located on back of the subwoofer, directly below the model name. The serial number may also be found on the product carton.
Ask Your Dealer
Your MartinLogan dealer can suggest many options for optimal subwoofer placement. They also have many tools at their disposal, such as experience, familiarity with the associated equipment, and even sound analysis equipment which may make the task of determining optimal subwoofer placement easier.
Enjoy Yourself
MartinLogan subwoofers are very refined and will benefit from care in setup. With the above placement tips in mind you will find, over months of listening, that small changes can result in measurable differences. As you live with your subwoofer, do not be afraid to experiment with positioning until you find the optimal relationship between your room, settings and subwoofer that gives you the best results. Your efforts will be rewarded!
TROUBLESHOOTING
No Output
- Check that all system components are turned on and source material is playing.
- Check speaker wires and connections.
- Check all interconnecting cables.
- If you are unable to resolve your problem, please contact your dealer or MartinLogan customer service (see below)
CONTACTING CUSTOMER SERVICE
text_image
Phone (785) 749-0133 Monday - Friday 8 AM - 5 PM CT
text_image
Email service@martinlogan.com
text_image
Social Media f Twitter InstagramSPECIFICATIONS\*
Depth® 212 Subwoofer
*Specifications are subject to change without notice.
Frequency Response .... 18–120 Hz ±3 dB (Anechoic via LFE input)
Low Frequency Driver .... Dual Active 12" cast-aluminum basket, high excursion, Carbon Aerocore cone woofers with under spider and voice coil venting, and dual copper shorting rings in a sealed non-resonant symmetrical chamber format.
Cabinet ....Extensively braced and reinforced variable thickness (1-3") cabinet
Amplifier Power ..... Reference Grade Class-D Amplifier: 2,200W Dynamic Peak (1,100W RMS)
DSP .... Ultra High-Resolution 500MHz Vojtko DSP Engine with 64bit processing
| Controls(Touch Control Interface) | Level Adjustment | 20-30Hz Level | Information |
| Tone Sweep | ARC On/Off | Factory Reset | |
| Low Pass Filter | Wireless On/Off | Language Selection | |
| Phase/Polarity | Passcode Lock | Owner's Manual QR Code | |
| Listening Mode | Logo Color | Control APP QR Code |
Controls ....Level: -40 to 12dB (Min-Max)
| (via Bluetooth) | Low-Pass Filter (Frequency): 35–120Hz ( 1^ Increments) |
| Low-Pass Filter (Order): Bypass, Third, Fourth Phase: 0– 180^ ( 1^ Increments) | |
| Phase (Polarity): Normal, Inverted | |
| Preset Listening Modes: Movie, Music, Night | |
| 20–30Hz Level: ± 10 dB | |
| Anthem Room Correction (ARC Genesis): On, Off | |
| Tone Sweep (120-20Hz): On, Off, Pause (Frequency) |
| Inputs. | Line Level: Left, Right, and LFE |
| XLR: Left, Right or LFE (Right In) | |
| Speaker Level: Left and Right (requires banana plugs) |
| Wireless Input | Integrated Wireless Receiver |
| Wireless Transmitter Included |
Outputs ...... RCA Sub Out (Outputs the sum of all connected inputs)
| Power Draw. | Standby (Wireless Disabled): 0.5W |
| Standby (Wireless Enabled): <2W (*Transmitter and Subwoofer combined) |
Feet....Integrated Anti-Vibration Feet (carpet spikes included)
Weight..... 127 lbs (57.6 kg)
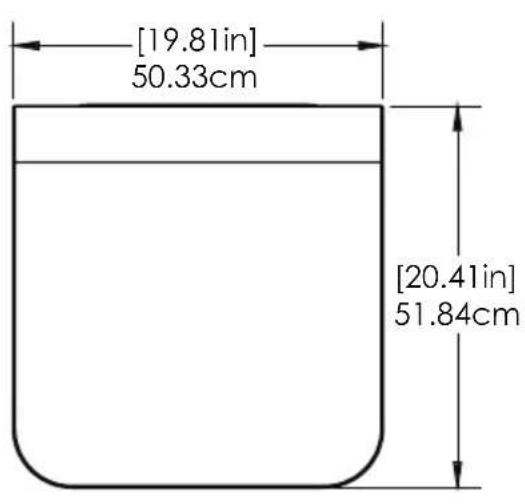
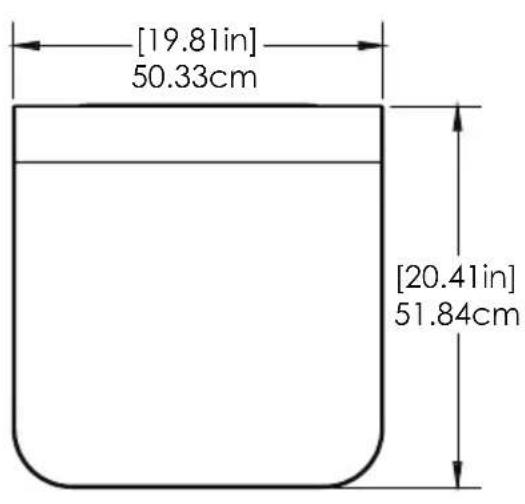
| Dimensions (HxWxD). | 21" x 19.81" x 20.4" |
| *Product height is without carpet | 53.3cm x 50.3cm x 51.8cm spikes but includes the feet. |
PRODUCT DIMENSIONS
text_image
[19.81in] 50.33cm [20.41in] 51.84cm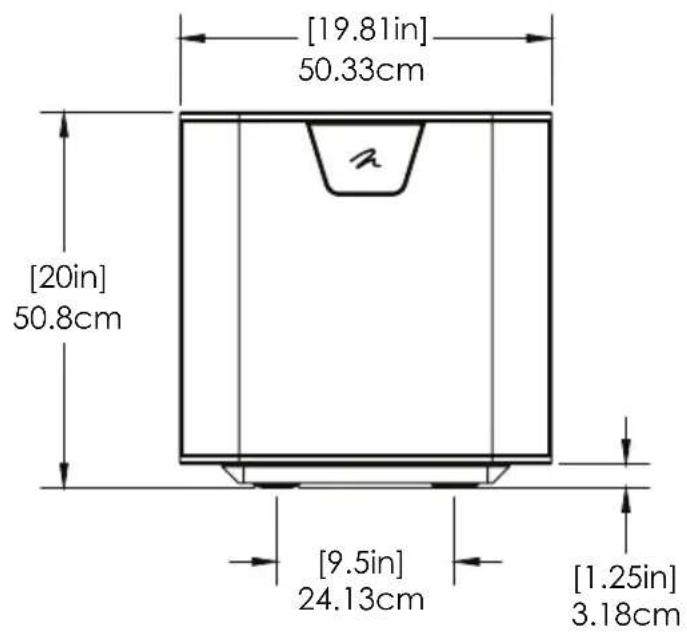
text_image
[19.81in] 50.33cm [20in] 50.8cm [9.5in] 24.13cm [1.25in] 3.18cm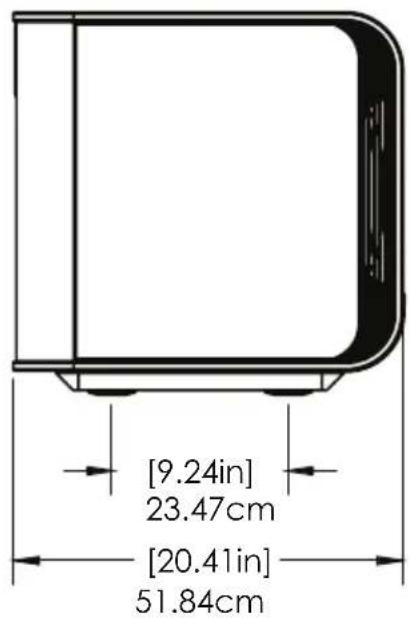
text_image
[9.24in] 23.47cm [20.41in] 51.84cmSPECIFICATIONS\*
Depth® 215 Subwoofer
*Specifications are subject to change without notice.
Frequency Response .... 18–120 Hz ±3 dB (Anechoic via LFE input)
Low Frequency Driver .... Dual Active 15" cast-aluminum basket, high excursion, Carbon Aerocore cone woofers with under spider and voice coil venting, and dual copper shorting rings in a sealed non-resonant symmetrical chamber format.
Cabinet ....Extensively braced and reinforced variable thickness (1-3") cabinet
Amplifier Power .... Dual Reference Grade Class-D Amplifiers: 4,400W Dynamic Peak (2,200W RMS)
DSP ....Ultra High-Resolution 500MHz Vojtko DSP Engine with 64bit processing
| Controls(Touch Control Interface) | Level Adjustment | 20-30Hz Level | Information |
| Tone Sweep | ARC On/Off | Factory Reset | |
| Low Pass Filter | Wireless On/Off | Language Selection | |
| Phase/Polarity | Passcode Lock | Owner's Manual QR Code | |
| Listening Mode | Logo Color | Control APP QR Code |
Controls ....Level: -40 to 12dB (Min-Max)
| (via Bluetooth) | Low-Pass Filter (Frequency): 35–120Hz ( 1^ Increments) |
| Low-Pass Filter (Order): Bypass, Third, Fourth Phase: 0– 180^ ( 1^ Increments) | |
| Phase (Polarity): Normal, Inverted | |
| Preset Listening Modes: Movie, Music, Night | |
| 20–30Hz Level: ± 10 dB | |
| Anthem Room Correction (ARC Genesis): On, Off | |
| Tone Sweep (120-20Hz): On, Off, Pause (Frequency) |
| Inputs. | Line Level: Left, Right, and LFE |
| XLR: Left, Right or LFE (Right In) | |
| Speaker Level: Left and Right (requires banana plugs) |
| Wireless Input | Integrated Wireless Receiver |
| Wireless Transmitter Included |
Outputs ...... RCA Sub Out (Outputs the sum of all connected inputs)
| Power Draw. | Standby (Wireless Disabled): 0.5W |
| Standby (Wireless Enabled): <2W (*Transmitter and Subwoofer combined) |
Feet....Integrated Anti-Vibration Feet (carpet spikes included)
Weight..... 173 lbs (78.5 kg)
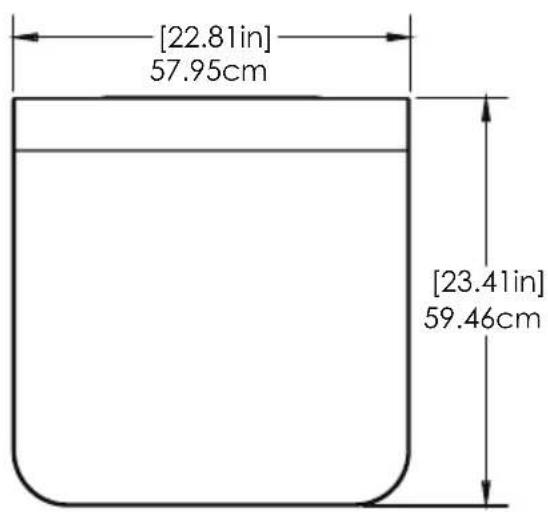
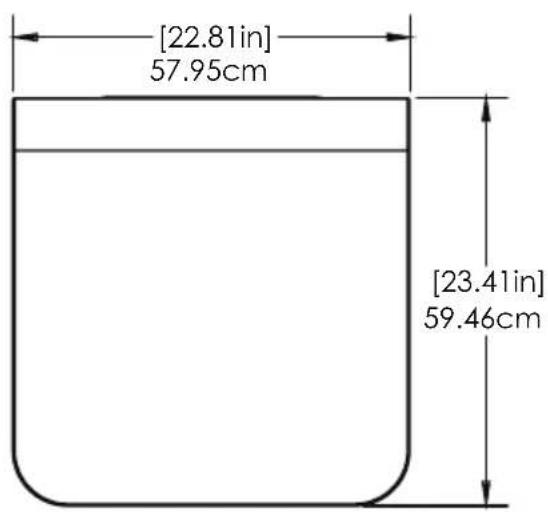
| Dimensions (HxWxD)....22.5" x 22.8" x 23.4" | |
| *Product height is without carpet | 57.2cm x 58cm x 59.5cm |
| spikes but includes the feet. | |
PRODUCT DIMENSIONS
text_image
[22.81in] 57.95cm [23.41in] 59.46cm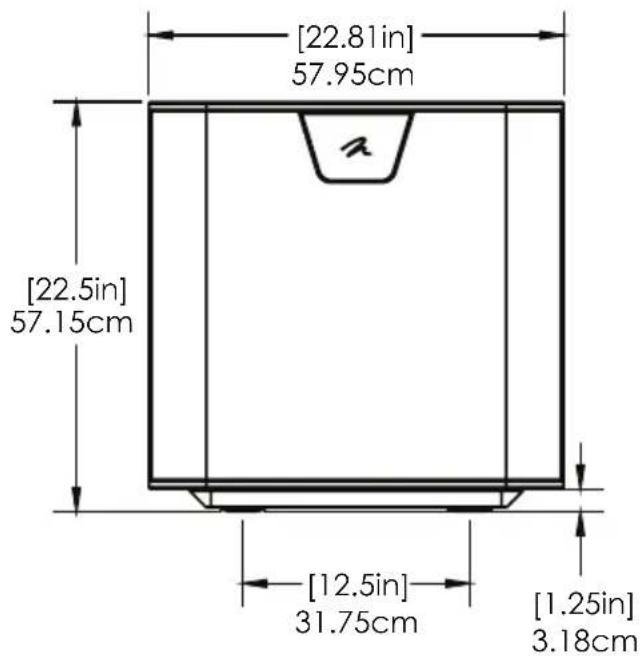
text_image
[22.81in] 57.95cm [22.5in] 57.15cm [12.5in] 31.75cm [1.25in] 3.18cm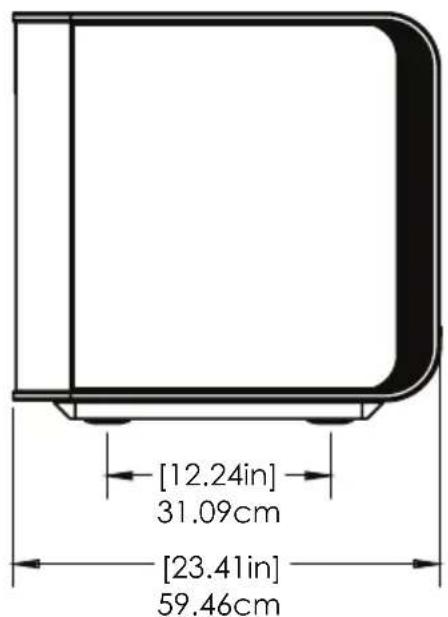
text_image
[12.24in] 31.09cm [23.41in] 59.46cm
text_image
nMARTIN LOGAN®
Lawrence, Kansas, USA tel. 785.749.0133 fax 785.749.5320 www.martinlogan.com

text_image
nMARTIN LOGAN®
DEPTH™ 212
High-Resolution Subwoofer System
&
DEPTH™ 215
High-Resolution Subwoofer System
natural_image
Line drawing of a 3D rectangular box with a recessed top and side panel, no text or symbols presentMANUEL D'UTILISATION
AVERTISSEMENT ! Subwoofer lourd

text_image
ARC MIC KIT KIT DE MICROPHONE ARC ACCESSORY KIT KIT D'ACCESSOIRES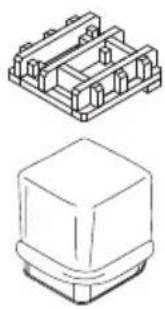
natural_image
Technical line drawing of two electronic component assemblies (no text or symbols)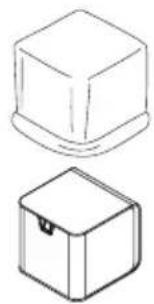
natural_image
Two technical line drawings of a mechanical component, one upright and one tilted (no text or symbols)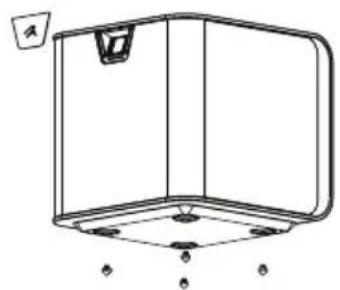
natural_image
Technical line drawing of a mechanical component with mounting holes and a label 'A' (no text or symbols on the diagram itself)natural_image
Line drawing of a coiled spring or rope structure (no text or symbols)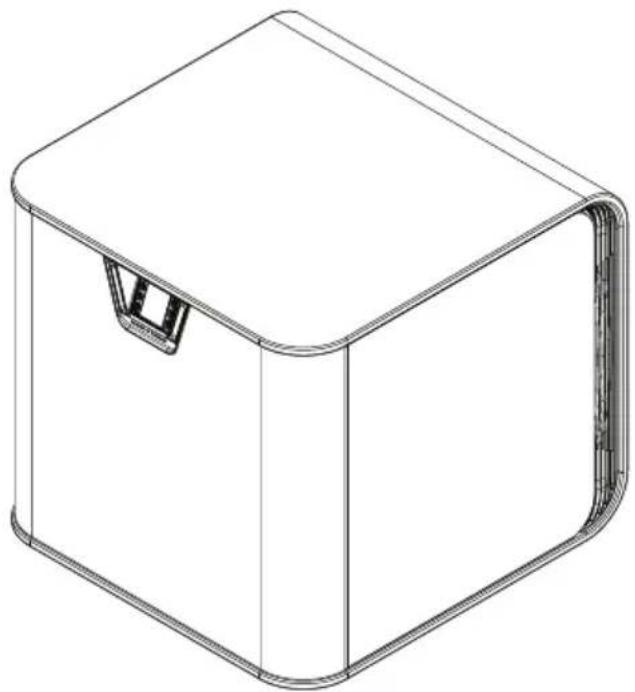
natural_image
Line drawing of a 3D rectangular box with a recessed top and side panel (no text or symbols)CONNEXIONS DES SIGNAUX AUDIO
text_image
Sub Out Sub In LTI Side Line Input Left XLR Input Left XLR Input Right OUtext_image
Sub Out Sub In LFE Right Line Input Left XLR Input Left XLR Input Right LFE Intext_image
Sub Owl Right Left Input Sub In LFL Left XLR Input Left XLR Input Right (LFL In)text_image
To additional subwoofer Sub Out Sub In LFE Right Line Input Left XLR Input Left XLR Input Right HFE Leftnatural_image
Hand interacting with a transparent container labeled 'n' (no other text or symbols)ANTHEM ROOM CORRECTION (KIT DE CALIBRATION INCLUS)
natural_image
Simple diagram of a table with a tray and a hand holding a ball, surrounded by four gray circular regions labeled 1 and 2 (no text or symbols on the diagram itself)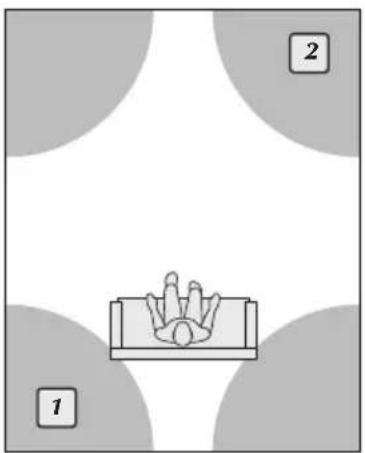
natural_image
Simple line drawing of a hand holding a small object inside a rectangular frame, surrounded by four gray circular corners labeled 1, 2, and 3 (no text or symbols on the diagram itself)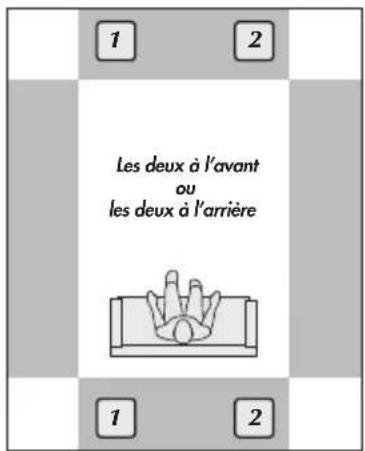
natural_image
Chessboard layout with a central table and two labeled buttons (no text or symbols on the diagram itself)ASSISE STABLE
INFORMATIONS SUR LA GARANTIE
DIMENSIONS DU PRODUIT
text_image
[19.81in] 50.33cm [20.41in] 51.84cm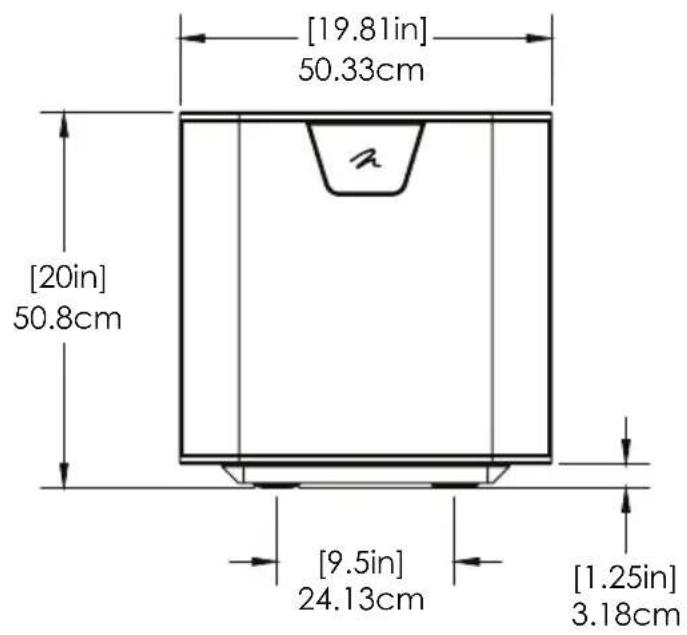
text_image
[19.81in] 50.33cm [20in] 50.8cm [9.5in] 24.13cm [1.25in] 3.18cm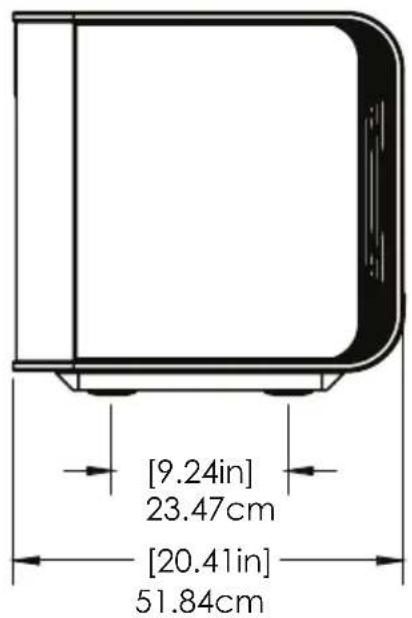
text_image
[9.24in] 23.47cm [20.41in] 51.84cmSPÉCIFICATIONS\*
Depth® 215 Subwoofer
DIMENSIONS DU PRODUIT
text_image
[22.81in] 57.95cm [23.41in] 59.46cm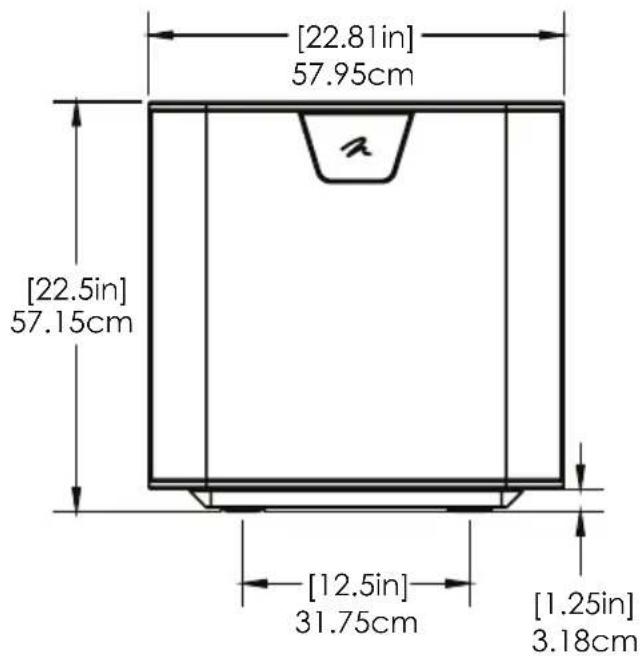
text_image
[22.81in] 57.95cm [22.5in] 57.15cm [12.5in] 31.75cm [1.25in] 3.18cm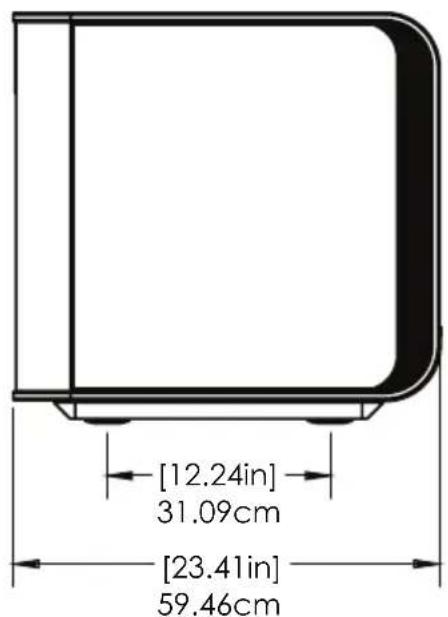
text_image
[12.24in] 31.09cm [23.41in] 59.46cm
text_image
nMARTIN LOGAN®
Lawrence, Kansas, USA tel. 785.749.0133 fax 785.749.5320 www.martinlogan.com