
9038 - Detector Unitest - Free user manual and instructions
Find the device manual for free 9038 Unitest in PDF.

| Product type | Wall detector (scanner) for wood, metal and live wires |
| Brand | Unitest |
| Model | 9038 |
| Dimensions | 190 x 71 x 46 mm |
| Weight | 250 g |
| Power supply | 1 x 9 V battery (IEC 6LR61) |
| Battery life | Approx. 100 h |
| Measurement modes | Normal, Deep, Metal |
| Detection depth (Normal) | Up to 2 cm |
| Detection depth (Deep) | Up to 4 cm |
| Detection depth (Metal) | Up to 8 cm |
| Voltage detection | 90-230 V AC |
| Display | LCD screen with signal bars and icons |
| Sound signal | Yes, optional |
| Calibration | Automatic, approx. 1/10 s |
| Housing material | Impact-resistant styrene |
| Operating temperature | -5°C to 40°C |
| Storage temperature | -20°C to 60°C |
| Max humidity | 85% RH |
| Care and cleaning | Clean with a damp cloth and mild detergent. Do not use solvents. |
| Battery replacement | Open the compartment under the label, connect the 9 V battery. |
| Safety | Follow warnings, disconnect power before working near electrical wires. |
| Warranty | 12 months (upon presentation of invoice) |
| Repairability | After-sales service available after warranty |
| Included accessories | Detector, 9 V battery, instruction manual |
Frequently Asked Questions - 9038 Unitest
User questions about 9038 Unitest
0 question about this device. Answer the ones you know or ask your own.
Ask a new question about this device
Download the instructions for your Detector in PDF format for free! Find your manual 9038 - Unitest and take your electronic device back in hand. On this page are published all the documents necessary for the use of your device. 9038 by Unitest.
USER MANUAL 9038 Unitest
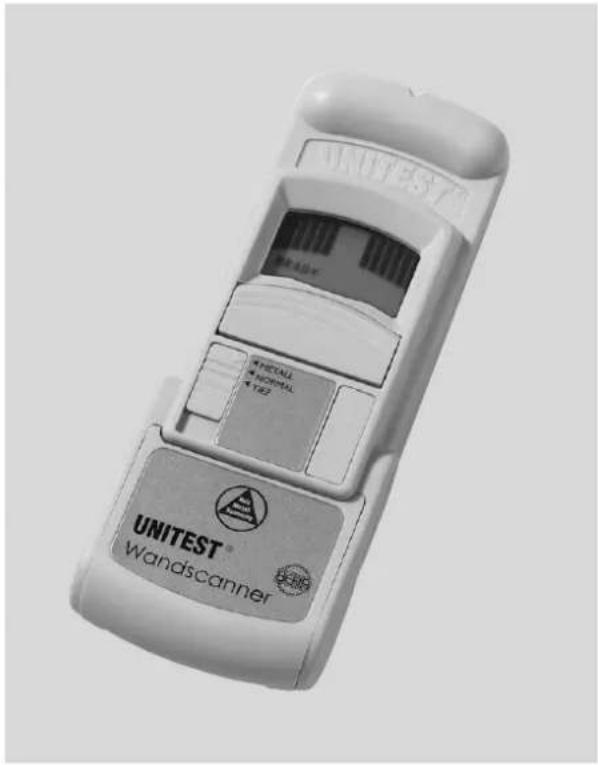
Wandscanner Wallscanner

Wandscanner Wallscanner
Contents
Contents Page
1.0 Introduction/Scope of Supply 19
2.0 Safety 20
3.0 Controls and Connections.. 20
4.0 Operation 21
4.1 Preparation and Safety Measures 21
4.2 Operation 22
5.0 Maintenance 28
5.1 Changing the Battery. 28
5.2 Cleaning 29
6.0 Technical Data. 30
References marked on instrument or in instruction manual:
Warning of a potential danger, comply with instruction manual.
Reference. Please use utmost attention.
Caution! Dangerous voltage. Danger of electrical shock.
Conformity symbol, the instrument complies with the valid directives. It complies with the EMV Directive (89/336/EEC), Standards EN 50081-1 and EN 50082-1 are fulfilled. It also complies with the Low Voltage Directive (73/23/EEC), Standard EN 61010-1is fulfilled.
The instruction manual contains information and references, necessary for safe operation and maintenance of the instrument. Prior to using the instrument (commissioning / assembly) the user is kindly requested to thoroughly read the instruction manual and comply with it in all sections.
Failure to read the instruction manual or to comply with the warnings and references contained herein can result in serious bodily injury or instrument damage.
Introduction / Scope of Supply
1.0 Introduction / Scope of Supply
The UNITEST Wallscanner is an accurate and sturdy electronic tool used to detect wood, metal and "hot" electrical wires in walls, floors and ceilings of conventional cross-sections. The UNITEST Wallscanner also detects rebar in concrete. The UNITEST Wall-scanner features three different scanning modes plus continuous "hot" electrical wire detection, ergonomic hand grip and controls, and a rugged, high impact plastic case. The UNITEST Wallscanner is designed to provide years of dependable and reliable use.
- Ideal drilling and mounting support
- Detects wood, metal and „hot“ electrical wires
Optical and acoustic indication
Clear LCD display bars
Ergonomic, rugged casing - Single handed operation
Scope of supply:
1 pce. UNITEST Wallscanner
1 pce. Battery 9 V, IEC 6LR61
1 pce. Instruction manual
1 pce. Quick-Reference-Guide
Transport and Storage
In order to avoid instrument damage, it is advised to remove batteries when not using the instrument over a certain time period.
Instruments must be stored in dry and closed areas. In the case of an instrument being transported in extreme temperatures, a recovery time of minimum 2 hours is required prior to instrument operation.
Safety / Controls and Connections
Operation
3.0 Safety
The UNITEST Wallscanner has been manufactured and tested to comply with the safety regulations and left our works in a safe condition. To maintain this condition, the user must observe the safety instructions contained in this Instruction Manual.
Before each measurement make sure that the UNITEST Wallscanner are undamaged.
Protect the instrument from prolonged exposure to direct sunlight.
Before any drilling and mounting operations disconnect all voltages!
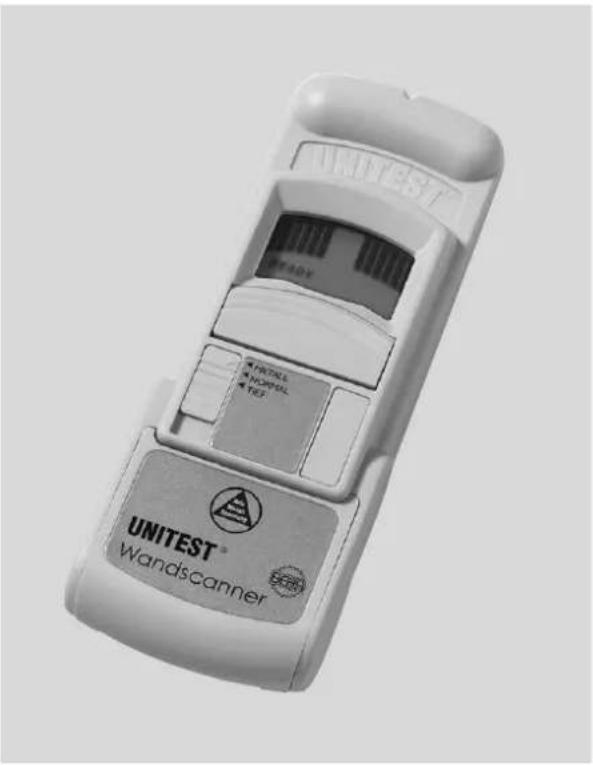
3.0 Controls and Connections
- Sensor
- LC-Display
- Activation Switch,ON MODE
- Mode Switch
- Battery Door
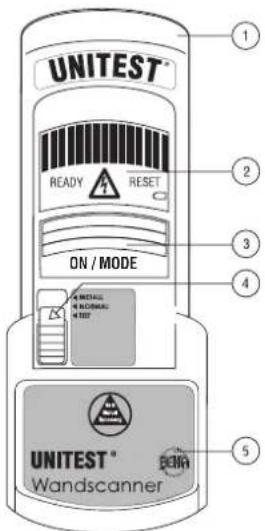
Fig.1
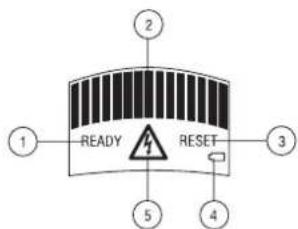
Fig. 3
Fig. 2
- Calibration Ready Indicator
- LCD Display Bars
- Reset Indicator
- Low Battery Indication
- AC Voltage Indicator
4.0 Operation
4.1 Preparation and safety measures
Before the UNITEST Wallscanner is ready for use, one 9-volt battery must be installed.
Slide open the battery door (5)
Connect the battery to the battery clip and insert the battery into the UNITEST Wallscanner
Replace the battery door (see figure 3)
With normal use, one 9-volt battery should last approximately two years.
Prior to working with the UNITEST Wallscanner we recommend the establishment of a test wall. Such a test wall can be constructed in accordance with the following example:
Fix a roof batten of 5cm width and a metal pipe (e.g. 1 / 2^* pipe) onto a flake board (presspahn) at a distance of approx. 25cm . This construction is superstructured by a conventional gypsum wallboard. Now, you may exercise the location of various materials at different
Operation
settings using the UNITEST Wallscanner and, thus, feel safe when handling the wall scanner.
Prior to usage check the instrument for perfect functioning. Never use the UNITEST Wallscanner in humidity or precipitations such as dew or rain.
Before any drilling and mounting operations disconnect all voltages!
4.2 Operation
Calibrating in NORMAL and DEEP Settings: Before the UNITEST Wallscanner can accurately find a wood (or metal) stud or joist, the UNITEST Wallscanner must be calibrated to the surface it will scan. Calibrating in both NORMAL and DEEP settings is identical.
Apply the UNITEST Wallscanner so that the two Velcro Pads on the back of the UNITEST Wallscanner are secure against the area to be scanned
Press and hold down the activation switch, till the bargraph is in the display. Then let the activation switch go.
The READY indicator will appear on the LCD once the UNITEST Wallscanner has been calibrated (about 1/10th of a second)
The UNITEST Wallscanner will not calibrate properly if it has been placed directly over a stud, dense area such as metal, or a wet, newly painted area. Improper calibration results in the flashing RESET warning on the display (see figure 2). If the RESET flashes, move the UNITEST Wallscanner a couple of inches to the side and try again.
Due to the sensitivity of the TIEF mode, the UNITEST Wallscanner will not flash the RESET warning if it has been calibrated over a stud while working in that mode. If, during scanning, the surface appears „blank“ to the UNITEST Wall-scanner, relocate UNITEST Wallscanner and calibrate again.
Operation
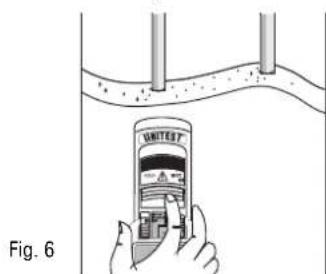
Scanning in NORMAL- and DEEP Settings:
NORMAL- and DEEP Settings have identical scanning procedures. DEEP, however, is twice as sensitive as the NORMAL setting for thick surface materials.
After the UNITEST Wallscanner has been calibrated and is set securely on a surface, slide it horizontally.
As the UNITEST Wallscanner moves towards a stud, the LCD bars will begin to move towards the midpoint at a rate of two-bars at a time. Once the UNITEST Wallscanner detects the edge of the stud, the center bar of the LCD will light and an audio tone will sound.
Mark the edge of the stud.

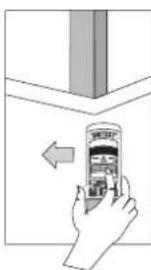
Fig. 4
- Continue moving through the stud until the bars return to the side of the display, then reverse the direction of the unit to locate the other edge of the stud (see figure 5).
The center of the two marks is the center of the stud.
Operation
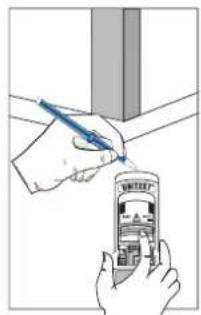
Figure 5
If the UNITEST Wallscanner is lifted from the scanning area during operation in the NORMAL mode, the RESET warning will light.
If the wall is especially thick or dense, the center bar of the LCD may not light while scanning in NORMAL setting. If this occurs, the lighting of the most centered LCD may be interpreted to indicate the stud edge. Or, switch to the DEEP mode to locate the stud.
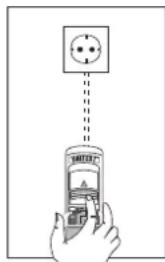
Calibrating in METALL Setting:
For maximum sensitivity, calibrate the UNITEST Wallscanner in the air, away from the surface before scanning in METALL mode. Press and hold the activation ON / MODE", switch till the bargraph is in the display. Then let the activation switch go. The READY indicator lights.
Scanning in METALL Settings:
After calibrating away from the scanning surface, place the UNITEST Wallscanner securely to the surface and begin to slide the UNITEST Wallscanner horizontally.
Once the UNITEST Wallscanner begins to detect metal, the LCD bars will move one bar at a time towards center. When the UNITEST Wallscanner displays the maximum indication, mark this point with a pencil.
Operation
- Continue sliding the UNTEST Wallscanner horizontally until the bars return to the side of the display, then reverse the direction of the unit to locate the other maximum indication. Mark this point with a pencil.
The center of the two marks is the center of the metal object.
The audio signal sounds at the third LCD bar.
The RESET indicator may light while scanning if the UNTEST Wallscanner was calibrated directly over metal.
While scanning for metal, the detection of the metal object may appear wider than the actual size. To obtain finer resolution, (less sensitivity) calibrate the UNITEST Wallscanner over the first set of two marks. Scan from both directions and mark the new and narrowed maximum detection points. Once again, the center of the two marks is the center of the metal object. This technique can be sequentially repeated until the UNITEST Wallscanner pinpoints the precise midpoint of the metal object.
Operation
Operation
Continuous AC Voltage Detection:
The UNITEST Wallscanner is designed to detect either 90...230 V AC in a HOT electrical wire.
Once voltage has been detected, the UNITEST Walcanner displays a flashing voltage icon (see figure 7). The voltage detection feature works continuously in all settings for safety.
A static charge may develop on dry wall which will spread the voltage detection at least 30~cm from both sides of the actual electrical wire. To narrow the detection, hold the UNITEST Wallscanner approximately 2 - 3 cm from the wall, while scanning.
For exact detection of electrical wire we recommend the UNITEST Cable Locator Cat.-No. 2032.
Voltage detection in conduit, behind metalized wall covering, and behind plywood sheerwall is NOT guaranteed. If the construction situation has plywood or thick wood backing behind dry wall, use extra caution.
Fig. 7
NORMAL and DEEP-Operation Tips:
The following tips help achieve the best results from the UNITEST
Wallscanner.
Low Battery and Sensitivity Test: To test the UNITEST Wallscanner's battery strength and sensitivity, place the UNITEST Wallscanner in NORMAL mode and hold the UNITEST Wallscanner away from any surface. Press and hold the activation "ON / MODE" switch till the bargraph is in the display. Then left the activation switch go. Until the
READY indicator lights. Move the palm of the free hand towards the back of the unit. When the hand is approximately 5 to 6cm away from the back of the UNITEST Wallscanner, the LCD bars should begin to move towards the midpoint of the display. Moving the hand away should cause the bars to return to the side of the display. If the bars do not react accordingly, it is time to replace the UNITEST Wallscanner's battery (see para 5.1).
To avoid interference and loss of accuracy, do not place the "free" hand within 15cm of the UNITEST Wallscanner while calibrating or scanning.
For best results the UNITEST Wallscanner should always be held parallel to and scanned perpendicular to the object one is trying to locate. If the user is uncertain which way the objects run, this can be determined by first scanning in a perpendicular direction.
Double Studs and Solid Headers:
These members are usually found around doors and windows. The UNTEST Wallscanner signals a wider-than-normal measurement when these situations are detected.
Wallpaper:
The UNITEST Wallscanner functions normally on walls covered with wallpaper or fabric, unless the materials are metallic foil or contain metallic fibers.
Plaster and Lath:
The UNITEST Wallscanner may work well in situations where lath and plaster are found, providing the lath is wood and the plaster is not excessively thick.
Acoustic Ceilings:
When scanning a ceiling with an uneven surface, place cardboard on the ceiling and scan over the cardboard. When using this technique, calibration must be performed with the cardboard in place.
Operation / Maintenance
Changing the Battery
Metal Finding Tips:
Always calibrate in air for best sensitivity.
- When scanning for deep metal members near 8 cm deep scan in both, horizontal and vertical directions. Metal sensitivity is sometimes increased when the metal object aligns with the sensor.
Depending on the proximity of the electrical wiring or pipes to the wall surface, the UNITEST Wallscanner may detect them in the same manner as studs, etc. in the DEEP and NORMAL Settings. With the use of metal and continuous AC detection, pipes and electrical wiring may be detected adequately. However, caution should always be used when nailing, cutting, or drilling in walls, floors and ceilings that may contain these items. The UNITEST Wallscanner will not detect hot wires inside metal pipe or conduit, or behind some plywood or thick wall sections.
Always turn off the power if drilling or mounting operations near electrical wires.
5.0 Maintenance
When using the instrument in compliance with the instruction manual no special maintenance is required.
5.1 Changing the Battery
Low Battery and Sensitivity Test:
To test the UNITEST Wallscanner's battery strength and sensitivity, place the UNITEST Wallscanner in NORMAL mode and hold the UNITEST Wallscanner away from any surface. Press and hold the activation switch until the bargraph is in the display. Then let the activation switch go. Move the palm of the free hand towards the back of the unit. When the hand is approximately 5 to 6cm away from the back of the UNITEST Wallscanner, the LCD bars should begin to move towards the midpoint of the display. Moving the hand away should cause the bars to return to the side of the display. If the bars do not react accordingly, it is time to replace the UNITEST Wallscanner's battery. If the symbol appears in the display, replace the discharged battery.
- Slide open the battery door (found under the product table)
Connect the battery to the battery clip and insert the battery into the UNITEST Wallscanner
Replace the battery door (see figure 3)
With normal use, one 9-volt battery should last approximately two years.
Please think of our environment when you dispose of your used batteries. They belong in a rubbish dump or a refuse collection place for hazardous waste.
Please, comply with the respective valid regulation regarding the return, recycling and disposal of used batteries and accumulators.
5.2 Cleaning
If the instrument is dirty after usage, it is advised to clean it by using a humid cloth and mild household detergent.
Never use acid detergents or dissolvents.
Technical Data
6.0 Technical Data
Display: LCD with bars, READY-, RESET- and Symbol
Scanning Procedures: ...... NORMAL max. 2 cm
TIEF max. 4 cm
METALL max. 8 cm
Voltage Range: approx. 90..230 V AC
Power supply: Battery 9 V IEC 6LR61
Batterylife: approx. 100 h
Low Batt Display: .........symbol appears
Shock Resistance: . . . . . . . . . . . . . . . . . . . . . . . . . . . . . . . . . . . . . . . . . . . . . . . . . . . . . . . . . . . . . . . . . . . . . . . . . . . . . . . . . . . . .
1.8 m drop on to concrete
Operating Temperature: ....-5°C to 40°C
Storage Temperature: -20°C to 60°C
Humidity: max 85% rel. Humidity
Hight above MSL up to 2000m
Dimension: 190 x 71 x 46 mm
Weight: 250 g
12 month warranty
UNITEST instruments are subject to strict quality control. However, should the instrument function improperly during normal use, you are protected by our 12 month warranty (valid only with invoice or receipt).
Within the warranty period we will decide whether to exchange or repair the defective instrument. We will repair free of charge any defects in workmanship of materials, provided the instrument is returned unopened and untampered with.
Damages due to dropping or incorrect handling are not covered by the warranty. If the instrument shows failure following expiry of warranty our service department can offer you a quick and economical repair.
Subject to changes without notice!
UNITEST

Wandscanner Wallscanner

Sommaire
Sommaire Page
4.1 Preparation and precautions
Alimentation: .pile 9 V IEC 6LR61
Wandscanner Wallscanner
Índice
In addition, the DCHG Group confirms that all best equipment and instruments used in the study are of the same type subject to control, valid. All test equipment and instruments used are calibrated at least once per year. The test equipment which has been calibrated in accordance with IEC 14026 is available for international and national lab tests.
Industrial Park
Deyington Co.
Carragaine, Ltd. Carriage of Life
Republic of Ireland Tel: +253)016910
Ex(353)214919010
e-mail: cnpnemara.electronics@cnpnalec.ie

1.5.150981129002
IQ NET

AEMOR Spain AFAQ France AIB-Vincotte lnter Belgium APCER Portugal SSI Unted Kingdom CSIQ Italy
Cus Czech Republic Germany CEMB NELG EURI GECRA FALB AURIO ENGLA JAUAN KEMA Netherlands KSA-04 Korea MSZT Hungary NCS Hungary NSL Ireland ODS Austria PCRC Poland PSB Singapur
OAS Australia OMI Canada SFS Finland Sill Israel JQA Japan SIO Slovenia SIS-SAO Sweden SOS Switzerland
IONet is represented in the USA by the following IQMel members: AFAQ, AIB-Vincolle Inter, BSI, DQS, KEMA, NSAI and QMI

04/2001 PTDB90380003