— Radio — Mode d'emploi PDF")
LIFE E66312 (MD 84950) - Radio MEDION - Free user manual and instructions
Find the device manual for free LIFE E66312 (MD 84950) MEDION in PDF.
User questions about LIFE E66312 (MD 84950) MEDION
0 question about this device. Answer the ones you know or ask your own.
Ask a new question about this device
Download the instructions for your Radio in PDF format for free! Find your manual LIFE E66312 (MD 84950) - MEDION and take your electronic device back in hand. On this page are published all the documents necessary for the use of your device. LIFE E66312 (MD 84950) by MEDION.
USER MANUAL LIFE E66312 (MD 84950) MEDION
natural_image
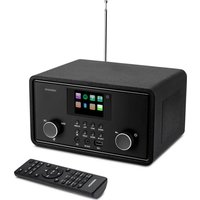
Black digital radio with antenna and control knobs, no visible text or symbols on device bodyDAB+ Radio
MEDION® LIFE® E66312 (MD 84950)
Inhaltsverzeichnis
DE
natural_image
Icon of an open book with a lowercase 'i' inside, enclosed in a black circle (no text or symbols)text_image
Warning sign with exclamation mark inside a trianglenatural_image
Black circular warning symbol with a white exclamation mark (no text or numbers)ACHTUNG!
natural_image
Black circular icon with a white lowercase 'i' in the center, commonly used to denote information (no additional text or symbols)HINWEIS!
natural_image
Icon of an open book with a lowercase 'i' inside, enclosed in a black circle (no text or symbols)HINWEIS!
text_image
Warning sign depicting a lightning bolt symbol in a triangular hazard triangleWARNUNG!
natural_image
Black circular warning symbol with a white exclamation mark (no text or numbers)ACHTUNG!
text_image
Warning sign with exclamation mark inside a triangleGEFAHR!
natural_image
Black circular warning symbol with a white exclamation mark (no text or numbers)ACHTUNG!
text_image
Warning sign depicting a lightning bolt symbol in a triangular hazard triangleWARNUNG!
natural_image
Black circular warning symbol with a white exclamation mark (no text or numbers)ACHTUNG!
natural_image
Black circular icon with a white lowercase 'i' in the center, commonly used to denote information (no additional text or symbols)HINWEIS
natural_image
Black circular icon with a white lowercase 'i' in the center, representing information (no additional text or symbols)HINWEIS
natural_image
Black circular icon with a white lowercase 'i' in the center, commonly used to denote information (no additional text or symbols)HINWEIS
natural_image
Black circular icon with a white lowercase 'i' in the center, commonly used to denote information (no additional text or symbols)HINWEIS
natural_image
Black circular icon with a white lowercase 'i' in the center, commonly used to denote information (no additional text or symbols)HINWEIS
natural_image
Black circular icon with a white lowercase 'i' in the center, commonly used to denote information (no additional text or symbols)HINWEIS
natural_image
Black circular icon with a white lowercase 'i' in the center, commonly used to denote information (no additional text or symbols)HINWEIS
text_image
Warning symbol with a sine wave inside a triangle, indicating sound or audio hazard.WARNUNG!
natural_image
Black circular icon with a white lowercase 'i' in the center, commonly used to denote information (no additional text or symbols)HINWEIS
natural_image
Recycling symbol composed of three chasing arrows forming a triangle (no text or labels)Verpackung
natural_image
Simple line drawing of a trash bin with two crossed lines indicating no waste or discharge (no text or symbols)Gerät
natural_image
Symbol of a trash bin crossed out by two diagonal lines (no text or numbers present)Batterien
Electronic Co. Ltd., China
Eingang AC 100–240 V \~ 50/60 Hz,
0,3 A
Ausgang
DC

6
text_image
QR code image containing encoded data, no visible human-readable text1. Information on how to use these
instructions 45
EN
1.1. Warning symbols and keywords used in these instructions ....46
FR
NL
2. Package contents
DK
3. Proper use
4. Safety instructions
4.1. Keep electrical equipment out of reach of children 50
4.2. Setting up the device safely ....51
4.3. Malfunctions 52
4.4. Ensure accessibility of the mains power socket....53
4.5. Damage 54
4.6. Information on handling batteries .....55
4.7. Cleaning and storage ....57
4.8. Thunderstorms 57
5. Overview of the device.... 58
5.1. Front 58
5.2. Rear 5
6. Using the device for the first time ...... 60
6.1. Mains operation – connecting the mains adapter ....60
6.2. Battery operation – inserting the batteries into the device ....61
6.3. Switch device on/off....61
6.4. Aerial....62
6.5. Setting the time ......62
6.6. Volume 65
6.7. Display illumination 65
6.8. Language 65
7. Radio operation
7.1. DAB mode 67
7.2. System settings in DAB mode ......69
7.3. FM mode 70
7.4. Radio Data System....71
7.5. Storing stations....72
7.6. System settings in FM mode .....73
8. Snooze function ....
9. Sound reproduction via headphones ..... 75
10. Setting the alarm function 76
11. Activating/deactivating the alarm function 78
11.1. Interrupting the alarm ....78
- Disposal 79
- Technical data 80
- Declaration of conformity 81
- Legal notice 82
1. Information on how to use these instructions

natural_image
Icon of an open book with an information symbol inside, enclosed in a black circle (no text or numbers)Please be sure to read these operating instructions carefully and follow all instructions given. The instructions will help you to operate the device reliably and help increase its service life. Always store these operating instructions near the device. Keep these operating instructions so that you can pass them on with the device if you sell it.
1.1. Warning symbols and keywords used in these instructions
DANGER!
Warning: immediate mortal danger!

text_image
Warning sign with exclamation mark inside a triangleWARNING!
Warning of possible risk of fatal injury and/or serious irreversible injuries!
CAUTION!
Danger of possible minor or moderate injuries!

natural_image
Black circular warning symbol with a white exclamation mark (no text or numbers)CAUTION!
Please follow the instructions to avoid property damage!

natural_image
Black circular icon with a white lowercase 'i' in the center, commonly used to denote information (no additional text or symbols)NOTICE!
Additional information on using the device!

natural_image
Icon of an open book with a lowercase 'i' inside, enclosed in a black circle (no text or symbols)NOTICE!
Please follow the instructions in the operating instructions!
text_image
Warning sign depicting a lightning bolt symbol in a triangular hazard triangleWARNING!
Warning of risk of electric shock!
- Bullet point/information on operating steps and results
▶ Tasks to be performed
2. Package contents
Please check your purchase to ensure that all items are included. If anything is missing, please contact us within 14 days of purchase.
The product you have purchased includes:
-DAB+ Radio MD 84950 -Mains adapter (model: DYS122-060150W-3, Dongguan Dongsong Electronic Co. Ltd., China)
3. Proper use
This device is used to receive and play back radio stations.
The device is intended for private use only and not for industrial/commercial use.
Please note that we shall not be liable in cases of improper use:
- Do not modify the device without our consent and do not use any auxiliary equipment which we have not approved or supplied.
-Use only spare parts and accessories which we have supplied or approved.
-Heed all the information in these operating instructions, especially the safety instructions. Any other use is deemed improper and can cause personal injury or damage to the device.
-Do not use the device in extreme environmental conditions.

natural_image
Black circular warning symbol with a white exclamation mark (no text or numbers)CAUTION!
Please note that different national regulations may apply in a number of countries about which frequency ranges can be freely received. Information received outside of the permitted frequency ranges may not be utilised nor may the content or the fact that it was received be passed on to third parties.
4. Safety instructions
4.1. Keep electrical equipment out of reach of children

text_image
Warning sign with exclamation mark inside a triangleDANGER!
Keep plastic packaging out of the reach of children. There is a risk of suffocation.
- This device is not intended for use by people (including children) with reduced physical, sensory or mental abilities or by those without experience and/or knowledge, unless they are supervised by a person responsible for their safety or they have been instructed in its use by that person. Children should be supervised to ensure they do not play with this device.
- Keep the device and its accessories out of reach of children.
4.2. Setting up the device safely
If the device has been moved from a cold to a warm room, wait a while before connecting it to the power supply. The resulting condensation may damage the device. The device can be operated safely as soon as it has reached room temperature.
- Set up and operate all the components on a stable, level and vibration-free surface to prevent the device from falling.
- When setting up the device, ensure a minimum clearance of 5 cm around the device to guarantee sufficient ventilation.
- The ventilation should not be obstructed by covering the device with objects such as magazin es, table cloths, curtains, etc.
Also make sure that:
- the device is not exposed to direct sources of heat (e.g. heaters);
- the device is not placed in direct sun-light;
- the device is not exposed to extreme temperatures;
- the device is not placed near to magnetic fields (for example, televisions or other loudspeakers);
- no naked flames (for example, lit candles) are placed near or on the device.
- no containers containing liquid, e.g. vases, are placed on or near to the device, and protect all the parts from drips or splashes. The container may tip over and the liquid may impair the electrical safety of the device.
4.3. Malfunctions
If the device is malfunctioning, it may be due to an electrostatic discharge. If this is the case, unplug the mains adapter and
remove the batteries. Re-insert the batteries and plug the device back in. This will reset the device.
4.4. Ensure accessibility of the mains power socket

natural_image
Black circular warning symbol with a white exclamation mark (no text or numbers)ATTENTION!
Even when the device is switched off, some components may still be live. To disconnect the device from the power supply or to completely isolate the device from voltage sources, unplug the device completely from the mains.
- Connect the device only to a power socket (100-240 V \~ 50/60 Hz) that is easy to reach and close to the place where you have set up the device. The socket outlet must be freely accessible so that you can unplug the device from the mains quickly if necessary.
- Do not use the device if it or the connecting cables are visibly damaged or if the device itself has been dropped.
- When disconnecting the device from the mains supply, always pull on the plug rather than on the cable.
- Make sure that the mains cable does not present a trip hazard. The connecting cable must not be trapped or squashed.
4.5. Damage
- If the mains plug, cable or device is damaged, remove the plug from the power supply immediately.
text_image
Warning sign depicting a lightning bolt symbol in a triangular hazard triangleWARNING!
Never try to open and/or repair the device yourself. There is a risk of electric shock!
- In order to prevent risks, damaged mains cables should be replaced by the manufacturer, the manufacturer's customer service department or a similarly qualified person.
- If there is a fault, please contact our Service Centre or another suitably qualified specialist workshop to avoid putting yourself at risk.
4.6. Information on handling batteries
The device can be operated with batteries. Please note the following instructions on handling batteries:
- Never recharge batteries! Risk of explosion!
- Keep batteries away from children; do not throw them into a fire, short-circuit or dismantle them.
- When inserting batteries ensure that the polarity is correct.
• Always replace all batteries at the same time.
- Always use replacement batteries of the same type; do not mix different types of batteries or old and new batteries.
- Clean the contacts on the batteries and on the device before inserting the batteries.
- Remove depleted batteries immediately! There is an increased risk of leakage!
- Never expose the batteries to excessive heat, such as sunlight, fire or similar sources of heat!
- If this instruction is not heeded, the batteries may discharge beyond their end-point voltage and could leak! Remove batteries immediately to avoid damage.
- Avoid contact with skin, eyes and mucous membranes. If any of these areas come into contact with battery acid, rinse them immediately with plenty
of clean water and consult a doctor as soon as possible.
- Remove the batteries if the device will not be in use for an extended period.
4.7. Cleaning and storage
- Before cleaning, pull the mains adapter out of the mains socket.
- Use a dry, soft cloth for cleaning.
- Avoid the use of chemical solutions and cleaning products because these may damage the device surface or markings.
- If the device is not going to be used for long periods, remove any batteries where necessary, switch off the device using the POWER button and disconnect the mains plug!
4.8. Thunderstorms
Pull out the mains plug if you are away for a long period of time or there is a thunderstorm.
5. Overview of the device
5.1. Front
text_image
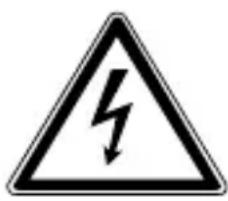
121110987 6543 2 11) Speaker
2) VOLUME: Increase/decrease volume
3) SLEEP: Set the sleep timer
4) ALARM/SNOOZE: Set the alarm function/snooze
5) INFO: Call up information
6) MENU: Open submenus
7) LCD display
8) PRESET: Store stations
9) SELECT: Confirm selection
10) MODE: Set operating mode (DAB/FM)
11) : Switch radio on/off
12) SEARCH: Menu options/Searching for a station
5.2. Rear
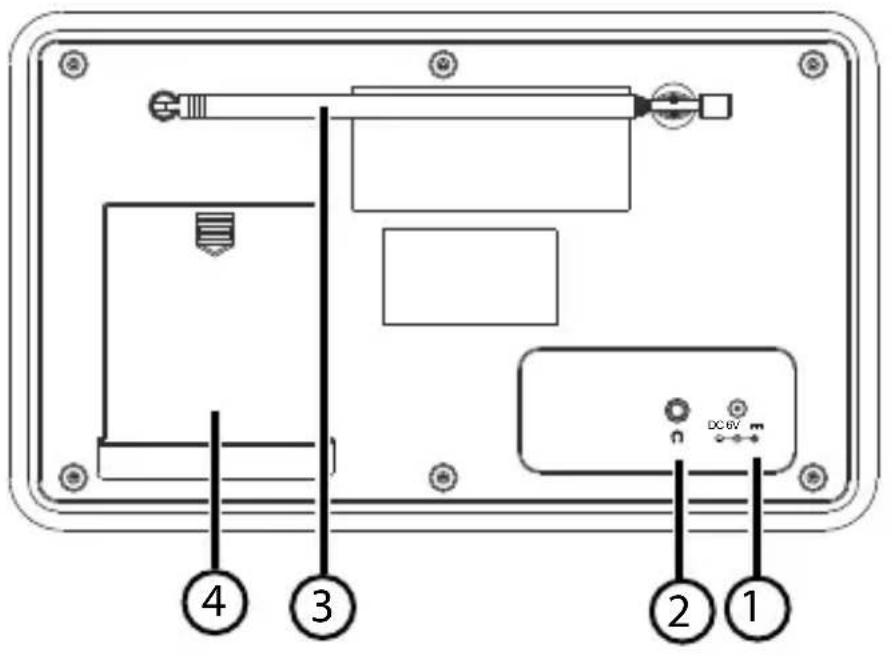
text_image
4 3 2 1 DC 6V1) DC 6V IN: Mains adapter connection
2): 3.5 mm jack headphone socket
3) FM/DAB aerial
4) Battery compartment
6. Using the device for the fi rst time
6.1. Mains operation – connecting the mains adapter
▶ Insert the mains adapter plug into the mains adapter socket on the device.
▶ Plug the mains adapter into an easily accessible 100–240 V \~ 50/60 Hz mains socket.

natural_image
Black circular warning symbol with a white exclamation mark (no text or numbers)CAUTION!
Only use the supplied mains adapter (model: DYS122-060150W-2 (EU) / DYS122-060150W-3 (UK), Dongguan Dongsong Electronic Co. Ltd., China) to make the connection. A name plate with the relevant details can be found on the mains adapter.

natural_image
Black circular icon with a white lowercase 'i' in the center, commonly used to denote information (no additional text or symbols)NOTICE
If the device is not going to be used for some time, take it out of operation. Switch off the device at the POWER button and disconnect the mains plug!
6.2. Battery operation – inserting the batteries into the device
The battery compartment is located at the rear of the device.
▶ Slide off the battery compartment cover on the rear of the device and open the battery compartment.
Insert 4 x 1.5 V batteries, size LR6/AA, (not supplied) with the negative end resting on the springs. Refer to the diagram in the battery compartment!
▶ Slide the battery compartment cover back onto the device until it audibly clicks into place.

natural_image
Black circular icon with a white lowercase 'i' in the center, commonly used to denote information (no additional text or symbols)NOTICE
If batteries are inserted and the mains adapter is not connected, the device will automatically run off the batteries.
6.3. Switch device on/off
▶ Press the button to switch on the radio.

natural_image
Black circular icon with a white lowercase 'i' in the center, commonly used to denote information (no additional text or symbols)NOTICE
After it has been switched on, the device will be in the last mode set (DAB+ or FM).
6.4. Aerial
The device has a telescopic aerial for FM/DAB+ reception.
▶ Pull the aerial out fully and arrange it for optimum reception.
6.5. Setting the time
If you are switching on your radio for the first time, the message "TIME IS NOT SET" will appear on the display.
▶ Press the ALARM/SNOOZE button and the hour display will start to flash.

natural_image
Black circular icon with a white lowercase 'i' in the center, commonly used to denote information (no additional text or symbols)NOTICE
Turn the SEARCH dial to the right to increase the number on the display. Turn the dial to the left to decrease the number on the display. Turn and hold the dial to quickly run through the numbers on the display.
▶ Use the SEARCH dial to set the time: firstly the hour and then the minutes. Confirm your selection in each case by pressing the SELECT button.
Then use the SEARCH dial to set the date: firstly the day, then the month and finally the year. Confirm your selection in each case by pressing the SELECT button.
6.5.1. Manually setting the time/date
You can also change the time, date and format at a later point in time:
▶ Press the MENU button.
▶ Turn the SEARCH dial until the SYSTEM menu appears on the display.
▶ Press the SELECT button.
▶ Turn the SEARCH dial until the TIME menu appears on the display.
▶ Press the SELECT button.
▶ Turn the SEARCH dial until the SET TIME / DATE menu appears on the display.
▶ Use the dial to firstly set the hour and confirm your selection by pressing the SELECT button.
Now set the minutes, day, month and year as described above.
▶ Once the year has been set, TIME SAVED will appear on the display.
The time and the date have now been set.
6.5.2. Automatically setting the time/date
You can set the time and date to update automatically.
▶ Press the MENU button.
▶ Turn the SEARCH dial until the SYSTEM menu appears on the display.
▶ Press the SELECT button.
▶ Turn the SEARCH dial until the TIME menu appears on the display.
▶ Press the SELECT button.
▶ Turn the SEARCH dial until the AUTO UPDATE menu appears on the display.
▶ Press the SELECT button.
▶ Turn the SEARCH DIAL and select whether the update should be carried out via DAB (UPDATE FROM DAB), via FM (UPDATE FROM FM), via DAB/FM (UPDATE FROM ANY), or whether no update should be carried out (NO UPDATE).
6.5.3. Setting the time format
You can set the time and date to change automatically.
▶ Press the MENU button.
▶ Turn the SEARCH dial until the SYSTEM menu appears on the display.
▶ Press the SELECT button.
▶ Turn the SEARCH dial until the TIME menu appears on the display.
▶ Press the SELECT button.
▶ Turn the SEARCH dial until the SET 12/24 menu appears on the display.
▶ Press the SELECT button.
▶ Turn the SEARCH DIAL and select whether the time should be displayed in 12 (SET 12 HOUR) or 24 (SET 24 HOUR) hour format and confirm your selection by pressing the SELECT button.
6.6. Volume
The VOLUME dial on the device is used to control the volume.
The volume will be shown for a few seconds on an indicator bar on the display under VOLUME.
6.7. Display illumination
▶ Press the MENU button.
▶ Turn the search dial until the SYSTEM menu appears on the display.
▶ Press the SELECT button.
▶ Turn the search dial until the BACKLIGHT menu appears on the display.
▶ Press the SELECT button.
▶ Turn the SEARCH dial until the desired brightness level (HIGH, MEDIUM or LOW) appears on the display.
▶ Press the SELECT button to confirm your selection.

natural_image
Black circular icon with a white lowercase 'i' in the center, commonly used to denote information (no additional text or symbols)NOTICE
The currently set display brightness is marked with a *.
6.8. Language
▶ Press the MENU button.
▶ Turn the search dial until the SYSTEM menu ap-
pears on the display.
▶ Press the SELECT button.
▶ Turn the search dial until the LANGUAGE menu appears on the display.
▶ Press the SELECT button.
▶ Turn the SEARCH dial until the desired language (ENGLISH or DEUTSCH) appears on the display.
▶ Press the SELECT button to confirm your selection.
7. Radio operation
You can receive FM stations and DAB+ stations with this radio.
You can save up to 10 preset FM stations and 10 preset DAB+ stations.

natural_image
Black circular icon with a white lowercase 'i' in the center, commonly used to denote information (no additional text or symbols)NOTICE
When the device is switched on, the radio will play the last station to which you were listening. If you are using the device for the first time, the radio will be set to DAB mode.
7.1. DAB mode
In order to receive DAB+ stations, the device must be set to DAB mode.
Press the MODE button until DAB is shown on the display.
7.1.1. Searching for DAB stations
In order to search for DAB+ stations, press the MENU button.
▶ Select FULL SCAN and confirm your selection with the SELECT button.
The device will now search through all available DAB+ stations, the message SCANNING will be shown initially on the display and then an indicator bar will show the progress of the search. Once the station search has been completed, the number of available stations will be shown briefly on the display.

natural_image
Black circular icon with a white lowercase 'i' in the center, representing information (no additional text or symbols)NOTICE
In order to keep your list of DAB+ stations up-to-date, regularly complete a DAB+ station search.
Turn the SEARCH dial to select a station from the list of stations and confirm your selection by pressing the SELECT button.
When listening to DAB+ radio, you can access the available information by (repeatedly) pressing the INFO button:
-Scrolling text
-Signal strength
-Programme type
-Group name
-Multiplex number/frequency
-Signal error rate
-Audio bit rate
-Time
-Date
7.2. System settings in DAB mode
7.2.1. Automatic station search
▶ Press the MENU button.
▶ Select FULL SCAN and confirm your selection with the SELECT button.
The device now searches for all available DAB+ stations.
7.2.2. Manual station search
▶ Press the MENU button.
▶ Select MANUAL TUNE and confirm your selection with the SELECT button.
Now use the DIAL to set the desired frequency and confirm your selection by pressing the SELECT button.
7.2.3. Hiding stations that can no longer be received
▶ Press the MENU button.
▶ Select PRUNE and confirm your selection with the SELECT button.
Now use the DIAL to select YES or NO and confirm your selection by pressing the SELECT button.
The device will now remove all those stations that can no longer be received from the list of stations.
7.2.4. System
▶ Press the MENU button, turn the SEARCH dial to select the SYSTEM menu and confirm your selection by pressing the SELECT button.
You can change the following additional settings here:
-Time
-Sleep
-Backlight
-Language
-Factory Reset
-SW Version
Now turn the SEARCH dial to select the desired menu and confirm your selection by pressing the SELECT button.
Now follow the subsequent instructions.
7.3. FM mode
In order to receive FM stations, the device must be set to FM mode.
Press the MODE button until FM is shown on the display.
7.3.1. Reset
▶ Press the MENU button, turn the SEARCH dial to select the SYSTEM menu and confirm your selection by pressing the SELECT button.
Now turn the SEARCH dial to select the FAC-TORY RESET menu and confirm your selection by pressing the SELECT button.
Now use the SEARCH dial to select YES or NO and confirm your selection by pressing the SELECT button.
7.4. Radio Data System
Radio Data System (RDS) is a service provided by radio stations. In addition to traditional music and voice services, they also broadcast additional information in the form of encrypted digital signals that can be analysed and displayed by the radio. On the display you can see the programme name and other information (traffic information, the title of the track currently being played, etc.).
If the reception of the radio station is weak the radio switches automatically to an RDS station that is broadcasting the same programme.
When listening to the radio, you can access the available information by (repeatedly) pressing the INFO button:
-Radio text
-Programme type
-Frequency
-Mono/Stereo
-Time
-Date
7.4.1. Searching for an FM station
▶ Turn the SEARCH dial in a clockwise direction to search upwards through the frequency band for the desired station.
▶ Turn the SEARCH dial in a anticlockwise direction to search downwards through the frequency band for the desired station.
When a station has been found, the station search will stop.
You can increase or decrease the frequency in small increments by lightly turning the SEARCH dial. If you apply more pressure then the search function will be activated and run either forwards or backwards through the frequency band.
7.5. Storing stations
You can now save up to 10 preset DAB+ stations and 10 FM stations.
▶ Firstly select either DAB+ or FM mode using the MODE button.
▶ Search for the desired station automatically or manually as described above.
▶ Press and hold down the PRESET button.
The memory space display under PRESET STORE will flash.
▶ Turn the SEARCH dial to select the desired memory space 1-10. Memory spaces that have not yet been assigned are labelled with EMPTY.
▶ Confirm your selected memory space by pressing the SELECT button.
You will receive the message PRESET X STORED to indicate that the station has been saved.
7.5.1. Calling up stations
▶ Briefly press PRESET. Turn the SEARCH dial to select the desired preset station.
▶ Confirm your selection by pressing the SELECT button.
7.6. System settings in FM mode
7.6.1. Search settings
Press the MENU button and select the option SCAN SETTING, turn the SEARCH dial to select either ALL STATIONS (all stations) or STRONG STATION (only strong stations).
▶ Confirm your selection by pressing the SELECT button.
7.6.2. Audio settings
Press the MENU button and select the option AUDIO SETTING, turn the SEARCH dial to select either STEREO ALLOWED or FORCED MONO.
The setting FORCED MONO may be useful when the station signal is weak and the programme is loud.
▶ Confirm your selection by pressing the SELECT button.
7.6.3. System
▶ Press the MENU button, turn the SEARCH dial to select the SYSTEM menu and confirm the selection by pressing the SELECT button.
You can change the following additional settings here:
-Time
-Sleep
-Backlight
-Language
-Factory Reset
-SW Version
Now turn the SEARCH dial to select the desired menu and confirm the selection by pressing the SELECT button.
Now follow the subsequent instructions.
8. Snooze function
You can set a time of 10/20/30/60/70/80 or 90 minutes after which the radio will automatically switch off or the function will be deactivated (SLEEP OFF).
The radio is switched on.
▶ Press the SLEEP button on the device repeatedly until the desired snooze time appears on the display.
▶ Confirm your selection by pressing the SELECT button.
9. Sound reproduction via headphones
On the rear of the radio, you will find the ear/head-phone socket 🙏
- Connect ear/headphones with a 3.5 mm jack plug here.
The loudspeaker on the radio will be deactivated automatically.
text_image
Warning symbol with a triangle containing a stylized 'e' and sound waves, indicating sound or hearing.WARNING!
Excessive volume when using earphones and headphones can result in damage to hearing and/or loss of hearing. Before pressing play, set the volume to the lowest setting.
Start playback and increase the volume to one which is comfortable for you.
Using headphones/earphones to listen to a device at high volumes for an extended period can damage your hearing.
10. Setting the alarm function
The device has an alarm function that you can use to wake yourself up with the sound of the radio or an alarm tone. You can set two alarm times.
When the radio is switched on, press the ALARM/SNOOZE button, repeatedly where necessary, to access the alarm menu and to select the desired alarm memory space (ALARM1 or ALARM2).
▶ Press the SELECT button to select the alarm memory space that you want to change.
▶ Use the SEARCH dial to set the alarm time: firstly the hour and then the minutes. Confirm your selection by pressing the SELECT button.
Now turn the SEARCH dial to select the length of the alarm and confirm the selection by pressing the SELECT button.
Now select the type of alarm using the SEARCH dial: DAB, FM or BUZZER and confirm by pressing the SELECT button.
Now use the SEARCH dial to select whether you want to be woken up in FM mode by the last station to which you were listening or by a station from the station list.
▶ Confirm the selection by pressing the SELECT button.
▶ Use the SEARCH dial to now select whether you want to be woken up DAILY, ONCE, at WEEKENDS or on WEEKDAYS.
▶ Confirm the selection by pressing the SELECT button.
Now turn the SEARCH dial to select the volume of the alarm tone and confirm by pressing the SELECT button.
▶ Turn the SEARCH dial to now select ALARM ON to activate the alarm and confirm by pressing the SELECT button.
ALARM SAVED now appears briefly on the display and the alarm time has been activated. When the radio is switched off, the display will show either ⏱1 or ⏱2.

natural_image
Black circular icon with a white lowercase 'i' in the center, commonly used to denote information (no additional text or symbols)NOTICE
The alarm function ONCE requires a precise date to be entered. This needs to be set after selecting the alarm function ONCE.
Follow the instructions on the screen to set the alarm.
11. Activating/deactivating the alarm function
When the radio is switched off, the alarm function can be easily activated or deactivated.
▶ Press the ALARM/SNOOZE button on the device to access the alarm menu.
Now use the SEARCH dial to switch the alarm function ON or OFF. Confirm your selection by pressing the SELECT button.
11.1. Interrupting the alarm
When the alarm signal sounds, press the ALARM/SNOOZE button to interrupt the alarm. The alarm will initially stop and is repeated again after approx. 5 minutes.
When the alarm signal sounds, press the ALARM/SNOOZE button twice in succession to interrupt the alarm for 10 minutes.
The alarm function is stopped when you switch on the device or deactivate the alarm.
12. Disposal

natural_image
Recycling symbol composed of three chasing arrows forming a triangle (no text or labels)Packaging
Your device has been packaged to protect it against transportation damage. The packaging is made of environmentally friendly material which can be recycled.

natural_image
Symbol of a trash bin crossed with a diagonal line and a horizontal bar below (no text or labels)Device
Old devices should not be disposed of with the normal household rubbish.
In accordance with Directive 2012/19/EU, the device must be properly disposed of at the end of its service life.
This involves separating the materials in the device for the purpose of recycling and avoiding any impact on the environment. Take old devices to a collection point for electrical scrap or a recycling centre.
Contact your local waste disposal company or your local authority for more information on this subject.
natural_image
Symbol of a trash bin crossed out by two crossed lines (no text or numbers present)Batteries
Batteries must be properly disposed of. Retailers who stock batteries and local authority collection points have appropriate disposal containers for this purpose. You can contact your local waste disposal company or municipal authorities for further information.
13. Technical data
Device
Power supply DC 6V = 1.5 A
Battery operation 4 x 1.5V Mignon/ AA/LR6 (not supplied)
Output power 2 x 20 watt max. music
output
(2 x 2 watt RMS)
Headphone output 3.5mm stereo jack
Output voltage max.
150mV
FM waveband 87.5 - 108 MHz
DAB+ waveband 174 – 240 MHz
Dimensions (W x H x D): 230 x 142 x 165 mm
Mains adapter
Model: DYS122-060150W-2 (for
the EU)
DYS122-060150W-3
the UK)
Manufacturer:
Dongguan
Electronic Co. Ltd., China
Input: AC 100–240 V \~ 50/60 Hz,
0.3 A
Output
DC = 1.5 A 6
14. Declaration of conformity
CE
Medion AG hereby declares that the product MD 84950 conforms to the following European requirements:
• EMC Directive 2004/108/EC
- Low Voltage Directive 2006/95/EC
• Ecodesign Directive 2009/125/EC
• RoHS Directive 2011/65/EU.
Full declarations of conformity are available at http://www.medion.com/conformity.
15. Legal notice
Copyright © 2015
All rights reserved.
This operating manual is protected by copyright.
Mechanical, electronic and any other form of reproduction is prohibited without the written permission of the manufacturer.
The owner of the copyright is:
Medion AG
Am Zehnthof 77
45307 Essen
Germany

text_image
QR code image containing encoded data, no visible human-readable textThese operating instructions can be re-ordered via the Service Hotline and are available for download on the Service web page www.medionservice.de.
You can also scan the QR code above to download the instructions onto your mobile device via the service portal.
Sommaire
natural_image
Icon of an open book with a lowercase 'i' inside, enclosed in a black circle (no text or symbols)text_image
Warning sign with exclamation mark inside a trianglenatural_image
Black circular warning symbol with a white exclamation mark (no text or numbers)ATTENTION!
natural_image
Black circular icon with a white lowercase 'i' in the center, representing information (no additional text or symbols)REMARQUE!
natural_image
Icon of an open book with a lowercase 'i' inside, enclosed in a black circle (no text or symbols)REMARQUE!
text_image
Warning sign depicting a lightning bolt symbol in a triangular hazard triangleAVERTISSEMENT!
natural_image
Black circular warning symbol with a white exclamation mark (no text or numbers)ATTENTION!
text_image
Warning sign with exclamation mark inside a triangleDANGER!
natural_image
Black circular warning symbol with an exclamation mark (no text or numbers)ATTENTION !
text_image
Warning sign depicting a lightning bolt symbol in a triangular hazard triangleAVERTISSEMENT!
natural_image
Black circular warning symbol with a white exclamation mark (no text or numbers)ATTENTION!
natural_image
Black circular icon with a white lowercase 'i' in the center, commonly used to denote information (no additional text or symbols)REMARQUE
natural_image
Black circular icon with a white lowercase 'i' in the center, commonly used to denote information (no additional text or symbols)REMARQUE
natural_image
Black circular icon with a white lowercase 'i' in the center, commonly used to denote information (no additional text or symbols)REMARQUE
natural_image
Black circular icon with a white lowercase 'i' in the center, commonly used to denote information (no additional text or symbols)REMARQUE
natural_image
Black circular icon with a white lowercase 'i' in the center, commonly used to denote information (no additional text or symbols)REMARQUE
natural_image
Black circular icon with a white lowercase 'i' in the center, commonly used to denote information (no additional text or symbols)REMARQUE
natural_image
Black circular icon with a white lowercase 'i' in the center, commonly used to denote information (no additional text or symbols)REMARQUE
natural_image
Warning symbol with a sine wave inside a triangle (no text or numbers)AVERTISSEMENT!
natural_image
Black circular icon with a white lowercase 'i' in the center, commonly used to denote information (no additional text or symbols)REMARQUE
natural_image
Recycling symbol composed of three chasing arrows forming a triangle (no text or labels)Emballage
natural_image
Symbol of a trash bin crossed with a diagonal line, no text or numbers presentAppareil
natural_image
Simple line drawing of a trash bin with two crossed lines indicating no waste or restriction (no text or symbols)Piles
Alimentation DC 6 V = 1.5 A
text_image
QR code image containing encoded data, no visible human-readable textnatural_image
Icon of an open book with a lowercase 'i' inside, enclosed in a black circle (no text or symbols)text_image
Warning sign with exclamation mark inside a triangleWAARSCHUWING!
natural_image
Black circular warning symbol with a white exclamation mark (no text or numbers)LET OP!
natural_image
Black circular icon with a white lowercase 'i' in the center, commonly used to denote information (no additional text or symbols)LET OP!
natural_image
Icon of an open book with a lowercase 'i' inside, enclosed in a black circle (no text or symbols)LET OP!
text_image
Warning sign depicting a lightning bolt symbol in a triangular hazard triangleWAARSCHUWING!
-Radio MD 84950
-Netadapter (model: DYS122-060150W-2, Dongguan Dongsong Electronic Co. Ltd., China)
natural_image
Black circular warning symbol with a white exclamation mark (no text or numbers)LET OP!
text_image
Warning sign with exclamation mark inside a triangleGEVAAR!
natural_image
Black circular warning symbol with an exclamation mark (no text or numbers)LET OP!
text_image
Warning sign depicting a lightning bolt symbol in a triangular hazard triangleWAARSCHUWING!
text_image
4 3 2 1 DC RVnatural_image
Black circular warning symbol with an exclamation mark (no text or numbers)LET OP!
natural_image
Black circular icon with a white lowercase 'i' in the center, commonly used to denote information (no additional text or symbols)LET OP
natural_image
Black circular icon with a white lowercase 'i' in the center, commonly used to denote information (no additional text or symbols)LET OP
natural_image
Black circular icon with a white lowercase 'i' in the center, commonly used to denote information (no additional text or symbols)LET OP
natural_image
Black circular icon with a white lowercase 'i' in the center, commonly used to denote information (no additional text or symbols)LET OP
natural_image
Black circular icon with a white lowercase 'i' in the center, representing information (no additional text or symbols)LET OP
natural_image
Black circular icon with a white lowercase 'i' in the center, commonly used to denote information (no additional text or symbols)LET OP
natural_image
Black circular icon with a white lowercase 'i' in the center, commonly used to denote information (no additional text or symbols)LET OP
text_image
Warning symbol with a triangle containing a stylized 'e' and sound waves, indicating sound or audio hazard.WAARSCHUWING!
OP HET DISPLAY WORDT KORT ALARM
natural_image
Black circular icon with a white lowercase 'i' in the center, commonly used to denote information (no additional text or symbols)LET OP
natural_image
Recycling symbol composed of three chasing arrows forming a triangle (no text or labels)Verpakking
natural_image
Symbol of a trash bin crossed with a diagonal line, no text or numbers presentToestel
natural_image
Symbol of a trash bin crossed out by two crossed lines (no text or numbers present)Batterijen
FM-frequentieband FM 87,5-108 MHz
DAB+-frequentieband 174-240 MHz
Afmetingen (b x h x d) ca. 230 x 142 x 165 mm
Netadapter
Model: DYS122-060150W-2 (voor
EU)
DYS122-060150W-3
text_image
QR code image containing encoded data, no visible human-readable textIndholdsfortegnelse
DE
natural_image
Icon of an open book with an information symbol inside a circle (no text or numbers)text_image
Warning sign with exclamation mark inside a trianglenatural_image
Black circular warning symbol with a white exclamation mark (no text or numbers)PAS PÅ!
natural_image
Black circular icon with a white lowercase 'i' in the center, commonly used to denote information (no additional text or symbols)BEMÆRK!
natural_image
Icon of an open book with a lowercase 'i' inside, enclosed in a black circle (no text or symbols)BEMÆRK!
text_image
Warning sign depicting a lightning bolt symbol in a triangular hazard triangleADVARSEL!
-DAB+ radio MD 84950
-Lysnetadapter (model: DYS122-060150W-2, Dongguan Dongsong Electronic Co. Ltd., China)
3. Korrekt anvendelse
natural_image
Black circular warning symbol with a white exclamation mark (no text or numbers)PAS PÅ!
text_image
Warning sign with exclamation mark inside a triangleFARE!
natural_image
Black circular warning symbol with a white exclamation mark (no text or numbers)PAS PÅ!
text_image
Warning sign depicting a lightning bolt symbol in a triangular hazard triangleADVARSEL!
natural_image
Black circular warning symbol with a white exclamation mark (no text or numbers)PAS PÅ!
Brug kun den medfølgende lysnetadapter (model: DYS122-060150W-2 (EU) / DYS122-060150W-3 (UK), Dongguan Dongsong Electronic Co. Ltd., China). På lysnetadapteren er der en mærkeplade med de tilsvaren-de oplysninger.

natural_image
Black circular icon with a white lowercase 'i' in the center, commonly used to denote information (no additional text or symbols)BEMÆRK
natural_image
Black circular icon with a white lowercase 'i' in the center, commonly used to denote information (no additional text or symbols)BEMÆRK
natural_image
Black circular icon with a white lowercase 'i' in the center, commonly used to denote information (no additional text or symbols)BEMÆRK
natural_image
Black circular icon with a white lowercase 'i' in the center, commonly used to denote information (no additional text or symbols)BEMÆRK
natural_image
Black circular icon with a white lowercase 'i' in the center, commonly used to denote information (no additional text or symbols)BEMÆRK
natural_image
Black circular icon with a white lowercase 'i' in the center, commonly used to denote information (no additional text or symbols)BEMÆRK
natural_image
Black circular icon with a white lowercase 'i' in the center, representing information (no additional text or symbols)BEMÆRK
text_image
Warning symbol with a sine wave inside a triangle, indicating sound or sound pressure.ADVARSEL!
natural_image
Black circular icon with a white lowercase 'i' in the center, representing information (no additional text or symbols)BEMÆRK
natural_image
Recycling symbol composed of three chasing arrows forming a triangle (no text or labels)Emballage
natural_image
Symbol of a trash bin with crossed lines indicating no waste or restriction (no text or numbers present)Enheden
natural_image
Symbol of a trash bin crossed out by two diagonal lines (no text or numbers present)Batterier
Model: DYS122-060150W-2 (for
EU)
DYS122-060150W-3
UK)
Producent: Dongguan
Dongse
Electronic Co. Ltd., China
Input AC 100–240 V \~ 50/60 Hz,
0.3 A
Output
DC

6V
1,5