Nicer Dicer Fusion - Food Processor GENIUS - Free user manual and instructions
Find the device manual for free Nicer Dicer Fusion GENIUS in PDF.



User questions about Nicer Dicer Fusion GENIUS
0 question about this device. Answer the ones you know or ask your own.
Ask a new question about this device
Download the instructions for your Food Processor in PDF format for free! Find your manual Nicer Dicer Fusion - GENIUS and take your electronic device back in hand. On this page are published all the documents necessary for the use of your device. Nicer Dicer Fusion by GENIUS.
USER MANUAL Nicer Dicer Fusion GENIUS
Nicer Dicer Fusion, Set 13 pcs. Instructions for use
Dear Genius Customer,
Cooking a delicious, healthy and appetising dish requires a lot of preparation work. Cutting fruits and vegetables into small dice, batons, even strips, quarters or eighths is very tedious. It not only takes time, you also need numerous kitchen tools such as knives, bowls and chopping boards, and so on. These require a lot of storage space in the kitchen and you don't always have them immediately to hand. All this is now a thing of the past: with the Nicer Dicer Fusion and the Nicer Slicer accessory set, you have everything in one - it really couldn't be easier, more practical or save more space! The Nicer Dicer Fusion and the Nicer Slicer from Genius are perfect for preparing starters, main courses, desserts and much more.
GB
The set you have purchased comprises the following parts:
1 Cutting top
1 Cutting base
1 Blade insert size 2 (6 x 6 mm/12 x 12 mm)
1 Pin block, small
1 XXL blade insert size 4 (24 x 24 mm)
1 Pin block, large
1 Blade insert size 3 (quarters and eighths)
1 Cutting stamp
1 Nicer Slicer with blade protector
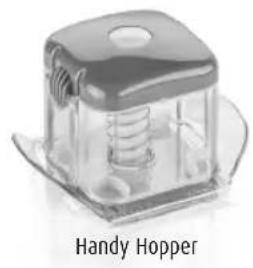
1 Handy Hopper
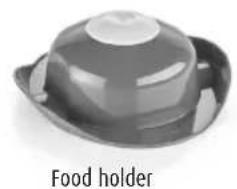
1 Food holder
1 Collecting container (capacity: 2.5 l)
1 Fresh-keeping lid
In this brochure that accompanies the product, you will find:
A detailed instruction manual for the Nicer Dicer Fusion (starting on page 6) and the Nicer Slicer (starting on page 10).
We hope you enjoy preparing and savouring your meals - bon appetit! Your Genius Team
TABLE OF CONTENTS
1 Safety and warning information 5
2 Components of the Nicer Dicer Fusion 6
3 The Nicer Dicer Fusion in practical use 7
4 Components of the Nicer Slicer 10
5 The Nicer Dicer in practical use 10
6 Possible uses of the inserts 14
7 Care and cleaning 16
8 Disposal. 16
1 Safety and warning information
Please read these Instructions for Use carefully and only use your product as described in the Instructions for Use to avoid injuries or material damage.
- Check the set before using it for the first time to ensure that it is complete and no damage has occurred in transit.
The device is not intended for use by adults or children with limited physical, sensory or intellectual abilities or little experience with household equipment, unless they are supervised by a competent person who is responsible for their safety or they receive clear instructions from such a person about how the device is to be used.
- Do not use the device if it is damaged in any way. There is a serious risk of injury.
- Do not make any unauthorised modifications, repairs or changes to the device.
- Dispose of the packaging material properly.
- When giving the product to a third party, always also pass on these Instructions for Use.
- Never place it on a hot surface or close to an open flame.
Use the device only with the accessories provided, otherwise you will damage the device.
- Never allow hands, hair, loose clothing or other items to come into contact with the blades.
The device is only for private use and not for commercial use. - Keep the product out of the reach of children. There is a serious risk of injury.
Guarantee
Excluded from the guarantee is any damage or defect caused by improper use, handling, or as the results of repairs carried out by the user themselves. This also applies to normal wear and tear. No liability can be assumed for improper use. We retain the right to change products and packaging at any time as part of our continuous development.
2 Components of the Nicer Dicer Fusion
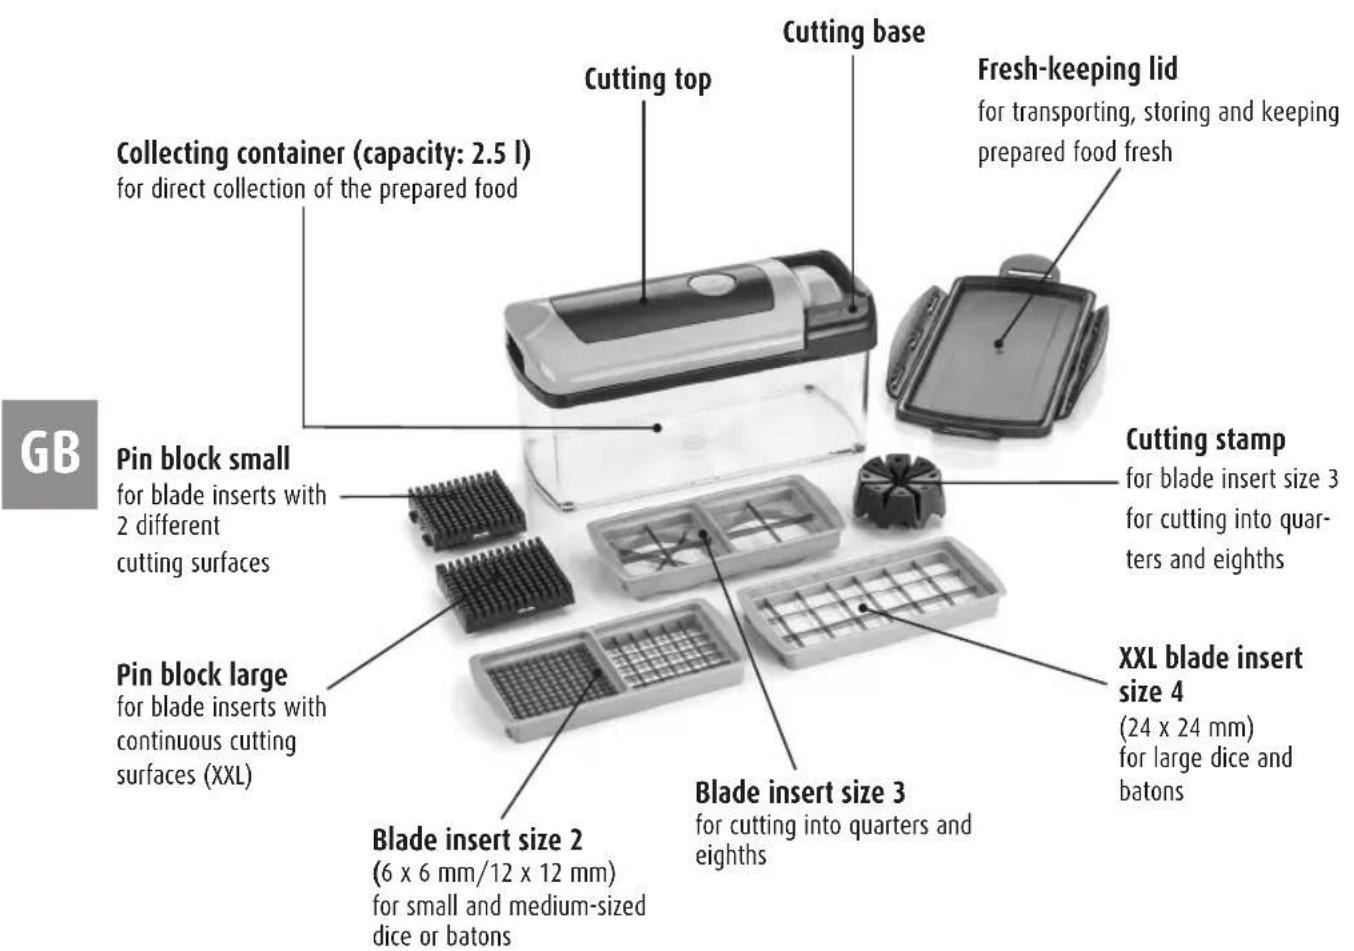
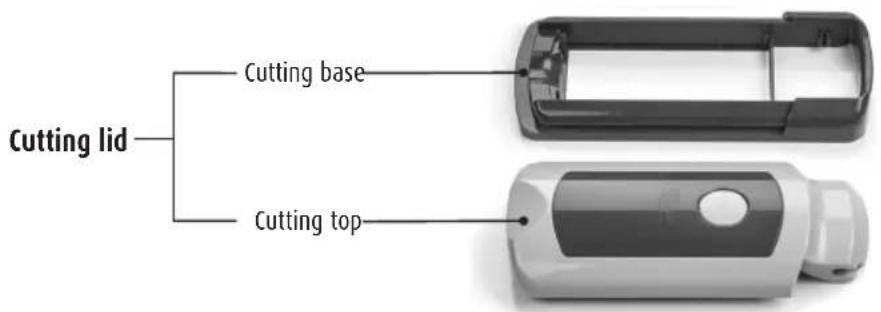
These Instructions for Use cover all available parts of the Nicer Dicer Fusion and Nicer Slicer sets. It may be that the set you have bought does not contain all of the parts mentioned. Of course, you can purchase any other parts you require at any time.
3 The Nicer Dicer Fusion in practical use
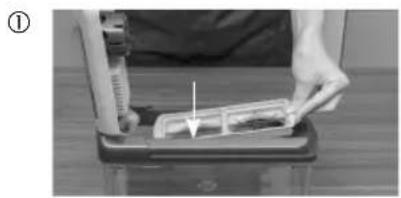
Insert the cutting top at an angle of 90^ (vertically) to the cutting base in the side slots provided. The cutting lid has an opening mechanism with 3 settings.
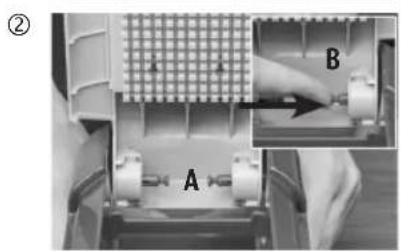
The automatic opening mechanism can be set by means of two pins (A) in three positions. Lock the protruding pins to achieve the required setting (B):
- Setting 1 = pins not locked: no automatic lid opening
- Setting 2 = one pin locked: slow automatic lid opening
- Setting 3 = both pins locked: fast automatic lid opening
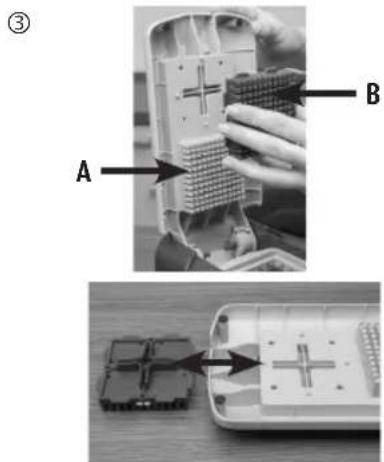
There are different pin blocks and a cutting stamp for the various blade inserts to achieve the best possible cutting results.
There is an integrated pin block (A) in the cutting top. There are also two detachable pin blocks (B) (large and small), which can be fixed in place next to the integrated pin block.
They are fixed as follows:
There is a cross-shaped recess next to the integrated pin block. On the back of each detachable pin block and the cutting stamp, there is a cross-shaped mounting. Push the mounting on the pin block or cutting stamp into the recess with gentle pressure until the block or stamp is fixed in place and ready to use.
Use of the detachable pin block and cutting stamp:
-
Blade inserts with two different cutting surfaces (for explanation, see 3.1):
-
Use of one cutting surface = integrated pin block suffices, no other insert required
- Use of both cutting surfaces = also use detachable pin block (small)
XXL blade with continuous cutting surface (for explanation, see 3.2)
- Detachable pin block (large) must also be used.
Blade insert for cutting into quarters/eighths (for explanation, see 3.3)
- Cutting stamp must also be used.
Note: The pin blocks and cutting stamp are required for the cutting process as they push the ingredients to be cut continuously through the blades, thereby ensuring a clean cut.
3.1 Blade inserts with 2 different cutting surfaces
The blade inserts have 2 different cutting surfaces, referred to as position 1 and 2 in these Instructions for Use (see figure). Food can be cut on both surfaces and it is possible to cut two different ingredients at the same time. The following should be noted in this connection:
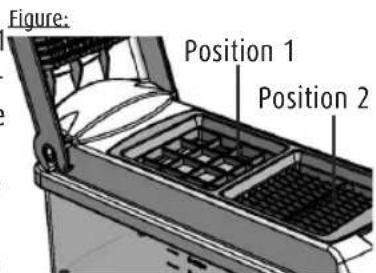
If one of the ingredients to be cut is harder than the other, place the harder one in position 1 (greater leverage).
If one of the ingredients to be cut is larger than the other, place it in position 2 (longer lever travel).
GB
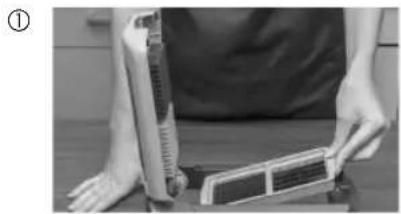
Place the cutting lid on the collecting container. Lift cutting top to insert the blade required. Feed it into the cutting top so that the slightly rounded narrow side of the blade insert is positioned in the corresponding recess in the frame of the cutting base. Then push down the other side of the blade insert until you hear a "click". The blade insert is now securely locked in place.
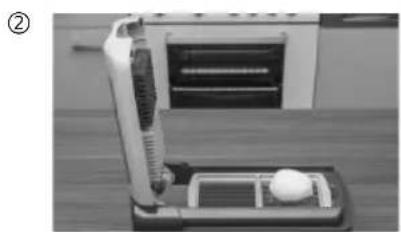
Place the food to be cut on the required cutting surface. For large pieces or those to be cut in an upright position, hold the food in place with your hand and press lightly on the cutting top so that the food cannot slip. If you wish to use both of the cutting surfaces at the same time, the (small) detachable pin block must be put in place first (see "Inserting the detachable pin block and cutting stamp"). If you only wish to use one cutting surface without inserting the detachable pin block, the cutting surface required must be in position 1.
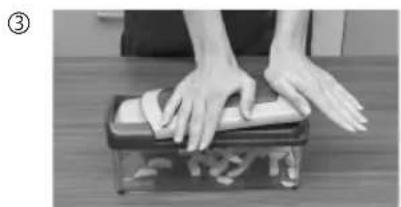
Push down firmly on the cutting top with both hands. The food is pushed through the blades, cut into even dice, batons or slices (depending on the blade insert) and automatically collected in the collecting container. If you have locked one or both of the pins in the cutting top, the lid will open automatically.
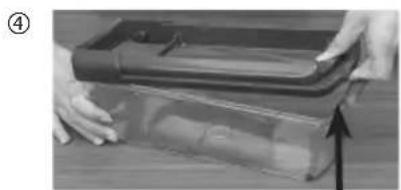
To remove the cut food, simply lift the entire cutting lid (cutting top and base) on one of the shorter sides and remove. Hold the collecting container with the other hand as you do so.
3.2 Blade inserts with continuous cutting surfaces (XXL blade inserts)
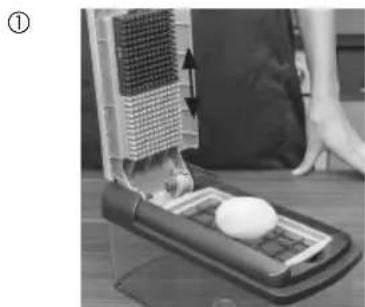
Insert the blade as described under 3.1. Then fix the detachable pin block (large) to the inside of the cutting top (see "Using the detachable pin block or cutting stamp"). Together with the integrated pin block, this creates a continuous surface and you can use the entire cutting area.
② To open the collecting container and remove the cut food, simply remove the complete cutting lid as described previously.
3.3 Blade insert for cutting into quarters and eighths
①
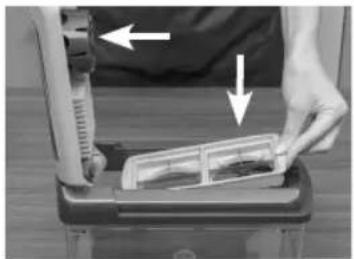
Insert the blade as described under 3.1.
Then fix the cutting stamp to the inside of the cutting top (see "Using the detachable pin block or cutting stamp").
Note: This blade must always be inserted in such a way that the surface for cutting into eighths is in position 2 (see 3.1. "Blade insert with 2 different cutting surfaces").
② To open the collecting container and remove the cut food, simply remove the complete cutting lid as described previously.
① Information
Non-slip feet on the bottom of the Nicer Dicer Fusion collecting container ensure it remains firmly in place on your work surface.
To store the chopped food, you can seal the collecting container with the practical stay-fresh lid. The collecting container can therefore be used to keep food fresh - chop now, use later!

Caution!
- When inserting the blade, ensure that the slightly rounded narrow sides fit flush with the cutting base, as they will bend otherwise.
The blades are extremely sharp to provide the optimal cutting results. Please ensure that you do not touch the blades during use. - The stamp for cutting into eighths is ONLY to be used with the blade for cutting into quarters and eighths. If you wish to cut with a different blade, do NOT use the stamp for cutting into eighths and always remove it once it has been used.
- Please take note that the cutting insert is not suitable for cutting rigid food such as stone-fruits etc. Cut apples, pears, peaches, apricots, etc. only cored or without stone. Cut bananas, pineapples, melons, pa-paya, mango, etc. only without skin.
- When using the cutting inserts (especially the XXL cutting insert), take care not to use too much food, otherwise the blades in the insert can be overloaded and get damaged.

Tips
- To cut food into dice, lay it flat on the cutting surface. For potato soup, for example, first cut the potatoes into slices. To dice, place several slices on top of one another on the blade. You can use the same method for cucumbers, courgettes, etc.
To cut into batons, to make chips for example, place the potatoes upright on the blade. Delicious batons of cucumber, apple, etc. for dipping can also be cut in this way. - Ingredients with a skin such as peppers, apples or pears can be processed more easily if they are positioned with the skin on top when they are on the blade (cut side on the cutting surface).
- Cutting made easy with the right technique: Place your stronger hand (left hand if you are left-handed, right hand if you are right-handed) on the outside of the cutting top. Then press down - with the support of your weaker hand. In this way, you will save time and effort!
Before starting work, dip the blades in water. Wet blades cut more quickly and require less force. During cutting, the blades are kept moist by the moisture in the food that is being cut.
4 Components of the Nicer Slicer
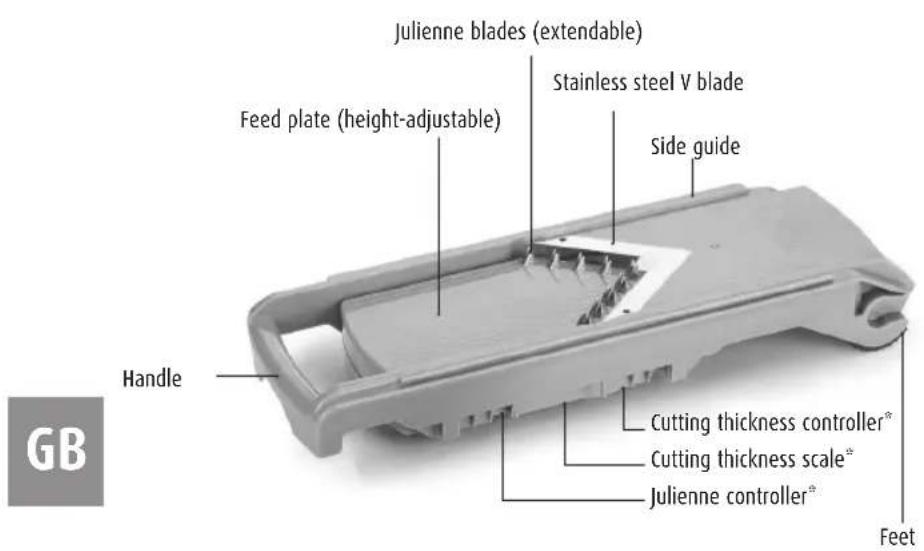
Base of the machine: see Figure 1
5 The Nicer Slicer in practical use
①
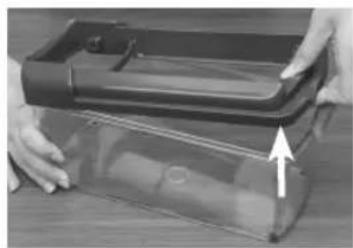
Place the cutting base on the matching collecting container of the Nicer Slicer - when you hear a click, the base is fixed in place.
(2)
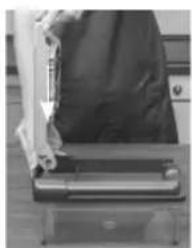
Insert the Nicer Slicer at 90^ (vertically) onto the base of the Nicer Dicer Fusion using the side slots provided. Then fold the Nicer Slicer forward so that it is fixed in the frame of the cutting base.
5.1 Setting the cutting thickness
With the aid of the thickness controller on the bottom of the Nicer Slicer, the height-adjustable feed plate can be set individually to achieve the required thickness.
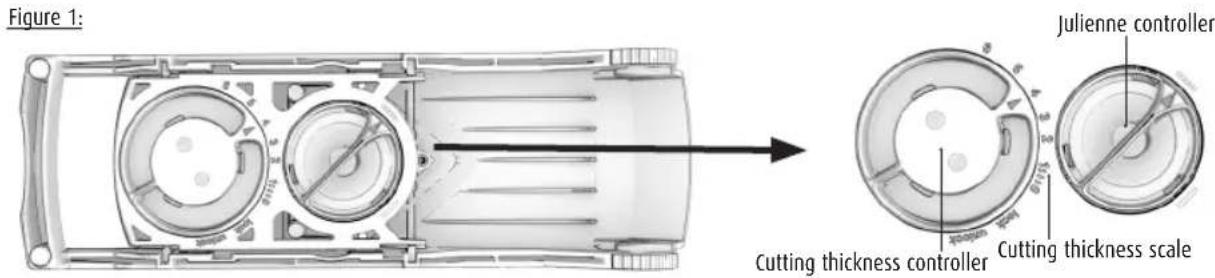
By turning the thickness controller anti-clockwise, the feed plate is lowered and thicknesses of 0mm to approx. 6mm can be achieved. The actual thickness of the slices depends on the firmness of the ingredient. The "0" to "6" markings on the thickness controller are a guide to setting the required thickness. Turning the controller clockwise raises the feed plate and the thickness is reduced (down to 0mm or "lock" - see "Caution" below). The selected thickness can be checked and adjusted on the cutting thickness scale.

Caution!
- To prevent injuries when not in use, the Nicer Slicer has an integrated cutting protection mechanism. In the "lock" position on the thickness scale, the feed plate is raised above the height of the blade and thus both prevents the stainless steel V blade from wearing during storage and protects against injury.
- To protect against injury to persons and damage to the blades, always replace the blade protector after each use! Take hold of the grip extension and pull it over the stainless steel V-blades. Take care to ensure that the 3 clips on the underside of the blade protector click into place under the stainless steel V-blades. Positioning of the blade protector can be made easier by pressing your thumb in the middle.
In the "unlock" position, the feed plate fixing is released and the entire section of the device can be removed (e.g. to make cleaning easier). Please note that the stainless steel V blade is then completely exposed and there is a serious risk of injury. To re-assemble, insert the side guide rails on the feed plate into the recesses on the frame of the machine and push the feed plate fully into the frame. Then set the thickness controller to the "lock" position and the feed plate is securely fixed in the machine once again
5.2 Slicing
① Set the required cutting thickness as described above.
② Place the Nicer Slicer securely in the base of the Nice Dicer Fusion, as described above.
③
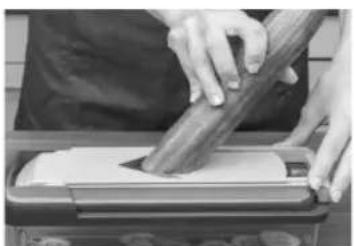
Then hold the handle of the Nicer Slicer securely with your weaker hand (your left hand if you are right handed, your right hand if you are left-handed). With your other, free hand, feed the ingredient to be cut in quick movements away from the handle, over the feed plate and through the stainless steel V blade. This will cut even slices of the ingredient as you do so. For reasons of safety you should always use the Handy Hopper or the food holder with smaller pieces of food or small remnants of larger pieces of food (see "Use of the food holder" and "Use of the Handy Hopper").
5.3 Cutting julienne strips
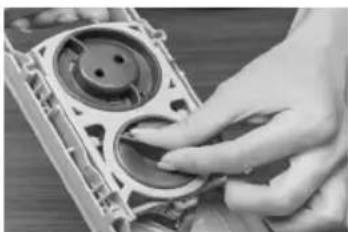
Set the required cutting thickness as described above. Now turn the julienne controller on the bottom of the machine to the symbol to extend the 18 extra blades for cutting the julienne strips. This gives a cutting width of 3 - 4mm . If the julienne controller is pointing to the symbol, the julienne blades remain concealed under the feed plate and slices will be cut.

Tips
- The best cutting results for julienne strips can be achieved with a medium thickness of approx. 3 to 4mm (set to the 3 or 4 mark on the thickness scale).
If the thickness controller is in the "lock" position, the extra blades for cutting julienne strips are safely concealed. They can then be extended only when a thickness greater than "0" is selected. - To protect against injury to persons and damage to the blades, always replace the blade protector after each use! Take hold of the grip extension and pull it over the stainless steel V-blades. Take care to ensure that the 3 clips on the underside of the blade protector click into place under the stainless steel V-blades. Positioning of the blade protector can be made easier by pressing your thumb in the middle.
The Nicer Slicer can also be used freehand, so that food can be shaved over finished dishes or onto the work surface. With its non-slip feet, "freehand" slicing is simple and safe.
5.4 Use of the food holder
The food holder is guided with your stronger hand (your right hand if you are right-handed, your left hand if you are left-handed). Hold the Nicer Slicer firmly by the handle with your other, free hand. With the food holder, smaller varieties of fruit and vegetables and remnants of larger ingredients can be cut into clean, even slices down to the last piece without endangering your fingers or fingernails.
①
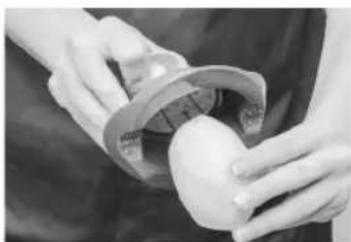
Place the ingredients on the feed plate (if already cut, with the cut surface down) and position the food holder in the centre so that the holding prongs on the stamp or the three integrated metal pins can penetrate the food (see Figure 2). This stops the food from slipping while it is being sliced and makes it clean, safe and easy to work with.
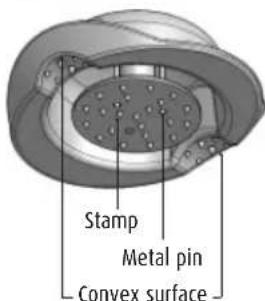
Figure 2:
②
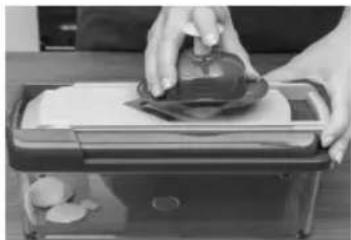
The food that is being held in place pushes the stamp out against the upper surface of the food holder. During cutting, the palm of the hand or fingers push the stamp down and thus ensure that the ingredient is being pushed through automatically until it has been processed almost entirely.
12
Tip
The two convex surfaces on the bottom of the food holder (see Figure 2) provide a secure hold for longer pieces of food such as carrots, courgettes and cucumbers.
5.5 Use of Handy Hopper
The runners on the Handy Hopper are fed into the side guides on both sides of the Nicer Slicer from the handle. As a result, the Handy Hopper slides safely over the stainless steel V blade and is always in the centre of it. The runners on both sides of the Handy Hopper ensure that the holding prongs on the stamp and the stainless steel V blade do not damage one another.
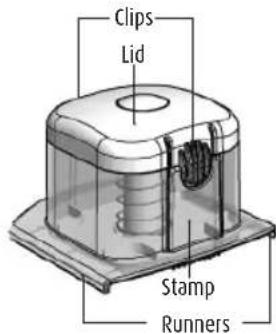
Figure 3:
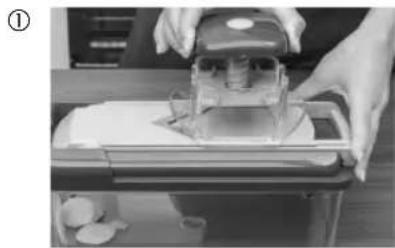
Squeeze the two clips on either side of the lid together and remove the lid. Put the ingredient on the feed plate in the Handy Hopper (if already cut, with the cut surface down).
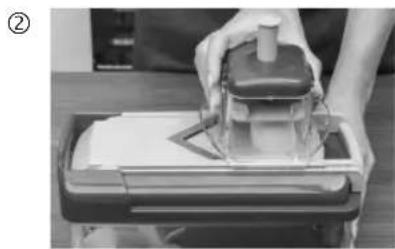
Place the stamp in the centre of the food and push the lid onto the Handy Hopper until you hear the clips lock in place. The spring inside the stamp keeps the holding pins pressed into the food. This prevents the food from slipping and it is pushed down automatically. To top up the ingredient, simply leave the Handy Hopper on the Nicer Slicer and follow the procedure described ① below.

Caution!
In the "lock" setting, the Handy Hopper cannot be inserted into the side guide. If it has already been fitted, it can no longer be moved over the feed plate and cannot be removed. To insert or remove, the thickness controller must first bee set to "0" (or greater).
6 Possible uses of the inserts
| Blade insert size 1 for medium-sized dice/batons or slices/strips | |
| Blade A Blade B Blade A: 6 x 36 mm Blade B: 18 x 18 mm | Potatoes, e.g. raw for chips or cooked for potato salad Tomatoes, kohlrabi, celery, mushrooms for salads, vegetable dishes or as ingredients for soups. Boiled egg, sausage for salads Cheese such as sheep's cheese or Mozzarella for Mediterranean dishes Apples, pears, peaches, apricots or strawberries for fruit salads, for example |
| Blade insert size 2 for small dices and smaller dice/batons | |
| Blade C Blade D Blade C: 6 x 6 mm Blade D: 12 x 12 mm | Onions, shallots, garlic, peppers, chilis for dips and salsas, for example, and to add to soups Sausage for sausage salads or casseroles Mushrooms, potatoes, tomatoes |
| Blade insert size 3 for cutting into quarters and eighths | |
| Blade E Blade F Blade E: Quarters Blade F: Eights | Potatoes for potato wedges or boiled potatoes Tomatoes, boiled eggs, mushrooms, radishes Apples, pears, kiwis, plums, peaches, apricots (warning: remove stones first!) |
| Blade insert size 4 for large dice/batons | |
| Blade G Blade G: 24 x 24 mm | Peppers, cooked ham, Mortadella, potatoes, courgettes for stews and cassero-les Apples, bananas, pears, pineapple, melon, papaya for fruit salads Firm varieties of salad such as iceberg lettuce |
| Blade insert size 5 for smaller dice/batons | |
| Blade H Blade H: 12 x 12 mm | Potatoes, e.g. raw for chips or cooked for potato salad Cucumber, peppers, tomatoes, courgettes, leeks, celery, pumpkin for salads, vegetable dishes or as ingredients for soups. Boiled eggs, cooked ham, sausage or Mortadella for salads Cheese such as sheep's cheese or Mozzarella for Mediterranean dishes |
| Blade insert size 6 for thick slices and strips | |
| Blade I Blade I: 12 x 36 mm | All salad leaves Chicken breast Horseradish, kohlabi Ham, cheese slices for salads |
| Nicer Slicer for slices and juliennes | |
| Thickness: 1 - 6 mm | Cucumber, radishes, mushrooms, tomatoes, onions, shallots Kohlabi, horseradish, celery Kiwis, lemons, oranges, limes, potatoes, eggs and much more |
Tip: Use the automatic opening mechanism of the cutting lid to make cutting easier.
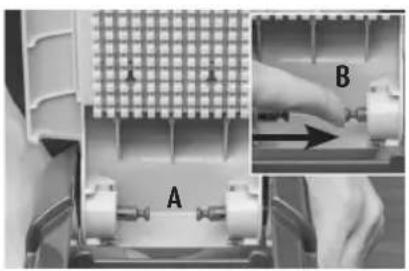
The cutting lid has an opening mechanism with 3 settings. The automatic opening mechanism can be set by means of two pins (A) in three positions. Lock the protruding pins in the required setting (B):
- Setting 1 = pins not locked: no automatic lid opening
- Setting 2 = one pin locked: slow automatic lid opening
- Setting 3 = both pins locked: fast automatic lid opening
7 are and cleaning
All of the parts of the Nicer Dicer Fusion and the Nicer Slicer should always be washed before initial use and after each subsequent use with a standard detergent under running water. Although all of the components of the Nicer Dicer Fusion and the Nicer Slicer can be put in a dishwasher, we recommend you wash them by hand to maintain their benefits and functions in the long-term.
Self-cleaning function
The Nicer Dicer Fusion has a self-cleaning function for the pin blocks.
GB
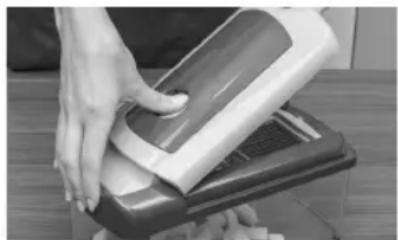
To clean the integrated pin block, press the "Push" button on the top of the upper part of the cutting top. The transparent cleaning plate integrated into the pin block is automatically pushed downwards and cleans the pin block of even the smallest food residues.
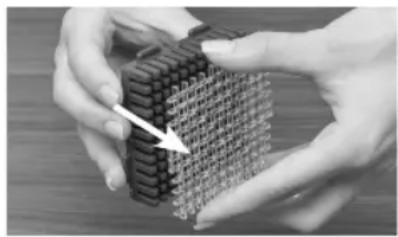
To clean the detachable pin blocks, lift the transparent cleaning plate out of the pin block by the four protruding supports (there is one support on each side).
In this way, the cleaning plate will clean the pin block of even the smallest food residues.
Caution!
With the Nicer Slicer in the "unlock" position, the feed plate fixing is released and the entire section of the device can be removed (e.g. to make cleaning easier). Please note that the stainless steel V blade is then completely exposed and there is a serious risk of injury.
Note
Although the Nicer Dicer Fusion and the Nicer Slicer can be put in a dishwasher, we recommend washing them by hand as the high-quality blades may otherwise become blunt over time.
8 Disposal
In the event that the Nicer Dicer Fusion or Nicer Slicer and/or accessories can no longer be used, they should be disposed of with the household rubbish. They can be disposed of by the municipal waste management services.
FR
Nicer Dicer Fusion, Set de 13 pieces
Chere cliente et cher client de Genius,
Nicer Dicer Fusion, Set 13 delig
Geachte Genius-klant,