
FP1550SDC - Food Processor BLACK & DECKER - Free user manual and instructions
Find the device manual for free FP1550SDC BLACK & DECKER in PDF.
| Product type | Food processor |
| Brand | Black & Decker |
| Model | FP1550SDC |
| Bowl capacity | 2,365 ml (10 cups) |
| Power | 500 watts |
| Voltage | 120 V ~ 60 Hz |
| Bowl material | Brushed stainless steel |
| Functions | Chop, slice, shred, knead, mix, pulse |
| Controls | ON, OFF, PULSE |
| Included accessories | Blade, reversible slicing/shredding disc, very thin disc, kneading blade, disc stem, pusher |
| Safety | Lid lock, interlock device (bowl and lid must be locked) |
| Cleaning | Removable parts dishwasher safe (top rack) or hand wash |
| Maintenance | Wipe base with a damp cloth; do not immerse |
| Warranty | 1 year limited (US and Canada) |
| Customer service | 1-800-231-9786 (warranty) / 1-800-738-0245 (parts) |
Frequently Asked Questions - FP1550SDC BLACK & DECKER
User questions about FP1550SDC BLACK & DECKER
0 question about this device. Answer the ones you know or ask your own.
Ask a new question about this device
Download the instructions for your Food Processor in PDF format for free! Find your manual FP1550SDC - BLACK & DECKER and take your electronic device back in hand. On this page are published all the documents necessary for the use of your device. FP1550SDC by BLACK & DECKER.
USER MANUAL FP1550SDC BLACK & DECKER
Please Read and Save this Use and Care Book (pages 1 - 13)
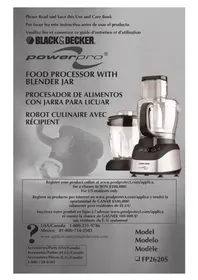
Brushed Stainless Steel 10-Cup Food
Processor
Robot culinaire
à 10 tasses en
natural_image
Close-up of a hand holding a small object, possibly a tool or device, with no visible text or symbols.Easy Touch Pulse Function
natural_image
Close-up of a hand operating a vacuum cleaner inside a transparent cylindrical device (no visible text or symbols)Reversible Slice/Shred Disc
natural_image
Close-up of three black cylindrical mechanical components on a coin (no visible text or symbols)Attachments
Accessoires
natural_image
Black and white photo of a power conversion kitchen blender with visible brand logo (no text or symbols on the device itself)
USA/Canada 1-800-231-9786
www.applicaconsumerproductsinc.com
Accessories/Parts (USA/Canada)
When using electrical appliances, basic safety precautions should always be followed, including the following.
Read all instructions.
☐ To protect against risk of electrical shock, do not put base, cord, or plug in water or other liquid.
☐ Close supervision is necessary when any appliance is used by or near children.
☐ Unplug from outlet when not in use, before putting on or taking off parts, and before cleaning.
□ Avoid contacting moving parts.
☐ Do not operate any appliance with a damaged cord or plug or after the appliance malfunctions or is dropped or damaged in any manner. Return the appliance to the nearest authorized service facility for examination, repair, or electrical or mechanical adjustment. Or, call the appropriate toll-free number listed on the cover of this manual.
☐ The use of attachments not recommended or sold by the appliance manufacturer may cause fire, electric shock, or injury.
☐ Do not use outdoors.
☐ Do not let cord hang over edge of table or counter.
- Keep hands and utensils away from moving blades or discs while processing food to prevent the possibility of severe personal injury or damage to the food processor. A scraper may be used, but it must be used only when the food processor is not running.
□ Blades are sharp. Handle carefully.
☐ To reduce the risk of injury, never place cutting blade or discs on base without first putting bowl properly in place.
☐ Be certain cover is securely locked in place before operating appliance.
☐ Never feed food into chute by hand. Always use food pusher.
☐ Do not attempt to defeat the cover interlock mechanism.
☐ Do not use appliance for other than intended use.
SAVE THESE INSTRUCTIONS.
This product is for household use only.
POLARIZED PLUG (120V Models Only)
This appliance has a polarized plug (one blade is wider than the other). To reduce the risk of electric shock, this plug is intended to fit into a polarized outlet only one way. If the plug does not fit fully into the outlet, reverse the plug. If it still does not fit, contact a qualified electrician. Do not attempt to modify the plug in any way.
TAMPER-RESISTANT SCREW
Warning : This appliance is equipped with a tamper-resistant screw to prevent removal of the outer cover. To reduce the risk of fire or electric shock, do not attempt to remove the outer cover. There are no user-serviceable parts inside. Repair should be done only by authorized service personnel.
ELECTRICAL CORD
The cord of this appliance was selected to reduce the possibility of tangling in or tripping over a longer cord. If more length is needed, use an extension cord rated no less than 15 amperes. (For 220 volts rated products, use an extension cord rated no less than 6 amperes.) When using an extension cord, do not let it drape over the working area or dangle where someone could accidentally trip over it. Handle cord carefully for longer life; avoid jerking or straining it at outlet and appliance connections.
Note: If the power supply cord is damaged, it should be replaced by qualified personnel or in Latin America by an authorized service center.
TABLE OF CONTENTS
Pages
Getting Familiar with Your Unit 4
Control Panel 4
How to Use ....5
Controls 5
Slicing/Shredding Discs 5
Chopping Blade 6
Dough Blade 6
Bread Making Tips for Dough Blade 7
Food Processing Tips 7
Care and Cleaning 8
Chopping Guide 9
Shredding Guide 10
Slicing Guide ....1
Recipes 12, 13
INTRODUCTION
Thank you for choosing the Black & Decker® Brushed Stainless Steel 10-Cup Food Processor from Distinctions Exclusive Collection ^134 .
- 500-watt motor delivers the power to perform all your processing needs
- At the touch of a button you can chop, slice, blend and much more
- Handles large food items without having to section
- Smooth-touch surface makes cleaning a breeze and removable parts are dishwasher safe
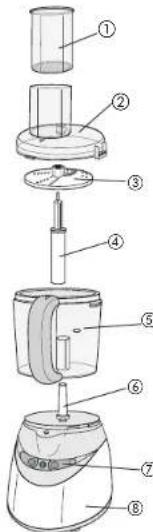
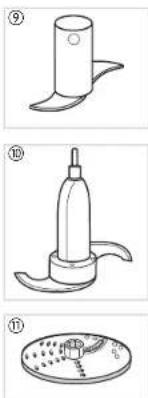
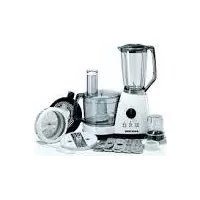
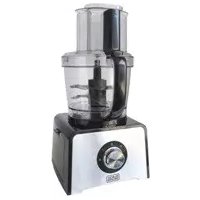
GETTING FAMILIAR WITH YOUR UNIT
Product may vary slightly from what is illustrated.
† 1. Food pusher (Part # MP12-3-102)
† 2. Food chute/cover (Part # MP12-2-600)
+ 3. Slice/Shred disc (Part # MP12-2-500)
+ 4. Disc stem (Part # 210204-100)
† 5. 10-cup (2365 ml) container (Part # MP12-2-200)
6. Center post
7. Control panel
8. Base
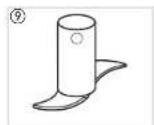
† 9. Dough blade (Part # MP12-3-017)
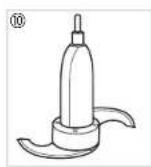
† 10. Chopping blade (Part # MP12-3-400)
+ 11. Extra-thin slice/Fine shred disc (Part # 211704-100)
† Consumer replaceable/removable parts
natural_image
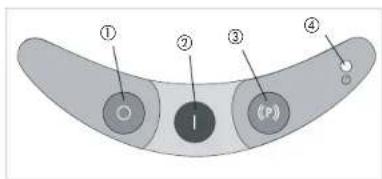
Three-step line drawings of kitchen utensils and a plate (no text or symbols)CONTROL PANEL
- Off button
- On button
- Pulse control
- Power indicator light
How to Use
This product is for household use only.
- Before first use, unpack the product and remove packing material. Handle sharp chopping blade and slice/shred discs carefully.
- Wash all parts except base.
Note: Do not attempt to chop ice in this food processor; it will damage container and dull chopping blade. This unit will not whip cream, beat egg whites to a desirable volume, grind coffee beans or spices with a high oil content, or slice or shred hard-cooked eggs, marshmallows, or soft cheeses.
CONTROLS
ON — When this button is pressed, unit runs continuously until OFF button is pressed.
OFF — Processor should always be left in OFF position when unit is not in use.
PULSE — PULSE button must be pressed and held for unit to operate. When released, unit will stop. Use PULSE for short processing tasks, such as chopping nuts, raw meats, or vegetables. This lets you check processed results and control the fineness.
Important: For your protection, this unit has an Interlock system. The processor won't operate unless container is properly locked onto base. Be sure to attach the container to the base before attaching the food chute/cover. The tab on cover must be correctly locked into the slot on container. Be sure cover is turned fully into slot until you hear it click into place. Do not attempt to operate unit without container and cover correctly locked in place. Be sure base is on a flat, dry, clean surface before you begin processing.
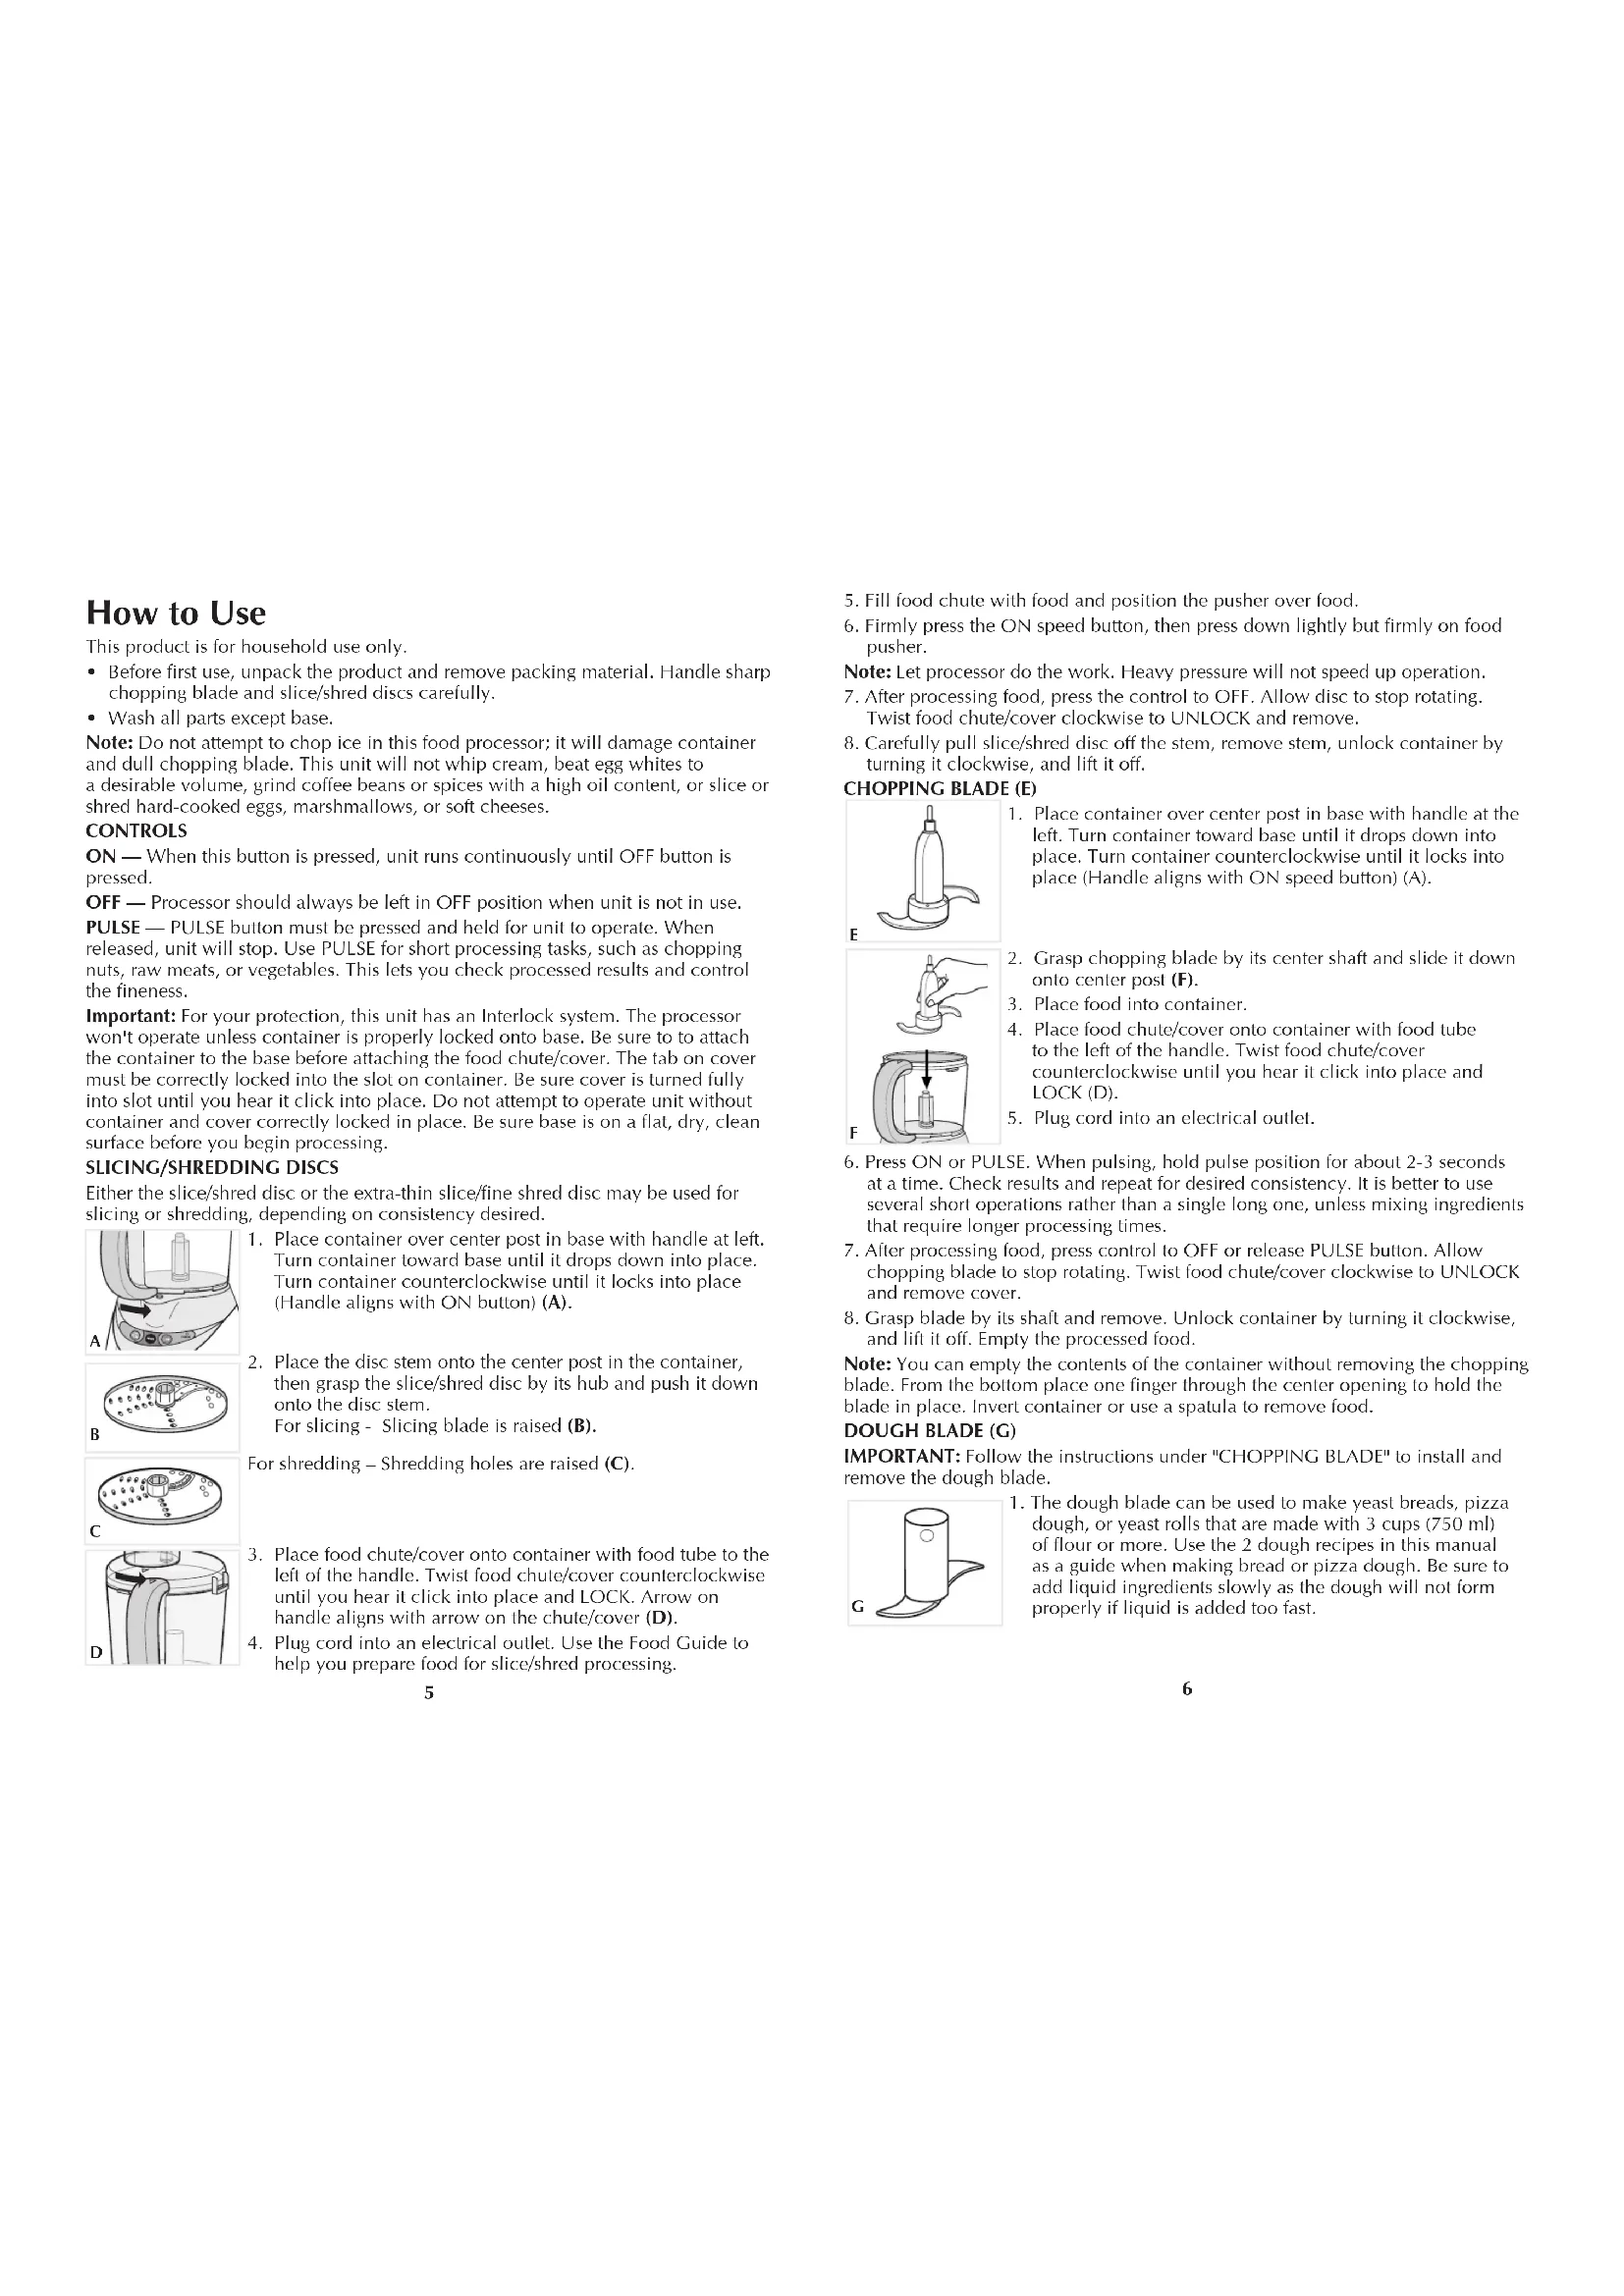
SLICING/SHREDDING DISCS
Either the slice/shred disc or the extra-thin slice/fine shred disc may be used for slicing or shredding, depending on consistency desired.

- Place container over center post in base with handle at left. Turn container toward base until it drops down into place. Turn container counterclockwise until it locks into place (Handle aligns with ON button) (A).
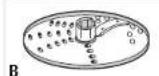
- Place the disc stem onto the center post in the container, then grasp the slice/shred disc by its hub and push it down onto the disc stem. For slicing - Slicing blade is raised (B).

For shredding - Shredding holes are raised (C).
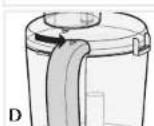
- Place food chute/cover onto container with food tube to the left of the handle. Twist food chute/cover counterclockwise until you hear it click into place and LOCK. Arrow on handle aligns with arrow on the chute/cover (D).
-
Plug cord into an electrical outlet. Use the Food Guide to help you prepare food for slice/shred processing.
-
Fill food chute with food and position the pusher over food.
- Firmly press the ON speed button, then press down lightly but firmly on food pusher.
Note: Let processor do the work. Heavy pressure will not speed up operation. - After processing food, press the control to OFF. Allow disc to stop rotating. Twist food chule/cover clockwise to UNLOCK and remove.
- Carefully pull slice/shred disc off the stem, remove stem, unlock container by turning it clockwise, and lift it off.
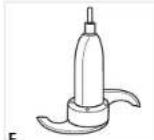
CHOPPING BLADE (E)
- Place container over center post in base with handle at the left. Turn container toward base until it drops down into place. Turn container counterclockwise until it locks into place (Handle aligns with ON speed button) (A).
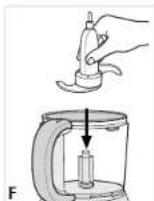
- Grasp chopping blade by its center shaft and slide it down onto center post (F).
- Place food into container.
- Place food chute/cover onto container with food tube to the left of the handle. Twist food chute/cover counterclockwise until you hear it click into place and LOCK (D).
-
Plug cord into an electrical outlet.
-
Press ON or PULSE. When pulsing, hold pulse position for about 2-3 seconds at a time. Check results and repeat for desired consistency. It is better to use several short operations rather than a single long one, unless mixing ingredients that require longer processing times.
- After processing food, press control to OFF or release PULSE button. Allow chopping blade to stop rotating. Twist food chute/cover clockwise to UNLOCK and remove cover.
- Grasp blade by its shaft and remove. Unlock container by turning it clockwise, and lift it off. Empty the processed food.
Note: You can empty the contents of the container without removing the chopping blade. From the bottom place one finger through the center opening to hold the blade in place. Invert container or use a spatula to remove food.
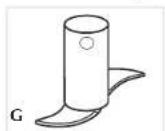
DOUGH BLADE (G)
IMPORTANT: Follow the instructions under "CHOPPING BLADE" to install and remove the dough blade.
-
The dough blade can be used to make yeast breads, pizza dough, or yeast rolls that are made with 3 cups (750 ml) of flour or more. Use the 2 dough recipes in this manual as a guide when making bread or pizza dough. Be sure to add liquid ingredients slowly as the dough will not form properly if liquid is added too fast.
-
You may have to stop the unit at times to scrape down the sides of the processing bowl.
Bread Making Tips for the Dough Blade
- For best results, use ingredients at room temperature and be sure the butter is soft.
- Check the date on the yeast package to be sure it hasn't expired. Measure flour accurately by spooning it into a measuring cup designed for dry ingredients. Level it off with the straight side of a knife or metal spatula. Do not pack flour by tapping the cup when measuring.
Note: Maximum amount of flour to be used is 6 cups (1500 ml) of all-purpose or bread flour or 3 1/2 cups (875 ml) of whole grain flour.
- You may use bread flour, if you'd prefer. Breads will be taller.
FOOD PROCESSING TIPS
Liquids
• Hot liquids (not boiling) and hot foods can be processed in container.
- Be sure to process small amounts of liquids — 2 cups or less at a time. Larger amounts will leak from container.
Food Size, Preparation and Loading
- When preparing cookie, cake batter or quick bread, use the chopping blade to cream butter or shortening and sugar first. Add dry ingredients last. Place nuts and fruits on top of dry ingredients to prevent over-chopping. Process using short pulses until blended. Do not over process.
Meat
- When using the chopping blade for processing meat, cut the meat into 1" (2.54cm) cubes. Do not put more than 1/2 lb. (230g) of meat into the container at a time. Chop on pulse to the size desired.
Dry Ingredients
- When using different foods in a recipe, process dry ingredients first and moist ingredients later. This reduces the number of times container must be washed and dried.
Care and Cleaning
This product contains no user serviceable parts. Refer service to qualified service personnel.
Note: Do not attempt to sharpen the cutting edges of the blades or discs. They are permanently sharpened at the factory and will be ruined by attempted sharpening. CLEANING
- Before cleaning, be sure unit is off and cord is unplugged.
- Whenever possible, rinse parts immediately after processing for easy cleanup.
-
Wipe base and feet with a damp cloth and dry thoroughly. Stubborn spots can be removed by rubbing with a damp cloth and a mild, non-abrasive cleaner. Do not immerse base in liquid.
-
All removable parts can be washed by hand or in a dishwasher.
- If washing by hand, wash in sudsy water, rinse, and dry thoroughly. If necessary, use a small nylon bristle brush to thoroughly clean container and food chute.
- If washing in a dishwasher, place removable parts on top rack only.
- Some staining of parts may occur. Use a paste of 2 tablespoons (30 ml) baking soda and 1 tablespoon (15 ml) water, then apply to stains and let stand overnight. Rinse and dry.
-
Do not use rough scouring pads or cleansers on any plastic or metal parts.
-
Do not allow blades or discs to soak in water for long periods of time.
CHOPPING GUIDE
FOOD AMOUNT COMMENTS
| BABY FOOD(1000 ml)container, along with 1/4 cup(60 ml) liquid per cup of solid food, process continuously to desired fineness. | Up to 4 cupscooked vegetables and/or meat to | Add up to 4 cups (1000 ml) |
| BREAD CRUMBsintra 1 1/2-2 inch pieces(3.75 & 5 cm). Add to containerand process to fine crumbs. | Up to 5 slices | Cut either fresh or dry bread slices |
| COOKIE/CRACKERCRUMBslarger crackers into 1 1/2-2 inch(3.75 & 5 cm) pieces. Add tocontainer and process until fine. | Up to 5 cups(1250 ml) | Use for crumbing graham crackers,chocolate or vanilla wafers. Break |
| CRANBERRIES,MINCEDcranberry relish. | 3 cups(750 ml) Can also add sugar to make | Pulse to chop to desired fineness. |
| EGGS, CHOPPEDeggs. Add to container. Pulse tochop, checking fineness after4 - 5 pulses. | Up to 12 | Peel, dry and halve hard-cooked |
| GARLIC, MINCEDDrop clove(s) down food chutewhile unit is running. | Up to 12 | Be sure container is dry. |
| MEAT, CHOPPED(RAW OR COOKED)and pulse to chop. | Up to 2 cups(500 ml) (2.54 cm) cubes. Add to bowl | Cut the very cold meat into 1" |
| MUSHROOMS,CHOPPED to container. Pulse to desiredfineness. | Up to 12 medium | Halve large ones and add |
| NUTS, CHOPPED(750 ml) to chop. | 3 cups | Add to container and pulse |
| ONIONS,CHOPPED Pulse 1 or 2 times to coarselychop. For green onions, upto 2 cups (500 ml) cut into1" (2.54 cm) pieces. | Up to 2 large | Quarter, and add to container. |
| PARMESAN ORROMANO CHEESE,GRATEDto coarse chop; processcontinuously to finely grate. | Up to 1-1/2 cups(375 ml) temperature. Cut into 1" (2.54 cm)cubes. Add to container and pulse | Allow cheese to reach room |
FOOD AMOUNT COMMENTS
| PARSLEY, HERBS Up to 2 cups Add to dry, clean container CHIOPPED (500 ml) and pulse to desired fineness. Process other fresh herbs in same manner. | ||
| PEPPER, GREEN, Up to 1 pepper Cut into 1" (2.54 cm) pieces. RED, YELLOW Add to container and pulse to CHOPPED chop. | ||
| PIE DOUGI Up to 2 9" (23 cm) Follow food processor recipe pic crusts for 1 or 2 standard size pie crusts. See Pastry Crust recipe. | ||
| SOUPS, PUREED OR CREAMD for pureeing and creaming. Process to desired smoothness. | 2 cups (500 ml) (not boiling) vegetable mixture | Add up to 2 cups (500 ml) hot |
| SQUASH (BUTTERNUT), PUMPKIN OR SWEET POTATOES PUREED | Up to 5 cups, (1250 ml) 1" (2.54 cm) cubes process continuously to puree. | Add 1/4 cup (60 ml) of cooking liquid per cup of food. Pulse to finely chop then |
| STRAWBERRIES, PUREED chop. Process continuously to puree. | 2 cups (500 ml) Add to container and pulse to | Hull and halve large berries. |
| TOMATOES, 4 medium Quarter tomatoes. Add up to CHOPPED 4 and pulse to desired size. | ||
SHREDDING GUIDE
| FOOD | COMMENTS |
| CABBAGE cabbage or slaw. Cut into pieces to fit chute. Shred using light pressure. Empty container as cabbage reaches disc. | Use shredding disc for very fine |
| CARROTS | Position in chute and shred. |
| CHEESE, CHEDDAR Cut to fit chute. | Cheese must be well chilled. |
| CHEESE, MOZZARELLA to shredding. Cut to fit chute. Use light pressure. | Cheese must be chilled in freezer for 30 minutes prior |
| POTATOES Cut potatoes to fit chute. | |
| ZUCCHINI lengthwise or horizontally. | Cut to fit chute, either |
| YELLOW SQUASH | Use light pressure. |
SLICING GUIDE
| FOOD COMMENTS | |
| APPLE Quarter and stack horizontallyin chute. Use firm pressure. | |
| CABBAGE For coarsely shredded results, useslicing side of disc. Cutinto pieces to fit chute.Empty container as cabbagereaches disc. | |
| CARROTS Cut into 4" (10 cm) lengths andpack in chute, alternating thickand thin ends. | |
| CELERY Remove strings. Cut stalksvertically into thirds. Pack chutefor best results. | |
| CUCUMBER If necessary, cut to fit chute. | |
| MUSHROOMS Stack chute with mushrooms ontheir sides for lengthwise slices. | |
| NUTS For coarsely chopped results, fillchute with nuts and slice. | |
| ONIONS Quarter and fill chute, positioningonions upright for coarselychopped results. | |
| PEACHES/PEARS Halve or quarter and core. Positionupright in chute and slice usinglight pressure. | |
| PEPPERS, Halve and seed. Cut large onesGREEN, RED, into quarters or strips, dependingYELLOW ETC. on desired results. Slice usingmoderate pressure. | |
| PEPPERONI Cut into 3" (8 cm) lengths. Removeinedible casing. Slice 2 piecesat a time using firm pressure. | |
| POTATOES Peel if desired, and cut to fitchute. | |
| STRAWBERRIES Hell. Arrange berries on their sidesfor lengthwise slices. | |
| TOMATOES Use small tomatoes for wholeslices; halve if necessary.Use gentle, but continuouspressure. | |
| TURNIPS Peel. Cut turnips to fit chute. | |
| ZUCCHINI, Slice off ends. Use small squashYELLOW SQUASH for whole slices; halve largerones to fit chute. |
Recipes
SPEEDY PROCESSOR PIZZA DOUGH
1-1/4 teaspoons (7 ml) active dry yeast
1-1/3 cups (315 ml) warm water 105°F - 115°F (40°C to 46°C)
1/4 teaspoon (1 to 2 ml) sugar
3 -1/2 to 3-3/4 cups (830 to 890 ml) unsifted all-purpose flour
1 teaspoon (5 ml) salt
2 tablespoons (30 ml) olive oil
-
Sprinkle yeast over water; add sugar and let stand until yeast is dissolved, about 5 minutes.
-
Position dough blade in container of processor. Add 3 cups (750 ml) flour, salt and olive oil. With processor running, gradually add yeast mixture down food chute. Add additional flour to make a soft dough. Continue processing dough for 1 to 1-1/2 minutes. Stop and let dough rest for 10 minutes.
-
On lightly floured board, knead several times and form into ball. Place in greased bowl, turning to grease top.
-
Cover and let rise at room temperature until doubled in bulk, about 1 hour.
-
Punch dough down. For thin crust pizza divide dough in half. Roll out on lightly floured board to about 12 inch (30 cm) circle. Transfer to pizza pan or baking stone sprinkled with corn meal. Lift edges to form a crust around edge of pan.
-
Spoon desired sauce onto crust and spread evenly. Top with desired toppings.
-
Bake at 450°F (230°C) 12 minutes or until crust is golden and filling is hot.
Yield: 2 pizza crusts
BASIC WHITE BREAD
3/4 cup (185 ml) water
1/2 cup (125 ml) milk
3 tablespoons (45 ml) butter or margarine
1-1/4 teaspoons (7 ml) active dry yeast
3-1/2 to 3-3/4 cups (830 to 890 ml) unsifted all-purpose flour
1 tablespoon (15 ml) sugar
1 teaspoon (5 ml) salt
-
In small saucepan, combine water, milk and butter. Heat to lukewarm 105^ F to 115^ F ( 40^ C to 45^ C). Stir in yeast to dissolve. Let rest 5 minutes.
-
Position dough blade in container of processor. Add 3 cups (750 ml) flour, sugar and salt. With processor running, gradually add yeast mixture down food chute. Add additional flour to make a soft dough. Continue processing dough for 1 to 1-1/2 minutes.
-
On lightly floured board, knead several times and form into ball. Place in greased bowl, turning to grease top.
-
Cover and let rise at room temperature until doubled in bulk, about 1 hour.
-
Punch dough down and shape into a loaf. Place in greased 9 x 5 x 3-inch (23 x 13 x 8 cm.) loaf pan. Cover and let rise at room temperature until doubled in bulk, about 1 hour.
-
Bake at 375^ F ( 190^ C) for 35 minutes or until loaf is deep golden brown and sounds hollow when tapped. Remove from pan and cool on wire rack.
Yield: 1 loaf
Note: This recipe should not be doubled in the food processor.
IMPORTANTES MISES EN GARDE

PANNEAU DE COMMANDE
Utilisation
For service, repair or any questions regarding your appliance, call the appropriate 800 number on cover of this book. Please DO NOT return the product to the place of purchase. Also, please DO NOT mail product back to manufacturer, nor bring it to a service center. You may also want to consult the website listed on the cover of this manual.
One-Year Limited Warranty
(Applies only in the United States and Canada)
What does it cover?
- Any defect in material or workmanship provided; however, Applica's liability will not exceed the purchase price of product.
For how long?
• One year after the date of original purchase.
What will we do to help you?
- Provide you with a reasonably similar replacement product that is either new or factory refurbished.
How do you get service?
- Save your receipt as proof of date of sale.
- Check our on-line service site at www.prodprotect.com/applica, or call our toll-free number, 1-800-231-9786, for general warranty service.
- If you need parts or accessories, please call 1-800-738-0245.
What does your warranty not cover?
• Damage from commercial use
• Damage from misuse, abuse or neglect
- Products that have been modified in any way
- Products used or serviced outside the country of purchase
• Glass parts and other accessory items that are packed with the unit
- Shipping and handling costs associated with the replacement of the unit
- Consequential or incidental damages (Please note, however, that some states do not allow the exclusion or limitation of consequential or incidental damages, so this limitation may not apply to you.)
How does state law relate to this warranty?
- This warranty gives you specific legal rights, and you may also have other rights that vary from state to state or province to province.
BESOIN D'AIDE?


- Brushed Stainless Steel 10-Cup Food
- Processor
- Robot culinaire
- à 10 tasses en
- SAVE THESE INSTRUCTIONS.
- POLARIZED PLUG (120V Models Only)
- TAMPER-RESISTANT SCREW
- ELECTRICAL CORD
- TABLE OF CONTENTS
- Pages
- INTRODUCTION
- GETTING FAMILIAR WITH YOUR UNIT
- CONTROL PANEL
- How to Use
- CONTROLS
- SLICING/SHREDDING DISCS
- CHOPPING BLADE (E)
- DOUGH BLADE (G)
- Bread Making Tips for the Dough Blade
- FOOD PROCESSING TIPS
- Liquids
- Food Size, Preparation and Loading
- Meat
- Dry Ingredients
- Care and Cleaning
- Recipes
- SPEEDY PROCESSOR PIZZA DOUGH
- BASIC WHITE BREAD
- IMPORTANTES MISES EN GARDE
- PANNEAU DE COMMANDE
- Utilisation
- One-Year Limited Warranty
- (Applies only in the United States and Canada)
- What does it cover?
- For how long?
- What will we do to help you?
- How do you get service?
- What does your warranty not cover?
- How does state law relate to this warranty?
- BESOIN D'AIDE?
Brand : BLACK & DECKER
Model : FP1550SDC
Category : Food Processor