
TCMKT850C - Coffee machine BLACK & DECKER - Free user manual and instructions
Find the device manual for free TCMKT850C BLACK & DECKER in PDF.
| Product type | Programmable coffee maker |
| Brand | Black & Decker |
| Model | TCMKT850C (also TCM850) |
| Capacity | 8 cups (approx. 1.2 L) |
| Carafe type | Insulated thermal carafe with lockable lid |
| Programming function | Yes, with digital clock and up to 24-hour programming |
| Automatic shut-off | Yes, at end of brew cycle |
| Pause & serve function | Yes (Sneak-A-Cup®): remove carafe without dripping |
| Keep warm | Up to 4 hours in thermal carafe |
| Water reservoir | Removable, with level indicators |
| Filter | Cone filter #4 (not included) |
| Power supply | 120 V, 60 Hz (polarized plug) |
| Power | Approximately 900 W (estimate based on similar models) |
| Power cord | Short, approx. 60 cm, with cord storage |
| Control panel | Buttons: ON/OFF, PROG, AUTO-ON, hour/minute setting |
| Indicator lights | Red (on), green (programming) |
| Cleaning and maintenance | Descaling with white vinegar recommended; carafe and filter dishwasher safe (top rack) |
| Safety | Carafe insertion sensor; stops if carafe not properly positioned |
| Available spare parts | Reservoir, carafe, filter basket, lid (part numbers TCM850-01 to TCM850-05) |
| Warranty | 1 year (US and Canada) |
Frequently Asked Questions - TCMKT850C BLACK & DECKER
User questions about TCMKT850C BLACK & DECKER
0 question about this device. Answer the ones you know or ask your own.
Ask a new question about this device
Download the instructions for your Coffee machine in PDF format for free! Find your manual TCMKT850C - BLACK & DECKER and take your electronic device back in hand. On this page are published all the documents necessary for the use of your device. TCMKT850C by BLACK & DECKER.
USER MANUAL TCMKT850C BLACK & DECKER
TCM850Pub1000001038R1
10/20/05
9:02 PM
Page 1
PLEASE READ AND SAVE THIS USE AND CARE BOOK.
POR FAVOR LEA ESTE INSTRUCTIVO ANTES DE USAR EL PRODUCTO.
VEUILLEZ LIRE ET CONSERVER CE GUIDE D'ENTRETIEN ET D'UTILISATION.

BLACK&DECKER
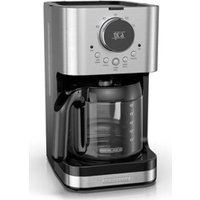
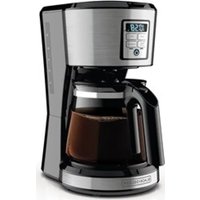
8-Cup Thermal Coffeemaker CafeteriaTERMICA de 8 tazas
Accessories/Parts (USA/Canada)
Accessories/Partes (EE.U./Canada)
Accessories/Pieces (E.-U./Canada) 1-800-738-0245
When using electrical appliances, basic safety precautions should always be followed to reduce the risk of fire, electric shock, and/or injury to persons, including the following:
Read all instructions.
Do not touch hot surfaces. Use handle or knobs.
To protect against electric shock, do not place cord, plug or appliance in water or other liquids.
- Close supervision is necessary when any appliance is used by or near children.
Unplug from outlet when not in use and before cleaning. Allow to cool before putting on or taking off parts and before cleaning the appliance.
Do not operate any appliance with a damaged cord or plug or after the appliance malfunctions, or has been damaged in any manner. Return the appliance to the nearest authorized service facility for examination, repair, or adjustment. Or, call the appropriate toll-free number on the cover of this manual.
The use of an accessory not evaluated for use with this appliance may cause injury.
Do not use outdoors.
Do not let cord hang over the edge of table or counter, or touch hot surfaces.
Do not place on or near a hot gas or electric burner or in a heated oven.
- Keep the lid on the carafe when in use.
The carafe is designed for use with the appliance. It must never be used on a range top.
Do not clean the carafe with abrasive cleansers, steel wool, or other abrasives.
Do not use this appliance for other than intended use.
POLARIZED PLUG (120V Models Only)
This appliance has a polarized plug (one blade is wider than the other). To reduce the risk of electric shock, this plug is intended to fit into a polarized outlet only one way. If the plug does not fit fully into the outlet, reverse the plug. If it still does not fit, contact a qualified electrician. Do not attempt to modify the plug in any way.
ELECTRIC CORD
a) A short power-supply cord (or detachable power-supply cord) is to be provided to reduce the risk resulting from becoming entangled in or tripping over a longer cord.
b) Longer detachable power-supply cords or extension cords are available and may be used if care is exercised in their use.
c) If a long detachable power-supply cord or extension cord is used,
1) The marked electrical rating of the detachable power-supply cord or extension cord should be at least as great as the electrical rating of the appliance,
2) If the appliance is of the grounded type, the extension cord should be a grounding-type 3-wire cord, and
3) The longer cord should be arranged so that it will not drape over the countertop or tabletop where it can be pulled on by children or tripped over.
TAMPER-RESISTANT SCREW
Warning : This appliance is equipped with a tamper-resistant screw to prevent removal of the outer cover. To reduce the risk of fire or electric shock, do not attempt to remove the outer cover. There are no user-serviceable parts inside. Repair should be done only by authorized service personnel.
Note: If the power supply cord is damaged, it should be replaced by qualified personnel or in Latin America by an authorized service center.
SAVE THESE INSTRUCTIONS.

Product may vary slightly from what is illustrated.
+1. Brew chamber (Part # TCM850-01)
2. Latch (not shown)
3. Filter basket handle
+4. Filter basket (Part # TCM850-02)
5.Water reservoir fill top
+6 . W after reservoir (Part # TCM850- 05
7. Water window
8. Water level indicators
- Carafe insertion sensor
- Water chamber with port
- Cord storage (back of unit)
+12. Thermal carafe (Part # TCM850-04) - Control panel
- Pour button
†15. Brew-thru lid (Part # TCM850-03)
† Consumer replaceable/removable parts

- AUTO-ON light (green)
2.AUTO-ON button - HOURS set button
- MINUTES set button
5.PROGRAM button - ON/OFF button
- ON/OFF light (red)
How to Use
This product is for household use only.
Important: For warranty verification, do not remove line cord sticker.
BEFORE FIRST USE
- Remove all packing materials and literature.
- Hand wash thermal carafe, lid, water reservoir, and filter basket in warm sudsy water; rinse thoroughly.
- Pour cold water into water reservoir up to the 6-cup level mark on the water window. Do not over fill. Note: When moving the water reservoir, water may drip into the water chamber and out a port, this is normal and dripping should be minimal.
- Be sure filter basket is aligned into position in brew chamber.
- Brew water through as instructed in "Brewing a Pot of Coffee" (Do not use coffee grounds or a paper filter.)
- When finished, discard water.

BREWING A POT OF COFFEE
You do not have to set the clock or program the coffeemaker to brew coffee.
-
Tilt back water reservoir, detach and lift out (A).
-
Fill water reservoir with cold water. To avoid overflow do not fill above the 8 cup level.
-
Replace water reservoir, and press down to secure.
-
Press latch and swing out, to open brew chamber (B).
-
Be sure the filter basket is aligned into position. Straight part of basket rim is aligned with latch (C).
-
Insert a No. 4 cone-shaped paper filter into the filter basket.
-
Add ground coffee into filter (we recommend 1 heaping
Tablespoon for every 2 cups).
-
Swing brew chamber closed.
-
Place lid onto thermal carafe and close by aligning arrowheads to lock into position (D).
-
Plug unit in.
-
Place carafe all the way into coffeemaker. Position carafe with spout facing straight in or coffeemaker will not brew (E).
Important: in order to brew coffee; lid must be secured onto the carale and carale spout must be aligned with the carale insertion sensor (F).
-
Press the ON/OFF button. Red "On" brewing light illuminates. To preset an automatic brew time, see "Programming the Timer for Auto-Brew".
-
When brewing is complete, coffeemaker automatically shuts itself off and red "On" light goes out.
Sneak-A-Cup® INTERRUPT FEATURE
You can pour a cup of coffee while coffee is brewing. 1. Remove carafe from coffeemaker.
2. Make sure pour button is in down position and pour a cup.
3. Replace carafe under filter basket and the brewing process continues. (Position carafe with spout facing straight in or caffeemaker will not brew) (E).
TCM850Pub1000001038R1 10/20/05 9:02 AM Page 6

THERMAL CARAFE
- Coffee is brewed directly into carafe via closed brew thru lid. Lock lid by aligning LOCK arrowhead with arrowhead on carafe rim. Coffee may overflow if the lid is not properly in place.
- Carafe keeps coffee hot and may be left away from coffeemaker for serving. Be sure the pour button is in the up position to seal in heat and flavor.
- To pour, push down on the pour button. Be sure that lid and carafe rim arrowheads are aligned (G).
Caution: Do not pour liquid from the carafe until lid is securely closed. -
When finished pouring, push down on the pour button again and button pops up.
-
Thermal carafe keeps coffee hot for up to four hours.
SETTING THE CLOCK (H)
- Plug in the coffeemaker
- Press the 1OURS and MINUTES buttons to the current time. A small light at the top left of the clock display indicates P.M.
Note: Unplugging the unit will reset the clock/timer to12:00.

PROGRAMMING THE TIMER FOR AUTO-BREW (H)
If the clock is not set for the current time of day, see "Setting the Clock" section.
To preset your coffeemaker to begin brewing at a certain time, first follow steps 1-11 in the "BREWING A POT OF COFFEE" section.
-
Press and hold the PROGRAM button for 1 second. Green light flashes and the clock display changes to show current programmed time or default of 12:00.
-
Press the HOURS and MINUTES buttons until the desired brew time is reached.
Note: If you wait more than 3 seconds to program brew time, or if the green light stops flashing, the clock redisplays the current time of day. You must then repeat the above steps to program.
-
Once programmed to the desired time, press the AUTO-ON button.
-
Programmed brewing time momentarily displays and the green AUTO-ON light illuminates indicating that the coffeemaker is preset for automatic brewing. If AUTO-ON light is not lit, automatic brewing function is not properly set.
-
When brewing begins the red "On" light illuminates.

- Be sure carafe is properly placed into coffeemaker or coffee will not brew (J).
Note: The Auto-Brew function can be cancelled at any time by pressing the AUTO-ON button a second time. The AUTO-ON light will go out.
Care and Cleaning
This product contains no user serviceable parts. Refer service to qualified service personnel.
Caution: Do not overexpose the control pad to water. It is not waterproof. Water may cause permanent damage and make cofeemaker inoperable.
CLEANING
- Be sure the unit is unplugged and cooled.
- Press latch to open brew chamber.
- Use filter basket handle to lift filter basket out.
- Discard the paper filter with the grounds.
- The filter basket and lid are top-rack dishwasher safe, or they may be hand washed in warm, sudsy water.
- Wipe the interior of the brew chamber and the exterior of the carafe and coffeemaker with a soft damp cloth. Do not use abrasive cleaners or scouring pads. Never immerse the coffeemaker in water.
- Place cleaned filter basket into cleaned brew chamber and swing closed.

- To clean the inside of the thermal carafe (K) and the water reservoir, wash in warm sudsy water, rinse well and allow to air dry. Do not clean the carafe with abrasive cleansers, steel wool, or other abrasives.
STORING
Power cord lucks into back of unit for convenient storage (L).
Maintaining Your Coffeemaker

Mineral deposits left by hard water can clog your cofeemaker. 1. Lift water reservoir fill-top or detach water reservoir and pour white vinegar into the water reservoir up to the 4-cup level mark on the water window. Add cold water up to the 6-cup line (M).
2. Press latch and swing out brew chamber.
3. Be sure the filter basket is aligned into position.
4. Insert paper filter into the filter basket. Swing brew chamber closed.
5. Place the carafe with lid secured, all the way into the coffeemaker. Position carafe with spout facing straight in, and plug in the unit.
6. Press the ON/OFF button, red brewinging "On" light illuminates.
7. Let half of the vinegar solution brew into the carafe (until the
solution level in the water window goes down to "3". Press the
ON/OFF button again to turn off the coffeemaker and let it soak for at least 15 minutes to soften mineral deposits.
- Press the ON/OFF button to turn the unit on again, and brew the remaining vinegar solution into the carafe.
- When the vinegar solution has finished brewing, discard the paper filter, empty the carafe and rinse with clean water.
-
Refill the water reservoir with cold water, put a paper filter in the filter basket and run another brew cycle to rinse out any vinegar solution remaining.
-
Wash the water reservoir, filter basket, carafe and lid as instructed in "Cleaning."
IMPORTANT MISES EN GARDE
For service, repair or any questions regarding your appliance, call the appropriate "800" number on the cover of this book. Do not return the product to the place of purchase. Do not mail the product back to the manufacturer nor bring it to a service center. You may also want to consult the website listed on the cover of this manual.
One-Year Limited Warranty
(Appplies only in the United States and Canada)
What does it cover?
- Any defect in material or workmanship; provided; however, Applica's liability will not exceed the purchase price of the product
For how long?
One year after the date of original purchase
What will we do to help you?
- Provide you with a reasonably similar replacement product that is either new or factory refurbished
How do you get service?
- Save your receipt as proof of the date of sale.
- Check our on-line service site at www.prodpprotect.com/applica, or call our toll-free number, 1-800-231-9786, for general warranty service
If you need parts or accessories, please call 1-800-738-0245.
What does your warranty not cover?
- Damage from commercial use
- Damage from misuse, abuse or neglect
- Products that have been modified in any way
- Products used or serviced outside the country of purchase
Glass parts and other accessory items that are packed with the unit - Shipping and handling costs associated with the replacement of the unit
- Consequential or incidental damages (Please note, however, that some states do not allow the exclusion or limitation of consequential or incidental damages, so this limitation may not apply to you.)
How does state law relate to this warranty?
- This warranty gives you specific legal rights, and you may also have other rights that vary from state to state or province to province.
:NECESITA AYUDA?
San Jose, Costa Rica
Tel: (506) 257-5716/223
0136
Ecuador
Castelcorp
Km 2-1/2 Avenida Juan T.
Authorized Service Center
Electrodomesticos, S.A.
Boulevard F Dorado, al lado
33 Independence Square.
Port of Spain
Trinidad,W.L.
Tel:(8681)623-4696
Venezuela
R.F.C.AMF-001026-PF3.
Col. Centro, Mexico D.F., CP 06050
RISQUES D'INCENDIE OU DE SECOUSSES ELECTRIQUES. NE PAS OUVRIR.
The lightning symbol refers to
"dangerous volars"; the
exclamation symbol refers to
maintenance instructions. See
below.
WARNING: To reduce the risk of
fire or electric shock, do no
remove the cover of the
corneaker. There are no dic
e
should be done by any service personnel only.
El simbolo de un rayo indic.
voltae peligroso,El signo de
Exclamation inlntly importantes
Instruetiones de monlenimiento
Consule a continuation:
consumer, fueling operation
deherjxocctuunie
TCM850Pub1000001038R1 10/20/05 9:02 AM, Page 28
BLACKS DECKER is a trademark of The Black & Decker Corporation, Towson, Maryland, USA. Marca registrada de The Black & Decker Corporation, Towson, Maryland, E.U. Marque de commerce deposoce de la société The Black & Decker Corporation, Towson, Maryland, E-U.
975W120V60Hz
975W220V50/60Hz

R12004/3-11-23E/S/F
Copyright © 1999-2005 Applica Consumer Products, Inc.
b.No.1000001038-00-RV01
Made in People's Republic of China
Printed in People's Republic of China
Importado por:
Applica de Mexico S. de R.L. de C.V.
Blvd. Manuel Avila Camacho 2900 Int. 902
Los Pirules, Tlalnepantla
Edo. Mex.
C.P.54040
Mexico

- BLACK&DECKER
- POLARIZED PLUG (120V Models Only)
- ELECTRIC CORD
- TAMPER-RESISTANT SCREW
- SAVE THESE INSTRUCTIONS.
- How to Use
- BEFORE FIRST USE
- BREWING A POT OF COFFEE
- Sneak-A-Cup® INTERRUPT FEATURE
- THERMAL CARAFE
- SETTING THE CLOCK (H)
- PROGRAMMING THE TIMER FOR AUTO-BREW (H)
- Care and Cleaning
- CLEANING
- STORING
- Maintaining Your Coffeemaker
- IMPORTANT MISES EN GARDE
- One-Year Limited Warranty
- (Appplies only in the United States and Canada)
- For how long?
- What will we do to help you?
- How do you get service?
- What does your warranty not cover?
- How does state law relate to this warranty?
- :NECESITA AYUDA?
- 0136
- Ecuador
- RISQUES D'INCENDIE OU DE SECOUSSES ELECTRIQUES. NE PAS OUVRIR.
Brand : BLACK & DECKER
Model : TCMKT850C
Category : Coffee machine