
HIM 20 K.A IX2 - Oven INDESIT - Free user manual and instructions
Find the device manual for free HIM 20 K.A IX2 INDESIT in PDF.
| Brand | Indesit |
| Model | HIM 20 K.A IX2 |
| Product type | Built-in oven with hob |
| Dimensions (W x H x D) | 43.5 cm x 32 cm x 43.5 cm |
| Oven volume | 160 L |
| Power supply | 230V / 400V~ 3N 50/60 Hz |
| Maximum power consumption | 8400 W |
| Hob type | Ceramic glass or electric cast iron plates |
| Number of burners | Not specified, but each burner has 6 power levels |
| Oven cooking programs | Conventional, Top heat, Grill, Pizza |
| Oven lighting | Bulb 25 W, E14 socket |
| Cooling system | Integrated cooling fan |
| Shelf levels | 5 levels |
| Removable door | Yes, for cleaning |
| Cleaning | Do not use steam cleaner; manual cleaning with lukewarm water and mild soap |
| Included accessories | Rack, dripping pan |
| Repairability index | Not provided |
| Warranty | Not specified, refer to customer service |
Frequently Asked Questions - HIM 20 K.A IX2 INDESIT
User questions about HIM 20 K.A IX2 INDESIT
0 question about this device. Answer the ones you know or ask your own.
Ask a new question about this device
Download the instructions for your Oven in PDF format for free! Find your manual HIM 20 K.A IX2 - INDESIT and take your electronic device back in hand. On this page are published all the documents necessary for the use of your device. HIM 20 K.A IX2 by INDESIT.
USER MANUAL HIM 20 K.A IX2 INDESIT
Operating Instructions COOKER AND OVEN
Contents
Operating Instructions, 1
Description of the appliance-Overall view,2
Description of the appliance-Control Panel, 3
Installation,4
Start-up and use,7
Cooking modes, 7
Using the hob,9
Precautions and tips, 10
Care and maintenance,11

Français
Mode d'emploi
CUISINIERE ET FOUR
Sommaire
Mode d'emploi,1
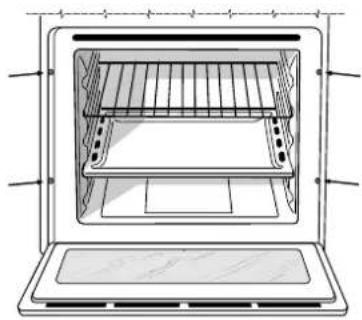
Description of the appliance
Overall view
- Control panel
2.Sliding grill rack
3.DRIPPING pan
4.GUIDE RAILS for the sliding racks
5.position 5
6.position 4
7.position 3
8.position 2
9.position 1
DE
Description of the appliance Control panel
1.Electric HOTPLATE control knob
2. ELECTRIC HOTPLATE indicator light
3. OVEN CONTROL knob
4. THERMOSTAT indicator light
DE
Before placing your new appliance into operation please read these operating instructions carefully. They contain important information for safe use, for installation and for care of the appliance.
Please keep these operating instructions for future reference. Pass them on to possible new owners of the appliance.
Positioning
! Keep packaging material out of the reach of children. It can become a choking or suffocation hazard (see Precautions and tips).
The appliance must be installed by a qualified person in compliance with the instructions provided. Incorrect installation may cause harm to persons, animals or may damage property.
Fitting the appliance
Use the appropriate cabinet to ensure that the appliance functions properly.
The panels adjacent to the oven must be made of heat-resistant material.
Cabinets with a veneer exterior must be assembled with glues which can withstand temperatures of up to 100^ .
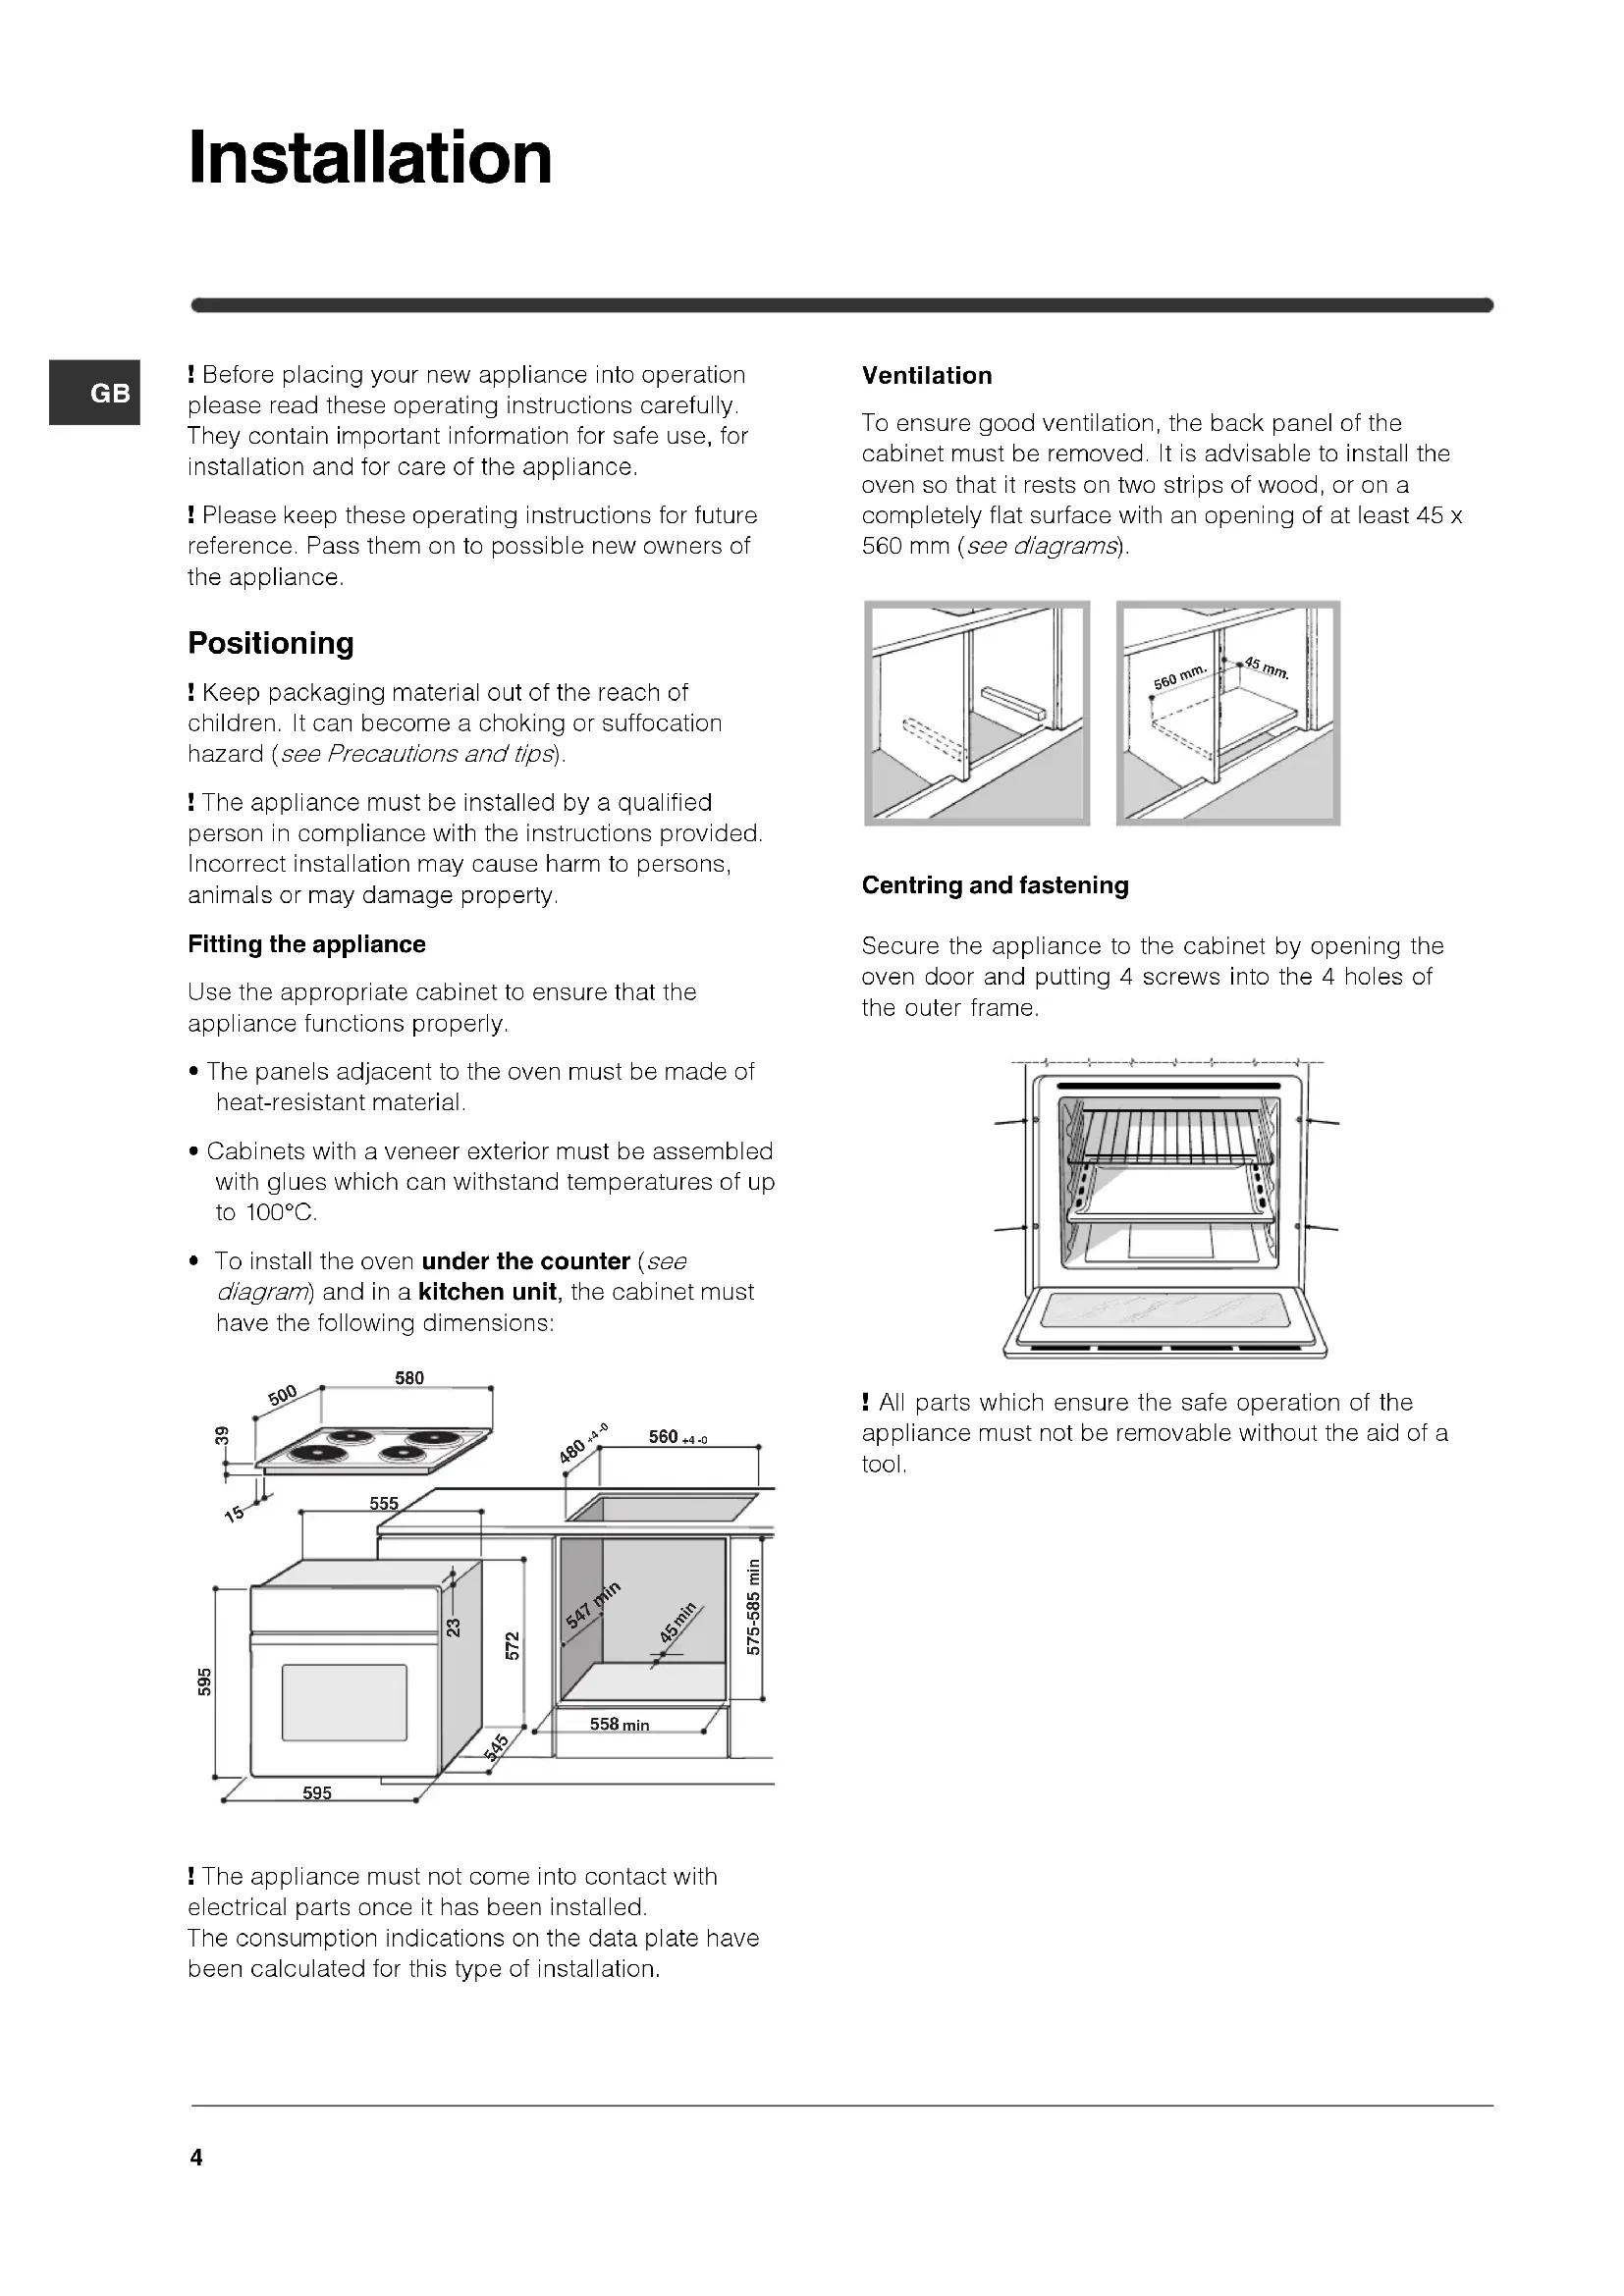
- To install the oven under the counter (see diagram) and in a kitchen unit, the cabinet must have the following dimensions:
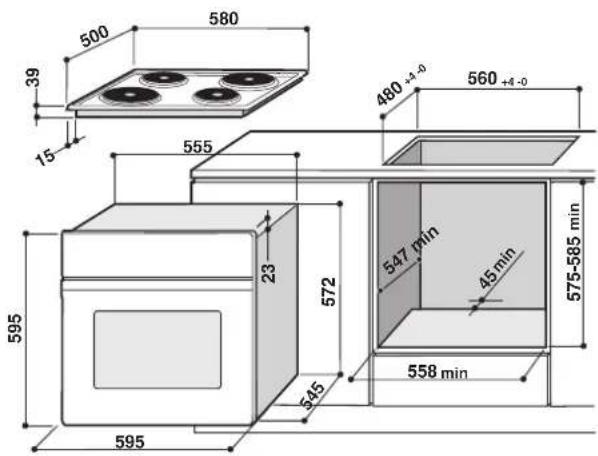
The appliance must not come into contact with electrical parts once it has been installed. The consumption indications on the data plate have been calculated for this type of installation.
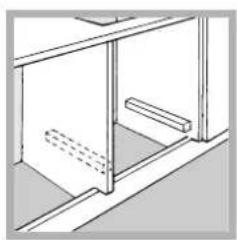
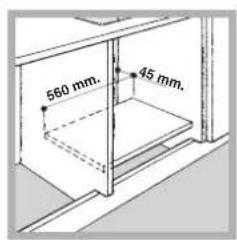
Ventilation
To ensure good ventilation, the back panel of the cabinet must be removed. It is advisable to install the oven so that it rests on two strips of wood, or on a completely flat surface with an opening of at least 45 × 560 mm (see diagrams).
Centring and fastening
Secure the appliance to the cabinet by opening the oven door and putting 4 screws into the 4 holes of the outer frame.
! All parts which ensure the safe operation of the appliance must not be removable without the aid of a tool.
Electrical connections
The cooker must be connected to the mains electricity supply. It is designed to operate with alternating current at the voltage and frequency indicated on the data plate (see the following page).
The hob is connected to the cooker using a special connector.
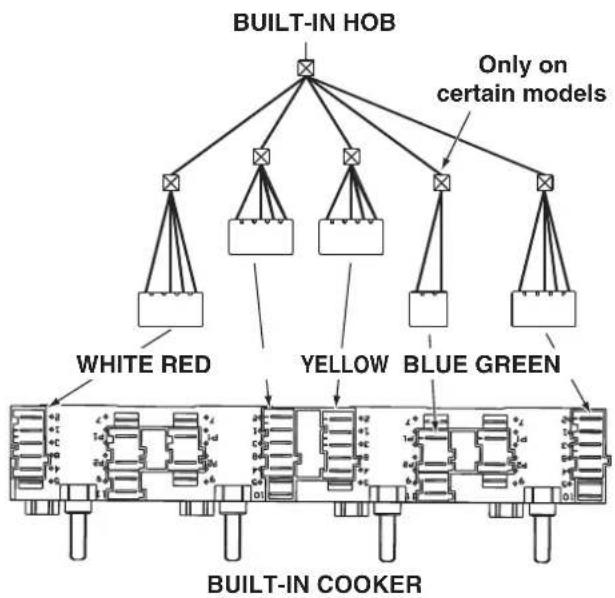
Replace the metal protection after performing all the necessary hob connections. If the hob is removed from its position, the red cap which was originally protecting the red connector must be replaced.
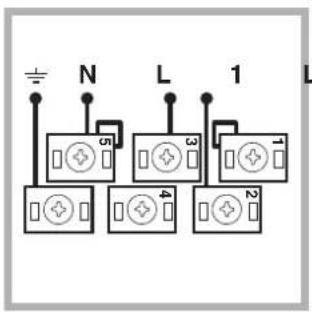
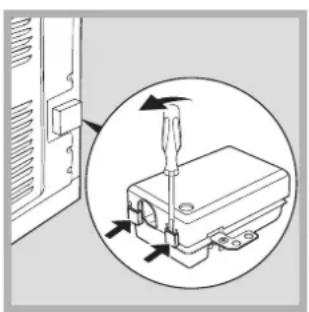
Fitting the power supply cable

-
Open the terminal board by inserting a screwdriver into the side tabs of the cover. Use the screwdriver as a lever by pushing it down to open the cover (see diagram).
-
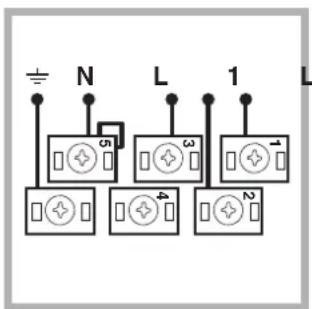
Install the power supply cable by loosening the cable clamp screw and the wire contact screws L-N- Connect the wires to the corresponding terminals: the Blue wire to the terminal marked (N), the Brown wire to the terminal marked (L) and the Yellow Green wire to the terminal marked
The terminal board is designed for a 400V three-phase connection (see diagrams below).
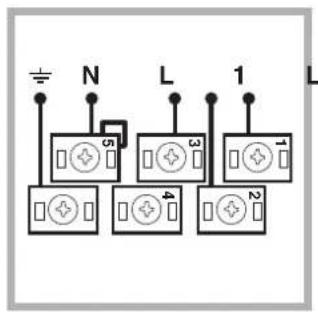
400V 3N~H05RR-F
5x2.5 CEI-UNEL 35363
3 L 2
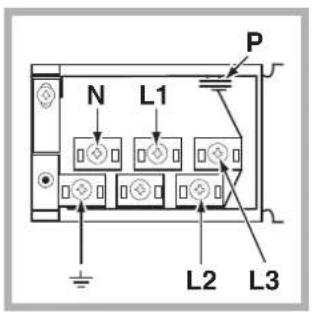
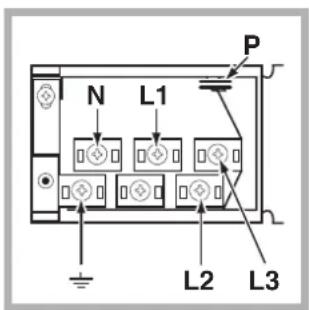
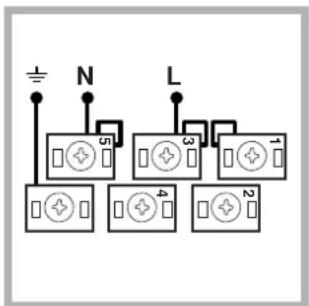
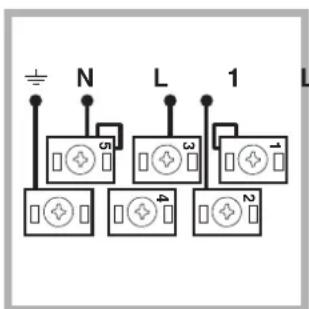
If the electrical system has other characteristics (see diagrams below), carry out the electrical connection using the connection supports provided in the box P.

230V ~H05RR-F 3x4 CEI-UNEL 35363
400V 2N~H05RR-F 4x4 CEI-UNEL 35363 2
-
Secure the power supply cable by fastening the clamp screw.
-
Close the cover of the terminal board.
Connecting the supply cable to the mains
Install a standardised plug corresponding to the load indicated on the data plate (see side).
The appliance must be directly connected to the mains using an omnipolar circuit-breaker with a minimum contact opening of 3mm installed between the appliance and the mains, suitable for the load indicated and complying with current electrical regulations (the earthing wire must not be interrupted by the circuit-breaker). The supply cable must not come into contact with surfaces with temperatures higher than 50^ .
The installer must ensure that the correct electrical connection has been made and that it is compliant with safety regulations.
Before connecting to the power supply, make sure that:
- The appliance is earthed and the plug is compliant with the law.
- The socket can withstand the maximum power of the appliance, which is indicated on the data plate (see below).
The voltage must be in the range between the values indicated on the data plate (see below). - The socket is compatible with the plug of the appliance. If the socket is incompatible with the plug, ask an authorised technician to replace it. Do not use extension cords or multiple sockets.
! Once the appliance has been installed, the power supply cable and the electrical socket must be easily accessible.
! The cable must not be bent or compressed.
The cable must be checked regularly and replaced by authorised technicians only (see Assistance).
! The manufacturer declines any liability should these safety measures not be observed.
| DATA PLATE | |
| Dimensions | width 43.5 cm height 32 cm depth 43,5 cm |
| Volume lt. 60 | |
| Electrical connections | voltage: 230V/400V~ 3N 50/60Hz maximum power absorbed 8400W |
| ENERGY LABEL | Directive 2002/40/EC on the label of electric ovens. Standard EN 50304 Energy consumption Class certification Natural convection heating mode: TRADITIONAL |
| CE | This appliance conforms to the following European Economic Community directives: - 2006/95/EEC of 12/12/06 (Low Voltage) and subsequent amendments; - 2004/108/EEC of 15/12/04 (Electromagnetic Compatibility) and subsequent amendments; - 93/68/EEC of 22/07/93 and subsequent amendments. - 2002/96/EC and subsequent amendments. |
Start-up and use
GB
! The first time you use your appliance, heat the empty oven with its door closed at its maximum temperature for at least half an hour. Ensure that the room is well ventilated before switching the oven off and opening the oven door. The appliance may produce a slightly unpleasant odour caused by the burning away of protective substances used during the manufacturing process.
Starting the oven
- Select the desired cooking mode by turning the SELECTOR knob.
- Select the desired temperature with the THERMOSTAT knob. See the Cooking advice table for cooking modes and the suggested cooking temperatures (see Cooking Modes).
- When preheating is finished, the THERMOSTAT indicator light will stay on: place the food in the oven.
- You may do the following during cooking:
- change the cooking mode by turning the SELECTOR knob.
- change the temperature by turning the THERMOSTAT knob.
- stop cooking by turning the SELECTOR knob to the "0" position.
! Never put objects directly on the oven bottom to avoid damaging the enamel coating.
! Always place cookware on the rack(s) provided.
Cooling ventilation
In order to cool down the external temperature of the oven, some models are fitted with a cooling fan that blows out air between the control panel and the oven door.
Once the cooking has been completed, the cooling fan remains on until the oven has cooled down sufficiently.
Oven light
It goes on when selecting with the SELECTOR knob. It stays on when a cooking mode is selected.
Cooking modes
TRADITIONAL OVEN mode
Both the top and bottom heating elements will come on. With this traditional cooking mode, it is best to use one cooking rack only; if more than one rack is used, the heat will be distributed unevenly.
The oven will automatically reach the temperature set, and the thermostat, which is controlled by the SELECTOR knob, will keep it constant.

TOP OVEN TOP OVEN
The top heating element comes on. This mode can be used to brown food at the end of cooking. Always cook in this mode with the oven door closed.
Practical cooking advice
In the GRILL cooking mode, place the dripping pan in position 1 to collect cooking residues (fat and/or grease).
GRILL
- Insert the rack in position 3 or 4. Place the food in the centre of the rack.
The top heating element is regulated by a thermostat and may not always be on.
PIZZA
- Use a light aluminium pizza pan. Place it on the rack provided. For a crispy crust, do not use the dripping pan (prevents crust from forming by extending cooking time).
- If the pizza has a lot of toppings, we recommend adding the mozzarella cheese on top of the pizza halfway through the cooking process.
Cooking advice table
| Foods | Weight (in kg) | Rack position | Pre-heating time (min) | Recommended temperature | Cooking time (minutes) |
| Pasta | |||||
| Lasagne | 2.5 | 3 | - | 210 | 75-80 |
| Cannelloni | 2.5 | 3 | - | 210 | 75-80 |
| Tagliatelle | 2.5 | 3 | - | 210 | 75-80 |
| Meat | |||||
| Veal | 1.7 | 3 | - | 220 | 85-90 |
| Chicken | 1.5 | 3 | - | 220 | 110-115 |
| Turkey | 3.0 | 3 | - | 220-Max | 95-100 |
| Duck | 1.8 | 3 | - | 220 | 120-125 |
| Rabbit | 2.0 | 3 | - | 220 | 105-110 |
| Pork | 2.1 | 3 | - | 220 | 100-110 |
| Lamb | 1.8 | 3 | - | 220 | 90-95 |
| Fish | |||||
| Mackerels | 1.1 | 3 | - | 210-230 | 55-60 |
| Dentex | 1.5 | 3 | - | 210-230 | 60-65 |
| Trout baked in foil | 1.0 | 3 | - | 210-230 | 40-45 |
| Pizza | |||||
| Napolitan | 1.0 3 15 Max 30-35 | ||||
| Pies | |||||
| Biscuits | 0.5 | 3 | 15 | 180 | 30-35 |
| Tart | 1.1 | 3 | 15 | 180 | 30-35 |
| Chocolate cake | 1.0 | 3 | 15 | 200 | 45-50 |
| Leavened cake | 1.0 | 3 | 15 | 200 | 50-55 |
! Cooking times are approximate and may vary according to personal taste. When cooking using the grill, the dripping pan must always be placed on the 1st oven rack from the bottom.
Type of hob
The oven is combined with a hob that can be made up of two types of heating elements: cast-iron electric plates (see diagram 1) or glass ceramic hobs (see diagram 2).
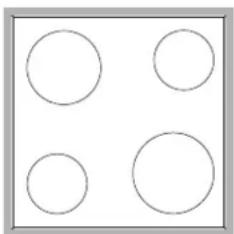
Switching on the glass ceramic hob
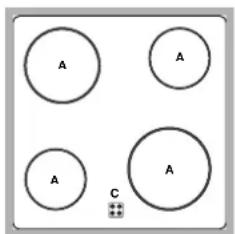
Traditional cooking zones
Traditional cooking zones are made up of circular heating elements. They turn red approximately ten seconds after they have been turned on. Each cooking zone is fitted with a control knob allowing you to select from 6 different temperature settings from a minimum of 1 to a maximum of 6.
Residual heat indicator lights*
The indicator lights (C) indicate that the temperature of the corresponding cooking zones have exceeded 60^ , even after the heating element has been switched off.
Recommended power levels for various types of cooking:
| Setting | Setting |
| 0 | Off |
| 1 | Cooking vegetables, fish |
| 2 | Cooking potatoes (using steam) soups, chickpeas, beans. |
| 3 | Continuing the cooking of large quantities of food, minestrone. |
| 4 | For roasting (average) |
| 5 | For roasting (above average) |
| 6 | For browning and reaching a boil in a short time |
Practical advice on using the glass ceramic hob
! The glue that is applied on the gaskets leaves some traces of grease on the glass. Before using the appliance, we recommend you eliminate these with a special non-abrasive cleaning product. During the first few hours of use there may be a smell of rubber which will disappear very quickly.
To obtain the best results with your hob:
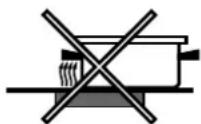
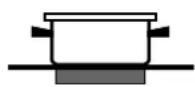
- Use flat-bottomed pans to ensure that they adhere to the cooking zone perfectly.
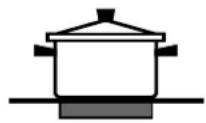
Always use pans with a diameter that is large enough to cover the hotplate fully, in order to use all the available heat.
- Make sure that the bottom of the cookware is always dry and clean to guarantee correct adherence and long life, not only for the cooking zones but also for the cookware itself.
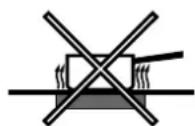
- Avoid using the same cookware that is used on gas burners: the heat concentration on gas burners may deform the base of the pan, causing it not to adhere correctly.
- Never leave a cooking zone on without cookware on it because as it heats up and rapidly reaches the maximum level, it could damage the heating elements.
GB
The appliance was designed and manufactured in compliance with international safety standards. The following warnings are provided for safety reasons and must be read carefully.
General safety
- The appliance was designed for domestic use inside the home and is not intended for commercial or industrial use.
- The appliance must not be installed outdoors, even in covered areas. It is extremely dangerous to leave the appliance exposed to rain and storms.
- When handling the appliance, always use the handles provided on the sides of the oven.
- Do not touch the appliance with bare feet or with wet or moist hands and feet.
- The appliance must be used by adults only for the preparation of food, in accordance with the instructions outlined in this booklet. Any other use of the appliance (e.g. for heating the room) constitutes improper use and is dangerous. The manufacturer may not be held liable for any damage resulting from improper, incorrect and unreasonable use of the appliance.
- When the appliance is in use, the heating elements and some parts of the oven door become extremely hot. Make sure you don't touch them and keep children well away.
- Ensure that the power supply cable of other electrical appliances does not come into contact with the hot parts of the oven.
- The openings used for ventilation and dispersion of heat must never be covered.
Always grip the oven door handle in the centre: the ends may be hot.
Always use oven gloves to place cookware in the oven or when removing it. - Do not use aluminium foil to line the bottom of the oven.
- Do not place flammable materials in the oven: if the appliance is switched on by mistake, it could catch fire.
Always make sure the knobs are in the "●"/"○" position when the appliance is not in use. - When unplugging the appliance always pull the plug from the mains socket, do not pull on the cable.
- Never carry out any cleaning or maintenance work without having unplugged the plug from the mains.
- In the case of a malfunction, under no circumstances should you attempt to repair the appliance yourself. Repairs carried out by inexperienced persons may cause injury or further malfunctioning of the appliance. Contact a Service Centre (see Assistance).
-
Do not rest heavy objects on the open oven door.
-
The glass ceramic hob is resistant to mechanical shocks, but it may crack (or even break) if hit with a sharp object such as a tool. If this happens, disconnect the appliance from the electricity mains immediately and contact a Service Centre.
- Remember that the temperature of the cooking zones remains relatively high for at least thirty minutes after they have been switched off.
- Keep any object that could melt away from the hob, for example plastic and aluminium objects, or products with a high sugar content. Keep plastic or aluminium objects away from the hob: if you forget them on surfaces that are still hot, they may cause serious damage to the hob.
- The appliance should not be operated by people (including children) with reduced physical, sensory or mental capacities, by inexperienced individuals or by anyone who is not familiar with the product. These individuals should, at the very least, be supervised by someone who assumes responsibility for their safety or receive preliminary instructions relating to the operation of the appliance.
- Do not let children play with the appliance.
Disposal
- Observe local environmental standards when disposing packaging material for recycling purposes. Observe existing legislation when disposing of the old appliance.
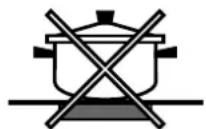
- The European Directive 2002/96/EC on Waste Electrical and Electronic Equipment (WEEE), requires that old household electrical appliances must not be disposed of in the normal unsorted municipal waste stream. Old appliances must be collected separately in order to optimise the recovery and recycling of the materials they contain and reduce the impact on human health and the environment. The crossed out "wheeled bin" symbol on the product reminds you of your obligation, that when you dispose of the appliance it must be separately collected.
Consumers should contact their local authority or retailer for information concerning the correct disposal of their old appliance.
Respecting and conserving the environment
- By using the appliance in the hours between late afternoon and early morning, you can help reduce the work load placed on electrical companies.
Always keep the oven door closed when using the GRILL mode to attain best results and to save energy (approximately 10% ). - Regularly check the door seals and wipe clean to ensure they are free of debris so that they stick properly to the door and do not allow heat to disperse.
Switching the appliance off
Disconnect your appliance from the electricity supply before carrying out any work on it.
Cleaning the appliance
- The stainless-steel or enamel-coated external parts as well as the rubber seals may be cleaned using a sponge that has been soaked in lukewarm water and neutral soap. If these stains are difficult to remove, use only specialised products. After cleaning, rinse and dry thoroughly. Do not use abrasive powders or corrosive substances.
- Ideally, the inside of the oven should be cleaned after each use, when it is still lukewarm. Use hot water and detergent, rinse and dry with a soft cloth. Do not use abrasive products.
- The accessories can be washed like everyday crockery (even in your dishwasher).
! Never use steam cleaners or pressure cleaners on the appliance.
Cleaning the oven door
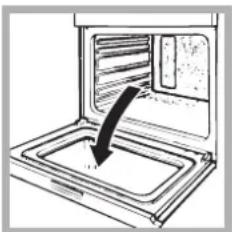
Clean the glass part of the oven door using a sponge and a non-abrasive cleaning product, then dry thoroughly with a soft cloth. Do not use rough abrasive material or sharp metal scrapers as these could scratch the surface and cause the glass to crack. To clean more thoroughly, you can remove the oven door.
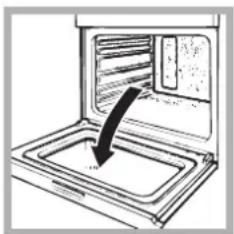
- Open the oven door fully (see diagram).
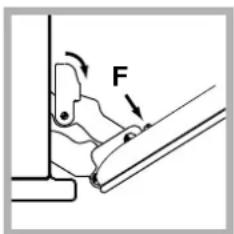
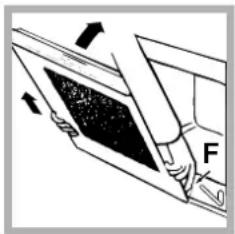
- lift up and turn the small levers situated on the two hinges; (see diagram).
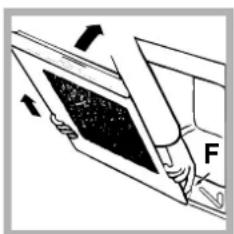
- Grip the door on the two external sides and close it approximately half way. Unlock the door by pressing on the clamps F, then pull the door towards you lifting it out of its seat (see diagram).
To replace the door, reverse this sequence.
Inspecting the seals
Check the door seals around the oven periodically. If the seals are damaged, please contact your nearest After-sales Service Centre (see Assistance). We recommend not using the oven until the seals have been replaced.
Replacing the light bulb
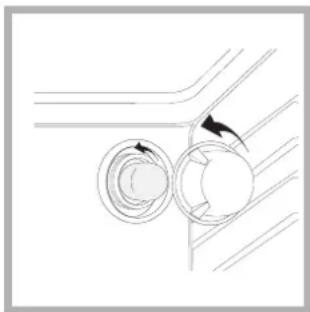
To replace the oven light bulb:

- Remove the glass cover of the lamp-holder.
- Remove the light bulb and replace it with a similar one: Wattage 25 W, cap E 14.
- Replace the glass cover (see diagram).
Assistance
Communicating:
- appliance model (Mod.)
- serial number (S/N)
This information is found on the data plate located on the appliance and/or on the packaging.
EuupoAoynon kaawdiou npoosia
1.AvoiTe To kouti
aKpOoEKToV
XpnoIIOTOwVtac Wc
MOxIo Eva KAtoaioi OITc
TLeuPIeC yawoaitoe
Tou KATTAKIO: TpaBnTe
KAI AvoiTe To KATTAKI
(βAETE EIKOVA).
- XpnoioutoioTe To KaWio Tpoopooiaoc;
EbiowTe Tn Bida aovapaiionc Kaawoiou KAI TIC BiEc
Tuv Etnaipwv L-N- kai Katotiv OTEpewote Ta
Kaawbia KATW aTO TIC KEpaIe C Twv BiWv ME Baon Ta
XpomegaT MNTAe (N) Kae (L) KITpivo-npaoivo (1±)
To kouti akpoedektw npoepetai yia uovcog 400 V tripaik (BtTE EIKOVc napakatw).
400V 3N~H05RR-F
5x2.5 CEI-UNEL 35363
3 L 2
Av n nEeKtpiKn EYkataoTaon avTIOxei o e aAa
Xapaktnpiotika (BETTE EIKOvec TApakatw),
DIEVEpynoTe TnV nEeKtpiKn OuvDeoN XpnoIooTioWvTaC
TIC ATIoAnEeic OuvDeoN cTou BpiokovTaI eOa STo KoutiP.
230V 1N~H07RN-F 3x4 CEI-UNEL 35364
400V 2N~H05RR-F
4x2.5 CEI-UNEL 35363
B npocce pnproTOBHeNBAIObOIMoMeHTMOXHO:
- IN3MeHnTb PpOpaMMy PnproToBneHn PpN NmOoN pyKoRTKn PPOrPAMMbI;
-
IN3MeHnTb TempepaTyPy npu NmOu npyIaTopa TEPMOCTAT;
-
npepBaTb npiroTOBnHeHne, NOBepHyB pyKoRTky IPOrPAMMbI B noJoxKeHne «0».
!HkoHa He cTaBbTe HnKaKnx PpeMeTOB Ha dHO dyXOBOro WkaΦa, TAK KAK OHMOrT NOBpeDITb 3MaIINPOBaHHO NOKpbITne.
! Bcerda cTaBbTe nocydy Ha npunaraioyocpewetky.
OxndTeBHaBeHTnlaCn
TINIOHKeHnTeMnepaTpbl ChapyKn DyXOBOro WkaΦa B INPOUCCE PnIroTOBJIeHnO, OXNaITeJIbHbI BeHTINrTop CO3daET IOTOK BO3dyxA MeKdY nepeDHeI NaHeIbHO IN DBepcEyn DxyOBOrO WkaΦa.
!No3aBepueHn pnproToBJeHn BENTINrTop npoDorKaet pa6oTaTb BnOTo D0 HaJIeXaUero OXlaXeHn dyxOBKn.
OcBeueHne DuxoBoro WkaFa
3aropaeTc npn BbIbope npn NOMOu npykoTkn PPOrPAMMbI. OcTaEcBkJIOueHHO npn BbIbope nporpaMMbl npiroTOBHeHn.
PpOrpaMmbI npuroToBJIeHnA
Поррамma TPAДИЦИОНHAДУХOBKA
BknouaOTc DaHarpeBaTeNbHbIX 3JemeHTA: HxHHn N BepxHn. B pexKmte TpaNIOHOHor npriTOOBHeHpeKOMeHdyETcNcNoHB3OBA Tb TOIbKO OINH yPOBeHb: Pn INcNOb3OBAHn HECKoJIbKnX yPOBHeN pacPpeJeHne TeMnpaTpybl 6yDeT HeONTMaJIbHbIM. DxyOBKa aBTOMaTHeckn HarpeBaetc Do 3aDaHHoTemnpaTpybl, KOtopa NoIDepkNBAeTc Cta6NJbHoN NOpeCTBOM TepMOCTata, YnpabJNeMOro pyKoTko IPOrPAMMbI.

PporpaMa BEPXHn HArPEBATEJb
BKnUoayetc BepxHn HarpeBaTeIbHbI 3JeMeHT.3Ta cyHKUma MoKeT 6bITb NcNoJIb3ObaHa DnA DOBOkU roTOBbIX 6NIOd. IOTOBbTe 6JIOda c 3aKpbIToI dBepuei dYXOBOrO 1kaΦa.
Ppaktnueckne COBeTbI no npnroTOBHeHIO
!PnNcnoJb3ObaHmpeXmua PnIb nomecnte npOTuBeHb Ha ypoBeHb 1dna c6opa KnUkocTei, BbldeJeMOro npxkapke (cok uunn knp).
ΓPUNb
- YcTaHOBnTe peWetKy Ha ypoBeHb 3 nnn 4, nOmeCTnTe npOdyKTbl B ueHTp peWetKn.
He 6ecnoKoTecb, ecn BepxHnn 3neMeHT He octaetcnoCToHHO BKJIOUeHHbIM: ero pa6ota ynpabnreTc TepMoCTaTOM.
NIIU4A
- NcnoB3yIe npOTuBeH u3 IerKOro aIIOHMnH, yctaHaBnBa ero Ha npUlaRaHOuOcypeWetky. Ppi nCNoB3OBaHHn npOTuBeH Bpem BbIneKu YdINHReTc, YTO 3aTpYdHReT noJyuHeHxpyCTAeN nIuCbI.
Bcnyae BbineKn Nmucb c 6nbHnoHaunHKo peKomeHdyeTc nIOXKnTb Ha NcUy cbip MOuapePnBa CpeDnHe BbineKn.
Ta6nua npuroTOBJeHna
- HNKOrda He OCTaBJIaTb KaKyIO-JI6o 3OHy HarpeBaHnRA BKNIOUeHHoH, He NOMecTnB Ha Hee NocuDy, TAK KAc OHa 6bICTpO DoCTnraEe MaKcMaJbHOrO HarpeBa, YTO MoXeT NOBpeiNTb HarpeBaTeJIbHbIe 3JIeMeHTbl.
*UMeetcTOnbkoBHeKoTOpbIXMoJeIax
!H3dJIe cnpoekTnpoBaHO u n3roToBJeHO B COOTBeTCTBmC MEXKdyHapOdHbIMN HOpMaTNBaMn PO 6e30NaChocTn. Heo6xOJIMO BHMaTeJIbHO npouHTaTb HAcTOaUe npDeynpeKdEHHa, CoCTaBNeHHbIe B CeJIax BaWei 6e30NaChocTn.
06uhe npabnla 6e3onacnoctn
-AnHoe n3dJIne npedHa3HaayaeTcIJI HeIpoceccnOHaJIbHOrIO cIIOJIb30BaHnB DOMaHnx YCIOBnX.
3aPseaaeTc yTaHaBnBaTb n3JeNHe Ha yIuie, daKe noi HABECOM, TAK KAK BO3DeIeCTBne Ha Hero Doxknd I rpo3bl ABnEeTc 4pe3BbHaiHo ONaChbIM.
Дпяпетмшенинздениьсерпесьа cneцальные руки, паюоженихьсбokов duyxoboro wkaф.
He npikacatbck N3deJIOBnaxKbIMpykam, 6ocNKOMnnCmOKpbIMHoram.
I3dJIHe npEHa3HauYeHO IpynroTOBJeHnI NIIeBbIX pOdyKTOB,MOKeT6bITb HcNoJIb3OBaHO TObKO B3PocJIbIM NIIaAMN B COOTBeTCTBm C HCTpyKUJMaM,IPuBEdeHHbIMB DaHHOM TexHueCKOM pykoBOcTBe.JIIObe Opye erO hCNOJIb3OBaHne (HaNPmep:OTOnJIeHne NOMEeHn) cHTaeTcR HeNaJIeXaUHM iCleIOBaTeJIbHO ONaCHbIM. PpOIN3BOInTeJIb He HeceT OTBeTCTBeHHOCTH 3a BO3MOxHbI yIep6,Bbl3BaHHbI HeHaJIeXaUHM, HePaBnIbHBiM Hepa3yMHbIM nCIOJIb3OBaHnEM N3dJIHn.
Bnpocce3KcnnyataunnH3dennHarpeBaTeIbHbIe 3JIeMeHTbI HKeOTopbIe YacTH NDbepcI dyXOBKn NOdBepraOTcCnblHomy HarpeBy. Heo6xOIMo npoRBJIbTb OCTpOxHOCTb BO n36exKaHne KOHTaKTOB C 3TmHn Yactamn H he pa3peWAtb DeTm npno6JnxKaTbc K dyXOBKe.
-ИЗбетаитЕ касань провдг БлкрпнТань Дугх 6ытOBыx 3лжКТрпрпборв К РорчимЧастм Духовогшkaфa.
He 3akpbBaIe BeHTnJIaIOHbIe peWetKn I OTBepCTna paccenBaHnTeTna.
- Bepntecb 3a pyky DBepuB B ceHTpe: c 60KOB OHa MOKeT 6blrTopauey.
BceTdaHaedeBaTe KxOHHbIe BapeKKn, KOrDa CTaBNTe HIN BbIHMaTe 6nOda n3 DxyOBKn.
-He noKpbIbAaTe dHOb dyXOBOrO uKaΦaΦoJIbRoI.
-He xpaHnTe B dyXOBOM uKafoy Bo3ropaembIX npedMeTOB.npN CnyaHOM BKIOueHEN N3JeINr TaKne MaTePnAbI MOrY T 3arOpetbcra.
Bcerda npoBepaIte, yTo6bl pyKoAaHaxOaunbc B noLoKeHH " 念 ^ / 心 ^ , KOrda n3dJeHne He NcNoJb3yTeTc.
- He TaHnTe 3a CeTeBOu WHyp DnA OToCoEInHeHnB BuJIKu H3JeNna H3 CeTeBOu PO3eTKU, BO3bMUTecb 3a BuJIKy pykoI.
-ПepeначаломЧNTКИ NINTEXHueckoro 6cnyKbAHnIu3dENy BcERdaBbHMaIte WTeNCeJIbHyU BUNKy u3 CeTeBOI po3eTKI.
Bcnyae HncnpabHocn KaTeOpueckn 3anpeaetcnoKpbBaTb BHyTpEHnE MexAHN3MbI N3dennC cJeIbUHX camOCToTeJbHOro pemOnTa.ObpaauTeCB LcHtp
TexnueckoRo 6cnykubHna (cm. TexobcyxueaHue).
He cTaBbTe TgKeJIbe IpeMeTbI Ha OTkpbTyIO DBepuy dyXOBOrO uKaΦa
CTeKnOkepaMuecka BapouHnaHeIb yToOnuBa K MExaHnueckmUyapam,TeM He MeHee OHa MoKeT TpeChyTb (NJN DaJe pa36ntbc) npu ydaPe ocTpblm npedMeTOM NIN INHTpyMeHTOM.B 3tOM cnyae He3aMeDInTeJbHO OTcoEInHNTe N3DeJIne OTCeTI 3JIeKTPoPnITAHn I o6paTnTeCb B LcHTp TexHnueckoro 06CnkykuaHH.
- TomHnTE, yTo TemNepaTpa KOHΦopOK ocTaetcOueHb BbICOKoB TteeHne TpuIucaTN MmHyT NocJe Hx BbIKJIOUeHn.
-Деркнг He 6e3oNacHOMpacToHmOTBapOCHNo naHEnIIO6bIpeMTebl, KoTOpblMoYTpacIIaBnTcBcHApnpMep,IIaCTMaCCa, aIOMHHuNnI3deNnaI3 caxapa.ObpaauIte oco6oe BHMaHne Ha yNaKOBouHbIe MaTePnAJIbI, NOIN3TNHeHOByIO nAn aIOMMHNEByIO NNeHKy:ecnOCTaBnTb 3TN MaTePnAJIbHa eue IopJey HnI TeNLO NobepxHOCTN, OHMOrYT cepBe3HO NoBepDnTB BapOuyIO NaHeNb.
YTNn3aun
- YHnTuKeHne yNaKOBouhBix MaTePnaIaOB: co6JIouDaIte MeCTHbIe HopMaTNBbl NO yTNJIN3aCm yNaKOBouhBix MaTePnaIaOB.
CorgnacHo EbponeckOu NpeKtBbe 2002/96/CE KacaTeIbHO yTNIIN3aUIN 3NeKTPoHNbIX IN 3NeKTPnueCKNX 3NeKTPoPn6OpOB 3NeKTPoPn6OpBbI He DOJIKNHb I BbIbpaCbBaTbCBA MecTe C O6bIyHbIM TropOcKIM MycopOM. BbIEeHHbIe IV3 CTPOJ np6Opbl DOJIKNbI CO6HpTaBcO TDeJIbHO DnA ONTNMn3aUIN IX yTNIIN3aUIN IN PekyepaUIN CoCTABNIAUIN IX MaTePnAnOB, a TaKKe IIN 6Be3OnacHocTn OKpyKaIOUeIN cpebl I 3DopOBbY. CmBOIN 3aYePKHyTaN MyCopHNA KOp3INKa, IMeIoUIncra Ha BCex pnp6opax, CnykNT HAnOMnHaHMe O6 IN OTDeJIbHO yTNIIN3aUIN. 3a BoJee NoIpoBoH InHΦopMaUneI O npabINbHO yTNIIN3aUIN 5bITobBX 3NeKTPoPn6OpOB NOIb3ObATEINI MOyT o6pATnTBcRl B CneUaJIbHyIO rOcydApCTBeHNHyIO opraHn3aUINO INN B Mara3IN.
3KoHOMn 3JekTpo3Heprn n OxpaHa OKpykaUoien Cpebl
- Ecni Bbl 6ydeTe noJIb3OBA Tbca DxYOBbIM WkaΦom BeuepOM n Do paHrero yTpa, 3To NOMoKET COKpaNTb Harpy3ky NoTpe6IeHnra 3NeKtpo3Heprnn 3JIeKTPoCTAHmM.
- PekomeHdyetcBcerda roTOBtB BpeKmE rPnIb c 3akpbToD ABepue: 3TO Heo6xOdmo Dna 3HaHTeJbHO N3KOHOOMN 3NeKTPo3Heprn (npMepHo 10%), a TaKke dJa LyuXnx pe3yIbTaTob npiroTOBJIeHn.
CoepKTe yIIOHTHeHn B NcnpabHOM uNCTOM COCTOHH, npOBepaIte, YTObI OH INIOTHo pINJIeTAM K DBepe He npOnyckaJIy YeTeek TeTTa.
OTKnIOUeHne 3JeKtpoNTaHHa
Ipeed hauanom kakoi-ni6o onepaun no 06cnykuaHIO uNu YnCTKe oTcoeHNHTe N3deJne OT cTeN 3JIeKTPoNTaHn.
UncTkauNdeJnna
!He nCnoB3yIe npoBbIe YnCTTae arpeTaI nn arpeTaI NOB BbICOKIM DaBJIeHnEM DnA YnCTKn N3deJn.
HapyKbIe 3MaJInpoBaHNbIe 3JIeMeHTbI JIN DeTAln H3 HePkaBeIOUeI CTaJIN, a TaKKe pe3NHOBbIe YNJIoTHEHm MOXHO IpoTnPaTb T6KOJ, CMOeHHoB B TeJIOB BoDE INB PactBope HeNTpaNBHO MOUcero cpeCTBa. JINy ydaJeHmO OcO60 TpyNbIX TATEH NcNOJb3yIne CneuNaHBHe YICTaUne cpeCTBa, IMeIOUncEeB I npOdaKe. Iocne YNCtKn peKOMeHdyETc TuaTeJBHo YdaJIbTb OCTaTKM MOUcero cpeCTBa BnaXHO TprNkoI N BbICyWNTb DxyOBky. He nCNoJIb3yIne abpa3NHBHe nopOswk Nnn Koppo3NHBle BeueCTBa.
CneDyeT npOn3BOnITb BHyTpEHHIOU qNCTky dYxOBOrO uKaΦa nocIe KaKDoR oero NcNoJIb3oBAHnA, He DoXuJaCb erO nONHO oxJaxJeHn. NcNoJIb3yIte TenuIyBOy n MOIOuee cpeCDBo, OonoCHnTe n IpOtpITe MmKoTpIKNoI. N36eraIte NcNoJIb3oBAHnA abpa3INBbIX cpeCDTB.
CbeMHbIe DeTaII MoxHO JeKO BbIMbITb KaK IIO6yO DpyryIO Nocdy, TaKe B NocydomoueHOn MaunHe.
!HkoTa He nCnoJb3yTe npoBbIe YnCTaue arperaTbI INn arperaTbI NOd BbICOKIM DaBHeHEm dna YnCTKn N3JeJIa.
YnctkaDbepzbl
IyNCTKn CTeKJa DBePcbl NcNoJIb3yUte Hea6pa3INBhIe ry6kn N UcTcIuIe CpeIcTBa, 3aTEM BbITpInTe Hacyxo MAnKO TprIKoH. He IcNoJIb3yUte TBepMbIe a6pa3INBhIE MaTePnaJIb IIN OcTpble MeTaNIIueckne CKpe6Kn, KOToPbIe MOrY TIOJapAnaTb NOBepxHOCTb N pa3bNTb CTeKNO.
IIN60JIeTtAteJIbHON YNCTKN MOXHO CHaTB DBePcy dyXOBKn.
- nonhoctbio OTKpoTe DBepuy DxyOBKn (cm. cxemy);
- npn nmoos OTBepTKN POnHMnTe N nobepHnTe WnOHKn F Ha DByx wapHnpax (CM. cxemy);

- BO3bMntecb 3a DBepCy pyKaMn C DByx CTOpOH, nIaBHO 3akpoTte ee, Ho He NOIhOcTBIO. 3aTeM NToHInTe DBepCy Ha Ce6r, Chmmae eC neTeJIb (CM. cxemy).ДЯ yCTaHOBKn DBepCuHa MeCTO BblONHTe BblweOnuCAHHbIe OepauN B o6paTHOM
nopraKe.
PpOBepka yNnOThHn
Perynapno npOBepaTe cocToHne yNIOtheHnBOKpyr DBepbI dYxOBOTo uKapa. B cnyuae NobpeXDeHn yNIOtheHn ObaaTecb B6nkaun LcHTp TexHuueckoro 06cnykBaHn (cm.TexHuueckoe 06cnyKueaHue).He peKomeHdyETcNOJb3OBAtbcra dYxOBko n NobpeXDeHHbIM yNIOtheHnem.
3aMeHa JlamNoyKn
3aMeHa NaMnoUKN B dyXOBOM uKafoy:
1.OTBNUHTNTE
CTeKJIaHHyU KpbIiKhY nlafoHa naMnOuKN;
2. BbIKpyTnTe JAMNoOky n 3aMeHHTe ee Ha HOByo TaKOro Xe Tnna: MoUHOCTb 25 BT, pe3b6a E 14.
3. BocctaHOBNTe KpbIkwY Ha MeCTO (CM
cxemy).
CepBnchoe 6cbnyxmbaHne
!Hnkorda He o6paauTecb K HeynoJHomOeHHbIM TexHKam.
Pn 6paueHn B CHTp CepBnchoro OcbnykBaHna Heo6xOaMo coo6uNTb:
TIN HENCnpaBHOCTN;
- MoeJIb n3dIeIIa (MoI.)
- HomepTex.nacnopTa (cepHbI N)
3Tn daHHbIe Bbl HaIeTe Ha nacnpTHoN Ta6mNKe, pacnoJIOXKeHHoH Ha 3dEJIIN.

- Operating Instructions COOKER AND OVEN
- Contents
- Mode d'emploi
- CUISINIERE ET FOUR
- Sommaire
- Description of the appliance
- Overall view
- DE
- Description of the appliance Control panel
- Positioning
- Fitting the appliance
- Ventilation
- Centring and fastening
- Electrical connections
- Fitting the power supply cable
- Connecting the supply cable to the mains
- Start-up and use
- GB
- Starting the oven
- Cooling ventilation
- Oven light
- Cooking modes
- TRADITIONAL OVEN mode
- TOP OVEN TOP OVEN
- Practical cooking advice
- PIZZA
- Type of hob
- Switching on the glass ceramic hob
- Traditional cooking zones
- Residual heat indicator lights*
- Recommended power levels for various types of cooking:
- Practical advice on using the glass ceramic hob
- General safety
- Disposal
- Respecting and conserving the environment
- Switching the appliance off
- Cleaning the appliance
- Cleaning the oven door
- Inspecting the seals
- Replacing the light bulb
- Assistance
- Communicating:
- EuupoAoynon kaawdiou npoosia
- OxndTeBHaBeHTnlaCn
- OcBeueHne DuxoBoro WkaFa
- PpOrpaMmbI npuroToBJIeHnA
- Поррамma TPAДИЦИОНHAДУХOBKA
- PporpaMa BEPXHn HArPEBATEJb
- Ppaktnueckne COBeTbI no npnroTOBHeHIO
- ΓPUNb
- NIIU4A
- 06uhe npabnla 6e3onacnoctn
- YTNn3aun
- 3KoHOMn 3JekTpo3Heprn n OxpaHa OKpykaUoien Cpebl
- OTKnIOUeHne 3JeKtpoNTaHHa
- UncTkauNdeJnna
- YnctkaDbepzbl
- PpOBepka yNnOThHn
- 3aMeHa JlamNoyKn
- CepBnchoe 6cbnyxmbaHne
- Pn 6paueHn B CHTp CepBnchoro OcbnykBaHna Heo6xOaMo coo6uNTb:
Brand : INDESIT
Model : HIM 20 K.A IX2
Category : Oven