
A3320FT - Oven ETNA - Free user manual and instructions
Find the device manual for free A3320FT ETNA in PDF.
| Product type | Built-in oven |
| Brand | Etna |
| Model | A3320FT |
| Power supply | 230 V ~ 50 Hz |
| Maximum power | See rating plate |
| Cooking type | Static and fan-assisted |
| Cooking functions | Natural convection, fan-assisted heat, grill, fan-assisted grill, defrosting, rotisserie |
| Temperature range | 50 °C to max (static), 50 °C to 200 °C (fan-assisted) |
| Timer | 24-hour clock with automatic programming, cooking duration and end, minute minder |
| Interior lighting | Special high-temperature lamp |
| Supplied accessories | Grid, drip tray, rotisserie spit (depending on model) |
| Cooking levels | 5 levels |
| Removable door | Yes, for cleaning |
| Cleaning | Warm water and soap, do not use abrasives |
| Child safety | Supervision required, hot door |
| Installation | By qualified professional, respect ventilation distances |
| Electrical connection | Earthed socket or omnipolar switch |
Frequently Asked Questions - A3320FT ETNA
User questions about A3320FT ETNA
0 question about this device. Answer the ones you know or ask your own.
Ask a new question about this device
Download the instructions for your Oven in PDF format for free! Find your manual A3320FT - ETNA and take your electronic device back in hand. On this page are published all the documents necessary for the use of your device. A3320FT by ETNA.
USER MANUAL A3320FT ETNA
INSTRUCTIONS FOR USE BUILT-IN OVENS
MODE D'EMPLOI FOURS ENCASTRABLES
FOUR MULTIFONCTION T3305/A3306
Read carefully all the instructions contained in this booklet. It provides you with important information regarding the safe installation, use and maintenance of the appliance as well as useful advice for getting the best out of your oven. Keep this booklet in a safe place for future reference. After removing the packing, check that the appliance is not damaged in any way.
Be careful not to leave the packing materials (plastic sheeting, expanded polystyrene etc.) where children can get at them, as they can be dangerous.
IMPORTANT: do not use the oven door handle to move the appliance, such as to remove it from the packaging.
ENVIRONMENTAL WARNING
Waste packaging

Do not throw the packaging of your appliance into the dustbin, but pick out the different materials (e.g. foil, paperboard, polystyrene) according to the local rules for rubbish elimination.
ATTENTION
The oven is an appliance which, for its nature, becomes hot, especially in correspondence of the glass door. It is therefore a good rule that children do not approach the oven when it is functioning, particularly when the grill in used.
The first time you switch the oven on, acrid smelling smoke may appear. This is caused by the heating of the adhesive used on the insulation panels surrounding the oven. There is nothing unusual about this. If it happens, simply wait until the smoke disappears before putting any food in the oven. Never roast or bake on the oven base.
IMPORTANT
This appliance must be used exclusively for cooking food and not for any other purpose.
Any other use of the appliance (such as heating a room) is improper and therefore dangerous.
The manufacturer will not accept responsibility for any damage caused by the improper and unreasonable use of the appliance.
There are certain basic rules which must be observed when using any electrical appliance, i.e.:
- disconnect the appliance from the electric mains supply before carrying out any cleaning or maintenance operation.
- never try to remove a plug from the mains supply socket by pulling on the cable
- never touch an appliance if your hands or feet are wet or damp
- never operate an appliance if you are barefoot
- never allow children or incompetent people to use the appliance unsupervised.
- in case of negligent use near the oven door hinges, you could hurt your hands
- if the appliance breaks down and/or does not work properly, switch off and do not tamper with it.
All repairs should be carried out only by an approved service agent. You should insist that only original spare parts are used.
Failure to follow the above advice can affect the safety of your appliance.
SPECIFICATION
The oens are designed to operate with a monophase alternating current of 230V 50Hz. Anyway, before the installation of the appliance, we suggest you to check always these specifications on the rating label applied on the outside rear part.

The parts of this appliance that may come into contact with foodstuffs comply with the provisions of EEC Directive 89/109. Moreover this appliance complies with european directives 89/336/CEE, 73/23/CEE and following changes.
INSTALLING THE APPLIANCE
Installation should be carried out according to the instructions by a professionally qualified person.
The manufacturer declines all responsibility for any damage to persons, animals or things due to a wrong installation.
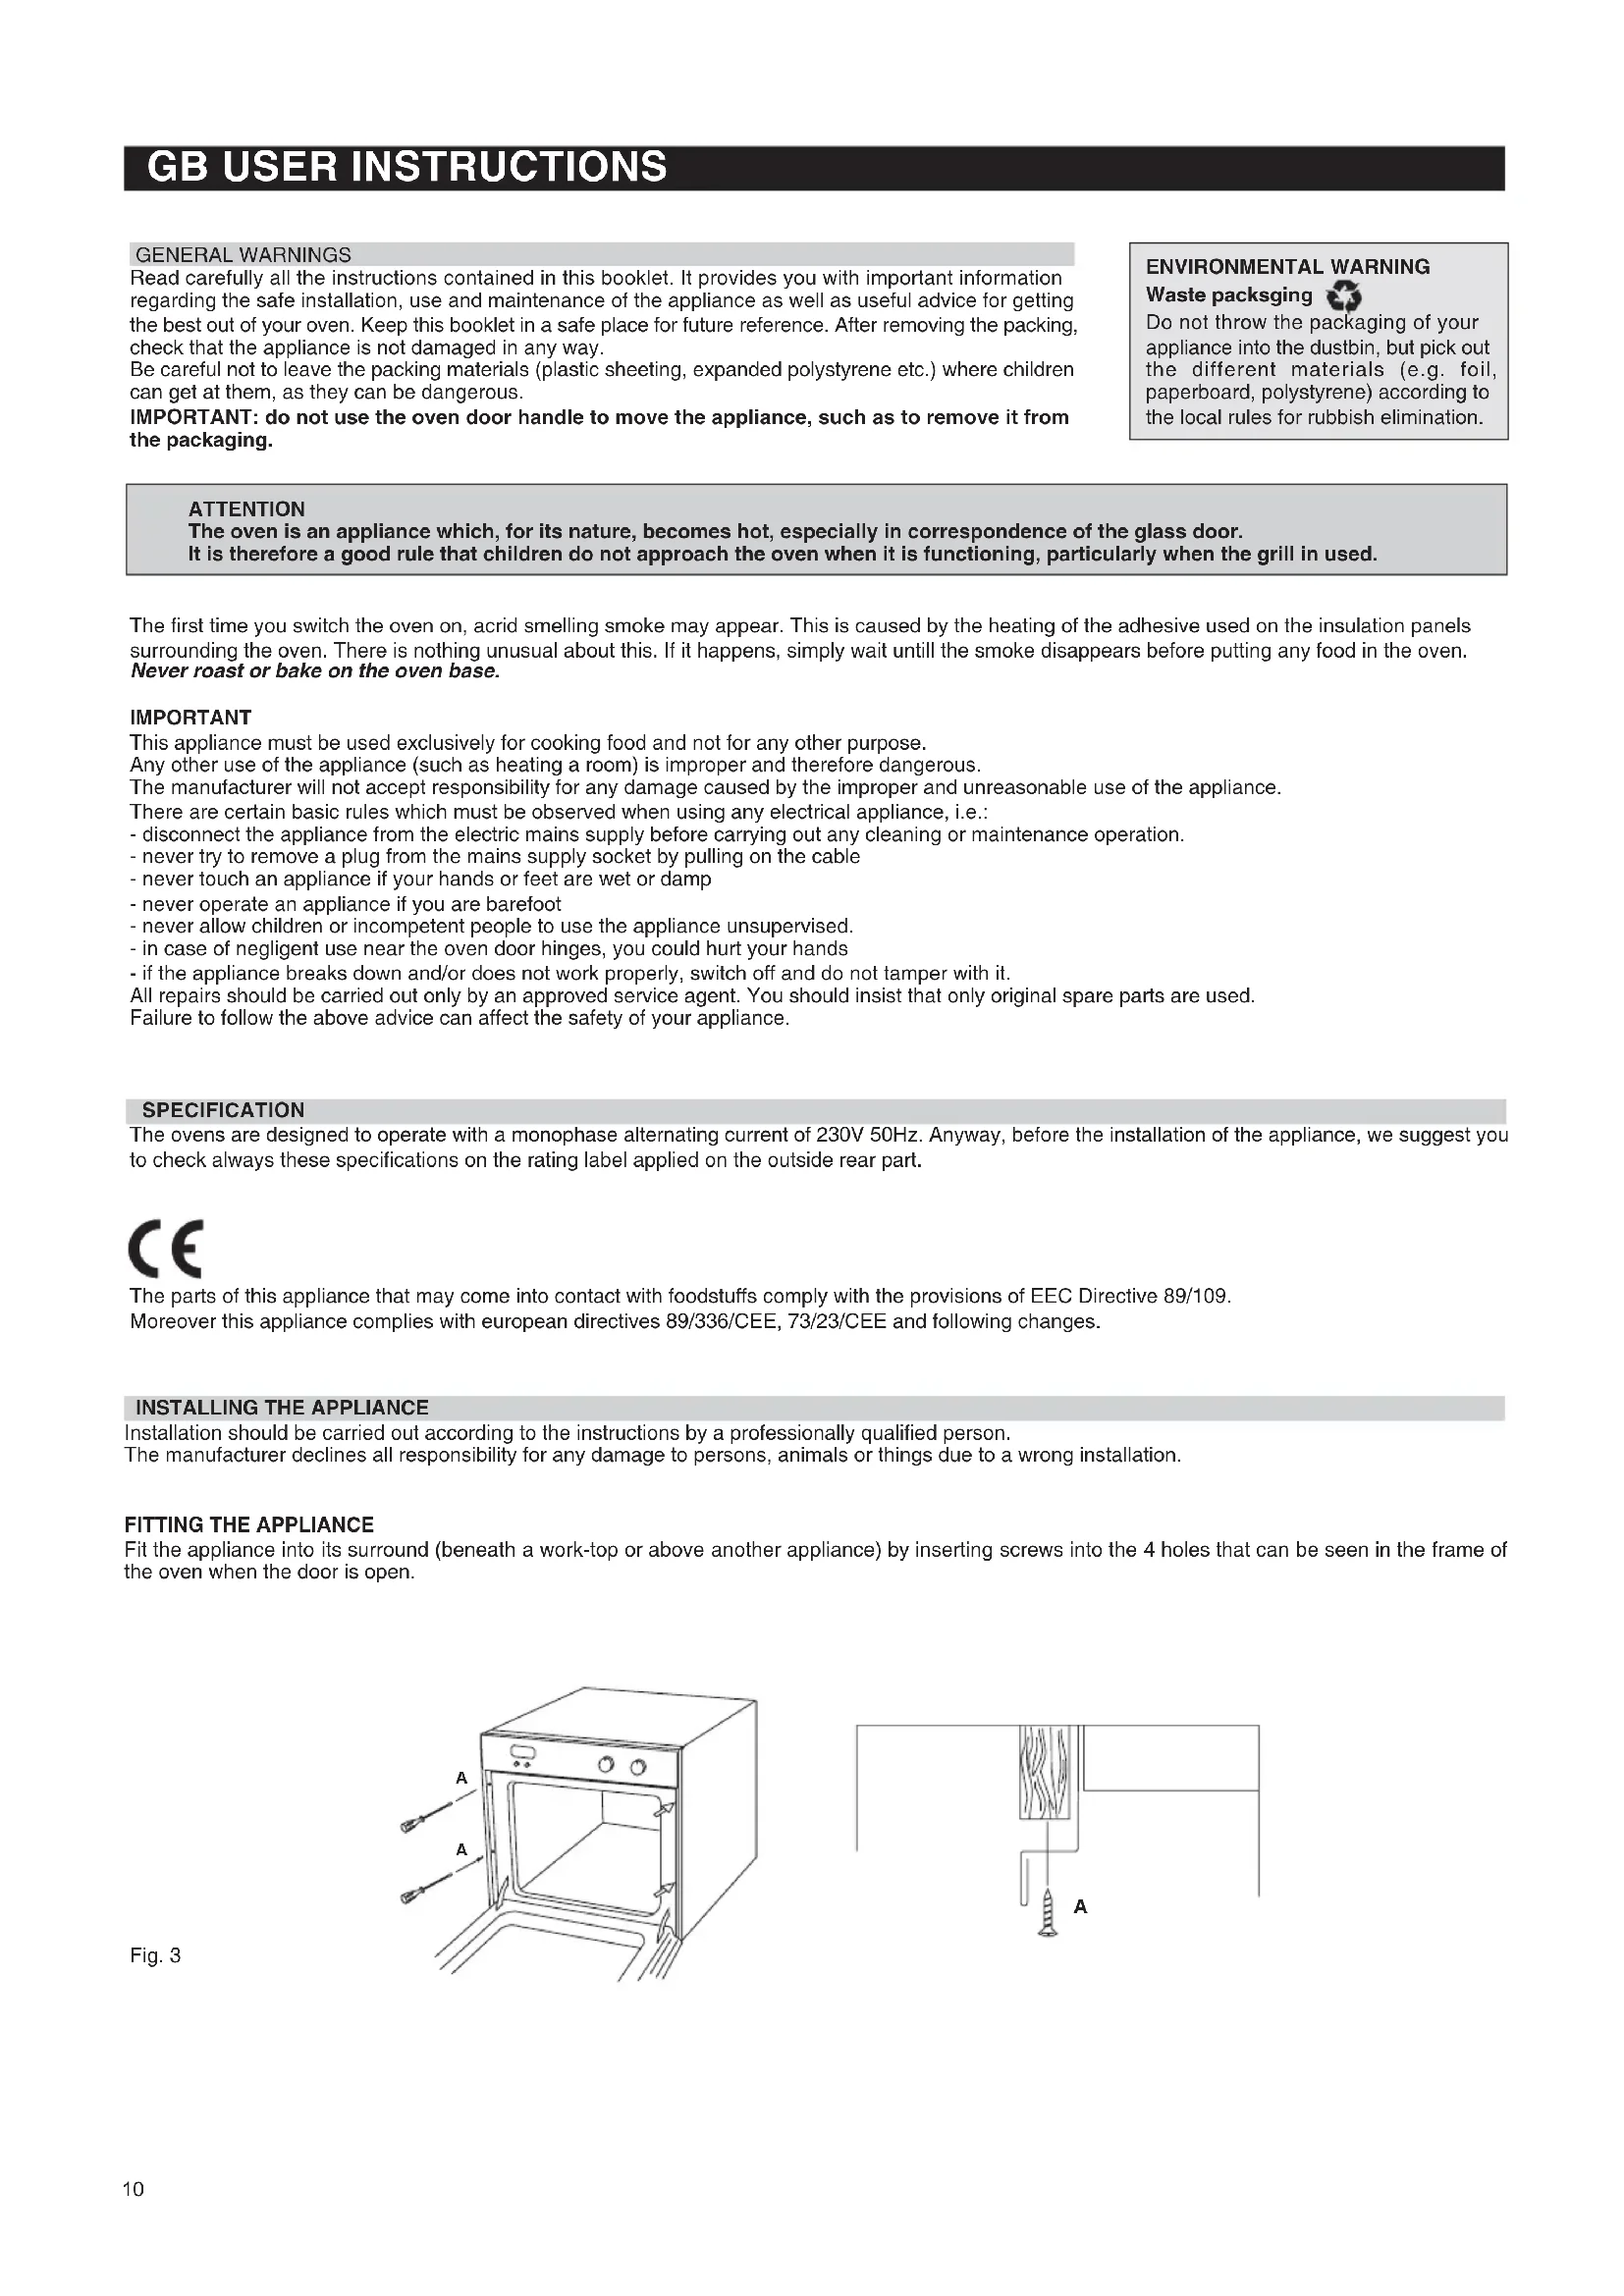
FITTING THE APPLIANCE
Fit the appliance into its surround (beneath a work-top or above another appliance) by inserting screws into the 4 holes that can be seen in the frame of the oven when the door is open.
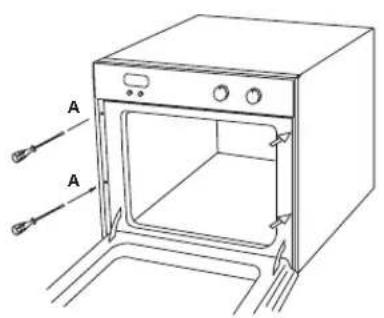
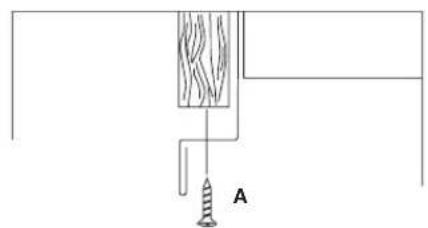
Fig. 3
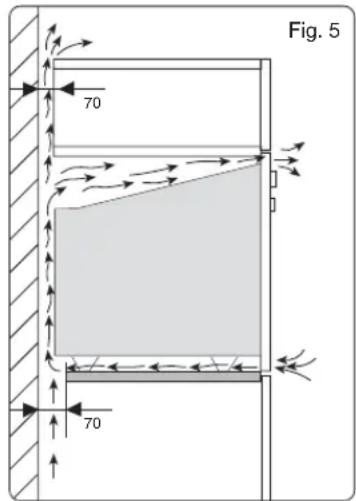
For the most efficient air circulation, the oven should be fitted according to the dimensions shown in fig.1-2 of page 2.
The rear panel of the cabinet must be removed so that air can circulate freely. The panel to which the oven is fitted should have a gap of at least 70mm at the rear.
NB: where ovens are to be matched with hobs, it is essential to follow the instructions contained in the booklet supplied with the other appliance.
IMPORTANT
For a built-in oven to work well the cabinet must be of the right type.
The panels of the adjoining furniture should be heat resistant. Particularly when the adjoining furniture is made of veneered wood, the adhesives should
be able to withstand a temperature of 120^ . Plastic materials or adhesive which cannot withstand this temperature will become deformed or unstuck.
To comply with safety regulations, once the appliance has been fitted it should not be possible to make contact with the electrical parts.
All parts which offer protection should be fixed in such a way that they cannot be removed without the use of a tool.
CONNECTION TO THE MAINS SUPPLY
THE APPLIANCE MUST BE CONNECTED IN ACCORDANCE WITH THE RULES CURRENTLY IN FORCE, AND ONLY BY AN AUTHORIZED ELECTRICAL INSTALLER.
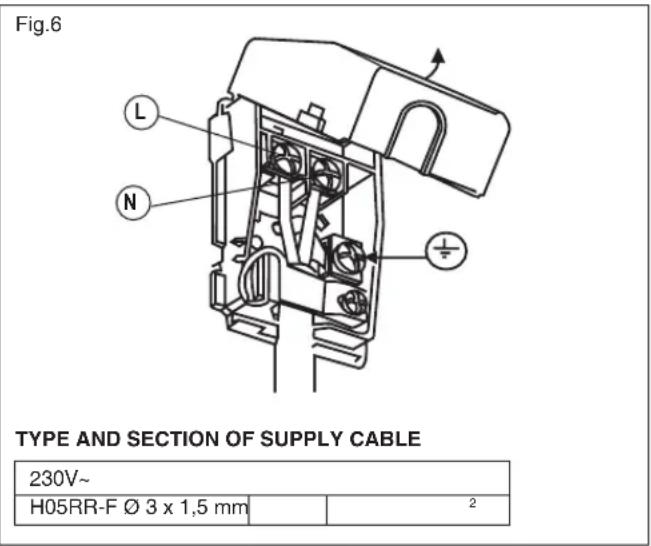
WARNING:THIS APPLIANCE MUST BE EARTHED
Check that the power rating of the mains supply and of the sockets are suitable for the maximum power of the appliance as indicated on the specification plate. Fit the plug into a socket fitted with a third contact which corresponds with the earth connection. This should be properly connected. If the appliance does not come already fitted with a plug, fit a regulation plug to the cable which is capable of taking the power indicated on the specification plate.
The earth wire is yellow/green. If the plug fitted to the appliance, and the socket, are incompatible, get a professionally qualified person to fit the correct type of plug. The same person should have also make sure that the thickness of the cable is suitable for the power absorbed by the appliance. Mains connection can also be made by fitting a monophase switch with a minimum gap between the contacts of 3mm , proportionate to the load and complying with the regulations in force.
The yellow/green earth wire should not be controlled by the switch.
The plug or monophase switch used for mains supply connection should be easy to get at, once the appliance is in position.
Important: position the mains supply cable so that it is never subjected to a temperature which is more than 50^ above ambient temperature.
The electrical safety of the appliance can only be guaranteed when it has been correctly connected to an efficient earthed power supply, as laid down in the regulations for electrical safety.
Important: the manufacturer cannot be held responsible for any damage to persons or objects due to the lack of an earth connection.
OVEN MAINTENANCE
ALWAYS UNPLUG THE PLUG FROM THE CURRENT SOCKET OR SWITCH OFF THE CURRENT ON THE POWER SUPPLY LINE BY MEANS OF THE MAINS CIRCUIT SWITCH, BEFORE CARRYING OUT ANY MAINTENANCE ON THE OVEN.
| SELECTOR | THERMOSTAT | N.B.: All functions will start after selecting the oven temperature with the thermostat knob. The oven is fitted with: • a lower heating element; • an upper heating element, which according to the cooking mode can be used for grilling or baking. |
| ● | Position O | |
| ○ | 50÷MAX | When you turn the control knob to position the light will be on for all the following operations. Natural convection Both the lower and upper heating elements operate together. This is the traditional cooking, very good for roasting joints, ideal for biscuits, baked apples and crisping food. You obtain very good results when cooking on a shelf adjusting the temperature between 50 and MAX°C. |
| ○ | 50÷MAX | Lower heating element This function is particularly indicated for cooking from the bottom, warming up food or sterilizing glass jars. It is also indicated for food requiring long and slow cookings, i.e. casserole. This function can be used between 50 and MAX°C. |
| ○ | 50÷MAX | Upper heating element It is indicated for warming up pre-cooked food when placing the grid on the second shelf from the top, or for defrosting pastry placing the grid on the first shelf from the bottom. This function can be used between 50 and MAX°C. |
| ○ | 50÷200 | Total grill heating element or (turnpit motor according to the models, see Fig.11). It is indicated for cooking on the spit, grilling and gratinating. |
MULTIFUNCTIONAL OVEN T3305/A3306
| SELECTOR KNOB THERMOSTAT | C max 50 200 150 a 100 | N.B.: All functions will start after selecting the oven temperature with the thermostat knob. The oven is fitted with: • a lower heating element; • an upper heating element, which according to the cooking mode can be used for grilling or baking. • a fan. |
| ● | Position O When you turn the control knob to position the light will be on for all the following operations. ○ Lower heating element This function is particularly indicated for cooking from the bottom, warming up food or sterilizing glass jars. It is also indicated for food requiring long and slow cookings, i.e. casserole. This function can be used between 50 and MAX°C. | |
| ○ | 50 ÷ MAX | |
| ○ | 50 ÷ 200 | Bottom and top elements plus fan With this setting the top and bottom elements and the fan work at the same time. This setting is used for baking several tarts or cakes on one shelf and for baking biscuits or small cakes on several different shelves. |
| ○ | 50 ÷ 200 | Lower heating element + fan The air which is heated by the lower heating element is circulated by the fan and so helps to distribute the heat between 50 and 200°C. This function can be used for sterilizing glass jars. Top heating element + fan |
| ○ | 50 ÷ 200 | The air which is heated by the top heating element is circulated by the fan and so helps to distribute the heat between 50 and 200°C. |
| ○ | 50 ÷ 200 | Grill It is indicated for grilling and gratinated tradition food. |
MULTIFUNCTIONAL OVEN A 3311/A3320
| SELECTOR KNOB THERMOSTAT | C max 50 200 150 100 | N.B.: All functions will start after selecting the oven temperature with the thermostat knob. The oven is fitted with: • a lower heating element; • an upper heating element, which according to the cooking mode can be used for grilling or baking. • a fan. • a circular heating element, which surrounds the fan. |
| ● | Position O | |
| ● | When you turn the control knob to position the light will be on for all the following operations. | |
| ○ | 50 ÷ MAX | Upper heating element It is indicated for warming up pre-cooked food when placing the grid on the second shelf from the top, or for defrosting pastry placing the grid on the first shelf from the bottom. This function can be used between 50 and MAX°C. |
| ○ | 50 ÷ MAX | Lower heating element This function is particularly indicated for cooking from the bottom, warming up food or sterilizing glass jars. It is also indicated for food requiring long and slow cookings, i.e. casserole. This function can be used between 50 and MAX°C. |
| ○ | 50 ÷ MAX | Natural convection Both the lower and upper heating elements operate together. This is the traditional cooking, very good for roasting joints, ideal for biscuits, baked apples and crisping food. You obtain very good results when cooking on a shelf adjusting the temperature between 50 and MAX°C. |
| ○ | 50 ÷ 200 | Bottom and top elements plus fan With this setting the top and bottom elements and the fan work at the same time. This setting is used for baking several tarts or cakes on one shelf and for baking biscuits or small cakes on several different shelves. |
| ○ | 50 ÷ MAX | Fan oven Both the fan and the circular heating element operate together. The hot air adjustable between 50 and MAX°C is evenly distributed inside the oven. This is ideal for cooking several types of food (meat, fish) at the same time without affecting taste and smell. It is indicated for delicate pastries. |
| ○ | 50 ÷ 200 | Lower heating element + fan The air which is heated by the lower heating element is circulated by the fan and so helps to distribute the heat between 50 and 200°C. This function can be used for sterilizing glass jars. |
| ○ | 50 ÷ 200 | Fan assisted total grill The air which is heated by the grill heating element is circulated by the fan and so helps to distribute the heat between 50 and 200°C. The fan assisted grill replaces perfectly the turnspit. You can obtain very good results also with large quantities of poultry, sausage, red meat. |
| ○ | 50 ÷ 200 | Total grill heating element or (tumpit motor according to the models, see Fig.11). It is indicated for cooking on the spit, grilling and gratinating. |
Using the turnspit
In the "CONVECTIONAL OVEN" models, the turnspit can be used in combination with the grill. After fitting the food on to the spit S, block it with the two forks F. Then proceed as follows:
- Position the spit support as shown in fig.(11)
- Fit the end of the spit into the motor M at the back of the oven (fig.11).
- Fit the support into the circular groove in the spit T.
- Unscrew and remove handle A.
- Place the oven tray with a little water on the lowest shelf of the oven.
- Turn the knob to position to start up the motor.
- Close the oven door.
- When the cooking time is up, screw the handle on the spit and remove everything from the oven. If necessary, use an oven glove to avoid any burn.
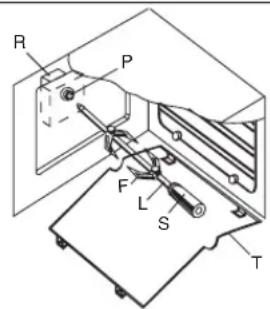
Fig. 11
USEFUL NOTES FOR COOKING
In the following table, some indicative hints for cooking:
| FAULTS CAUSES REMEDIES | ||
| The upper crust is dark and the Not enough lower part too pale - Use deeper cake tins | heat from the bottom - Use the natural convection position - Lower the temperature - Put the cake on a lower shelf | |
| The lower part is dark and the Excessive heat from the bottom - Use the natural convection position upper crust too pale - Use lower side tins | - Lower the temperature - Put the cake on a higher shelf | |
| The outside is too cooked and the Too high inside not cooked enough - the cooking time | temperature - Lower the temperature and increase | |
| The outside is too dry even though Too low of the right colour | temperature - Increase the temperature and reduce the cooking time | |
- Natural convection
Preheat the oven for 10-15 minutes. Grease the meat with a little oil, put it on the drip-tray and place everything quickly into the oven.
-Grilling
Preheat the grill for about 5 minutes (till the heating element becomes red).
Prepare natural or aromatized meat and place it on the grill pan. Place on the shelf near the top. Place the drip-tray with a little water underneath for collecting the cooking juices.
The grill can be used to gratinate and brown after normal cooking.
COOKING WITH FAN
- Defrosting
To defrost food, place it still wrapped up in its aluminium or polythene sheet protection on a dish.
Place everything on the grid in the oven centre.
The door must be closed.
-Fan oven
It is not necessary to preheat the oven, except for very short cooking times or food with considerable quantity of liquid (e.g. fruit tartes) to avoid condensation. In case of batch cooking, you can introduce food with approximately equal cooking temperatures (even if the length of time differs) on two or more shelves without mixing tastes and flavours.
It is possible to put food into the oven or to take it out of it without heat losses caused by the door opening. Heat will be quickly recovered by means of the fan.
Cooking temperatures are lower than those of the convectional oven (from 20 to 30^ for pastries and from 30 to 40^ for meats) whereas times are longer (50^ - 10 minutes).
-Fan assisted grill
It does not need preheating. Cooking must be operated with the door closed. The distance between grill and food should be proportionate to the required results:
-
nearer for undone meat brown on its surface
-
far from it for food perfectly baked inside.
The drip-tray with a little water for collecting meat juices has to be placed on the first shelf underneath.
MISCELLANEOUS
Marinated meat and boneless meat cook quicker than other sorts; cooking progress can be checked by pressing the meat with a fork; if it does not yield, it is properly cooked.
Before slicing the meat wait at least 15 minutes, to allow the juice to settle.
If the meat is larded or covered by bacon, it should not be cooked at too high temperatures to avoid splattering.
Pastry cakes should be cooked blind for 2/3 of the cooking time before being filled. The remaining cooking time depends on the garnishing (fruit, jam).
Beaten doughs should not be too much fluid, as this could only extend cooking times.
Do not place pans directly on to the oven base as the heat which comes from below cannot escape. This may cause breakage or cracking of the enamelling.
INDICATIVE TIMINGS AND TEMPERATURES FOR COOKING WITH CONVECTIONAL OVEN
| Q.ty Dish | Oven temperatures Shelf position Cooking time | in °C from the bottom in minutes | ||
| PASTRY: | ||||
| Soft dough: Cake 175 1st shelf 40-50 | ||||
| Sponge cake 170 1st shelf 30 | ||||
| Short bread: Fruit tart | 180-190 | 1st shelf | 20-30 | |
| Leaven dough: Paradise cake | 160 | 1st shelf | 40-45 | |
| Margareth cake | 160 1st shelf | 40-45 | ||
| Chocolate cake | 160 1st shelf | 25-35 | ||
| Albumes sweet: Meringue | 100 1st shelf | 90 | ||
| Puff pastry: «Vol au vent» | 200 | 1st shelf | 20 | |
| Puff pastry | 200 1st shelf | 20 | ||
| MEAT | ||||
| 11/2kg. | Roast beef | 190 1st shelf | 90 | |
| 1kg. | Roast veal | 150-160 | 1st shelf | 120-150 |
| 2kg. | Veal stew | 170-190 | 1st shelf | 60-90 |
| 11/2kg. | Roast lamb | 150-160 | 1st shelf | 60-75 |
| 11/2kg. | Roast kid | 150-160 | 1st shelf 50-60 | |
| 11/2kg. | Leg of roe-buck | 200 1st shelf | 90 | |
| 11/2kg. | Leg of wild boar | 190 1st shelf | 120 | |
| POULTRY: | ||||
| Roast pigeon | 150-160 | 1st shelf 45 | ||
| 2kg. | Turkey | 150 1st shelf | 180-240 | |
| 4kg. | Goose | 160 1st shelf | 240-270 | |
| 21/2kg. | Duck | 175 1st shelf | 90-150 | |
| 11/2kg. | Chicken | 170 1st shelf | 60-80 | |
| 21/2kg. | Capon | 170 1st shelf | 120-150 | |
| FISH: | ||||
| Trout 200 1st shelf 15-25 | ||||
| 1kg. | Cod-fish | 190 1st shelf | 50 | |
| VARIOUS: | ||||
| Lasagne 200 1st shelf 40 | ||||
| Souffés | 180-200 | 1st shelf 20 | ||
| Cream puff (beignets) | 200 1st shelf | 20 | ||
| Pizza | 200 1st shelf | 20 |
INDICATIVE TIMINGS AND TEMPERATURES FOR COOKING WITH FAN OVEN
| Q.ty Dish | Oven temperature Shelf position from Cooking time | in °C the bottom in minutes | ||
| PASTRY: | ||||
| Soft doughs: Cake 175 2nd shelf 45 | ||||
| Sponge cake 170 2nd shelf 35 | ||||
| Tart 170 2nd shelf 40 | ||||
| Short bread: Apple pie 200 2nd shelf 35 | ||||
| Tart 200 3rd shelf 30 | ||||
| Leaven doughs: Cake 170 2nd shelf 35 | ||||
| Ring-shaped cake 170 2nd shelf 40 | ||||
| Biscuits 180 2nd shelf 25 | ||||
| Albumes sweet: Meringue 110 1st and 2nd shelf 35 | ||||
| Puff pastry: Small “vol au vent” 200 2nd shelf 20 | ||||
| MEAT | ||||
| Pork: | ||||
| 1 kg. | Roast 220 2nd shelf 90 | |||
| 1 kg. | Cutlet 200 1st shelf 60 | |||
| 1 kg. | Filet 200 1st shelf 60 | |||
| 1 1/2 kg. | Leg 200 1st shelf 90 | |||
| 1 kg. | Meat-roll 180 2nd shelf 85 | |||
| 1 1/2 kg. | Sausage 170 1st shelf 45 | |||
| Beef: | ||||
| 1 kg. | Spit 220 1st shelf 95 | |||
| 1 kg. | Filet 220 1st shelf 75 | |||
| 1 kg. | Roast beef 240 2nd shelf 45 | |||
| 1 kg. | Roast potatoes 230 1st shelf 45 | |||
| Veal: | ||||
| 1 kg. | Leg 200 1st shelf 95 | |||
| 1 kg. | Roast 180 2nd shelf 90 | |||
| 2 kg. | Hock 180 1st shelf 100 | |||
| 1 kg. | Breast 180 1st shelf 60 | |||
| Lamb: | ||||
| 1 kg. | Leg 200 2nd shelf 95 | |||
| 1 kg. | Shoulder 175 1st shelf 70 | |||
| Mutton: | ||||
| 1 kg. | Shoulder 180 1st shelf 85 | |||
| 1 1/2 kg. | Leg 200 1st shelf 90 | |||
| 1 1/2 kg. | Breast 180 1st shelf 70 | |||
| Game: | ||||
| 1 kg. | Roast pheasant 200 1st shelf 70 | |||
| 2 kg. | Roast hare 175 1st shelf 75 | |||
| Rabbit 175 1st shelf 75 | ||||
| Poultry: | ||||
| 1 1/2 kg. | Turkey 180 2nd shelf 70 | |||
| 1 kg. | Guinea-fowl 180 2nd shelf 65 | |||
| 2 kg. | Duck 180 1st shelf 90 | |||
| 1 kg. | Chicken 175 2nd shelf 75 | |||
| 1 kg. | Devil chicken 200 1st shelf 75 | |||
| FISH: | ||||
| 1 1/2 kg. | Dentex 180 1st shelf 45 | |||
| 1 kg. | Gratinated sole 200 1st shelf 25 | |||
| VARIOUS: | ||||
| Lasagne 200 2nd shelf 40 | ||||
| Cannelloni 200 2nd shelf 40 | ||||
| Pizza 200 1 e 2nd shelf 45 | ||||
| Maraschino pudding 175 1st shelf 45 | ||||
| Cream puff 175 2nd shelf 20 | ||||
| Soufflés 175 1st shelf 35 | ||||
| Baked apples 180 1st shelf 60 |
For a manual operation of the programmer, turn the knob anticlockwise to . Adjust the cooking time by turning the knob clockwise. Select the cooking time with the relevant knob (max.120 min.). The oven will switch off automatically when the cooking is up.
"LED" PROGRAMMER
Features
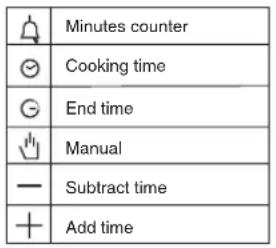
24 hours clock with automatic programme and minutes counter.
Functions
Cooking time, cooking end time, manual position, clock, minutes counter, times to be set up to 23 hours 59 minutes.
Display
4-figures, 7-segments display for cooking times and time of day.
Cooking time and manual function = saucepan symbol
Automatic function = AUTO
Minutes counter = bell symbol
The symbols light up when the corresponding functions are selected.
Setting
To set, press and release the desired function, and within 5 seconds set the time with + and - buttons.
Tasto + e -
+and - buttons
The + and - buttons increase or decrease the time at a speed depending on how long the button is pressed.

Setting the time
Press any two buttons (cooking time, end time, minutes counter) at the same time, and + or - button to set the desired time. This deletes any previously set programme. The contacts are switched off and the AUTO symbol flashes.
Manual use
By pressing the manual button the relay contacts switch on, the AUTO symbol switches off and the saucepan symbol lights up.
Manual operation can only be enabled after the automatic programme is over or it has been cancelled.
Automatic use
Press the cooking time or end time button to switch automatically from the manual to the automatic function.
Semi-automatic use with cooking time setting
Press the cooking time button and set the desired time with + or-. The AUTO and cooking time symbols light up continuously. The relay switches on immediately. When the cooking end time corresponds to the time of day, the relay and cooking time symbol switch off, the sound signal rings and the AUTO symbol flashes.
Semi-automatic use with end time setting
Press the end time button. The time of day appears on the display. Set the cooking end time with ^+ button. The AUTO and cooking time symbols light up continuously. The relay contacts switch on. When the cooking end time corresponds to the time of day, the relay and the cooking time symbol switch off. When the cooking time is up, the AUTO symbol flashes, the sound signal rings and both the relay and the cooking time button switch off.
Automatic use with cooking time and end time setting
Press the cooking time button and select the length of the cooking time with + or - button. The AUTO and cooking time symbols light up continuously. The relay switches on. By pressing the cooking end time button the next cooking end time appears on the display. Set the cooking end time with ^+ button. The relay and the cooking time symbol switch off. The symbol lights up again when the time of day corresponds to the cooking start time. When the cooking time is up, the AUTO symbol flashes, the sound signal rings, the cooking time symbol and the relay switch off.
Minutes counter
Press the minutes counter button and set the cooking time with + or - button.
The bell symbol lights up when the minutes counter is operating. When the set time is up, the sound signal rings and the bell symbol switches off.
Sound signal
The sound signal starts at the end of a programme or of the minutes counter function and it lasts for 15 minutes.
To stop it, push any one of the functions buttons.
Start programme and check
The programme starts 4 seconds after it has been set. The programme can be checked at any time by pressing the corresponding button.
Setting error
A setting error is made if the time of day on the clock falls within the cooking start and end times. To correct the setting error, change the cooking time or cooking end time. The relays switch off when a setting error is made.
Cancelling a setting
To cancel a setting, press the cooking time button and then press the - button until 00 00 appears on the display. A set programme will automatically cancel on completion.
Baking tins and utensils
Only heat-resistant cooking utensils able to withstand a temperature of at least 300^ may be used in the oven: metal baking tins, aluminium foil, ovenproof glass, ceramic, glass ceramic and ovenproof earthenware.
The type of utensil used can have an effect on the end result; for instance, cakes and pastries brown better and more quickly in dark-coloured baking tins than in light-coloured tins.
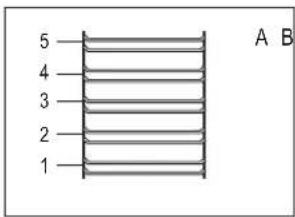
Shelf heights
The various shelf heights are shown in Figure A. The first slot is the lowest shelf height and the fifth slot the highest.
Oven accessories
Depending on the model, your oven can be supplied with the following accessories:
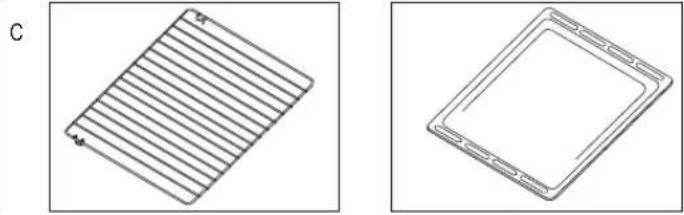
Shelf (fig.B)
Cakes and dishes coked in a baking tin or casserole are placed on this shelf for cooking. Food such as meat for grilling can also be laid directly on this shelf.
Baking tray (fig. C)
This is used for baking biscuits, profiteroles, pizzas and all other sorts of food which are not placed in a baking tin for cooking. To ensure good heat distribution the baking tray must be placed in the oven with the long side toward the back.
CLEANING AND MAINTENANCE
Wait until the appliance has cooled down before attempting to clean it.
Disconnect it from the power supply, either by pulling the plug out or switching off the power supply at the mains. Clean enamelled, chromed or painted parts with warm water and soap, or non-corrosive liquid detergent.
Clean stainless steel parts using methylated spirit of a suitable commercially produced solution.
Clean aluminium panels or edges with cotton wool or with a cloth soaked in vaseline or a seed-based oil. Clean and then go over it with methylated spirit. Never use abrasives, corrosive detergents, bleaches or acids for cleaning the oven.
Do not leave corrosive or acidic substances (lemon juice, vinegar, etc.) on enamelled, painted or stainless steel parts.
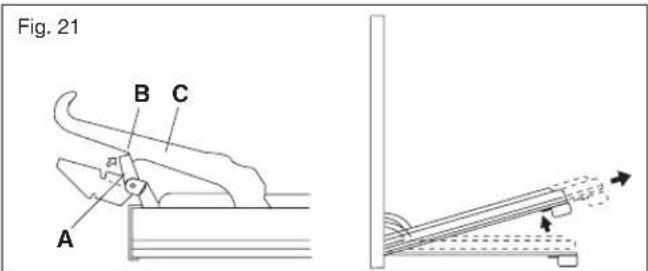
Removal of oven door (Fig.21)
To make cleaning easier, remove the oven door as follows: insert hook A (fig.21) in hinge slot B. Half open the door and, using both hands, pull the door towards you until it becomes unhooked. To refit the door, carry out the same operation in reverse, taking care to introduce the two sectors C correctly.
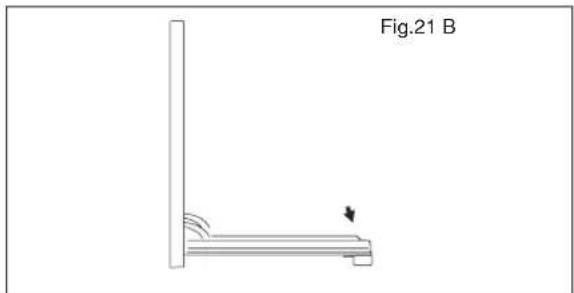
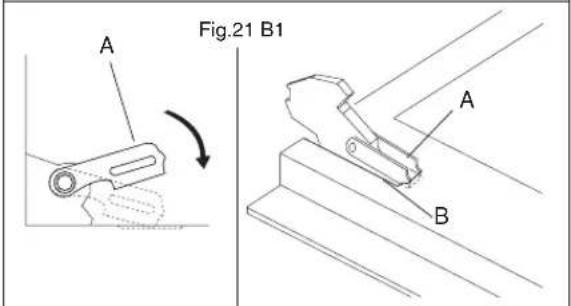
Removal of oven door ( fixed fulcrum Fig.21 B/B1)
In-depth cleaning of the oven becomes more convenient if the door is removed following the instructions below:
Completely open the door and press it down gently (fig. 21 B) to allow the hooks "A" of the hinge to locate inside the cavity "B" (fig. 21 B1). Using both hands, pull the door towards you until it comes off the oven.
To replace the door, reverse the above procedure.
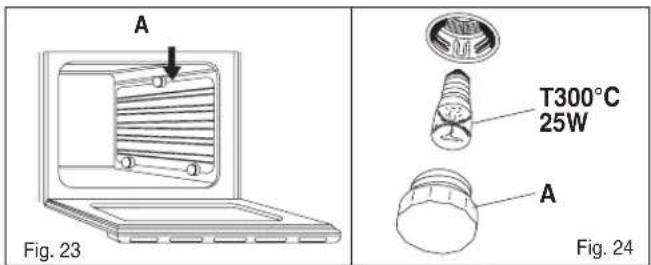
Panels (fig.23)
The shelves holder frame is hooked on to three catches. Simply press the catches down slightly to remove the frame.
Oven light (fig.24)
The oven bulb is a special kind which is resistant to high temperatures. Replace it in the following way: disconnect the oven from the power supply, either by pulling the plug out or by switching off the power supply at the mains; remove the protective glass (A) and replace the burnt out bulb with one of the same type. Replace the protective glass.
Important: if you decide not to use the oven any more, it should be made inoperable by cutting the power supply cable, after unplugging it from the power supply. Disused appliances can be a safety risk as children often play with them. For this reason it is advisable to make the oven safe.
NL GEBRUIKSAANWYZING INBOUWOVEN
ALGEMENE WAARSCHUWINGEN
WAARSCHUWING MET BETREKKING TOT HET MILIEU
Verpakkingsafval

HET APPARAAT MONTEREN
WAARSCHUWING: DIT APPARAAT DIENT GEAARD TE ZIJN
MEHRFACHFUNTIONER BACKOFEN T3305/A3306