
L841 - Washing machine EDESA - Free user manual and instructions
Find the device manual for free L841 EDESA in PDF.
| Brand | Edesa |
| Model | L841 |
| Appliance type | Washing machine (washer) |
| Maximum washing capacity | 5 kg |
| Maximum drying capacity | 2.5 kg for resistant fabrics, 1.5 kg for delicate fabrics |
| Washing programs | Normal (cotton, linen), Delicate (synthetics, wool, silk), Special wool program |
| Washing temperatures | From cold to 90°C |
| Additional functions | Spin removal, Spin selection, Anti-crease |
| Spin type | Adjustable (variable speed) with anti-vibration safety |
| Integrated drying | Yes, by condensation (closed circuit with water cooling) |
| Power supply | 230 V / 50 Hz |
| Dimensions (W x D x H) | 60 x 55 x 85 cm (estimated) |
| Approximate weight | 65 kg |
| Detergent drawer | 3 or 4 compartments (prewash, wash, liquid additives, bleach) |
| Door safety | Automatic locking during cycle, unlocking after about 2 minutes |
| Transport safety | Internal fixing screws to remove before first use |
| Maintenance and cleaning | Regular cleaning of pump filter, cleaning of detergent drawer, occasional descaling cycle |
| Spare parts and repairability | Edesa after-sales service, no user-replaceable parts |
| General information | User and installation manual provided, 88 pages |
Frequently Asked Questions - L841 EDESA
User questions about L841 EDESA
0 question about this device. Answer the ones you know or ask your own.
Ask a new question about this device
Download the instructions for your Washing machine in PDF format for free! Find your manual L841 - EDESA and take your electronic device back in hand. On this page are published all the documents necessary for the use of your device. L841 by EDESA.
USER MANUAL L841 EDESA
MANUAL DE INSTRUCCIONES DE USO Y MANTENIMIENTO
MANUALE DI ISTRUZIONI PER L'USO E LA MANUTENZIONE
NOTICE D'INSTRUCTIONS D'UTILIZATION ET D'ENTRETIEN
MANUAL DE INSTRUÇões DE USO E MANUTENÇão
INSTRUCTION AND MAINTENANCE BOOKLET
BEDIENUNGSANLEITUNG FÜR GEBRAUCH UND INSTANDHALTUNG
Tessuti in lana Carico massimo consigliabile: 1,0 Kg.
Instruction and maintenance booklet
ENGLISH
List of contents
The manufacturer thinks of you 61
Familiarise yourself with your washing machine 61
Some words of warning 61
61
Technical specifications table 61
Transportation safety features 61
A description of the washing machine 61
Control panel 61
Using the selection controls 61
Programme selection control. 61
Temperature selection control. 61
Drying time selection control 62
Using the control buttons 62
Stop/Start button 62
Buttons for additional functions 62
Starting. 63
Loading garments into the drum 63
Putting in the washing powder and additives 64
Selecting the washing programme 65
Table of programmes 65
Programme guide 66/67
Cleaning out your washing machine before using it 68
Cleaning and special care 68
Practical tips for a better wash 68
General tips 70
Troubleshooting guide 71
Drying instructions 71
The manufacturer thinks of you
Because there is nothing more important for the manufacturer than you, and as we are always striving to offer you the best possible service, we have come up with this Instruction hand book to make you more familiar with your washing machine. READ IT CAREFULLY, for it will enable you to get the most out of your washing machine and the functions which it has been designed to carry out, in addition to preventing any possible problems and malfunctions which could arise out of not having read this.
Familiarise yourself with your washing machine
The first thing that you should do is to learn everything about your washing machine. On the inside of the cover of this instruction hand book you will find illustrations. We would advise you to pay attention to them. They will undoubtedly help you to understand the commentary and to get a clear picture of all of the elements which make up your machine.
Some words of warning
Installing
The machine must be installed by a QUALIFIED TECHNICIAN in accordance with current safety specifications. In the owner's manual you will find all relevant specific instructions for the installation process.
Technical specifications table
You will find a Technical specifications table stuck to your washing machine. It shows all relevant technical details and serial numbers of the machine. THIS TABLE SHOULD BE STUDIED BEFORE ANY ELECTRICAL CONNECTIONS ARE MADE.
Transportation safety features
Before you attempt to use your washing machine it is absolutely imperative that you should remove the interior fastening
screws which are for fastening during the shipping. The installation manual will tell you how to do this.
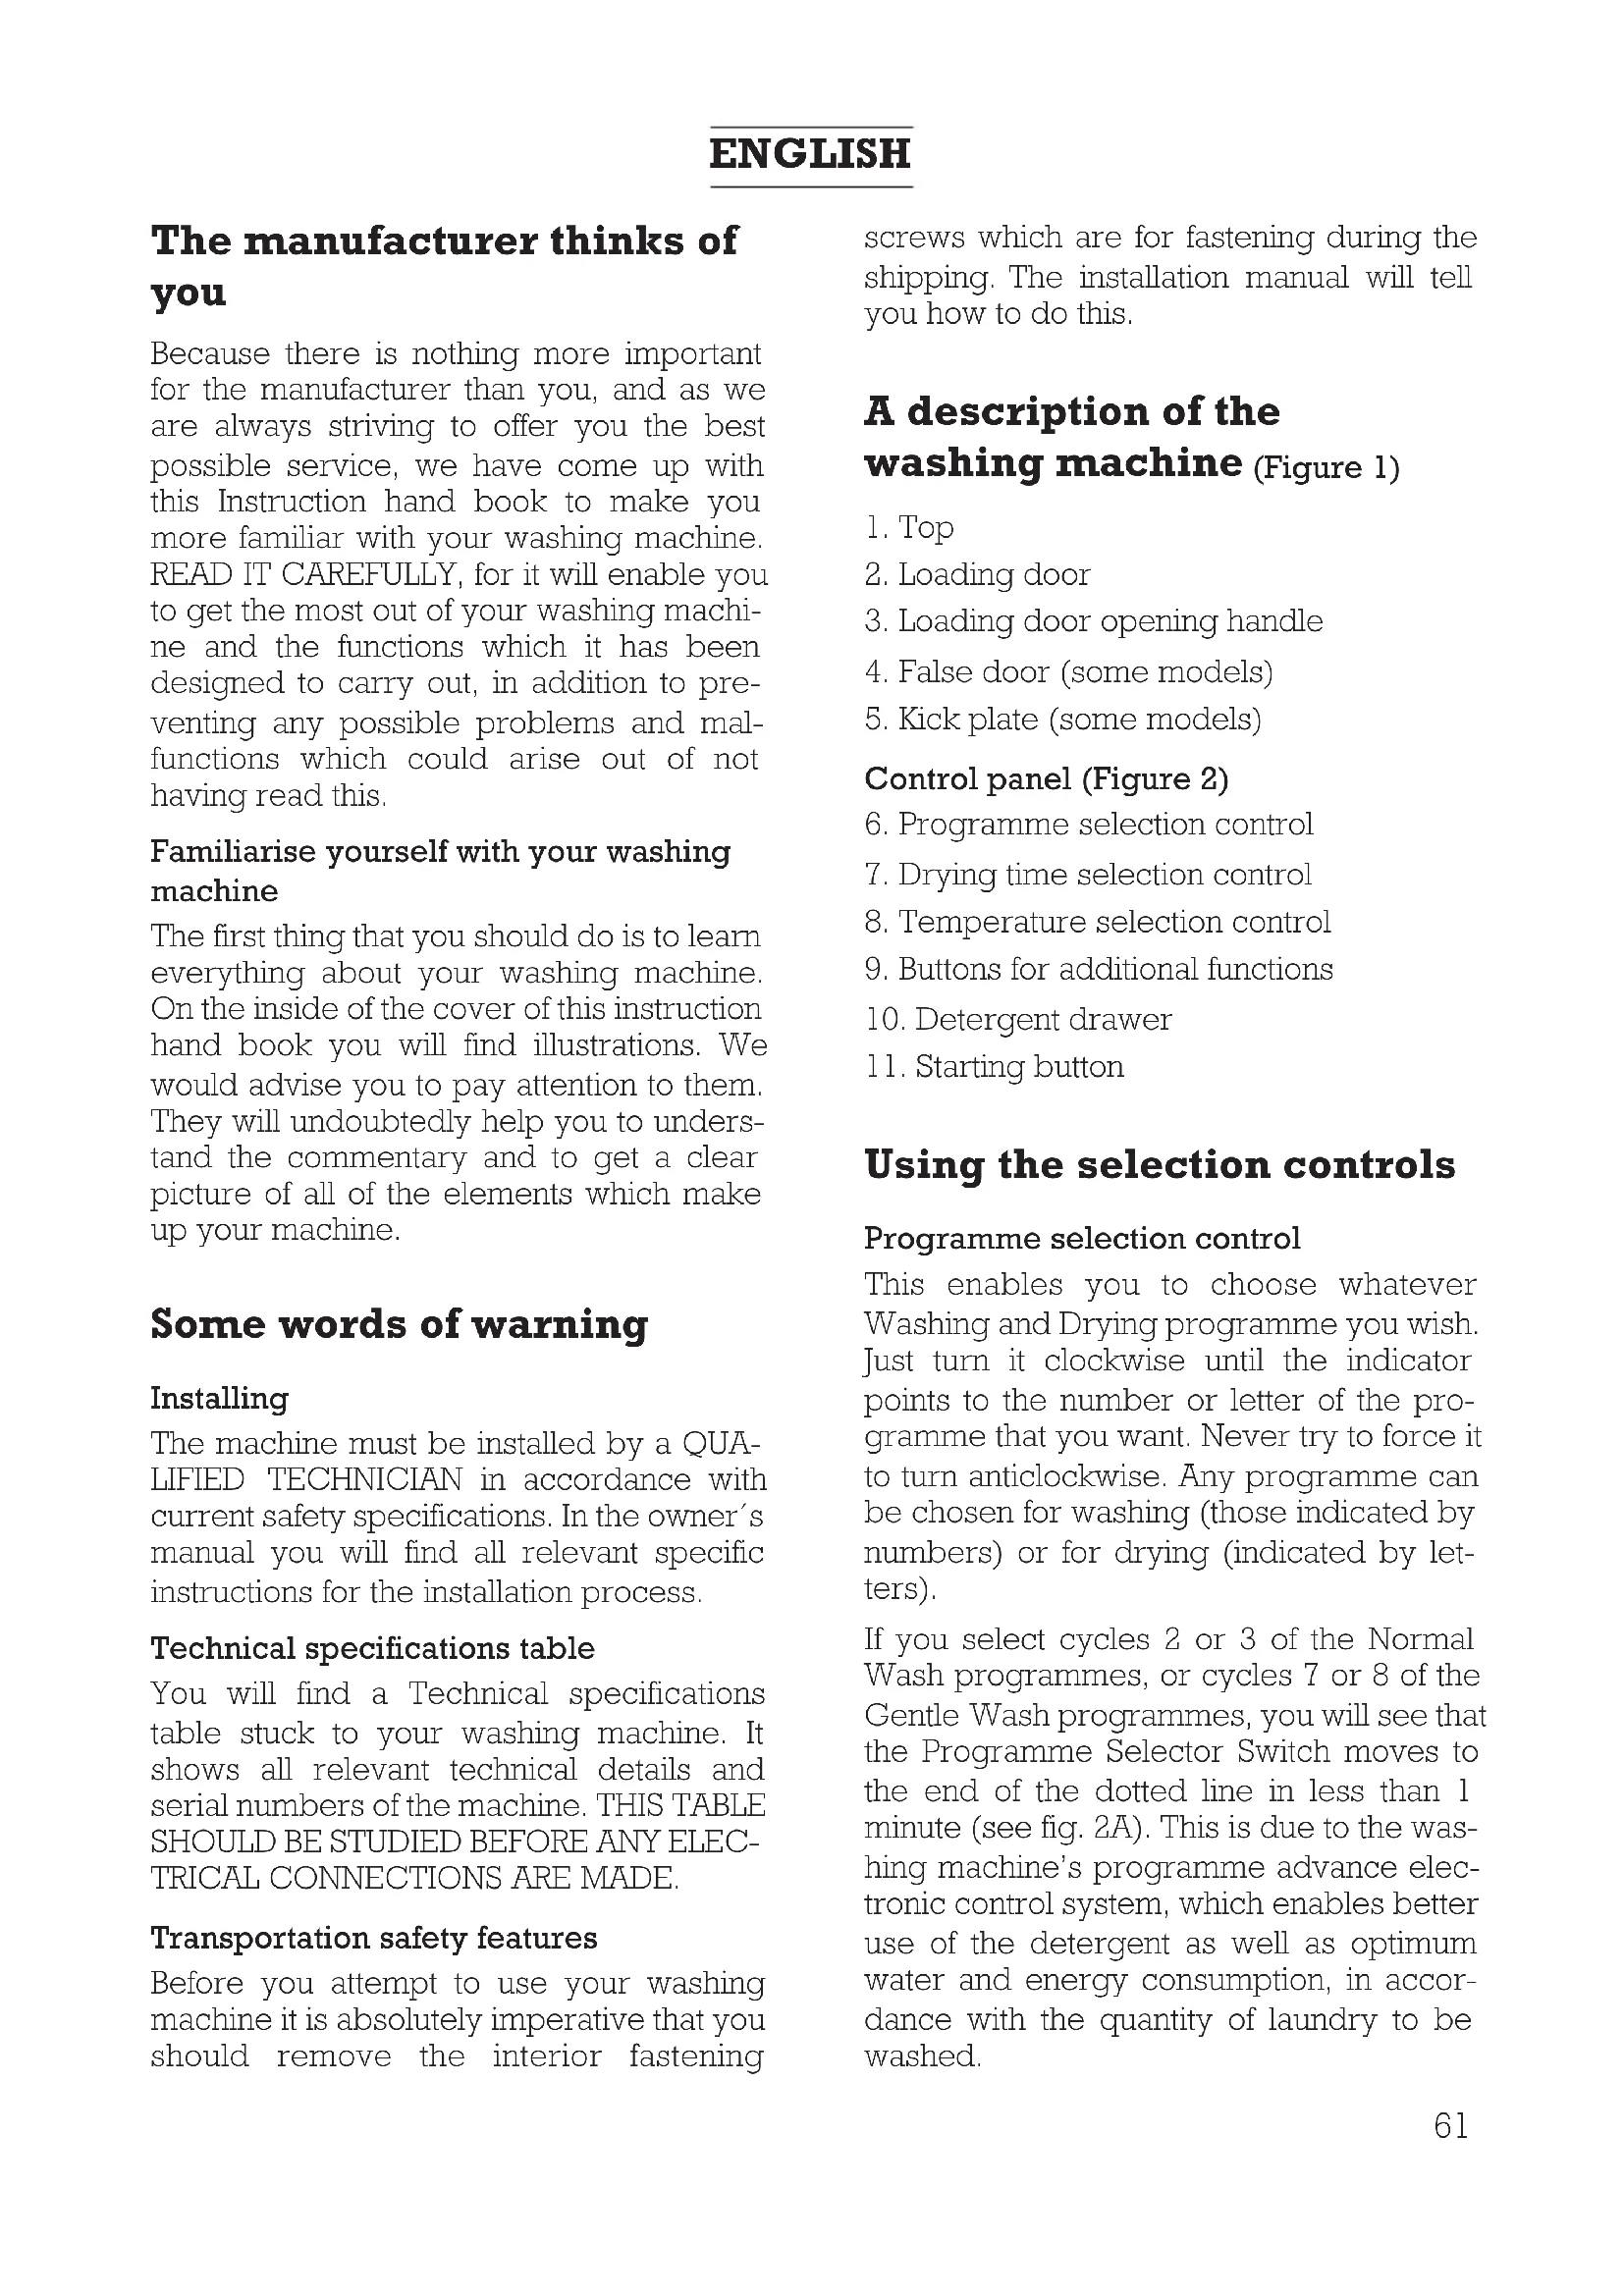
A description of the washing machine (Figure 1)
- Top
- Loading door
- Loading door opening handle
- False door (some models)
- Kick plate (some models)
Control panel (Figure 2)
- Programme selection control
- Drying time selection control
- Temperature selection control
- Buttons for additional functions
- Detergent drawer
- Starting button
Using the selection controls
Programme selection control
This enables you to choose whatever Washing and Drying programme you wish. Just turn it clockwise until the indicator points to the number or letter of the programme that you want. Never try to force it to turn anticlockwise. Any programme can be chosen for washing (those indicated by numbers) or for drying (indicated by letters).
If you select cycles 2 or 3 of the Normal Wash programmes, or cycles 7 or 8 of the Gentle Wash programmes, you will see that the Programme Selector Switch moves to the end of the dotted line in less than 1 minute (see fig. 2A). This is due to the washing machine's programme advance electronic control system, which enables better use of the detergent as well as optimum water and energy consumption, in accordance with the quantity of laundry to be washed.
ENGLISH
There are settings for normal drying and for delicates, indicated by the letters S and D respectively.
Any of the three settings (Figure 2A) indicates the end of the washing programme.
Temperature selection control
This enables you to select what temperature you want to wash at. Simply turn it gently so that the signal matches the desired temperature. Should you not wish to wash in warm or hot water, turn the indicator to the cold water sign
Drying time selection control
This control enables you to select the drying time that you estimate you will need for your wash. Gently turn it clockwise so that the number of minutes coincides with the time printed on the control. All times are in minutes.
The drying programme has finished when the Selection control (7) is in the STOP position. If this control is set for any time at all, then the machine will run through a drying programme after the washing programme. If you do not want a drying programme, this control must always be set at STOP.
Using the control buttons
Stop/start button

If the programme runs through until the end, you will be able to open the loading door once the programme has finished and the necessary time has passed for the Safety Door Block System which is incor
porated into the machine to have deactivated (approx. 2 minutes).
While the machine is running either a washing or drying programme, it can be terminated by pushing in the Pilot switch to its stop position (11).
When the button is pressed back to ON, the washing machine starts again from the same phase in the cycle where it was turned off. Should you stop the machine at any time in order to put garments in or take any back out, make sure that the water level does not overflow from the open door and that the temperature inside the drum is not excessive, don't forget that even with the switch off, you will have to wait long enough for the door's safety block to be deactivated.
Buttons for additional functions
By using these buttons, you will be able to incorporate a series of additional functions and features into any previously selected washing programme, which will enable you to adjust the washing of your garments to your own standards and needs.
Select the function you want by pressing the corresponding button.
Your washing machine will have some of the following functions, depending on which model it is.
- Spin dry bypass button

When you press this button, you remove the spin dry phase from whatever washing programme you have selected, which prevents creases from forming when washing special materials.

Fig. 2A
ENGLISH
- Spin dry selection button

This button enables you to select a more gentle spin speed. This is especially recommended for washing garments which have been worn and washed a great deal or any garments whose materials have special finishes
If you then go on to a drying programme, you should bear in mind that the this will take longer and will consequently work out more expensive.
- Crease guard button

When you select this button the programme will stop during the last rinse, leaving the garments floating in the water inside the drum, thereby preventing any creases from forming. You can then either press the button once more to finish the programme or select the drainage programme only to drain away the water should you want to avoid the spin dry programme.
Starting
Your washing machine can carry out a washing programme, a drying programme or a washing and drying programme (consecutive drying).
Here is an explanation of each of these.
- Selecting a wash-only programme
- Selecting a combined washing and drying programme
- Select the number of the programme that you want with the Programme Selector Control (6).
- The Drying Time Selector Control (7) must be set at STOP.
- Select the wash temperature you want with the Temperature Selector Control (8).
- Press whichever of the additional function buttons that you may want.
- Press the START button.
The process is the same as a wash-only programme except that you set the Drying
Time Selector Control (7) at the temperature you want.
- Selecting a dry only programme
- Turn the Programme Selector Control (6) to letter corresponding to the type of drying programme you want (S or D)
- With the Drying Time Selector Control select the drying time that you want.
- Press the START button.
Loading garments into the drum
Opening the loading door
To open the loading door, pull the handle 3 (Fig. 1) outwards.
Loading the drum
We recommend you to follow these steps when loading garments into the drum:
- Make sure that there is nothing in any of the pockets.
- Do not put any garments in which are folded or crumpled up.
- Put the garments into the drum one by one so that they do not become tangled. Make sure that you put the smallest items at the back of the drum.
- Do not press them down.
- Remember that there are different recommended weights of loads for different programmes.
- When washing towels and similar items, try to avoid washing them on their own, always put them in with other garments.
Once you have loaded everything into the drum, press the loading door until it is closed tight. Make sure that nothing gets trapped between the loading door and the rubber seal.
ENGLISH
Putting in the washing powder and additives
Pour any washing powder or additives into the detergent drawer (Fig. 3) before starting the washing programme. Your washing machine's detergent drawer has three or four compartments, depending on the model, which have the following symbols:
Compartment: Pour in the washing powder for the PREWASH.
Compartment: Pot in the washing powder for the WASH
Compartment: Pot in any liquid additives such as treatments, softeners, etc.
Compartment: Pour in liquid bleaches, etc.
N.B.: the level of the liquids must not exceed the MAX SIGN (Fig. 3)
Optional drawer
Liquid detergents can also be used in your washing machine, by using a special optional drawer which you can obtain by getting in touch with the TECHNICAL ASSISTANCE NETWORK. This drawer must be placed in the COMPARTMENT of the detergent drawer (Fig. 3). As for the dosage to use, always follow the manufacturer's recommendations. But in no event must the level of the detergent exceed the MAX level marked on the side of the drawer.
Detergent
Only use detergents which are appropriate for washing garments in automatic washing machines, ones which are good quality and which do not produce froth. Use only neutral detergents for washing woollen garments.
Detergent dosages
Remember that the dosage of detergent to use will always depend on:
- The amount of garments to be washed.
- The type of garments you are washing.
- How dirty the garments are.
- How hard the water is.
Using a greater amount of detergent than is necessary does not get better results from the wash, and as well as increasing the strain on your budget, it is not very environmentally-friendly.
The detergents which are most recommended for washing programmes without a prewash programme are those which can be applied directly inside the drum. We recommend you in any case to follow the guidelines for whichever manufacturer's detergent you chose to use.
The following table should help you to decide how much detergent you will need to use depending on the hardness of your local water supply and the amount of clothes you need to wash.
ENGLISH
| LOAD IN KG. | ||||
| 5 | 3,5 | 2,5 | 1 | |
| Water Hardness (in French degrees) | Detergent dosage in grammes | |||
| Soft (up to 12) | 90 | 80 | 65 | 55 |
| Medium (12/25) | 125 | 115 | 90 | 75 |
| Hard (25/37) | 160 | 140 | 110 | 90 |
| Very hard (more than 37) | 180 | 160 | 130 | 110 |
| The information about the degree of hardness of the water is available on request from your local offices of the authorities in charge. If they have the information in German degrees, then you multiply this by 1.78 get the equivalent. | ||||
Selecting the washing programme
Yours is a multiprogramme washing machine which is adaptable to washing all types of garments
To this end there are two types of programmes incorporated:
1.- NORMAL PROGRAMMES, ideal for resistant garments.
2.- DELICATE PROGRAMMES, ideal for washing delicate garments
The washing systems incorporated into your washing machine are specially designed for washing cotton and synthetic materials as well as woollen, silk and acrylic garments.
The basic differences between the PROGRAMMES is the drum's rotation rhythm, as well as the temperature, the duration of the washing programme and the level of water.
The NORMAL Cycles are generally the ones to use for washing resistant materials such as cotton, resistant synthetics, linen, etc., whereas the DELICATE Cycles with their gentler drum rhythm movement, lower temperatures and higher levels of
water are designed for washing synthetic materials, as well as materials such as wool, silk, etc. All models which have a Washing Temperature Selection Control also have an automatic variable load regulator which ensures that the water and energy consumption are automatically adjusted to the amount of clothing which is going to be washed.
Table of programmes
Here is a detailed table of all the washing machine programmes. Make sure that you refer to it, for it gives you all of the information relating to the different kinds of washing programmes which your washing machine offers you.
An abbreviated version of the table can be found on the front or top panel of the detergent dispenser, or on a card included in the documentation bag.
Remember that as well as the following washing programmes, your washing machine also has two types of drying programmes:
Programme S: Normal Drying
Programme D: Delicate Drying
Programme guide
Normal wash programmes:
For cotton, linen and canvas fabrics, etc.
Recommended maximum load: 5,0 Kg.
| Programme position | PROGRAMME DESCRIPTION | Recommended temp. range | Washing product compartments | Label symbols | Soil level and colour | Estimated duration (minutes) | kWh litres |
| 1 | Pre-wash, followed by wash, rinse cycles, automatic absorption of additives if required, and final spin. | 90-70°C | Heavy soil Whites | 115-135 | 1.20-1.75/53 | ||
| 60-50°C | Heavy soil Colour-fast | 115-130 | 0.90-1.05/53 | ||||
| 40-Cold | Heavy soil Non colour-fast | 95-115 | 0.15-0.60/53 | ||||
| 2 | Wash, rinse cycles, automatic absorption of additives if required, and final spin. | 90-70°C | Medium soil Whites | 110-130 | 1.20-1.75/53 | ||
| 60-50°C | Heavy soil Colour-fast | 120-135 | 0.90-1.05/53 | ||||
| 40-Cold | Light soil Non colour-fast | 95-120 | 0.15-0.60/53 | ||||
| 3 | Quick wash, rinse cycles, automatic absorption of additives if required, and final spin (recommended maximum load: 2,5 kg). | 40-Cold | Light soil Non colour-fast | 40-45 | 0.15-0.30/35 | ||
| 4 | Rinse cycles with automatic absorption of additives and final spin. | Hard-wearing fabrics | 35 | 0.05/40 | |||
| 5 | Rinse cycles with automatic absorption of fabric softener and final spin. | Hard-wearing fabrics | 10 | 0.05/15 | |||
| 6 | Drain and long spin. Hard-wearing fabrics | 8 | 0.05/0 |
Delicate wash programmes:
For delicate, synthetic and mixed fabrics, etc. Recommended maximum load: 2,5 Kg.
| Programme position | PROGRAMME DESCRIPTION | Recommended temp. range | Washing product compartments | Label symbols S | oil level and colour | Estimated duration (minutes) | kWh litres |
| 7 | Wash, rinse cycles, automatic absorption of additives if required, and final spin. | 60-50°C | 60 | Medium soil Whites | 60-65 | 0.50-0.70 48 | |
| 40-Cold | 30 40 | Light soil Non colour-fast | 55-60 | 0.10-0.40 48 | |||
| 9 | Drain and gentle spin. | Delicate fabrics | 5 | 0.05 0 |
Woollens programmes:
For woollen garments Recommended maximum load: 1,0 Kg.
| Programme position | PROGRAMME DESCRIPTION | Recommended temp. range | Washing product compartments | Label symbols S | oil level and colour | Estimated duration (minutes) | kWh litres |
| 8 | Wash, rinse cycles, automatic absorption of additives if required, and final spin. | 40-Cold | 30 40 | Light soil Non colour-fast | 30-45 | 0.05-0.50 52 | |
| 10 | Drain with no spin. | 2 | 0/0 | ||||
Cleaning out your washing machine before using it
So that you can clear out the remains of any lubrication materials and test water from the inside of the washing machine, it is recommendable to wash it out first before you use it for washing any clothing. The procedure for that is as follows.
Evacuate any residual water (Programme 13).
- Put a dosage of detergent in the COMPARTMENT of the DETERGENT DRAWER.
- Select the number 2 WASHING PROGRAMME (90^ without prewash) using the Programme Selector Control (6).
- Start the washing machine.
- Wait until the programme finishes.
Cleaning and special care
(Fig. 6)
Your washing machine is fitted with a self-cleaning pump and therefore does not require any cleaning or maintenance. However, certain objects may accidentally fall into the pump (e.g. buttons, coins, pins, etc.) and as it is not a good idea for them to be expelled through the drain pipe, they will be caught by an accessible filter in the front of the pump to prevent any jamming. To gain access to the pump, you just have to remove the panel-kickplate covering the bottom part of your washing machine (Figure 6A) and proceed as follows:
With the aid of a screwdriver, first of all undo the two screws at the side (A), and then disengage the lug (D) at the top, turn in the direction of the arrow (F) and disengage the three lugs (B).
Place a flat container under the filter to catch the small amount of water that will come out when you remove the filter cover.
Turn the filter cover anticlockwise and remove from the pump chamber any fluff or small objects that have built up over time.
In the case of figure 6B, turn the cover Z anti-clockwise with the help of a coin.
To put everything back in place, just carry out these instructions in reverse and ensure that the filter cover is properly closed.
Warning: For safety reasons, before removing the cover-kickplate, ensure that the wash cycle is over and unplug the machine from the mains supply.
Practical tips for a better wash
Here is a series of tips which you ought to keep in mind when using your washing machine. Tips referring to the different types of garments which you can wash, as well as the different kinds of detergents and washing powders which can be used. Knowing them will help you to get a better wash, as well as keeping your washing machine in good working order.
Classifying the garments
Sort your garments into different types according to their:
- COLOUR
HOW DIRTY THEY ARE - HOW DELICATE THEY ARE
Colour
- Before you load garments into the machine, sort them according to the type of material and how strong the colours are.
- Wash whites and coloureds separately.
ENGLISH
- If the coloureds are new, you would be better off washing them separately several times.
Dirtiness
- Sort the garments according to how dirty they are, and treat any which are especially dirty or have some particular stain.
Treat any very dirty parts beforehand, especially the collars and cuffs. - For garments which are not very dirty, select preferably a short programme. In that way, not only do you get an excellent wash, but you will also be saving energy.
- Select a normal Washing Programme for normal dirty garments.
- Select a Long Programme with Prewash for very dirty garments.
Delicate garments
- The material of which certain garments are composed or the way in which they are made can make them sensitive to motion, so in order to wash them we recommend you should select the DELICATE PROGRAMMES which your washing machine is equipped with.
- Select your washing machine's SPECIAL WOOL PROGRAMME for washing woollen garments.
- Check beforehand whether your garments can be machine-washed.
Label Information
There are normally symbols on the labels of the collars or the side seams of garments. These symbols tell you:
Maximum WASHING temperature.
- The products with which they can be and cannot be washed.
Treatments for looking after them.
- Temperatures and appropriate ways for them to be ironed.
Washing symbols

Can be washed at 30^

Can be washed at 40^

Can be washed at 60^ . Coloureds.

Can be washedat 90^ .Resistant garments.

Specialist wash only, not at home.

Bleach can be used.

Bleach can be used.

Bleach cannot be used.

Dry clean.

Do not dry clean.

Dry in the washing machine.

Do not dry in the washing machine.

Dry clean and special treatment.

Dry clean. Use only mineral solvents, benzene, turps, etc.

Dry clean. Perchlorethylene can be used in addition to the aorementioned solvents.

Dry clean. All normal solvents can be used.

Iron on a light heat.

Iron on a medium heat.

Iron on a strong heat.

Specialist iron only, not a home.

Wool.
Treating stains
There are many occasions when, due to the type and characteristics of some stains, you do not obtain satisfactory results from the wash. Here is a series of special treatments which you can apply to these stains prior to washing them in your machine.
Water-soluble stains
Treat even stubborn stains with a generous dose of detergent or a washing paste.
Stains which won't dissolve in water
Treat these stains with a special cleaning agent.
ENGLISH
Special stains
Felt-tip and ball-tip pens: rub it with a cloth soaked in alcohol.
Candle wax: cover the stain with blotting paper and iron over it at a temperature suitable for the cloth. Repeat the operation if necessary.
Resin, grease and skin cream: clean it with a petroleum-based stain remover and then wash the garment.
Tar: rub butter into it, leave it for a while to take effect, and then wash the garment.
Blood, milk and egg: soak the stain in cold water and then was the garment with an enzyme-enriched detergent at a temperature from 50^ to 60^ , providing that the garment can be washed at this temperature.
Fruit, coffee and wine: these stains usually disappear after a few washes.
Should you have a stain which cannot be washed or which is particularly critical, ask a specialist for advice. But whatever you do, DO NOT USE CHEMICAL PRODUCTS IN THIS WASHING MACHINE.
Practical tips for loading garments into the drum
- Whenever it is possible for you to do so, it is recommendable to put the maximum load into your washing machine. This will reduce the water and energy consumption considerably.
- Whenever you are washing very dirty garments or any soft, fluffy items (towels, etc.), we would advise you to put in less than the recommended load
- We recommend you to always load garments of different sizes together in the same wash. This reinforces the action of the wash, favours an even distribution of items inside the drum for the spin dry, thereby making the washing machine work more silently.
General washing tips
- When washing garments together whose recommended washing tempe
ratures are different, you must always choose the lowest temperature.
- In general, bleaches can only be used for washing resistant white cloths such as cotton, linen, etc.
- Select the Delicate Programmes for washing, synthetic, mixed and delicate fibres, as this will prevent creases which are difficult to iron out.
- It is recommendable to end the Delicate and Very Delicate Programmes with a short spin cycle, which will make the rinses more efficient, and the water will be more thoroughly wrung out from the garments.
General tips
Maintenance
Before any cleaning or maintenance operation, it is advisable to disconnect the washing machine from the mains.
Cleaning
After each time you use the washing machine, leave the loading door open so that air can circulate freely around the inside of the machine.
From time to time it is a good idea to carry out a complete Washing Cycle using a deli-ming product. This will lengthen your washing machine's working life.
Cleaning the outside
To clean the outside of the washing machine, use lukewarm soapy water, or any mild cleaning agent which is neither an abrasive nor a solvent. Then wipe it down with a clean cloth.
Cleaning the detergent drawer
Whenever any residues of any washing product can be seen in the DETERGENT DRAWER, it is time for it to be cleaned, which should be done as follows:
- Detach the drawer from the machine by pulling the flap outwards.
ENGLISH
2.- Clean the COMPARTMENTS of the DRAWER using a brush and warm water.
3.- Clean the siphons of the liquid compartments also.
After this is done, put the drawer back into the washing machine.
Troubleshooting guide
Should anything go wrong with the functioning of the washing machine, you can probably put it right by referring to the following advice.
However, should the problem persist, unplug the washing machine and contact our TECHNICAL ASSISTANCE SERVICE. There are no fuses or analogue components which can be changed by the user. But we urge you that under no circumstances should you attempt to open up the machine.
The washing machine won't start
- There is no electricity
- The washing machine is not plugged in at the mains.
- The fuses on the fuse board have blown.
- The loading door has not been closed correctly.
- The Start button has not been pushed in.
The washing machine does not take in water
- The water has been cut off.
- he water inlet tap has not been turned on.
- The hose filter is blocked.
- The water inlet pipe is tangled.
The washing machine will neither release the water nor spin dry
- The water drain pipe is tangled.
The washing machine vibrates or makes excessive noise
- The INTERIOR FASTENING SCREWS have not been taken out.
- The washing machine is not on a level surface. (Consult the Installation manual).
Important:
Some models (high speed spin dry) have a safety device incorporated into their spin dry programmes which means that the programme will stop should the garments inside the drum concentrate in such a way as to create an excessive level of vibrations. Should you ever find that the garments are not sufficiently wrung out, try spin drying them once more after you have distributed them more evenly inside the drum.
Drying instructions
The drying system
The drying process occurs due to hot air circulating in a closed circuit and steam condensing by means of refrigeration with mains water.
Therefore IT IS ABSOLUTELY IMPERATIVE FOR THE MAINS WATER TAP TO BE TURNED ON DURING THE DRYING CYCLES ALSO.
The water drainage pump will simultaneously switch on at regular intervals during the whole drying programme in order to release the refrigeration water in addition to the water coming from the condensation.
During the last few minutes of the drying cycle, there is no heating up of circulating air. This is in order to even out the temperatures inside the drum so that no creases should form. You are strongly recommended NOT TO INTERRUPT THIS FINAL STAGE.
Preparing the garments
Check the manufacturer's instructions on all garment labels and make sure that they can be machine dried. Do not machine dry any excessively delicate items such as cur
ENGLISH
tains, woollens, silk, any containing foam-rubber or similar materials.
IMPORTANT
Only materials which have previously been washed with water can be dried with hot air, never try to dry any garments which have been treated with inflammable products (petrol, alcohol, wax, stain removers, etc.) due to the fire risk which this poses.
The maximum load which is recommended is 2.5kg of dry clothing in the case of resistant materials and 1.5kg for delicate garments. That is to say, if you carry out a washing programme with a full load and then intend to dry it, the garments should be divided into two loads for drying.
Programmes
Your washing machine-dyer has two basic drying programmes:
- Resistant garments, cotton (position S)
-Delicate garments, synthetics (position D)
Both of them are selected with the Programme Selector Control (6).
The D drying programme runs at a lower temperature than does the S programme.
You can run dry-only programmes or washing programmes followed by a drying programme (consecutive wash-dry).
N.B.
Remember that it is a good idea to allow the washing machine to even up the final temperature to prevent any creases from forming. Therefore, should you wish to stop a drying cycle which is still running, you are advised to turn the Drying Time Selector Control (7) to the mark, which will enable the ventilation to function with cold air for a few minutes.
Drying time
You will need to experiment for a period of time in order to select the appropriate drying time, which will depend on the materials and size of the garments and the load.
Nevertheless, the following table gives some rough estimates.
| Time in minutes | ||||
| Load Resistantkg | Ant garments Delicate garments | |||
| Total drying | Ready for ironing | Total drying | Ready for ironing | |
| 0.5 | 25 | 30 | 35 | 40 |
| 1.5 | 50 | 65 | 80 | 100 |
| 2.5 | 85 | 100 | - | - |


- ENGLISH
- List of contents
- The manufacturer thinks of you
- Familiarise yourself with your washing machine
- Some words of warning
- Installing
- Technical specifications table
- Transportation safety features
- A description of the washing machine (Figure 1)
- Control panel (Figure 2)
- Using the selection controls
- Programme selection control
- Temperature selection control
- Drying time selection control
- Using the control buttons
- Stop/start button
- Buttons for additional functions
- - Spin dry bypass button
- - Spin dry selection button
- - Crease guard button
- Starting
- - Selecting a wash-only programme
- - Selecting a combined washing and drying programme
- - Selecting a dry only programme
- Loading garments into the drum
- Opening the loading door
- Loading the drum
- Putting in the washing powder and additives
- Optional drawer
- Detergent
- Detergent dosages
- Selecting the washing programme
- Table of programmes
- Cleaning out your washing machine before using it
- Cleaning and special care
- Practical tips for a better wash
- Classifying the garments
- Colour
- Dirtiness
- Delicate garments
- Label Information
- Washing symbols
- Treating stains
- Water-soluble stains
- Stains which won't dissolve in water
- Special stains
- Practical tips for loading garments into the drum
- General washing tips
- General tips
- Maintenance
- Cleaning
- Cleaning the outside
- Cleaning the detergent drawer
- Troubleshooting guide
- The washing machine won't start
- The washing machine does not take in water
- The washing machine will neither release the water nor spin dry
- The washing machine vibrates or makes excessive noise
- Important:
- Drying instructions
- The drying system
- Preparing the garments
- IMPORTANT
- Programmes
- N.B.
- Drying time
Brand : EDESA
Model : L841
Category : Washing machine