BAR2 KN5V2 IN - Oven BAUKNECHT - Free user manual and instructions
Find the device manual for free BAR2 KN5V2 IN BAUKNECHT in PDF.
User questions about BAR2 KN5V2 IN BAUKNECHT
0 question about this device. Answer the ones you know or ask your own.
Ask a new question about this device
Download the instructions for your Oven in PDF format for free! Find your manual BAR2 KN5V2 IN - BAUKNECHT and take your electronic device back in hand. On this page are published all the documents necessary for the use of your device. BAR2 KN5V2 IN by BAUKNECHT.
USER MANUAL BAR2 KN5V2 IN BAUKNECHT
THANK YOU FOR BUYING A BAUKNECHT PRODUCT
In order to receive a more complete assistance, please register your product on www.bauknecht.eu/register

Before using the appliance carefully read the Safety Instruction.
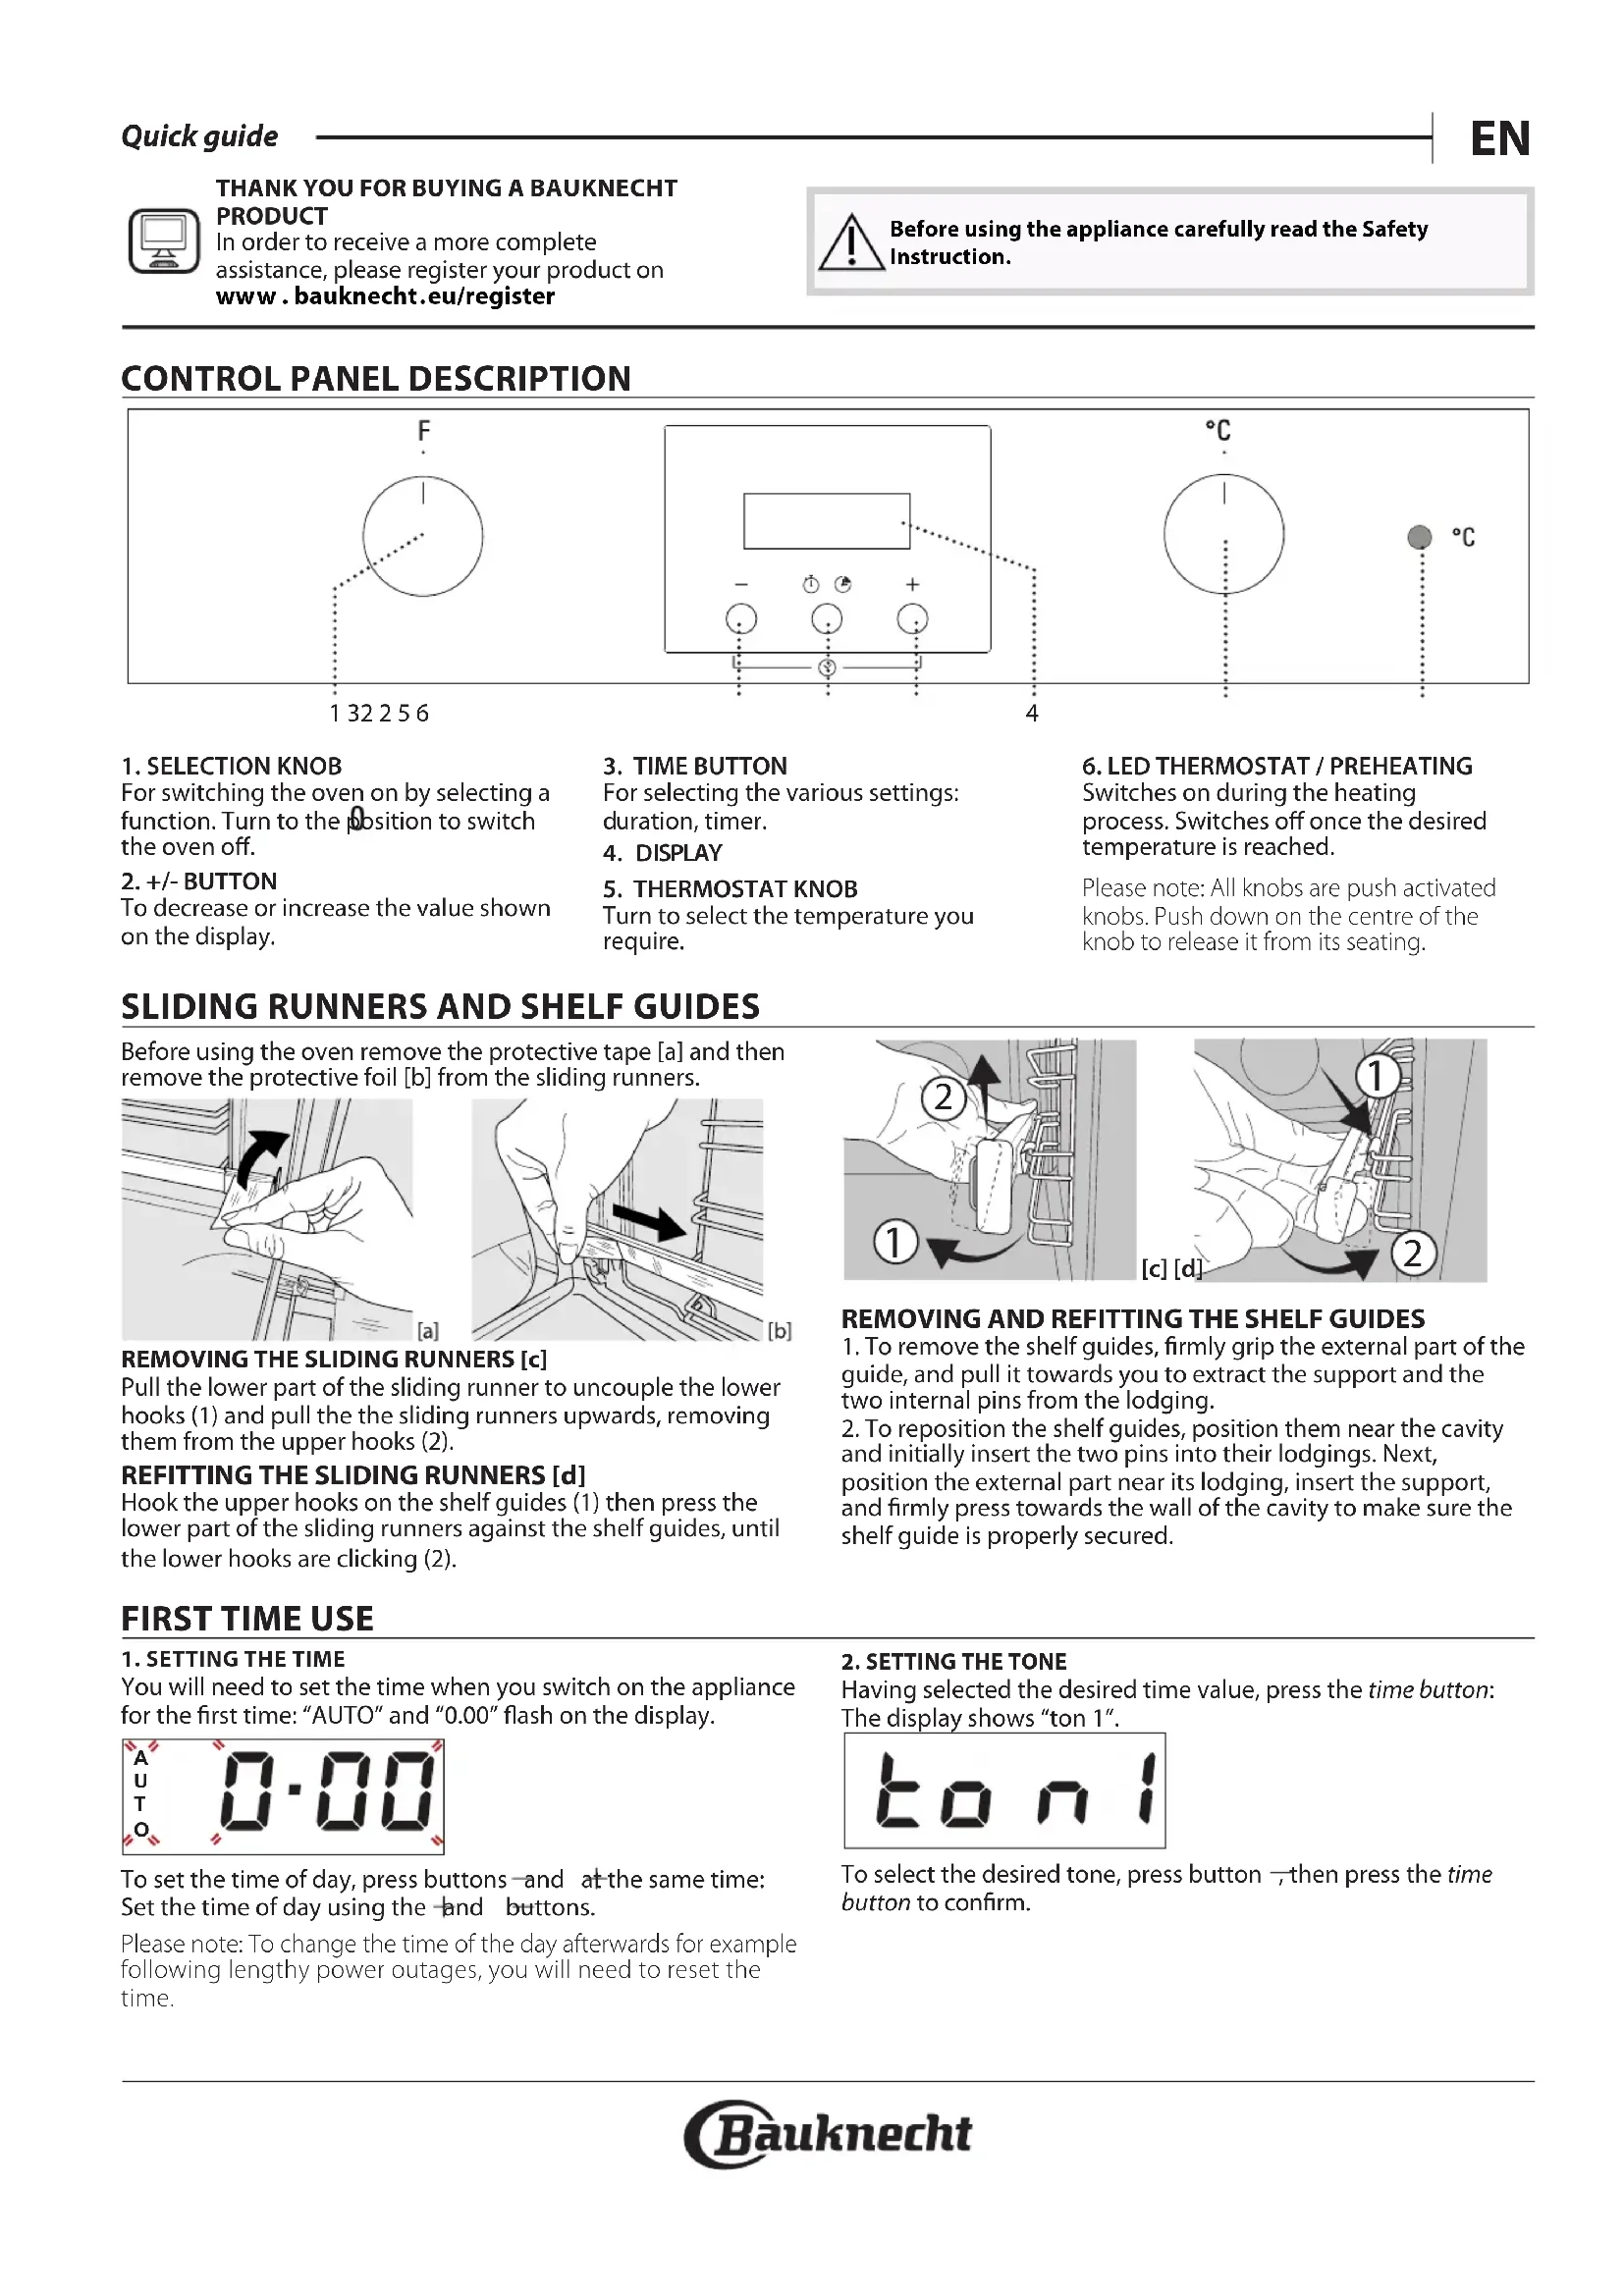
CONTROL PANEL DESCRIPTION
1. SELECTION KNOB
For switching the oven on by selecting a function. Turn to the position to switch the oven off.
2. +/- BUTTON
To decrease or increase the value shown on the display.
3. TIME BUTTON
For selecting the various settings: duration, timer.
4. DISPLAY
5. THERMOSTAT KNOB
Turn to select the temperature you require.
- LED THERMOSTAT / PREHEATING Switches on during the heating process. Switches off once the desired temperature is reached.
Please note: All knobs are push activated knobs. Push down on the centre of the knob to release it from its seating.
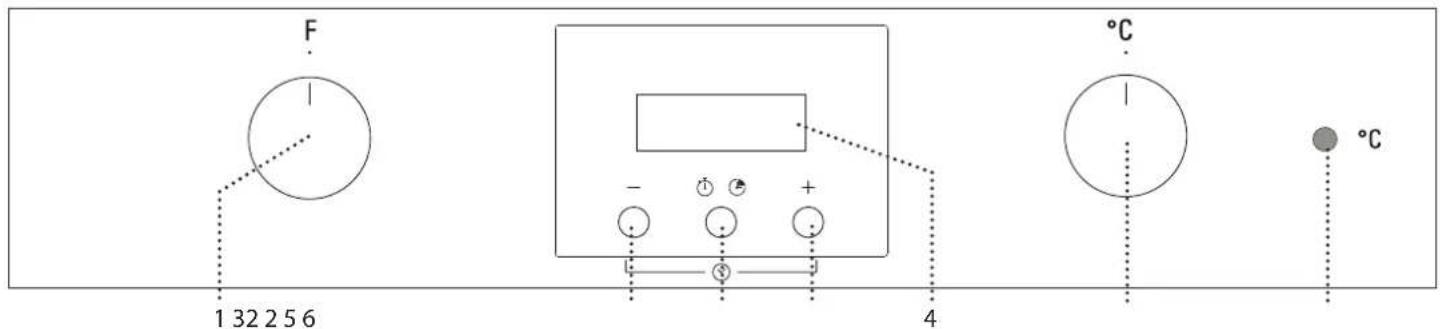
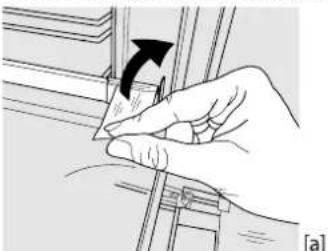
SLIDING RUNNERS AND SHELF GUIDES
Before using the oven remove the protective tape [a] and then remove the protective foil [b] from the sliding runners.
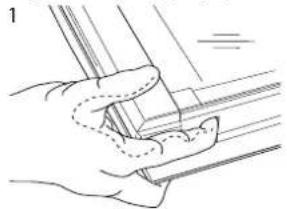
REMOVING THE SLIDING RUNNERS [c]
Pull the lower part of the sliding runner to uncouple the lower hooks (1) and pull the the sliding runners upwards, removing them from the upper hooks (2).
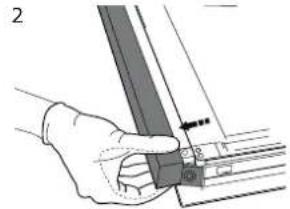
REFITTING THE SLIDING RUNNERS [d]
Hook the upper hooks on the shelf guides (1) then press the lower part of the sliding runners against the shelf guides, until the lower hooks are clicking (2).
![BAUKNECHT BAR2 KN5V2 IN - REFITTING THE SLIDING RUNNERS [d] - 1](/content/2026/03/497400/images/3b84904df8b2a27cf0abdd6333e17ef557251dbba52d11ed22c8e569fdd09b0c.jpg)
REMOVING AND REFITTING THE SHELF GUIDES
-
To remove the shelf guides, firmly grip the external part of the guide, and pull it towards you to extract the support and the two internal pins from the lodging.
-
To reposition the shelf guides, position them near the cavity and initially insert the two pins into their lodgings. Next, position the external part near its lodging, insert the support, and firmly press towards the wall of the cavity to make sure the shelf guide is properly secured.
FIRST TIME USE
1. SETTING THE TIME
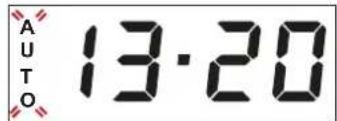
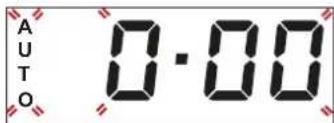
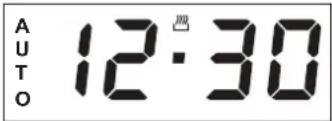
You will need to set the time when you switch on the appliance for the first time: "AUTO" and "0.00" flash on the display.
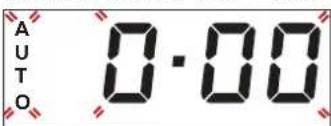
To set the time of day, press buttons and at the same time: Set the time of day using the and buttons.
Please note: To change the time of the day afterwards for example following lengthy power outages, you will need to reset the time.
2. SETTING THE TONE
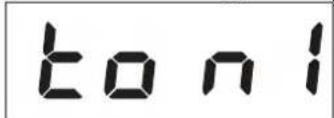
Having selected the desired time value, press the time button: The display shows "ton 1".
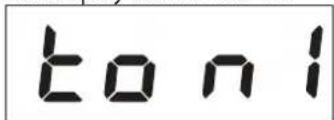
To select the desired tone, press button then press the time button to confirm.
3. HEAT THE OVEN
A new oven may release odors that have been left behind during manufacturing: this is completely normal. Before starting to cook food, we therefore recommend heating the oven with it empty in order to remove any possible odors.
Remove any protective cardboard or transparent film from the
FUNCTIONS & DAILY USE
OFF
For switching off the oven.
LIGHT
For switching on the light in the compartment.

CONVENTIONAL
For cooking any kind of dish on one shelf only.

CONVECTION BAKE
For baking cakes with juicy fillings on a single shelf. This function can also be used for cooking on two shelves. Switch the position of the dishes to cook food more evenly.

GRILL
For grilling steaks, kebabs and sausages, cooking vegetables au gratin or toasting bread. When grilling meat, we recommend using a Baking tray to collect the cooking juices: position the pan on any of the levels below the wire shelf and add 500ml of drinking water.

TURBO GRILL
For roasting large joints of meat (legs, roast beef, chicken). We recommend using a Baking tray to collect the cooking juices: position the pan on any of the levels below the wire shelf and add 500ml of drinking water.

DEFROSTING
For defrosting food more quickly.
1. SELECT A FUNCTION
To select a function, turn the selection knob to the symbol for the function you require.
2. ACTIVATE A FUNCTION
To start the function you have selected, turn the thermostat knob to set the temperature you require. To interrupt the function at any time, switch off the oven, turn the selection knob and the thermostat knob to O and
3. PREHEATING
Once the function has been activated, the LED thermostat will switch on signalling that the preheating process has begun. At the end of this process, the LED thermostat switches off indicating that the oven has reached the set temperature: at this point, place the food inside and proceed with cooking. Please note: Placing the food in the oven before preheating has finished may have an adverse effect on the final cooking result.
4.PROGRAMMING COOKING
After selecting and activating the function, it is possible to set the duration values.

DURATION
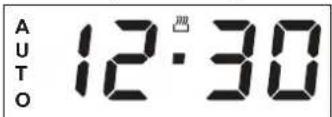
Press the time button: the symbol flashes.
Press the time button again: the display shows DUR and AUTO flashes.

Set the duration using the button and .After a few seconds,
oven and remove any accessories from inside it.
Heat the oven to 250^ for about one hour. The oven must be empty during this time.
Please note: It is advisable to air the room after using the appliance for the first time.
the display shows the time of the day while AUTO remains lit, confirming the setting.
To view the remaining cooking time press the time button for at least 2 seconds.
To change it, if necessary, press it again a second time, using + and - buttons to modify the duration.
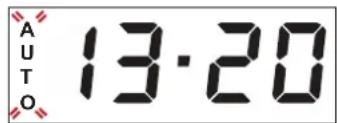
At the end of cooking, the symbol switches off, an alarm sounds and AUTO flashes on the display.
Press any button to deactivate the alarm.
Return the function knob and thermostat knob to and, then press the time button for at least 2 seconds to switch off the oven.
SETTING THE TIMER
This option does not interrupt or activate cooking but allows you to use the display as a timer, both while a function is active and when the oven is off.
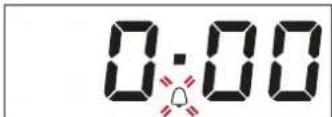
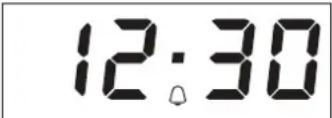
To activate the timer, long press the time button: the symbol flashes on the display.

Use the and buttons to set the desired duration: the countdown begins after a few seconds.
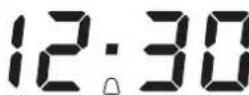
The display shows the time of the day and the remains lit, confirming the timer has been set.
Please note: To view the countdown and change it if necessary, press the time button 2 seconds again.
COOKING TABLE
| RECIPE FUNCTION PREHEAT | TEMPERATURE (°C) | DURATION (MIN) | LEVEL AND ACCESSORIES | ||
| Leavened cakes | F | Yes 150 - 170 30 - 90 | 2 | ||
| G | Yes 150 - 170 30 - 90 *** | 4 1 | |||
| Biscuits / tartlets | - | Yes 160 - 180 15 - 35 | 2/3 | ||
| F | Yes 150 - 170 20 - 40 *** | 4 2 | |||
| Pizza / Focaccia | - | Yes 220 - 250 10 - 25 | 1/2 | ||
| G | Yes 200 - 240 15 - 30 *** | 4 2 | |||
| Lasagne / baked pasta / cannelloni / flans | Yes 190 - 200 45 - 65 | 2 | |||
| Lamb / veal / beef /pork 1 kg | - | Yes 190 - 200 | 80 - 110 | 2 | |
| Chicken/rabbit/duck 1 kg | - | Yes 200 - 230 | 50 - 100 | 2 | |
| Baked fish/en papillote 0,5 kg (fillets, whole) | - | Yes 170 - 190 30 - 45 | 2 | ||
| Toasted bread | - | 5' | 250 | 2 - 6 | 5 |
| Sausages / kebabs / spare ribs / hamburgers | - | 5' | 250 | 15 - 30 * | 5 4 |
| Roast potatoes | - | 200 - 220 | 35 - 55 ** | 3 | |
| ACCESSORIES | Wire shelf Baking dish on the wire shelf Baking tray/Drip tray or baking dish on the wire shelf Drip tray / Baking tray Drip tray / Baking tray with 200 ml of water | ||||
Turn food halfway through cooking
Turn food two thirds of the way through cooking (if necessary).
** Switch levels halfway through cooking.
The time indicated does not include the preheating phase: we recommend placing the food in the oven and setting the cooking time only after the required temperature has been reached.
The level is indicated on the wall of the cooking compartment.
Download the complete Use and Care Guide from docs.bauknecht.eu for the table of tested recipes, compiled for the certification authorities in accordance with the standard IEC 60350-1.
CLEANING AND MAINTENANCE
Make sure that the oven has cooled down before carrying out any maintenance or cleaning. Do not use steam cleaners.
Do not use wire wool, abrasive scourers or abrasive/corrosive cleaning agents, as these could damage the surfaces of the appliance.
Wear protective gloves. The oven must be disconnected from the mains before carrying out any kind of maintenance work.
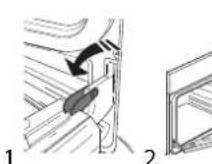
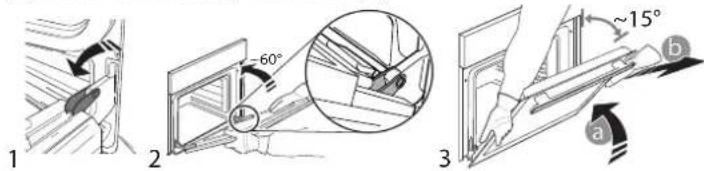
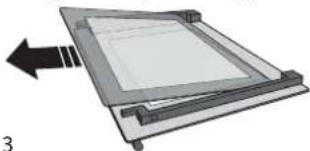
REMOVING AND REFITTING THE DOOR
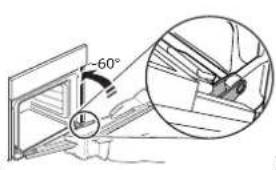
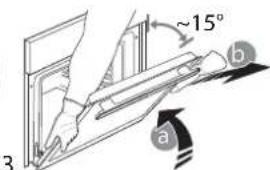
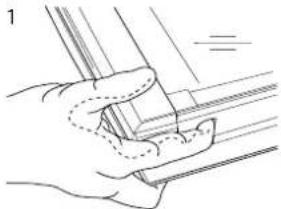
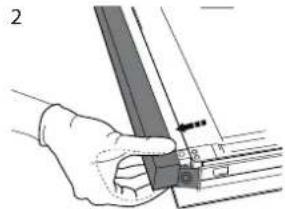
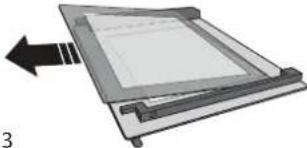
To remove the door, open it fully and lower the catches until they are in the unlock position (1). Close the door as much as you can (2). Take a firm hold of the door with both hands - do not hold it by the handle. Simply remove the door (3) by continuing to close it while pulling it upwards (a) at the same time until it is released from its seating (b).
Put the door to one side, resting it on a soft surface. Refit the door by moving it towards the oven, aligning the hooks of the hinges with their seating and securing the upper part onto its seating. Lower the door and then open it fully. Lower the catches into their original position: make sure that you lower them down completely. Try closing the door and check to make sure that it lines up with the control panel. If it does not, repeat the steps above.
CLICK & CLEAN - CLEANING THE GLASS
After removing the door and resting it on a soft surface with the handle downwards, simultaneously press the two retaining clips (1) and remove the upper edge of the door by pulling it towards you (2).
Lift and firmly hold the inner glass with both hands, remove it and place it on a soft surface before cleaning it (3).

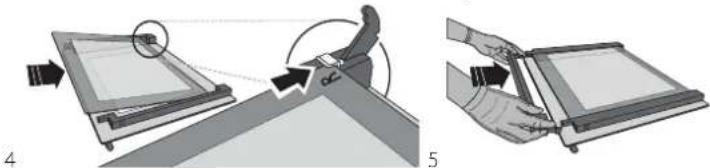
To correctly reposition the inner glass, make sure that the "R" is visible in the left-hand corner and the clear surface (not printed) is facing up. First insert the long side of the glass indicated by "R" into the support seats, then lower it into position (4). Refit the upper edge (5): a click will indicate correct positioning.
Make sure the seal is secure before refitting the door.
TROUBLESHOOTING
| Problem Possible cause Solution | ||
| The oven does not work Power cut | Disconnection from the mains | Check for the presence of mains electrical power and whether the oven is connected to the electricity supply. Turn off the oven and restart it to see if the fault persists |

Download the complete Use and Care Guide from docs.bauknecht.eu for more informations about your product

Policies, standard documentation and additional product information can be found by:
- Visiting our website docs.bauknecht.eu
Using QR Code
- Alternatively, contact our After-sales Service (See phone number in the warranty booklet). When contacting our After-sales Service, please state the codes provided on your product's identification plate.
DESCRIPTION DU BANDEAU DE COMMANDE

1. BOUTON DE SELECTION
YCTAHOBKA TEJIECKONINUCECKNX HANPABJIAIOUX [d]
3aueHnTe BepxHnE KpOuKn 3a depKaTeI npOTNBHe (1), 3aTeM npNXMnTE HNKHIOU qAcb TeNeCKOnuuecknx HAnpaBIAUoIXK DepKaTeIam PpOTNBHe TaK, YTObI HNKHnE KpOuKn
3aΦHKCnPOBaJIncb CO CJIbIIMMbIM UeJIYKOM (2).
![BAUKNECHT BAR2 KN5V2 IN - YCTAHOBKA TEJIECKONINUCECKNX HANPABJIAIOUX [d] - 1](/content/2026/03/497400/images/d29f15888d66188cc676eb4d00e12548ba78a2786d593d893bff7d5d442f225b.jpg)
CHRTNE UYCTAHOBKA DEPKATEJEI NPOTUBHEI
- 106bI CHaTB DEpKATEIn IPOTNBHeN, KpeIKO BO3bMNTecB 3a HApyKHyIO uACTb DEpKATEeIN NOTAHNTe IN HA Ce68, UTo6bl n3Bnueb ONOpY IN DBA BHTpeHNIX WtntoTA IN3 THe3D.
- 106bI yCTAHOBuTb DEpKATEIn IPOTNBHeN Ha MeCTo, PACNOJIOXITE IN PdOM C BbiEMKO IN CHaHaNA BCTaBBTe DBA WtntoTA B THe3DA. 3aTEM PACNOJIOXTE HApyKHyIO qACTb PIAOM C ee THe3DOM, BCTaBBTe ONOpY IN HaxMIte B HAnpaBneHm CTEHKN BiEMKn, YTO6bI y6eINbCB, YTO DEpKATEIn IONOK HAdExHO 3aKpePJIeHbl.
IEPBOE INCIOJIb3OBAHNE
1.YCTAHOBKA BPEMEHN
Pn nepBOM BkIoueHn np6opa Heo6xOIMO yCTAHOBNTB Bpem:Ha dncnnee mraet 四 A O T O 10.00
YTo6bI NpeHn K yCTaHOBKe BpeMeHN CYTOK, HaxMnte OJHOBpeMeHH KOHNI :YCTaHOBtE BpMa CYTOK C NOMOuBIO KHONOK
PnmeaHne:YTO6bI N3MeHNTb TeKyuue Bpema,HaNPmep, nocne IINTeBHO OTKIOUcHn ENEKTPuueCTBa,CJeNyET NepeyctaHOBt bacbl..
2. HACTPOIMKA 3BYKOBOROCINHJIA
Bb6paB HyxHoe 3aueHne BpeMeHN, HaxMNTe KhONky BpeMeHu: Ha DCNnee NOBNTcRA HADNCb (3Byk 1).
BbIepeTe Heo6xOaMmbl 3ByKOBO CnHrHaJI HaKaTNem KHOKN 3aTEM IINIOITBePckDeHnna HaxMNTE KhoNkY epMeHu.
3.ПОГРЕВ ДУХOBКИ
HObBdyXoBOI uKaΦ MoKET ABJIbTcR NCTOCHNOK 3aNaXOB, CB3aHHbIX C nPoUeCCOM POn13BOJCTBa; 3TO HOpMaJIbHOe ABNeHne. Ipeed NaJALOM nprirotobHeHn6IIOd peKOMEHNyTeCn pOrpTeB nyCTO dyXoBOI uKaΦ dny UdaJIeHn BO3MOKHBIX OCTaTOHbIX 3aNaXOB.
CnMMTe c dyXOBOrO 1kaΦa3aunTHbI KapTOH n npo3paHyIO
IJIeHky, n3BLeKeITe BCE npuHaJTeJxHOctn.
PporpeBaIte dyxOBky npri TemnepaType 250 ^ C B TeueHne npimepHO OndHoro Yaca. DxyOBKa B 3TO Bpemr DonxHa 6bITb nyCTOn.
PnmeuHne: nOcNE nepBOrO uCNoJIb3OBaHn neu peKOMeHnyETcR npOBeTpNTb NOMEUeHne.
PEKIMbI IN EXEJIHEBHOE IcNoJIb3OBAHNE

BblKJ
BbIKIouHe nE yXOBOro 1kaa.

IIOCBETKA
BkHoueHne OcBeUeHnA dyXOBOro shkaa.

Obbl
PekimДяпriROTOBHeHЯJI6bIX 6JIIOJ TOnbKO Ha ODHOM yPOBHe.

ПОДРУМЯНВАНЕ
PexnM nBn BnneKaHn nporOB C coOHn HaunHKoHa ODHOM ypOBHe. B daHHom pexnme dOnyckaeTc npuroTOBJeHne 6IIOu H aDByx npOBHx OndOBpeMeHHo. B nOceHem cnyae I
6OJIe paBHomePHoro npuroTOBJeHn peKomeHdyETc MeHrTB MeCTaMn npuroTabJbBaEMbIe 6IIOda.

TnIb
PexnM nI nprirotOBHeHna rpiJe cTeiKOB,Ke6aOB, KO16acOK,OBOUHbIX rpaTeHOB uXle6HbIX TOCTOB.Pp nprirotOBHeHmMaHa rpiJe peKOMeHNyETcNcNOb3OBA Tb npOTBeH dIra C6opa coka: noCTabTe ero Ha IIO6o yPOBeH NOpeWetKoI n DoabBe 500 mN NITbeBO B ODibl.

TYPBOFPIb
Pekn m Jn KApKn KpyNbIX KyCKOB Mca (poCT6nΦ, 6apaHbno HoxKn, cblnTata). PekomeHyETcN CNOB3OBA Tb npOTNBb Dnncbopa CTekaUoero coka: noCTaBBte ero Ha NIOB yPOBEh NOpeWetkOu DoabTe 500 mI NTBeBOB BObl.

PA3MOPAXKUBAHVE
Дяуckошного pa3mopaxnBaHЯ npOdyKTOB.
1.BbI5OPPEKIMMA
YTo6bI Bb6paTb peXIM, NOBepHInTe pyUky Bb6opa Ha 3HaouK Heo6xOuMOro peXUMa.
2.BKJIIOUOHEHNEPEXKIMA
Дявкюнгь ВьбpaHHOro peKIMa yCTaHOBnTe HxHyTo Tempepaty, NOBepHyB pyKy TepMOCTaTa. 4To6blnpepBaTb DeIcTBnE peKIMa B IIO60MOMeHT, BbIKNIOUHTe duXOBky, NOBepHyB pyKy BbIbopa n pyKy TepMOCTaHa On
3.IIPOITPEB
PnBkIoueHmpeKIma3aropaeTcNHNdkatOpTePMoCTata, coo6uOuO uHaue npouceca nporpeBa.
HnDnKaTOp rachet B MOMeHT 3aBepseHna HArpeBa,yKa3bIbaN Ha To, YTO dYxOBKa DOCTnRHa yCTaHOBneHHo TEMpeaTypbI: NOMeCTnTe B dYxOBky 6JIIONo HAuHInTe pNiROTOBNeHne.
PpmeuHne: NomeeHne 6IIOda B dyxOBoW uKaΦ do 3aBepHeHn nporpeBa MoKeT yXuDunb pe3yNbTaT pNIROTOBHeHn.
4.ПОТРAMMИРОBAHIVЕ ПИГOTOOTOBJIECHNIA
Iocne BbIbopa n aKTHBaUnpeKIma MoKHO 3aJaTb 3HaYeHHe nnTeNbHOCTn.

ДЛNTIELHOCTh
HaKMITE KHNKy BpeMeHn:HaHHaet MURaTb CMBOJ

Eepe pa3 haxMnte KONky BpemeHn:Ha dncnnee NOBRTc HAdnncb «DUR» n Muraoune cunBOJbl «AUTO».

3aainTe nnTebHoctb, nCnoJb3y KhoNk n. Ype3 HEckonbKO cekyHn Ha nucnlee noBNTc Tekyuee Bpemr. CmBOJI «AUTO» octaHTc ropeb B noDTBepxdHe ne BblONHeHHo HAcTpoKn.
I npOBepKnOCTaBweroCBApeMeHn pnproToBneHna HaxMnte KhoNky BpeMeHN u ydepXNBaiTe He MeHee 2 cekyHd. EcnBpemHyKHO n3MeHNTb, HaxMnte 3Ty KhoNky eue pa3 n n3MeHNTe dInTeNbHOCTb, NCOnb3yra KHONk +n
Nocne OKOHuaHn npuROTOBHeHn CmBOJ mCue3aET,dyXOBKa nOdaet 3ByKoBoi CnHaan,a HauPiNCb «AUTO» Ha dncnnee HauHnae MMrTaTb.
YTO6bI BbIKIOUHTb 3ByKOBo CnHaI, HAKMITE JIO6yIO KHOJky.
PiOBeHInTe pyKy Bbl6opa pexKMa n pyKy tepMOCTaTa o6paTHo Ha 0 ,
3aTeM HAKMTe KHOJky BpeMeHN u yepKBAuTe He MeHee 2
CEkyHn, YTO6bI BbIKIOUHTb DxyBOB uKaΦ.
YCTAHOBKA TAVIMEPA
DnHbIpeKIM He npepbBaet H He 3anyckaet npoecc
PnroTOBHeHr:OH NIIuMb IO3BOJAE TNCIOB3OBaTb INCJIeB
KaueCTBe TaMepa, KaN Pn BkIOUeHHOM, TaK N Pn BBIKIOUeHHOM
DyXOBOM uKafe.
IraakTUBaun TaMepa HaxmTe UyepxNBaTe KHONKy
BpemeHn:Ha DnCJIee HaHHT MMRtB CMBON

KHOIIAMN 3aIaTe HxkyHIOIINTEbHOCTb:O6paTHbIOTcET HaHTcHpe3 HeCKoJIbKO CeKyH.
Ha nncnnee noBnTcBpeM cyTOK n OCTaHETcC NMBOIOPTBepkdaouu, yTo TaImep yCTaHOBneH.
PnmeaHne:YtObblyBnDteNpHHeoXoMocTnN3MeHHTb 0bpaTHbIOTcET,eupePa3HaXmITE KhONKy BpeMeHNu ydepKnBaIte ee He MeHee 2 cekyHd.
TABLIUCA IPNIROTOBLEHNA BJIUD
He nCnoB3yIe napooOuNCTnTEn.
He nCnoB3yTe a6pa3NBbIe ry6Kn, CTaNbHbIe MoaALKn, arpeccuBbIe n a6pa3NBbIe MOUcne cpeCTBa, TAK KAK OHN MOrYT NOBpeDnTb NOBepXHOCTn np6Opa. HadehBeT
3aunTHbIe nepuATkn.
OTKnIOHTe DxyxOBoi WkaΦ OT 3JIeKTPocTe NpePeB BbINOnHeHnEm IIO6bIX DeIcTBn No O6CnyXuBaHnIO.
CHATNE UYCTAHOBKA DBEPUbl
IJI CHATNIA DBepbIO NOJHOCTbIO OTKPOINTe ee n OTKNHBTE
fIKCaTOpBI B NOJIOKeHne pa36NoKIpOBKn (1).PpIKpOInTe DBepuy,
HACKoJIbKO 3TO BO3MOXHO (2).HaDeXHO 3aXBaNTe DBepuy oBeIMn
pykAMn (He 3a pyuKy).PiocTo CHIMnTe DBepuy (3):IJIa TOrO
npoONKaIte ee npIKpbIBaTb N OJHOBpeMeHHo NOTAHnTe BBepx
(a), IOKa OHa He BByIeTn3 na3OB (b).
IIOJXNTe DBepuy Ha MrgkyIO NBepxHOCTb. Iy uCTaHOBKn DBepcIi NOHecnte ee K DxyOBKe, COBMeCTte KpOKN PeTeNb C rHe3dAMN i BCTaBBTe BEPxHne qACTn peTEnB rHe3da. OnyCTnte DBepuy, a 3aTEM NIOHOCTBIO OTKpoIne ee. IOBepHnTE oHKCaTopbI B nCXoHoe NIOJoxHeHne: BHN3 Do ynpa. 3akpoTne DBepuy i y6eINTEcb, YTO OHa HaxODITcB ODoHn PNOCKOCTn C naHelenbO npabHeHn. Ecnn Het, NOBTOPNe pnpBeDeHHbE Bbiue sarn.
CLICK & CLEAN - OYNCTKA CTEKJA
Korda DBepca CHaTa nLeXHT Ha MmKoI NOBepxHOCTn pyuKoI BnH3,ODHOBpeMeHHO HaxMnte Dba fHKCaTopa (1) n ChmMTe BepxHn KpaDBePcbl,NotraHyB ero Ha ce68 (2).
IOnHIMnTE BHyTpEHHee CTeKnO, KpenKO yJepKnBaer eo6eMMpyKaMn, 3aTeM CHmnte npeed OuNCTKo NIOxKeTe erHaMgKyIO NOBepXHOCTb (3).
BHyTpHee CTeKIO yCTaHObIeNO npabunbHO,ecn B JEBOM
yIy BuHa 6yKBa R a npO3paHna NOBepxHOCTb (6e3 npHTa)
CMOTpNT BBepx.ChaJana BCTaBBte B na3bl DmHHyO CTOpOHy
CTeKla C 6yKBoN R ,3aTEM ONyCTnteeroBnpEynCMOTpeHHoe
noJooKeHne (4).3aΦNKcnpuTe BepxHn KpaI (5):UeJyOK O3Naaet
npabunbHyO yCTaHOBky.
Ipepe yCTaHOBko DBepu IPPOBepbTe cenoCTHOCTb yNIOtheHnA.