SGSP305TS - Cooker THERMADOR - Free user manual and instructions
Find the device manual for free SGSP305TS THERMADOR in PDF.

User questions about SGSP305TS THERMADOR
0 question about this device. Answer the ones you know or ask your own.
Ask a new question about this device
Download the instructions for your Cooker in PDF format for free! Find your manual SGSP305TS - THERMADOR and take your electronic device back in hand. On this page are published all the documents necessary for the use of your device. SGSP305TS by THERMADOR.
USER MANUAL SGSP305TS THERMADOR
natural_image
A bowl of pasta with vegetables, peaches, and meat toppings, served on a checkered napkin with chopsticks and a fork (no text or symbols visible).THERMADOR.COM
Table of
CONTENTS
▲ Safety Definitions 4
IMPORTANT SAFETY INSTRUCTIONS 5
Gas Appliance Safety 5
Fire Safety 6
Gas Safety 6
Burn Prevention 7
Child Safety 7
Cleaning Safety 7
Cookware Safety 8
Proper Installation and Maintenance 8
State of California Proposition 65 Warning: 8
Getting Started 9
Before Using the Appliance for the First Time 9
Parts and Accessories 9
Accessories 11
Sealed STAR™ Burners 11
STAR™ Burner Caps 11
Thermador ExtraLow® (XLO) STAR™ Burners (SGSX and SGSXP models only) 12
Burner "ON" Lights 12
Install Burner Grates 12
Control Knobs 13
Operation 14
About the Appliance 14
Getting the Most Out of Your Appliance 15
Cleaning and Maintenance 22
Cleaning 22
Cleaning Guidelines 23
Maintenance 24
Service 25
Before Calling for Service 25
Product Rating Label 26
THERMADOR® Support 26
Service 26
Parts and Accessories 26
STATEMENT OF LIMITED PRODUCT WARRANTY .... 27
What this Warranty Covers & Who it Applies to 27
How Long the Warranty Lasts 27
Repair/Replace as Your Exclusive Remedy 27
Out of Warranty Product 27
Warranty Exclusions 27
This THERMADOR Appliance is made by
BSH Home Appliances Corporation
1901 Main Street, Suite 600
Irvine, CA 92614
Questions?
1-800-735-4328
www.thermador.com
We look forward to hearing from you!

Safety Definitions

WARNING
This indicates that death or serious injuries may occur as a result of non-observance of this warning.

CAUTION
This indicates that minor or moderate injuries may occur as a result of non-observance of this warning.
NOTICE: This indicates that damage to the appliance or property may occur as a result of non-compliance with this advisory.
Note: This alerts you to important information and/or tips.
IMPORTANT SAFETY INSTRUCTIONS
READ AND SAVE THESE INSTRUCTIONS
Gas Appliance Safety
⚠ WARNING: If the information in these instructions is not followed exactly, a fire or explosion may result causing property damage, personal injury or death.
- Do not store or use gasoline or other flammable vapors and liquids in the vicinity of this or any other appliance.
- WHAT TO DO IF YOU SMELL GAS
- Do not try to light any appliance.
- Do not touch any electrical switch.
- Do not use any phone in your building.
- Immediately call your gas supplier from a neighbor's phone. Follow the gas supplier's instructions.
- If you cannot reach your gas supplier, call the fire department.
- Installation and service must be performed by a qualified installer, service agency or the gas supplier.
IMPORTANT SAFETY INSTRUCTIONS
READ AND SAVE THESE INSTRUCTIONS
IMPORTANT: SAVE THESE INSTRUCTIONS FOR THE LOCAL ELECTRICAL INSPECTOR'S USE.
INSTALLER: LEAVE THESE INSTRUCTIONS WITH THE UNIT FOR THE OWNER.
OWNER: PLEASE RETAIN THESE INSTRUCTIONS FOR FUTURE REFERENCE.
WARNING
When properly cared for, your new appliance has been designed to be safe and reliable. Read all instructions carefully before use. These precautions will reduce the risk of burns, electric shock, fire and injury to persons. When using kitchen appliances, basic safety precautions must be followed including those in the following pages.
Fire Safety
Save these instructions.
Set the burner control so that the flame does not extend beyond the bottom of the pan.
Do not allow aluminum foil, plastic, paper or cloth to come in contact with a hot surface element, burner or grate. Do not allow pans to boil dry.
If the cooktop is near a window, forced air vent or fan, be certain that flammable materials such as window coverings do not blow over or near the burners or elements. They could catch on fire.
Always have a working smoke detector near the kitchen.
Never leave the cooktop unattended when in use.
Boilovers cause smoking and greasy spillovers may ignite.
WARNING
TO REDUCE THE RISK OF A GREASE FIRE:
a. Never leave surface units unattended at high settings. Boilovers cause smoking and greasy spillovers that may ignite. Heat oils slowly on low or medium settings.
b. Always turn hood ON when cooking at high heat or when flambéing food (i.e. Crêpes Suzette, Cherries Jubilee, Peppercorn Beef Flambé).
c. Clean ventilating fans frequently. Grease should not be allowed to accumulate on fan or filter.
d. Use proper pan size. Always use cookware appropriate for the size of the surface element.
In the event that personal clothing or hair catches fire, drop and roll immediately to extinguish flames.
Smother flames from food fires other than grease fires with baking soda. Never use water on cooking fires.
Take care that drafts like those from fans or forced air vents do not push the flames so that they extend beyond the edges of the pan.
Have an appropriate fire extinguisher available, nearby, highly visible and easily accessible near the appliance.
WARNING
TO REDUCE THE RISK OF INJURY TO PERSONS IN THE EVENT OF A GREASE FIRE, OBSERVE THE FOLLOWING:
a. SMOTHER FLAMES with a close-fitting lid, cookie sheet, or metal tray, then turn off the burner. BE CAREFUL TO PREVENT BURNS. If the flames do not go out immediately, EVACUATE AND CALL THE FIRE DEPARTMENT.
b. NEVER PICK UP A FLAMING PAN – You may be burned.
c. DO NOT USE WATER, including wet dishcloths or towels – a violent steam explosion will result.
d. Use an extinguisher ONLY if:
- You know you have a Class ABC extinguisher, and you already know how to operate it.
- The fire is small and contained in the area where it started.
- The fire department is being called.
- You can fight the fire with your back to an exit.
During a power failure, only the cooktop burners can be lit manually.
Whenever possible, do not operate the ventilation system during a cooktop fire. However, do not reach through fire to turn it off.
Gas Safety
To prevent carbon monoxide build-up, do not block appliance air vents.
Have the installer show you where the gas shut-off valve is located.
For proper burner performance, keep igniters clean and dry.
If a burner goes out and gas escapes, open windows and doors. Wait until gas dissipates before using the appliance.
WARNING
All igniters spark when any single burner is turned on for SGS and SGSP models. One igniter sparks on SGSX and SGSXP when burner is turned on. Do not touch any of the burners when the cooktop is in use.
If you smell gas, your installer has not done a proper job of checking for leaks. If the connections are not perfectly tight, you can have a small leak and, therefore, a faint smell. If you smell gas, immediately shut off the unit and contact an authorized service technician to diagnose the issue. See Warning, \~ "Gas Appliance Safety" on page 5
IMPORTANT SAFETY INSTRUCTIONS
READ AND SAVE THESE INSTRUCTIONS
WARNING
To prevent flare-ups all grates must be properly positioned on the cooktop whenever the cooktop is in use. Each of the feet must be placed into the corresponding dimples in the cooktop. Do not use a grate if the rubber feet are missing or damaged.
Keep the igniter ports clean for proper lighting performance of the burners. It is necessary to clean these when there is a boilover or when the burner does not light even though the electronic igniters click.
WARNING
To prevent flare-ups do not use the cooktop without all burner caps and all burner grates properly positioned.
WARNING
Do not clean or touch any of the burners when an extra low burner (if equipped) is in use. When the extra low burner automatically reignites the ignitor at the burner will spark.
WARNING
Use this appliance only for its intended use as described in this manual. NEVER use this appliance as a space heater to heat or warm the room. Doing so may result in carbon monoxide poisoning and overheating the appliance. Never use the appliance for storage.
Burn Prevention
DO NOT TOUCH SURFACE UNITS OR AREAS NEAR UNITS - Surface units may be hot even though they are dark in color. Areas near surface units may become hot enough to cause burns. During and after use, do not touch, or let clothing, potholders, or other flammable materials contact surface units or areas near units until they have had sufficient time to cool. Among these areas are the cooktop and areas facing the cooktop.
Do not heat or warm unopened food containers. Build-up of pressure may cause the container to burst and cause injury.
Always turn hood ON when cooking at high heat or when flambéing food (i.e. Crêpes Suzette, Cherries Jubilee, Peppercorn Beef Flambe).
Use high heat settings on the cooktop only when necessary. To avoid bubbling and splattering, heat oil slowly, on no more than a low-medium setting. Hot oil is capable of causing extreme burns and injury.
Never move a pan of hot oil, especially a deep fat fryer. Wait until it is cool.
Secure all loose garments, etc., before beginning. Tie long hair so that it does not hang loose, and do not wear loose-fitting clothing or hanging garments, such as ties, scarves, jewelry, or dangling sleeves.
Child Safety
When children become old enough to use the appliance, it is the responsibility of the parents or legal guardians to ensure that they are instructed in safe practices by qualified persons.
Do not allow anyone to climb, stand, lean, sit, or hang on any part of an appliance, especially a door, warming drawer, or storage drawer. This can damage the appliance, and the unit may tip over, potentially causing severe injury.
Do not allow children to use this appliance unless closely supervised by an adult. Children and pets should not be left alone or unattended in the area where the appliance is in use. They should never be allowed to play in its vicinity, whether or not the appliance is in use.
CAUTION
Items of interest to children should not be stored in an appliance, in cabinets above an appliance or on the backsplash. Children climbing on an appliance to reach items could be seriously injured.
Cleaning Safety
IMPORTANT SAFETY NOTICE: The California Safe Drinking Water and Toxic Enforcement Act requires the Governor of California to publish a list of substances known to the state to cause cancer, birth defects or other reproductive harm, and requires businesses to warn customers of potential exposure to such substances. The burning of gas cooking fuel and the elimination of soil during self-cleaning can generate some by-products which are on the list. To minimize exposure to these substances, always operate this unit according to the instructions contained in this booklet and provide good ventilation.
WARNING
The burning of gas cooking fuel can create small amounts of Carbon Monoxide, Benzene, Formaldehyde and Soot. To minimize exposure to these substances the burners should be adjusted by a certified installer or agency to ensure proper combustion. Ensure proper ventilation with an open window or use a ventilation fan or hood when cooking with gas. Always operate the unit according to the instructions in this manual.
IMPORTANT SAFETY INSTRUCTIONS
READ AND SAVE THESE INSTRUCTIONS
After a spill or boilover, turn off the burner and allow the cooktop to cool. Clean around the burner and burner ports. After cleaning, check for proper operation.
Do not clean the appliance while it is still hot. Some cleaners produce noxious fumes when applied to a hot surface. Wet clothes and sponges can cause burns from steam.
Cookware Safety
Hold the handle of the pan when stirring or turning food. This helps prevent spills and movement of the pan.
Use Proper Pan Size.
The use of undersized cookware will expose a portion of the heating element or burner to direct contact and may result in ignition of clothing. Select cookware having flat bottoms large enough to cover the surface heating unit.
This appliance is equipped with one or more surface units of different sizes. Proper relationship of cookware to heating element or burner will also improve efficiency.
Always position handles of utensils inward so they do not extend over adjacent work areas, burners, or the edge of the cooktop. This reduces the risk of fires, spills and burns.
Adjust burner flame size so that it does not extend beyond the edge of the cookware. Proper relationship of cookware to burner flame reduces safety risks.
Use only certain types of glass, heatproof glass, ceramic, earthenware, or other glazed utensils that are suitable for cooktop use.
Proper Installation and Maintenance
Have the installer show you the location of the circuit breaker or fuse. Mark it for easy reference.
This appliance must be properly installed and grounded by a qualified technician. Connect only to properly grounded outlet. Refer to Installation Instructions for details.
This appliance is intended for normal family household use only. It is not approved for outdoor use. See the Statement of Limited Product Warranty. If you have any questions, contact the manufacturer.
Do not store or use corrosive chemicals, vapors, flammables or nonfood products in or near this appliance. It is specifically designed for use when heating or cooking food. The use of corrosive chemicals in heating or cleaning will damage the appliance and could result in injury.
WARNING
Failure to operate knobs properly may result in personal injury and damage to the appliance.
This appliance is not intended for operation with an external time switch or external remote control.
Do not operate this appliance if it is not working properly, or if it has been damaged. Contact an authorized servicer.
Do not repair or replace any part of the appliance unless specifically recommended in this manual. Refer all servicing to a factory authorized service center.
To avoid electrical shock hazard, before servicing the appliance, switch power off at the service panel and lock the panel to prevent the power from being switched on accidentally.
State of California Proposition 65 Warning:
WARNING
This product can expose you to chemicals including vinyl chloride, which is known to the State of California to cause cancer and birth defects or other reproductive harm. For more information go to
www.P65Warnings.ca.gov.
Note: IMPORTANT SAFETY NOTICE: The California Safe Drinking and Toxic Enforcement Act requires the Governor of California to publish a list of substances known to the state to cause cancer, birth defect or other reproductive harm, and requires businesses to warn customers of potential exposure to such substances. The burning of gas cooking fuel and the elimination of soil during self-cleaning can generate small amounts of carbon monoxide. The fiberglass insulation in Self Clean ovens gives off very small amounts of formaldehyde during the first several cleaning cycles. California lists formaldehyde as a potential cause of cancer. Carbon monoxide is a potential cause of reproductive toxicity. Exposure to these substances can be minimized by:
-
Providing good ventilation when cooking with gas.
-
Operating the unit according to the instructions in this manual.
Getting Started
Before Using the Appliance for the First Time
- Remove all packing materials and literature from the cooktop surface.
- Wipe with a clean, damp sponge and dry.
- There may be a slight odor during the first several uses. This is normal and will disappear.
- Optimum cooking results depend on the proper cookware being selected and used. See "Proper Cookware".
- Read all safety precautions and Use and Care Manual information prior to operating.
Parts and Accessories
SGS305TS, SGSX305TS
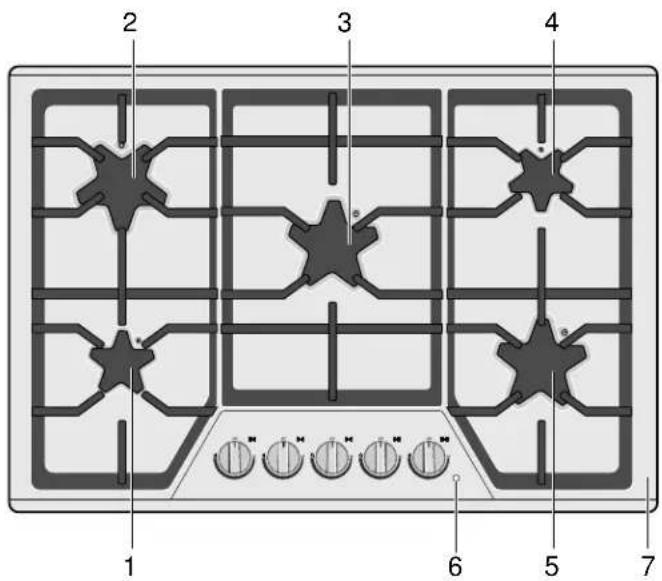
text_image
1 2 3 4 5 6 71 Left front burner (8,000 BTU/2.34 kW) XLO feature on SGSX model only
2 Left rear burner (10,000 BTU/2.93 kW)
3 Center burner (16,000 BTU/4.69 kW) XLO feature on SGSX model only
4 Right rear burner (8,000 BTU/ 2.34 kW)
5 Right front burner (10,000 BTU/ 2.93 kW)
6 Burner "on" indicator light
7 Serial Number/Data Plate location (right front underneath)
SGSP305TS, SGSXP305TS
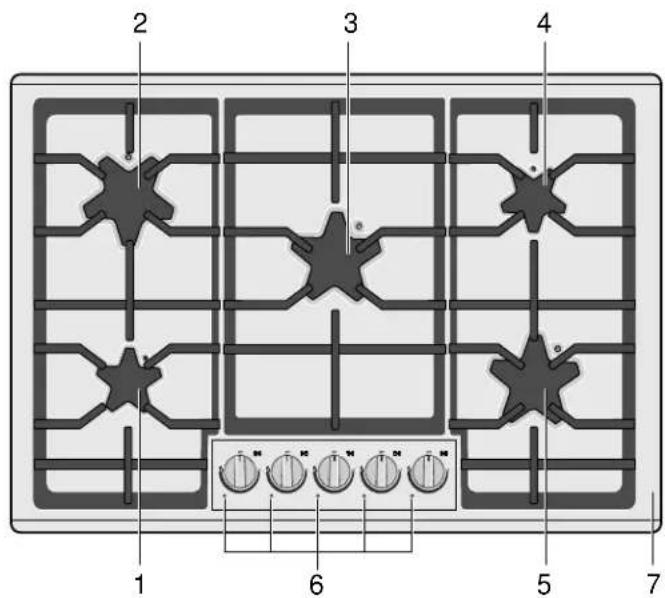
text_image
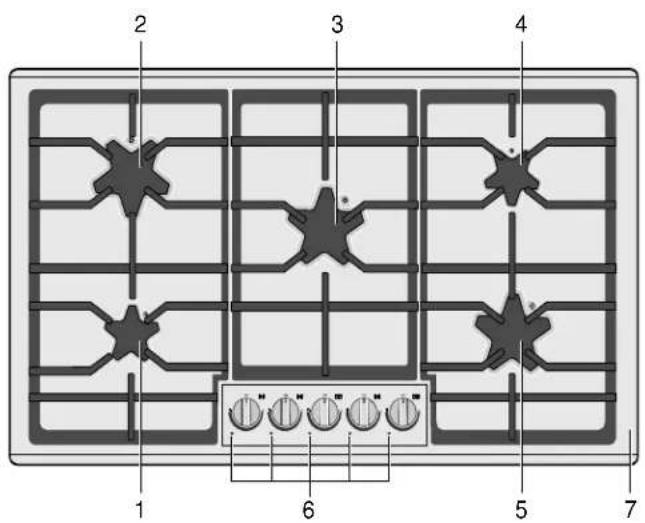
2 3 4 1 6 5 71 Left front burner (8,000 BTU/ 2.34 kW) XLO feature on SGSXP model only.
2 Left rear burner (10,000 BTU/ 2.93 kW)
3 Center burner (18,000 BTU/ 5.28 kW) XLO feature on SGSXP model only.
4 Right rear burner (8,000 BTU/ 2.34 kW)
5 Right front burner (10,000 BTU/ 2.93 kW)
6 Burner "on" indicator lights - XLO has a light ring, see XLO burner section for details.
7 Serial Number/Data Plate location (right front underneath)
SGS365TS, SGSX365TS SGSP365TS, SGSXP365TS
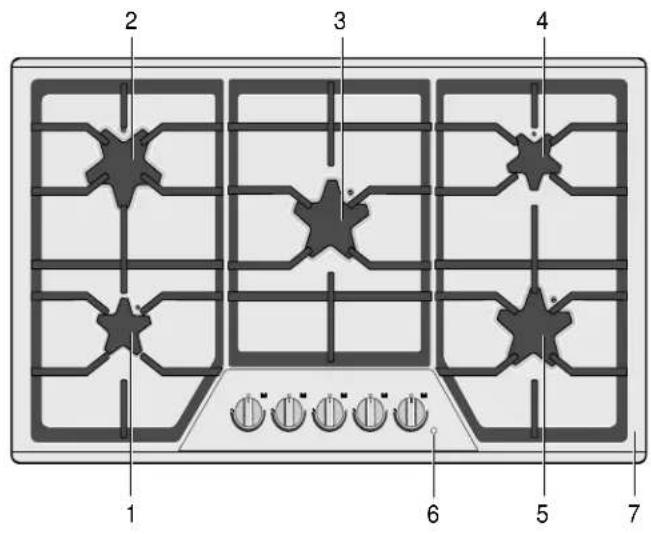
text_image
1 2 3 4 5 6 71 Left front burner (9,100 BTU/ 2.67 kW) XLO feature on SGSX model only
2 Left rear burner (12,000 BTU/ 3.52 kW)
3 Center burner (16,000 BTU/ 4.69 kW) XLO feature on SGSX model only
4 Right rear burner (9,100 BTU/ 2.67 kW)
5 Right front burner(12,000 BTU/ 3.52 kW)
6 Burner "on" indicator light
7 Serial Number/Data Plate location (right front underneath)
text_image
1 2 3 4 5 6 71 Left front burner (9,100 BTU/ 2.67 kW) XLO feature on SGSX model only
2 Left rear burner (12,000 BTU/ 3.52kW)
3 Center burner (18,000 BTU/ 5.28 kW) XLO feature on SGSX model only
4 Right rear burner (9,100 BTU/ 2.67 kW)
5 Right front burner (12,000 BTU/ 3.52 kW)
6 Burner "on" indicator light
7 Serial Number/Data Plate location (right front underneath)
Accessories
Below is an overview of the accessories available for purchase for the Thermador gas cooktops and information on how to use them correctly. These accessories are specially developed for your appliance.
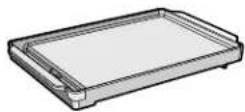
Griddle
SGRIDDLEW
- Use this specially developed griddle for foods such as pancakes, French toast, grilled sandwiches, bacon, vegetables and hamburgers.
- The Thermador griddle is customized to fit on the center burner for all Thermador gas cooktops.
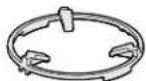
Wok Ring
SWOKRINGW
- For stir frying meat, vegetables and rice with a round-bottom wok.
- Use only with round-bottom woks with a maximum diameter of 16 inches.
- The Thermador wok ring is recommended to be used on the center burner for all Thermador gas cooktops.
Sealed STAR™ Burners
Your new cooktop has sealed STAR™ gas burners. There are no burner parts under stainless steel to clean, disassemble or adjust. Your cooktop has three different burner sizes: small, medium, and large. Match the corresponding letters on the burner cap and burner base. See Burner Cap Placement.
STAR™ Burner Caps
The burner cap is porcelain coated steel. The burner caps must be properly placed for the cooktop to function properly. If the burner cap is not properly placed, one or more of the following problems may occur:
- Burner flames are too high.
• Flames shoot out of burners.
• Stainless steel discolors. - Burners do not ignite.
- Burner flames light unevenly.
- Burner emits gas odor.
WARNING
To prevent flare-ups and avoid creation of harmful by-products, do not use the cooktop without all burner caps, all burner bases and all burner grates properly positioned.
WARNING
To prevent burns, do not touch burner caps, burner bases or grates while hot. Turn the cooktop off and allow the burners to cool.
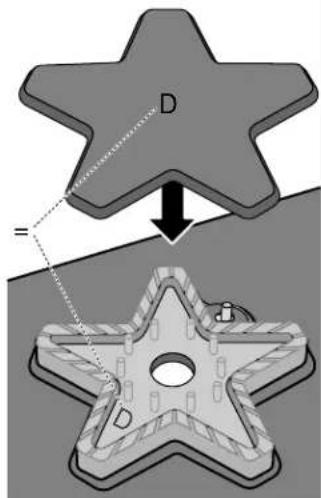
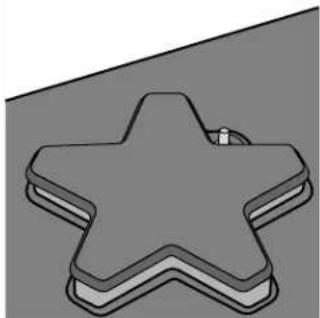
Burner Cap Placement
Each cap has a letter (B, D, or F) cast in the underside of the cap that corresponds to a letter (B, D, or F) cast in the burner base that is attached to the appliance.
- Place each burner cap on its correct burner base per its corresponding letter designation.
- Place burner cap gently on top of burner base so that the prongs of the burner base fit snugly into the groove of the burner cap.
1
text_image
D =2
natural_image
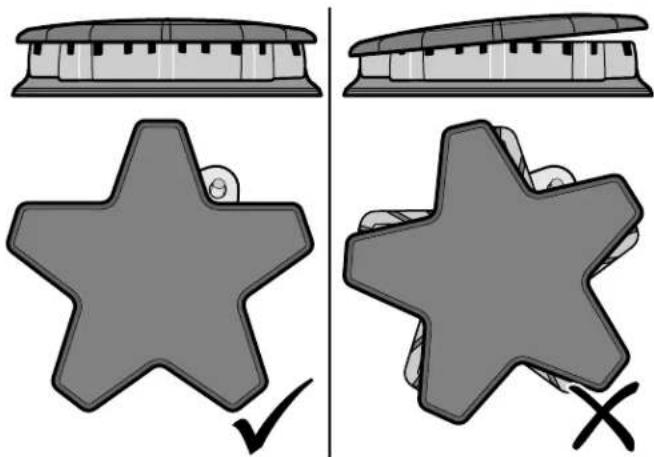
3D-rendered star-shaped object with layered surface and a small protrusion (no text or symbols)Checking Burner Cap Placement
- Check to make sure that there is no gap between the burner cap and burner base. See illustration below for correct and incorrect placements of the burner cap.
- You may gently try to move the burner cap from side to side to check if it is properly placed. If properly placed, the cap will click from side to side as the prongs hit the groove ridge.
text_image
Illustration comparing two types of hair clips: one with a piano keyboard, the other with a star-shaped clip and a checkmark indicating cancellation.Thermador ExtraLow® (XLO) STAR™ Burners (SGSX and SGSXP models only)
The center and left front burners are enhanced with the ExtraLow® (XLO®) feature. XLO allows the reduction of heat even further than the Low setting in order to simmer, poach, melt or hold cooked food without scorching or burning.
The XLO feature has the following properties:
- The XLO feature will cycle the burner flame ON and OFF when the control knob is set within one of the five XLO settings (the time the flame is ON depends on the knob setting).
- Igniters will spark during the re-ignition of the XLO burners. There will be a slight clicking noise when this occurs (approximately every 60 seconds).
- For SGSXP models only, the left side of the light ring will turn off and the right side of the light ring will illuminate in blue when activating the XLO setting.
WARNING
Do not clean or touch any of the burners when one or both ExtraLow® burners are in use. When the ExtraLow® burner automatically reignites, the igniter at the burner will spark.
Burner "ON" Lights
For SGS and SGSX models: There is an "ON" light on this cooktop. When illuminated, it indicates at least one burner is in use.
For SGSP models:
An "ON" light corresponds with the knob for each burner (a total of five lights). When illuminated, it indicates that the corresponding burner is in use.
For SGSXP models:
A light ring around each knob will illuminate to indicate that the corresponding burner is in use.
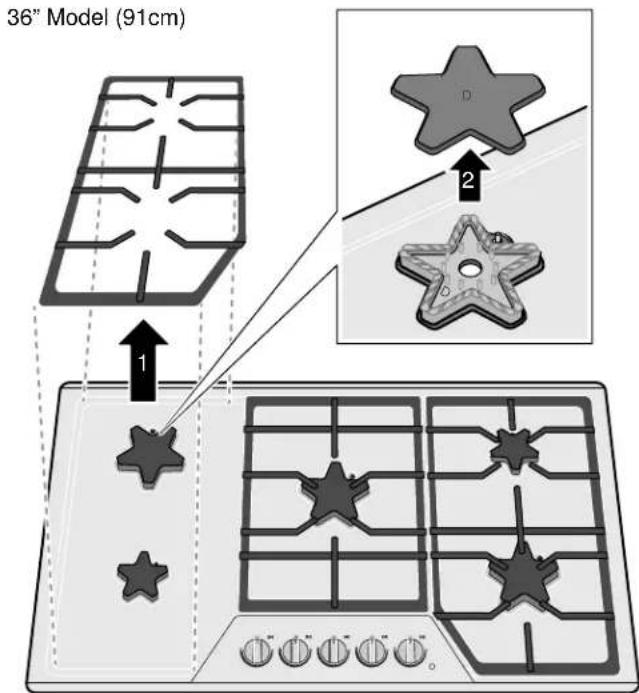
Install Burner Grates
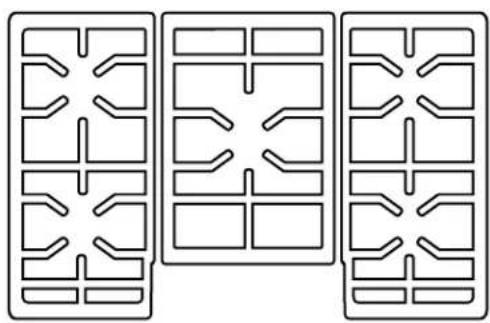
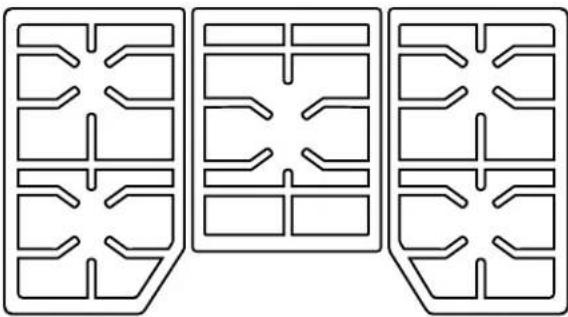
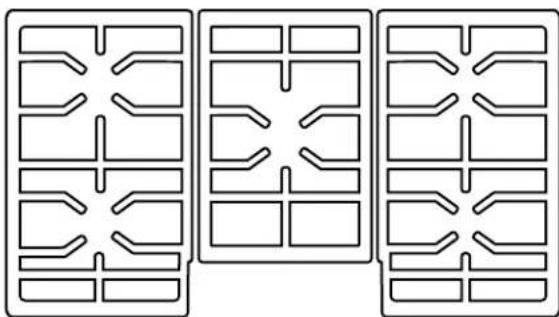
Properly position and install each burner grate according to each individual model as shown in the illustrations below.
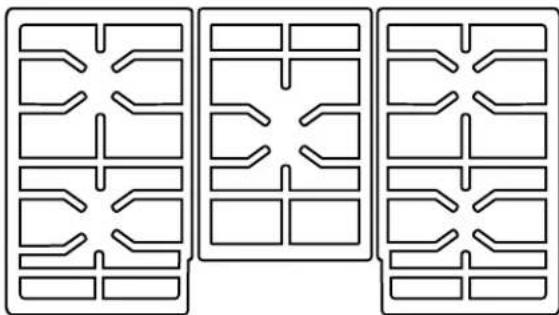
30" SGS
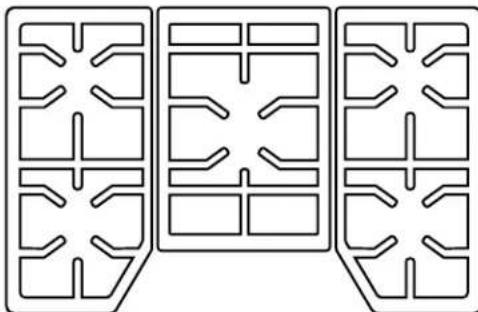
natural_image
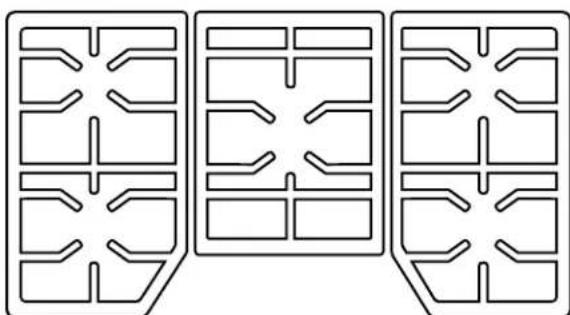
Three identical abstract geometric patterns arranged in a grid, no text or symbols present.30" SGSP
natural_image
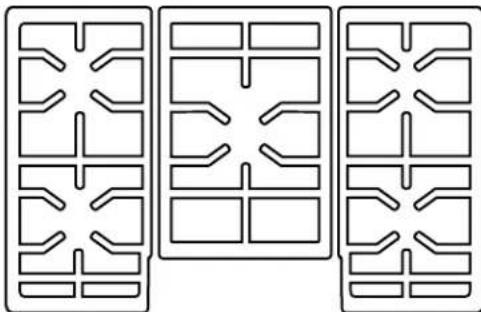
Three identical rectangular panels with internal geometric patterns, no text or symbols present36" SGSX
natural_image
Three identical abstract geometric patterns with symmetrical rectangular cutouts and diagonal lines, no text or symbols present.36" SGSXP
natural_image
Three identical rectangular grid patterns with internal curved cutouts, no text or symbols present.WARNING
To prevent flare-ups, properly support pots and avoid spills, all grates must be properly positioned on the cooktop whenever the cooktop is in use. Each of the four feet must be placed into the corresponding dimples in the cooktop. Do not use a grate if the rubber feet are missing or damaged.
For replacement of rubber feet: Call Customer Support at 1-800-735-4328.
Control Knobs
The cooktop has one control knob for each burner. Push down and turn to the left to light and set the desired heat setting.
WARNING
Failure to operate knobs properly may result in personal injury and damage to the appliance.
Standard Knobs
SGS and SGSP models, which do not feature ExtraLow® operation, have only standard metal burner controls and rubber grommets.
To operate: Select the appropriate control knob and push down. A clicking noise will occur immediately after pushing the knob. Turn knob counterclockwise to the HI setting to ignite the flame. Continue turning knob counterclockwise to desired flame size. Turn off by turning the control knob clockwise to OFF.
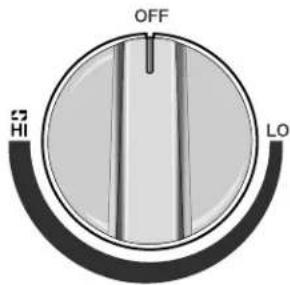
text_image
OFF HI LOExtraLow® (XLO) Knobs
SGSX and SGSXP models have standard metal burner controls and rubber grommets as well as two ExtraLow® burner controls on the left front and center. → "Thermador ExtraLow(XLO) STAR™ Burners (SGSX and SGSXP models only)" on page 12
The ExtraLow® burner controls have five XLO settings that vary in heating level. A slight catch will be felt when at the LO position and each designated XLO setting.
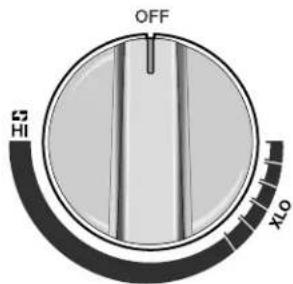
text_image
OFF HI LOTo operate: Select the appropriate control knob, push down and turn counterclockwise until the control knob is set within one of the five XLO settings. Turn off by turning the control knob clockwise to OFF.
Control Knob Removal
To remove knob and/or grommet: With control knob in the OFF position, gently lift knob up and off. Gently pull the grommet from the sides and lift out.
WARNING
To avoid possible electric shock, do not reach through control opening into rough-in box.
WARNING
Do not use the appliance without the knobs and grommets in place.
To replace knob and/or grommet: Carefully insert the grommet into the opening, ensuring that the maintop is seated in the track around the entire perimeter of the grommet. Replace control knob by placing indicator line at the OFF position. Press down firmly.
Operation
About the Appliance
Use the cooktop for surface cooking applications such as boiling, frying, simmering, steaming and sautéing.
WARNING
The burning of gas cooking fuel can create small amounts of carbon monoxide, benzene, formaldehyde and soot. To minimize exposure to these substances, the burners should be adjusted by a certified installer or authorized servicer to ensure proper combustion. Ensure proper ventilation with an open window or use a ventilation fan or hood when cooking with Gas. Always operate the unit according to the instructions in this manual.
Normal Operation - Electronic Ignition/Reignition
The cooktop uses electronic igniters to light the burners. There is no pilot light. Each burner has its own igniter. If a burner flame blows out during use, the burner will automatically reignite.
CAUTION
To avoid possible injury or damage to the appliance, ensure grates are installed exactly per installation instructions and not backwards or upside down.
The igniter should be clean and dry for proper operation.
- Avoid getting water or food on the igniter.
- If the igniter is wet or soiled, it may spark without igniting the burner, or even spark continuously when a flame is present.
Note: If the burner does not light within 4 seconds, turn the burner off. Check to see that the burner cap is positioned correctly on the burner base and the igniter is clean and dry. If a burner still fails to ignite, see "Before Calling for Service".
When a flame is present and a Low setting is used, the igniter may occasionally spark. This is normal.
CAUTION
To avoid possible injury or damage to the appliance, ensure grates are installed exactly per installation instructions and not backwards or upside down.
Typical Flame Characteristics
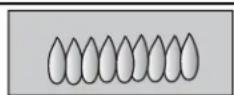
The burner flame should be blue in color and stable with no yellow tips, excessive noise or fluttering. It should burn completely around the burner cap.
Checking Flame Characteristics:
Yellow flames:
Further adjustment is required.
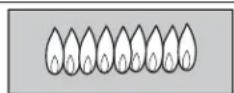
Yellow tips on outer cones:
Normal for LP Gas.
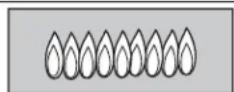
Soft blue flames:
Normal for Natural Gas.
- If the flame is completely or mostly yellow, verify that the regulator is set for the correct fuel. After adjustment, retest.
- Some yellow streaking is normal during the initial start-up. Allow unit to operate 4 to 5 minutes and re-evaluate before making adjustments.
- Foreign particles in the gas line may cause an orange flame during initial use. This should disappear with use. Check burner to make sure port holes are not obstructed. If the ports are clogged. → "Before Calling for Service" on page 25
Note: An audible “pop” may be heard when the burner is turned off manually. The “popping” may be louder with LP gas than with natural gas. This is normal.
Getting the Most Out of Your Appliance
Here the following can be found:
- Selection of dishes and ideal setting (heating level and burner) for them
• Suitable cooking accessories - Tips about cookware
• Preparation methods
General Tips
Proper Cookware
- Aluminum or copper bottomed pans conduct heat evenly.
- Steel pans, if not combined with other metals, may cook unevenly.
- Cast-iron cookware absorbs heat slowly and cooks more evenly at low-to-medium settings.
- Flat heavy bottom pans provide even heat and stability.
- DO NOT USE pans that are thin, warped, dented or ridged as they heat unevenly.
Choosing Suitable Cookware
Cookware Recommendations
Pan Bottom Diameter
WARNING
PREVENTING BURNS FROM HOT KNOBS
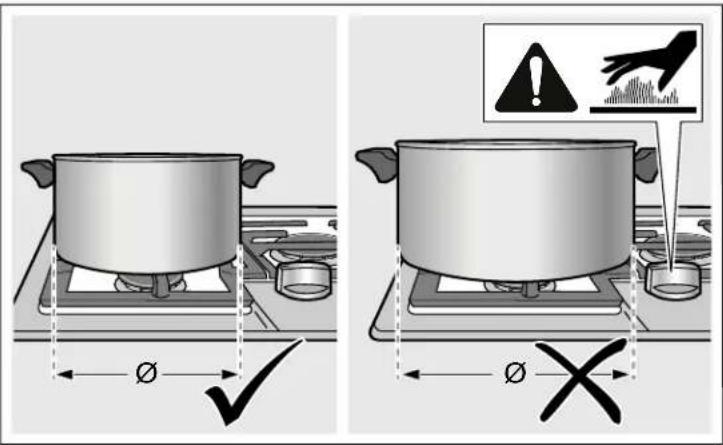
Ensure the cookware does not exceed the size of the grates. Cookware that is larger than the grates may cause the flames to get too close to the knobs creating a burn hazard when touched.
- The flame should be the same size as the bottom of the pan or smaller.
- Do not use small pans with high flame settings as the flames can spread up the sides of the pan.
- Oversized pans that span two burners should not exceed the size of the grates and should be placed front to back, not side to side.
text_image
Diagram illustrating cooking process with a pot on a stove and warning symbols for heating and safety.Use Balanced Pans
• Balance is important for stability and even cooking.
- Pans must sit level on the cooktop grate without rocking or wobbling.
• Center pan over burner.

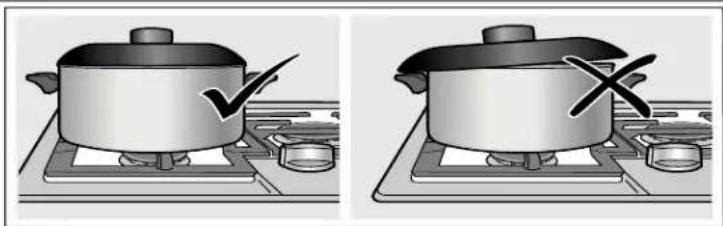
natural_image
Two-panel illustration showing a cooking pan on a stove, one with checkmark and the other with X (no text or symbols)Proper Fitting Lid
• A well-fitting lid helps shorten the cooking time.
- For best cooking results, always use a lid when boiling water.
natural_image
Two-panel illustration showing a cooking pot on a stove with a checkmark and a cross mark, no text or symbols present.Specialty Cookware
Pans that span 2 burners, (i.e. griddles, roasters, fish poachers, etc.) may be used when placed front to back. For all models, use the Thermador accessory griddle (Model SGRIDDLEW) on the center burner only. See Parts and Accessories section for further information.
Use a wok with a flat bottom. Round bottom woks (with a maximum 16 inch diameter) can be used with the Thermador accessory support wok ring (Model SWOKRINGW). See Parts and Accessories section for further information.
Canners and pressure cookers must meet the same requirements as described above. After bringing contents to a boil, use lowest heat setting possible to maintain a boil or pressure (for pressure canners or cookers)
Cooking Recommendations for Your Cooktop
Beverages
Beverages should be heated to a boil on High heat, and then simmered on a lower setting. If the beverage is held on Low (or ExtraLow) to keep warm, stir approximately every 10 minutes to prevent sticking or burning. You can find the ideal settings for several beverages in the Standard Burner and ExtraLow Cooking Tables. Use a lower setting if the pan is covered.
Breads
Breads (i.e. French toast and grilled sandwiches) are best cooked using a preheated skillet or griddle on Medium heat. Once the pan is preheated, begin cooking breads according to ideal settings in the Standard Burner Cooking Table. From batch to batch, the heat setting may need to be adjusted for optimal browning.
Deep Frying
Deep Frying is recommended on the large burner on Medium High heat. The heat setting may need to be adjusted to maintain oil temperature. You can find the ideal settings for several deep fried foods in the Standard Burner Cooking Table.
Sauces, Soups and Stocks
Sauces, Soups, and Stocks should be heated to a boil on High heat and then simmered on a lower setting. When heating cream sauces on your cooktop, use a lower setting than tomato sauces to prevent scorching. If sauce, soup or stock is held on Low (or ExtraLow) to keep warm, stir approximately every 10 minutes to prevent sticking or burning. You can find the ideal settings for several sauces, soups and stocks in the Standard Burner and ExtraLow Cooking Tables. Use a lower setting if the pan is covered.
Vegetables, Side Dishes and Eggs
Steamed vegetables are easy to make on your cooktop. Bring the water and vegetable to a boil with a lid on High heat, then turn down to a lower setting until tender.
Cereals and rice should be cooked on the large or medium burner on High heat, and then finished according to the recipe instructions or until liquid is absorbed. Cereals and rice can both be simmered using ExtraLow. Pasta is best cooked on the large burner. Using High heat with a lid, bring water to a boil. Once pasta is added, the heat may need to be turned down to prevent boil over.
When cooking scrambled or fried eggs melt butter on Medium High, and then add eggs to cook to desirable doneness. You can find the ideal settings for several of these dishes in the Standard Burner and ExtraLow Cooking Tables.
Meat, Fish and Poultry
In the Standard Burner and ExtraLow® Cooking Tables, the ideal heating setting for any meat, fish or poultry can be found. The cooking time depends on the amount, composition and temperature of the food. Setting ranges are indicated for this reason. Try using the lower values at first or increase the temperatures throughout cooking.
Below are a few recommendations when cooking meat, fish and poultry on the cooktop:
• Meats are best cooked on the large burner.
- It is recommended to use a preheated skillet when pan frying meats.
- Cook bacon and sausage patties on Medium High until meat starts to sizzle, and then turn heat down to Medium.
- Simmering: Bring liquid to a boil on High, and then simmer covered on Medium Low to Low (or ExtraLow®) until meat is tender.
- Braising: Brown meat on Medium High, and then simmer covered on Medium Low to Low (or ExtraLow®) until meat is tender.
- Poaching: Bring liquid to a boil on High heat, and then simmer covered on Low or ExtraLow until meat is cooked through.
Desserts
Chocolate is best melted using ExtraLow® (see ExtraLow® Cooking Table for appropriate setting). If the cooktop does not have ExtraLow®, chocolate should be melted using a double boiler on the small burner.
Standard Burner Cooking
The table lists the optimal heating setting for various dishes. The temperature and cooking time depend on the amount, composition and temperature of the food. Setting ranges are indicated for this reason. Try using the lower values at first. During cooking heat may be increased.
Standard Burner Cooking Table
| Food Burner | Heat LevelStart Cooking(boil, melt, brown. fry, etc.) | Heat LevelContinue Cooking(simmer, braise, poach, hold, etc.) | |
| Beverages | |||
| Mulled Cider | LargeMedium | High Medium Low | |
| Hot Chocolate | LargeMedium | Medium High Low | |
| Tea Small High Low | |||
| Breads | |||
| French toast | LargeMedium | Medium Medium-Medium Low | |
| Pancakes | LargeMedium | Medium Medium-Medium Low | |
| Grilled Sandwiches | LargeMedium | Medium Medium-Medium Low | |
| Cereals | |||
| Beans | LargeMedium | High Medium-Medium Low | |
| Cornmeal/Polenta Medium High Medium-Medium Low | |||
| Grits Medium High Medium-Medium Low | |||
| Oatmeal Medium High Medium-Medium Low | |||
| Deep Frying | |||
| French Fries Large Medium High Medium High | |||
| Donuts Large Medium High Medium High | |||
| Desserts | |||
| Pie Filling, Fruit Compote Small Medium Low Medium-Medium Low | |||
| Pudding Small Medium Low Medium-Medium Low | |||
| Poached Fruit | LargeMedium | High-Medium High | Medium-Medium Low |
| Eggs | |||
| Fried | LargeMedium | Medium High Medium Low | |
| Scrambled | LargeMedium | Medium High Medium Low-Low | |
| Food Burner | Heat LevelStart Cooking(boil, melt, brown. fry, etc.) | Heat LevelContinue Cooking(simmer, braise, poach, hold, etc.) | |
| Meat, Fish, Poultry | |||
| Bacon, Sausage Patties Large Medium High Medium-Medium Low | |||
| Braising: Swiss Steak, Pot Roast, Stew Meat | Large Medium High Low | ||
| Shallow Frying: Chicken, Fish | Large Medium Medium-Medium Low | ||
| Pan Frying: Lamb Chops, Thin Steaks, Hamburg-ers, Link Sausage | Large Medium High Medium | ||
| Simmering: Stewed Chicken, Corned Beef, Poaching Fish | Large High Medium Low | ||
| Pasta | |||
| All types | LargeMedium | High High | |
| Rice | |||
| White Rice Medium High Low | |||
| Brown Rice Medium High Low | |||
| Sauces | |||
| Tomato Sauce: Marinara, Bolognese | Large High Low | ||
| Cream Sauce: Alfredo, Queso | Large Medium Low | ||
| Butter Sauce: Bearnaise, Hollandaise | MediumSmall | Medium Low | |
| Soups and Stocks | |||
| Cream Soup | LargeMedium | Medium Low | |
| Broth Soup | LargeMedium | High Low | |
| Stock: Beef, Chicken, Vegetable | LargeMedium | High Low | |
| Vegetables | |||
| Fresh | MediumSmall | High Medium | |
| Frozen | MediumSmall | High Medium | |
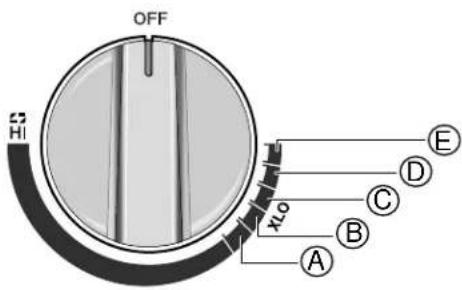
ExtraLow® Burner Cooking (SGSX and SGSXP Models Only)
The Center and Left Front burners are enhanced with the ExtraLow® (XLO) feature. When the control knob is set within one of the five XLO settings, the flame cycles ON and OFF automatically. This cycling is normal and allows simmering, poaching, melting or holding cooked food without scorching or burning.
How They Work
There are five XLO settings that vary in heating level. The XLO settings gradually decrease in heating level as the knob is turned to the right of the LO position.
The burner flame will cycle ON and OFF during each minute when the control knob is at any one of the five XLO settings. The time the flame is ON depends on the XLO setting. XLO 5 has the highest heating level of the XLO settings so the flame is ON for the longest amount of time. As the knob is turned counterclockwise, the amount of time the flame is ON will decrease.
Each XLO setting can be set by turning the appropriate control knob to the desired XLO setting (see ExtraLow® Setting Locations below). A slight catch will be felt at the LO position and each designated XLO setting.
Cooking with ExtraLow® (XLO)
text_image
OFF x₀ A B C D EExtraLow® (XLO) Setting Locations
A XLO 5 (highest heating level)
B XLO 4
C XLO 3
D XLO 2
E XLO 1 (lowest heating level)
The table lists the optimal heating setting for various dishes. The temperature and cooking time depend on the amount, composition and temperature of the food.
Setting ranges are indicated for this reason. Try using the lower values first. Heat can be increased during cooking.
- Check the food occasionally to see if the control knob should be turned to a lower or higher setting.
- It is normal to stir food occasionally. This is especially important when simmering for several hours, such as homemade sauce or beans.
- Simmer bubbles may not be seen when the flame has cycled OFF.
- While the flame is ON, there may be bubbling. There should be at least steam and a slight quivering of the liquid's surface.
- Use a lower XLO setting if the pan is covered.
- When lowering the flame setting, adjust it one XLO setting at a time.
- If a setting is too low to hold a simmer, bring the food back to a boil before resetting to a higher heat.
- If an oversized pan is used, the simmer action may occur more in the center. For even cooking, stir the food around the outer edges into the food in the center.
- The quantity and type of food affects which setting to use.
ExtraLow® (XLO) Cooking Table
| Food Burner | Heat LevelStart Cooking(boil, melt, brown. fry, etc.) | Heat LevelContinue Cooking(simmer, braise, poach, hold, etc.) | |
| Beverages | |||
| Mulled Cider | CenterLeft Front | High XLO 4 | |
| Hot Chocolate | CenterLeft Front | Medium High-MediumMedium High | XLO 2XLO 3 |
| Tea Left Front High | Steep-XLO 2Keep Warm-XLO 1 | ||
| Cereals | |||
| Beans Center High XLO 2 | |||
| Cornmeal/Polenta | CenterLeft Front | High | XLO 2XLO 3 |
| Grits | CenterLeft Front | High | XLO 2XLO 3 |
| Oatmeal Center High XLO 3 | |||
| Desserts | |||
| Chocolate Left Front XLO 2 XLO 2 | |||
| Poached Fruit Center High XLO 3 | |||
| Butter Left Front Melt-XLO 2 XLO 2 | |||
| Marshmallows Center Melt-XLO 1 XLO 1 | |||
| Eggs | |||
| Poached | Center High XLO 5 | ||
| Scrambled | Center XLO 5 XLO 5 | ||
| Frittata | Center Medium High-Medium | XLO 5 | |
| Food Burner | Heat LevelStart Cooking(boil, melt, brown. fry, etc.) | Heat LevelContinue Cooking(simmer, braise, poach, hold, etc.) | |
| Meat, Fish, Poultry | |||
| Braising: Beef, Pork,Lamb | Center | Standard Cook-Medium HighSlow Cook-XLO 4 | XLO 4 |
| Braising: Chicken Center | Standard Cook-Medium HighSlow Cook-XLO 3 | XLO 3 | |
| Poaching: Fish and Poul-try | Center High XLO 3 | ||
| Rice | |||
| White Rice Left Front High XLO 4 | |||
| Brown Rice Left Front High XLO 3 | |||
| Risotto Center Medium High-Medium XLO 5 | |||
| Sauces | |||
| Tomato Sauce: Marinara,Bolognese | Center High XLO 2 | ||
| Cream Sauce: Alfredo,Queso | CenterLeft Front | Medium High-MediumMedium | XLO 2 |
| Butter Sauce: Bearnaise,Hollandaise | Left Front XLO 1 XLO 1 | ||
| Soups and Stocks | |||
| Cream Soup | CenterLeft Front | Medium High-MediumMedium | XLO 1 |
| Broth Soup | CenterLeft Front | High XLO 1 | |
| Stock: Beef, Chicken,Vegetable | CenterLeft Front | High XLO 5 | |
| Vegetables | |||
| Fresh | CenterLeft Front | High XLO 5 | |
| Frozen | CenterLeft Front | High XLO 5 | |
| Casseroles: Macaroni &Cheese, Green Bean | Center Medium High-Medium | Heat/Simmer-XLO 2Keep Warm-XLO 1 | |
Cooking Tips
| Water is taking too long to boil. | Use room temperature water.Boil water on largest burner with lid. |
| Water is boiling over. | Turn burner down to Medium High or Medium to prevent water from boiling over.If pot has a lid on, remove lid before turning burner down. |
| Frying oil is splattering on to cooktop. | Turn burner down to Medium or Medium Low to stop splattering.Use a splatter screen to keep cooktop clean. |
| Food is sticking or burning to pan. | Use lower heat setting or XLO.Stir food often to prevent sticking or burning. |
| Food is not staying warm during hold on Low or ExtraLow® | Use a lid to keep food warm on Low or XLO.Turn burner to a higher heat setting to keep food at desired temperature. |
| Pan is taking too long to heat up. | Use a burner that is a similar size to your pan.Center the pan over the burner before turning the burner on.Turn burner to a higher setting to heat pan quicker. |
Cleaning and Maintenance
Cleaning
The entire cooktop can be safely cleaned by wiping with a soapy sponge, then rinsing and drying. If stubborn soil remains, follow the recommended cleaning methods below.
text_image
36" Model (91cm)Note: 36" model is for cleaning reference only. Cleaning process is the same for all models.
Cleaning recommendations:
• Always use the mildest cleaner that will do the job. Use clean, soft cloths, sponges or paper towels.
- Rub stainless steel finishes in the direction of the grain. Wipe area dry to avoid water marks.
- Before cleaning, be certain the burners are turned off and the grates and burners are cool.
- Do not clean removable cooktop parts in any self cleaning oven or dishwasher.
• After cleaning, place all parts in their proper positions before using cooktop.
- For proper burner performance, keep igniters clean and dry.
- Keep the igniter ports clean for proper lighting performance of the burners. It is necessary to clean these when there is a boilover or when the burner does not light even though the electronic igniters click.
- Do not use flammable cleansers such as lighter fluid.
CAUTION
All igniters spark when any single burner is turned on. Do not touch any of the burners when the cooktop is in use.
WARNING
All igniters spark when any single burner is turned on for SGS and SGSP models. One igniter sparks on SGSX and SGSXP when burner is turned on. Do not touch any of the burners when the cooktop is in use.
Cleaning Guidelines
The cleaners recommended below and on the following page indicate a type and do not constitute an endorsement of a particular brand. Use all products according to package directions.
| Cooktop Part / Material Suggested Cleaners Important Reminders | ||
| Burner base / aluminum alloy | Nonabrasive Cleaner: Dish soap and hot water. Rinse and dry immediately.Mild Abrasive Cleaners: Bon Ami® or Soft Scrub®Abrasive Cleaners: Brillo® or S.O.S.* pads. | Do not scratch or gouge the port openings.Clean ports with a wire or straightened paper clip.Do not use a toothpick that may break off.Do not soak burner bases.A toothbrush can be used for stubborn stains. |
| Burner cap / porcelain enamel | Nonabrasive Cleaner: Dish soap and hot water. Rinse and dry immediately.Nonabrasive Cleaners: Ammonia, Fantastic®, Formula 409®.Mild Abrasive Cleaners: Bon Ami®, Ajax®, Comet®.Liquid Cleaners: Kleen King®, Soft Scrub®.For food stains, use an abrasive cleaner such as, Zud® or Bar Keepers Friend®. | Acidic and sugar-laden spills deteriorate the porcelain enamel.Do not use wet sponge or towel on hot porcelain.Do not soak burner caps.Always apply minimal pressure with abrasive cleaners.Dry thoroughly and make sure burner cap is seated properly on burner base after cleaning. |
| Control knobs and grommets | Nonabrasive Cleaner: Dish soap and hot water.Rinse and dry immediately. | Do not soak knobs or grommets.Do not use abrasive scrubbers or cleaners, such as Bon Ami®, Ajax®, or Comet®. They may permanently damage the finish or remove graphics.To remove knobs and grommets, see “Control Knob Removal”.Do not pull on grommet when removing or replacing. |
| Exterior finish / stainless steel | Nonabrasive Cleaners: Dish soap and hot water, Fantastic®, Formula 409®. Rinse and dry immediately.Cleaner Polish: Stainless Steel Magic® to protect the finish from staining and pitting; enhances appearance.Hard water spots: Household white vinegar.Mild Abrasive Cleaners: Kleen King Stainless Steel liquid cleaner, Bon Ami®.Heat discoloration: Bar Keepers Friend® | Do not use steel wool pads. They will scratch the surface.Stainless steel resists most food stains and pit marks providing the surface is kept clean and protected.Never allow food stains or salt to remain on stainless steel for any length of time.Rub lightly in the direction of the grain.Chlorine or chlorine compounds in some cleaners are corrosive to stainless steel. Check ingredients on label before using. |
| Grates and grate bridge / porcelain enamel on cast iron | Nonabrasive cleaners: Hot water and detergent, Fantastic®, Formula 409®. Rinse and dry immediately.Mild Abrasive Cleaners: Bon Ami® and Soft Scrub®.Stubborn Stains: Use soap-filled steel wool pads. | The grates are heavy; use care when lifting. Place on a protected surface for cleaning.Blisters/ crazing/ chips are common due to the extreme temperatures on grate fingers and rapid temperature changes.Acidic and sugar-laden spills deteriorate the enamel. Remove soil immediately after unit has cooled enough to touch.Abrasive cleaners, used too vigorously or too often can eventually mar the enamel.Do not clean in a self-cleaning oven or dishwasher. |
| Igniters / ceramic Carefully wipe with a cotton swab dampened with water, ammonia or Formula 409®.Gently scrape soil off with a toothpick. | Avoid excess water on the igniter. A damp igniter will prevent burner from lighting.Remove any lint that may remain after cleaning. | |
| Glass Panel (SGSP and SGSXP models only) | Nonabrasive Cleaner: Dish soap and hot water.Rinseand dry immediately. | Clean immediately after cooking.Avoid abrasive cleaners such as metal scouring pads, scrub sponges, soap-filled scouring pads and powder cleaners. |
| Thermador Appliqué (SGS and SGSX models only) | Nonabrasive Cleaner: Dish soap and hot water.Rinseand dry immediately. | Clean immediately after cooking.Avoid abrasive cleaners such as metal scouring pads, scrub sponges, soap-filled scouring pads and powder cleaners. |
Maintenance
The appliance requires only regular cleaning for proper operation. No other maintenance is required.
For detailed instructions see "Cleaning and
Maintenance" on page 22
Service
Before Calling for Service
Before calling Customer Service, consider the suggestions and instructions below:
CAUTION
Repairs should only be done by an authorized servicer.
Improper repair of your appliance may result in risk of severe physical injury or death.
Troubleshooting Chart
| Problem Suggestion | |
| Burner(s) do not light / igniters do not spark | Make sure that the gas shut off valve is in the “ON” position and the gas supply to the house is not shut off.To operate knob, select the appropriate control knob and push down. A clicking noise will occur immediately after pushing the knob. Turn knob counterclockwise to the HI setting to ignite the flame. Continue turning knob counterclockwise to desire flame size. Push down and turn counterclockwise to the desired flame size. Turn off by turning the control knob clockwise to OFF.Make sure the burner caps and burner bases and the burner ports are not clogged. Clear ports with a wire or straightened paper clip if clogged.Make sure the igniters are clean and dry.Check the power supply. It should be properly grounded with the correct polarity. Make sure the unit is fully plugged in to the outlet and the circuit breaker is not tripped.If the burner flame goes out unexpectedly, make sure there is not a draft in the room. |
| Igniters spark even though knobs are in the off position | When the electrical power connection has been activated at the first power up or reconnected after an outage, the igniters may spark once or twice, even though all burner knobs are in the “OFF” position.Make sure all burner knobs are not stuck or pushed down. This will cause sparking in the OFF position. |
| Cooking results are not what was expected | The cooktop is not level.Cooking pan does not fit the surface being used. → "Proper Cookware" on page 15Cookware is not the type or size recommended. → "Proper Cookware" on page 15 |
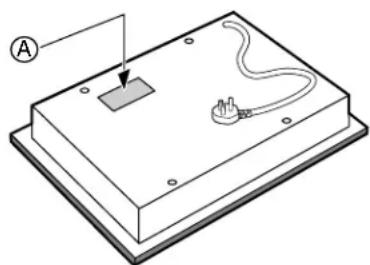
Product Rating Label
The rating label shows the model number and the FD number (production number/product's unique identifier) of your cooktop. It is located on the underside of the cooktop.
natural_image
Isometric diagram of a rectangular electronic device with a small component and wiring, labeled with point A (no text or symbols present)Rating Label Location
A Rating Label
Model Number and FD Number
The model number and the FD number of your appliance are found on the rating label. Make a note of these numbers in the space below to save time in the event your appliance requires service.
Model # FD #
Thermador 800-735-4328
Customer Support
Keep your invoice or escrow papers for warranty validation if service is needed.
THERMADOR® Support
Service
We realize that you have made a considerable investment in your kitchen. We are dedicated to supporting you and your appliance so that you have many years of creative cooking.
Please do not hesitate to contact our STAR® Customer Support Department if you have any questions or in the unlikely event that your THERMADOR® appliance needs service. Our service team is ready to assist you.
USA
800-735-4328
www.thermador.com/support
Canada
800-735-4328
www.thermador.ca
Parts and Accessories
Parts, filters, descalers, stainless steel cleaners and more can be purchased in the THERMADOR® eShop or by phone.
USA
http://store.thermador.com/us
Canada
- If you live in any of the Atlantic provinces, Ontario, or Québec contact:
Marcone
1.800.287.1627
- If you live in any of the Territories, Manitoba, Saskatchewan, Alberta, or British Columbia contact:
Reliable Parts
1.800.663.6060
STATEMENT OF LIMITED PRODUCT WARRANTY
What this Warranty Covers & Who it Applies to
The limited warranty provided by BSH Home Appliances Corporation ("BSH") in this Statement of Limited Product Warranty applies only to the THERMADOR® appliance ("Product") sold to you, the first using purchaser, provided that the Product was purchased:
- For your normal, household (non-commercial) use, and has in fact at all times only been used for normal household purposes.
- New at retail (not a display, "as is", or previously returned model), and not for resale, or commercial use.
- Within the United States or Canada, and has at all times remained within the country of original purchase.
The warranties stated herein apply to the original purchaser of the Product warranted herein and to each succeeding owner of the product purchased for ordinary home use during the term of the warranty.
BSH reserves the right to request proof of purchase at the time any warranty claim is submitted to confirm that the Product falls within the scope of this limited product warranty.
Please make sure to return your registration card; while not necessary to effectuate warranty coverage, it is the best way for BSH to notify you in the unlikely event of a safety notice or product recall.
How Long the Warranty Lasts
BSH warrants that the Product is free from defects in materials and workmanship for a period of seven hundred and thirty (730) days from the date of purchase. The foregoing timeline begins to run upon the date of purchase, and shall not be stalled, tolled, extended, or suspended, for any reason whatsoever.
This Product is also warranted to be free from cosmetic defects in material and workmanship (such as scratches of stainless steel, paint/porcelain blemishes, chip, dents, or other damage to the finish of the Product), for a period of sixty (60) days from the date of purchase or closing date for new construction. This cosmetic warranty excludes slight color variations due to inherent differences in painted and porcelain parts, as well as differences caused by kitchen lighting, product location, or other similar factors. This cosmetic warranty specifically excludes any display, floor, "As Is", or "B" stock appliances.
Repair/Replace as Your Exclusive Remedy
During this warranty period, BSH or one of its authorized service providers will repair your Product without charge to you (subject to certain limitations stated herein) if your Product proves to have been manufactured with a defect in materials or workmanship. If reasonable attempts to repair the Product have been made without success, then BSH will replace your Product (upgraded models may be available to you, in BSH's sole discretion, for an additional charge). All removed parts and components shall become the property of BSH at its sole option. All replaced and/or repaired parts shall assume the identity of the original part for purposes of this warranty and this warranty shall not be extended with respect to such parts. BSH's sole liability and responsibility hereunder is to repair manufacturer-defective Product only, using a BSH-authorized service provider during normal business hours. For safety and property damage concerns, BSH highly recommends that you do not attempt to repair the Product yourself, or use an un-authorized servicer; BSH will have no responsibility or liability for repairs or work performed by a non-authorized servicer. If you choose to have someone other than an authorized service provider work on your Product, THIS WARRANTY WILL AUTOMATICALLY BECOME NULL AND VOID. Authorized service providers are those persons or companies that have been specially trained on BSH products, and who possess, in BSH's opinion, a superior reputation for customer service and technical ability (note that they are independent entities and are not agents, partners, affiliates or representatives of BSH). Notwithstanding the foregoing, BSH will not incur any liability, or have responsibility, for the Product if it is located in a remote area (more than 100 miles from an authorized service provider) or is reasonably inaccessible, hazardous, threatening, or treacherous locale, surroundings, or environment; in any such event, if you request, BSH would still pay for labor and parts and ship the parts to the nearest authorized service provider, but you would still be fully liable and responsible for any travel time or other special charges by the service company, assuming they agree to make the service call.
Out of Warranty Product
BSH is under no obligation, at law or otherwise, to provide you with any concessions, including repairs, pro-rates, or Product replacement, once this warranty has expired.
Warranty Exclusions
The warranty coverage described herein excludes all defects or damage that are not the direct fault of BSH, including without limitation, one or more of the following:
- Use of the Product in anything other than its normal, customary and intended manner (including without limitation, any form of commercial use, use or storage of an indoor product outdoors, use of the Product in conjunction with air or water-going vessels).
- Any party's willful misconduct, negligence, misuse, abuse, accidents, neglect, improper operation, failure to maintain, improper or negligent installation, tampering, failure to follow operating instructions, mishandling, unauthorized service (including self-performed "fixing" or exploration of the appliance's internal workings).
- Adjustment, alteration or modification of any kind.
- A failure to comply with any applicable state, local, city, or county electrical, plumbing and/or building codes, regulations, or laws, including failure to install
the product in strict conformity with local fire and building codes and regulations.
- Ordinary wear and tear, spills of food, liquid, grease accumulations, or other substances that accumulate on, in, or around the Product.
- Any external, elemental and/or environmental forces and factors, including without limitation, rain, wind, sand, floods, fires, mud slides, freezing temperatures, excessive moisture or extended exposure to humidity, lightning, power surges, structural failures surrounding the appliance, and acts of God.
In no event shall BSH have any liability or responsibility whatsoever for damage to surrounding property, including cabinetry, floors, ceilings, and other structures or objects around the Product. Also excluded from this warranty are Products on which the serial numbers have been altered, defaced, or removed; service visits to teach you how to use the Product, or visits where there is nothing wrong with the Product; correction of installation problems (you are solely responsible for any structure and setting for the Product, including all electrical, plumbing or other connecting facilities, for proper foundation/flooring, and for any alterations including without limitation cabinetry, walls, floors, shelving, etc.); and resetting of breakers or fuses.
TO THE EXTENT ALLOWED BY LAW, THIS WARRANTY SETS OUT YOUR EXCLUSIVE REMEDIES WITH RESPECT TO PRODUCT, WHETHER THE CLAIM ARISES IN CONTRACT OR TORT (INCLUDING STRICT LIABILITY, OR NEGLIGENCE) OR OTHERWISE. THIS WARRANTY IS IN LIEU OF ALL OTHER WARRANTIES, WHETHER EXPRESS OR IMPLIED. ANY WARRANTY IMPLIED BY LAW, WHETHER FOR MERCHANTABILITY OR FITNESS FOR A PARTICULAR PURPOSE, OR OTHERWISE, SHALL BE EFFECTIVE ONLY FOR THE PERIOD THAT THIS EXPRESS LIMITED WARRANTY IS EFFECTIVE. IN NO EVENT WILL THE MANUFACTURER BE LIABLE FOR CONSEQUENTIAL, SPECIAL, INCIDENTAL, INDIRECT, "BUSINESS LOSS", AND/OR PUNITIVE DAMAGES, LOSSES, OR EXPENSES, INCLUDING WITHOUT LIMITATION TIME AWAY FROM WORK, HOTELS AND/ OR RESTAURANT MEALS, REMODELLING EXPENSES IN EXCESS OF DIRECT DAMAGES WHICH ARE DEFINITIVELY CAUSED EXCLUSIVELY BY BSH, OR OTHERWISE. SOME STATES DO NOT ALLOW THE EXCLUSION OR LIMITATION OF INCIDENTAL OR CONSEQUENTIAL DAMAGES, AND SOME STATES DO NOT ALLOW LIMITATIONS ON HOW LONG AN IMPLIED WARRANTY LASTS, SO THE ABOVE LIMITATIONS MAY NOT APPLY TO YOU. THIS WARRANTY GIVES YOU SPECIFIC LEGAL RIGHTS, AND YOU MAY ALSO HAVE OTHER RIGHTS WHICH VARY FROM STATE TO STATE. No attempt to alter, modify or amend this warranty shall be effective unless authorized in writing by an officer of BSH.
Table de
MATIÈRES
natural_image
3D rendered star-shaped object with layered structure, no text or symbols visibletext_image
Illustration showing two star-shaped objects with different shapes and checkmark indicators, likely illustrating a selection or comparison exercise.natural_image
Pure architectural floor plan lines without any text, numbers, or symbolsSGSP de 30 po
natural_image
Three identical rectangular diagrams with internal geometric patterns, no text or symbols present.SGSX de 36 po
natural_image
Three identical abstract geometric patterns with symmetrical rectangular cutouts, no text or symbols present.SGSXP de 36 po
natural_image
Three identical rectangular grid patterns with internal curved cutouts, no text or symbols present.AVERTISSEMENT
text_image
OFF HI LOBoutons ExtraLow ^MD (XLO)
text_image
OFF HI XLOtext_image
Diagram illustrating cooking process with pots on a stove and warning symbols indicating explosion or damage.natural_image
Two-panel illustration showing a cooking pan on a gas stove, one with checkmark and the other with X (no text or symbols)natural_image
Two-panel illustration showing a cooking pot on a stove with a checkmark and a cross mark indicating a cooking step (no text or symbols present)text_image
36" Model (91cm)Remarque : 36" model is for cleaning reference only. Cleaning process is the same for all models.