
MC100SD - Multi-cooker BLACK & DECKER - Free user manual and instructions
Find the device manual for free MC100SD BLACK & DECKER in PDF.

| Product Type | Multi-cooker |
| Brand | Black & Decker |
| Model | MC100SD |
| Pot capacity | Approximately 5.7 L (6 quarts) |
| Dimensions (approx.) | 35 x 30 x 28 cm |
| Weight (approx.) | 4.5 kg |
| Power | 120 V, 60 Hz, approximately 1000 W |
| Plug type | Grounded (3-prong) |
| Pot material | Non-stick ceramic coating |
| Lid material | Tempered glass |
| Main functions | Sear/Sauté, Roast/Bake, Slow Cook (High/Low), Keep Warm |
| Temperature range | Up to 230 °C (450 °F) in sear mode; adjustable in roast mode |
| Roasting rack included | Yes |
| Cleaning | Pot and lid dishwasher safe |
| Maintenance | Wipe the base with a damp cloth; do not immerse |
| Safety | Automatic shut off in case of power failure; hot surfaces |
| Spare parts available | Lid (MC1100S-01), Rack (MC1100-02), Pot (MC1100S-03) |
| Repairability | No user-serviceable parts; contact customer service |
| Warranty | 2 years (Canada and United States) |
| Customer service | 1-800-231-9786 (United States and Canada) |
| Use | Household use only |
Frequently Asked Questions - MC100SD BLACK & DECKER
User questions about MC100SD BLACK & DECKER
0 question about this device. Answer the ones you know or ask your own.
Ask a new question about this device
Download the instructions for your Multi-cooker in PDF format for free! Find your manual MC100SD - BLACK & DECKER and take your electronic device back in hand. On this page are published all the documents necessary for the use of your device. MC100SD by BLACK & DECKER.
USER MANUAL MC100SD BLACK & DECKER
Thank you for your purchase!
Rate and review your products at
Should you have any questions or concerns with your new product, please call our Customer Service Line at 1-800-231-9786 (US and Canada). Please do not return to the store.
Congratulations on your purchase of the Black+Decker™ Multicooker. We have developed this use and care guide to ensure optimal performance and your satisfaction. Save this use and care book and register your appliance online at www.prodprotect.com/applica.
CONTENTS
Important Safeguards. 4
Getting to Know Your Multicooker 6
Getting Started 7
Important Information About Your Multicooker 7
7
Care and Cleaning 9
Helpful Hints and Tips. 10
Troubleshooting. 13
Recipes. 14
Warranty and Customer Service Information 18
IMPORTANT SAFEGUARDS.
When using electrical appliances, basic safety precautions should always be followed to reduce the risk of fire, electric shock, and/or injury, including the following:
- Read all instructions.
- Do not use appliance for other than intended use.
- Do not touch hot surfaces. Use handles or knobs.
- To protect against electrical shock do not immerse cord, plugs or appliance in water or other liquids.
- Close supervision is necessary when any appliance is used by or near children.
- Unplug from outlet when not in use and before cleaning. Allow to cool before putting on or taking off parts.
- It is recommended to regularly inspect the appliance. Do not operate any appliance with a damaged cord or plug, or after the appliance malfunctions or has been damaged in any manner. For service, repair or any questions regarding your appliance, please call our Customer Service Line at 1-800-231-9786 (US and Canada).
- The use of accessory attachments not recommended by the appliance manufacturer may cause injuries.
- Do not use outdoors.
- Do not let cord hang over edge of table or counter, or touch hot surfaces.
- Do not place on or near a hot gas or electric burner, or in a heated oven.
- Extreme caution must be used when moving an appliance containing hot oil or other hot liquids.
- To disconnect, push the power switch to "Off" (O) then remove plug from wall outlet.
- When using the appliance, provide adequate air space above and on all sides for circulation. Do not operate if the appliance is covered or touching flammable materials, including curtains, draperies, walls and the like, when in operation.
- Do not store any item on top of the appliance while in operation.
-
Do not store any materials, other than the manufacturer's recommended accessories, in this appliance when not in use.
-
Do not place any of the following materials in the appliance: paper, cardboard, plastic and other flammable materials.
- This appliance is not intended for use by persons (including children) with reduced physical, sensory or mental capabilities, or lack of experience and knowledge, unless they have been given supervision or instruction concerning use of the appliance by a person responsible for their safety.
Children should be supervised to ensure that they do not play with the appliance. - The appliance is not intended to be operated by means of an external timer or separate remote control system.
- Do not use this appliance on an unstable surface.
- Do not attempt to heat or cook non-food items in this appliance.
- This appliance is not intended for deep frying foods.
Additional Safeguards:
- This appliance generates heat and escaping steam during use. Proper precautions must be taken to prevent the risk of burns, fires, or other injury to persons or damage to property.
- Avoid sudden temperature changes, such as adding frozen foods into a heated cooking pot or placing hot cooking pot directly on a countertop.
- To prevent damage or shock hazard, do not cook directly in cooking base. Cook only in cooking pot provided.
- Lift off glass lid carefully to allow water to drip into cooking pot.
- Never use the cooking pot on a gas or electric cooktop or over an open flame.
SAVE THESE INSTRUCTIONS.
This product is for household use only.
POLARIZED PLUG
This appliance has a polarized plug (one blade is wider than the other). To reduce the risk of electric shock, this plug is intended to fit into a polarized outlet only one way. If the plug does not fit fully into the outlet, reverse the plug. If it still does not fit, contact a qualified electrician. Do not attempt to modify the plug in any way.
TAMPER-RESISTANT SCREW
Warning: This appliance is equipped with a tamper-resistant screw to prevent removal of the outer cover. To reduce the risk of fire or electric shock, do not attempt to remove the outer cover. There are no user-serviceable parts inside. Repair should be done only by authorized service personnel.
ELECTRICAL CORD
- A short power-supply cord is provided to reduce the risk resulting from becoming entangled in or tripping over a longer cord.
- Longer detachable power cords or extension cords are available and may be used if care is exercised in their use.
- If a long detachable power-supply cord or extension cord is used,
a) The marked electrical rating of the extension cord should be at least as great as the electrical rating of the appliance,
b) If the appliance is of the grounded type, the extension cord should be a grounding-type 3-wire cord, and
c) The longer cord should be arranged so that it will not drape over the countertop or tabletop where it can be pulled on by children or tripped over unintentionally.
Note: If the power cord is damaged, please contact the warranty department listed in these instructions.
GETTING TO KNOW YOUR MULTICOOKER
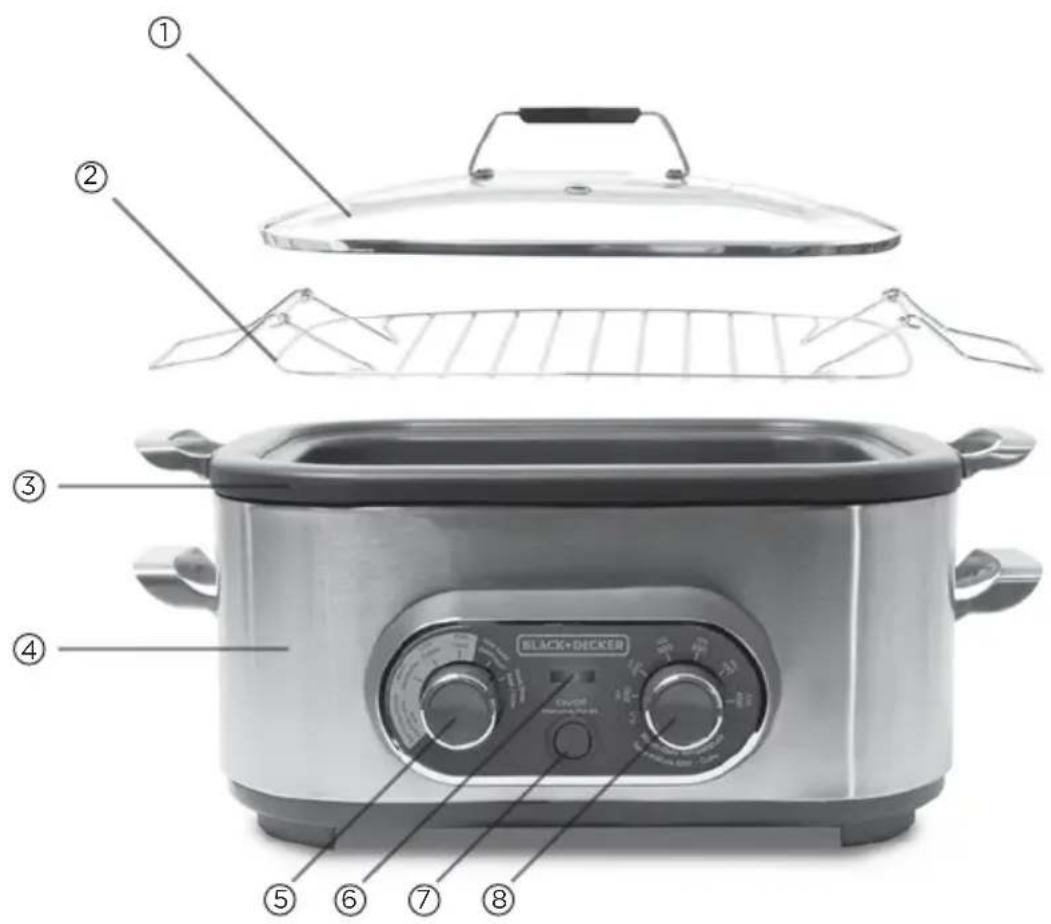
- Tempered glass lid (Part# MC1100S-01)
- Roasting rack (Part# MC1100-02)
-
Cooking pot (Part# MC1100S-03)
-
Cooking base
- Control knob
- Power light
- Power switch
- Temperature knob
GETTING STARTED
This appliance is intended for household use only.
- Remove all packing material, any stickers, and the plastic band around the power plug.
- Go to www.prodprotect.com/applica to register your product.
- Wash all removable parts as instructed in CARE AND CLEANING.
Place the clean, dry cooking pot in the cooking base.
- Select a location where the Multicooker is to be used. Place the unit on a stable, heat resistant surface, free from cloth, liquids and any other flammable materials. Ensure that the unit has enough space all the way around and above it to allow heat to flow without damage to cabinets or walls.
IMPORTANT INFORMATION ABOUT YOUR MULTICOOKER
- The cooking pot gets hot. When in use, always use oven mitts or potholders when touching any outer or inner surface of the appliance.
- If there is a power outage, the Multicooker will turn off. If this is discovered quickly, continue cooking when the power is restored. If you are not sure how long the Multicooker has been off, discard the food.
- During first few minutes of use you may notice smoke and a slight odor. This is caused by oil that may have been used during manufacturing of the unit and will not impact the performance.
- Do not cut foods directly in the cooking pot and do not use metal utensils in this appliance; both actions could scratch the ceramic coating.
Always preheat the cooking pot before adding ingredients, as you would before sautéing/searing on the stove top or roasting/baking in the oven. Approximately 5 to 10 minutes (with or without lid) is needed for searing and sautéing and 15 to 20 minutes (with the lid on) is needed for roasting and baking. Slow cooking is the only function that requires no preheating.
SEAR/SAUTÉ
This function turns on only the bottom heating elements and heats up to 450^ , enabling you to both sear and sauté foods like on the stovetop. On this setting, you will only use the control knob.
- Plug in the appliance and press power switch to On. The power light will illuminate and stay on until the appliance is switched to Off.
-
Turn the control knob to Sear/Saute.
-
Allow Multicooker to preheat 5 to 10 minutes.
- Add ingredients to the cooking pot. Cover with glass lid or leave lid off to stir.
- When cooking time is done, either turn the control knob to the next desired function (if switching functions, please see function directions), or switch the appliance off.
- Unplug the appliance when not in use.
ROAST/BAKE
This function turns on the bottom and side heating elements, enabling you to both bake and roast foods like in a conventional oven. On this setting, you will use both the control and temperature knobs. The roasting rack can be used to raise food above the pan bottom for more even roasting or baking.
- Plug in the appliance and press power switch to On. The power light will illuminate and stay on until the appliance is switched to Off.
- Turn the control knob to Roast/Bake, and then turn the temperature knob to the desired temperature.
- Allow the Multicooker to preheat and come to desired temperature. This will take approximately 15 to 20 minutes.
- Add ingredients to the cooking pot. Cover with glass lid. For best results, avoid opening the lid during the cooking process. If baking with an oven safe baking pan, place the pan directly on top of the roasting rack for more even results.
- When cooking time is done, either turn the control knob to the next desired function (if switching functions, please see function directions), or remove food and switch the appliance Off.
- Unplug the appliance when not in use.
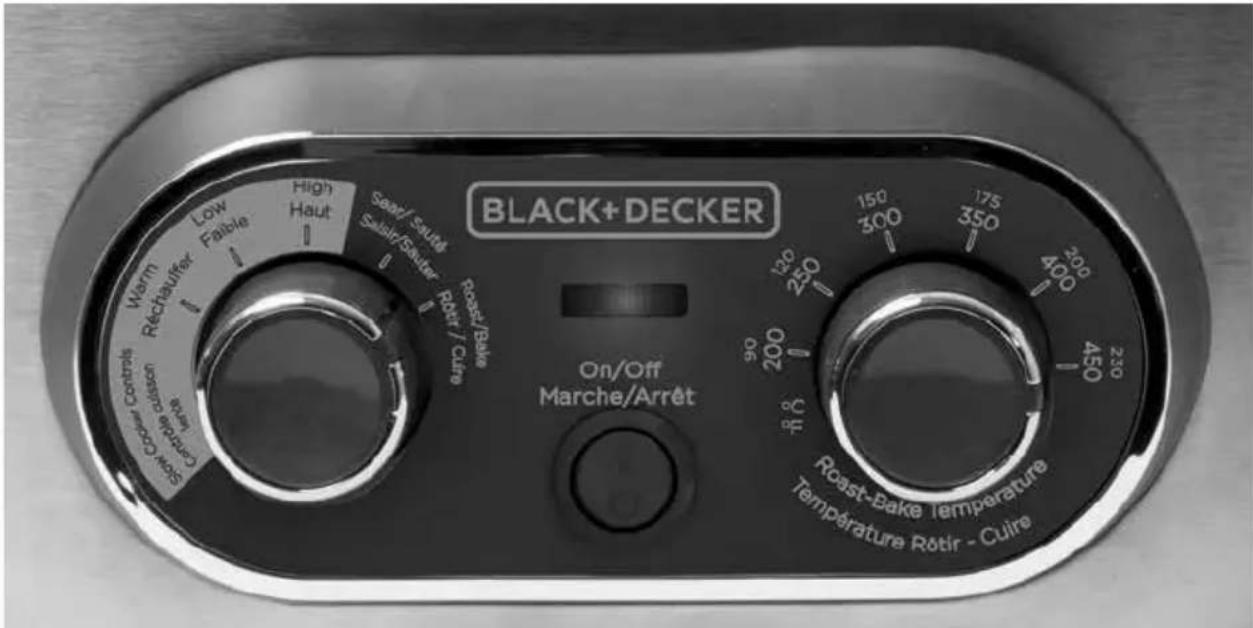
SLOW COOK
This function turns on only the side heating elements, enabling you to truly slow cook foods like a traditional slow cooker. On this setting, you will only use the control knob.
- Add ingredients to the cooking pot and cover with glass lid.
- Plug in the appliance and press power switch to On. The power light will illuminate and stay on until the appliance is switched Off.
- Turn the control knob to the desired heat setting under Slow Cook Controls to begin cooking.
NOTE: Do not use the Warm function to cook.
- Set a kitchen timer for cook time if desired.
- When cooking time is done, either turn the control knob to Warm, switch the appliance Off, or turn the control knob to the next desired function (if switching functions, please see function directions).
NOTE: Do not hold foods on Warm for more than 4 hours.
- When ready to serve, press the power switch to Off. The power light will turn off.
- Unplug the appliance when not in use.
WARM
This function turns on only the side heating elements, enabling you to use the appliance like a traditional slow cooker. Please reference the Slow Cook section for additional instructions. On this setting, you will only need the control knob.
NOTE: Do not hold foods on Warm for more than 4 hours.
CARE AND CLEANING
This product contains no user serviceable parts. Refer service to qualified service personnel.
CLEANING
IMPORTANT: Never immerse cooking base in water or other liquids.
- Always unplug and allow to cool completely before cleaning.
- Wash cooking pot and glass lid in warm, soapy water. If food has stuck to the cooking pot, fill pot with warm, soapy water and allow to soak before cleaning with nonabrasive scouring pad.
NOTE: Both the cooking pot and glass lid are dishwasher safe.
- Rinse and dry thoroughly.
- Wipe interior and exterior of the cooking base with a soft, slightly damp cloth or sponge.
IMPORTANT: Never use abrasive cleansers or scouring pads to clean the cooking base, as they may damage the surfaces.
STORING
Make sure that the appliance is thoroughly cool and dry. Never wrap the cord tightly around the appliance; keep it loosely coiled. Placing the lid on upside-down for storage can help save space.
HELPFUL HINTS AND TIPS
ROAST
- The approximate maximum capacity for roasting is a 4-5 lb. chicken or a 3-4 lb. roast.
- If you desire the deeper flavor of browned meat use the Sear/Sauté function before roasting.
- Tougher cuts of meat can be tenderized by simmering them. Adding sauce or gravy can also add a bolder flavor.
- Always roast with lid on. Open the lid as little as possible to ensure even cooking and to keep heat from escaping.
- Foil roasting bags can be used, but plastic roasting bags are not recommended.
- Using a meat thermometer can help significantly improve results; you will want to remove the meat or poultry from the roaster when the reading is 5 to 10 degrees (Fahrenheit) below the desired temperature. The internal temperature will continue to rise as the meat is resting after it has been removed.
- Multicookers often cook turkeys and chickens in less time than a conventional oven. When first converting recipes from a conventional oven, closely monitor the internal temperature.
BAKE
- For many baked goods, this appliance can be used in place of a normal oven.
- Use the roasting rack in the base of the appliance when baking to ensure more even cooking. Place baking dishes directly on the rack.
SLOW COOK
-
The cooking pot should always be filled from 12 to 34 full, to avoid over and under cooking.
-
When only half full, check for doneness 1 to 2 hours before recommended cooking time.
-
To avoid spillovers, do not fill slow cooker more than 34 full.
Always slow cook with the lid on.
-
Do not open lid during first 2 hours of cooking; this allows heat to rise efficiently.
-
Open the lid as little as possible to assure even cooking. Every time the lid is removed, the cooking time increases by 15-20 minutes.
-
Most recipes can be cooked on either High or Low. Many recipes will give the time for both.
-
Low: Normally used for longer cook times and less tender cuts of meat, 8 to 10 hours
-
High: Used to shorten cook time. One hour on High is equal to about 2 hours on Low.
-
Warm: Only used for keeping cooked foods at a food-safe serving temperature (135^) and should not be used to cook foods. It is not recommended to use warm for more than 4 hours. Always hold foods at this setting with the lid on.
-
To save time, fill the cooking pot the night before. Cover and refrigerate. You may need to add some extra cooking time because the food and cooking pot will be cold.
-
To save space while storing the cooking pot or to place in the refrigerator, invert the lid.
-
You may also pour cake batter directly into the greased cooking pot. Cover and bake using the Slowcooker function on Low for 3 hours or until cake pulls away from sides. Turn Multicooker off and let cake rest 30 minutes before serving.
SLOW COOKING INGREDIENTTIPS
DAIRY
- Milk products, especially those low in fat, tend to curdle if cooked too long. Add them toward the end of the cooking time.
Evaporated milk and condensed soups are great substitutes for milk and cream.
SOUPS AND STEWS
- Because there is little evaporation, soups and stews require less liquid than usual.
- If too thick, add additional liquid in last 12 hour of cooking or at serving time.
- Condensed soups and dry soup mixes add great flavor and body to sauces and gravies.
SEASONINGS
- Fresh herbs should be added at the end of the cooking cycle. If cooked too long they lose their color and flavor.
- Dried herbs work well in the slow cooker and can be added at the beginning. They can become stronger on longer cooking; begin with less and add at end, if needed.
- Some spices and dried herbs, such as cinnamon sticks, bay leaves and whole peppercorns can become quite intense with long cooking, so use sparingly.
If using bay leaves, remember to remove before serving.
MEATS
- The higher the fat content, the less liquid is needed. Also, place thickly sliced onions under fattier meat to keep the meat above the drippings.
- Browning before cooking on the slow cooker settings is not necessary. However, lightly coating meat with flour and browning it, gives more body and flavor to sauces. This works for ground meat as well.
- Make sure the top of the meat does not touch the lid.
- Cooking times will vary depending upon the size and cut of the meat. Meat with bone-in will take longer to cook. Lean meats and poultry will cook faster.
- Meats slow cooked in liquids develop great flavor with a minimum of effort.
- Use High for more tender cuts of meat; use Low for tougher cuts.
- Always thoroughly thaw meats before slow cooking them.
VEGETABLES
- Place vegetables such as carrots, potatoes, turnips, and beets at the very bottom of the cooking pot and always cover them with liquids. They usually take longer to cook than most meat.
- Vegetables cook well; they develop better flavor and don't break down as they would in an oven.
- Canned beans are the perfect substitute for dried beans.
FISH
- Fish cooks quickly; add it for the last 15 minutes.
TROUBLESHOOTING
| PROBLEM POSSIBLE | CAUSE SOLUTION | |
| Food is undercooked | ·The wrong setting or temperature may have been used. ·The power may have been interrupted. ·The lid may have been improperly placed on the cooking pot. ·The power in your home may be slightly different. ·Lid has been removed too many times during operation. | ·Make sure you use the correct function and setting for the recipe. ·If the power was interrupted and you don't know for how long; discard the food. ·Make sure the lid is placed evenly on top of the cooking pot. ·Keep the lid closed while roasting or slow cooking. Every time the lid is removed it adds 15-20 minutes to the slow cooking time. |
| Food is overcooked | ·There may be a difference between your favorite recipe and the operation of the Multicooker settings. ·Not all appliances cook exactly the same; the settings could be cooking slightly differently than appliances that have been used previously. | ·As you use the functions, make note of any changes in time on your favorite recipes. |
| The meat was done but the vegetables were under-cooked while slow cooking | ·The foods may have been improperly placed in the cooking pot. | ·Place the vegetables on the bottom and sides of the cooking pot. ·Place the meat on top of the vegetables and in the center of the cooking pot. |
If additional assistance is needed, please contact our consumer service team at 1-800-231-9786.
RECIPES: SLOW COOKER
LENTIL SOUP
Servings: 8
Ingredients:
1/4 lb. pancetta
8 oz. smoked sausage, cut into bite-size pieces
1 cup chopped onion
2 large cloves garlic, chopped
6 cups vegetable broth or water
1 lb. dried lentils, sorted and rinsed
1 can (16 oz.) garbanzo beans, rinsed and drained
1 can (14 1/2 oz.) diced tomatoes
1 12 cup chopped carrots
1 cup thickly sliced celery
1 tsp. dried thyme
112 tsp. salt
12 tsp. black pepper
12 cup chopped celery leaves
Directions:
Switch the Black+Decker Multicooker On with the cooking pot in place; turn the function knob to Sear/Saute and allow a 5 to 10 minutes for the cooking pot to preheat. Add pancetta to the cooking pot and cook until golden on all sides, stirring often.
Remove with slotted spoon and set aside. Add the onions and garlic to the cooking pot and cook until onions are softened, stirring often. Add pancetta and remaining ingredients, except celery leaves.
Cover with glass lid. Turn the function knob to the slow cook setting of High for 4 to 5 hours or the Low setting for 8 to 10 hours, until lentils are very tender. Stir in celery leaves.
VEGETABLE LASAGNA
Servings: 8
Ingredients:
1 Tbsp. vegetable oil
1 zucchini, sliced
1 yellow squash, sliced
4 oz. fresh mushrooms, sliced
1 garlic clove, minced
1 jar (24 oz.) marinara sauce
1 cup water
1 container (15 oz.) Ricotta cheese
1 egg
1 (8 oz.) package shredded mozzarella cheese, divided
12 cup grated Parmesan cheese, divided
8 uncooked lasagna noodles
Directions:
Switch the Black+Decker Multicooker On. With the cooking pot in place, turn the function knob to Sear/Sauté. Preheat for 5 to 10 minutes. Then place oil in cooking pot. Add squash and mushrooms, sauté 3-5 min. or until tender. Remove vegetables from cooking pot, mix with marinara sauce and water. Set aside. Turn off Multicooker.
Mix Ricotta, 112 cups mozzarella 14 cup Parmesan and egg in medium bowl.
To assemble lasagna, spoon 1/3 of the vegetable mixture into the bottom of the cooking pot. Top with 4 lasagna noodles, 12 the cheese mixture and 1/3 of the vegetables. Repeat for second layer.
Cover and turn function knob to the slow cooker setting of Low. Cook, 4-6 hours or until liquid is absorbed.
Sprinkle with remaining cheeses and let stand, covered 10 min. before serving.
LOADED POTATO SOUP
Servings: 6 to 8
Ingredients:
1 (30oz.) bag of frozen diced hash browns
1 (32 oz.) carton chicken broth
1 can (10 oz.) cream of chicken soup
1 pkg. (8 oz.) cream cheese, cubed
1 pkg. (3 Oz.) bacon bits
1 cup shredded cheddar cheese
Salt and pepper to taste
Directions:
Place potatoes in the cooking pot. Stir together chicken broth, cream of chicken soup and half of the bacon bits; add pot to Multicooker cooking base.
Cook on Low setting, 7-8 hours or until potatoes are tender.
Add cream cheese to soup. Cook an additional hour, stirring occasionally to melt cream cheese.
Ladle soup into bowls; top with shredded cheese and additional bacon bits.
BEEF POT ROAST DINNER
Servings: 8 to 10
Ingredients:
6 medium carrots, cut in 212 inch pieces (about 2 cups)
4 medium potatoes, quartered 1 bag (20 oz.) frozen pearl onions
4 large cloves garlic, chopped 4 lb. boneless bottom round roast
1 / 2 tsp. salt 1 / 4 tsp.coarsely ground pepper
1 envelope beef onion soup mix
1 cup beef broth
112 tsp. herbs de Provence 1 / 2 tsp. dried thyme
Directions:
Place half of the vegetables on bottom the Black+Decker Multicooker cooking pot. Season beef with salt and pepper. Place on top of vegetables. Add remaining vegetables around the meat.
Combine remaining ingredients. Pour over beef. Cover with glass lid.
Switch the Multicooker On, turn the function knob to the slow cooker setting of Low and cook for 8 hours or until beef is tender.
SHREDDED PORK SANDWICHES
Servings: 12
Ingredients:
2 large Vidalia onions, sliced
312 lb. fresh pork butt or loin 1 / 2 tsp. salt
1 / 4 tsp. coarse black pepper
1 cup barbecue sauce
1 cup beef broth
14 cup honey
14 cup fresh lime juice
14 cup spicy brown mustard
2 Tbsp. tomato paste
Hamburger buns
Cole slaw
Directions:
Place onions in bottom of the Multicooker cooking pot.
Season pork with salt and pepper; place on top of onions, fat side up.
Combine remaining ingredients. Pour over pork. Cover with glass lid.
Switch the Multicooker On with the cooking pot in place; turn function knob to the slow cooker setting of High and cook for 5 hours or until pork shreds easily with a fork.
Remove meat and allow to rest 5 minutes. Using 2 forks, shred pork and mix with sauce from the cooking pot before serving.
Serve warm on buns topped with coleslaw.
RECIPES: ROASTING AND BAKING
ORANGE ROASTER CHICKEN
Servings: 3 to 4
Ingredients:
2 Tbsp. softened butter
1 Tbsp. chopped fresh chives
1 Tbsp. diced fresh green onion
1 Tbsp. chopped fresh oregano
1 tsp. salt
1 / 4 tsp course ground pepper
1 small orange, quartered
1 green onion, cut in 1-inch pieces
312 lb. chicken
Directions:
Switch the Black+Decker Multicooker On. With the cooking pot in place, turn control knob to Roast/Bake and set the temperature to 350^ . Allow the appliance to preheat for 15 to 20 minutes.
Meanwhile in a small bowl, combine everything except for the orange, green onion and the chicken. Using your fingers, lift skin away from meat of chicken. Rub seasoning mixture between the meat and skin. Place orange and onion into cavity of chicken and tie the legs together.
Carefully place the chicken in the Multicooker and set a kitchen timer for 60 minutes. At the end of the cooking cycle, check chicken for doneness. Internal temperature of the breast should be 165^ . If necessary, add additional cooking time. Remove chicken from cooking pot. Let rest 10 minutes before serving.
ROAST BEEF WITH POTATOES
Servings: 6
Ingredients:
2 tsp. Montreal steak seasoning
1 tsp. seasoned salt
12 tsp. lemon pepper
12 tsp. dried basil
12 tsp. dried thyme
1 / 4 tsp. garlic powder
1 Tbsp. olive oil
212 lb. eye of round roast
1/2 lb. small red potatoes
½ lb. pearl onions
Directions:
Switch the Multicooker On. With the cooking pot in place turn function knob to Roast/Bake and adjust the temperature knob to 350^ . Allow the appliance to preheat for 15 to 20 minutes.
Carefully place the beef in the Multicooker and cook for 40 minutes. Add potatoes and onions, cook an additional 20 minutes. At the end of the cooking cycle, check beef and vegetables for doneness. Internal temperature of the beef should be a minimum of 160^ . If necessary, add additional cooking time.
WARRANTY INFORMATION
For service, repair or any questions regarding your appliance, call the appropriate 800 number listed within this section. Please DO NOT return the product to the place of purchase. Also, please DO NOT mail product back to manufacturer, nor bring it to a service center. You may also want to consult the website listed on the cover of this manual.
Two-Year Limited Warranty (Applies only in the United States and Canada)
What does it cover?
- Any defect in material or workmanship provided; however, Spectrum Brands, Inc.'s liability will not exceed the purchase price of product.
For how long?
- Two years from the date of original purchase with proof of purchase.
What will we do to help you?
- Provide you with a reasonably similar replacement product that is either new or factory refurbished.
How do you get service?
- Save your receipt as proof of date of sale.
- Visit the online service website at www.prodprotect.com/applica, or call toll-free 1-800-231-9786, for general warranty service.
- If you need parts or accessories, please call 1-800-738-0245.
What does your warranty not cover?
- Damage from commercial use
- Damage from misuse, abuse or neglect
- Products that have been modified in any way
- Products used or serviced outside the country of purchase
Glass parts and other accessory items that are packed with the unit - Shipping and handling costs associated with the replacement of the unit
- Consequential or incidental damages (Please note, however, that some states do not allow the exclusion or limitation of consequential or incidental damages, so this limitation may not apply to you.)
How does state law relate to this warranty?
- This warranty gives you specific legal rights. You may also have other rights that vary from state to state or province to province.
iBIENVENIDO!
Col. Centro, Cuauhtemoc,
México, D.F.
Tel. 018007142503
Nicaragua
LRM ELECTRONICA
Managua - Sinsa Altamira 1.5
kilómetros al norte
Nicaragua
Tel. (505) 2270-2684
Panama
Supermarcas
Centro commercial El dorado, Plaza
Dorado, Local 2.
Panama
Tel. (507) 392-6231
Perú
Servizio Central Fast Service
City Market Nivel Plaza Local 153
Diagonal Hotel Melia,
Caracas
Tel. (582) 324-0969
www.applicaservice.com
servicio@applicamail.com
BIENVENUE!
What will we do to help you?
- Provide you with a reasonably similar replacement product that is either new or factory refurbished.
En Chile, Household Products Chile Ltda
BLACK+DECKER and the BLACK+DECKER logo are trademarks of The Black & Decker Corporation and are used under license. All rights reserved
Made and Printed in People's Republic of China