
KM 6009 CB - Food Processor BOMANN - Free user manual and instructions
Find the device manual for free KM 6009 CB BOMANN in PDF.

| Product type | Food processor |
| Brand | Bomann |
| Model | KM 6009 CB |
| Power supply | 220 - 240 V~, 50 Hz |
| Power consumption | 1000 W |
| Protection class | II |
| Net weight | 3.50 kg |
| Maximum mixing bowl capacity | 3.5 liters (light doughs) |
| Maximum heavy dough quantity | 1.5 kg |
| Included accessories | Dough hook, mixing hook, whisk, splash guard, protective disc |
| Number of speeds | Continuous speed variator with pulse function |
| Functions | Kneading, mixing, whisking, pulse |
| Safety | Safety switch on the pivoting arm |
| Cleaning | Hand wash, not dishwasher safe |
| Bowl material | Stainless steel (estimated) |
| Repairability | Contact an authorized technician for any repairs |
Frequently Asked Questions - KM 6009 CB BOMANN
User questions about KM 6009 CB BOMANN
0 question about this device. Answer the ones you know or ask your own.
Ask a new question about this device
Download the instructions for your Food Processor in PDF format for free! Find your manual KM 6009 CB - BOMANN and take your electronic device back in hand. On this page are published all the documents necessary for the use of your device. KM 6009 CB by BOMANN.
USER MANUAL KM 6009 CB BOMANN
Thank you for choosing our product. We hope that you enjoy using the appliance.
Symbols in this Instruction Manual
Important information for your safety is specially marked. It is essential to comply with these instructions in order to avoid accidents and prevent damage to the appliance:

WARNING:
This warns you of dangers to your health and indicates possible injury risks.

CAUTION:
This refers to possible hazards to the appliance or other objects.

NOTE: This highlights tips and information.
Contents
Overview of the Components 3
General Notes 35
Special Safety Instructions for this Appliance. 35
Unpacking the Appliance 36
Overview of the Components / Scope of Delivery 36
Electric Connection 36
Installation and Operation of the Kneading Machine 36
Recipes 38
Cleaning 38
Storage 39
Troubleshooting 39
Technical Data. 39
Disposal 39
General Notes
Before using this appliance, carefully read this instruction manual and keep it together with the warranty certificate, cashier receipt and, if possible, the original packaging including the interior packing. If you give this appliance to other people, please also pass on the instruction manual.
- The appliance is designed exclusively for private use and for the envisaged purpose. This appliance is not fit for commercial use.
- Do not use it outdoors. Keep it away from sources of heat, direct sunlight, humidity (never dip it into any liquid) and sharp edges. Do not use the appliance with wet hands. If the appliance is humid or wet, unplug it immediately.
- The appliance and the mains lead have to be checked regularly for signs of damage. If damage is found the appliance must not be used.
- Use only original spare parts.
- In order to ensure your children's safety, please keep all packaging (plastic bags, boxes, polystyrene etc.) out of their reach.

WARNING:
Do not allow small children to play with the foil. There is a danger of suffocation!
Special Safety Instructions for this Appliance

WARNING: Risk of injury!
- Before replacement of accessories or additional parts that move during operation, the appliance must be switched off and cut off from the mains!
- Do not touch moving parts.
- Before switching on, make sure that the accessories attachment has been installed correctly and is seated securely.
- Always disconnect the appliance from the supply if it is left unattended and before assembling, disassembling or cleaning.
- This appliance shall not be used by children.
- Keep the appliance and its cord out of the reach of children.

WARNING: Risk of injury!
Children may not play with the appliance.
- Appliances can be used by persons with reduced physical, sensory, or mental capabilities or lack of experience and / or knowledge, if they are supervised or have been instructed concerning safe use of the appliance and understand the hazards involved.
- Do not repair the appliance by yourself. Always contact an authorized technician. If the supply cord is damaged, it must be replaced by the manufacturer, its service agent or similarly qualified persons in order to avoid a hazard.

CAUTION:
Do not immerse the appliance into water for cleaning. Follow the instructions that we provide in the chapter "Cleaning".
- Do not manipulate any of the safety switches.
- Only process foodstuffs with this appliance. Misuse of the appliance for other purposes may cause injury.
Unpacking the Appliance
- Remove the packaging of the appliance.
- Remove all packaging material such as plastic film, filler material, cable ties and box packaging.
- Check that all parts are in the box.
- If the packaging content should be incomplete or if damages should be noticeable, do not operate the appliance. Return it to the distributor immediately.

T:
Dust or production residues may still be found on the appliance. We recommend that you clean the appliance as described under "Cleaning".
Overview of the Components / Scope of Delivery
1 Swivel arm
2 Motor housing
3 Lever for lowering / raising the arm
4 Push button (Pulse operation)
5 Control knob
6 Operation indicator lamp
7 Mixing bowl
8 Splash guard
9 Whisk
10 Kneading hook
11 Mixing hook
12 Protective disk
Electric Connection
Check that the mains voltage to be used matches the voltage of the appliance. Refer to the rating label for detailed specifications.
Installation and Operation of the Kneading Machine

TE:
Turn on the appliance with the mixing bowl in place only!
- Opening the swivel arm: Swivel the lever in direction and hold it in that position. Move the swivel arm by hand to the top position and release the lever.
- If you need the splash guard, attach it now to the swivel arm from below. Hold the splash guard (8) in such a way
that the fill opening is positioned in front of you. On the bottom of the swivel arm, there are two recesses on the front and back. Insert the splash guard with its guide lugs into these recesses. Turn the splash guard towards LOCK to lock it.
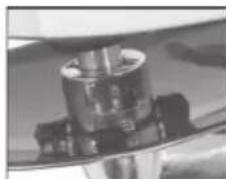
- For use of the kneading hook (10) or the mixing hook (11), first attach the protective disk. It prevents contact of dough with the drive shaft. Hold the disk like a bowl. Insert the kneading hook (10) or the mixing hook (11) from below through the recess in the disk opening and tighten it by a quarter turn to the left.
4. Use of an attachment:
On the top of the attachment, you can see a recess for the drive shaft and a recess for the splint. Push the attachment onto the drive shaft. Push down and at the same time turn the acces

sory anticlockwise in order for the splint of the drive shaft to lock into the accessory.
- Mixing bowl: Set the mixing bowl to its holder. Turn the mixing bowl all the way in the direction LOCK shown on the housing.
- Fill your ingredients into the mixing bowl.
NOTE:
If you knead heavy doughs, do not put all the ingredients at once into the mixing bowl. Start the kneading with flour, sugar and eggs. Add fluids slowly during the kneading.
- Check that the control knob is set to MIN.
- Hold the swivel arm securely. Swivel the lever in direction and hold it in that position. At the same time, lower the arm slowly by hand. Release the lever.
- Insert the power plug into a suitable socket.
- Select a speed using the table below.
Table Dough Types and Tools
| Dough Type Attachment | Position at the Control Knob | Quantity | Max. Operating Time | |
| Heavy dough (e. g. bread or short pastry) Kneading hook | m | max. 1.5 kg 3 | 5 minutes | |
| Medium dough (e. g. batter) Mixing hook | m | min. 0.5 kg max. 3.5 kg | 2 - 4 minutes | |
| Light dough (e. g. waffle or crêpes dough, pudding) | Whisk | m | min. 500 ml max. 3.5 litre | 2 - 4 minutes |
| Cream Whisk | m | min. 200 ml max. 1 litre | 3 - 5 minutes | |
| Egg whites Whisk | m | 4 - 10 egg whites 3 | - 5 minutes |
NOTE:
- Once the appliance is turned on, the operation indicator lamp lights up.
- Short time operation: With heavy dough, do not operate the appliance longer than 5 minutes and then let it cool down for 10 minutes.
- Push button (pulse operation): Briefly switch the motor to the highest speed setting by holding down the push button (4).
Pause Operation
WARNING: Danger of injury!
Always set the control knob to MIN if you want to interrupt the operation.
- Pull the power plug to change attachments.
- Wait for the attachment to come to a complete stop!
- If you activate the lever during operation to raise the arm, a safety switch deactivates the motor.
- The motor switches on again as soon as you lower the swivel arm again!
End Operation and Remove the Bowl
- At the end of work, set the control knob to MIN. Pull the power plug.
- Swivel the lever in direction and hold it in that position. Move the swivel arm by hand to the top position and release the lever.
- Remove the attachment.
- If you have used the splash guard, twist it counterclockwise to remove it.
- Turn the mixing bowl briefly anticlockwise to remove it.
- You can loosen the finished dough with a scraper and remove it from the mixing bowl.
- Clean all used components as described in the chapter "Cleaning".
Recipes
Sponge Mixture (Basic Recipe) Position 2 - 3
Preparation:
250 g soft butter or margarine, 250 g sugar, 1 package of vanilla sugar or 1 package Citro-Back, 1 pinch of salt, 4 eggs, 500 g wheat flour, 1 package of baking powder, approx. 1% litre milk.
Preparation:
Place wheat flour with the other ingredients in the mixing bowl, use the mixing hook to mix for 30 seconds at position 2, then approx. 3 minutes at position 3. Grease the form or line it with baking paper, fill in the dough, and bake. Before the cake is removed from the oven, test to see if it is done: With a sharp wooden stick, pierce the centre of the cake. If no dough sticks to it, it's done. Place the cake on a baking grid to let it cool.
Conventional Oven:
Tray slot: 2
Heating: Electric oven upper and lower heat 175 - 200 °C, gas oven: Speed 2 - 3
Baking time: 50 - 60 minutes
You can modify this recipe according to your taste, e. g. with 100 g raisins or 100 g nuts or 100 g grated chocolate. Let your imagination run wild.
Linseed Rolls Position 1-2
Ingredients:
500 - 550 g wheat flour, 50 g linseed, 38 litre water, 1 cube yeast (40 g), 100 g low-fat curd (well drained), 1 teaspoon salt. For brushing: 2 tablespoons water.
Preparation:
Soak linseed in 1% litre of lukewarm water. Place the remaining lukewarm water (1/4 litre) in the mixing bowl, crumble the yeast into it, add curd and mix well with the kneading hook on position 1. The yeast must be completely dissolved. Add the flour with the soaked linseeds and salt into the mixing bowl. Knead on position 1, then switch to position 2 and knead another 3 to 5 minutes. Cover the dough and let it rise in a warm place for 45 - 60 minutes. Knead again, take it out of mixing bowl, and form 16 rolls from it. Cover a baking tray with wet baking paper. Place the rolls on it, let them rise for 15 minutes, brush with lukewarm water, and bake.
Conventional Oven:
Tray slot: 2
Heating: Electric oven: Upper and lower heat
200 - 220 °C (preheat for 5 minutes),
gas oven: Speed 2 - 3
Baking time: 30 - 40 minutes
Chocolate Cream Position 4
Ingredients:
200 ml sweet cream, 150 g dark chocolate, 3 eggs, 50 - 60 g sugar, 1 pinch of salt, 1 package of vanilla sugar, 1 tablespoon cognac or rum, leaf chocolate.
Preparation:
Whip the cream stiff in the mixing bowl with the whisk, remove it from the mixing bowl, and keep it cool. Melt the chocolate according to the instructions on the package or heat it for 3 minutes in the microwave at 600~W . In the meantime, beat eggs, sugar, vanilla sugar, brandy or rum and salt with the whisk in the mixing bowl on position 4 until foamy. Add and evenly stir in the molten chocolate coating on position 4. Keep some of the whipped cream for garnishing. Add the remaining cream to the creamy matter and fold in for a short time with the pulse function. Garnish the chocolate cream and serve it well cooled.
Cleaning

WARNING:
- Always pull the power plug before cleaning.
- Never immerse the appliance in water for cleaning. This might result in an electric shock or fire.

CAUTION:
- Do not use a wire brush or abrasives for cleaning.
- Do not use acid or abrasive cleaning agents.
Motor Housing
Clean the housing only with a damp cloth and a squirt of detergent.
Mixing Bowl, Splash Guard, Protective Disk, Kneading and Mixing Attachments

CAUTION:
The attachments are not suitable for cleaning in a dishwasher. Heat and aggressive cleaning agents may warp or discolour the attachments.
- Parts that have come into contact with food can be rinsed with water.
- Dry all components well before re-attaching them to the appliance.
Storage
- Clean the appliance as described. Let the accessories dry completely.
- We recommend that you keep the appliance in the original packaging, if you do not want to use it for a longer period.
Always store the appliance out of reach of children in a well ventilated, dry place.
Troubleshooting
| Problem Possible Cause Remedy | ||
| The appliance cannot be switched on or stops operation. | Appliance without power supply. | Check the socket with another appliance. |
| Connect the power plug properly. | ||
| Check the fuse. | ||
| The appliance cannot be switched on or stops operation. | The swivel arm is not locked in the lowest position. A safety switch prevents operation. | Push the lever and the swivel arm at the same time until the arm locks. |
| The appliance is defective. | Contact our service centre or a specialist. | |
Technical Data
Model: KM 6009 CB
Power supply: 220 - 240 V~, 50 Hz
Power consumption: 1000 W
Protection class: II
Net weight: approx. 3.50 kg
The right to make technical and design modifications in the course of continuous product development remains reserved.
This appliance has been tested according to all relevant current CE guidelines, such as electromagnetic compatibility and low voltage directives, and has been constructed in accordance with the latest safety regulations.
Disposal
Meaning of the "Dustbin" Symbol
Protect our environment: do not dispose of electrical equipment in the domestic waste.
Please return any electrical equipment that you will no longer use to the collection points provided for their disposal.
This helps avoid the potential effects of incorrect disposal on the environment and human health.
This will contribute to the recycling and other forms of re-utilisation of electrical and electronic equipment.
Information concerning where the equipment can be disposed of can be obtained from your local authority.
Instrukcja obslugi
Yka3bIbaeHa BO3MOxHyO ONaCHOCTb IIN3dJIIMN IN dpynx OKpyKaIOxN ppeDMTOB.

3NeKtpnueckoe coeHHeHne
Поберы,чToИСпОЛьзУЕмоЕ habржehне ЗЕКТpo-nITaHЯ COOTBETCTByeT Habржehиnpiбopa.Cm.Ha 3TNKeTke HOMHaNoB NOДрбные ТхиЧeCKne XapakTePnCTKn.
YcTaHOBka n 3KcnIyataqra TeCTomeaJKN
IPIIMEUYAHNA:
BkIIOuAte yCTPOINCTBO TOnbKO C yCTaHOBHeHHbIM Ha MeCTO KYBUNHOM CMeUNBaHnI!
- OTKpbITHe NOBOPoTHOrO npea: NObepHnTe pblar B noJIOXeHne n ydepKnBaIte erO b 3TOM nOIOKeHN.
PykoI nepemecntte NOBOPOTHe Pnueo B BepxHee nIOJoxHne N OTNCTTe pbHa.
2.EcHn HxKeH 6pbI3ROBnK, NOCDcoEHNHTe erO CHN3y K NOBOPOTOMy pykaby. YdePknBaIte 6pbI3ROBnK (8) TAKIM O6pa3OM, YTO6bl OTBePCTne DnA 3aONHeHnPa cpanoIaranocb HanpoTnB Bac. Ha nhe NoBOPTHOro pykaba HaxoJATCn DaYrIy6LnEHHn, CpePei n C3aDn. BctabTe nIT npOTnB 6pbI3r c erO hApPbAJIouzMn BbICTynAmn B 3tN yIy6LnEHHn. NObepHnTE nIT npOTnB 6pbI3R B HAnpAbLeHHn LOCK dnn erO qKcaun.
3.Дпяпrimеония Кюка 3amewuBaHn(10)Илпперемшвань(11)счала yctaHOBTe 3aunTHbIMdNck.ОнпpeOTbpaTb KOHTaKT Tecta C npNBODhBIMBAJOM.
ДерхиTe ДИСК КАЧУ.ВCTABБTe KPIOKa 3AMEWBAHn(10)ИПИ ПЕМЕШВAHn(11)CHN3Y B n3 OTBepCTNДИСКАИЗТЯНITE NOBOPOTOM Ha YeTBePb BNeBO.
I P E D U N P E X D E H N E:
- Pered ounstkoBcerga n3Bnekaite BnIky nITaHna.
He norpykaite yctpoiCTBO B BODy dIa OUHCTKN. 3To moKet npNBecTN K nopaxeHHIO 3JIeKTpueeCKIM TOKOM nIN noXapy.
BHIMAHNE:
He nCnoB3yIe MeTaNJIuYeCKyU 0eTky Nn INHbIe abpa3NHBIe YnCTaIe CpeCDtBA IJN OChTKn.
He nCnoJIb3yIte arpeccnBhble mnn abpa3nBhble qHCTrue cpeDCTBa.
Koxy MoTopa
KoKyx CneIyET NCTNTb TOJbKO C NOMOJIbBO BnaXHOI TKAHN, DObaBnB HEMHORO KINDKOCTN DnA MbITbIOCcybl.
KyBWH DnI CMeWNBaHnI, 3aunTHaN KpbIuKa O T pa36pb13rNBaHnI, 3aunTHbI NcK, HacaN I nB36uBAHnI CMeWNBaHnI
BHIMAHNE:
HacaKn HEnb3a MbItb NocydomooeHNO MaunHe. HarpeB n arpeccNBhIe YNCTAUNe CpeCDTBA MoryT deOpmpoBaT hIN ObecuBETNb HacaKn.
-ДеталуycтpoIcTBA,copnKacabUHneC CПИЕБВIMnpOdyKTAMN,MOXHO npONONOCKaTb BOdoI.
XopoIo npocuIHTe BCE KOMnOHeHTbI nepeI NOBTOpHbIM NODKJIIOUeHHeM K pni6Opy.
XpaHeHne
OuHCTnTe yctpoIcTBO B COOTBeTCTBm C INHCTpyKJrMaM.
JaTe npHaJIeXHOCTaM POJIHOCTbIO BBICOXHyTb.
- EcIN Bbl XOTNTe PNOJNTb CPOK Cnyk6bI yCTpoNCTBa, peKOMEHnyETcXpaHnTb erO B opuHaJIbHOY npaKOBKe.
Bcerda xpaHnTe yctpoNCTBO B HeIOCTynHom IINI DeTeN, XopoIo npOBetpNBaEMOM IN CYXOM MecTe.
YcTpaHHe HEnCnpaBHOtei
aaoa aaaa bcbuulal jooalal jaaull
joo 1
a. a. g. 5y1g a. y. g 1uab 1uocu oocu
j0alal jSc gill jSloIy Iaaleblc llogb61 dc Jgssll
ablaablaJxjLg
4g
aysg a8s
:
60-50 3. aS1a yS a 150 a S 200
g g g g g g g g g g g g g g g g g g g g g g g g g g g g g
:
jolal jol jol aaiy bll lclg g kwlalag 1000
ogall gl agglbl allll aeg ylgsgaill ayls y. 3rllg 1000
olil0i 600 g 5g 3 6g 9g
jlllbrg 600 g 5g 3 6g 9g
aylgall e g 4 g 5g 3 6g 9g
lglal g 4 g 5g 3 6g 9g
agall ae 5-4 ae 5e 1plauu ugo J
qall ae zo laig aeg sll odl j agsll no gao I
dyl gdd ylggsll eg S .
2-1g
:
1 8/3.50 50 550-500
a a (lale alao) 100,(p40)
o 2
:
a 4/1) a j 8/1 j k l j k l k l k l k l k l k l k l k l k l k l k l k l k l k l k l k l k l k l k l k l k l k l k l k l k l k l k l k l k l k l k l k l k l k l k l k l k l k l k l kl k
:
2:duuallas
jdua aalglgall ool al 100: ySul nall :nwl 5o 200 220-200 1
3-2 aee 1auej: jai jj (jit)
40-30 1
#
:
#
.
.
aolaiw 131520018g jglalb
.
gall jgl jks jlljglu jslal 1
aalaa g 1b5y 1aLs
4ab = y_0
.
jglall jaiy y
10 45j 5
()
(4) ab.1 = a.1 = b 且 b.1 = a.1 = b
Lggo Juaaill
129,000 0000000000000000
3 15MIN gogbI Jgsslljj bdo Ioo
.
.
1o 1
cuaa aee
.0j061 jla 0j031
jglv 1 jw w 20 c8 y 8y 8y 8y 8y
!4
e glljg j
wol.min goll sall
J
yJyJyJyJyJyJyJyJyJyJyJyJyJyJyJyJyJyJyJy
.
.3
aL aL aL aL aL aL aL aL aL aL aL aL aL aL aL aL aL aL aL aL aL aL aL aL aL aL aL aL aL aL aL aL aL aL aL aL aL aL a L a L a L a L a L a L a L a L a L a L a L a L a L a L a L a L a L a L a L a L a L a L a L a L a L a L a L a L a L a L a L a L a L a L a L a L a L a L a L a L a L a L a L a L a L a L a L a L a L a L a
ailljy aelw yjlae oesj 5
jao 100000000000000000000000000000000000000000
.

!yloylj:j
:
1
"abill" Jaa 3 aoljll lall jai. aai 161 jajy
.
.
.
jai:slu Jzjj Sji
4b - y_0 = 0

- = ( x1,y1) , = ( x2,y2)
j.aaogll uie aolgl jy jgj 1
aJgJgJgJgJgJgJgJgJg
aIoo 1000
gagga.01gll 1jll Jauu. uuiia 8
LOCK oJy j.
yjg(11)j(10)
y 10) j 10
J.
:clalbplusai
Ggaaa1d10la 1
aaii laiyig yiyilgol gaojia
2945 J315 aed6d 01s7g 00
3gj 3gjwJl Jb0.
ab = 20
Cg 15
Sall aal alol ooll aol lalol alcg 10
jssll jbj jslgwl 1
MIN gobgd de bgaosaoaol jj jo joi 7
a 100000000000000000000000000000000000000000000
aJy JyJyJyJyJyJyJyJyJyJy
Juaa 3 Juaa Jua
10.
gj 1y jgj
1..jglj#
2. 21 ÷ 29 ÷ 20 ÷ 100
.
- gaxially oj
-
g jj
-
g E,g g,h,l A,c E,b
= x + y
jglalai jai jglal algai lalao gajl sla jslj
"..i. i. j. g. i. c. o. i. o. o. o. o. o.
auiuul gbi/ uigkglde aole ojbi
100
yds 2
13
()yj
Ssollie 5
山 6
100 7
jll 8
aeea 9
j00 10
11
g 12
jL
J 100000000000000000000000000000000000000000000000000000
3
59
59
59
58
58
Aolc Udo
J 1111111111111111111111111111111111
.5jgl11p111u11111
(aLw sLo g (aIbdo aosy) aygbllg oalbl aasgl g 1b, jzall j51. dLw yg jzll pssw y.0oall bssl g .g all de lykuluall e jil
jglal plaiw jie gll aai gl ala 1
JgUJgluJcIgU(LgGgJgJgUgUgUgU
:yoo
y 1
L
jglal pluotaly giaiz jol liLioa oljol 1
111 1
dLw dblal laa aolll clogl0o 1e clole gog p
aLb1 alg oag oal qaii Clll oij Uyll ygrall
a loyI sblo 1 xag ciao de jboJIo so Jio Jio .alazab
S OBC = S COD + S_ BOC
1111j
.alaolab1
4.3
alj jgldll jy jay d alaoa jblao g jol lla x
ai a ai 分母最小值为 k .
01.21.21.21.21.21.21.21.21.21.21.21.21.21.21.21.21.21.21.21.21.21.21.21.21.21.21.21.21.21.21.21.21.21.2
Ugaxb1
3 62
...jglld lgl dolld doo..
61 61 61 61 61 60
jlll l 100
!4y1j:
山
jss jss sbs jds
.45
.15
g.45,45,45,45,45,45,45,45,45,45,45,45,45,45,45,45,45,45,45,45,45,45,45,45,45,45,45,45,45,45,45,45,45,45,
a0 = 2,b0 = - 4
JabJl jol jalil llo pluwo
Jabj Jglio jc Ie y Boa Jy Jg jg jde
jLjJyJJabJy
a#i#i i##
1 1
aaiab1 bla6b1 aagaaiaa aea aal
GARANTIEKARTE
warranty card · garantiekaart · carte de garantie · scheda di garanzia · tarjeta de garantia · cartao de garantia · garantikort · karta gwarancyjna · zaručni list · kartica jamstva · carte de garantie · fapauunonha Kapta · zaručný list · garancijski list · garanciajegy · rapahtiHmΦopMynp · fapaHTmHbɪŋ TaHOH
juluo zhe
KM 6009 CB
24 Monate Garantie gemäß Garantierklarung - 24 months warranty according to warranty declaration - 24 maanden garantie volgens garantieverklaring - 24 mois de garantie selon la déclaration de garantie - 24 mesi dar guanazia seconda la dichiarazione di garanzia - 24 measles de garantia de acuero con la déclaracion de garantia - 24 meanes de acido con a déclaracion de garantia - 24 manedes garanti i henhold til garantibetingensene - 24 misesz gwarancj na podstawie oswiadczenia gwarancjnego - zaruka 24 misiou podle prohlasei o zaruce - 24 mesecno jamstvo u skladu s jamstvenom deklaracionj - 24 luni garantie conform declarejie de garantie - 24 mecua rapaunur in cbottecbrine c rapaunuohnata daeknapauern - 24-mescnzara podla vyhlasenia o zaruke - 24-mesecnca garancija, skladno z garancijsko Izavo - 24 honaparagica a garanciafeletetelekben leirtak szerint - rapaHTN Ha 24 MCHI BIDNOIBIO ZARNI npo rappaTI - rapaHTN 24 mcra cornaccho zarnenHHBIM rapaHTNHbIM npabvam -
Kaufdatum, Handlsterpmel, Unterschrift - date of purchase, dealer stamp, signature - aankoopdatum, dealerstempl, handelkening - date dachat, tampon du concessionaire, signature - data de acquisto, tambore del revendatore, fimra - fecha de compa, sella del distribuider, fimra - data de compa, canimbe o do distribuider, assinatura - kapezdata, forhandierment, signatur - data zakpu, piecedz spreadawyoc, poepis - datum zakupei, raztiko prodezie, podpiis - datum kupvine, zig trogova, petipis - datum o achizheny, stampila fumuzorulus, semnatura - da na kynkara, lhevar na Ipojadaiva, Iopmnc - datum nakupu, pediatra obchodnika/predajcu, podpiis - datum nikupa, zig trogova, petipis - visarais datuma, kereskedo belyegzje, alairas - da para npropana, neapka npodauan, pnpnc - da npropenpemienu, Utaam npodaua, Pnpncina.
BOMANN®
www.bomann-germany.de
BOMANN®
C. Bomann GmbH
Internet: www.bomann.de
Made in P.R.C.


- Symbols in this Instruction Manual
- WARNING:
- CAUTION:
- Contents
- General Notes
- Special Safety Instructions for this Appliance
- WARNING: Risk of injury!
- Unpacking the Appliance
- T:
- Overview of the Components / Scope of Delivery
- Electric Connection
- Installation and Operation of the Kneading Machine
- TE:
- Use of an attachment:
- NOTE:
- Pause Operation
- WARNING: Danger of injury!
- End Operation and Remove the Bowl
- Recipes
- Sponge Mixture (Basic Recipe) Position 2 - 3
- Preparation:
- Conventional Oven:
- Linseed Rolls Position 1-2
- Ingredients:
- Chocolate Cream Position 4
- Cleaning
- Motor Housing
- Mixing Bowl, Splash Guard, Protective Disk, Kneading and Mixing Attachments
- Storage
- Technical Data
- Disposal
- Meaning of the "Dustbin" Symbol
- Instrukcja obslugi
- 3NeKtpnueckoe coeHHeHne
- YcTaHOBka n 3KcnIyataqra TeCTomeaJKN
- IPIIMEUYAHNA:
- I P E D U N P E X D E H N E:
- BHIMAHNE:
- Koxy MoTopa
- XpaHeHne
- 4g
- aysg a8s
- :
- 2-1g
- :
- #
- !yloylj:j
- jai:slu Jzjj Sji
- gj 1y jgj
- auiuul gbi/ uigkglde aole ojbi
- jL
- Aolc Udo
- L
- Ugaxb1
- jlll l 100
- GARANTIEKARTE
- KM 6009 CB
Brand : BOMANN
Model : KM 6009 CB
Category : Food Processor