UPSOLEBPR1 - Uninterruptible power supply Middle Atlantic - Free user manual and instructions
Find the device manual for free UPSOLEBPR1 Middle Atlantic in PDF.
| Product Type | External battery pack for UPS (Uninterruptible Power Supply) |
| Brand | Middle Atlantic |
| Model | UPSOLEBPR1 (also UPS-0LEBPR-1) |
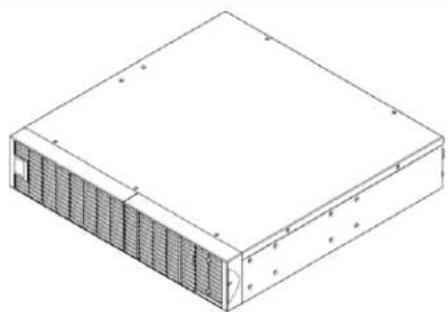
| Dimensions (W x D x H) | 483 x 400 x 88 mm (2U rack) |
| Weight | 25 kg (requires two people for lifting) |
| Input Power | 100-240 V AC, 50/60 Hz |
| Battery Type | Sealed lead-acid maintenance-free battery |
| Battery Voltage | 48 V DC (estimated) |
| Battery Capacity | Not specified in the manual, suitable for Middle Atlantic UPS units |
| Main Functions | Extended runtime for Middle Atlantic UPS; installation in standard 19" rack |
| Operating Temperature | 0 °C to 40 °C |
| Relative Humidity | 20 % to 80 % non-condensing |
| Installation | Must be installed by qualified maintenance personnel; install below the UPS |
| Maintenance | Battery replacement by qualified personnel only; do not open the housing |
| Cleaning | Disconnect the device before cleaning; use a dry cloth |
| Safety | Risk of electric shock, short circuit, and explosion; follow warnings in the manual |
| Spare Parts and Repairability | Replacement battery certified by Middle Atlantic; no user-serviceable parts |
| Certifications | FCC Part 15 Class A (commercial use) and Class B (residential use); ICES-003 Class A/B |
| General Information | User manual included; must be read before installation |
Frequently Asked Questions - UPSOLEBPR1 Middle Atlantic
User questions about UPSOLEBPR1 Middle Atlantic
0 question about this device. Answer the ones you know or ask your own.
Ask a new question about this device
Download the instructions for your Uninterruptible power supply in PDF format for free! Find your manual UPSOLEBPR1 - Middle Atlantic and take your electronic device back in hand. On this page are published all the documents necessary for the use of your device. UPSOLEBPR1 by Middle Atlantic.
USER MANUAL UPSOLEBPR1 Middle Atlantic
Thank you for purchasing a UPS-OLEBPR expansion battery pack. Please read these instructions thoroughly before installing this product.
PRODUCT FEATURES
- Add additional runtime to an online series UPS
- Connect up to 10 expansion battery packs to a single UPS
- Plug and play operation.

Middle Atlantic Products
April, 2016 I-00779 Rev -
TABLE OF CONTENTS
IMPORTANT SAFETY INSTRUCTIONS 4
CONSIGNES DE SECURITE IMPORTANTES 4
REGULATORY COMPLIANCE 5
Federal Communications Commission (FCC) Compliance Statement for UPS-OLEBPR-1 (Used for 2200 and 3000VA Online UPS Models). 5
Industry Canada (IC) 5
Federal Communications Commission (FCC) Compliance Statement for UPS-OLEBPR-2 (Used for 1500VA Online UPS Models)
Industry Canada (IC) 5
OVERVIEW 6
UNPACKING 6
HARDWARE INSTALLATION 7
Safety Precautions. 7
Précautions de Sécurité 7
Rackmount Installation 7
Sliding Out the Battery Pack from the Rackrail 9
BASIC OPERATION 10
Battery Pack Front/Rear Panel Description. 10
UPS With One Battery Pack Connected 10
UPS With Multiple Battery Packs Connected. 11
External Battery Pack Configuration 11
MAINTENANCE 12
Safety Precautions. 12
Précautions de Sécurité 12
Storage 12
Replacement Batteries 12
Battery Disposal 12
Battery Replacement 13
TABLE OF CONTENTS
UPS MODELS AND CORRESPONDING BATTERY PACKS 14
TECHNICAL SPECIFICATIONS 15
TROUBLESHOOTING 15
WARRANTY 16
IMPORTANT SAFETY INSTRUCTIONS
This manual contains important instructions. Please read and follow all instructions carefully during installation and operation of the unit. Read this manual thoroughly before attempting to unpack, install, or operate the UPS.
CAUTION! The battery can power hazardous components inside the unit, even when the AC input power is disconnected.
CAUTION! (No User Serviceable Parts): Risk of electric shock, do not remove cover. No user serviceable parts inside. Refer servicing to qualified service personnel.
CAUTION! (Non-Isolated Battery Supply): Risk of electric shock, battery circuit is not isolated from AC power source; hazardous voltage may exist between battery terminals and ground. Test before touching.
CAUTION! The UPS-0LEBPR-1 / UPS-0LEBPR-2 models may only be installed by qualified maintenance personnel.
CAUTION! Do not dispose of batteries in fire as the battery may explode.
CAUTION! Do not open or mutilate the battery, released electrolyte is harmful to the skin and eyes.
CAUTION! A battery can present a risk of electric shock and high short circuit current. The following precautions should be observed when working on batteries:
- Remove watches, rings or other metal objects.
-
Use tools with insulated handles.
-
Wear rubber gloves and boots.
- Do not lay tools or metal parts on top of batteries.
- Disconnect charging source prior to connecting or disconnecting battery terminals.
- Determine if battery is inadvertently grounded. If inadvertently grounded, remove source from ground. Contact with any part of a grounded battery can result in electrical shock. The likelihood of such shock can be reduced if such grounds are removed during installation and maintenance.
CAUTION! Make sure everything is turned off and AC power is disconnected completely before conducting any maintenance, battery replacement, repairs or shipment.
CAUTION! Connect the Protection Earth (PE) safety conductor before any other cables are connected.
SERVICING OF BATTERIES SHOULD BE PERFORMED OR SUPERVISED BY PERSONNEL WITH KNOWLEDGE OF BATTERIES AND THEIR REQUIRED PRECAUTIONS. KEEP UNAUTHORIZED PERSONNEL AWAY FROM BATTERIES!
CONSIGNES DE SECURITE IMPORTANTES
Federal Communications Commission (FCC) Compliance Statement for UPS-OLEBPR-1
(Used for 2200 and 3000VA Online UPS Models)
NOTE: This equipment has been tested and found to comply with the limits for a Class A digital device, pursuant to Part 15 of the FCC Rules. These limits are designed to provide reasonable protection against harmful interference when the equipment is operated in a commercial environment. This equipment generates, uses, and can radiate radio frequency energy and, if not installed and used in accordance with the instruction manual, may cause harmful interference to radio communications. Operation of this equipment in a residential area is likely to cause harmful interference in which case the user will be required to correct the interference at his own expense.
CAUTION! Any changes or modifications not expressly approved by the manufacturer could void the user's authority to operate the equipment.
Industry Canada (IC)
Federal Communications Commission (FCC) Compliance Statement for UPS-OLEBPR-2
(Used for 1500VA Online UPS Models)
CAUTION! Any changes or modifications not expressly approved by the party responsible for compliance could void the user's authority to operate the equipment.
NOTE: This equipment has been tested and found to comply with the limits for a Class B digital device, pursuant to part 15 of the FCC Rules. These limits are designed to provide reasonable protection against harmful interference in a residential installation. This equipment generates, uses and can radiate radio frequency energy and, if not installed and used in accordance with the instructions, may cause harmful interference to radio communications. However, there is no guarantee that interference will not occur in a particular installation. If this equipment does cause harmful interference to radio or television reception, which can be determined by turning the equipment off and on, the user is encouraged to try to correct the interference by one or more of the following measures:
- Reorient or relocate the receiving antenna.
- Increase the separation between the equipment and receiver.
- Connect the equipment into an outlet on a circuit different from that to which the receiver is connected.
- Consult the dealer or an experienced radio/TV technician for help.
Industry Canada (IC)
The Middle Atlantic battery packs (UPS-OLEBPR-2 / UPS-OLEBPR-1) support 60A polarized plugs, and is designed for variety of Middle Atlantic UPS systems. When combining with the UPS, the battery pack provides extended runtime with a 36VDC/72VDC external connection. Additional parallel-connected battery packs provide the UPS for a longer extended runtime operation.
UNPACKING

Power cord
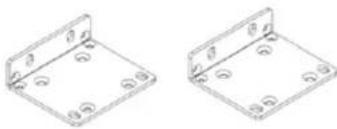
Rackmount ears (2)


Tie plate (1)
Flat head screws: M5x7L (8)

Pan head screws: M5x12L (4)

Pan head screws: M5x6L (6)

Pan head Screws: 10-32x1/2L (12)

Screw hole dust covers (12)

Rubber feet (12)

1.5/2/3KVA Battery pack

Quick Start Guide
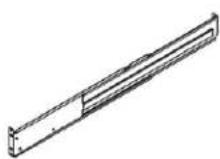
Rackmount Left Rail
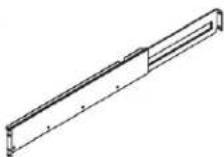
Rackmount Right Rail

Left Hanging Bracket

Right Hanging Bracket
HARDWARE INSTALLATION
Safety Precautions
CAUTION! This unit is heavy; lift carefully. A two person lift is recommended.
CAUTION! Lift the battery pack out of the shipping box by firmly holding both sides of the unit. Do not lift the battery pack out of the shipping box while holding the front face of the unit, as this may cause damage.
CAUTION! Installation environment should be in a temperature and humidity controlled indoor area free of conductive contaminants. Do not install this battery pack where excessive moisture or heat is present (please see "Technical Specifications" on page 14 for acceptable temperature and humidity ranges).
CAUTION! Never install a battery pack, or associated wiring or equipment, during a lightning storm.
CAUTION! Do not work alone under hazardous conditions.
CAUTION! Do not remove the top cover. Removing the cover may risk an electric shock.
CAUTION! The battery can energize hazardous live parts inside even when the AC input power is disconnected.
CAUTION! To prevent the risk of fire or electric shock, only use the supplied hardware to attach the mounting brackets.
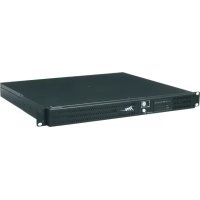
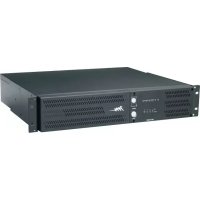
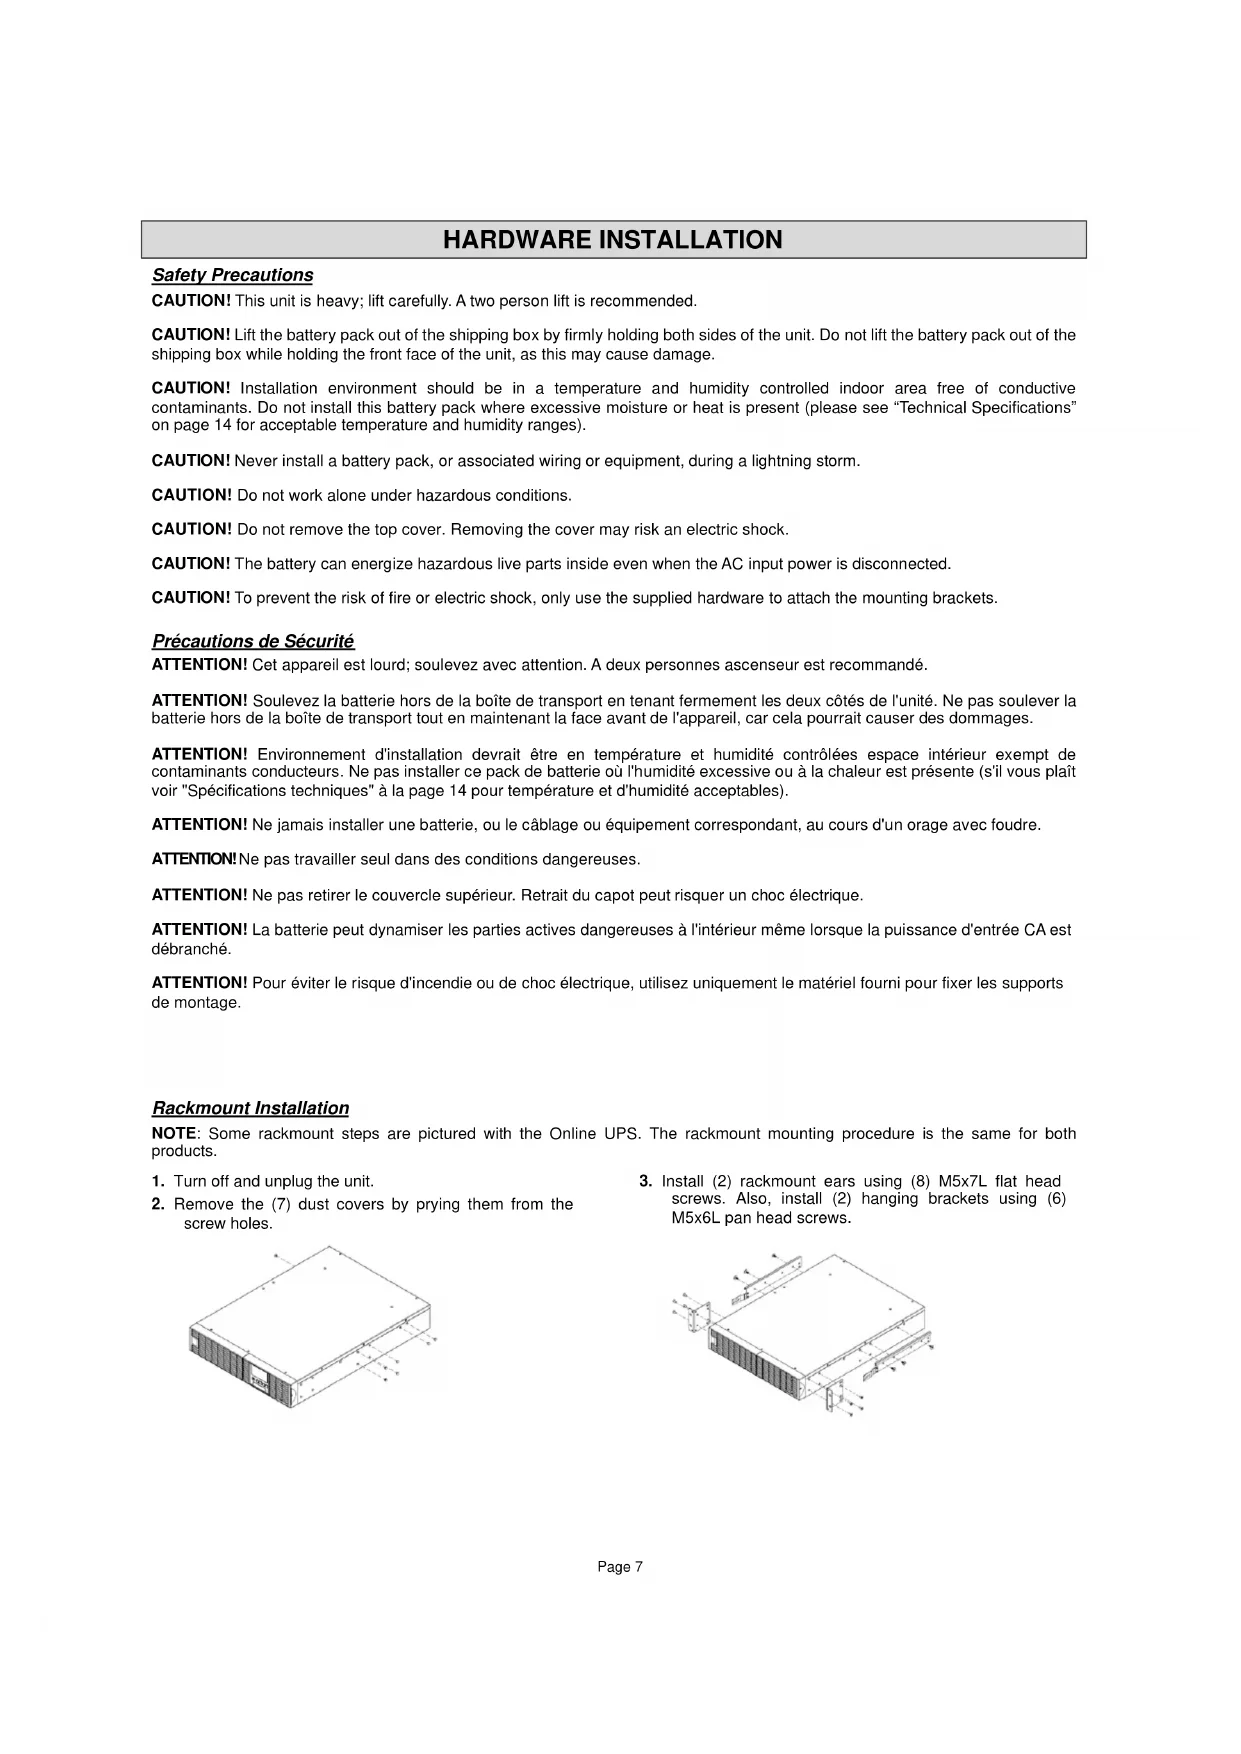
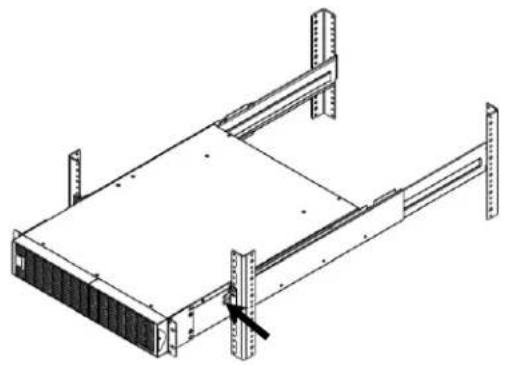
Rackmount Installation
NOTE: Some rackmount steps are pictured with the Online UPS. The rackmount mounting procedure is the same for both products.
- Turn off and unplug the unit.
- Remove the (7) dust covers by prying them from the screw holes.
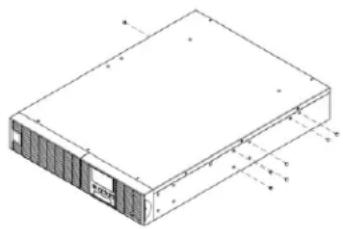
- Install (2) rackmount ears using (8) M5x7L flat head screws. Also, install (2) hanging brackets using (6) M5x6L pan head screws.
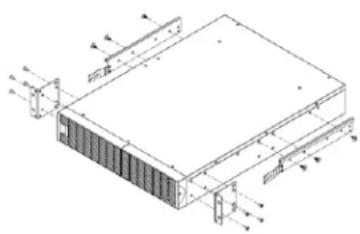
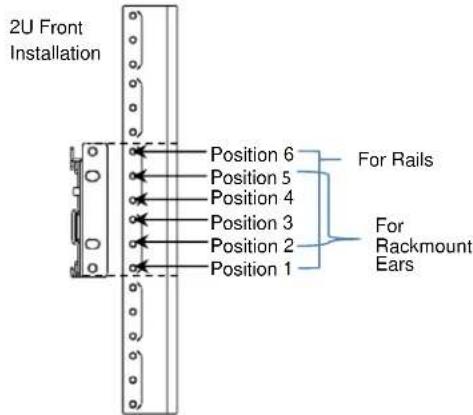
- Install your rackmount rails. The rails adjust to mount in 48cm (19") panel racks from 52 to 91.5cm (20.5 to 36") deep. Select the proper holes in the rack for positioning the battery pack in the rack. The battery pack takes up positions 1 through 6.
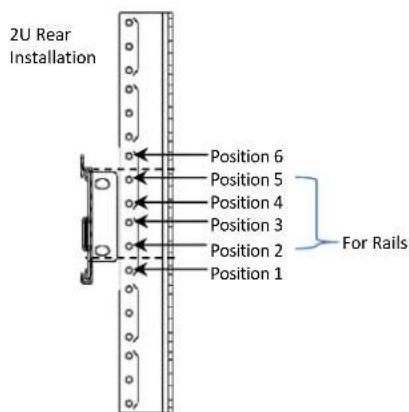
- Adjust the rackrail depth within specified mounting ranges from step 4. Attach the rackmount rail to your rack with (8) 10 - 32 × 1 / 2L screws and (2 screws for both front and back and for each rail). Tighten all screws.
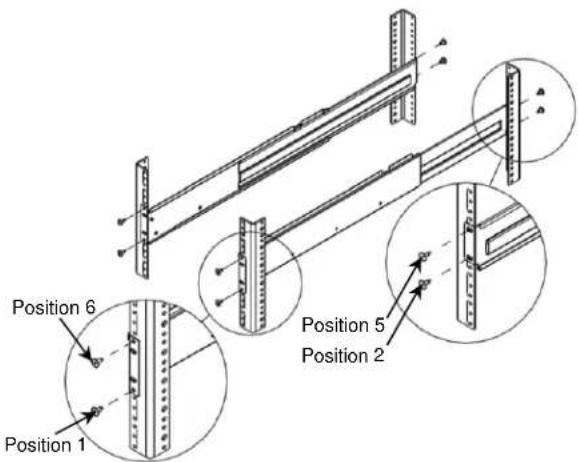
- Slide hanging brackets on the battery pack into the rails mounted in the rack with the front of the unit facing you. Secure the battery pack to your rack with (4) 10-32x1/2L screws on the front of the rack (located in positions 2 and 5).
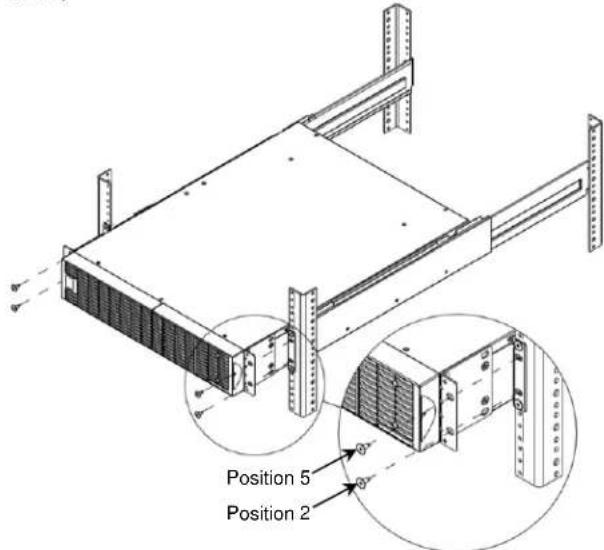
- Once completed, perform the same steps for the UPS.
CAUTION! The battery pack must be installed below the UPS.
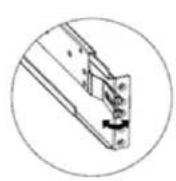
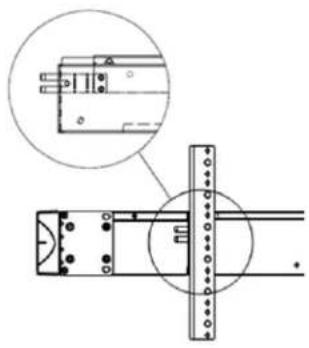
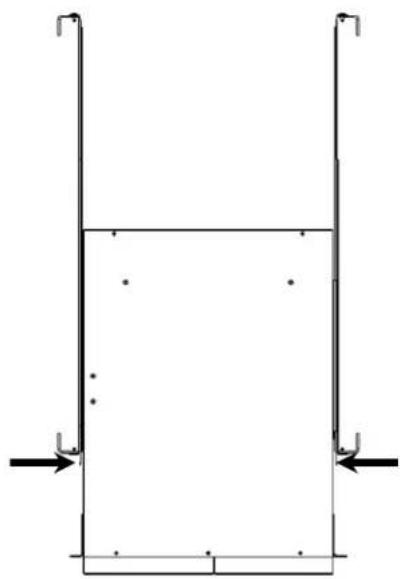
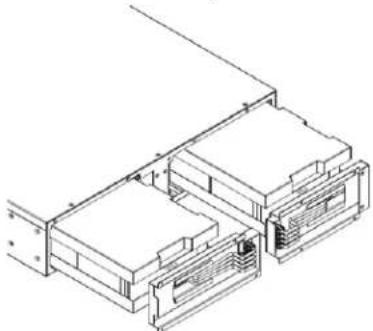
Sliding Out the Battery Pack from the Rackrail
- Turn off and unplug the unit.
- The battery pack is secured from being pulled out of the rack any further than its mid-length by a safety lock mechanism. Use both hands to hold the battery pack and press the safety locking tabs to pull the battery pack out of the rack.
BASIC OPERATION
Battery Pack Front/Rear Panel Description
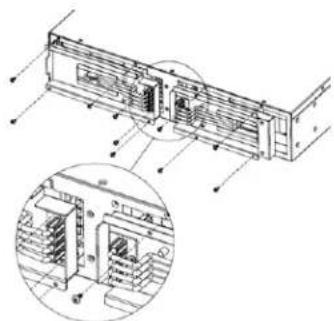
- On-board Replaceable Fuse Cover:
Replaceable fuse is accessible from the rear panel. It must be done by qualified personnel.
- AC Circuit Breaker:
Provides overload and fault protection.
- AC Output Outlet:
Use this outlet to connect to the AC Input Inlet of a downstream battery pack.
- AC Input Inlet (Charge Only):
AC power connectivity to wall receptacle.
- Input Connector:
Use this input connector to series connect another battery pack. Remove the connector cover for access.
- Output Cable:
Use this output cable to connect the battery pack to the UPS or another battery pack.
- DC Breaker:
Use the DC breaker to disconnect battery output.
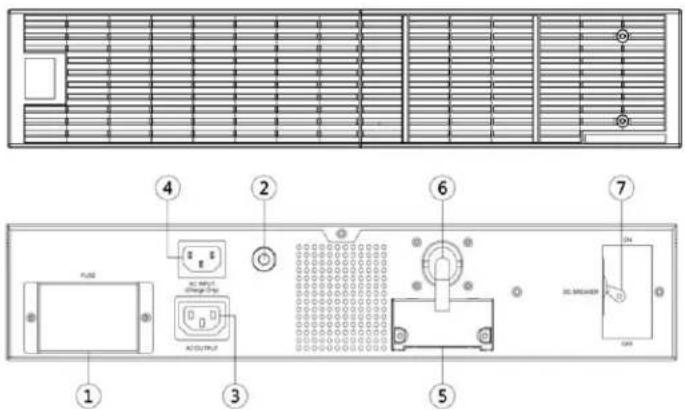
UPS-OLEBPR-2 / UPS-OLEBPR-1
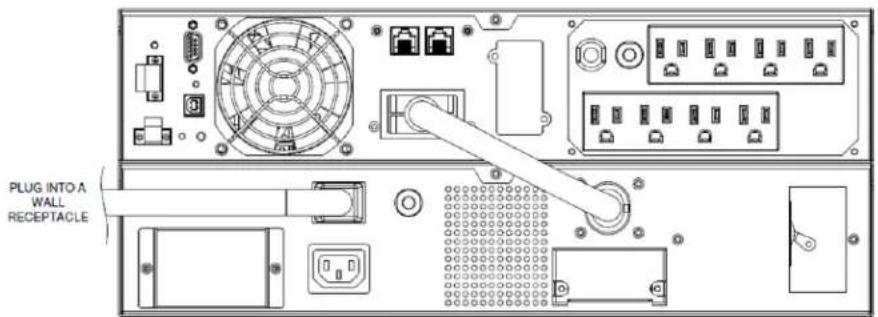
UPS With One Battery Pack Connected
- Turn off the DC breaker of the battery pack.
- Loosen the two screws to remove the battery cable retention bracket of the UPS.
- Use the output cable of the battery pack to connect the battery pack to the UPS.
- Rotate the battery cable retention bracket and tighten the two screws to fix battery cable.
- Use a power cord to plug AC input inlet of the battery pack into a wall receptacle.
- Turn on the DC breaker of the battery pack.
UPS With Multiple Battery Packs Connected
- Connect the 1 st battery pack to the UPS using the previous instructions. For more information, see "UPS With One Battery Pack Connected" on page 10.
- Turn off the DC breaker of the 2 nd Battery module.
- Loosen the two screws to remove the battery cable retention bracket of the 1^st battery pack.
- Use the output cable of the 2^nd battery pack to connect the 2^nd battery pack to the 1^st battery pack.
- Rotate the battery cable retention bracket and tighten the two screws to fix battery cable.
External Battery Pack Configuration
The UPS can be configured to reflect the correct estimated runtimes for the number of battery packs installed by using the LCD Control Panel to select the number of battery packs installed.
- Press the "ENTER" button to activate the "MAIN MENU".
- Press the "▲" and "▼" buttons to scroll to the "Configure" option.
- Press the "ENTER" button to select the "Configure" submenu.
- Press the "▲" and "▼" buttons to scroll to the "EBM Number" option.
- Press the "ENTER" button to select the "EBM Number" submenu.
The first configuration number will be displayed on the second column of LCD display.
- Press the "▲" and "▼" buttons to scroll through the number of attached battery packs.
- Press the "ENTER" button to select the number of battery packs installed.
You may be prompted to save the selection, if so press the "ENTER" button to save the setting.
- Press the "ESC" button to cancel or return to the previous LCD menu.
| Configure Submenu Available Settings Default Settings | |
| EBM Number = [0] [1] [2] [3] [4] [5] [6] [7] [8] [9] [10] | |
| 0 | |
MAINTENANCE
Safety Precautions
CAUTION! Make sure everything is turned off and AC power is disconnected completely before conducting any maintenance, battery replacement, repairs or shipment.
CAUTION! Only use replacement batteries which are certified by Middle Atlantic Products. Use of incorrect battery type is an electrical hazard that could lead to explosion, fire, electric shock, or short circuit.
CAUTION! Batteries contain an electrical charge that can cause severe burns. Before servicing batteries, please remove any conductive materials such as jewelry, chains, wrist watches, and rings.
CAUTION! Do not open or mutilate the batteries. Electrolyte fluid is harmful to the skin/eyes and may be toxic.
CAUTION! To avoid electric shock, turn off and unplug the battery pack from the wall receptacle before servicing the battery.
CAUTION! Only use tools with insulated handles. Do not lay tools or metal parts on top of the UPS or battery terminals.
Please read and follow the Safety Precautions before servicing the battery. Battery replacement should be performed by trained personnel who are familiar with the procedures and safety precautions. Make a note of the replacement battery pack number.
Storage
Cover your battery packs and fully charge them when storing for an extended period of time. Recharge the batteries every three months to ensure their full capacity and maintain the longest possible battery life
Replacement Batteries
Please refer to the front side of the battery pack for the model number of the correct replacement batteries. Contact technical support at 1-800-266-7225 for more information about Middle Atlantic Product's Battery Replacement Program.
Battery Disposal
Batteries are considered hazardous waste and must be disposed of properly. Contact your local government for more information about proper disposal and recycling of batteries. Do not dispose of batteries in fire.
Middle Atlantic Products encourages environmentally sound methods for disposal and recycling of its UPS products. Please dispose and/or recycle your UPS and batteries in accordance to the local regulations of your state.
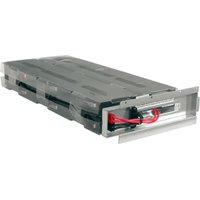
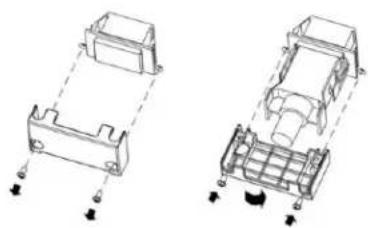
Battery Replacement
- Power off the unit and disconnect it from its AC power source.
-
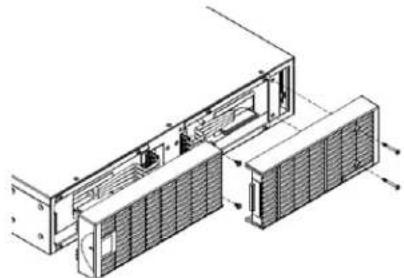
Remove the retaining screws from the cable protection cover and then remove the cover itself.
-
Remove the front panels.
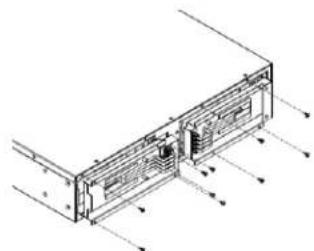
- Pull the battery tray out slowly and then put the new battery tray back into the compartment.
- Fasten back the connectors on the battery retaining cover. Then insert the battery connectors and tighten the screws of battery retaining cover.
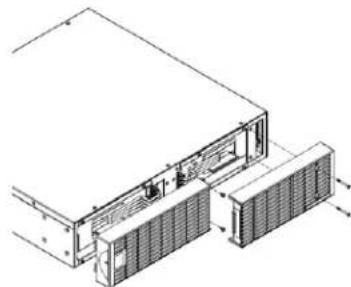
- Reinstall the front panels.
UPS MODELS AND CORRESPONDING BATTERY PACKS
The following table shows Middle Atlantic Products, Inc. online UPS units and their corresponding online expansion battery packs.
Contact technical support at 1-800-266-7225 for more information about Middle Atlantic Product's Battery Replacement Program.
| MAP UPS or EBPR Part Number | Description | Compatible Expansion Battery Packs | UPS-OLRBP-1 | UPS-OLRBP-2 | UPS-OLRBP-3 | UPS-OLRBP-4 |
| UPS-OL1500R | 1500VA UPS | UPS-OLEBPR-2 | X | |||
| UPS-OL2200R | 2200VA UPS | UPS-OLEBPR-1 | X | |||
| UPS-OL3000R | 3000VA UPS | UPS-OLEBPR-1 | X | |||
| UPS-OLEBPR-1 | 2200/3000VAPUSExpansionBattery | NA X (2 each) | ||||
| UPS-OLEBPR-2 | 1500VA USSPansionBattery | NA X (Left) X (Right) | ||||
TECHNICAL SPECIFICATIONS
| Model | UPS-OLEBPR-2 UPS-OLEBPR-1 | ||
| Configuration | |||
| AC Input Voltage 100~125Vac | |||
| DC Output Voltage 36Vdc 72Vdc | |||
| Amperage 60A | |||
| Physical | |||
| Dimensions (L x W x H) | 16.9 x 17 x 3.5in. (430 x 433 x 88mm) | 23.6 x 17 x 3.5in. (600 x 433 x 88mm) | |
| Net Weight 50.6lbs(23.0Kg) | 96.8lbs(44.0Kg) | ||
| Battery | |||
| Specifications | Qty 6 (2 x Banks of 3 Batteries) | Qty 12 (2 x Banks of 6 Batteries) | |
| Recharge Time (Typically) 5 hours for | 0-100% Capacity; 4 hours for 0-90% Capacity | ||
| Interface PP45 | |||
| Sealed, Maintenance Free | Yes | ||
| Hot-Swappable | Yes | ||
| Built-in Charger | Yes | ||
| Environment | |||
| Operating Temperature | 32°F to 104°F (0°C to 40°C) | ||
| Operating Relative Humidity | 0 to 90% Non-Condensing | ||
| Safety | |||
| Conformance Approvals | UL | ||
| RoHS | RoHS Compliant | ||
TROUBLESHOOTING
| Problem | Possible Cause | Solution |
| BAT Disconnected | Missing battery power. | Check battery connector and battery breaker. |
| Battery Failure | The UPS has detected a bad battery. | 1. Check battery connector and battery breaker. 2. Contact technical support at 1-800-266-7225 for more information about Middle Atlantic Product's Battery Replacement Program. |
| Replace Battery | Battery will soon need to be replaced due to insufficient runtime. | Contact technical support at 1-800-266-7225 for more information about Middle Atlantic Product's Battery Replacement Program. |
| Overcharge | Battery is overcharged. | 1. Remove battery connector and check charger voltage. 2. Contact technical support at 1-800-266-7225 for repair information. |
| Charger Failure | Charger has failed. |
WARRANTY
Middle Atlantic Products, Inc. (the "Company") warrants the RackLink Device product to be free from defects in material or workmanship under normal use and conditions for a period of (3) three years from date of shipment by the Company.
The Company's entire liability to the purchaser, and the purchaser's (or any other party's) sole and exclusive remedy, under this warranty shall be limited, at the Company's option, to either (a) return of and refund of the price paid for, or (b) repair or replacement at the Company's factory of the products purchased, or any part or parts thereof, which the Company has determined to be defective after inspection thereof at the Company's factory. This warranty does not cover damage due to acts of God, accident, misuse, abuse or negligence by parties other than the Company, or any modification or alteration of the products. In addition, this warranty does not cover damage due to improper handling, assembly, installation or maintenance.
THIS WARRANTY IS IN LIEU OF ALL OTHER WARRANTYES OF ANY KIND, EITHER EXPRESSED OR IMPLIED, INCLUDING, BUT NOT LIMITED TO, IMPLIED WARRANTYES OF MERCHANTABILITY AND FITNESS FOR A PARTICULAR PURPOSE. TO THE MAXIMUM EXTENT PERMITTED BY APPLICABLE LAW, IN NO EVENT SHALL THE COMPANY BE LIABLE FOR ANY SPECIAL, INCIDENTAL, INDIRECT, OR CONSEQUENTIAL DAMAGES WHATSOEVER (INCLUDING, WITHOUT LIMITATION, DAMAGES FOR LOSS OF BUSINESS PROFITS, BUSINESS INTERRUPTION OR ANY OTHER PECUNIARY LOSS) ARISING OUT OF THE USE OF THE PRODUCTS PURCHASED, EVEN IF THE COMPANY HAS BEEN ADVISED OF THE POSSIBILITY OF SUCH DAMAGES. THE COMPANY'S LIABILITY TO THE PURCHASER (OR ANY OTHER PARTY) HEREUNDER, IF ANY, SHALL IN NO EVENT EXCEED THE PURCHASE PRICE OF THE PRODUCTS PAID TO THE COMPANY.
Corporate Headquarters
Corporate Voice 973-839-1011 - Fax 973-839-1976 / International Voice +1 973-839-8821 - Fax +1 973-839-4982
middleatlantic.com - info@mmiddleatlantic.com
Middle Atlantic Canada
Voice 613-836-2501 - Fax 613-836-2690 / middleatlantic.ca - customerservicecanada@midgeatlantic.ca
Factory Distribution
USA: NJ - CA - IL Canada: ON - BC
At Middle Atlantic Products we are always listening. Your comments are welcome.
Middle Atlantic Products is an ISO 9001 and ISO 14001 Registered Company.