
OXG1T230NVND - Wine cellar ARTEVINO - Free user manual and instructions
Find the device manual for free OXG1T230NVND ARTEVINO in PDF.

| Product type | Single-zone wine cellar |
| Brand | ArteVino |
| Model | OXG1T230NVND |
| Dimensions (H x W x D) | 1825 x 680 x 720 mm |
| Net weight | 86 kg |
| Door type | Glass door |
| Power supply | 220-240 V, 50 Hz, grounded outlet with 30 mA residual current circuit breaker |
| Recommended ambient temperature range | 0 °C to 30 °C |
| Set temperature range | 9 °C to 15 °C (recommended setting 10-14 °C) |
| Storage capacity | Up to 72 Bordeaux Tradition bottles per storage shelf |
| Number of shelves | Multiple adjustable shelves (12-bottle models) |
| Main functions | Electronic temperature control, digital display, temperature alarm, hygrometry system, sliding and display shelves, reversible door |
| Refrigerant | R600a (isobutane, flammable) |
| Maintenance and cleaning | Dust the condenser twice a year, annual interior cleaning with non-aggressive product, clean the seal with clean water |
| Safety | Mandatory grounding, 30 mA residual current circuit breaker, do not use mechanical defrosting devices, do not store explosive substances |
| Spare parts and repairability | Spare parts available for 11 years, minimum 2-year warranty on parts |
| General information | Installation with 7 cm clearance at rear, wait 48 hours before first use, domestic use only |
Frequently Asked Questions - OXG1T230NVND ARTEVINO
User questions about OXG1T230NVND ARTEVINO
0 question about this device. Answer the ones you know or ask your own.
Ask a new question about this device
Download the instructions for your Wine cellar in PDF format for free! Find your manual OXG1T230NVND - ARTEVINO and take your electronic device back in hand. On this page are published all the documents necessary for the use of your device. OXG1T230NVND by ARTEVINO.
USER MANUAL OXG1T230NVND ARTEVINO
2-CEM Directive 2004/108/CE
Norme 62233:2008
3- Environnement
Directive 2010/30/UE
Règlement 1060/2010

R600a
Comply with DEPARTMENT OF ENERGY - 10 CFR Part 430 - Energy Conservation Program: Energy Conservation Standards for Miscellaneous Refrigeration Products.
Welcome
You have just purchased an ARTEVINO product - thank you for your custom. We take particular care in manufacturing our products in terms of their design, ergonomics and ease of use.
We hope that you will be completely satisfied with this product.
Please note
The information contained in this document may be changed without warning.
ARTEVINO offers no guarantee for this product when it is used for purposes other than those for which it was designed. ARTEVINO shall not be held responsible for any errors contained in this manual or for any damage linked to or resulting from the supply, performance or use of this appliance.
This document contains original information, which is protected by copyright. All rights are reserved.
Photocopying, reproducing or translating this document, whether partially or completely, is strictly forbidden, without ARTEVINO's prior written consent.
This appliance is only designed for storing wine.
This appliance is not designed to be used as a built-in appliance.
It is not designed to be used by people (including children) with reduced mental, sensorial or physical abilities, or by people who have no experience or knowledge, unless they have first received instructions on how to use the machine or are supervised by a person responsible for their safety.
Children must be supervised to ensure that they do not play with the appliance.
If the power lead is damaged, it must be replaced by a special cable or unit available from the manufacturer or its customer service department.
WARNING:
-
Ensure that the air vents in the appliance's cavity and the flush-fitting structure are unobstructed.
-
Necessity to have the plug accessible after installation
-
Do not use mechanical devices or other means to speed up the defrosting process other than those recommended by the manufacturer.
-
Do not damage the refrigeration circuit.
-
Do not use electrical appliances inside the wine storage compartment, unless they have been recommended by the manufacturer.
-
Do not store in this appliance explosive substances such as aerosols containing flammable propellant gas.
This appliance is intended for domestic and similar applications such as:
-
kitchenettes reserved for staff of shops, offices and other professional environments;
-
gites and use by guests of hotels, motels and other environments which are residential in nature
-hotel rooms;
- the food service industry and other similar applications except for retail sale.
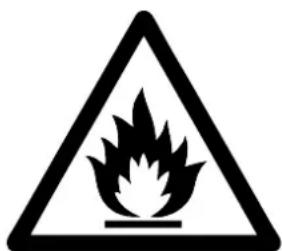
There is a name plate inside the cabinet. The name plate provides various technical information and safety notice with a yellow flame triangle label, name and chemical symbol of the refrigerant.
The refrigerator contains flammable refrigerant (R600a:iso-butane). Requirements to ensure gas safety and safe use of refrigerators: The refrigerator system behind and inside the refrigerator contains refrigerant. Do not allow any sharp objects must come into contact with the refrigeration system.
- Do not use electrical appliances inside the wine cabinet.
Childrend should be supervised to ensure that the refrigerator should be used properly.
Do not use the mechanical devices or other means to accelerate the defrosting process, unless they are of the type recommended bu the manufacturer.
Do not block the openings on the circumstances of the refrigerator.
- In case of having damaged the refrigerant circuit, do not use electric items or fire equipments nearby, and open all the windows to provide good ventilation. Please also contact your local maintenance agent to follow up
- Do not remove the bottom grill of the cabinet unless it is recommended by the manufacturer. Do not place directly the wine bottles without the grill.
The warning labels mentioned above should be kept throughout the life of the refrigerator. The user manual should be handed over to any person who would use or handle the refrigerator whenever the refrigerator would be transferred to another location and delivered to a recycling plant; - The use of an extension cord is not recommended.
-DANGER: Risk of child entrapment. Before you throw away your old wine cabinet: - Take off the doors
- Leave the shelves in place so that children may not easily climb inside.
Contents
Protecting the environment - Ecodesign . P 4
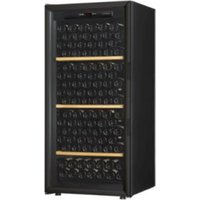
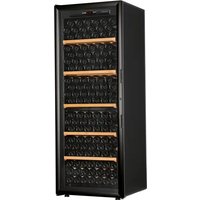
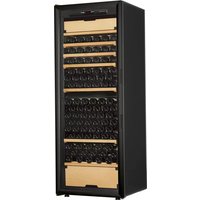
Description of your wine cabinet.. P 5
Some important facts about wine.. P 6
Power supply. P6
Installing your wine cabinet.. P 6-7
Door reversibility (glass door only). P 8-9
Loading and layout advice. P 10-11
Commissioning and temperature setting. P 12-13
Everyday maintenance of your wine cabinet. P 13
Operating faults.. P 14
Standards. P 14
Energy and technical features. P 15
Protecting the environment - Ecodesign
Spare parts for our appliances are available for 11 years. For further information, contact your stockist. For France, contact our customer service department. Contact details at www.artino.com
Disposing of packaging:
All packaging used by ARTEVINO is made from recyclable materials (except the expanded polystyrene high density base and the lower hinge protector).
After unpacking your cabinet, take the packaging to a refuse collection point. For the most part, it will be recycled.
In compliance with legislation relating to protecting and caring for the environment, your wine cabinet does not contain C.F.C.s or H.C.F.Cs.

To save energy:
- Install your wine cabinet in a suitable location (see page 7) and observe the recommended temperature ranges.
- Keep the door open for as short a time as possible.
- Ensure that the door seal is in good working order and that it is not damaged. If it is, contact your ARTEVINO retailer.
- We recommend that you fill your wine cabinet to at least 75% of its total capacity.
N.B.: Caring for the environment:
When replacing your wine cabinet, enquire at your local municipal refuse department in order to find out the suitable recycling procedure.
The refrigerant gases, substances and some parts contained in ARTEVINO wine cabinets are made up of recyclable materials which require a special disposal procedure to be followed.
Seal the lock to prevent children accidentally locking themselves inside the cabinet.
Disable any unusable appliances by unplugging them and cutting off the power lead.
Description of your wine cabinet
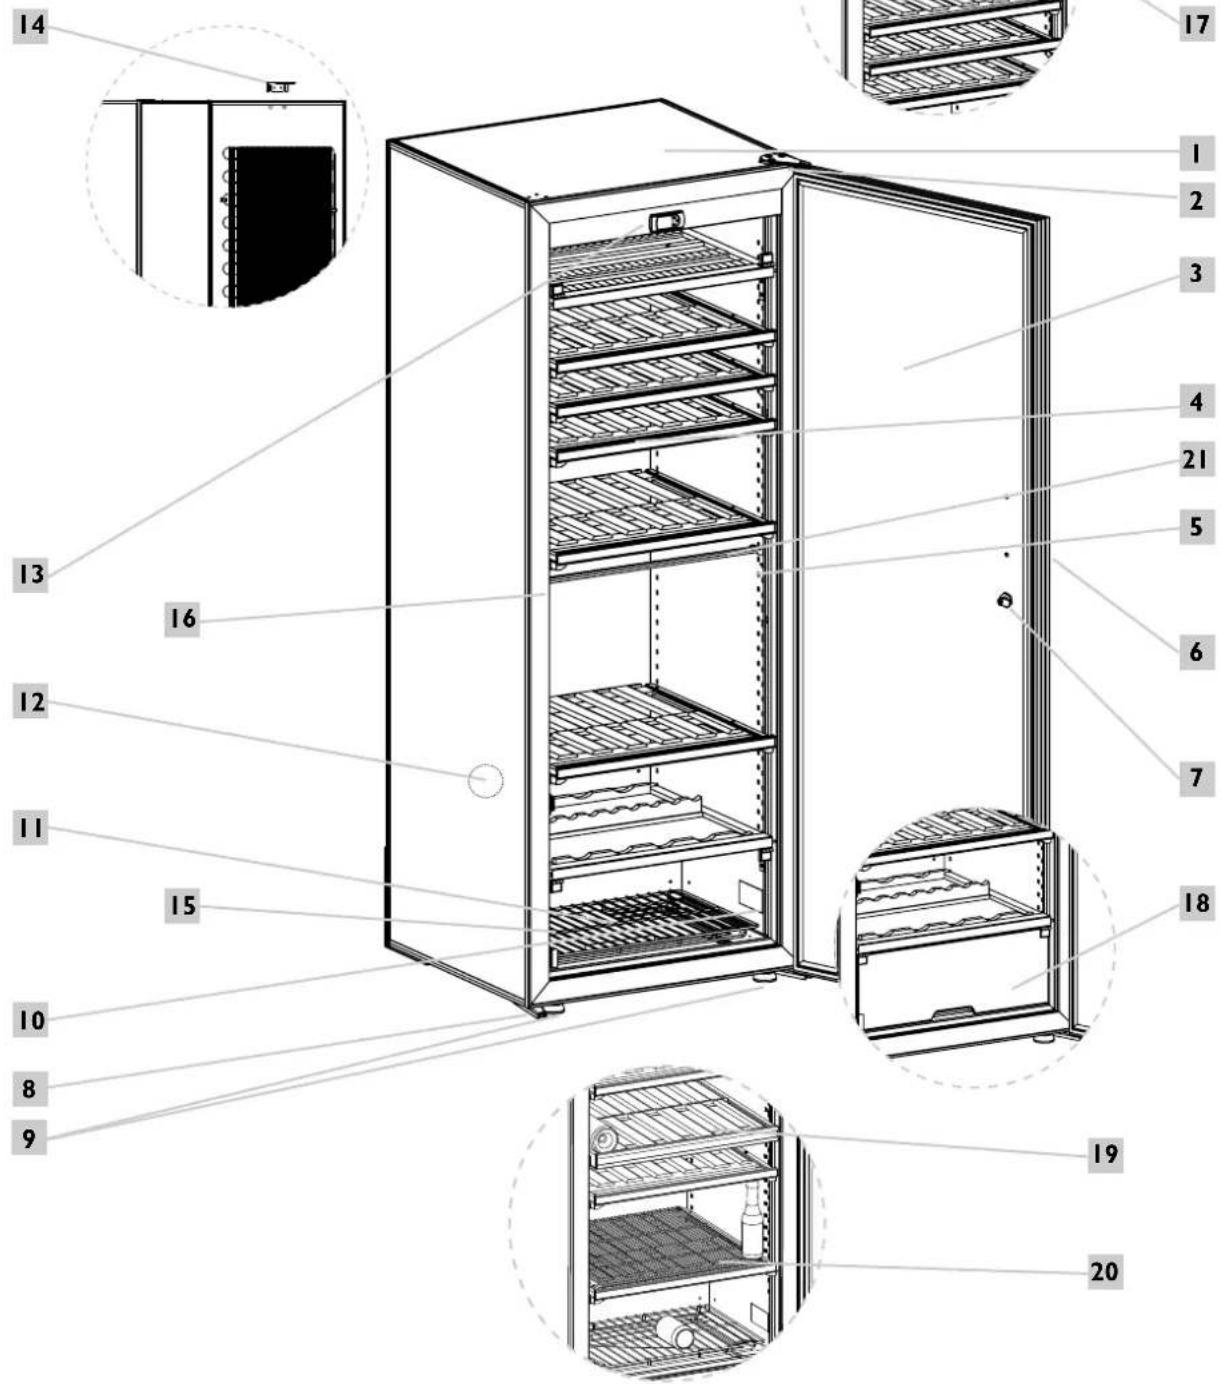
Cabinet body
9 Lower hinge (x2)
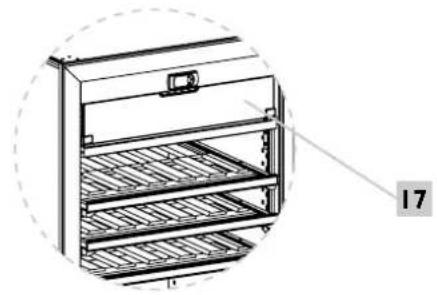
17 Red wine service compartment*
2 Upper hinge
10 Product identification label
18 Chilling compartment
Glass or solid door depending on model
Grid
19 Compartment separation shelf
Storage shelf Sliding shelf
12 Breather hole
20 Specific grid for beverages
Support strip for fixing shelf
13 Control panel
21 Cabinet bracing bar (do not remove) - large size IT, MT and 3T only
6 Handle
15 Conduate collection tray with outlet hole
7 Lock
16 Door catch
8 Adjustable feet (x2)
3-temperature models only ^**2T cabinet only
Some important facts about wine
Your ARTEVINO wine cabinet has been designed to guarantee optimal storage and/or serving conditions for your wine.
Wine is a complex product. It develops very slowly and requires specific conditions in order to reach its full potential.
All wines are stored at the same temperature. Only their serving temperatures differ.
This being the case, just like the natural cellars of wine producers, it is not so much the absolute value of the storage temperature that is important but its consistency. In other words, whatever temperature your cabinet is set at (between 10^ and 14^ for a maturing cabinet), your wine will be stored in ideal conditions provided that this temperature does not fluctuate.
IN ANY EVENT, IF YOU NOTICE A HUMIDITY OR TEMPERATURE FAULT INSIDE YOUR WINE CAFINET, BE AWARE THAT ONLY PROLONGED EXPOSURE TO ABNORMAL CONDITIONS IS HARMFUL TO YOUR WINES.
Power supply
For your personal safety, the wine cabinet must be correctly earthed.
Ensure that the socket is correctly earthed and that your installation is protected by a circuit breaker (30mA^*)
*Not applicable to some countries.
All work must be carried out by a qualified electrician.
Installing your wine cabinet
- When unpacking your cabinet, check that it is not damaged (signs of impact, buckling, marks).
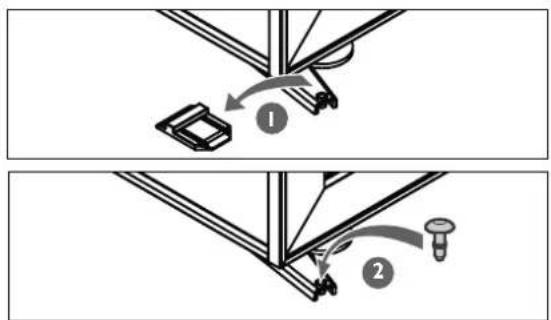
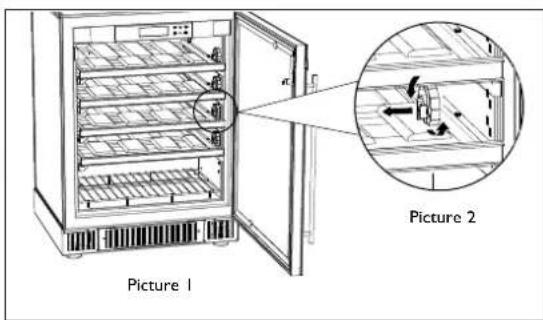
- Remove the protective elements found inside and outside your cabinet including the lower hinge protector (see diagram (I))
- Fit the cap (see diagram 2), found in the accessories bag, used for sealing the hole in the lower hinge.
- Open the door and check that the various elements are intact.
Protective wedges for transportation have been attached to each shelf. 2 wedges per shelf (Picture 1). Remove all of them using a rotating movement (Picture 2). You can retain these wedges and reuse them if you have to transport your wine cabinet over a long distance.
- Arrange the electric power lead so that it does not come into contact with any of the cabinet's components.
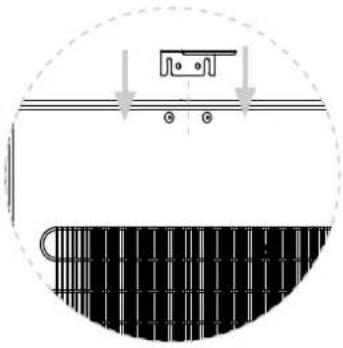
- Install the stop at the back of the cabinet (see diagram).
This allows a space of 7cm to be maintained between the wall and the rear of the cabinet. This space allows your cabinet's power consumption to be optimised.
- Place the 2 caps in the 2 holes at the top of the cabinet, ensuring that you do not push them all the way in.
- Slide the rear stop between the caps and the wall of the cabinet, then push the 2
caps all the way in.
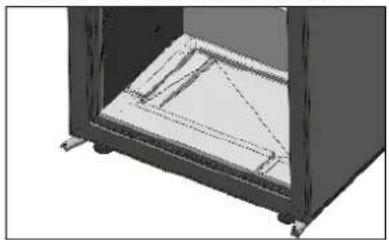
- If the appliance is not able to reduce humidity levels to the desire value, remove the black discharge pipe located at the base of the cabinet.
- Place your cabinet in the desired location.
Recommendation
If you leave your wine cabinet closed for long periods (>3 months) in an environment where the temperature is close to your cabinet's temperature setting (a difference of about < 5^ ) this could create an environment in which mould develops or cause your bottles' labels to peel off. Lack of dehumidification and air renewal can create significant humidity inside the cabinet. We strongly recommend that you regularly monitor your cabinet and clean it once a year.
The location that you choose for your cabinet must:
- be open to the outside and well ventilated (not in an enclosed cupboard, for example),
- allow there to be a minimum space of 7cm between the wall and the back of the cabinet,
- not be close to any source of heat,
- not be too damp. Max 85% ambient humidity (linen cupboard, laundry room, bathroom...).
- have a flat, stable floor.
- be supplied with standard accessible power (outlet that complies with standards in force in your country, earthed with circuit breaker).
It is forbidden to use an extension cord or adaptor.
Installation of two cabinets side by side
Caution: In the case of two side by side cabinets installed in extreme conditions (Temperature >30^ - Relative Humidity >70% ), in order to prevent condensation of stagnant air between the walls, please leave either a minimum space of 5 cm between the two cabinets, or fill the space with a foam sheet to remove the void.
Fitting the handle
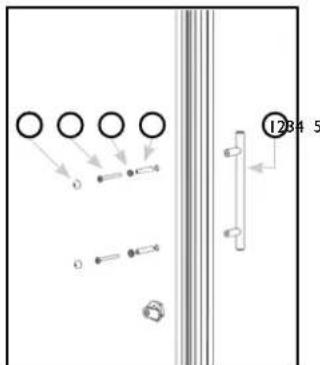
In order to correctly fit the handle on your wine cabinet's solid door, please follow these instructions.
Prepare the items required for assembly, supplied with your cabinet:
- The handle ①,
- 2 handle tubular supports ②
-2 washers ③
-2 screws ④
-2 caps ⑤.
You will also need a flathead screwdriver (not supplied)
Instructions :
I. Insert I washer on I screw.
2. Insert the handle tubular support then the screw in the hole provided on the inside of the wine cabinet door.
3. Use the screwdriver to screw the screw into the handle post and gently tighten.
4. Place the cap on the screw head.
5. Repeat this procedure for the other handle post.
Recommendation
To allow you to easily level your wine cabinet, it is fitted with 2 adjustable feet at the front.
Carry out final levelling of your cabinet (spirit level recommended).
WAIT 48 HOURS BEFORE PLugging IN YOUR APPLIANCE
When moving your cabinet, never tilt it more than 45^ , and always on its side (on the opposite side of the flexible lead).
Door reversibility (glass door only)
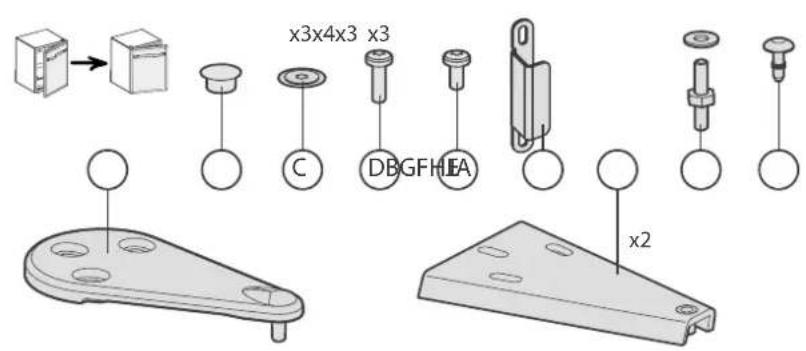
A Upper hinge
B Caps
C Caps
D Torx screw
E Hex screw
F Door catch
Lower hinge
H Door pin
Door pin cap
This allows you to change the direction in which the door opens. Follow the instructions below (example for changing a right-hand door into a left-hand door):
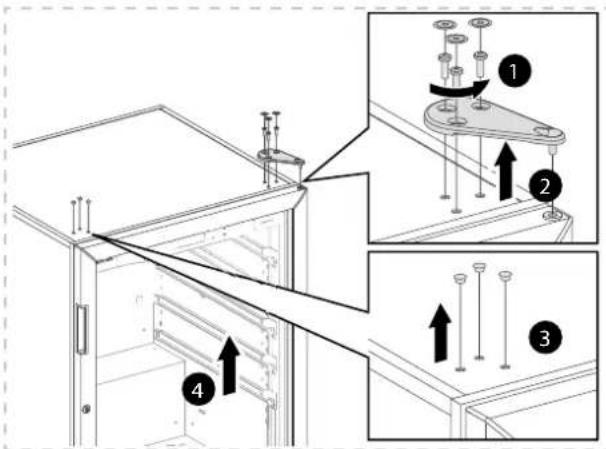
Unscrew the three screws using a "T25" Torx wrench.
2 Remove the upper hinge.
3 Carefully remove the caps using a thin blade.
4 Remove the cabinet door by opening it slightly, then lifting it upwards.
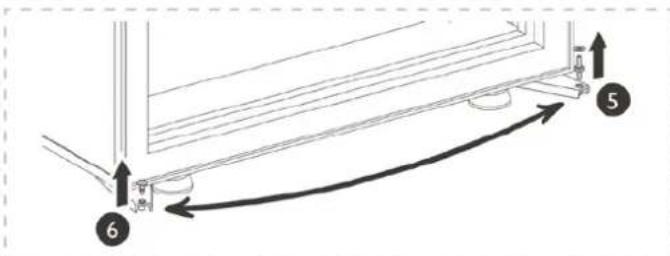
5 Unscrew the door pin.
6 Carefully remove the cap using a thin blade and assemble the pin in its place. Reposition the cap on the opposite side
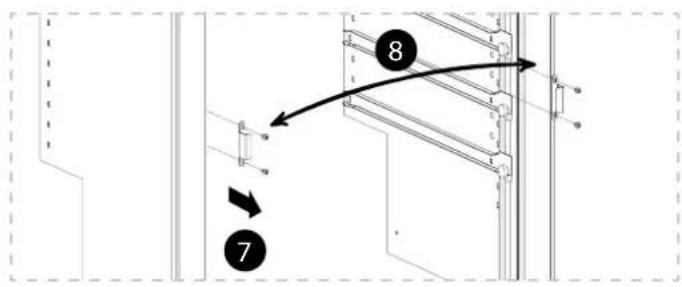
7 Unscrew the two screws and the door catch.
Unscrew the two screws on the opposite side and remove the two washers.
8 Mount the door catch on the desired opening side, using screws.
Replace the washers, then the screws, on the side opposite the door catch.
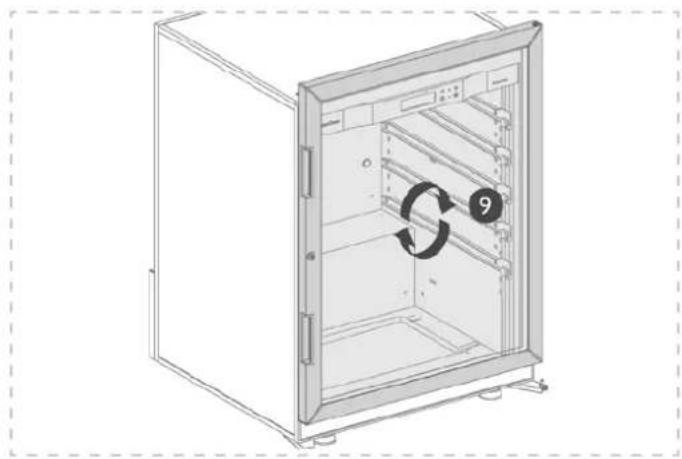
9 Turn the door through 180^
Warning: the door is very heavy. Take any necessary precautions to ensure that you do not injure yourself or drop it.
10 Put the door back on its pin.
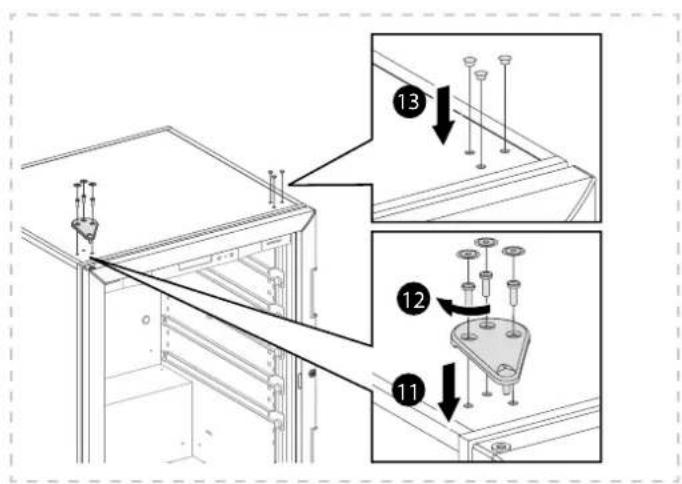
Put in place the upper hinge.
12 Screw the hinge so that the door is completely parallel to the cabinet. Check that the door seal adheres well to the cabinet (by closing the door), to ensure that it is completely air-tight.
13 Put in place the caps.
Loading and layout advice
Recommendation
We strongly recommend that you do not leave your wine bottles:
- Wrapped in tissue paper inside your EuroCave wine cabinet. Tissue paper does not tolerate ambient humidity in the long-term. The saturated paper will stick to your bottle labels and damage them.
- Stored in cardboard packaging or a wooden case in your EuroCave wine cabinet, in order to encourage maximum air flow around the bottles and prevent the packaging from deteriorating, which could eventually contaminate your wine bottles.
Each shelf can be used as a storage shelf, sliding shelf or display shelf. The shelves in your cabinet have 12 recesses, allowing your bottles to be stored safely.
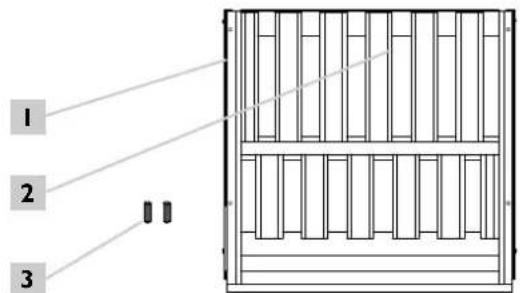
Runners (x2)
2 Shelf - 12 recesses
3 Dowels (x2)
Shelf specially developed for wine cabinets in the Oxygen range.
14 dowel pins supplied in the accessories bag.

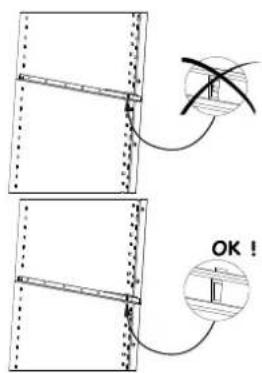
Diagram I
Installing a shelf in storage version:
To install bottles on a storage shelf, proceed as follows:
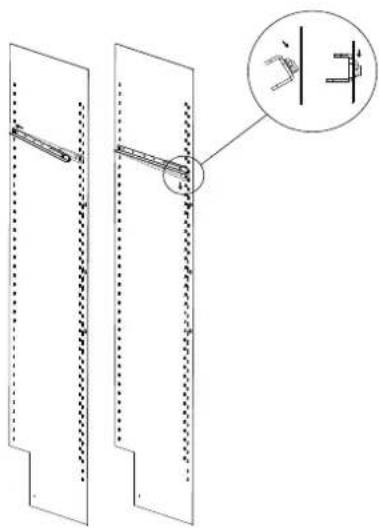
I. Insert 2 runners in the shelf support strips. For each shelf, position one runner on the right and one runner on the left (see diagram 1). Ensure that the runners are correctly fixed in their housing (see diagram 2)
2. Place the shelf in the 2 runners. (see diagram 3)
3. Place a locking dowel in each of the 2 holes located at the front of the shelf, in the upper section. These pins then fix the shelf with respect to the runner and prevent any unwanted movement.
4. Start by placing bottles in each recess of the back row with the base of the bottle towards the back.
5. Continue by placing the bottles in the opposite direction on the front row.
6. Continue stacking the bottles, ensuring that no bottles touch the back wall.
7. A storage shelf can support a maximum of 6 rows of 12 bottles, i.e. 72 traditional Bordeaux bottles (97 kg).
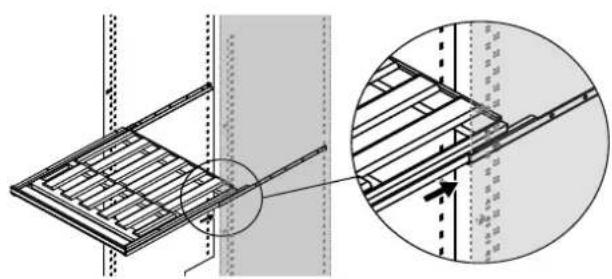
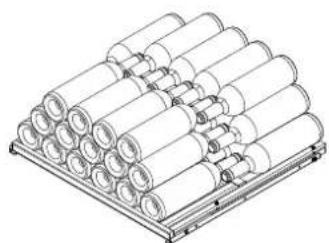
Diagram 3Diagram 2
N.B: For optimal use of your storage shelf, attach the rubber studs to the rear of the shelf, one on the left, the other on the right, ensuring that no bottles touch the back wall.
Installing a shelf in display version:
To install bottles on a display shelf, proceed as follows:
I. Insert 2 runners in the shelf support strips. For each shelf, position one runner on the right and one runner on the left (see diagram I and 2).
2. Place the shelf in the 2 runners. (see diagram 3)
3. Place a locking dowel in each of the 2 holes located at the front of the shelf, in the upper section. These pins then fix the shelf with respect to the runner and prevent any unwanted movement.
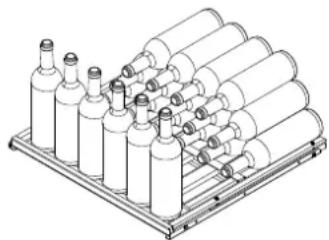
4. Start by placing bottles in each recess of the back row with the base of the bottle towards the back (6 traditional Bordeaux bottles).
5. Continue stacking the bottles on the back row (6 + 6 + 6 + 6 = 24 traditional Bordeaux bottles), ensuring that no bottles touch the back wall.
6. To display your bottles, place them vertically at the front of the shelf (maximum capacity : 6 traditional Bordeaux bottles)
7. In display version, the shelf has a maximum capacity of 30 traditional Bordeaux bottles.
Installing a shelf in sliding version:
To install bottles on a sliding shelf, proceed as follows
I. Insert 2 runners in the shelf support strips. For each shelf, position one runner on the right and one runner on the left. (see diagram I and 2).
2. Place the shelf in the 2 runners. (see diagram 3)
3. Place a locking dowel in each of the two holes located at the back of the shelf, in the upper section. These pins prevent the shelf from sliding all the way out of the cabinet
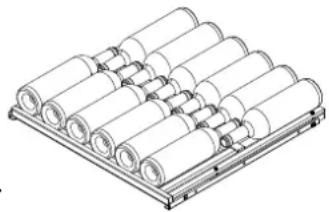
4. Start by placing bottles in each recess of the back row with the base of the bottle towards the back.
5. Continue by placing the bottles in the opposite direction on the front row.
6. A sliding shelf can only hold a single row of bottles (maximum of 12 traditional Bordeaux bottles).
7. In the case of a mixed layout, for optimal accessibility, we recommend that you place the sliding shelves in the central section of the appliance.
NEVER PULL OUT MORE THAN ONE LOADED SLIDING SHELF AT A TIME.
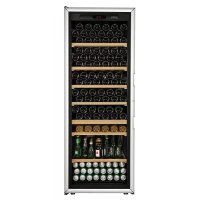
Installing the specific grid for beverages (only available on the 2 temperatures model - OXY2TVD6COUS)
I. Place a universal ArteVino shelf in the beverage center.
2. Place the grid on the ArteVino shelf (see diagram 4).
3. Install your bottles and cans upright on the grid.
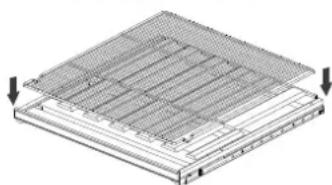
Diagram 4
NB: Additional information, for the small model only.
The small model is delivered with 2 shelves. I shelf fixed on runners + I shelf placed on 2 fixed rack support pins.
To change the latter to sliding or display version,
- Remove the shelf from the cabinet,
- Remove the 2 rack support pins,
Take the 2 runners supplied with the cabinet, - Insert the 2 runners in the desired location, in the shelf support strips (see diagram 1 and 2),
- Then follow the installation stages provided in the previous paragraphs.
If you do not have enough bottles to fill your wine cabinet, it is preferable to spread the load over the entire cabinet rather than placing bottles "all at the top" or "all at the bottom". For optimal performance, we recommend that you use the cabinet at over 75% of its capacity.
Commissioning and temperature setting
Commissioning
After waiting 48 hours, plug in your wine cabinet, having checked that your socket is correctly supplied with power
(presence of correct sized fuses, circuit breaker in working order. If need be, plug in another electrical appliance to check the power supply).
Humidity
Your cabinet is fitted with an exclusive ARTEVINO system allowing you to recreate inside your wine cabinet the level of humidity required to effectively seal your bottles' corks. When installing your cabinet, it is important to pour the equivalent of one glass of water onto the floor of the cabinet to reach an optimal hygrometry rate.
Temperature setting
Description of the control panel
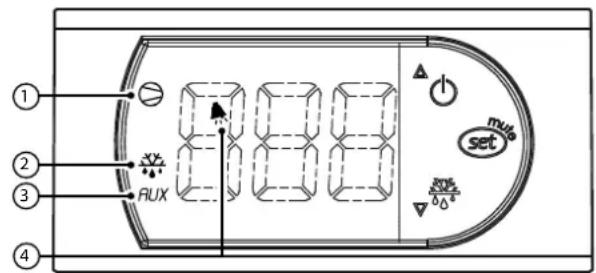
- Temperature display: displays the actual temperature inside your wine cabinet. It is therefore necessary to wait before your new setting takes effect.
Status lights:
Compressor ① : indicates that the compressor is operating. When this flashes, it means that the compressor is going to start up in a few minutes (technical delay).
Defrosting cycle 2+ : indicates that an automatic defrosting cycle is underway.
Heater 3:indicates that the heater is operating.
Alarm 4: informs you that there is an abnormally high or low temperature inside the wine cabinet.
Commissioning the control panel
By default, the control is in the OFF position. To switch on the cabinet, press and hold the button for several seconds until just the temperature is displayed.
To put the cabinet on standby, press and hold down the button for several seconds. The display switches between the internal temperature and the OFF display (the cabinet is no longer operating, only the display is active).
To reactivate the cabinet back on, press and hold down the button for several seconds until just the temperature is displayed.
To set the temperature of your wine cabinet
The temperature of your wine cabinet is set entirely from the control panel.
Single-temperature cabinets:
- Press and hold down the SET button for a few seconds until the set temperature (STI) flashes. The default temperature setting is 12^ (ideal maturing temperature). However, the temperature can be set from 9^ - 15^ .
- The recommended temperature setting range for wine storage is 10^ - 14^ .
- Set the desired temperature using the and buttons.
- Confirm your setting by pressing the SET button. If you do not confirm by pressing this key, the change in temperature setting will not take effect.
Your wine cabinet must be placed in a room with a temperature of 0^ - 35^ for solid door and 0^ - 30^ for Glass door.
2 temperatures model:
BEVERAGE CENTER COMPARTMENT (BOTTOM):
- Press and hold the SET button for a few seconds until the SET temperature (STI) flashes. The default temperature setting is 3^ . However, the temperature can be set from 3^ to 6^
- Set the desired temperature using the and buttons.
- Maintain pressure on the SET button for a few seconds. This confirms the temperature setting of the lower compartment of the cabinet (Beverage center) and allows you to access the temperature setting (ST2) of the upper compartment (aging compartment).
AGING COMPARTMENT (TOP):
- The default temperature is 12^ C . However,the temperature can be set from 10^ C à 14^ C
- Set the desired temperature using the and buttons.
- Confirm your setting by pressing the SET button. If you do not confirm by pressing this key, the change in temperature setting will not take effect.
Your wine cabinet must be placed in a room with a temperature of 12^ - 25^ .
3-temperature cabinets:
ZONE IN THE CENTRE OF THE CABINET OR MATURING ZONE:
- Press and hold down the SET button for a few seconds until the set temperature (STI) flashes. The default temperature setting is 12^ (ideal maturing temperature). However, the temperature can be set from 10^ - 14^ .
- Set the desired temperature using the and buttons.
- Maintain pressure on the SET button for a few seconds. This confirms the temperature setting in the maturing zone and allows you to access the temperature setting of the red wine service zone (ST2).
RED WINE SERVICE ZONE:
The default temperature setting is 18^ . However, the temperature can be set from 15^ - 20^ .
- Set the desired temperature using the and - buttons.
- Confirm your setting by pressing the SET buttons. If you do not confirm by pressing this key, the change in temperature setting will not take effect.
N.B.: the temperature of the lower compartment (chilling compartment) results from the temperature set in the maturing zone. The temperature gradient between these zones is 4 - 6^ .
N.B.: to function correctly, your cabinet must be placed in a room with a temperature of 12 - 30 °C.
Multi-temperature cabinets:
LOWER ZONE:
- Press and hold down the SET buttons for a few seconds until the set temperature (STI) flashes. The default temperature setting is 8^ . However, the temperature can be set from 6^ - 10^ .
- Set the desired temperature using the and buttons.
- Maintain pressure on the SET buttons for a few seconds. This confirms the temperature setting in the lower zone of the cabinet and allows you to access the temperature setting of the upper zone (ST2).
UPPER ZONE:
The default temperature setting is 18^ . However, the temperature can be set from 15^ - 20^ .
- Set the desired temperature using the and buttons.
- Confirm your setting by pressing the SET buttons. If you do not confirm by pressing this key, the change in temperature setting will not take effect.
N.B.: to function correctly, your cabinet must be placed in a room with a temperature of 12 - 30 °C.
Alarms
If the temperature inside the cabinet is 6^ above or below the temperature setting, for over 3 hrs, the control activates the alarm and the warning light appears.
NB: If you have loaded your cabinet with a large number of bottles, it can take several hours for your wine cabinet's temperature to stabilise. The warning light may then appear. Wait a while then check again. If the alarm warning light does not disappear, contact your retailer.
When commissioning your cabinet, or after significant changes to the temperature setting, it can take several hours for your wine cabinet to stabilize and display the new desired temperature. Wait a few days. If the temperature does not stabilise, contact your retailer.
Everyday maintenance of your wine cabinet
Your ARTEVINO cabinet is a tried and tested appliance. The following few operations will allow your cabinet to perform at its best for many years to come.
1) Clean the water drain at the bottom of the wine cabinet. Pay attention that nothing is blocking this drain.
2) Regularly vacuum (twice a year) the condenser (black metal grill attached to the back of your wine cabinet).
3) Once a year, thoroughly clean the inside of your wine cabinet, remembering to unplug it after removing your bottles (use a gentle cleaning product and water, remember to rinse well and then dry it with a soft rag).
4) It is often necessary to clean the door seal. Using unsuitable cleaning products can cause premature ageing of the seals. Certain rules must therefore be followed: whenever you clean the seal, always rinse off any cleaning product with clear water. All traces of cleaning product must be removed from the seal. ARTEVINO only recommends using a mild soapy solution. If this proves insufficient, it is possible to occasionally use an ethanol-based solution, provided that the concentration used is less than 10% and that the seal is then rinsed thoroughly with clear water.
Operating faults
When starting up
- The compressor does not work > check that the wall socket is supplied with power by plugging in another electrical appliance.
- The compressor never stops > put your hand on the condenser (grill located on the back of the appliance). If the condenser is cold, contact your retailer.
If the condenser is hot, set your cabinet (ST1) to the maximum temperature setting value. If the compressor still does not stop, contact your retailer.
- The wine cabinet does not switch on > contact your dealer
I ANY WORK CARRIED OUT BY TECHNICAL SERVICES NOT APPROVED BY ARTEVINO I SHALL RENDER THE WARRANTY NULL AND Void.
| THE USE OF A GLASS DOOR CAN AFFECT THE PERFORMANCE OF YOUR WINE | | --- | --- | | CABINET IN SOME EXTREME TEMPERATURE CONDITIONS.
Minimum duration of guarantee offered by the manufacturer: 2 years parts.
Standards
Your product meets the following standards:
I - Safety Directive 2006/95/CE
Standard EN60335-1:2012+AII:2014
EN60335-2-24/2010
2-EMC Directive 2004/108/CE
Standard 62233:2008
3- Environment
Directive 2010/30/UE
Regulation 1060/2010

R600a
Depending on the country, ArteVino wine cabinets may contain flammable refrigerant gas (R600a: ISO BUTANE).
Technical features
| Oxygen | |||||||
| Type of door | Height Wmm mm | dth Depth Weight when mm kg T° mini °C/°F T° | empty Recommended to maxi °C/°F | temperature range | |||
| 1-temperature | |||||||
| OXGIT | Solid door 18 | 680 725 720 / 32 | 35 / 95 | ||||
| Glass door | 1825 680 | 720 86 0 / 32 | 30 / 86 | ||||
| OXMIT | Solid door 14 | 680 725 630 / 32 | 35 / 95 | ||||
| Glass door | 1480 680 | 720 74 0 / 32 | 30 / 86 | ||||
| OXPIT | Solid door | 960 | 680 | 725 | 45 | 0 / 32 | 35 / 95 |
| Glass door 960 | 680 | 720 52 0 / 32 | 30 / 86 | ||||
| Multi temperature | |||||||
| OXGMT | Solid door | 1825 | 680 | 725 | 72 | 12 / 54 | 30 / 86 |
| Glass door | 1825 | 680 | 720 | 86 | 12 / 54 | 30 / 86 | |
| OXMMT | Solid door | 1480 | 680 | 725 | 63 | 12 / 54 | 30 / 86 |
| Glass door | 1480 | 680 | 720 | 74 | 12 / 54 | 30 / 86 | |
| OXPMT | Solid door | 960 | 680 | 725 | 45 | 12 / 54 | 30 / 86 |
| Glass door | 960 | 680 | 720 | 52 | 12 / 54 | 30 / 86 | |
| 3-temperatures | |||||||
| OXG3T | Solid door | 1825 | 680 | 725 | 79 | 12 / 54 | 30 / 86 |
| Glass door | 1825 | 680 | 720 | 93 | 12 / 54 | 30 / 86 | |
| OXM3T | Solid door | 1480 | 680 | 725 | 70 | 12 / 54 | 30 / 86 |
| Glass door | 1480 | 680 | 720 | 81 | 12 / 54 | 30 / 86 | |
| 2-temperatures | |||||||
| OXG2T | Solid door | 1825 | 680 | 725 | 72 | 12 / 54 | 25 / 77 |
| Glass door | 1825 | 680 | 720 | 86 | 12 / 54 | 25 / 77 | |
Setting accuracy: +/-1,5^/3^ , Display accuracy: +/-1,5^/3^
According to delegated regulation (EU) 2019/2016 of the European Commission, access energy data about our appliances on the EPREL database by scanning the QR code visible on your appliance's energy label.
Data relating to American energy consumption regulations
| REFERENCEModel Type of door | United States1 115V 60Hz - R600a gas | ||
| Annual energy consumptionkWh/yr | |||
| OXGIT230NPD/ NPG Single temperature Solid Door 172 | |||
| OXGIT230PPD/ PPG Single temperature Solid Door 172 | |||
| OXGIT230NVSD/NVND Single temperature Glass Door 212 | |||
| OXMIT182NPD Single temperature Solid Door 143 | |||
| OXMIT182PPD Single temperature Solid Door 143 | |||
| OXMIT182NVSD/NVND Single temperature Glass Door 172 | |||
| OXPIT98NPD Single temperature Solid Door 114 | |||
| OXPIT98PPD Single temperature Solid Door 114 | |||
| OXPIT98NVSD/NVND Single temperature Glass Door 143 | |||
| OXGMT225NPD/ NPG Multi temperature Solid Door 172 | |||
| OXGMT225NVSD Multi temperature Glass Door 212 | |||
| OXMMT177NPD Multi temperature Solid Door 143 | |||
| OXMMT177NVSD Multi temperature Glass Door 172 | |||
| OXPMT98NPD Multi temperature Solid Door 114 | |||
| OXPMT98NVSD Multi temperature Glass Door 143 | |||
| OXG3T199NPD/ NPG 3-temperatures | Solid Door | 172 | |
| OXG3T199NVSD/NVND 3-temperatures | Glass Door | 212 | |
| OXM3T15INPD 3-temperatures | Solid Door 143 | ||
| OXM3T15INVD/NVND 3-temperatures | Glass Door | 172 | |
| OXG2T206NPD/ NPG 2-temperatures | Solid Door | 212 | |
| OXG2T206NVSD 2-temperatures | Glass Door | 252 | |
Comply with DEPARTMENT OF ENERGY - 10 CFR Part 430 - Energy Conservation Program: Energy Conservation Standards for Miscellaneous Refrigeration Products.
Willkommen
2-CEM Directiva 2004/108/CE
Norma 62233:2008
3-Medio Ambiente
Directiva 2010/30/UE
Reglamento 1060/2010
R600a
ARTEVINO是IImdnyelfEoFpHJnOuRHOHAnOLOUHnOg,iHgHnOuHcHnOuHcHnOuHcHnOuHcHnOuHcHnOuHcHnOuHcHnOuHcHnOuHcHnOuHcHnOuHcHnOuHcHnOuHcHnOuHcHnOuHcHnOuHcHnOuHcHnOoHcHnOuHcHnOuHcHnOuHcHnOuHcHnOuHcHnOuHcHnOuHcHnOuHcHnOuHcHnOuHcHnOuHcHnOuHcHnOuHcHnOuHcHnOuHcHnOuHcH
I 1
i
i
i
i
藻藻藻藻藻藻藻藻藻藻藻藻藻藻藻藻藻藻藻藻藻藻藻藻藻藻藻藻藻藻藻藻藻藻藻藻藻藻藻藻藻藻藻藻藻藻藻藻藻藻藻藻藻藻藻藻藻藻藻藻藻藻藻藻藻藻藻藻
14の母香元义默士社贝
报备文件
Mgnt 430- n t s h: dngt e n t (Energy Conservation Standards for Miscellaneous Refrigeration Products)
Notes / Note / Hinweis / Notas / Opmerkingen / 注释 /
Notes / Note / Hinweis / Notas / Opmerkingen / 注释 /
Notes / Note / Hinweis / Notas / Opmerkingen / 注释 /
Notes / Note / Hinweis / Notas / Opmerkingen / 注释 / 썼모

03/2022-10001460-GroupeEuroCave-Villeurbanne,France-RCSLyonB320316995-Photosarenotcontractuallybinding./sieneneproctycknngkucuoyi

- Welcome
- Please note
- WARNING:
- Contents
- Protecting the environment - Ecodesign
- Disposing of packaging:
- To save energy:
- N.B.: Caring for the environment:
- Description of your wine cabinet
- Some important facts about wine
- Power supply
- Installing your wine cabinet
- Recommendation
- Installation of two cabinets side by side
- Fitting the handle
- Instructions :
- WAIT 48 HOURS BEFORE PLugging IN YOUR APPLIANCE
- Door reversibility (glass door only)
- Loading and layout advice
- Installing a shelf in storage version:
- Diagram 3Diagram 2
- Installing a shelf in display version:
- Installing a shelf in sliding version:
- Installing the specific grid for beverages (only available on the 2 temperatures model - OXY2TVD6COUS)
- NB: Additional information, for the small model only.
- Commissioning and temperature setting
- Commissioning
- Humidity
- Temperature setting
- Status lights:
- Commissioning the control panel
- To set the temperature of your wine cabinet
- Single-temperature cabinets:
- temperatures model:
- AGING COMPARTMENT (TOP):
- 3-temperature cabinets:
- RED WINE SERVICE ZONE:
- Multi-temperature cabinets:
- LOWER ZONE:
- UPPER ZONE:
- Alarms
- Everyday maintenance of your wine cabinet
- Operating faults
- When starting up
- Standards
- Technical features
- Data relating to American energy consumption regulations
- Willkommen
- 报备文件
Brand : ARTEVINO
Model : OXG1T230NVND
Category : Wine cellar